Solving LinkedIn Queens Game using backtracking
 Shanmukha
Table of contents
As a weekend project I thought of solving LinkedIn’s Queens game programmatically. (Well idea was to make it solve using ChatGPT, but too many un-knows and thought of solving using classic, vanilla backtracking)
For those of you who haven't played (or don't even know) Queens game:
How to play
Goal: Place exactly 1 Q in each row, column, and color region.
Rule: Q cannot touch each other, not even diagonally.
The idea was:
Take a screenshot containing the puzzle
Our code should automatically detect the puzzle grid
Crop or rebuild the puzzle cleanly
Convert the puzzle to 2D array
(solve the classic n-queens problem using backtracking)
Add/Modify the Queens constraints to the N Queens problem
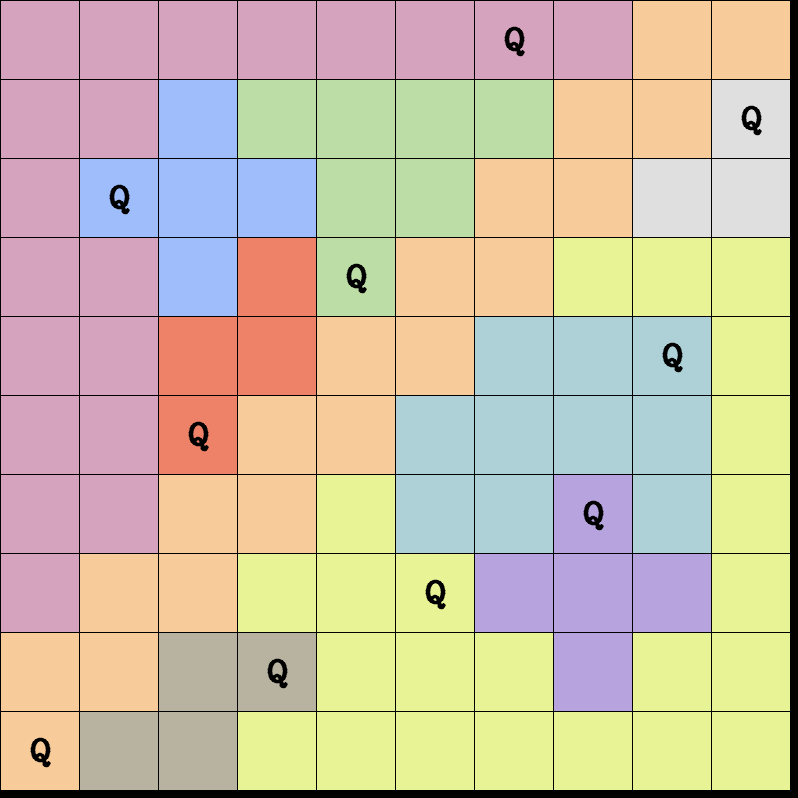
Using the solution, regenerate the image with Queens placed
Enter OpenCV: Detecting and Processing the Puzzle Image
I knew the first step was to process the puzzle image using OpenCV. I have zero to none knowledge in OpenCV, so I started with basic questions to GPT like:
How to load image
import cv2 as cv
import numpy as np

# Reading an image
original = cv.imread("<file_name">)
cv.imshow("original", original)
How to draw a line, circle, rectangle, text on the same image
# Drawing a line
line = cv.line(original, (original.shape[1]//2, original.shape[0]//2), (0,0) , (0,255,0), thickness=2)
cv.imshow("line", line)

# Drawing other shapes
circle = cv.circle(line, (line.shape[1]//2, line.shape[0]//2), 50, (0,0,255), thickness=2)
rect = cv.rectangle(circle, (10,10), (circle.shape[1]//2, circle.shape[0]//2), (255,0,0), thickness=2)
text = cv.putText(rect, "Hi", (rect.shape[1]//2, rect.shape[0]//2), cv.FONT_HERSHEY_SIMPLEX, 1, (255,255,255), thickness=2)

cv.imshow("all shapes", text)
Cropping image
# its essentially selecting the pixels we need from the entire image
cropped = original[0:original.shape[1]//2, 0:original.shape[0]//2]
cv.imshow("cropped", cropped)
How to detect contours
by default OpenCV reads images as BGR, as opposed to traditional RGB
# Its best to convert image to grayscale
# and add a bit of blur for better contour detections
# since our image is mostly a grid we dont need blur

# by default OpenCV reads images as BGR
# as opposed to traditional RGB
gray = cv.cvtConvert(original, cv.COLOR_BGR2GRAY)
contours, _ = cv.findContours(gray, cv.RETR_TREE, cv.CHAIN_APPROX_NONE)
Combining the basics
Read the image
Convert to Grayscale
Find contours, sort them and pick the largest (I picked second largest since the 1st was always the bounding box of original image)
Crop to just the puzzle
Again find contours, because now our image only contains the puzzle grid
Get the number of cells
Iterate over each cell and take average color and assign a number for each color
original = cv.imread(file_name)
cv.imwrite("solution/original.png", original)

gray = cv.cvtColor(original, cv.COLOR_BGR2GRAY)

contours, _ = cv.findContours(gray, cv.RETR_TREE, cv.CHAIN_APPROX_NONE)
contours = sorted(contours, key=cv.contourArea, reverse=True)

# fix the 1 here!!!
x, y, w, h = cv.boundingRect(contours[1])

# Crop the grid area from the image
grid = original[y:y+h, x:x+w]

cv.imwrite("solution/grid.png", grid)

gray = cv.cvtColor(grid, cv.COLOR_BGR2GRAY)
cv.imwrite("solution/gray-grid.png", gray)

contours, _ = cv.findContours(gray, cv.RETR_TREE, cv.CHAIN_APPROX_NONE)
contours = sorted(contours, key=cv.contourArea)

total_cells = len(contours) - 2
grid_size = int(math.sqrt(total_cells))
if total_cells != grid_size**2:
    print("Unable to detect full grid! Aborting")

cell_width = w // grid_size
cell_height = h // grid_size

colors = []

board = []
color_index = 1
color_map = {}
reverse_color_map = {}
padding = 10
for i in range(grid_size):
    row = []
    for j in range(grid_size):
        # Calculate cell coordinates
        cell_x = j * cell_width
        cell_y = i * cell_height

        padding = 15
        cell = grid[cell_y+padding:cell_y+cell_height-padding, cell_x+padding:cell_x+cell_width-padding]

        # Get the average color of the cell
        avg_color = cell.mean(axis=0).mean(axis=0)
        avg_color = avg_color.astype(int)
        avg_color = tuple(avg_color)

        # Append the color in RGB format
        # row_colors.append(tuple(avg_color))
        if avg_color not in color_map:
            color_map[avg_color] = str(color_index)
            reverse_color_map[str(color_index)] = avg_color
            color_index += 1
        row.append(color_map[avg_color])

    board.append(row)
| Original | Grid | Grayscale |
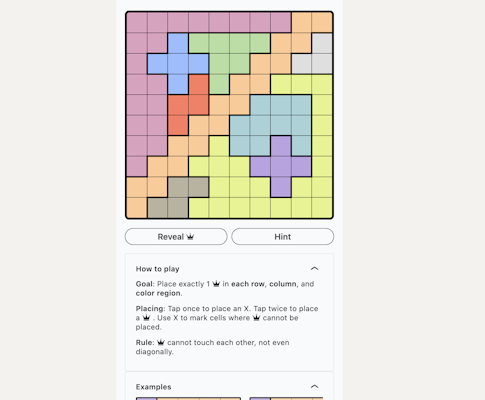 | 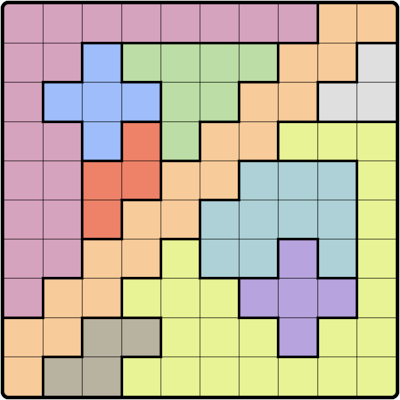 | 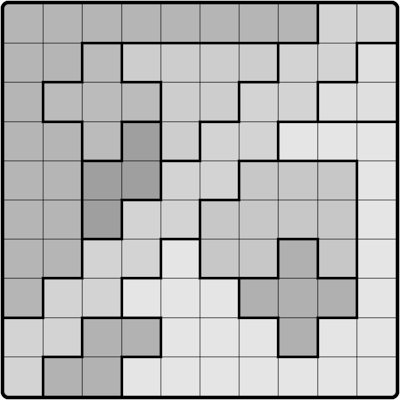 |
Board
|1,1,1,1,1,1,1,1,2,2|
|1,1,3,4,4,4,4,2,2,5|
|1,3,3,3,4,4,2,2,5,5|
|1,1,3,6,4,2,2,7,7,7|
|1,1,6,6,2,2,8,8,8,7|
|1,1,6,2,2,8,8,8,8,7|
|1,1,2,2,7,8,8,9,8,7|
|1,2,2,7,7,7,9,9,9,7|
|2,2,10,10,7,7,7,9,7,7|
|2,10,10,7,7,7,7,7,7,7|
Solving the N-Queen problem
Here is the solution to classic N Queen problem using backtracking generated using ChatGPT
def is_safe(board, row, col, n):
    # Check this row on left side
    for i in range(col):
        if board[row][i] == 'Q':
            return False

    # Check upper diagonal on left side
    for i, j in zip(range(row, -1, -1), range(col, -1, -1)):
        if board[i][j] == 'Q':
            return False

    # Check lower diagonal on left side
    for i, j in zip(range(row, n), range(col, -1, -1)):
        if board[i][j] == 'Q':
            return False

    return True

def solve_nqueens_util(board, col, n):
    # If all queens are placed
    if col >= n:
        return True

    # Consider this column and try placing queens in all rows one by one
    for i in range(n):
        if is_safe(board, i, col, n):
            board[i][col] = 'Q'

            # Recur to place the rest of the queens
            if solve_nqueens_util(board, col + 1, n):
                return True

            # If placing queen at board[i][col] doesn't lead to a solution, then backtrack
            board[i][col] = '.'

    return False

def solve_nqueens(n):
    board = [['.' for _ in range(n)] for _ in range(n)]

    if not solve_nqueens_util(board, 0, n):
        return "No solution exists"

    return board

def print_board(board):
    for row in board:
        print(" ".join(row))

# Example usage:
n = 8
solution = solve_nqueens(n)
if solution != "No solution exists":
    print_board(solution)
else:
    print(solution)
Adding constraints for Queens
Our new is_safe method becomes:
def is_safe(original_board, board, row, col, queens_in_colors, n):
    # Check this row on left side
    for i in range(col):
        if board[row][i] == 'Q':
            return False

    # Check upper diagonal on left side
    if col - 1 >= 0 and row - 1 >= 0:
        if board[row-1][col-1] == "Q":
            return False

    if col - 1 >= 0 and row + 1 < n:
        if board[row+1][col-1] == "Q":
            return False

    for i in range(row):
        if board[i][col] == "Q":
            return False

    # same color shouldnt have one
    current_color = original_board[row][col]
    if queens_in_colors[current_color]:
        return False

    return True
Re-generating the Image with the Solution
Finally, its time to regenerate the image with Q placed on the cells
solved_board = solve_n_queens(board)

if len(color_map) != grid_size:
    print("Too many colors detected! Aborting")

# recreating grid
output_image = np.ones((h,w,3), dtype="uint8")

border_size = 1
letter_height = 10

for i in range(grid_size):
    for j in range(grid_size):
        cell_x = j * cell_width
        cell_y = i * cell_height
        color_pick = reverse_color_map.get(board[i][j])
        color = (int(color_pick[0]), int(color_pick[1]), int(color_pick[2]))

        output_image = cv.rectangle(output_image, (cell_x + border_size, cell_y + border_size), (cell_x + cell_width - border_size, cell_y + cell_height - border_size), color, thickness=-1)
        output_image = cv.line(output_image, (cell_x, cell_y), (cell_x + cell_width, cell_y ), (0,0,0), thickness=1)
        if solved_board[i][j] == "Q":
            output_image = cv.putText(output_image, "Q", (cell_x + cell_width // 2 - letter_height, cell_y + cell_height // 2 + letter_height), cv.FONT_HERSHEY_COMPLEX, 1, (0,0,0), lineType=cv.LINE_AA, thickness=2)

cv.imwrite("solution/solve.png", output_image)
Final Output
Subscribe to my newsletter
Read articles from Shanmukha directly inside your inbox. Subscribe to the newsletter, and don't miss out.
Written by

Shanmukha
Shanmukha
Tinkerer of code. Engineer at LinkedIn. With over 9 years of experience in the tech industry, I specialize in building robust mobile applications using Xamarin, web apps with React, and creating scalable backend solutions with .NET Core APIs (and a bit of Spring Boot). Every day brings a new inspiration, and I love the challenge of bringing ideas to life through innovative, practical solutions.