Terraform Resources Syntax, Behavior & Meta Argument
 Deepak Kumar
Table of contents
Terraform Resource Syntax
Terraform Resource Behavior
Resource Meta-Argument count
Resource Meta-Argument depends_on
Resource Meta-Argument for_each
Resource Meta-Argument lifecycle
Terraform Resource Syntax Behavior
We will review about Terraform resource behavior. Let understand by example.
Create a new file with version.tf and EC2_Instance.tf
#Terraform Block
terraform {
  required_version = " >= 1.4"
  required_providers {
    aws = {
        source = "hashicorp/aws"
        version = "~> 4.0"
    }
  }
}

#Provider Block
provider "aws" {
    region = "us-east-1"

}
#EC2 Instance Resource

resource "aws_instance" "My-EC2-VM" {
    ami = "ami-047a51fa27710816e"
    instance_type = "t2.micro"
    availability_zone = "us-east-1a"
    tags = {
      "Name" = "Web"
    }
}
Create Resource :- While doing Terraform Plan/apply you will see "+ create". It means that new resource will be created.


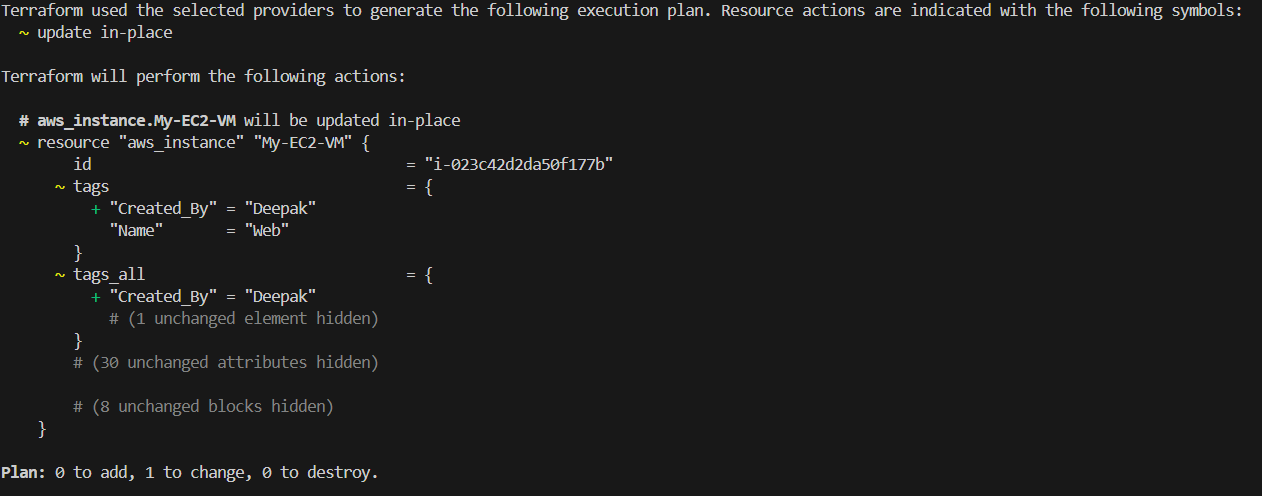
Update in-place Resources:- Lets modify EC2_Instance.tf, Add a new tag and run terraform plan/apply
  # Add this for EC2 Instance tags
      "Created_By" = "Deepak"
You will see "~ update in-place", It means that only changes will apply on existing resource.
Destroy and Re-create Resources :- Update availability zone in ec2_instance.tf
Terraform will destroy first then recreate instance in other availability zone
# Before
  availability_zone = "us-east-1a"

# After
  availability_zone = "us-east-1b"

- Destroy Resource :- Execute terraform destroy, It will destroy (- destroy) the resources which is available in state file configuration.

Meta Argument
count : - The
countmeta-argument allows you to create multiple instances of a resource or module from a single configuration block.Basic Syntax:
countis defined by the Terraform language.You can use it with modules and with every resource type.
The
countmeta-argument accepts a whole number, and Terraform creates that many instances of the resource or module.
Example (Creating EC2 Instances):
#EC2 Instance Resource

resource "aws_instance" "My-EC2-VM" {
  ami               = "ami-047a51fa27710816e"
  instance_type     = "t2.micro"
  count = 5
  tags = {
    #"Name" = "Web"
    "Name" = "web-${count.index}"
  }
}
Terraform apply -auto-approve

Referring to Instances:
When
countis set, Terraform distinguishes between the block itself and the multiple resource or module instances associated with it.Instances are identified by an index number (starting with 0).
For example:
aws_instance.serverrefers to the resource block.aws_instance.server[0],aws_instance.server[1], etc., refer to individual instances.
depends_on:- The depends_on meta-argument allows you to explicitly specify dependencies between resources or modules.
Use
depends_onwhen a resource or module relies on another resource’s behavior but doesn’t directly access any of that resource’s data in its arguments.It handles hidden dependencies that Terraform cannot automatically infer.
Example:-
Create 9 aws resources in a step by step manner
Create Terraform Block
  # Terraform Block
  terraform {
    required_version = ">= 1.4"
    required_providers {
      aws = {
        source  = "hashicorp/aws"
        version = "~> 4.0"
      }
    }
  }
Create Provider Block
  # Provider Block
  provider "aws" {
    region = "us-east-1"
    profile = "default"
  }
Create 9 Resource Blocks
Create VPC
  resource "aws_vpc" "DEV-VPC" {
      cidr_block = "10.0.0.0/16"
      tags = {
          "name" = "MY-VPC"
      }
  }
Create Subnet
  resource "aws_subnet" "DEV-VPC-Public-Subnet-1" {
    vpc_id = aws_vpc.DEV-VPC.id
    cidr_block = "10.0.1.0/24"
    availability_zone = "us-east-1a"
    map_public_ip_on_launch = true
  }
Create Internet Gateway
  resource "aws_internet_gateway" "DEV-VPC-IGW" {
    vpc_id = aws_vpc.DEV-VPC.id
  }
Create Route Table
  resource "aws_route_table" "VPC-DEV-Public-route-table" {
    vpc_id = aws_vpc.DEV-VPC.id
  }
Create Route in Route Table for Internet Access
    resource "aws_route" "DEV-VPC-Public-route" {
      route_table_id = aws_route_table.VPC-DEV-Public-route-table.id
      destination_cidr_block = "0.0.0.0/0"
      gateway_id = aws_internet_gateway.DEV-VPC-IGW.id
    }
Associate Route Table with Subnet
  #Associate the Route Table with the Subnet
  resource "aws_route_table_association" "DEV-VPC-Public-route-table-associate" {
    route_table_id = aws_route_table.VPC-DEV-Public-route-table.id
    subnet_id = aws_subnet.DEV-VPC-Public-Subnet-1.id
  }
Create Security Group in the VPC with port 80, 22 as inbound open
  # Create Security Group
  resource "aws_security_group" "DEV-VPC-SG" {
    name = "dev-vpc-default-sg"
    vpc_id = aws_vpc.DEV-VPC.id
    description = "Dev VPC Default Security Group"

    ingress {
      description = "Allow Port 22"
      from_port   = 22
      to_port     = 22
      protocol    = "tcp"
      cidr_blocks = ["0.0.0.0/0"]
    }

    ingress {
      description = "Allow Port 80"
      from_port   = 80
      to_port     = 80
      protocol    = "tcp"
      cidr_blocks = ["0.0.0.0/0"]
    }

    egress {
      description = "Allow all ip and ports outboun"
      from_port   = 0
      to_port     = 0
      protocol    = "-1"
      cidr_blocks = ["0.0.0.0/0"]
    }

  }
Create EC2 Instance in respective new vpc, new subnet created above with a static key pair, associate Security group created earlier
  # Create EC2 Instance
  resource "aws_instance" "MY-EC2-VM" {
    ami = "ami-0be2609ba883822ec" # Amazon Linux
    instance_type = "t2.micro"
    subnet_id = aws_subnet.DEV-VPC-Public-Subnet-1.id
    key_name = "terraform-key"
      #user_data = file("apache-install.sh")
    user_data = <<-EOF
      #!/bin/bash
      sudo yum update -y
      sudo yum install httpd -y
      sudo systemctl enable httpd
      sudo systemctl start httpd
      echo "<h1>Welcome AWS Infra created using Terraform in us-east-1 Region</h1>" > /var/www/html/index.html
      EOF
    vpc_security_group_ids = [ aws_security_group.DEV-VPC-SG.id ]
  }
Create Elastic IP Address and Associate to EC2 Instance
  # Create Elastic IP
  resource "aws_eip" "MY-EIP" {
    instance = aws_instance.MY-EC2-VM.id
    vpc = true
    depends_on = [ aws_internet_gateway.DEV-VPC-IGW ]
  }
Use
depends_onResource Meta-Argument attribute when creating Elastic IP# Create Elastic IP resource "aws_eip" "MY-EIP" { instance = aws_instance.MY-EC2-VM.id vpc = true depends_on = [ aws_internet_gateway.DEV-VPC-IGW ] }
- Elastic IP will create after Internet gateway
for_each:- The for_each meta-argument allows you to configure a set of similar resources by iterating over a data structure.
Examples:-
Using a map:
resource "aws_instance" "My-EC2-VM" {
  for_each = {
    "Dev"="MY-DEV"
    "Prod"="MY-PROD"
  }
  ami               = "ami-047a51fa27710816e"
  instance_type     = "t2.micro"
  tags = {
    #"Name" = "Web"
    "Name" = each.value
    "Environment"=each.value
  }
}
Using a set of strings:
resource "aws_iam_user" "MY-USER" {
  for_each = toset(["Deepak", "Amit", "Abhinav", "Simran", "Arif"])
  name = each.value
}
each.key corresponds to the map key (or set member).
each.value corresponds to the map value (same as each.key for sets).
Meta Argument lifecycle:-
The
lifecycleblock is used to control the behavior of resources during their lifecycle.It helps manage dependencies and ensures resources are created, updated, or destroyed in a specific manner.
lifecyle Meta-Argument block contains 3 arguments
create_before_destroy
prevent_destroy
ignore_changes
create_before_destroy:- create Resource & Destroy
With this Lifecycle Block we can change that using
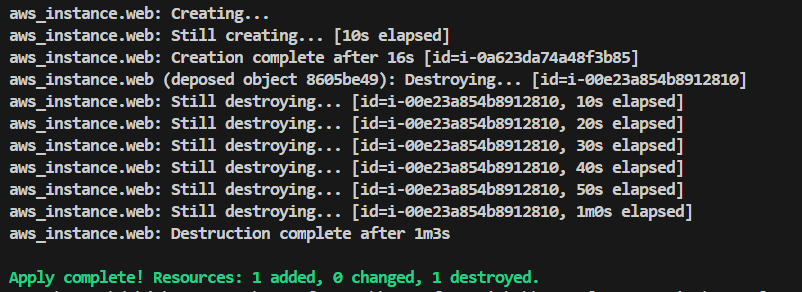
create_before_destroy=trueFirst new resource will get created
Second old resource will get destroyed
Examples:-
Create a EC2 Instance in us-east-1a
    # Create EC2 Instance
    resource "aws_instance" "web" {
      ami               = "ami-0915bcb5fa77e4892" # Amazon Linux
      instance_type     = "t2.micro"
      availability_zone = "us-east-1a"
      tags = {
        "Name" = "web-1"
      }
    }
Terraform apply
Now add lifecycle block and change availability zone to us-east-1b
  # Create EC2 Instance
  resource "aws_instance" "web" {
    ami           = "ami-0915bcb5fa77e4892" # Amazon Linux
    instance_type = "t2.micro"
    availability_zone = "us-east-1b"
    tags = {
      "Name" = "web-1"
    }
    lifecycle {
      create_before_destroy = true
    }
  }
It has created first resource and then destroy.
lifecycle - prevent_destroy :-
Prevents Terraform from destroying the resource.
Useful for critical resources that should not be accidentally deleted.
Examples: -
Create EC2 instance with lifecycle block as prevent_destroy=true
# Create EC2 Instance
resource "aws_instance" "web" {
  ami           = "ami-0915bcb5fa77e4892" # Amazon Linux
  instance_type = "t2.micro"
  availability_zone = "us-east-1b"
  tags = {
    "Name" = "web-1"
  }
  lifecycle {
    prevent_destroy = true
  }
}
Now try to destroy terraform destroy

lifecyle - ignore_changes: - It will stop changing of any attributes created manually.
Terraform will find the difference in configuration on remote side when compare to local and tries to remove the manual change when we execute terraform apply
Example:-
Create Ec2 Instance
# Create EC2 Instance
resource "aws_instance" "My-VM" {
  ami           = "ami-0915bcb5fa77e4892" # Amazon Linux
  instance_type = "t2.micro"
  availability_zone = "us-east-1b"
  tags = {
    "Name" = "Web"
  }
}
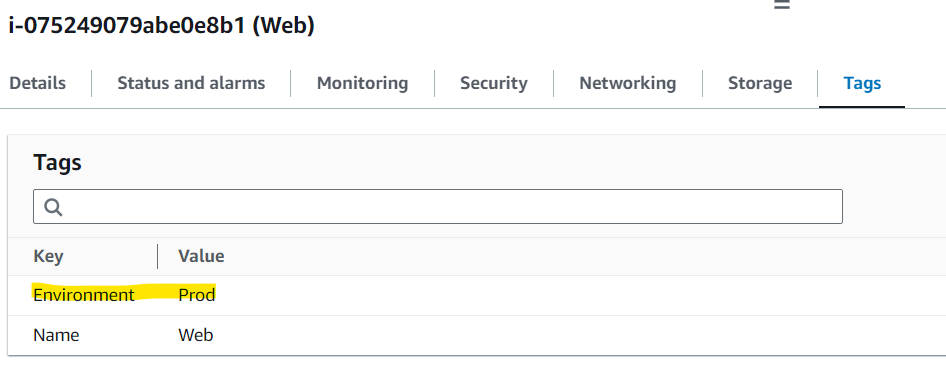
Login to AWS console and add new tag

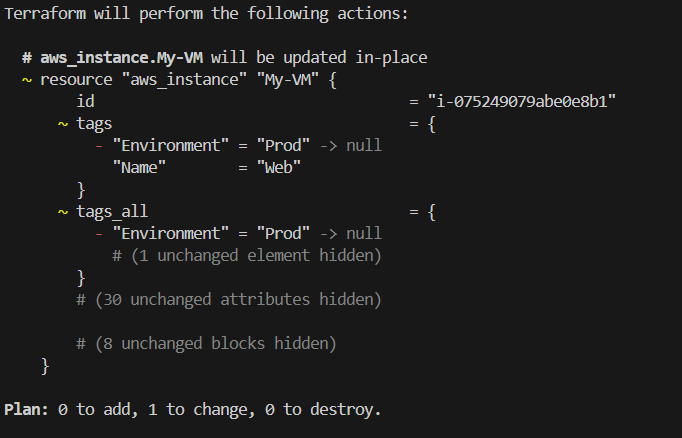
Now run Terraform Plan,

We can see in the snapshot, terraform is removing Environment tag which created manually from AWS console
Now Add lifecycle block as ignore change tag

No change in infrastructure found
Subscribe to my newsletter
Read articles from Deepak Kumar directly inside your inbox. Subscribe to the newsletter, and don't miss out.
Written by
