Databases - Visualize a Relational Database
 yyounos shaik
Difficulty : Easy Time : 60 mins Cost: 0$
What you'll need:
- An AWS account.
AWS SERVICES:
AWS RDS ( Relational Database Service)
AWS QuickSight
Amazon IAM (Identity And Access Managment)
Security Groups
VPC (Virtual Private Cloud)
Overview
In this beginner friendly project we'll create our own relational database, populate it with data, and connect it to QuickSight, a tool in AWS for visualizing data.
The Goal of this project is to set up our own relational database and visualize it using some fun charts... all using AWS.
Step 1: Set up an IAM User
What is an IAM user? Why are we setting one up?
In AWS, a user is a person or a computer that can do things on the AWS cloud.
When you create an AWS account for the first time, the login you get is called the root user of the AWS account. The root user has complete access to all AWS services and resources in your account, including your billing and personal information.
AWS recommends that you do not use the root user for your everyday tasks to protect it from security breaches. Instead you should create an IAM user.
For security reasons, some AWS services (including one that we'll be using in this series) cannot be accessed with the root user... You'll definitely need to use an IAM user for this project!
For this project you'll need your IAM user, not your root user.
Log in with your IAM admin user.
If you have logged in successfully as your IAM user, Skip to the next step.
If you don't have an IAM user, here's how to set one up:
Head to your AWS Account as the root user.
Open the AWS IAM console.

From the left hand navigation panel, choose
Users.Choose
Create user.For your new user's User name, use
Yourname-IAM-Admin.
Yup, replaceYournamewith your name!Make sure to select the checkbox next to
Provide user access to the AWS Management Console - optional.This does not apply to all accounts, but if you're prompted with a pop up panel that says
Are you providing access to a person?, chooseI want to create an IAM user.For the console password, choose
Custom password.Type in a password that you will be able to remember/access in the future.
You will use this password for all future projects, so make sure to choose a secure one!
Deselect the checkbox for
Users must create a new password at next sign-in - Recommended.Choose
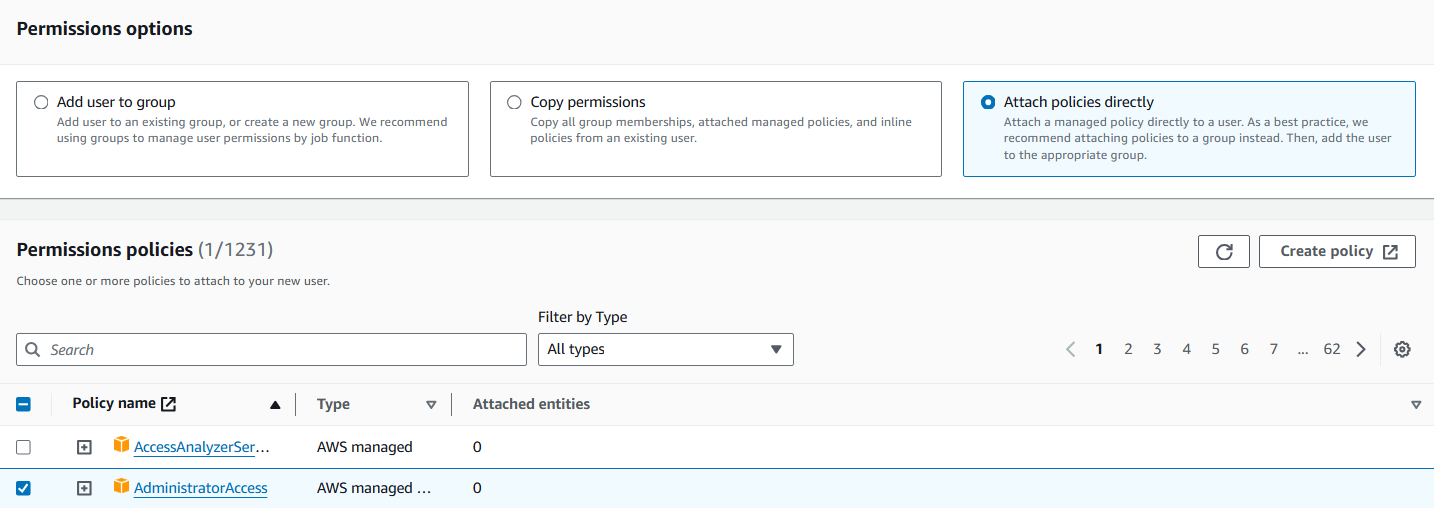
Next.In the permissions set up page, choose
Attach policies directly.From the list of
Permissions policies, selectAdministratorAccess.
Choose
Next.Choose
Create user.And done! you've just created your new user! stay on this page.
Choose
Download .csv file.Copy the
Console sign-in URL.Now you're ready to start using your IAM user.
Log out of your root user's AWS Account.
Paste and go to your copied console sign-in URL.
Open your downloaded .csv file containing your user's access instructions.
Log in using your IAM user's username and the password revealed in the .csv file.
Step 2 : Create a Relational Database
First things first... we need a relational database. Once we have this, we can populate it with data and connect it to QuickSight. Easy!
you are going to:
Create a relational database from scratch.
What is a relational database?
A relational database is a type of database that organizes data into tables, which are collections of rows and columns. Kind of like a spreadsheet! We call it "relational" because the rows relate to the columns and vice-versa.
Take note of your Region in the top right of your AWS Console.
Why does our region matter?
We're working with a couple of different services in this project and need to make sure we create them all in the same region. Otherwise things are going to get very complicated on the networking side!
If you have used Amazon QuickSight before, make sure that the Region you're in now is the same as the one you used for QuickSight.
You can check this by opening QuickSight, and checking the top right corner of the page.
The region where QuickSight is deployed will be displayed next to your account name, for example, us-east-1 (N. Virginia)
If you haven't used QuickSight before, don't worry about it - we'll set it up when we get there. Continue on!
Regions Ready? Okay! Lets Create a Database.
Head to your RDS console - search for
rdsin search bar at the top of the screen.
In the left navigation bar, select Databases.
In th Database section, select Create Database.
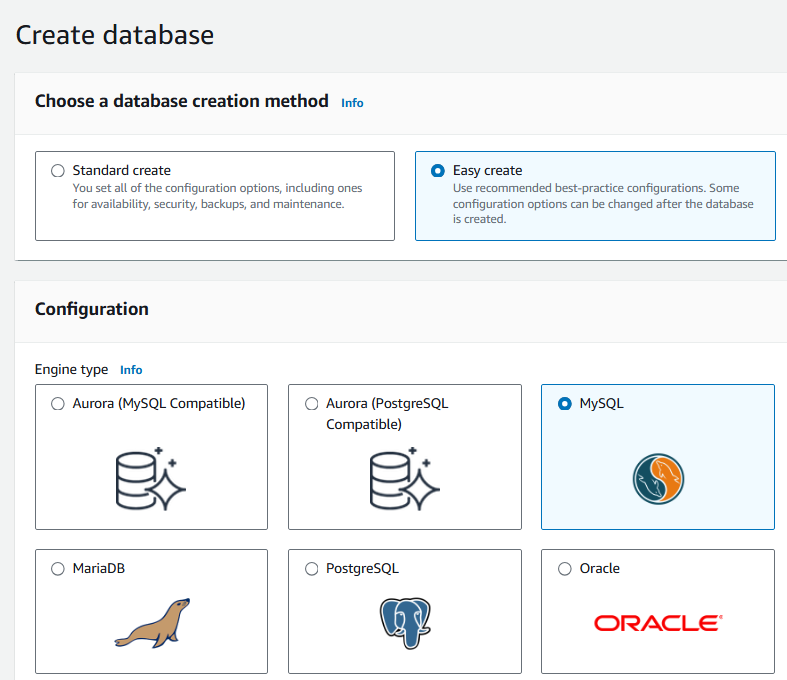
On the create database page, choose easy create.
In the configuration section make the following changes:
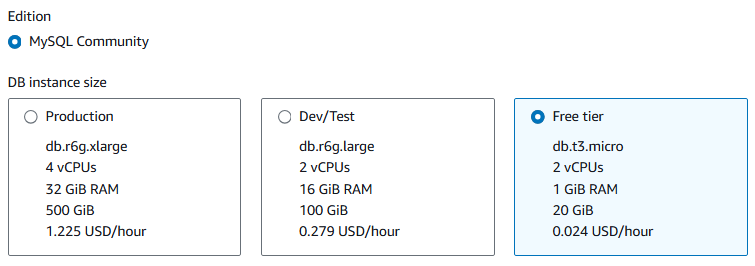
For Engine type, choose MySQL.
What is MySQL? How is it different to SQL?
SQL: (Structured Query Language) is a standard programming language used for managing and manipulating relational databases.
MySQL: MySQL is the most popular open source database in the world. MySQL on RDS offers the rich features of the MySQL community edition with the flexibility to easily scale compute resources or storage capacity for your database.
For DB instance size, choose free tier.
For Master username, enter
admin.In the Credentials management section, select Self managed.
For Master password, type a unique password, and confirm password.
Make sure you save your database login details somewhere safe! You'll need them later on.
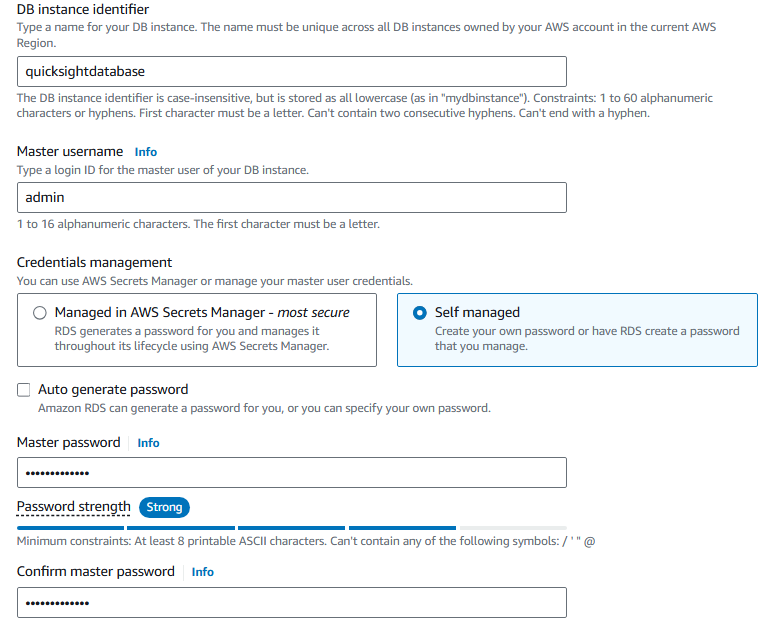
Leave the rest as the default settings and select choose create database.
We've created a nw relational database.
Step 3 : Connect RDS to MYSQL WorkBench
Now that we've got our relational database shell in AWS (this is what we call our 'RDS instance'), we need to create a few tables and enter in some data.
To do this we'll be using one of the most popular database tools in the world, that isn't part of AWS:
- MySQL Workbench from Oracle.
Why are we using MySQL Workbench and not som native to AWS?
AWS RDS can actually import data from S3 using tools like AWS Database Migration Service or SQL commands, but these methods can require more setup and configuration.
If you're doing a large-scale data import then you might consider more AWS native workflows and CI/CD pipelines...but for this project MySQL Workbench suits us perfectly.
In this step, you're going to :
Download MySQL Workbench. (If it's already installed in your PC then well and good, you can skip this step).
Open the MySQL Workbench download page, select your operating system, and then download the top option.
While that's downloading, lets make our RDS public so that we can modify it from MySQL Workbench.
Make your RDS instance public, to allow connections from outside the AWS network.
Open the AWS RDS console, in the left-hand navigation pan, choose Databases.
Then, choose QuickSightDatabase.
On the QuickSightDatabase page, choose Modify.
Scroll down to the connectivity section, choose Additional Configuration.
Then, Choose Publicly accessible.
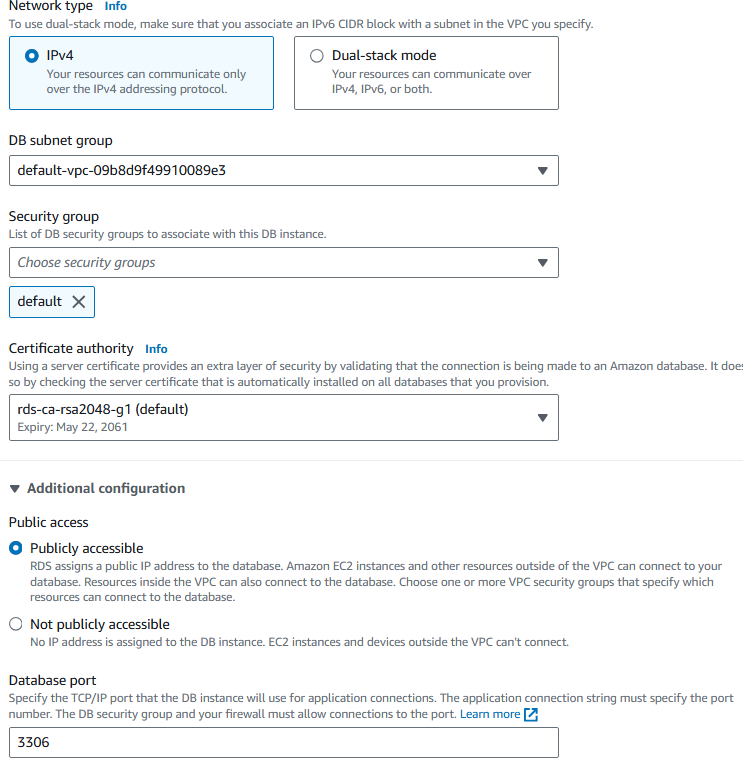
Choose Continue.
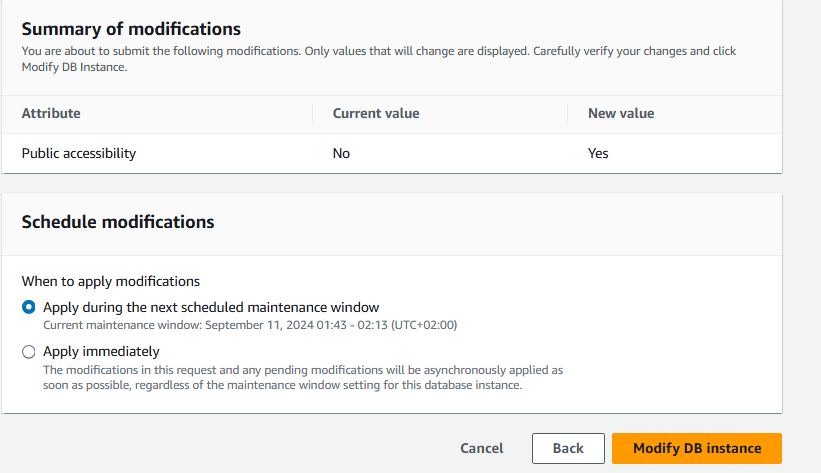
Choose Apply immediately.
Select Modify DB instance.
Modify the security attached to your RDS instance so that your local machine can access your RDS instance.
In Amazon RDS in your AWS console, go to the left-hand navigation, and select Databases.
Then, choose quicksightdatabase.
On the quicksightdatabase page, in the Connectivity & security section, choose the VPC security groups link.
On the Security groups page, choose the Security group ID.
On the
sg-defaultpage, in the Inbound rules section, choose Edit inbound rules.On the Edit inbound rules page, in the Inbound rules section, choose Add rule, and make the following changes:
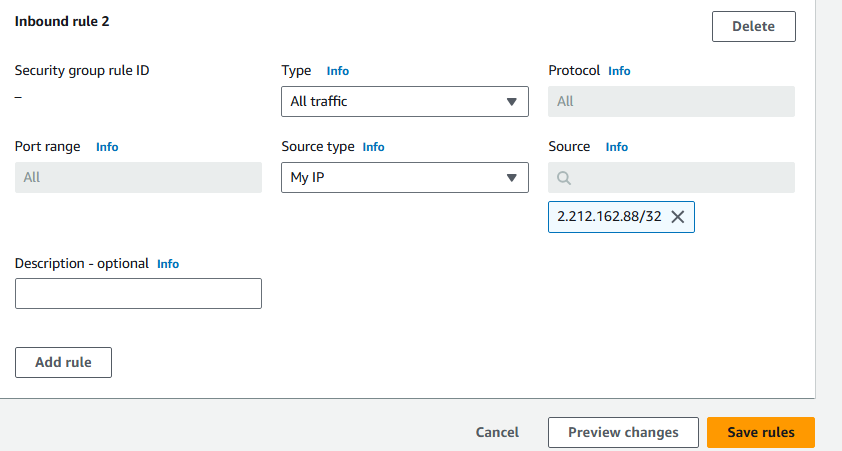
For Type, choose All TCP from the drop-down list.
For Source, choose My IP.
Then, choose Save rules.
What did we just change? And why?
Every RDS instance we create has a default security group attached to it. This security group controls the traffic going into and out of the database.
We need MySQL Workbench to access our database, so we need to change the inbound traffic rules in the security group.
By saying that we only allow traffic from our current IP address, we are only allowing our machine to connect to the database - this will enable MySQL Workbench to connect when we use it from our local computer, which makes it good for security!
Login to Your Database from MYSQL Workbench.
Verify that MySQL Workbench has downloaded successfully. Then, install and open the software.
Select Databases in the top menu bar, then Manage Connections...
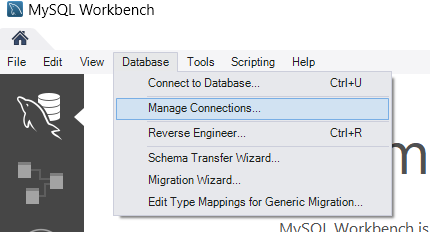
Select New in the bottom left.
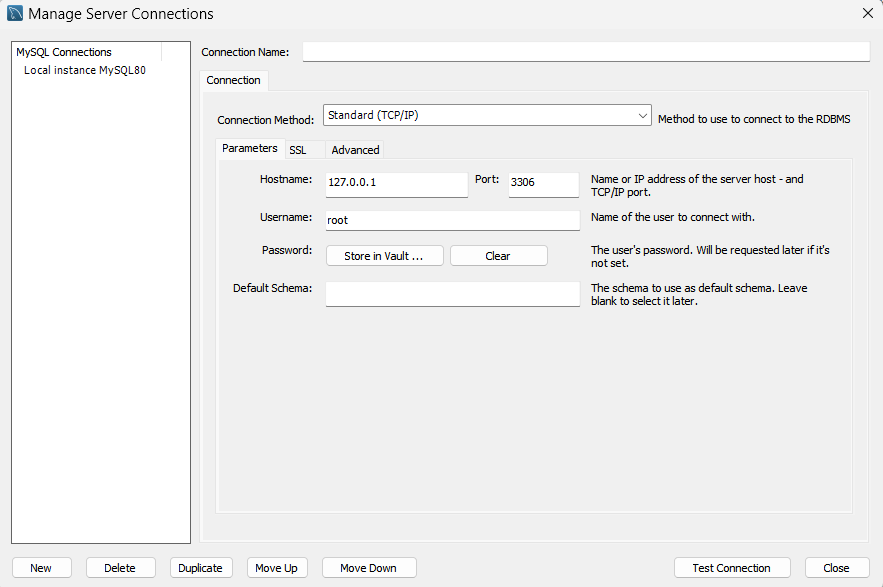
Enter the following details:
For Connection Name, paste
AWS-QuickSightDatabaseFor Hostname, return to your RDS database page for your QuickSightDatabase.
Look under Connectivity and security to find the Endpoint. Example:
QuickSightDatabase.abc.us-east-1.rds.amazonaws.com,1433Copy this into Hostname in your MySQL Workbench.
Copy the Port from the same place in AWS to the Port field in MySQL Workbench.
For password, select store in vault... then enter in your database password.
Then, choose Test connection.
You should get a pop-up say's successfully made the MySQL connection. Success!
For Username, type the username you entered when creating the aws-quicksight-database (probably
adminunless you changed it).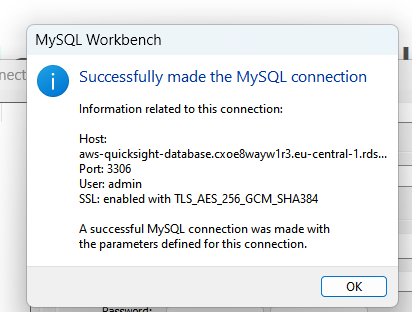
Note : if you are changing the Inbound rules in the IAM user account but when its time to connect its showing error or access denied in MySQL Workbench just log in the root account and add the same inbound rules in the default security groups and it will successfully work!
Step 4: Create Database tables and Load Data
Now that we've got our MySQL Workbench connected with our RDS instance, we can actually start to add our own tables and data.
In this step, you're going to:
Create a new schema using MySQL Workbench
Create two new tables in your schema
Populate those tables with data using SQL
This is going to help us create the data we want to pull into QuickSight to show off in some cool charts.
Let's load some data into our relational database!
Close any pop-ups that are still open in MySQL Workbench.
Select your newly created connection to open the MySQL Workbench Query Editor.
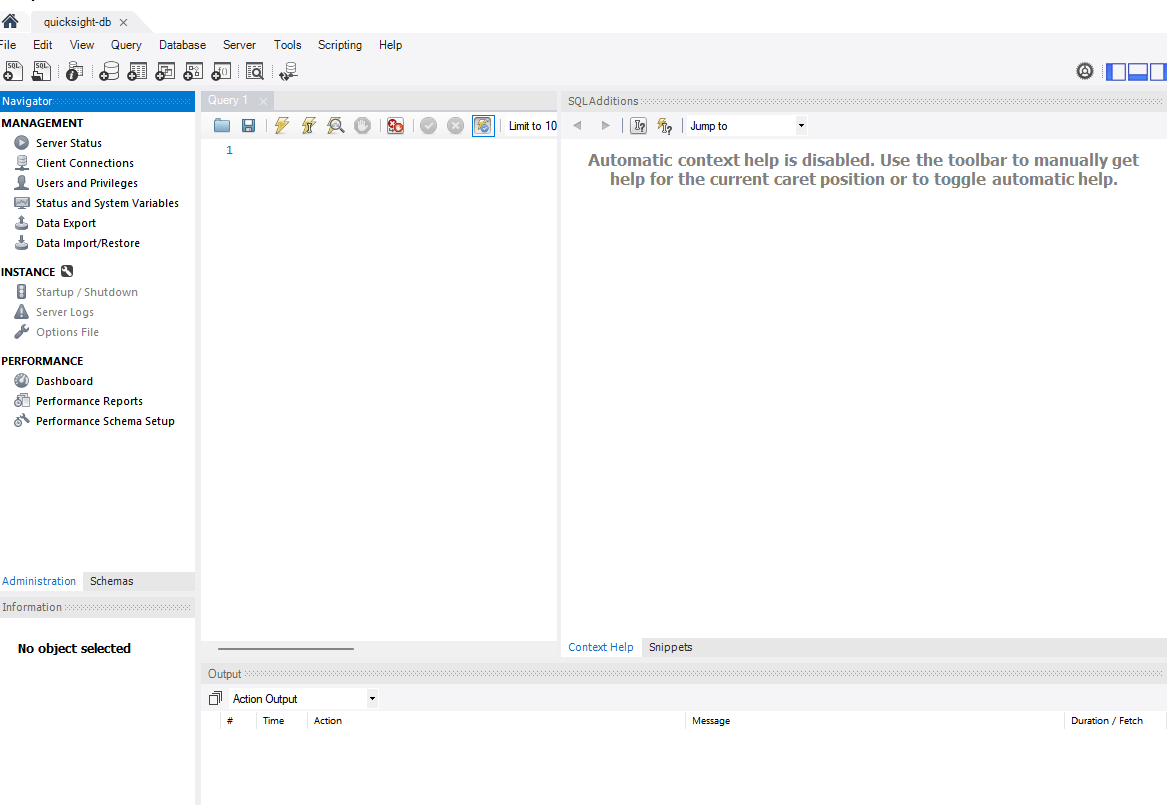
Select Schemas as the tab in the top left, next to Administration.
What does 'Schema' mean?
A database schema is like a blueprint or structure of how the data is organized in a database. It sets up how the database is structured, including the tables, what fields should go in those tables, the relationships between tables, and other advaced components of a database.
Right click on the blank space under the schemas menu.
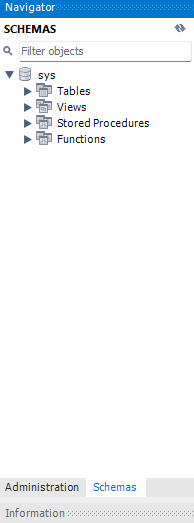
Select Create Schema.
name your schema QuickSightDatabase.

Leave everything else as is, and select Apply.
Once it's finished running, select Close.
Select the tab named sql file near the top left of the screen.
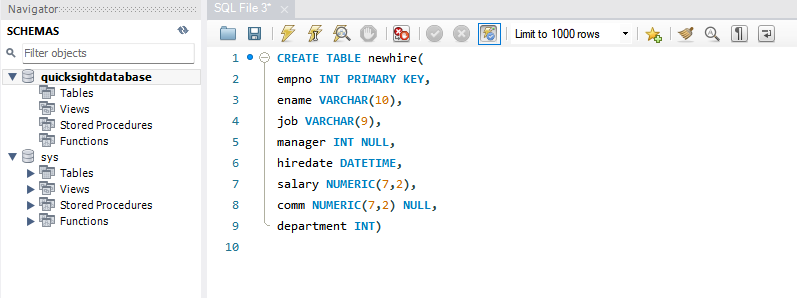
In your new Query script, copy and paste the following SQL query.
  CREATE TABLE newhire(
  empno INT PRIMARY KEY,
  ename VARCHAR(10),
  job VARCHAR(9),
  manager INT NULL,
  hiredate DATETIME,
  salary NUMERIC(7,2),
  comm NUMERIC(7,2) NULL,
  department INT)
Run your Query script by selecting the lightning button above your script.
Did you get an error?
If you get an error it might be because you have not selected your schema in the right menu. Make sure that you double-click your schema 'quicksightdatabase'. Then run the query again!
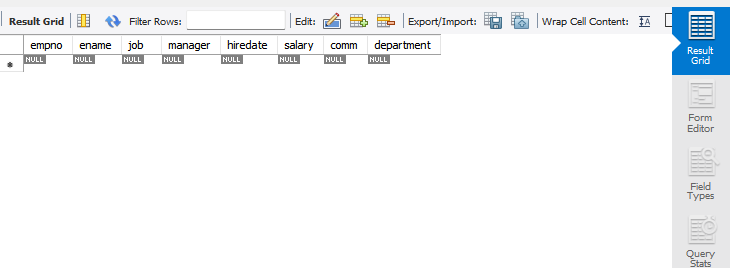
To see the results from our query, delete the current query and replace it with the following:
select * from newhire;Run this new query to see the empty table you just created.
Now let's insert data in our new table by running another query.
Delete the current contents of your query script and paste the following:
INSERT INTO newhire (empno, ename, job, manager, hiredate, salary, comm, department) VALUES
(1, 'JOHNSON', 'ADMIN', 6, '1990-12-17', 18000, NULL, 4),
(2, 'HARDING', 'MANAGER', 9, '1998-02-02', 52000, 300, 3),
(3, 'TAFT', 'SALES I', 2, '1996-01-02', 25000, 500, 3),
(4, 'HOOVER', 'SALES I', 2, '1990-04-02', 27000, NULL, 3),
(5, 'LINCOLN', 'TECH', 6, '1994-06-23', 22500, 1400, 4),
(6, 'GARFIELD', 'MANAGER', 9, '1993-05-01', 54000, NULL, 4),
(7, 'POLK', 'TECH', 6, '1997-09-22', 25000, NULL, 4),
(8, 'GRANT', 'ENGINEER', 10, '1997-03-30', 32000, NULL, 2),
(9, 'JACKSON', 'CEO', NULL, '1990-01-01', 75000, NULL, 4),
(10, 'FILLMORE', 'MANAGER', 9, '1994-08-09', 56000, NULL, 2),
(11, 'ADAMS', 'ENGINEER', 10, '1996-03-15', 34000, NULL, 2),
(12, 'WASHINGTON', 'ADMIN', 6, '1998-04-16', 18000, NULL, 4),
(13, 'MONROE', 'ENGINEER', 10, '2000-12-03', 30000, NULL, 2),
(14, 'ROOSEVELT', 'CPA', 9, '1995-10-12', 35000, NULL, 1);
run the script by selecting the lightning button again.
once it's run, remove the query and run the following to see your results:
SELECT * FROM newhire;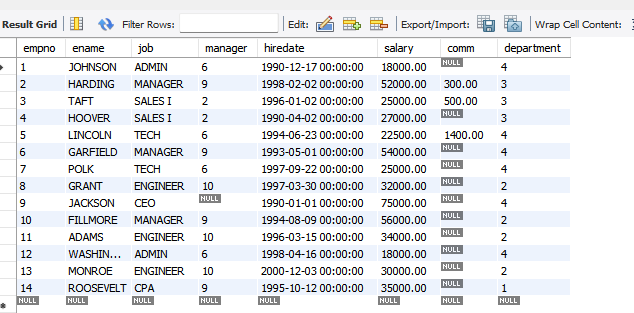
Remove the current query and run the following to create and insert a second table:
  CREATE TABLE department(
  deptno INT NOT NULL,
  dname VARCHAR(14),
  loc VARCHAR(13));

  INSERT INTO department (deptno, dname, loc) VALUES
  (1, 'ACCOUNTING', 'ST LOUIS'),
  (2, 'RESEARCH', 'NEW YORK'),
  (3, 'SALES', 'ATLANTA'),
  (4, 'OPERATIONS', 'SEATTLE');
Once it's run, remove the query and run the following to see your results:
SELECT * FROM department;
Step 5: Connect RDS to QuickSight
We've got a database with some data in it. Nice work!
Now let's connect it up to QuickSight so we can start seeing some visual charts of our data.
In this step, you're going to:
Adjust the security group attached to our RDS instance to allow inbound requests from QuickSight.
Add your RDS instance as a data source in QuickSight.
Navigate back into your RDS instance from the RDS console in AWS.
Open your RDS instance.
Under Connectivity & security, select the link in VPC security groups to open the related security group.
Open the security group by selecting the Security group ID
Select Edit inbound rules to add a new rule with the following details:
Type: All Traffic
Source: Custom, then
0.0.0.0/0in the next box.What does this inbound rule do?
This inbound rule let's any external service access our RDS instance. 0.0.0.0/0 means "all addresses" so applies to anyone trying to access our RDS instance.
Select save rules.
Navigate to QuickSight by searching
Amazon QuickSightin the search bar at the top of your AWS console.If this is your first time using QuickSight, follow the sign-up flow;
PLEASE make sure to untick the offer to upgrade with the optional add-on Add Paginated Reports. No getting charged today!
Make sure you select the same Region as the one you've been doing this project in.
Once you're in QuickSight, select Datasets from the left menu.
In the top right of the screen, Select New dataset.
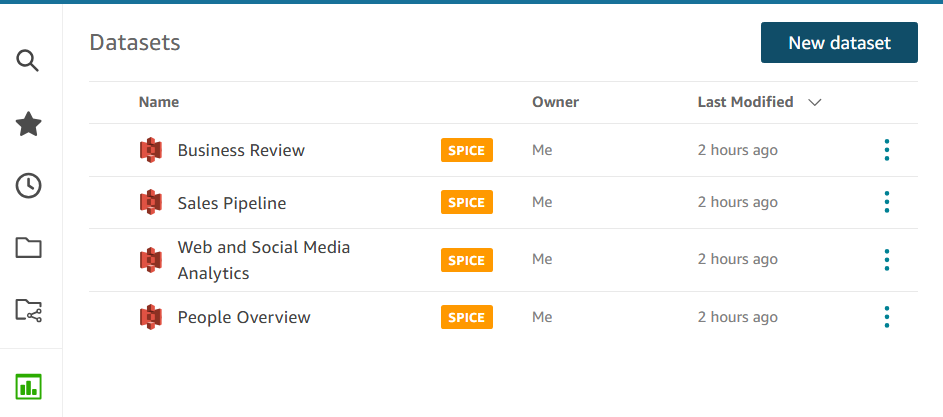
Fill out the following values:
Data source name:
RDS_Public_DatabaseInstance ID: select your database from the drop-down
Connection type:
Public networkDatabase name:
QuickSightDatabaseUsername:
admin(or the username you created when you set up your RDS instance)Password: enter in your RDS instance password.
Select Validate connection.
Done! It works.
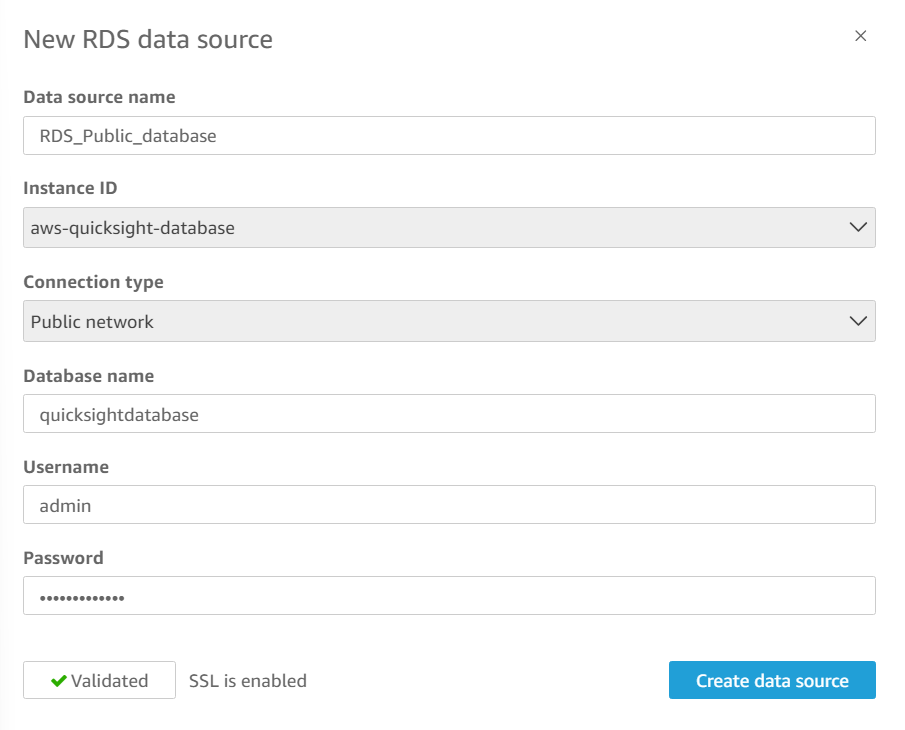
Note : If you are facing to connect the RDS to the QuickSight, make sure that both the services are at the same region and check the name of the databases you kept.
Step 6: Secure QuickSight
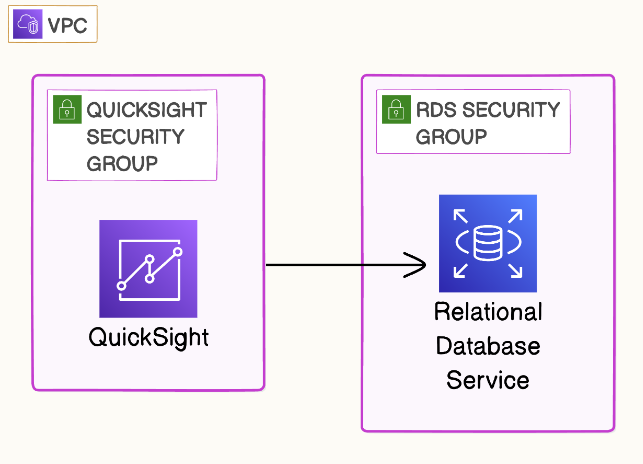
We can put QuickSight in a Security Group and our RDS in a Security Group, then let our RDS Security accept requests from the QuickSight security group only.
In this step, you're going to:
Create a new security group for QuickSight.
Close your current QuickSight data source pop up and return to your AWS console.
Search for
security groupsin the search bar in your AWS console.Select Create security group
For Security group name enter
QuickSight_SecGpFor Description enter
Security Group that contains QuickSightSelect the default VPC as your VPC option. We haven't created our own VPC so the default one is what our RDS and QuickSight will be living in.
Leave the inbound and outbound rules as they are.
Select Create security group
Take note of your new QuickSight_SecGp ID; take a screenshot or copy and paste it somewhere safe. You'll need it so we can attach our new security group to QuickSight!
Attach Security Group to QuickSight
Now that we've created our Security Group we need to actually associate it with to QuickSight. Off we go!
Navigate to
QuickSightusing the search bar.Select the profile icon in the top right and select Manage QuickSight from the dropdown.
Select Manage VPC connections
Select the Add VPC connection button
For VPC connection name, enter
RDS_VPCSelect the VPC from the dropdown that matches the one you added to your QuickSight security group. If you only see one VPC in the dropdown, that'll be it!
For Execution role, select aws-quicksight-service-role-v0.
What is Execution role?
The execution role is the IAM role which will give us the permissions to create this VPC connection.
Select the default dropdown options for the Subnet ID fields
For Security Group IDs select the same ID as your QuickSight_SecGp which you saved earlier.
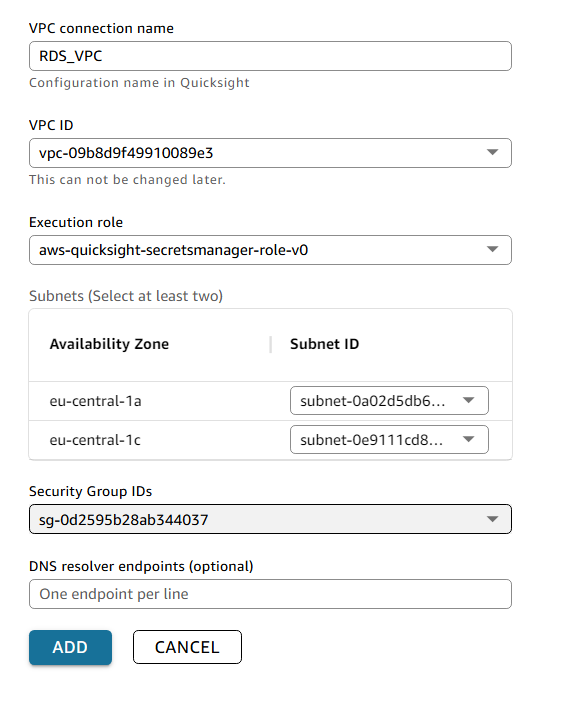
Select Add to confirm your VPC.
If we read an erroe we can see it tells us what to do:
" The role provided is unauthorized to perform the required action"
Which role? It must be the aws-quicksight-service-role-v0 role we selected as the execution role. We need to edit it to have the proper permissions to execute this task.
Update Role:
Open a new tab to your AWS console and search for
IAMIn the left menu, select Roles
In the Roles search bar, search for our role;
aws-quicksight-service-role-v0.In the Permissions policies section, select Add permissions
From the dropdown, select Create inline policy
Select the JSON option as a policy editor.
Paste in the following IAM policy:
  {
    "Version": "2012-10-17",
    "Statement": [
      {
        "Effect": "Allow",
        "Action": [
          "ec2:DescribeVpcs",
          "ec2:DescribeSubnets",
          "ec2:DescribeSecurityGroups",
          "ec2:DescribeNetworkInterfaces",
          "ec2:CreateNetworkInterface",
          "ec2:DeleteNetworkInterface",
          "ec2:ModifyNetworkInterfaceAttribute",
          "iam:PassRole"
        ],
        "Resource": "*"
      },
      {
        "Effect": "Allow",
        "Action": [
          "iam:PassRole"
        ],
        "Resource": "*"
      }
    ]
  }
Select Next.
For Policy name, enter
QuickSightAllowVPC.Select Create Policy.
Try Again!
Return to your QuickSight VPC connection.
Select Add one more time.
It worked! We now have attached QuickSight to our new security group.
Step 7 : Secure RDS
so our QuickSight service is now safely in our own security group. Let's do the same for our RDS instance and stop using the default security group.
In this step, you're going to:
Make our RDS instance private instead of publicly accessible.
The database no longer needs to be publicly accessible; that's way too sketchy. We're going to do a much better job with security groups.
Open the Amazon RDS console, in the left-hand navigation, select Databases.
Then, choose QuickSightDatabase.
On the QuickSightDatabase page, choose Modify.
On the ModifyDB instance: QuickSightDatabase page, in the Connectivity section, choose Additional Configuration.
Select Not publicly accessible, and choose Continue.
Select Apply immediately.
Select Modify DB instance.
Create a new security group specially for our RDS instance.
Search for
security groupsin the search bar in your AWS console.Select Create security group.
For Security group name enter
RDS_SecGp.For Description enter
Security Group that contains RDS.Select the default VPC as your VPC option. Our RDS security group will live in the same VPC as our QuickSight security group. Perfect!
Add inbound rules to allow QuickSight to query our RDS instance:
Under Inbound rules, select Add rule
For Type select MYSQL/Aurora.
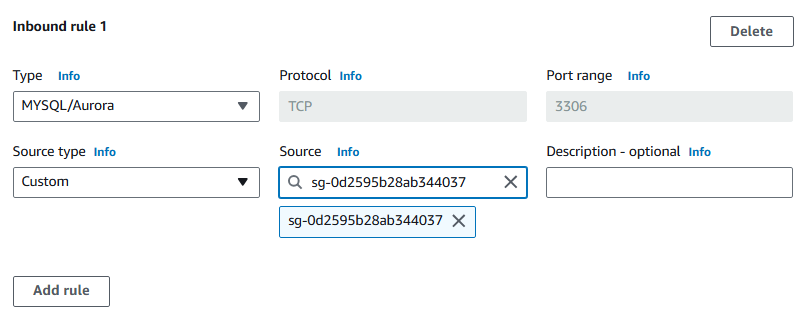
For Source select Custom and then search for the security group ID of your QuickSight_SecGp.
Select Create security Group.
Give our QuickSight security group access to our RDS securtiy group so they can talk to each other.
Return to your RDS instance and select Modify.
Under the Connectivity section, look for Security group.
Select your newly created RDS_SecGp and remove any existing one.
Select Continue.
Select Apply immediately.
Select Modify DB instance.
Step 8 : Reconnect RDS with QuickSight.
Now that everything is wired up, secure, and ready to go, we can jump back into QuickSight and add our new secure data source.
In this step, you're going to:
Create a dataset in QuickSight to connect with our new security group.
Return to the QuickSight console (you may need to click the QuickSight logo in the top left to leave the QuickSight VPC settings).
Select Datasets.
Select New dataset.
Select RDS.
Fill out the following values:
Data source name:
RDS_VPC_Database.Instance ID: select your database from the drop-down.
Connection type:
RDS_VPC.Database name:
QuickSightDatabase.Username:
admin(or the username you created when you set up your RDS instance).Password: enter in your RDS instance password.
Select Validate connection.
Nice work - a secure connection!
Choose the table we want to query to create our charts.
Select Create data source.
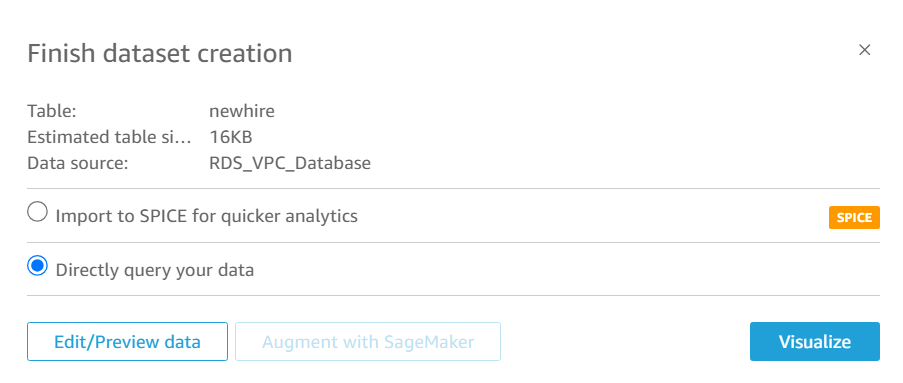
Select newhire as the table to visualize.
Click Select.
Select Directly query your data and then Visualize.
Step 9 : Make some Charts!
Follow these steps to create a security group for Amazon QuickSight to access the RDS database in a VPC.
Cancel any pop-up that shows and select the Vertical Bar Chart from the left hand Visuals section.
Drag jobs into the x-axis.
Drag salary into the Value measure.
Continue adding any other charts you feel like!
When you're ready, select Publish in the top right
Name your dashboard
RDS New Hire Data.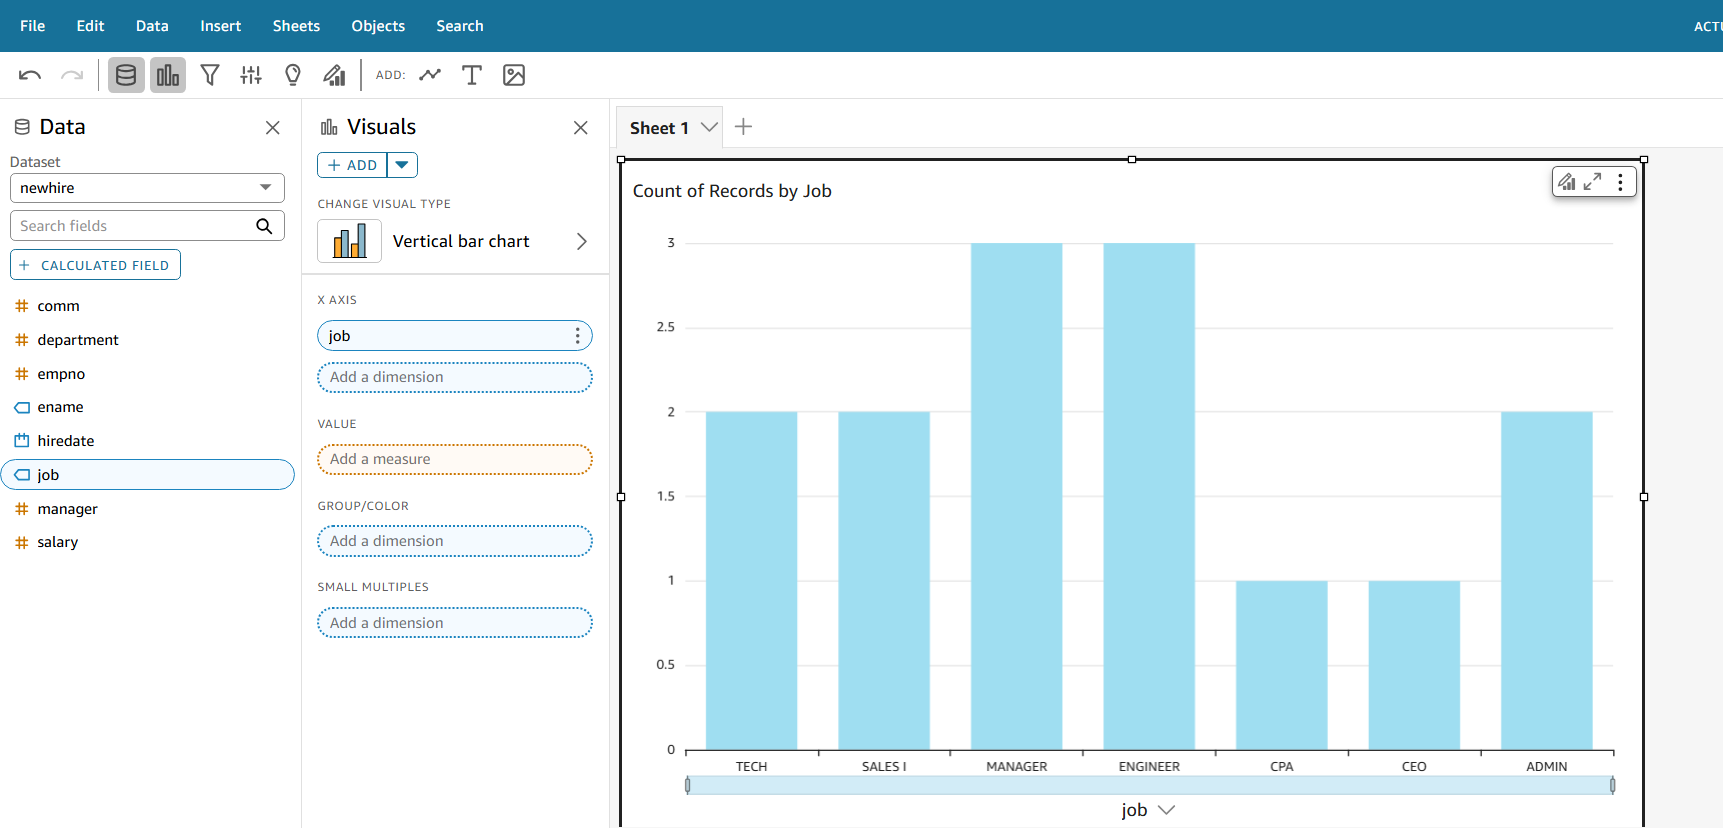
Select Publish Dashboard.
Summary
Congrats!!! You have finally connected the Relational Database System to the Amazon QuickSight and visualized the data uploaded in the MySQL Workbench. You can add more visuals to the QuickSight if you want. See you in Next Project!
Subscribe to my newsletter
Read articles from yyounos shaik directly inside your inbox. Subscribe to the newsletter, and don't miss out.
Written by

yyounos shaik
yyounos shaik
An Aspring Cloud Engineer