AWS IAM : Simplifying Cloud Access Management
 Kajal Patil
AWS Identity and Access Management (IAM) is a cornerstone of cloud security and compliance, offering a robust framework for controlling access to AWS resources. Imagine having a tool that not only ensures that only the right people can access your services but also helps you manage permissions with precision and flexibility. IAM empowers organizations to define who can do what, when, and where within their AWS environment. By leveraging IAM, you can minimize security risks, maintain strict compliance, and streamline user management, all while keeping sensitive data safe. Understanding IAM is not just about managing users; it's about creating a secure, efficient, and compliant cloud infrastructure where access is always under your control.
Why IAM?
The need for IAM comes from the complexity of modern cloud setups. As organizations grow and move to the cloud, they have many teams and users, each needing different access levels to various resources. Without a strong access management system, there's a higher risk of unauthorized access, data breaches, and compliance issues. IAM makes this easier by offering a structured way to manage users, groups, and permissions, ensuring access is given based on the principle of least privilege.
What IAM Does
IAM enables organizations to:
Authenticate Users: Verify the identity of users and services trying to access AWS resources.
Authorize Access: Control what authenticated users can do with AWS resources based on defined permissions.
Manage Permissions: Create and manage policies that specify what actions are allowed or denied for users, groups, and roles.
Key Features of IAM
Users: Individual identities that represent a person or service interacting with AWS. Each user can have their own credentials and permissions.
Groups: Collections of users that share the same permissions. Groups simplify management by allowing permissions to be assigned to multiple users at once.
Roles: Temporary identities that can be assumed by users or AWS services to perform specific actions. Roles are crucial for granting access without needing to create additional users.
Policies: JSON documents that define permissions. Policies specify what actions are allowed or denied on specific resources.
Understanding IAM Policies
An IAM policy is essentially a set of rules that defines what actions a user or service can perform on specific AWS resources. The basic structure of an IAM policy includes:
Effect: Specifies whether the policy allows or denies access (Allow or Deny).
Action: The specific actions that are allowed or denied (e.g.,
s3:PutObject,ec2:StartInstances).Resource: The specific resources to which the actions apply (e.g., an S3 bucket or an EC2 instance).
Condition: Optional parameters that specify when the policy is in effect (e.g., based on time of day or IP address).
Example of an IAM Policy
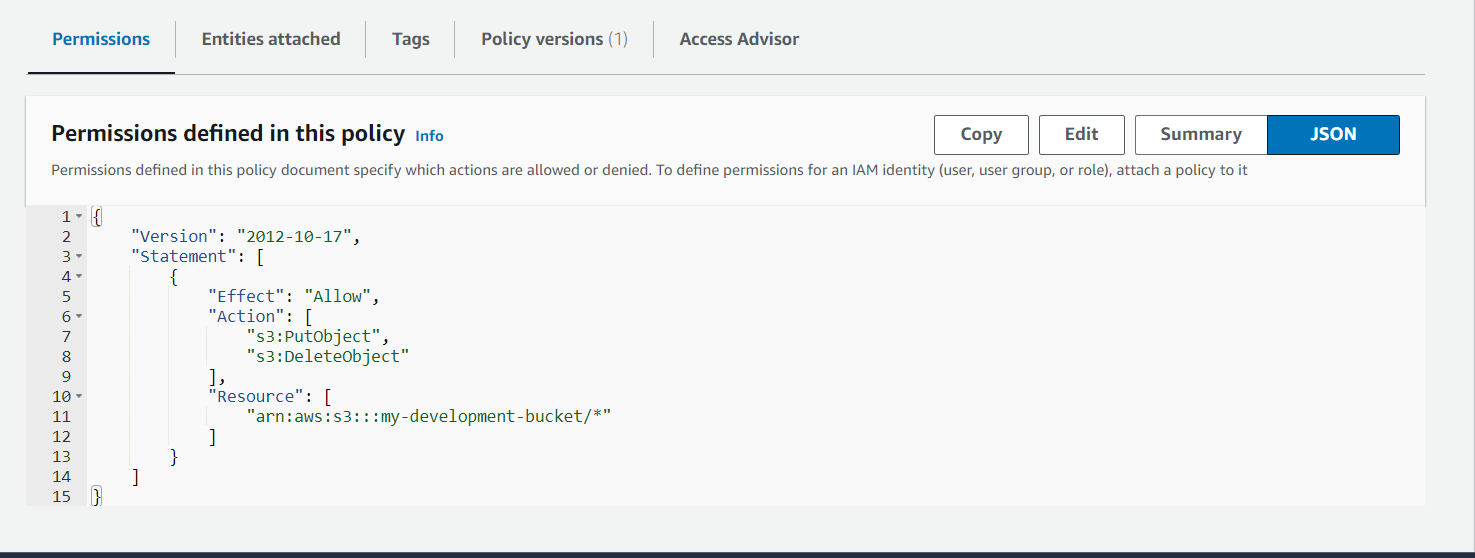
To illustrate how IAM policies work, consider a scenario where a company wants to allow a user named alice.smith to upload files to a specific S3 bucket named my-development-bucket. The policy would look like this:
    jsonCopy code{
      "Version": "2012-10-17",
      "Statement": [
        {
          "Effect": "Allow",
          "Action": [
            "s3:PutObject",
            "s3:DeleteObject"
          ],
          "Resource": [
            "arn:aws:s3:::my-development-bucket/*"
          ]
        }
      ]
    }
In this example:
Effect: The policy allows access (
Allow).Action: The user can perform two actions:
s3:PutObject(upload files) ands3:DeleteObject(delete files).Resource: The actions apply specifically to all objects within the
my-development-bucketS3 bucket, denoted by the wildcard/*.
This policy ensures that alice.smith can only upload and delete files in the designated bucket, adhering to the principle of least privilege by restricting her access to only what is necessary for her role. By using such policies, organizations can effectively manage permissions and enhance security across their AWS environments.
How IAM Enables Secure Access Management: A Practical Example
AWS Identity and Access Management (IAM) is a powerful service that helps organizations securely control access to their AWS resources. By creating users, groups, and policies, IAM ensures that only authorized people can perform specific actions on designated resources. This is especially important in complex cloud environments where different teams need different levels of access. Let's see how IAM can be used in a real-life example with Tech Solutions Inc. The company needs to manage access for three teams: Development, QA, and Operations, each with different needs.
Step-by-Step Guidance for Implementing IAM at Tech Solutions Inc.
Setting up AWS Identity and Access Management (IAM) can seem complicated, but breaking it down into simple steps makes it easier. Here is a straightforward guide for Tech Solutions Inc. to set up IAM for their Development, QA, and Operations teams.
Step 1: Access the IAM Dashboard
Sign in to AWS Management Console:
- Go to the AWS Management Console and log in with your AWS account credentials.
Navigate to IAM:
In the console, find the "Security, Identity, & Compliance" section.
Click on "IAM" or use the search bar to locate the IAM service.
Step 2: Create IAM Users
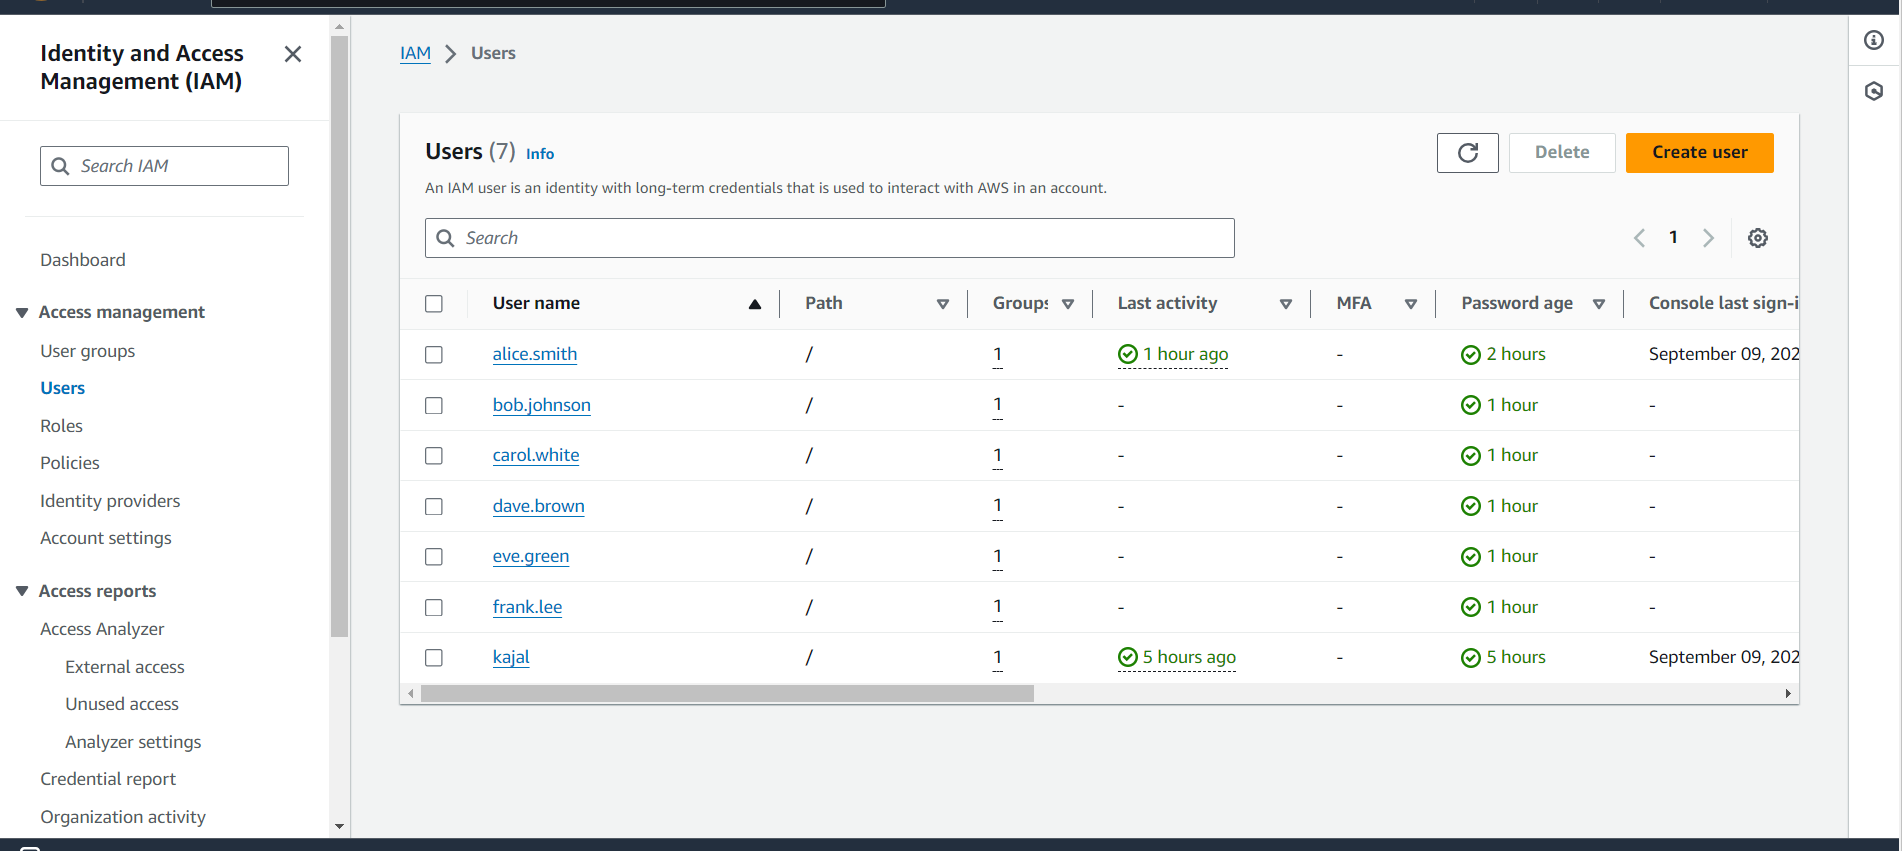
Go to the Users Section:
- In the IAM dashboard, click on "Users" in the sidebar.
Add Users:
Click on "Add user."
Enter the usernames for each team member:
Development Team:
alice.smith
bob.johnson
QA Team:
carol.white
dave.brown
Operations Team:
frank.lee
Select Access Types:
- For each user, select both "Programmatic access" and "AWS Management Console access."
Set Permissions:
- Choose to attach existing policies directly or create custom policies later.
Review and Create:
- Review the user details and click "Create user."

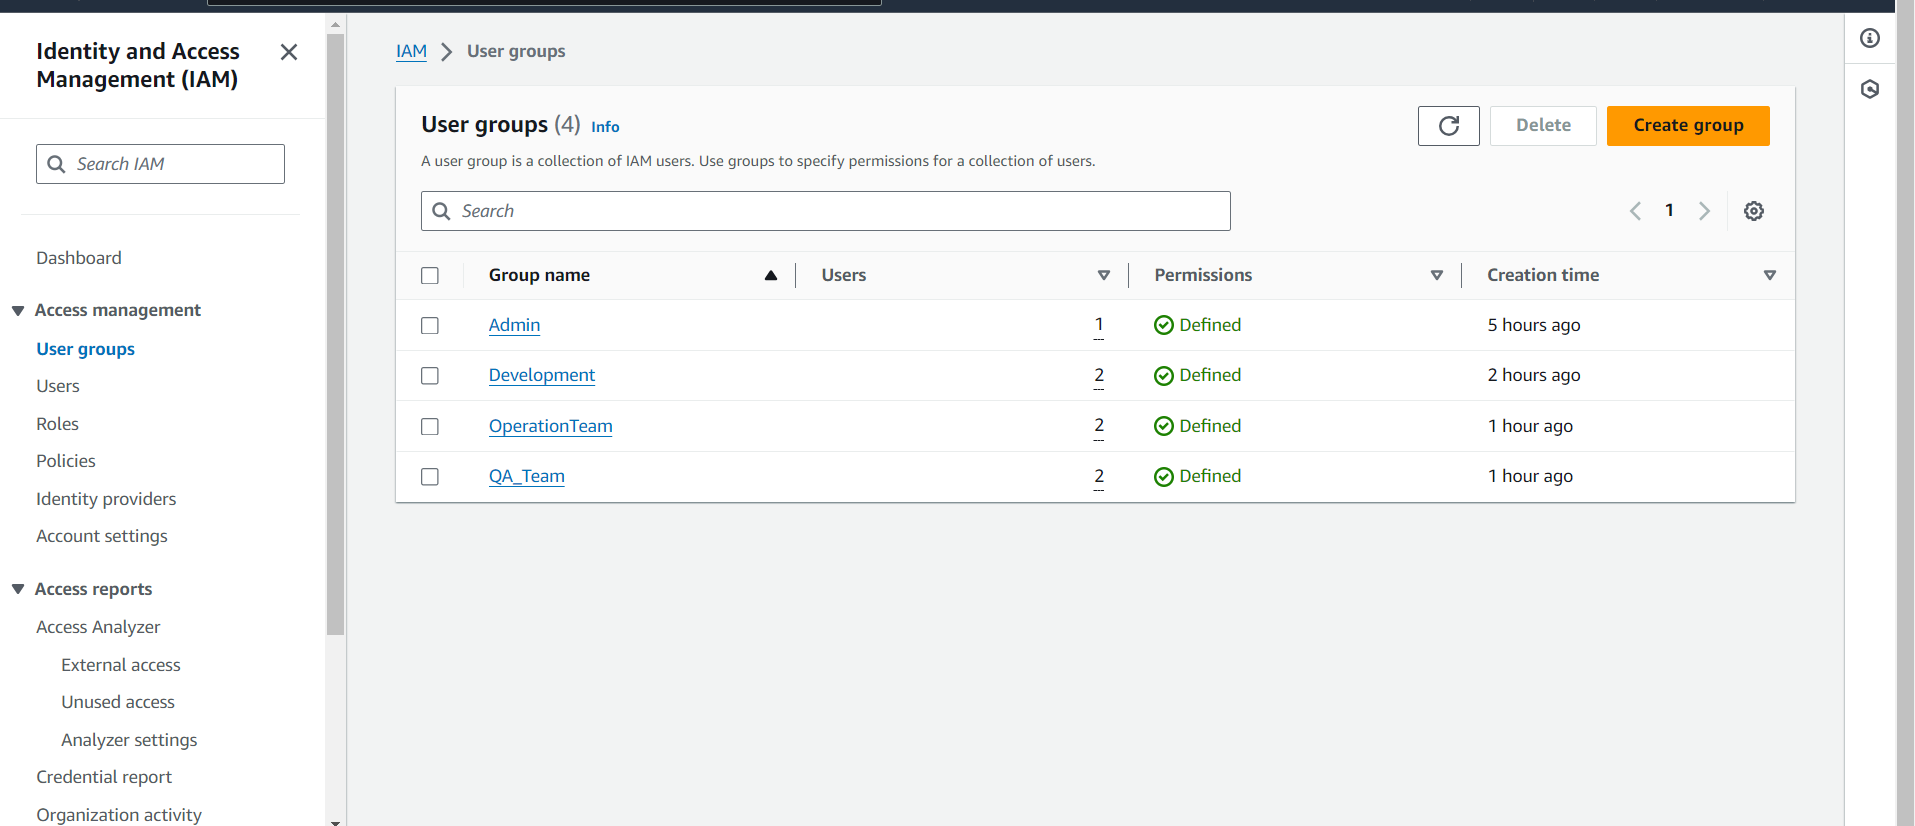
Step 3: Create IAM Groups
Go to the Groups Section:
- In the IAM dashboard, click on "Groups."
Create New Groups:
Click on "Create New Group."
Enter the group names and attach appropriate policies:
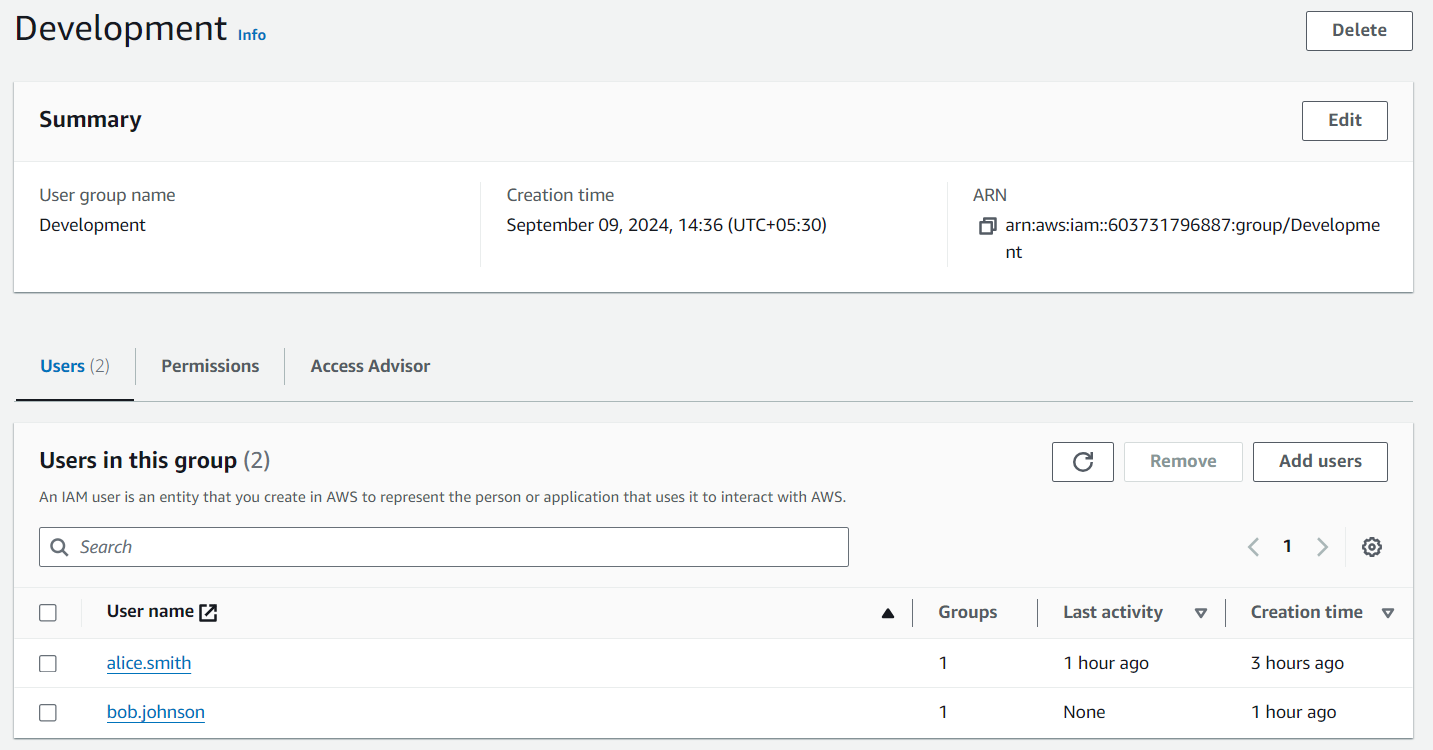
Developers Group:
Users: alice.smith, bob.johnson
Policies: Attach AmazonEC2FullAccess and AmazonS3FullAccess.
QA Group:
Users: carol.white, dave.brown
Policies: Attach AmazonS3ReadOnlyAccess and AmazonEC2ReadOnlyAccess.
Operations Group:
Users: eve.green, frank.lee
Policies: Attach CloudWatchFullAccess and IAMFullAccess.
Review and Create Groups:
Review the group details and click "Create group."

Step 4: Create Custom Policies (if needed)
Go to the Policies Section:
- Click on "Policies" in the IAM dashboard.
Create Policy:
Click on "Create Policy."
Choose the "JSON" tab to define a custom policy. For example, to allow write access to a specific S3 bucket, use the following policy:
        json{
          "Version": "2012-10-17",
          "Statement": [
            {
              "Effect": "Allow",
              "Action": [
                "s3:PutObject",
                "s3:DeleteObject"
              ],
              "Resource": [
                "arn:aws:s3:::my-development-bucket/*"
              ]
            }
          ]
        }
Review and Create Policy:
Name the policy (e.g., CustomS3WriteAccess) and click "Create policy."

Step 5: Assign IAM Users to Groups
Go to the Users Section:
- Click on "Users" in the IAM dashboard.
Select Users:
- For each user, select them and navigate to the "Groups" tab.
Add Users to Groups:
Click "Add user to groups."
Assign users to their respective groups:
alice.smith and bob.johnson to Developers
carol.white and dave.brown to QA
eve.green and frank.lee to Operations
Click "Add to groups."

Step 6: Test User Access
Log in as Each User:
- Each user should log in using their credentials.
Perform Access Tests:
alice.smith: Attempt to launch an EC2 instance and upload a file to S3.
carol.white: Try listing objects in S3 and describing EC2 instances.
eve.green: Verify access to CloudWatch logs and IAM policies.
Address Access Issues:
- If any user encounters access issues, revisit the policies and adjust them as necessary.
Step 7: Enable Multi-Factor Authentication (MFA)
Go to the Users Section:
- Click on "Users" in the IAM dashboard.
Select a User:
- Choose a user (e.g., alice.smith) and go to the "Security credentials" tab.
Manage MFA Device:
Click on "Manage MFA Device."
Choose "Virtual MFA device" and follow the setup instructions:
Use an authenticator app (like Google Authenticator) to scan the QR code.
Enter the verification codes from the MFA device.
Verify and Save:
- Confirm the MFA setup and save the settings.
Step 8: Cross-Check the Project
Verify User Creation:
- Ensure all users (alice.smith, bob.johnson, carol.white, dave.brown, eve.green, and frank.lee) are created with the correct access types.
Verify Group Creation:
- Confirm that the Developers, QA, and Operations groups exist and have the correct policies attached.
Verify Policy Attachment:
- Check that custom policies are attached to the appropriate groups and that users inherit these policies.
Test Access:
- Verify that each user has the correct level of access to resources according to their group's permissions.
Verify MFA Setup:
- Ensure that MFA is enabled for users as required and that they can successfully log in using MFA.
In conclusion, AWS Identity and Access Management (IAM) is an essential tool for any organization leveraging AWS services. It provides a comprehensive framework for managing user access and permissions, ensuring that only authorized individuals can interact with specific resources. By implementing IAM, organizations can enhance their security posture, maintain compliance, and streamline user management. The practical example of Tech Solutions Inc. demonstrates how IAM can be effectively used to manage access for different teams, ensuring that each team has the appropriate level of access to perform their tasks efficiently. With features like users, groups, roles, and policies, IAM offers the flexibility and control needed to build a secure and efficient cloud infrastructure.
Subscribe to my newsletter
Read articles from Kajal Patil directly inside your inbox. Subscribe to the newsletter, and don't miss out.
Written by
