NGSPICE: Ultimate Circuit Simulation Tool
 Aniket Rana
About
We have been analyzing the electrical/electronic circuits manually on paper using derived equations and their mathematical analysis. But its time consuming and contains high chances of human errors as it gets more complex.
This is where NGSPICE comes into the picture, It's a free and open-source electronic circuit simulator based on the Berkeley SPICE 3f5 circuit simulation program. Using this we can simulate and analyze complex analog, digital, and mixed-signal circuits. The first version was released in 1985 and has since been updated regularly till date.
How it works?
The community has developed mathematical models which are based on the physical properties of the components and are used to predict the behavior of the circuit under different conditions. It solves the circuit equations using numerical methods to obtain the circuit's voltages and currents.
Features
Support for a wide range of electronic components, including transistors, diodes, resistors, capacitors, inductors, and more.
Support for behavioral modeling, which allows users to create custom component models based on their own specifications.
Ability to simulate analog, digital, and mixed-signal circuits.
Support for a variety of simulation types, including transient analysis, AC analysis, DC analysis, and more.
Ability to generate and analyze frequency response plots, time-domain waveforms, and other simulation results.
Support for SPICE netlists, which allows users to import and export circuit designs from other SPICE-based tools.
Getting Started
NGSPICE is available for Windows, macOS, and Linux platforms. The installation process varies depending on the platform.
- Windows
- Download the NGSPICE installer from the official website here. Double-click the downloaded file to start the installation process. Follow the on-screen instructions to complete the installation.
- macOS
- Install the Homebrew package manager if it is not already installed and download from here. Open the Terminal app and run the following command to install NGSPICE:
brew install ngspice
- Linux
- The installation process for Linux varies depending on the distribution. Here are the commands for some popular distributions:
Debian/Ubuntu
sudo apt-get update
sudo apt-get install ngspice
Fedora
sudo dnf update
sudo dnf install ngspice
Arch Linux
sudo pacman -S ngspice
Usage
NGSPICE can be used in two ways:
Graphical user interface (GUI)
Command line interface (CLI).
We will be focusing on the CLI interface for now as it is widely used.
To use NGSPICE through the CLI the process is divided into two steps:
Step-1: Creating a netlist file.
A Netlist file that describes the circuit you want to simulate. A netlist is a text file that lists the components of the circuit, their connections, and their parameters. Generally, it is a plain text file with a .cir extension.
Rules to follow while creating a netlist file:
The first line of the netlist file should be a comment line that starts with an asterisk (*) denoting the name of the circuit.
Netlist files are case-insensitive. So, you can use any combination of upper and lower case letters.
Each line in the netlist file should contain a single component or directive.
A component is denoted by its symbol followed by its name, node connections, and parameters. Here shown some of the most common components' symbols and usage.
| Symbol | Description | Usage |
| R | Resistor | R1 1 2 1k |
| C | Capacitor | C1 2 0 1uF |
| L | Inductor | L1 1 0 1mH |
| V | Voltage source | V1 1 0 1V |
| I | Current source | I1 1 0 1A |
| D | Diode | D1 1 0 |
| Q | Bipolar junction transistor (BJT) | Q1 1 2 3 NPN |
| M | Metal oxide semiconductor field-effect transistor (MOSFET) | M1 1 2 3 4 NMOS |
| E | Voltage-controlled voltage source | E1 1 2 3 4 1V |
| G | Voltage-controlled current source | G1 1 2 3 4 1A |
| H | Current-controlled voltage source | H1 1 2 3 4 1V |
| F | Current-controlled current source | F1 1 2 3 4 1A |
| . | Directive | .model M1 NMOS (VTO=0.5) |
- The node connections are denoted by their names or numbers. Their names are arbitrary and can be anything you want. The node numbers are assigned automatically by NGSPICE and are used to identify the nodes in the simulation results.
Some of the most common directives are:
.model- Used to define a custom component model..include- Used to include another netlist file in the current netlist file..lib- Used to include a component library file in the current netlist file..param- Used to define a parameter that can be used in the netlist file..control- Used to define a control section that contains commands that are executed after the simulation is completed..endc- Used to end a control section..run- Used to run the simulation..plot- Used to define a plot section that contains commands that are executed after the simulation is completed..set- Used to set a simulation parameter..save- Used to save a simulation result in a file..print- Used to print a simulation result in the terminal..tran- Used to perform transient analysis..dc- Used to perform DC analysis..end- Used to end a plot section.Note: directives can be used in both the control and plot sections:
.control
.tran 1ns 10ns
run
plot v(out)
.endc
Different types of simulation:
Transient analysis - Used to simulate the behavior of a circuit over a period of time.
DC analysis - Used to simulate the behavior of a circuit under different DC conditions.
AC analysis - Used to simulate the behavior of a circuit under different AC conditions.
Step-2: Running the simulation.
To run the simulation, open the terminal and navigate to the directory where the netlist file is located. Then run the following command:
ngspice <netlist_file_name>.cir
Examples
Lets see it in action, We'll go through some examples to get a hang of it.
[1] RC Circuit
Step-1: Writing Netlist of the circuit
Circuit diagram
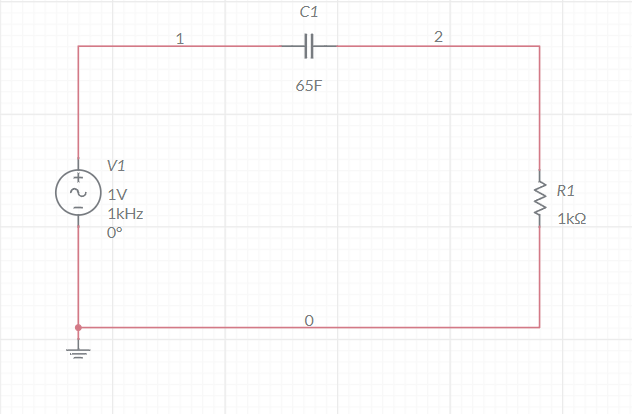
The netlist file for this circuit will be as follows:
* RC circuit
vin in 0 1v PULSE( -1 1 20ps 10ps 10ps 300ps 600ps)
c1 out 0 48f
r1 in out 1k
.control
run
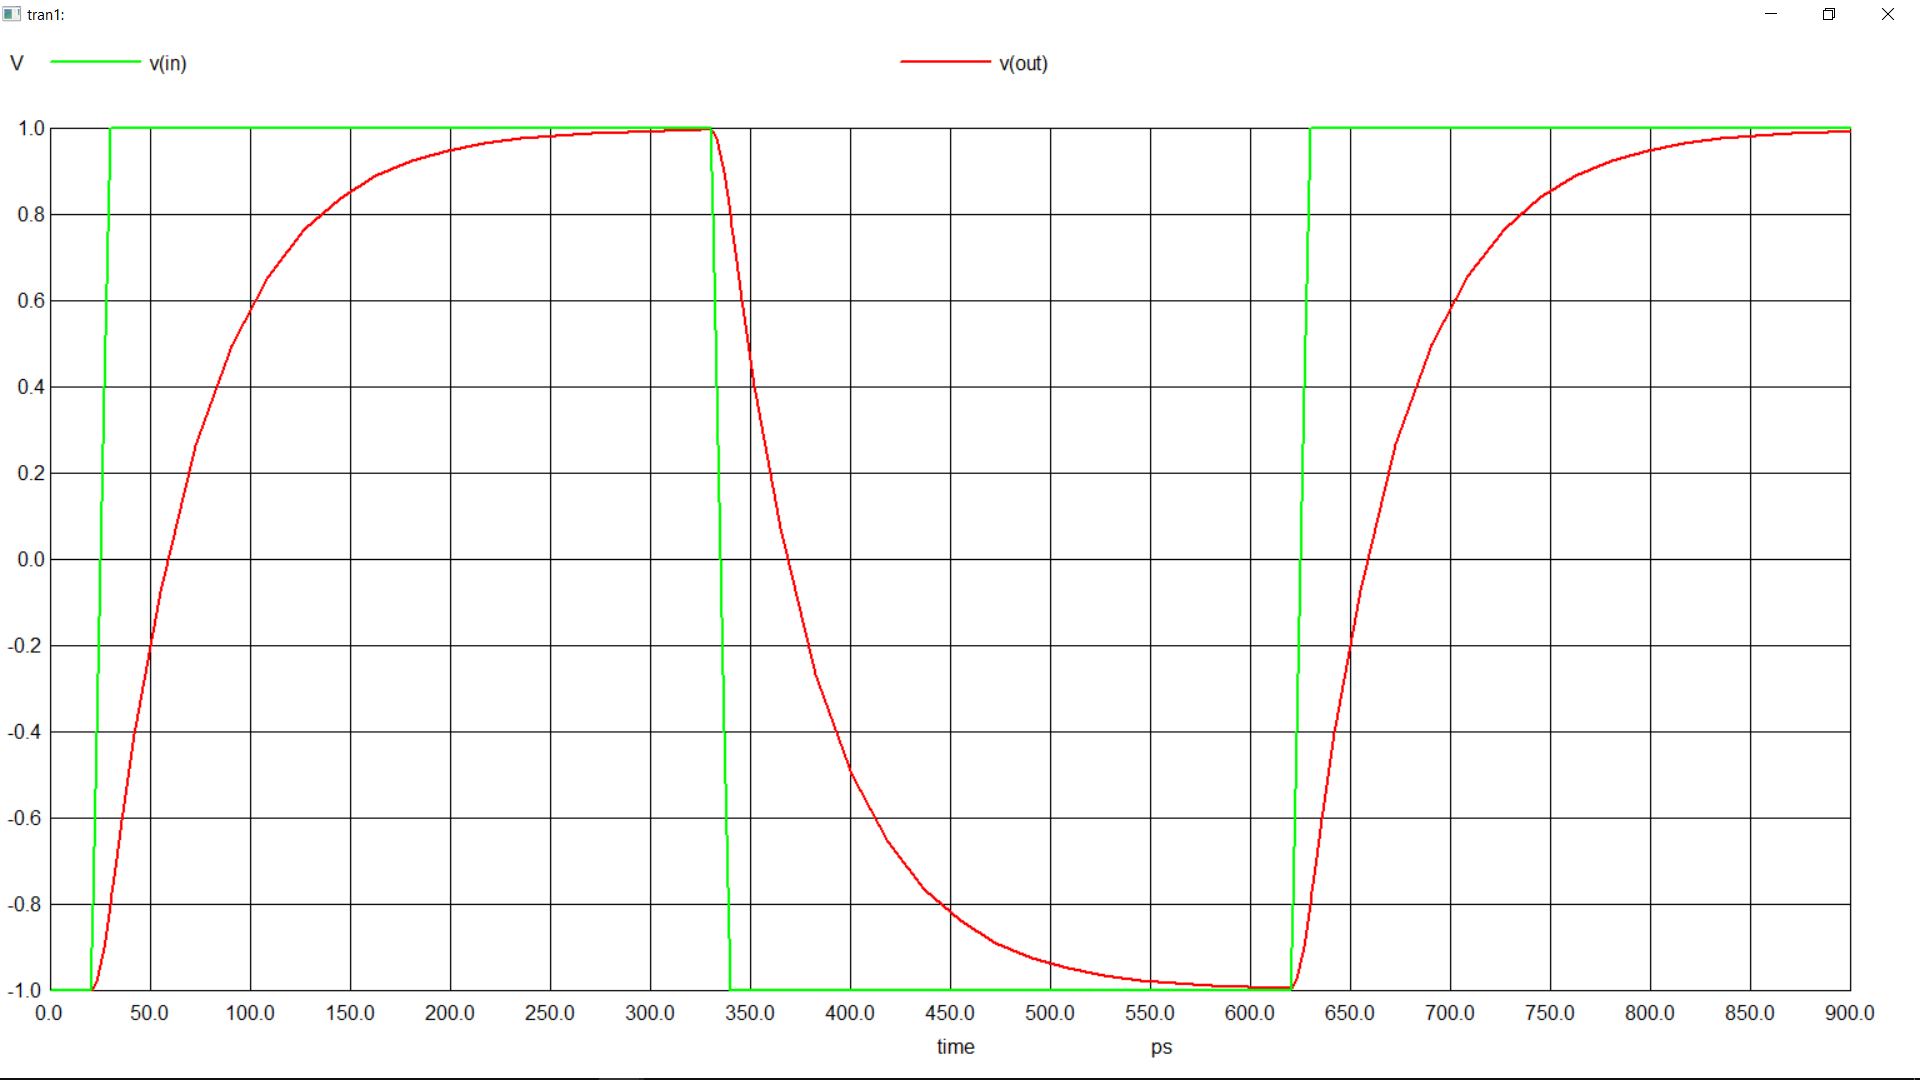
tran 20ps 900ps
set color0=white
set xbrushwidth=2.5
plot v(in) v(out)
.endc
.end
- Save the file as
rc-circuit.cir.
Step-2: Running the simulation
ngspice rc-circuit.cir
Output:
[2] Fanout of a TTL Inveter
TTL Inverter is a digital logic gate that behaves as a NOT gate.
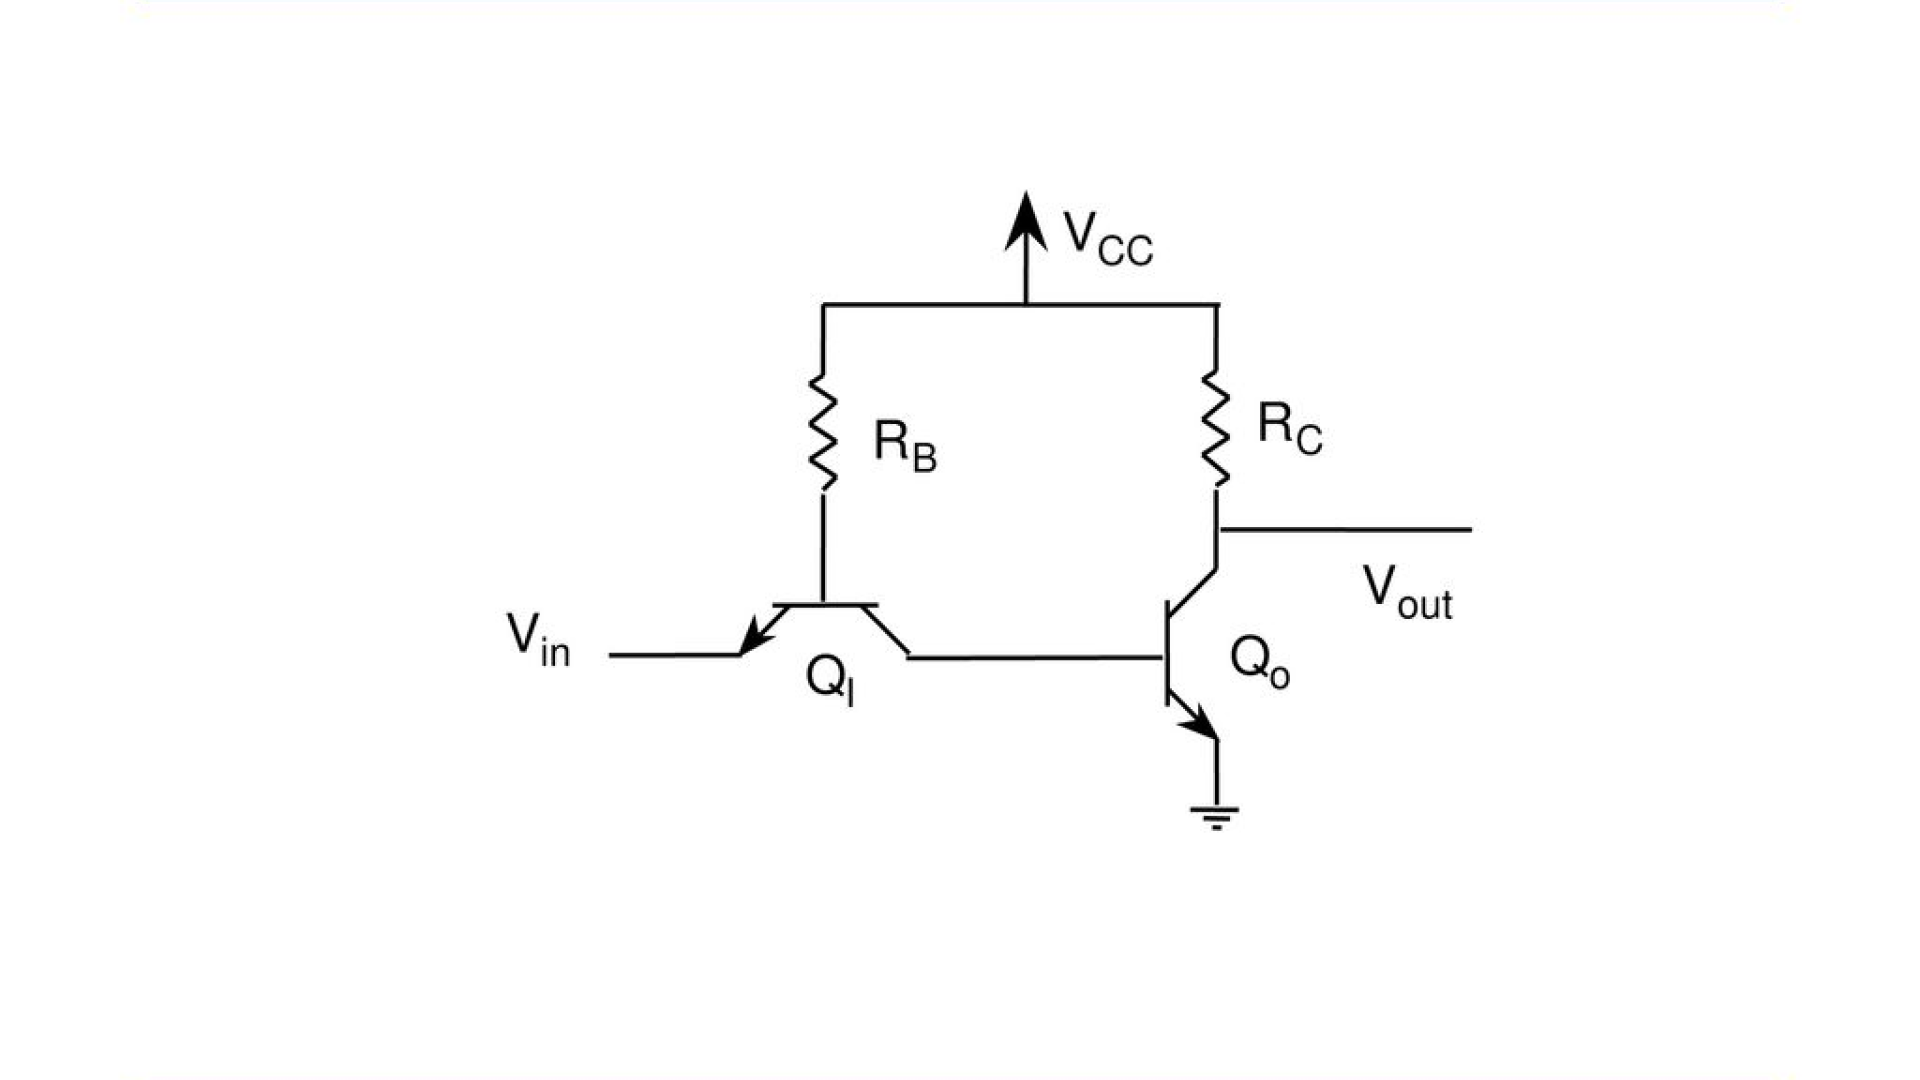
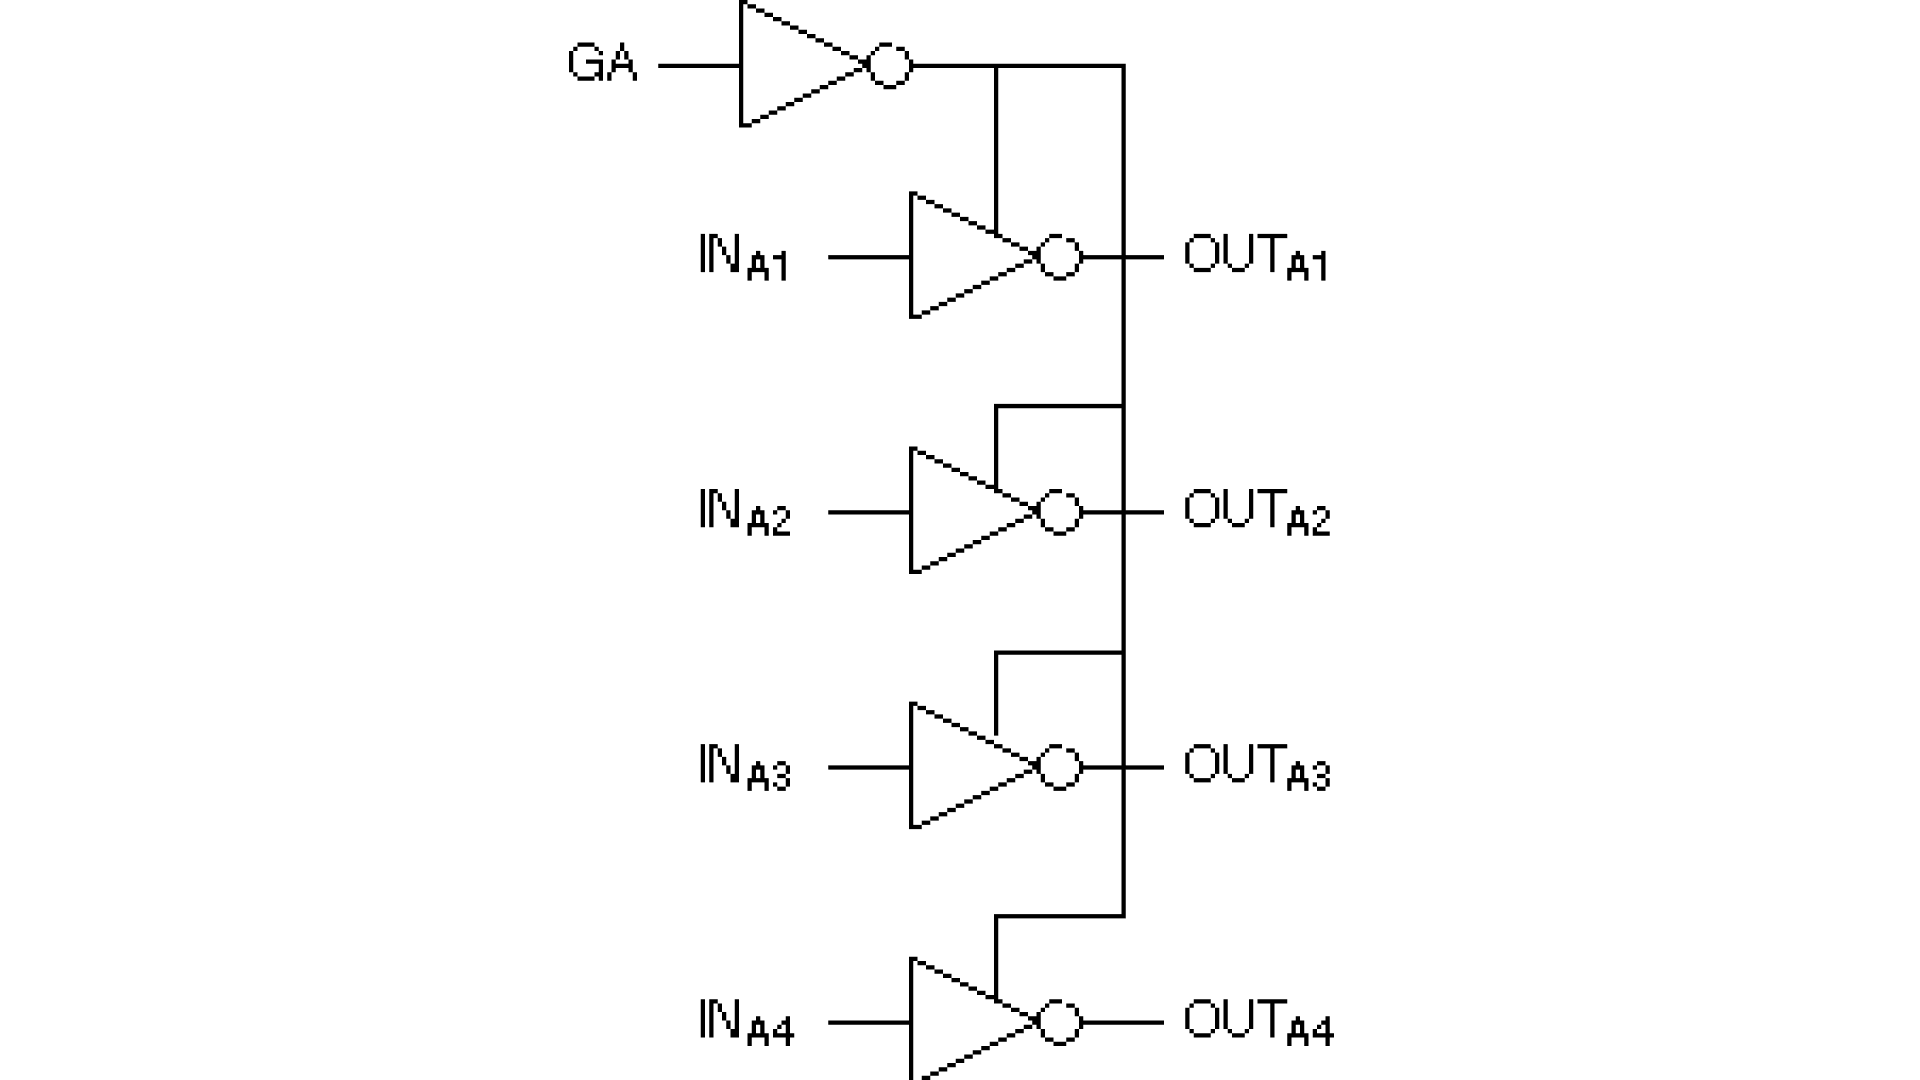
Fan-Out is the maximum number of parallel gates that can be connected to a single gate without affecting the output of the gate.
Step-1: Writing Netlist of the circuit
* TTL inverter
.MODEL bjt npn(BF=20)

* Subcircuit for TTL inverter
.subckt inv e1 c2
    Rb b1 cc 10k
    Rc c2 cc 1k
    Q1 c1 b1 e1 bjt
    Q2 c2 c1 0 bjt
    Vcc cc 0 5
.ends

Vin in 0 5

xmaster in out0 inv

x1 out0 out1 inv
x2 out0 out2 inv
x3 out0 out3 inv
x4 out0 out4 inv
x5 out0 out5 inv
x6 out0 out6 inv
x7 out0 out7 inv
x8 out0 out8 inv
x9 out0 out9 inv
x10 out0 out10 inv
x11 out0 out11 inv
x12 out0 out12 inv
x13 out0 out13 inv
x14 out0 out14 inv
x15 out0 out15 inv
x16 out0 out16 inv

.control
run
dc vin 0 5 0.01
set xbrushwidth = 3
set color0 = white
plot v(out0) v(in)
.endc
.end
Here the use of .subckt and .ends is to define a subcircuit.The subcircuits are like functions in programming languages that define once then feed the values and use as many times as you want. The subcircuit can be used in the main circuit by using the x symbol.
Save the file as
ttl-inverter.cir.
Step-2: Running the simulation
ngspice ttl-inverter.cir
Output:
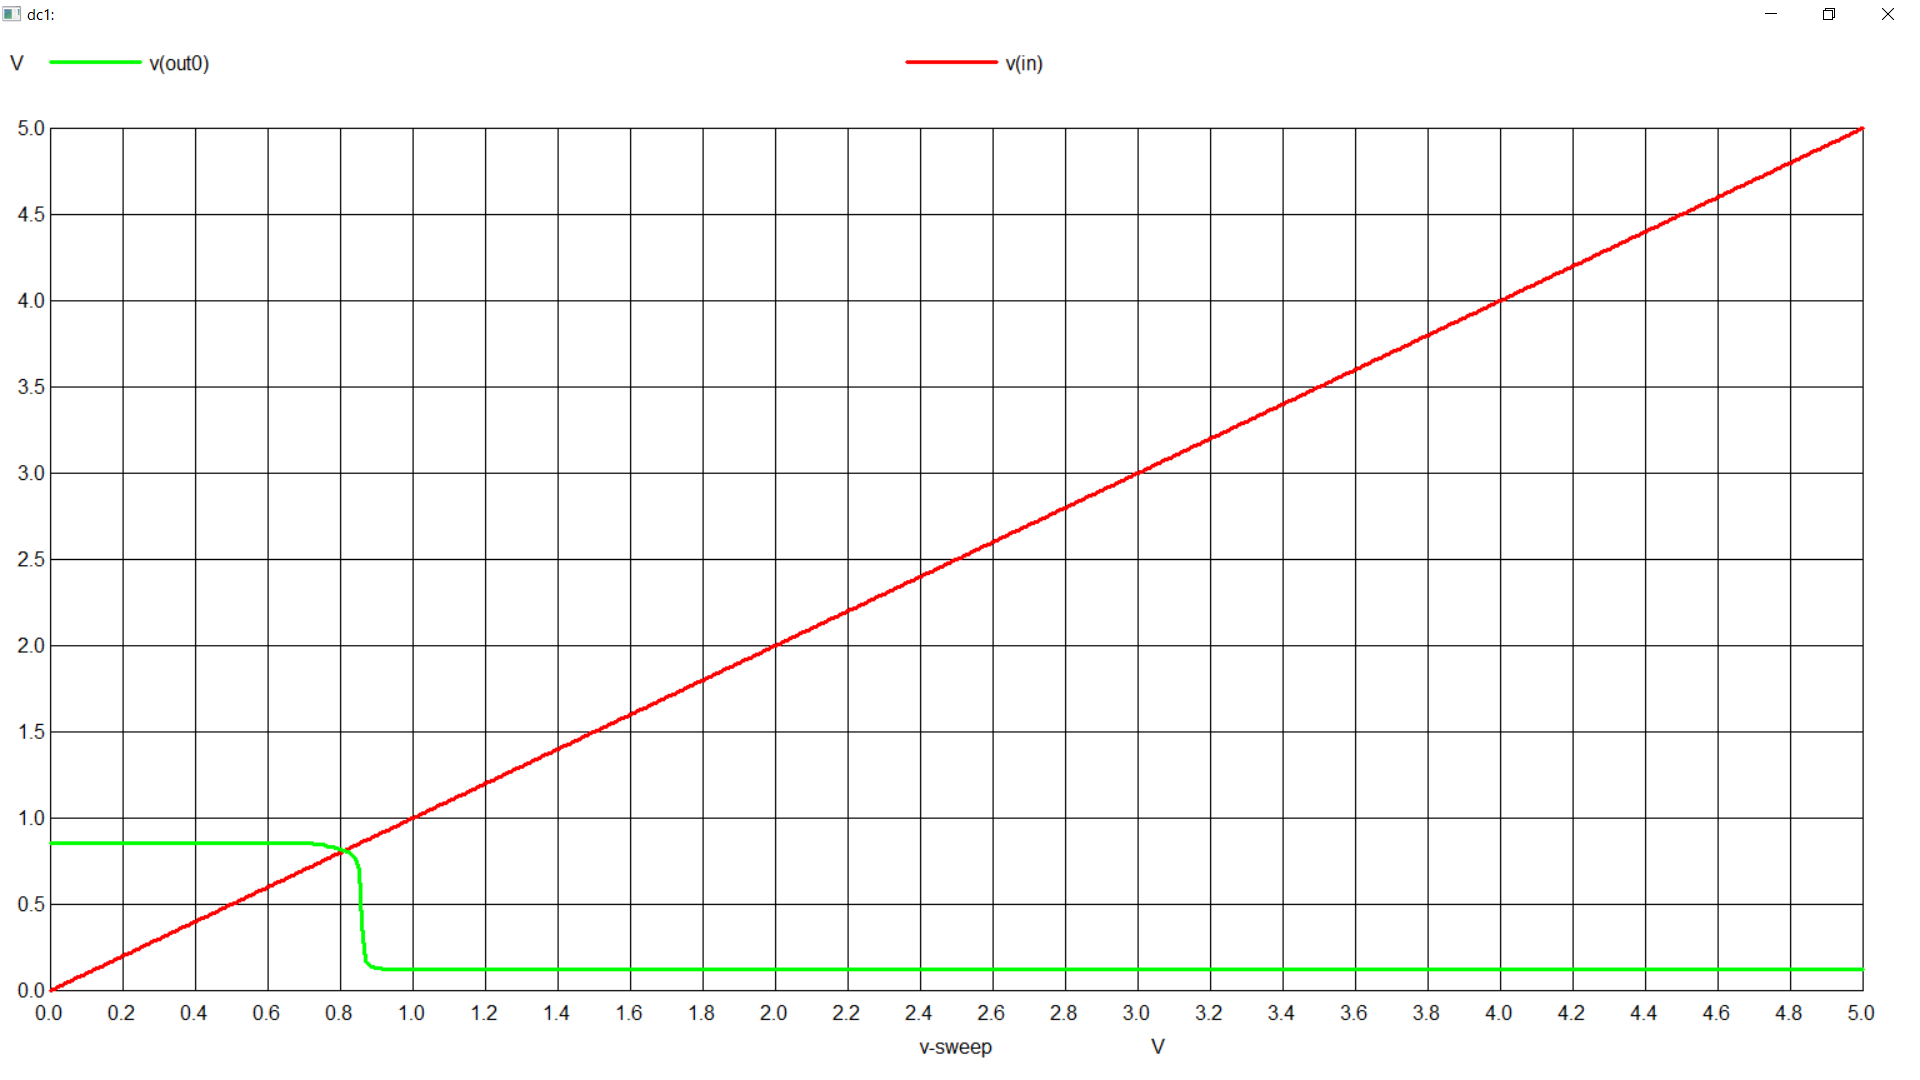
- Here we can see that if we connect one extra gate to the output of the inverter then the output of the inverter becomes unstable. Hance the fanout of the inverter is 16.
Advantages
NGSPICE has several advantages over other circuit simulation tools:
Open-source - NGSPICE is free and open-source, which means that anyone can use, modify, and distribute the software without restrictions.
Cross-platform - NGSPICE runs on Windows, macOS, and Linux, making it accessible to a wide range of users.
Widely used - NGSPICE is widely used in the engineering and academic communities, which means that there is a large user base and plenty of support available.
Flexible - NGSPICE allows users to create custom component models, which means that it can simulate a wide range of circuits and components.
Lmitations
Steep learning curve - NGSPICE has a steep learning curve, especially for users who are new to circuit simulation.
Lack of GUI features - The GUI interface of NGSPICE is not as advanced as other commercial circuit simulation tools, which may make it less user-friendly for some users.
Conclusion
It's for sure one of the coolest tools that is worth checking out. If used properly, it can provide results accurate to real-life scenarios. It was a part of my curriculum and I was able to learn a lot from it. I hope you will too. I tried to cover only the basic stuff here. For more you can check out The official manual of NGSPICE. If you have any questions or suggestions, feel free to ping me on any of my socials. Thanks for reading !!!
Subscribe to my newsletter
Read articles from Aniket Rana directly inside your inbox. Subscribe to the newsletter, and don't miss out.
Written by
