Simplifying Workload Identity and Service Accounts in GKE
 Nikita Shinde
Introduction
In the world of Kubernetes, managing identity and access controls efficiently is crucial for secure and scalable deployments. Google Kubernetes Engine (GKE) provides robust mechanisms to handle these aspects through workload identity and service accounts. In this blog, we will explore these concepts, draw insights
Understanding Workload Identity
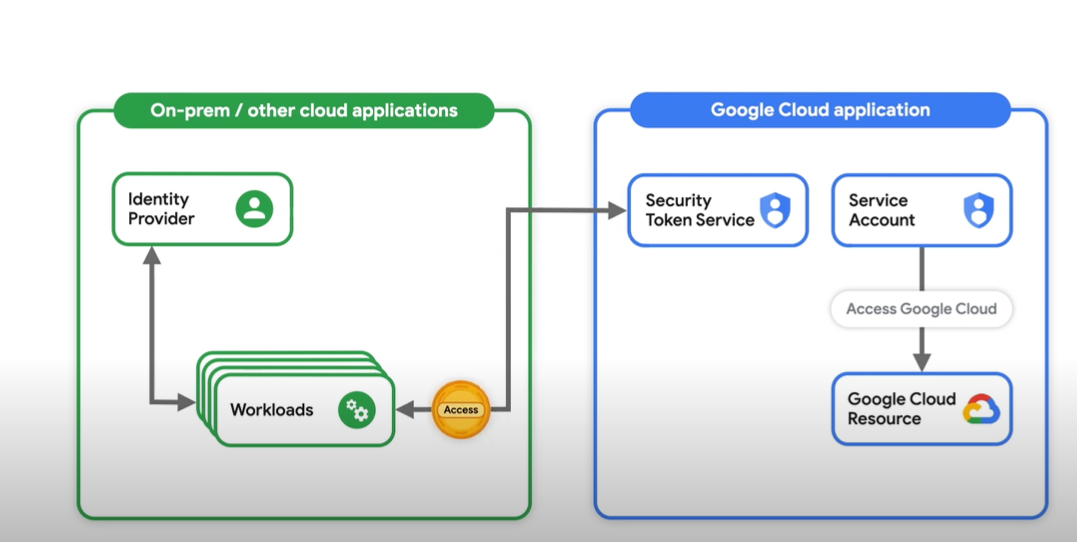
Workload identity in GKE allows your applications running in Kubernetes to securely access Google Cloud resources without manually managing credentials. By leveraging Google Cloud's IAM (Identity and Access Management), workloads can assume identities that grant them the necessary permissions to interact with Google Cloud services.
Key Benefits:
- Enhanced Security: Workload identity eliminates the need to manage and rotate service account keys manually, reducing the risk of credentials being exposed.
Simplified Access Management: Integrating IAM roles with Kubernetes service accounts simplifies the process of granting permissions to workloads.
1. Configure applications to use Workload Identity
Consider we have a GKE application and we want to enable workload identity,
so without workload identity, the workloads will use default service accounts like
to achieve this, go to Kubernetes Engine > Clusters > Security
and enable the workload identity option,
we need to update the node pool to use the GKE metadata server
To modify an existing node pool to use Workload Identity Federation for GKE, run the following command: you can either change it from the Google Console or CLI
gcloud container node-pools update NODEPOOL_NAME \
    --cluster=CLUSTER_NAME \
    --region=COMPUTE_REGION \
    --workload-metadata=GKE_METADATA
after that, log into your cluster and run this, to verify the service account
gcloud auth list
Look for the field autopilot in the output. If it says, your cluster is in Autopilot mode. If not, it's a Standard cluster
2. Create GCS Bucket & Service Accounts
- Create a bucket
gcloud storage buckets create gs://testing-nonprod --project=testing-nonprod --default-storage-class=STANDARD --location=us-west1 --uniform-bucket-level-access
- Create a Kubernetes Service Account:
kubectl create serviceaccount <k8s-service-account> --namespace <namespace>
- Create an IAM service account for your application or use an existing IAM service account instead. You can use any IAM service account in any project in your organization
gcloud iam service-accounts create <gcs-service-account> \
    --project=testing-nonprod
- Ensure that your IAM service account has the roles you need. You can grant additional roles using the following command(give permission from Cloud Console):
gcloud projects add-iam-policy-binding testing-nonprod \
    --member "serviceAccount:<gcs-service-account>@testing-nonprod.iam.gserviceaccount.com" \
    --role "roles/storage.admin" \
    --condition='title=testing-nonprod,expression=resource.service == "storage.googleapis.com" && resource.name.startsWith("projects/_/buckets/testing-nonprod")'
- Bind the service account to the Kubernetes service account: Use IAM policy bindings to link your Kubernetes service account with the Google Cloud service account (bind it from Google Console).
gcloud iam service-accounts add-iam-policy-binding <gcs-service-account>@milvus-testing-nonprod.iam.gserviceaccount.com \
    --role "roles/iam.workloadIdentityUser" \
    --member "serviceAccount:testing-nonprod.svc.id.goog[default/<k8s-service-account>]"
- Annotate the Kubernetes Service Account: Annotate the Kubernetes service account to link it with the Google Cloud service account.
kubectl annotate serviceaccount <k8s-service-account> \
  --namespace <namespace> \
  iam.gke.io/gcp-service-account=<gcs-service-account>@<project>.iam.gserviceaccount.com
Why annotate the service account? It allows GKE to recognize which service account it is associated with. When you describe your Kubernetes service account, you’ll see the newly applied annotation that wasn’t there before
Deploy Your Workload: When deploying your workload, ensure it uses the Kubernetes service account you configured.
💡In Standard clusters only, add the following to thetemplate.specspec: nodeSelector: iam.gke.io/gke-metadata-server-enabled: "true"Save the following manifest as test-app.yaml
 apiVersion: v1
 kind: Pod
 metadata:
   name: test-pod
   namespace: NAMESPACE
 spec:
   serviceAccountName: <k8s-service-account>
   nodeSelector:
     iam.gke.io/gke-metadata-server-enabled: "true"
   containers:
   - name: test-pod
     image: google/cloud-sdk:slim
     command: ["sleep","infinity"]
     resources:
       requests:
         cpu: 500m
         memory: 512Mi
         ephemeral-storage: 10M
to check its mode from Google Cloud Console, go to Kubernetes Engine > Clusters, go to Nodes
Alternative: Check via Console or
gcloudCommand:If the GCP UI still doesn’t show the mode, you can quickly check using the
gcloudcommand-line tool:gcloud container clusters describe [CLUSTER_NAME] --zone [ZONE]Look for the field autopilot in the output. If it says, your cluster is in Autopilot mode. If not, it's a Standard cluster.
8. Apply the configuration to your cluster:
kubectl apply -f test-app.yaml
Wait for the Pod to become ready. To check the status of the Pod, run the following command:
kubectl get pods --namespace=NAMESPACEWhen the Pod is ready, the output is similar to the following:
 NAME       READY   STATUS    RESTARTS   AGE
 test-pod   1/1     Running   0          5m27s
Open a shell session in the Pod:
kubectl exec -it pods/test-pod --namespace=NAMESPACE -- /bin/bashGet a list of objects in the bucket:
 curl -X GET -H "Authorization: Bearer $(gcloud auth print-access-token)" \
     "https://storage.googleapis.com/storage/v1/b/BUCKET/o"
The output is the following:
 {
   "kind": "storage#objects"
 }
This output shows that your pod can access objects in the bucket.
alernatively test this command inside the Pod,
curl -H "Metadata-Flavor: Google" http://169.254.169.254/computeMetadata/v1/instance/service-accounts/default/email
if it gives this: <gcs-service-account>@testing-nonprod.iam.gserviceaccount.com
then we can call the Gcloud API and it returns the applied service account
I hope you found valuable insights in this article. See you in the next read!
Subscribe to my newsletter
Read articles from Nikita Shinde directly inside your inbox. Subscribe to the newsletter, and don't miss out.
Written by
