Cost-Effective Cloud Setup with AWS for Start-Ups
 Uchechukwu Chinwe Nnaji
OVERVIEW
Setting up an AWS cloud environment for a small tech startup is a great opportunity to take advantage of scalability, flexibility, and cost efficiency in the cloud. AWS provides the perfect environment for easily building and deploying applications that scale, without having huge upfront costs and hugely complicated infrastructure management. The challenge with AWS, however, is that it comes with a very broad ecosystem that one could find difficult to understand for any small team. The following article will guide you through the key steps in setting up a minimal, low-cost AWS environment that will be well-suited for a startup.
Efficient resource management, user access control, and cost optimization will help you configure an AWS environment that provides support in your startup ' s growth by keeping it within budget.We begin with the introduction to the AWS Management Console, whereby all of your cloud resources can be managed through a very intuitive interface. Then we take you through setting up AWS IAM for proper and secure access to your team members. Finally, we will take you through cost monitoring tools and best practices that help you keep a close watch on AWS expenses. This guide will take you through everything you need to know to get up and running on AWS-and position your startup to take full advantage of AWS as it innovates and scales, without breaking the bank.
GOALS
Familiarization with the AWS environment involves understanding its core services and navigation tools. It’s crucial to learn how to efficiently manage user access through IAM and to utilize cost management features to keep expenses under control. This foundational knowledge will help you set up and maintain a cost- effective and secure AWS environment.
PREREQUISITES
To use AWS effectively, there are several software prerequisites that you may need .
1.AWS Command Line Interface (CLI):
Software: AWS CLI Description: Allows you to manage AWS services from the command line.
Prerequisite: Python 3.7 or later (depending on the AWS CLI version).
Installation: Install using pip (pip install awscli) or download directly from AWS.
2.AWS SDKs:
Software: AWS SDK for various languages (e.g., Python, JavaScript, Java, .NET, Go).
Description: Libraries that allow developers to interact programmatically with AWS services.
Prerequisite: Specific language runtime and development environment (e.g., Python 3.x for Boto3, Node.js for AWS SDK for JavaScript).
Installation: Install via package managers like pip for Python (pip install boto3), npm for Node.js, etc.
3.Integrated Development Environment (IDE):
Software: IDEs like Visual Studio Code, IntelliJ, PyCharm, Eclipse, etc.
Description: Used for writing and managing code that interacts with AWS services.
Prerequisite: Relevant IDE extensions/plugins for AWS (e.g., AWS Toolkit for Visual Studio Code).
Installation: Available through the IDE marketplace or official websites.
3.AWS Management Console Access Software: A modern web browser (e.g., Chrome, Firefox, Edge, Safari).
Description: Used for managing AWS resources via the graphical interface.
Prerequisite: Internet connection and an updated web browser.
Introducing The AWS Management Console
The AWS Management Console is a web application that provides a point of entry to AWS where users can interact with and manage AWS services. It serves as a point of entry to AWS, which empowers first-time and expert users to configure, deploy, and monitor cloud resources without much hassle.
Step-by-Step Guide to Log In to the AWS Management Console
1.create an AWS Account (if you don’t already have one)
2.Visit the AWS Signup Page and click on "Create an AWS Account."
3,Fill in the required details, including your email, password, and account name.
AWS requires a valid credit card for account creation, even for free-tier usage.
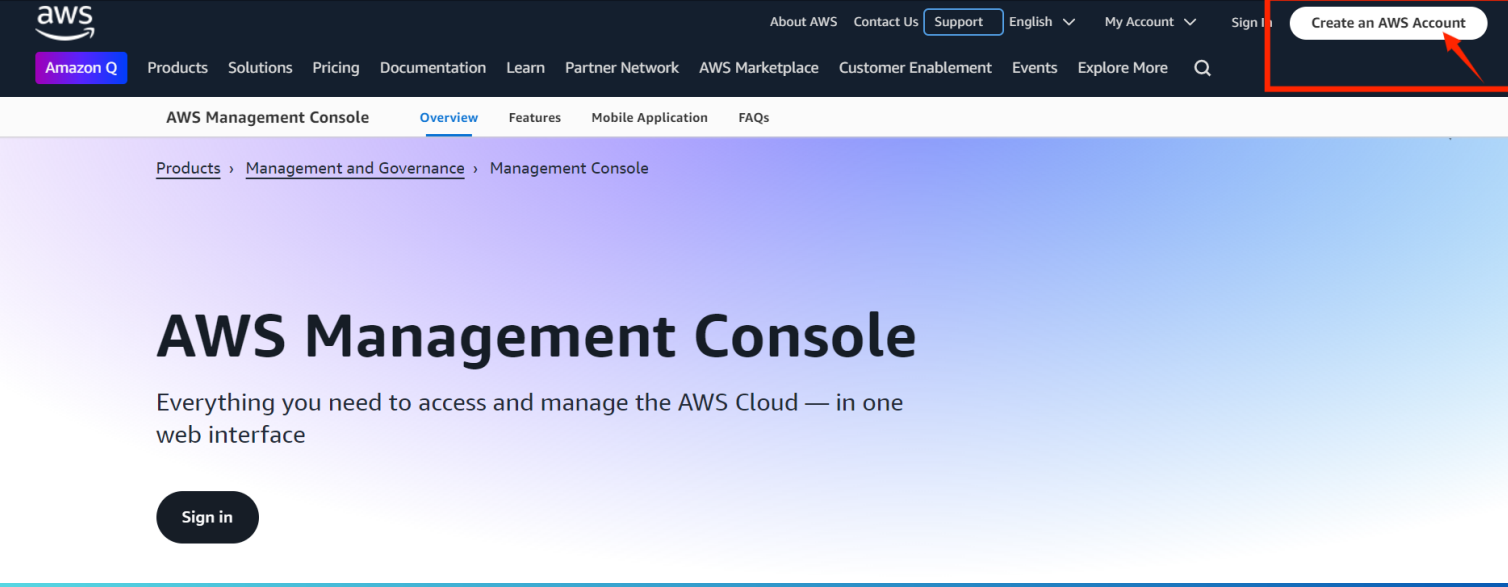
Step-by-Step Guide to Log In to the AWS Management Console
1.Go to the AWS Management Console Login Page:
2.Visit the AWS Management Console login page. Enter Your Credentials:
3.Input your Root User email or IAM User name
(if an IAM user account has been created) and click Next.
4.Enter the password associated with your AWS account or IAM credentials and
5.click Sign In.

Step-by-Step Guide to Log In to the AWS Management Console
1.Choose the AWS Region:
2.After logging in, you will be directed to the AWS Management Console Dashboard.
3.The main dashboard provides an overview of recent activity, billing, and quick
access to services.
5.At the top right corner, select the appropriate AWS Region
where you want to manage your resources(e.g., US East (N. Virginia), EU (Frankfurt), Asia Pacific (Mumbai)
6.Service Search: Use the search bar to quickly locate specific services or explore
the “Services” menu for a full list.

IAM (Identity and Access Management)
AWS Identity and Access Management (IAM) is the service that helps to securely control access to AWS resources. This can be done by managing users, groups, and permissions and thereby marking who can access certain services and resources along with what kind of conditions. What's more, IAM allows you to create security policies with very exact permissions, making sure only the right people have the right access to your AWS environment.
Step-by-Step Guide to Log In to the IAM Dashboard
1.Access IAM Dashboard:
2.Click on "Services"
3.choose "IAM" under the Security, Identity, & Compliance

Essential IAM Configuration for Beginners
Important Features: Users, groups, roles, and policies. Understanding these
components is crucial for securing your environment.
Creating IAM Users with Privileges
1.Navigate to IAM:
2.In the AWS Management Console, go to "IAM." Add User:
3.Click on "Users" in the sidebar. Click "Add user."
4.Enter a username and select the type of access
5.Set permissions by attaching existing policies or creating a new one.

Creating IAM Groups
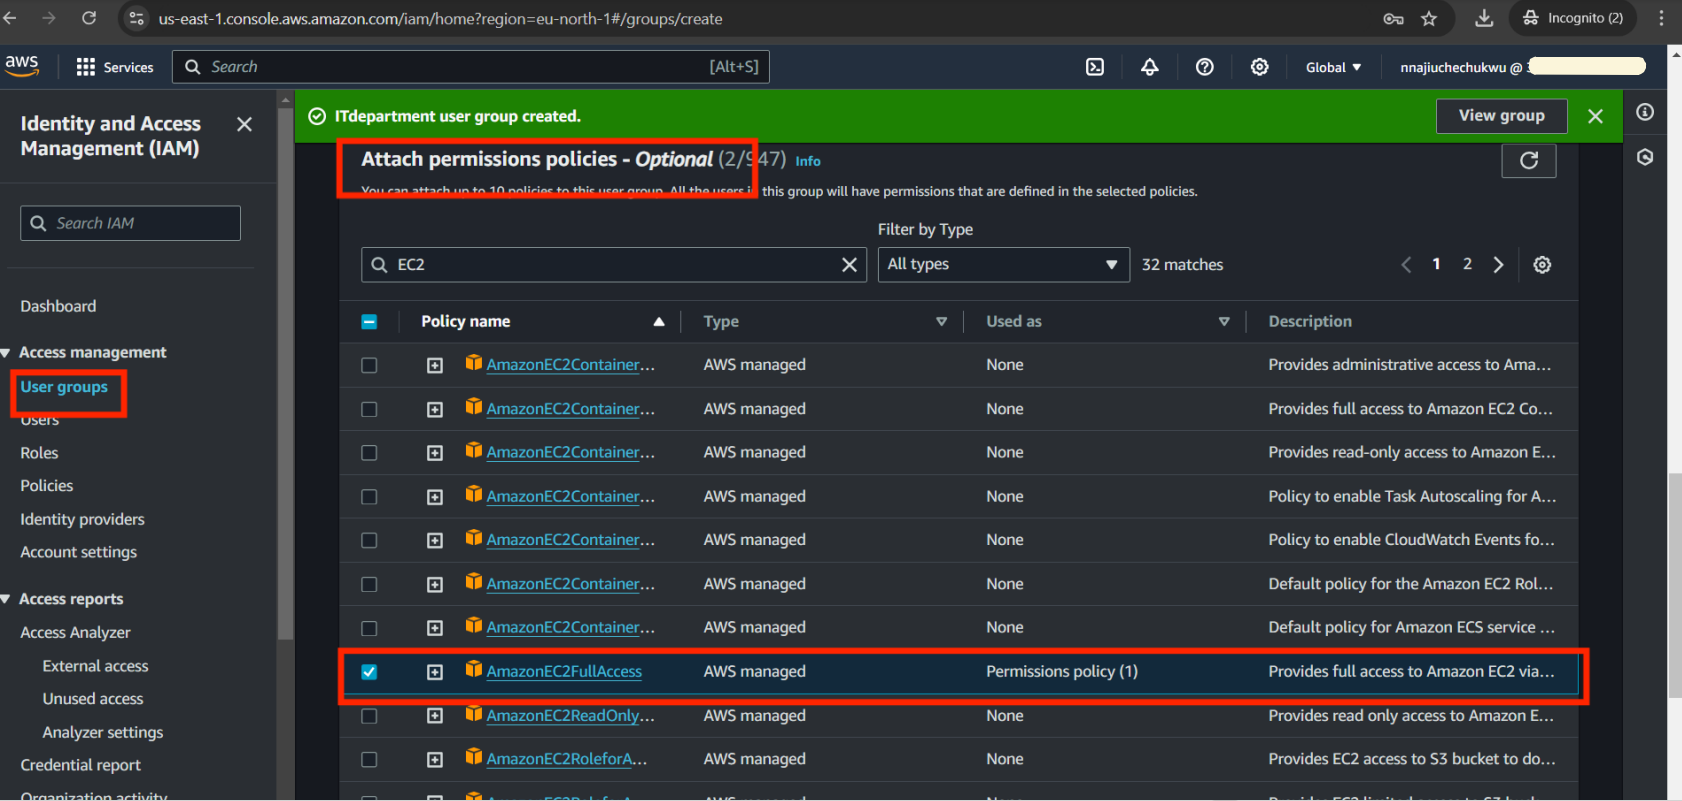
1.Navigate to Groups: In the IAM dashboard, go to "Groups." Create Group:
2.Click "Create New Group."
3.Name the group (e.g., "Developers"). Attach relevant policies
4.Review and create the group.
Why Groups Are Important: Groups simplify permission management by allowing
you to assign policies to a group rather than to individual users.

Assigning Basic Policies/Permissions
1.Assign Policies to Users or Groups: Go to "Users" or "Groups" in IAM.
2.Select the user or group.
3.Click "Add permissions."
4.Choose "Attach policies directly" or "Add user to group" for easier management.
Examples of Basic Policies:
AmazonS3ReadOnlyAccess for read-only access to S3.
AmazonEC2FullAccess for complete access to EC2
(consider more restricted policies for better security).
Create Users and Groups:
Click "Users" or "Groups" to create new users or groups, assign them roles,
and manage their permissions.
Manage Policies:
1.Click "Policies" to create, view, or attach policies to users, groups, or roles to
control access to AWS resources.
2.Enable MultiFactor Authentication (MFA):
3.Click on "Users", select a user, and choose "Security credentials" to enable MFA for enhanced security.
Why you should Create an IAM User with Specific
Privileges
Besides other reasons, some of the best security practices that can create an IAM user with specific privileges are: Security Best Practices:
It is considered good security practice not to utilize the root user account that was created at the time the AWS account was set up for daily work. This is because it has full access to all AWS resources. Instead, IAM users should be created with only the necessary permissions to perform their roles.
Fine-Grained Access Control:
IAM enables you to provide the least amount of privilege necessary for an actor to perform an action; this reduces the risk of accidental disclosure or malicious acts against your resources or data.
Audit and Compliance
IAM users ease tracking activities via AWS CloudTrail logs. It provides accountability and traceability of actions in your AWS environment. It is important from the point of view of audits and compliance.
Segregation of Duties
Different users can have different levels of access depending on their roles. For example, a developer may need access to create and manage EC2 instances, whereas on the other side, a billing administrator only needs access to billing information.
Billing and Cost Management in AWS
AWS Billing and Cost Management, an AWS service, allows you to manage and optimize your AWS costs and usage. It comes with tools such as your past and present bills, and letting you check it, budgeting and cost alerts that you can use for free, and your spending patterns can be tracked. The capacity for cost allocation tags, detailed billing reports, and AWS Cost Explorer, you can easily see where you use your resources the most, stand to save costs, and make sure that you are sticking to your budget. This facility is compulsory usage for the purposes of money management and proper cloud services. Cloud service cost monitoring, as a cloud service, and cost optimization tools are necessary.
Access the "Billing and Cost Management" dashboard to view detailed billing information, set budgets, and track costs. It's crucial to monitor this regularly to avoid unexpected charges.
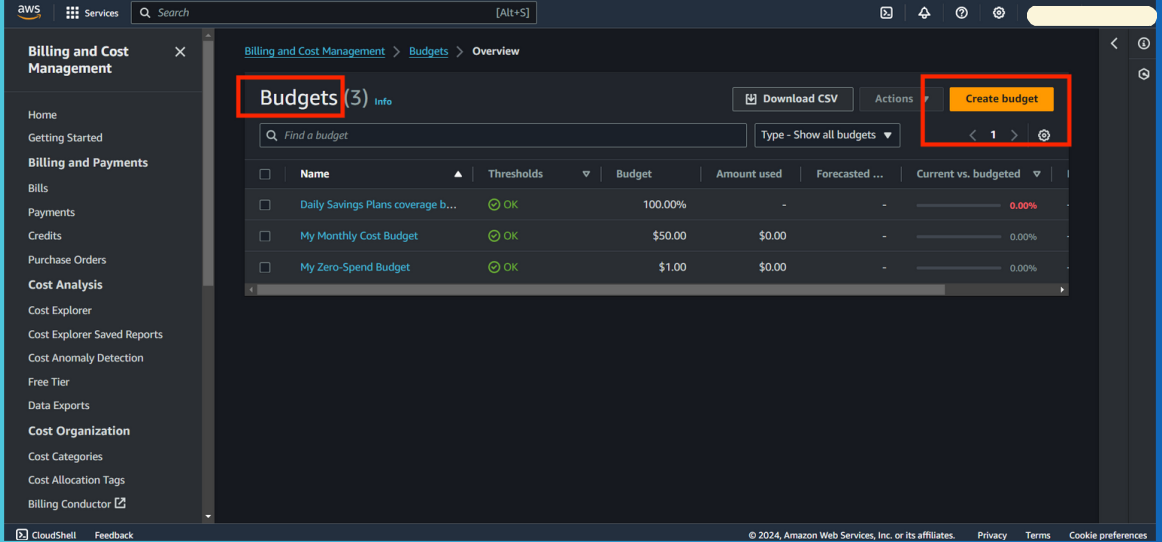
Step-by-Step Guide on :
How to create a budget in AWS using the AWS Budgets service
1.Sign in to AWS Management Console
2.Go to the AWS Management Console.
3.Sign in with your AWS account credentials.
4.Navigate to Services
5.Select Cloud Financial Management

Select Billing and Cost Management
6.Select Budget from the drop down
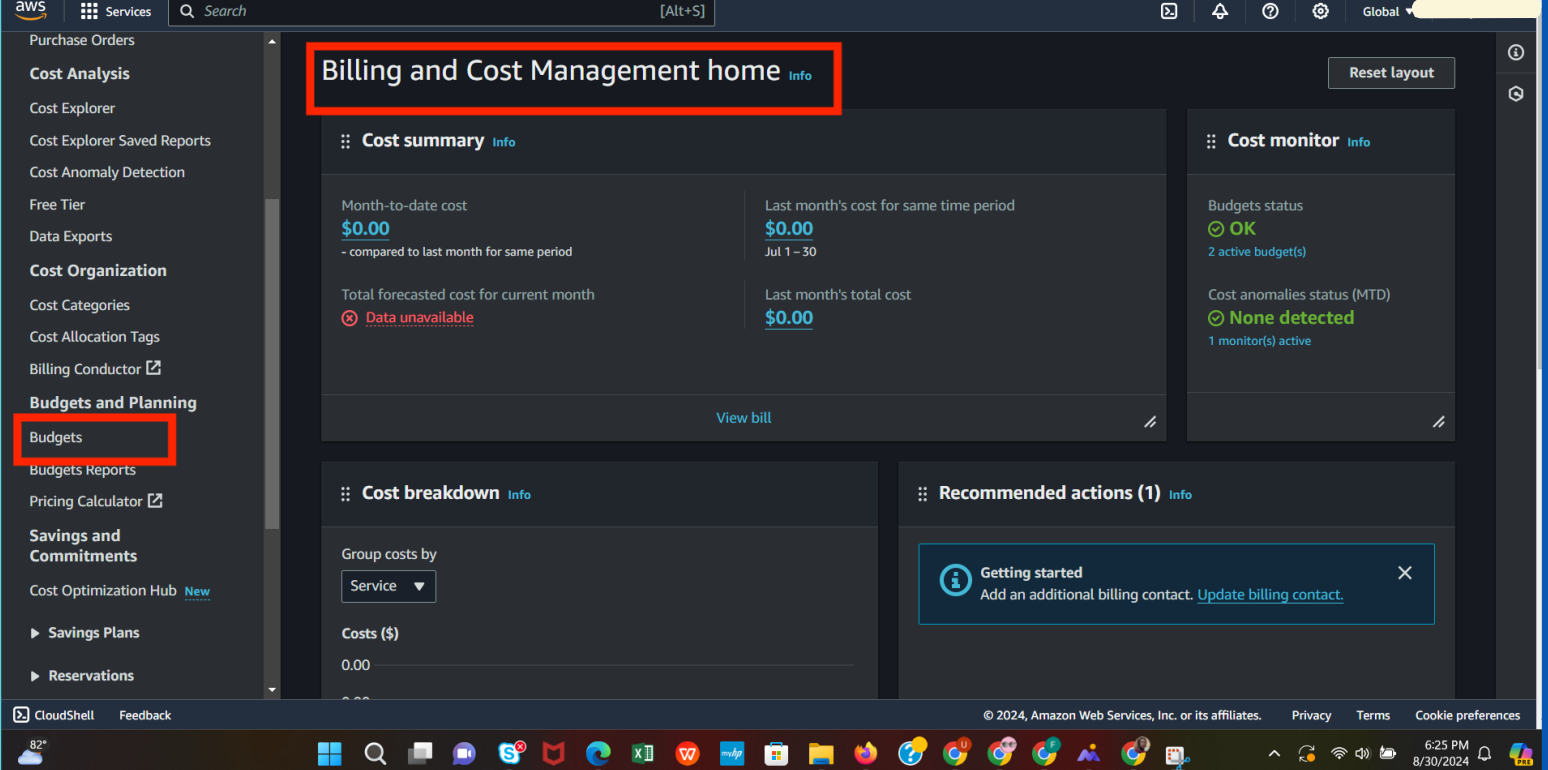
7.On the AWS Budgets dashboard, click the "Create a budget" button.
Important Note :
Kindly ensure that you are sticking to your budget. This facility is compulsory usage for the purposes of money management and proper cloud services.
Cloud service cost monitoring, as a cloud service, and cost optimization tools are
necessary.
Access the "Billing and Cost Management" dashboard to view detailed billing information, set budgets, and track costs. It's crucial to monitor this regularly to avoid unexpected charges.
Choose a period for your budget and choose the start month (e.g., monthly or yearly). Enter a name for your budget.

Set Alerts and Notifications
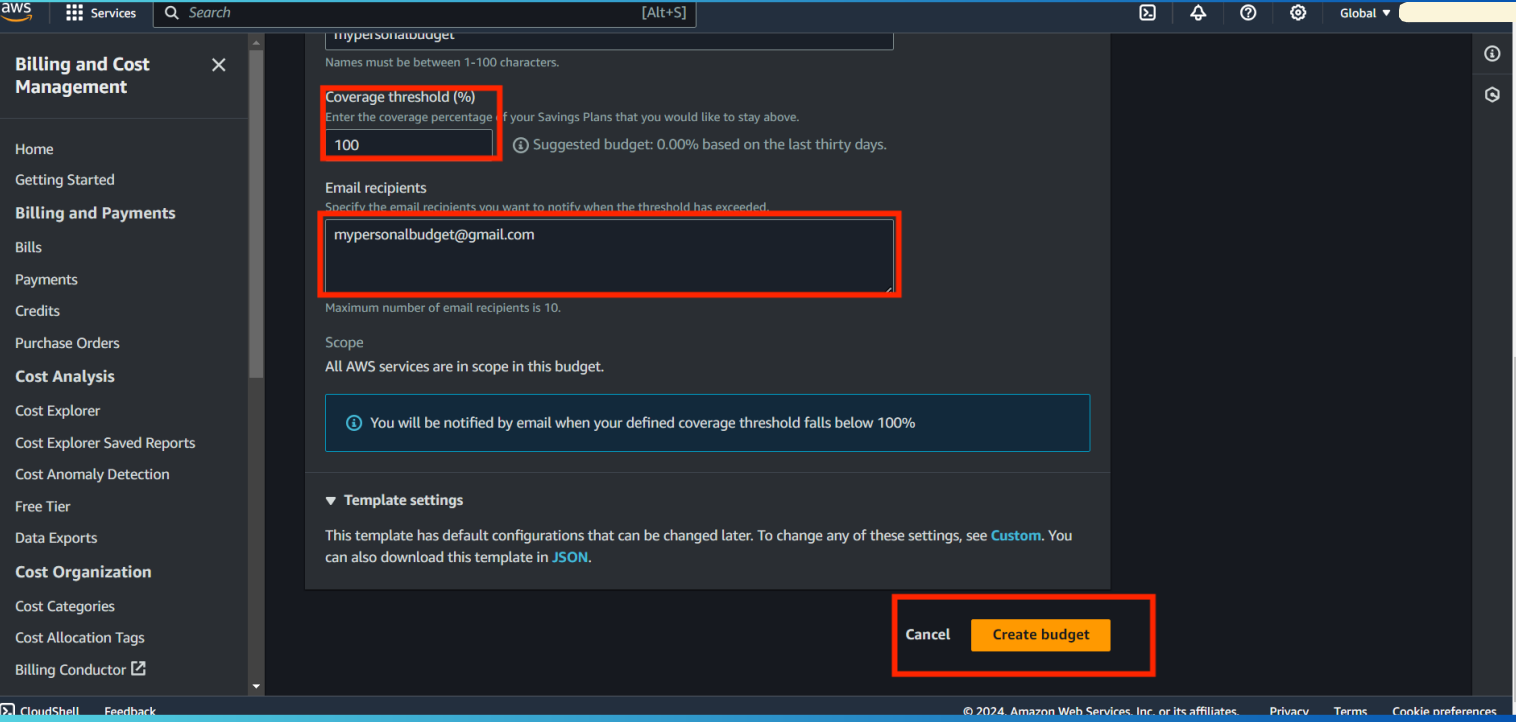
1.Choose to create notifications based on budget thresholds.
2.Define the thresholds (e.g., when 80% of the budget is spent).
3.Set the budgeted amount (the maximum amount you want to spend or use).
4.Enter the email addresses to notify when thresholds are reached.
5.Review and Create the Budget
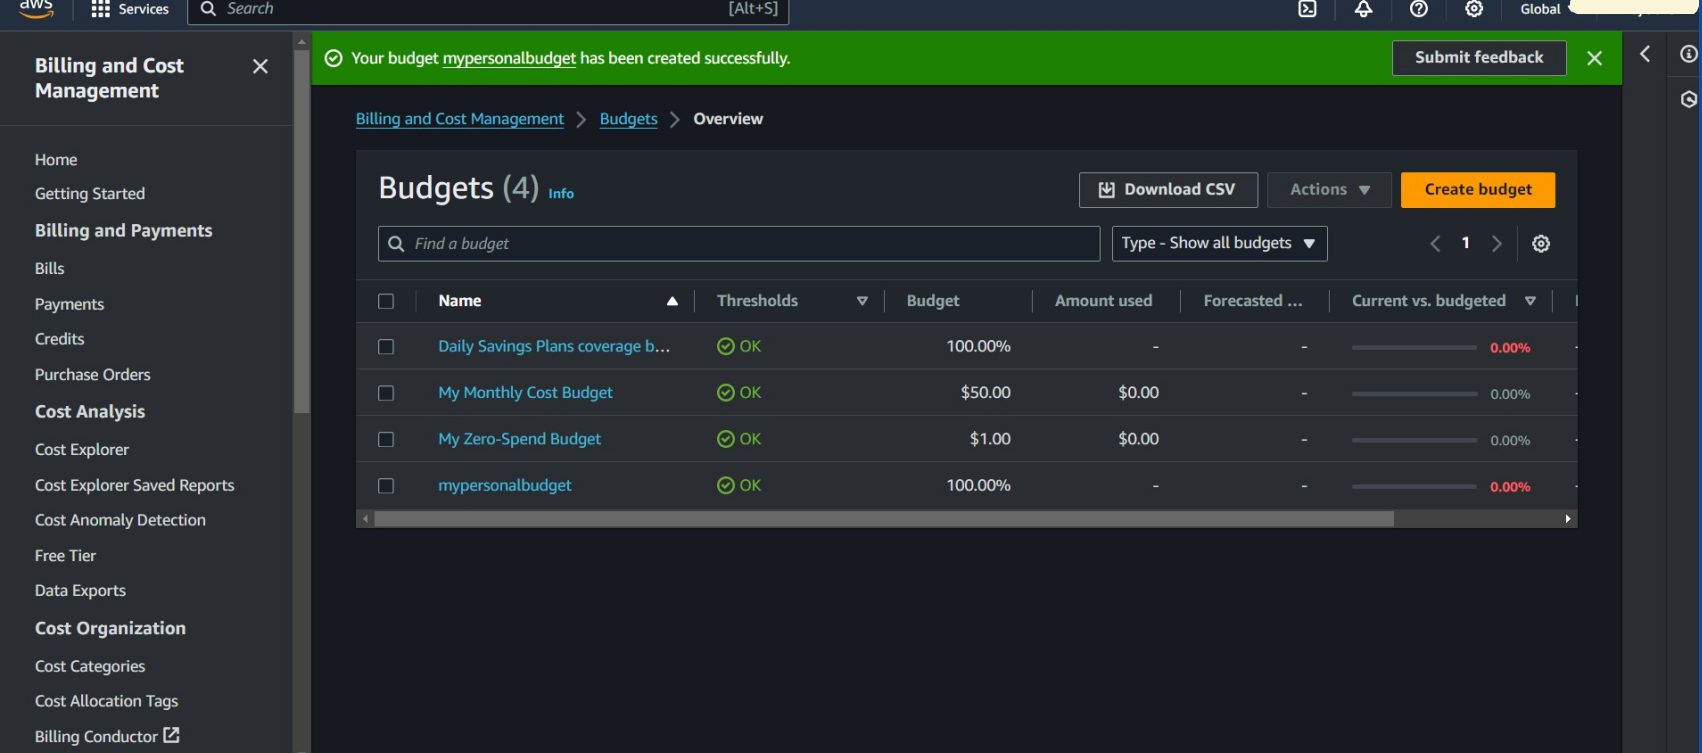
6.Review all the details you have provided. Click "Create budget" to finalize.
CONCLUSION
Setting up a cost-effective AWS environment involves a balance of understanding AWS services, configuring IAM for secure access, and monitoring costs to stay within budget. By familiarizing yourself with the AWS Management Console, setting up IAM correctly, and keeping a close eye on your costs, you'll create a solid foundation for your startup's cloud infrastructure. Remember to revisit your configurations periodically and adjust as your startup grows. With these basics in place, you'll be well on your way to leveraging AWS efficiently and effectively.
References:
@Fredrick_Achiever @Skill _Afrika
Subscribe to my newsletter
Read articles from Uchechukwu Chinwe Nnaji directly inside your inbox. Subscribe to the newsletter, and don't miss out.
Written by

Uchechukwu Chinwe Nnaji
Uchechukwu Chinwe Nnaji
Customer Success Management |Business Improvement & Innovation |Cloud Enthusiast| Passionate about Cloud computing, transforming customer journeys, and driving growth through data-driven insights and inventive solutions.