How to Set Up a Jupyter Notebook in VS Code (with Virtual Environment & Kernels) and Install Packages
 alexandra moldovan
This guide will walk you through setting up a Jupyter Notebook in Visual Studio Code (VS Code) using a virtual environment, creating kernels, and installing necessary packages.
Steps
1. Install Jupyter
First, you need to install Jupyter to work with Jupyter Notebooks. You can do this via Pip, Anaconda, or Conda depending on your preference.
Using Pip:
pip3 install jupyter
Alternatively, you can use Anaconda or Conda if you prefer those package managers.
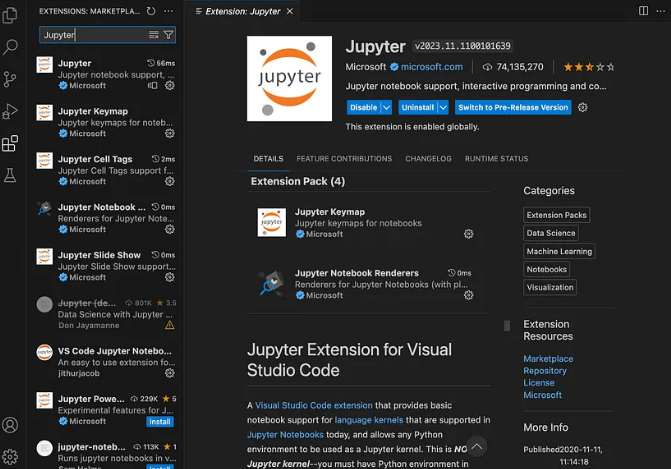
2. Install the Jupyter Extension in VS Code
Open VS Code.
Click on the Extensions button on the left sidebar.
Search for Jupyter in the search bar.
Click Install.

Once installed, this extension will allow you to open, edit, and run Jupyter Notebooks in VS Code.
3. Create a Project Folder & Navigate into It
You need to create or navigate to a project folder to organize your work. This can be done in the terminal, Finder, or VS Code.
To create a folder from the terminal:
mkdir myproject
Then navigate into the folder:
cd myproject
Alternatively, you can do this directly within VS Code by opening the command palette (Ctrl + Shift + P or Cmd + Shift + P on Mac) and selecting Open Folder.
4. Create & Activate a Virtual Environment
A virtual environment ensures your project dependencies are isolated.
Open a terminal within VS Code and navigate to your project folder.
Create a virtual environment by running the following command:
python3 -m venv my_virtual_envAfter creating the virtual environment, activate it:
On macOS/Linux:
source my_virtual_env/bin/activateOn Windows:
my_virtual_env\Scripts\activate
Your terminal should now look something like this, indicating the virtual environment is active:
(my_virtual_env) user@machine myproject $
Verify the virtual environment by listing its files:
ls my_virtual_env
You should see directories like bin, lib, include, etc.
5. Install ipykernel
Next, install the ipykernel package, which allows your virtual environment to be used as a Jupyter kernel:
pip3 install ipykernel
6. Create a New Kernel for the Project
After installing ipykernel, you need to create a new kernel associated with your project:
python3 -m ipykernel install --user --name=myproject_kernel
Here, myproject_kernel is the name of the new kernel. You can choose any name that suits your project.
7. Start and Open a Jupyter Notebook in VS Code
You can now launch Jupyter Notebook directly from VS Code using the command below in the terminal:
jupyter notebook
Alternatively, you can use the VS Code command palette to create a new Jupyter Notebook:
Press
Ctrl + Shift + P(orCmd + Shift + Pon macOS).Type
Create: New Jupyter Notebookand select the option.

8. Select the Correct Kernel for the Project
Finally, ensure you are using the correct kernel for your project.
Open the command palette by pressing
Ctrl + Shift + P(orCmd + Shift + Pon macOS).Search for
Notebook: Select Notebook Kernel.Select Jupyter Kernel.

- Choose the
myproject_kernelyou created earlier.

You should see the kernel status displayed at the top right of your notebook.
Sample Code: Running a Simple Python Script in Jupyter
Now that your Jupyter Notebook is set up in VS Code, let’s run some Python code:
# Importing packages
import numpy as np
import matplotlib.pyplot as plt

# Creating data
x = np.linspace(0, 10, 100)
y = np.sin(x)

# Plotting the graph
plt.plot(x, y)
plt.title('Sine Wave')
plt.xlabel('x')
plt.ylabel('sin(x)')
plt.show()
This script generates a simple sine wave plot.
Installing Additional PackagesTo install additional packages within the virtual environment, use the pip command:
pip install package_name
For example, to install numpy and matplotlib:
pip install numpy matplotlib
After installation, you can start using these libraries in your Jupyter Notebook.
With these steps, you now have a fully functional Jupyter Notebook setup in VS Code with virtual environments and custom kernels. This setup is perfect for keeping your project dependencies isolated and easy to manage. Happy coding!
Subscribe to my newsletter
Read articles from alexandra moldovan directly inside your inbox. Subscribe to the newsletter, and don't miss out.
Written by
