How to ABAC: Banking Edition
 Vanessa Villa
What is ABAC?
Attribute-based Access Control is an authorization schema that allows for fine-grained access policies to be created based on attributes like location, time of day, and a user’s department. For a more detailed look as to the benefits of ABAC over other Authorization models, look at the AuthZ schema comparison blog here.
Banks are a wonderful example of how to use ABAC. They have users that travel the world and need to be able to access their accounts but also need to be wary of fraud, phishing attacks, and a host of other problems. Should customers be able to create and delete bank accounts from different countries without a secondary check? That seems like highly suspicious activity and banks may want to block those actions or get on a call with the customer to confirm their identity and intent.
Why use ABAC?
There are access policies that cannot be fulfilled with RBAC and ReBAC alone. Attributes add that additional granularity to design access based on things like location, time, and user’ information like ‘number of days employed’. Think of it as an additional method to construct authorization models. For more information on the pro’s of ABAC, check out Pangea’s announcement of the feature. Once you’ve decided that you want to go forward with adding ABAC as a layer of refinement on top of your existing authorization policies, check out our walk through of how to configure an authorization schema for banks. The example shows how to add access checks to user’s creating and deleting banks to a specific country.
How to add Authorization to your app (ABAC)
ABAC can be configured in Pangea using the Pangea User Console. Create a free Pangea account and enable the AuthZ Service and follow the steps below to configure our ABAC implementation. We are going to extend out the Bank example for today.
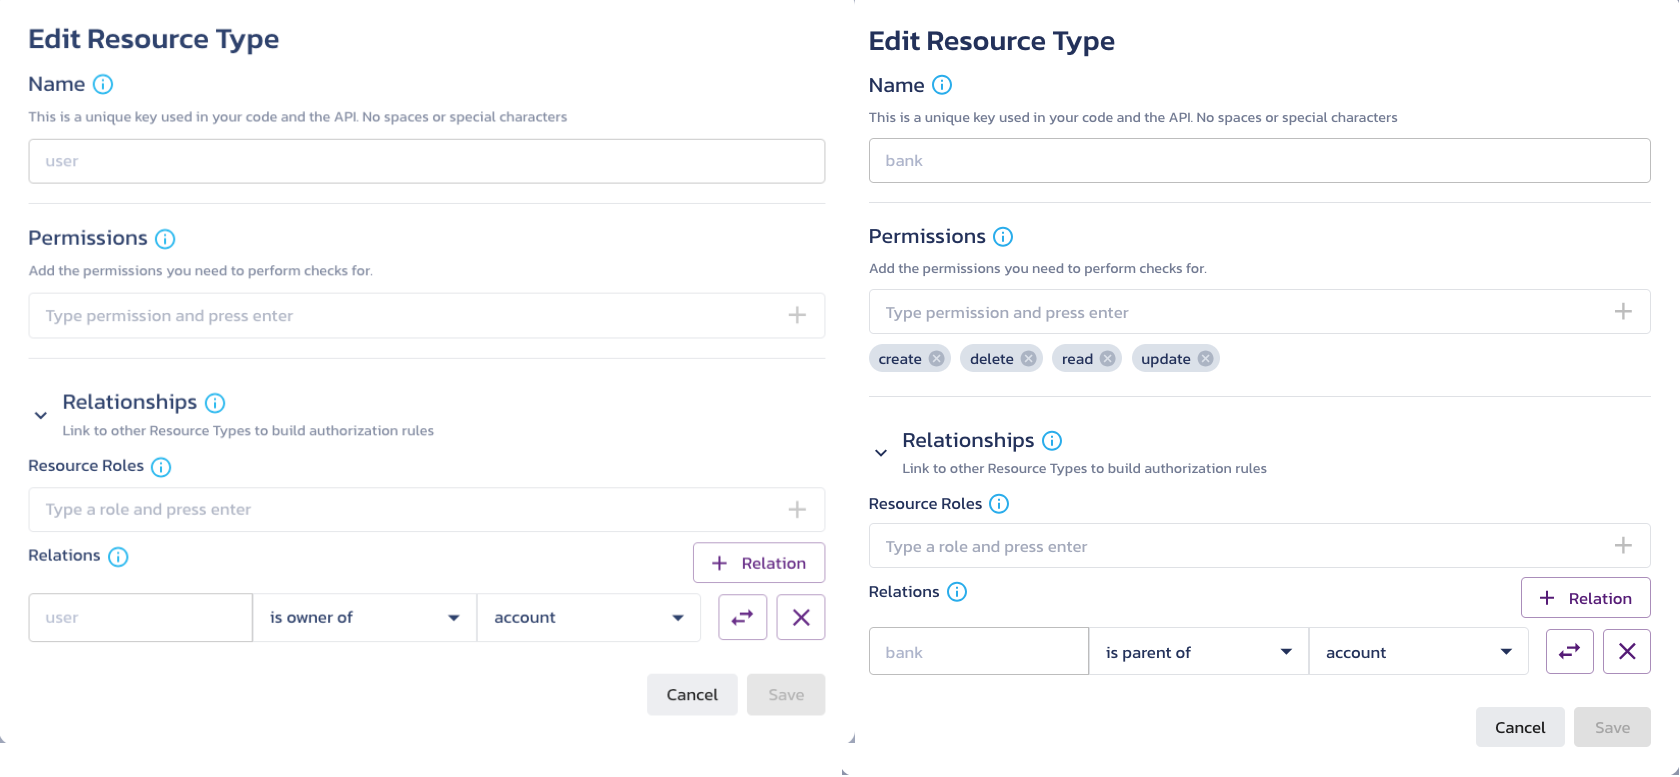
1. Add your Resource types.Resources the types of things that we will have in our system. We get a ‘User’ resource by default but because we are defining a bank system it would need accounts and banks.
Each resource type by default has CRUD operations but if there is another operation like Transfer or Invite needed, feel free to add them here.
Adding Roles
2. Give Roles Access to Resources:
Go to the Roles & Access page to define each role’s permissions. For the bank example, we have Banker, Teller, and Account Owner roles. We will tackle the Account Owner role in the next step. Banker and Teller permissions to resources Bank and Accounts are shown below.
For a Banker, they should have access to create, delete, read and update for banks but only be able to read and update accounts.
As for the Tellers, they need access to read and update both the account and bank. Their access table should look something like the image below.
Adding Relationships
3. Add relationships to resources: Account Owners should only be able to see their own account. If we had added them as an explicit role Account Owners would be able to see all the account information and open up the possibility of them seeing Bank information as well. We go back to the Resources tab and can now add that role to the account resource itself:
Go into the User resource and add a relationship of “
User is the owner of Account”Go into the Bank resource and add a relationship of “
Bank is parent of account”

Going back to the Roles & Access page we can see Account Owner as a new role and update the permissions accordingly.
Adding Attributes
4. Add attributes: You probably don’t want Account Owners to be able to create and delete accounts from beyond their country of origin. Let’s add an attribute that will check to ensure that is true. Click on the three lines next to the create permission.
This should open up a side panel where you can then click function
Next you can populate the function. Call it country_check and add the request.attributes.country == US logic to the function, update, and save.
For delete, the function should already exist and should be easy to add.
5. Assign a Role: This is where we put all of it together and can assign people to specific roles. For today’s example, we are going to do the following assignment of User “Pango” is a owner for account “12345”.
We can also say that this bank account belongs to a specific bank. In the example for today bank ‘Manidae’ is parent for account "12345".
Coding
7: Install the SDK and token values: to make an access check in your application, you can install AuthZ SDK like below.
npm install pangea-node-sdk
You copy the Default token and Pangea Domain into your environment variables. Those values are located in the AuthZ Overview Page.
#Put this in your .env file with the correct values

PANGEA_DOMAIN="<Pangea Domain Value>"
PANGEA_AUTHZ_TOKEN="<Pangea AuthZ Token>"
8. Call AuthZ to check access: The call to check if a user has access to a resource looks like the code snippet below.
import { PangeaConfig, AuthZService } from "pangea-node-sdk";

const token = process.env.PANGEA_AUTHZ_TOKEN;
const config = new PangeaConfig({ domain: process.env.PANGEA_DOMAIN });
const authz = new AuthZService(token, config);
const roleCheck = await authz.check({
         resource: {type: account, id: 12345},
         action: create,
         subject: { type: 'user', id: ‘Pango’},
         attributes: {country: 'US'}
     });

// this should be true, as shown in the playground as well
console.log(roleCheck.allowed);
Conclusion
ABAC as a finer grained model for access policies is extremely powerful and a useful tool to understand and use when necessary. In complex organizations where non standard fields need to be used for access control, ABAC is wonderful for adding a way at runtime to check the system if access is allowed. To try out Pangea’s Authorization service and more, go to Pangea.Cloud to create a free account.
Visit our community if you have any questions, comments, or feedback. We’d love to hear from you.
Subscribe to my newsletter
Read articles from Vanessa Villa directly inside your inbox. Subscribe to the newsletter, and don't miss out.
Written by
