Volume Mounting with Docker Containers
 Sandhya Babu
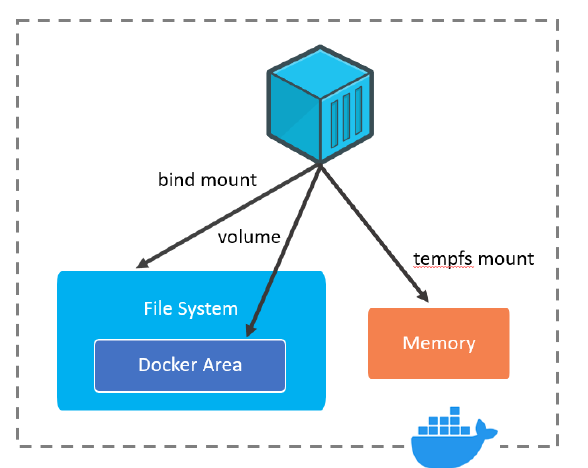
Volumes vs. tmpfs Mounts vs. Bind Mounts
Volume Mounts:
Volume mounts are used to store data outside of a container's filesystem, ensuring data persistence even if the container is deleted or restarted. They are managed by Docker and stored in a special Docker directory.
Use Cases:
Data Persistence: Keep database files or other important data that must survive container restarts or deletions.
Shared Storage: Share files or logs between multiple containers.
Backup and Restore: Simplify the process of backing up and restoring data as it's stored outside the container.
tmpfs Mounts:tmpfs mounts are a type of volume stored in the system’s memory. They provide fast access to data but are temporary, as the data is lost when the container stops or restarts.
Use Cases:
Temporary Data: Store session data or caches that need fast access but don’t require persistence.
Sensitive Information: Keep sensitive information in memory instead of on disk to ensure it's not persisted.
Bind Mounts:
Bind mounts link specific files or directories on the host system to the container, giving direct control over host paths. They provide immediate synchronization between host and container files.
Use Cases:
Development: Link your host machine's code directory to a container, allowing real-time updates to code in the container.
Access Host Files: Grant containers direct access to files or directories on the host, such as configuration files or application data.
All three methods—volumes, tmpfs mounts, and bind mounts—allow you to share data between the host and Docker containers.
Volumes are managed by Docker & stored in a special Docker directory.
Bind mounts directly link host paths.
tmpfs mounts use system memory for temporary storage.
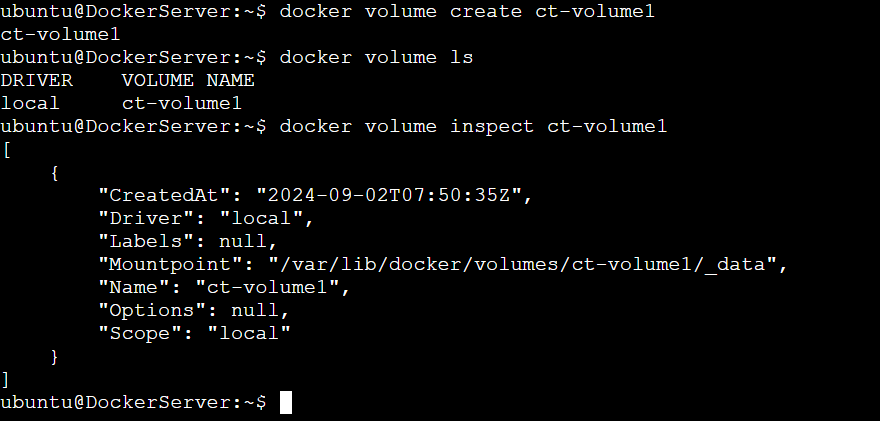
Task 1: Creating a new docker volume and inspecting containers
- Create a New Volume
Command: docker volume create ct-volume1
Explanation: This command creates a new Docker volume named ct-volume1.
Purpose: The purpose is to set up a persistent storage location outside the container, which helps keep data even when the container is deleted.
- Check Your Volume
Command: docker ps
Explanation: This command lists all the Docker volumes available on your system.
Purpose: To verify that the volume
ct-volume1was successfully created and to view all existing volumes
- Get Detailed Information about the Volume
Command: docker volume inspect ct-volume1
Explanation: Gives detailed information about
ct-volume1, including its location and other metadata. It helps you see where Docker is storing your data.Purpose: To check the configuration details of the created volume to ensure it was properly set up and ready for use.
Task 2: Launching a Nginx container mapped to a specific docker volume and verification
Run the Nginx Container with Volume Mounting
Command: docker run -d -p 80:80 --name=nginx-container --mount src=ct-volume1,dst=/usr/share/nginx/html nginx
Explanation: This command runs an Nginx container in detached mode (
-d), maps port 80 of the host to port 80 of the container (-p 80:80), names the containernginx-container, and mounts the Docker volumect-volume1to the container’s/usr/share/nginx/htmldirectory. Any files you put in this volume will be served by Nginx.Purpose: This allows you to persist web content independently of the container's lifecycle.

- Show All Running Containers
Command: docker ps
Explanation: This command lists all the currently running Docker containers.
Purpose: The purpose is to verify that the
nginx-containeris running and to check its status.

- Get Detailed Information About the Nginx Container
Command: docker container inspect nginx-container
Explanation: This command provides detailed information about the
nginx-container, including its configurations, mounted volume & network settings.Purpose: The purpose is to verify that the
nginx-containeris correctly configured, if that's using thect-volume1as expected.
- List Files in the Volume
Command: ls /var/lib/docker/volumes/ct-volume1/_data/
Explanation: This command lists the files in the directory where
ct-volume1is mounted.Purpose: To see files currently stored in ct-volume1. If Nginx is serving content from this directory, you can see the files that Nginx will serve.

Navigate to the Volume Directory
Command: cd /var/lib/docker/volumes/ct-volume1/_data/
Explanation: This command changes the current directory to the data directory of the
ct-volume1volume on the host.Purpose: To navigate to the directory where the volume's data is stored, where you can directly interact with the files stored in volume.

If you’re having trouble accessing the ct-volume1 directory on your Docker host, you might need to switch to the root user (sudo -i)
- Create Files in the Volume
Command: touch f1 f2 f3
Explanation: This command creates three empty files named f1, f2, and f3 in the volume. These files will now be available inside the Nginx container at /usr/share/nginx/html.
Purpose: The purpose is to add sample files to the
ct-volume1volume, which can then be accessed by the Nginx container
Edit the index.html File
Command: vi /var/lib/docker/volumes/ct-volume1/_data/index.html
Explanation: This command opens the
index.htmlfile in thevieditor within thect-volume1volume.
Purpose: The purpose is to edit the index.html file, typically to add or modify content that will be served by the Nginx web server.
Access the IP address of the EC2 instance to check if nginx is serving content from index.html
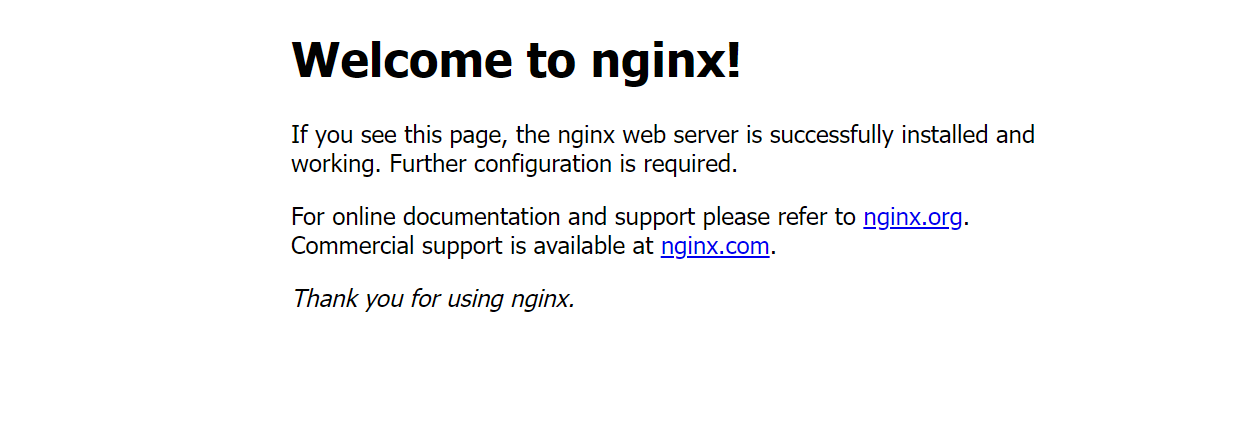
Similarly, to verify if the Docker volume mapping is working correctly, you can access the Nginx container’s directory where the volume is mounted. Here’s how you can do it:
Access the Nginx Container: docker exec -it nginx-container /bin/bash
Navigate to the Mounted Directory: cd /usr/share/nginx/html
List the Contents: ls
You should see the files and directories from the ct-volume1 volume listed here. This confirms that the volume mapping is working correctly.

Summary:
In this task, we launched a Nginx container with a Docker volume attached, allowing us to store and manage files directly in the container's volume. We verified this by creating and editing files in the volume's directory, ensuring that the data is accessible and modifiable.
Task 3: Deleting the container and attaching the volume to another container
- Stopping and removing the Nginx Container
Command: docker container stop nginx-container
Purpose & Explanation: This command stops the running
nginx-container, making sure it’s no longer active so we can safely remove it.Command: docker rm container nginx-container
Purpose & Explanation: This command deletes the
nginx-containerfrom the system, freeing up resources.
- Listing All Containers (Including Stopped Ones)
Command: docker ps -a
Purpose & Explanation: This command shows a list of all containers on the system, even those that have been stopped. It lets us confirm that the
nginx-containerhas been properly removed.
- Running a BusyBox Container with the Same Volume
- Command: docker run -it --name busybox-container1 --mount source=ct-volume1,target=/data busybox sh
Purpose & Explanation: This command starts a new container named busybox-container1, using the same volume (ct-volume1) and mounting it to the /data directory inside the container. The -it option allows us to interact with the container through a shell.
- Listing the Files in the BusyBox Container
Command: ls
Purpose & Explanation: Inside the BusyBox container, this command lists all the files in the current directory.
- Navigating to the /data Directory
Command: cd /data
Purpose & Explanation: This command changes the directory to
/datainside the container, where our volume is mounted, so we can interact with its contents.

Listing the Files in /data
Command: ls
Purpose & Explanation: This lists the files stored in the
/datadirectory, which should be the same files we created earlier.
- Exiting the BusyBox Shell
Command: exit
Purpose & Explanation: This command exits the interactive shell, effectively stopping the BusyBox container session.
- Stopping the BusyBox Container
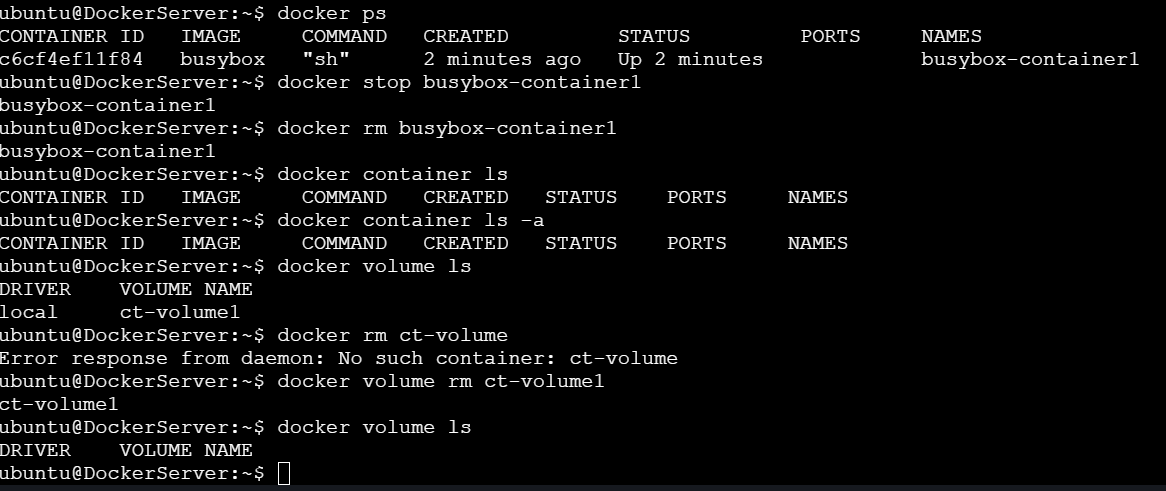
Command: docker stop busybox-container1
Purpose & Explanation: This stops the
busybox-container1, ensuring it’s no longer running.
- Rmoving the BusyBox Container
Command: docker rm busybox-container1
Purpose & Explanation: This command removes the
busybox-container1from the system, freeing up resources while keeping our volume intact.
- Listing All Containers Again
Command: docker ps -a
Purpose & Explanation: This lists all containers, including stopped ones, to confirm that the
busybox-container1has been removed.
- Listing All Volumes
Command: docker volume ls
Purpose & Explanation: This command lists all Docker volumes on the system, confirming that our volume (
ct-volume1) is still present.
- Rmoving the Volume
Command: docker volume rm ct-volume1
Purpose & Explanation: This command deletes the
ct-volume1volume from the system, cleaning up the storage once it’s no longer needed.
- Lsting All Volumes Again
Command: docker volume ls
Purpose & Explanation: This command lists all remaining Docker volumes to confirm that
ct-volume1has been successfully removed.
Summary:
In this task, we successfully reused the data from a stopped Nginx container by mounting its volume to a new BusyBox container. We confirmed that the data persisted across containers and then cleaned up by removing both the BusyBox container and the volume.
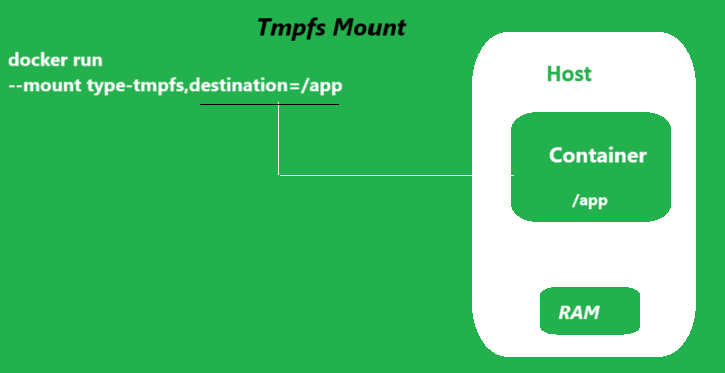
tmpfs mount
tmpfs is a special kind of volume that is stored in memory, not on disk. It's fast but temporary, so the data disappears when the container stops or restarts.
In-Memory Storage: Data is stored in the host system’s RAM.
Temporary: Data is lost when the container stops or restarts.
Use Case: Ideal for temporary data that doesn’t need to persist, such as cache or session data.
Task 4: Create a Container with tmpfs Mount and Verify It
- Run the Nginx Container with tmpfs Mount:
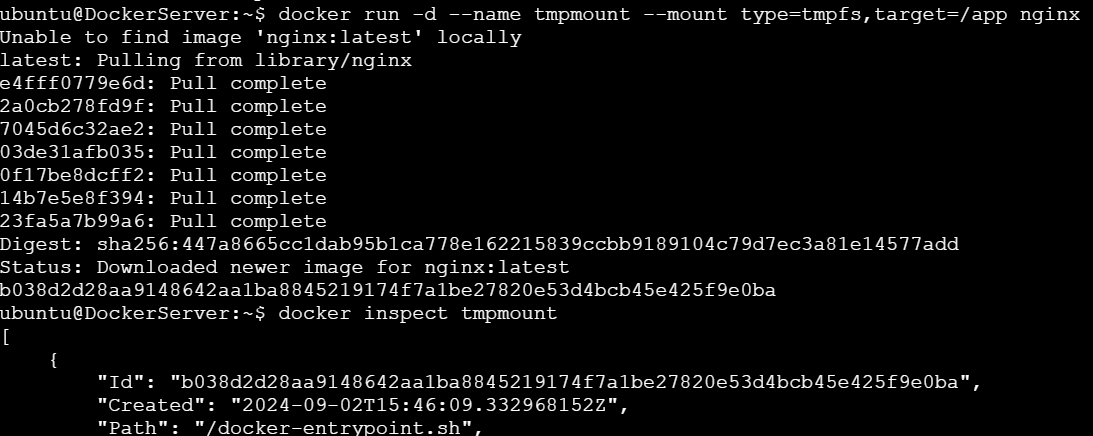
Command: docker run -d --name tmpmount --mount type=tmpfs,destination=/app nginx:latest
Explanation: This command starts an Nginx container named
tmpmountwith a temporary filesystem (tmpfs) mounted at/app. This tmpfs mount stores data in memory, not on disk.Purpose: To create a container with a temporary storage area that doesn't persist data after the container stops or restarts.
- Inspect the Container:
Command: docker container inspect tmpmount
Explanation: This command shows detailed information about the
tmpmountcontainer, including its configuration, mounted volumes, location, network settings.Purpose: To verify that the tmpfs mount is correctly set up.
- Access the Container’s Shell:
Command: docker exec -it tmpmount bash
Explanation: This command opens an interactive shell session inside the running
tmpmountcontainer.Purpose: To interact directly with the container's filesystem.
- Navigate to the
/appDirectory:
Command: cd /app
Explanation: This changes the current directory to
/appwithin the container.Purpose: To access the directory where the tmpfs is mounted.
- Create a File in the
/appDirectory:
Command: touch abc.txt
Explanation: This command creates an empty file named
abc.txtin the/appdirectory.Purpose: To test if you can write files to the tmpfs-mounted directory.
- List the Files in /app:
Command: ls
Explanation: This lists all files in the
/appdirectory.Purpose: To confirm that the file
abc.txtwas successfully created.
- Exit the Shell:
Command: exit
Explanation: This exits the interactive shell session.
Purpose: To leave the container's shell.

- Stop the Container:
Command: docker stop tmpmount
Explanation: This stops the
tmpmountcontainer.Purpose: To test whether the tmpfs-mounted data persists after the container stops.
- Start the Container Again:
Command: docker start tmpmount
Explanation: This restarts the
tmpmountcontainer.Purpose: To see if the data created in the tmpfs mount is still there after a restart.

- R-enter the Container’s Shell:
Command: docker exec -it tmpmount bash
Explanation: This opens a shell session in the restarted container.
Purpose: To check the contents of the tmpfs mount after restarting the container.
- Navigate to
/appAgain and List Files:
Commands: cd /app and ls
Explanation: These commands navigate to the
/appdirectory and list the files there.Purpose: To verify that the
abc.txtfile is no longer present, demonstrating that tmpfs does not persist data after the container restarts.

Summary:
In this task, we set up a Nginx container using a tmpfs mount, which stores data in memory rather than on disk. After creating and viewing a file within the tmpfs mount, we stopped and restarted the container. When we checked the mount again, the file was gone, showing that data in a tmpfs mount is temporary and doesn't persist after a container restarts.
Subscribe to my newsletter
Read articles from Sandhya Babu directly inside your inbox. Subscribe to the newsletter, and don't miss out.
Written by

Sandhya Babu
Sandhya Babu
🌟 Aspiring DevOps Engineer | Cloud & DevOps Enthusiast🌟 Hello! I’m Sandhya Babu, deeply passionate about DevOps and cloud technologies. Currently in my exploring phase, I’m learning something new every day, from tools like Jenkins, Docker, and Kubernetes to the concepts that drive modern tech infrastructures. I have hands-on experience with several Proof of Concept (POC) projects, where I've applied my skills in real-world scenarios. I love writing blogs about what I've learned and sharing my experiences with others, hoping to inspire and connect with fellow learners. With certifications in Azure DevOps and AWS SAA-C03, I’m actively seeking opportunities to apply my knowledge, contribute to exciting projects, and continue growing in the tech industry. Let’s connect and explore the world of DevOps together!