Creating a Starbucks Clone on AWS: A Comprehensive DevSecOps Guide
 Balraj Singh
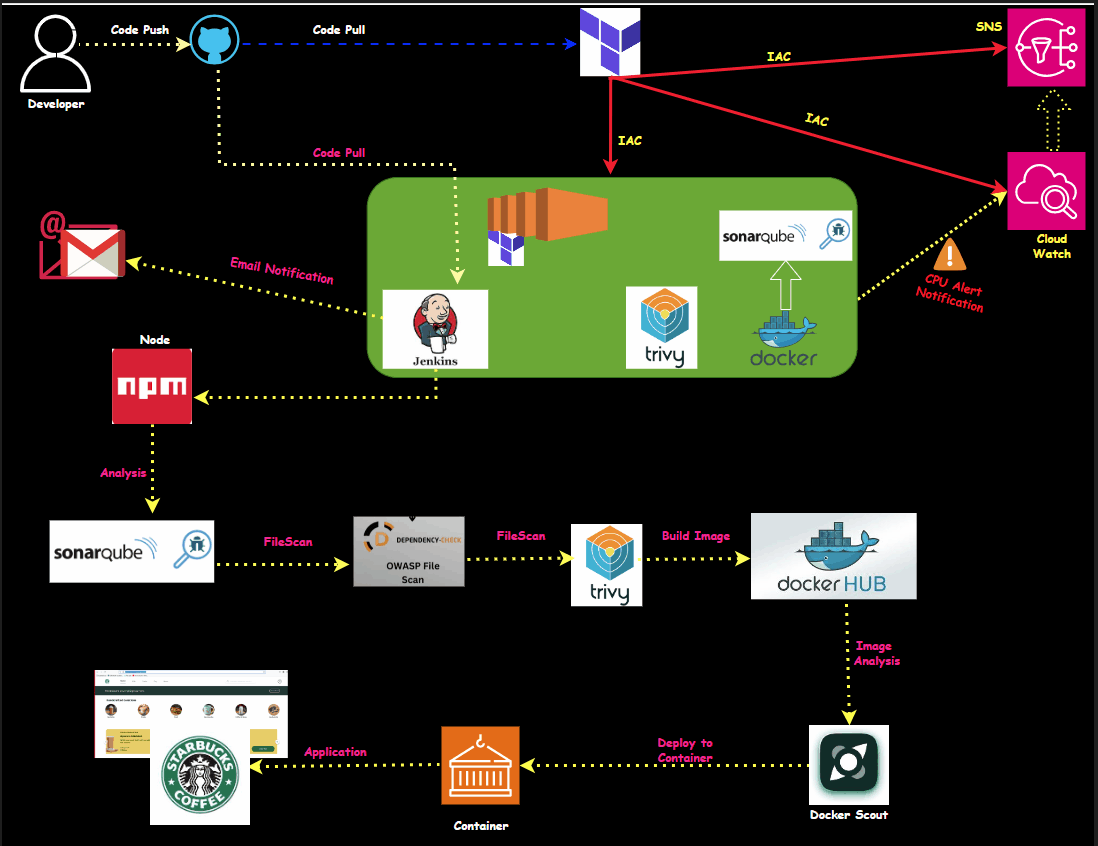
In this blog, we’ll guide you through deploying a Starbucks clone on AWS using a DevSecOps approach. This method combines development, security, and operations practices to ensure a smooth and secure deployment. We’ll cover the key steps, the technologies used, and how to troubleshoot common issues.
Prerequisites for This Project
Before you start, ensure you have the following:
AWS Account: Set up an account to manage resources and services.
Jenkins Installed: Ensure Jenkins is configured and running for CI/CD processes.
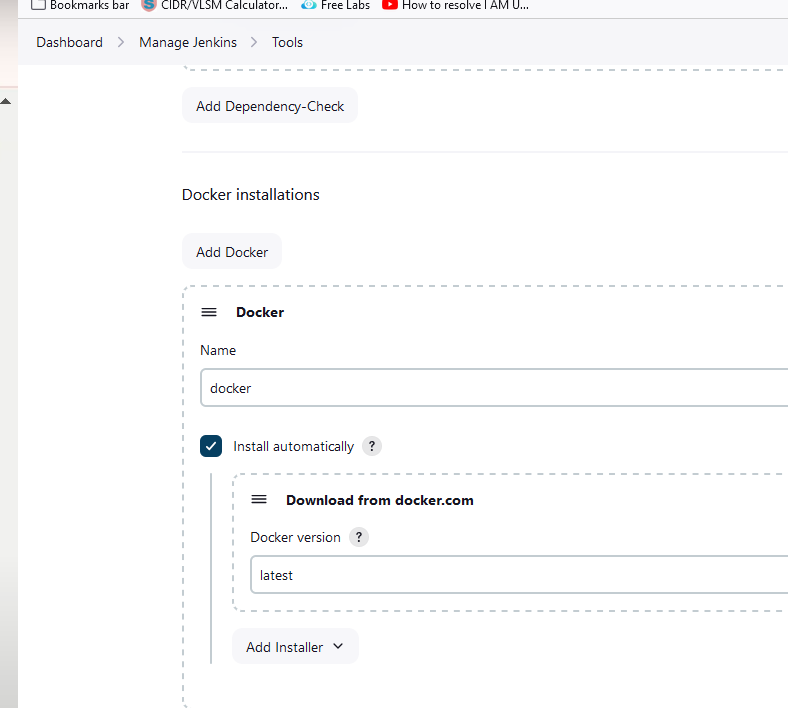
Docker: Install Docker and Docker Scout for building and scanning Docker images.
AWS Services: Configure AWS CloudWatch for monitoring and SNS for notifications.
SonarQube: Install and configure SonarQube for code quality analysis.
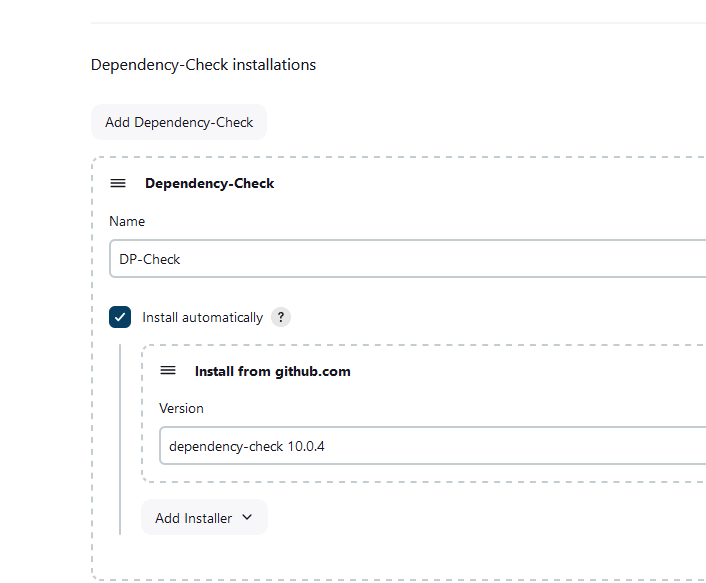
OWASP Dependency-Check: Install for vulnerability scanning of project dependencies.
Technologies Used:
Jenkins: Automation server for building, testing, and deploying code.
Docker: Container platform for building and running applications.
Docker Hub: Repository for storing and sharing Docker images.
CloudWatch: AWS service for monitoring and managing cloud resources.
SNS (Simple Notification Service): AWS service for sending notifications.
SonarQube: Code quality and security analysis tool.
OWASP Dependency-Check: Tool for identifying vulnerabilities in project dependencies.
Docker Scout: Tool for scanning Docker images for security vulnerabilities.
Setting Up the Environment
I have created a Terraform file to set up the entire environment, including the installation of required applications, tools, and the EKS cluster automatically created.
Note⇒ I was using t3.medium and having performance issues; I was unable to run the pipeline, and it got stuck in between. So, I am now using t2.xlarge now. Also, you have to update your email address in the main.tf file so that topic for alerting can be created while creation the VM.
Setting Up the Virtual Machines (EC2)
First, we'll create the necessary virtual machines using terraform.
Below is a terraform configuration:
Once you clone repo then go to folder "11.Real-Time-DevOps-Project/Terraform_Code" and run the terraform command.
cd Terraform_Code/

$ ls -l
Mode                 LastWriteTime         Length Name
----                 -------------         ------ ----
da---l          10/09/24   7:32 PM                Terraform_Code
Note ⇒ Make sure to run main.tf from inside the folders.
cd 11.Real-Time-DevOps-Project/Terraform_Code"

Mode                 LastWriteTime         Length Name
----                 -------------         ------ ----
-a---l          21/08/24   2:56 PM            500 .gitignore
-a---l          10/09/24   7:29 PM           4287 main.tf
-a---l          10/09/24   1:17 PM           3379 terrabox_install.sh
You need to run the main.tf file using the following Terraform command.
terraform init
terraform fmt
terraform validate
terraform plan
terraform apply --auto-approve
Environment Setup
| HostName | OS |
| Jenkins | Ubuntu 24 LTS |
Password for the root account on all these virtual machines is xxxxxxx
Perform all the commands as root user unless otherwise specified
Once you run the terraform command, we will verify the following things to ensure everything is set up via terraform.
Verify the Jenkins version
# jenkins --version
ubuntu@ip-172-31-95-197:~$ jenkins --version
2.462.2
Verify the Trivy version
# trivy --version
ubuntu@ip-172-31-95-197:~$ trivy --version
Version: 0.55.0
Verify the Docker & Docker Scout version
# docker --version
# docker-scout version

ubuntu@ip-172-31-95-197:~$ docker --version
Docker version 24.0.7, build 24.0.7-0ubuntu4.1


docker ps -a
CONTAINER ID   IMAGE                     COMMAND                  CREATED          STATUS          PORTS                                       NAMES
0b976c169a37   sonarqube:lts-community   "/opt/sonarqube/dock…"   12 minutes ago   Up 12 minutes   0.0.0.0:9000->9000/tcp, :::9000->9000/tcp   sonar


ubuntu@ip-172-31-95-197:~$ docker-scout version

      ⢀⢀⢀             ⣀⣀⡤⣔⢖⣖⢽⢝
   ⡠⡢⡣⡣⡣⡣⡣⡣⡢⡀    ⢀⣠⢴⡲⣫⡺⣜⢞⢮⡳⡵⡹⡅
  ⡜⡜⡜⡜⡜⡜⠜⠈⠈        ⠁⠙⠮⣺⡪⡯⣺⡪⡯⣺
 ⢘⢜⢜⢜⢜⠜               ⠈⠪⡳⡵⣹⡪⠇
 ⠨⡪⡪⡪⠂    ⢀⡤⣖⢽⡹⣝⡝⣖⢤⡀    ⠘⢝⢮⡚       _____                 _
  ⠱⡱⠁    ⡴⡫⣞⢮⡳⣝⢮⡺⣪⡳⣝⢦    ⠘⡵⠁      / ____| Docker        | |
   ⠁    ⣸⢝⣕⢗⡵⣝⢮⡳⣝⢮⡺⣪⡳⣣    ⠁      | (___   ___ ___  _   _| |_
        ⣗⣝⢮⡳⣝⢮⡳⣝⢮⡳⣝⢮⢮⡳            \___ \ / __/ _ \| | | | __|
   ⢀    ⢱⡳⡵⣹⡪⡳⣝⢮⡳⣝⢮⡳⡣⡏    ⡀       ____) | (_| (_) | |_| | |_
  ⢀⢾⠄    ⠫⣞⢮⡺⣝⢮⡳⣝⢮⡳⣝⠝    ⢠⢣⢂     |_____/ \___\___/ \__,_|\__|
  ⡼⣕⢗⡄    ⠈⠓⠝⢮⡳⣝⠮⠳⠙     ⢠⢢⢣⢣
 ⢰⡫⡮⡳⣝⢦⡀              ⢀⢔⢕⢕⢕⢕⠅
 ⡯⣎⢯⡺⣪⡳⣝⢖⣄⣀        ⡀⡠⡢⡣⡣⡣⡣⡣⡃
⢸⢝⢮⡳⣝⢮⡺⣪⡳⠕⠗⠉⠁    ⠘⠜⡜⡜⡜⡜⡜⡜⠜⠈
⡯⡳⠳⠝⠊⠓⠉             ⠈⠈⠈⠈

version: v1.13.0 (go1.22.5 - linux/amd64)
git commit: 7a85bab58d5c36a7ab08cd11ff574717f5de3ec2
ubuntu@ip-172-31-95-197:~$
Verify the Cloud Watch alert
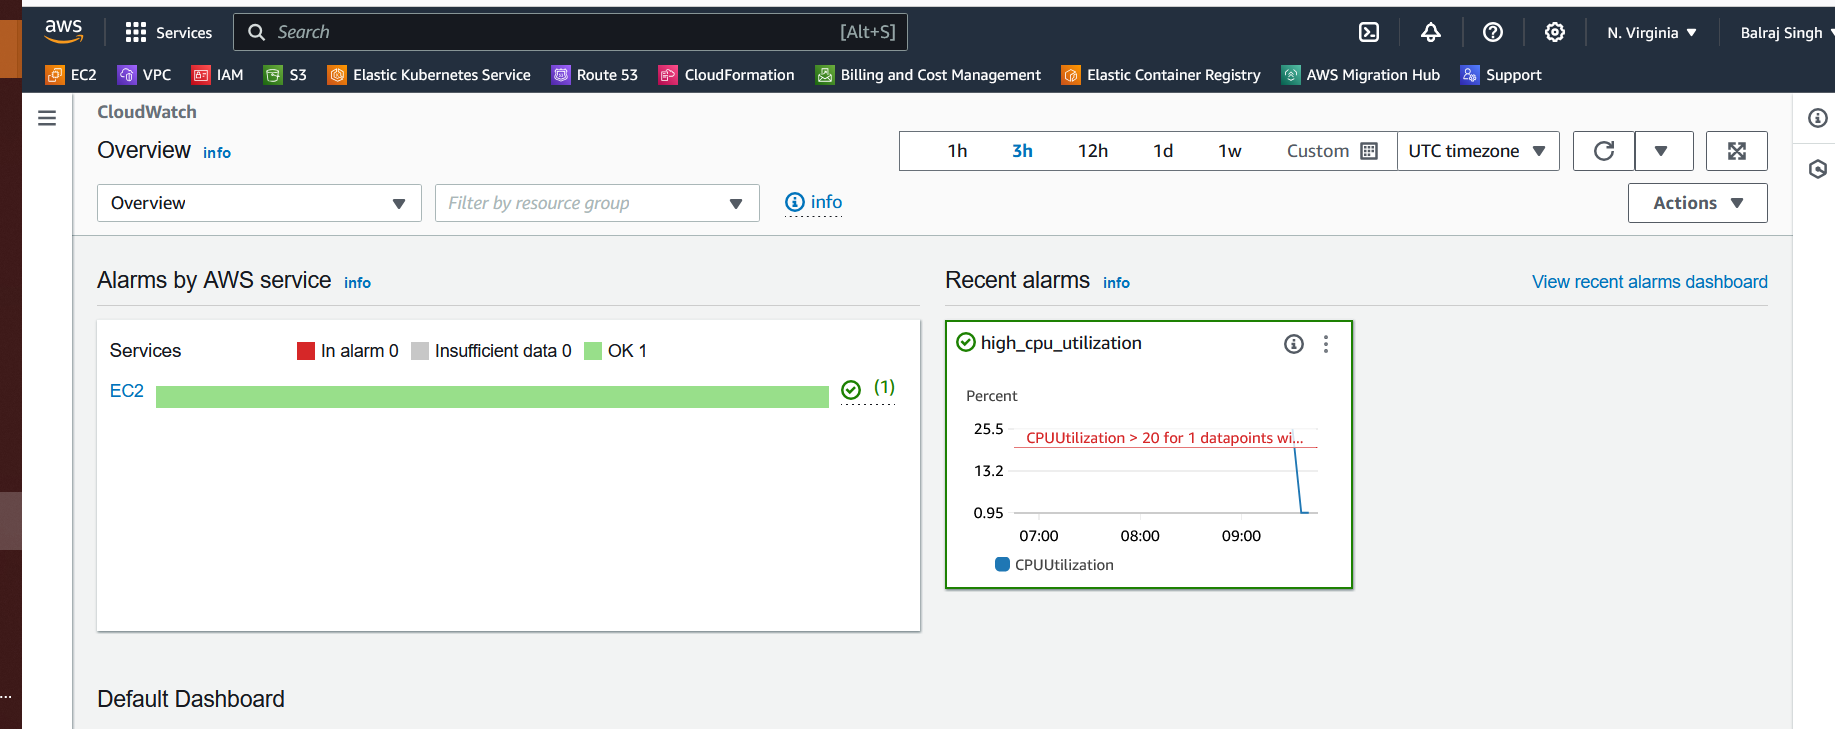
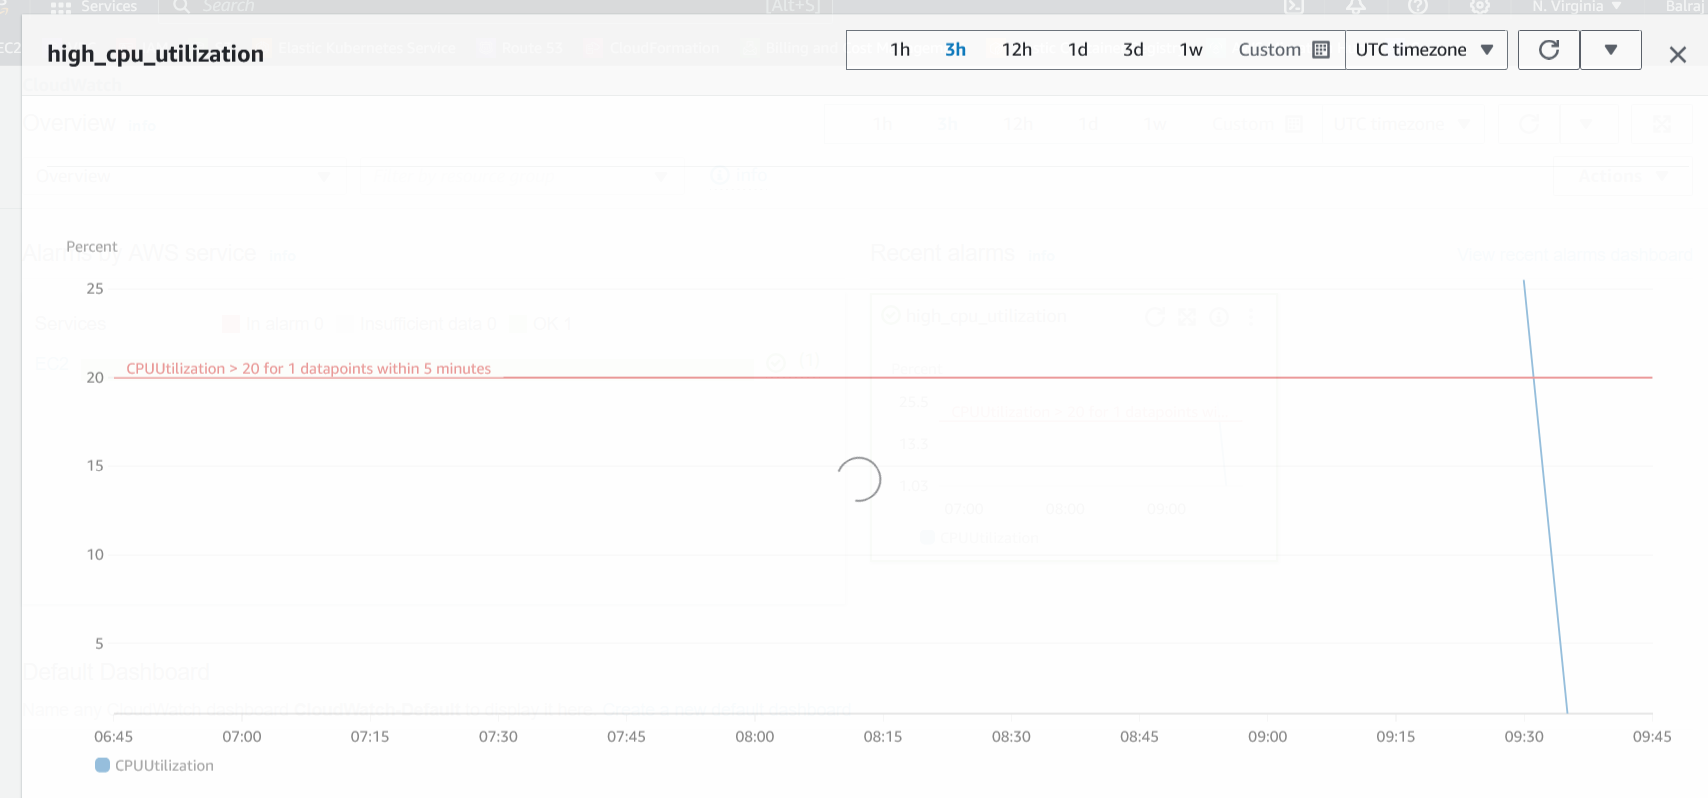
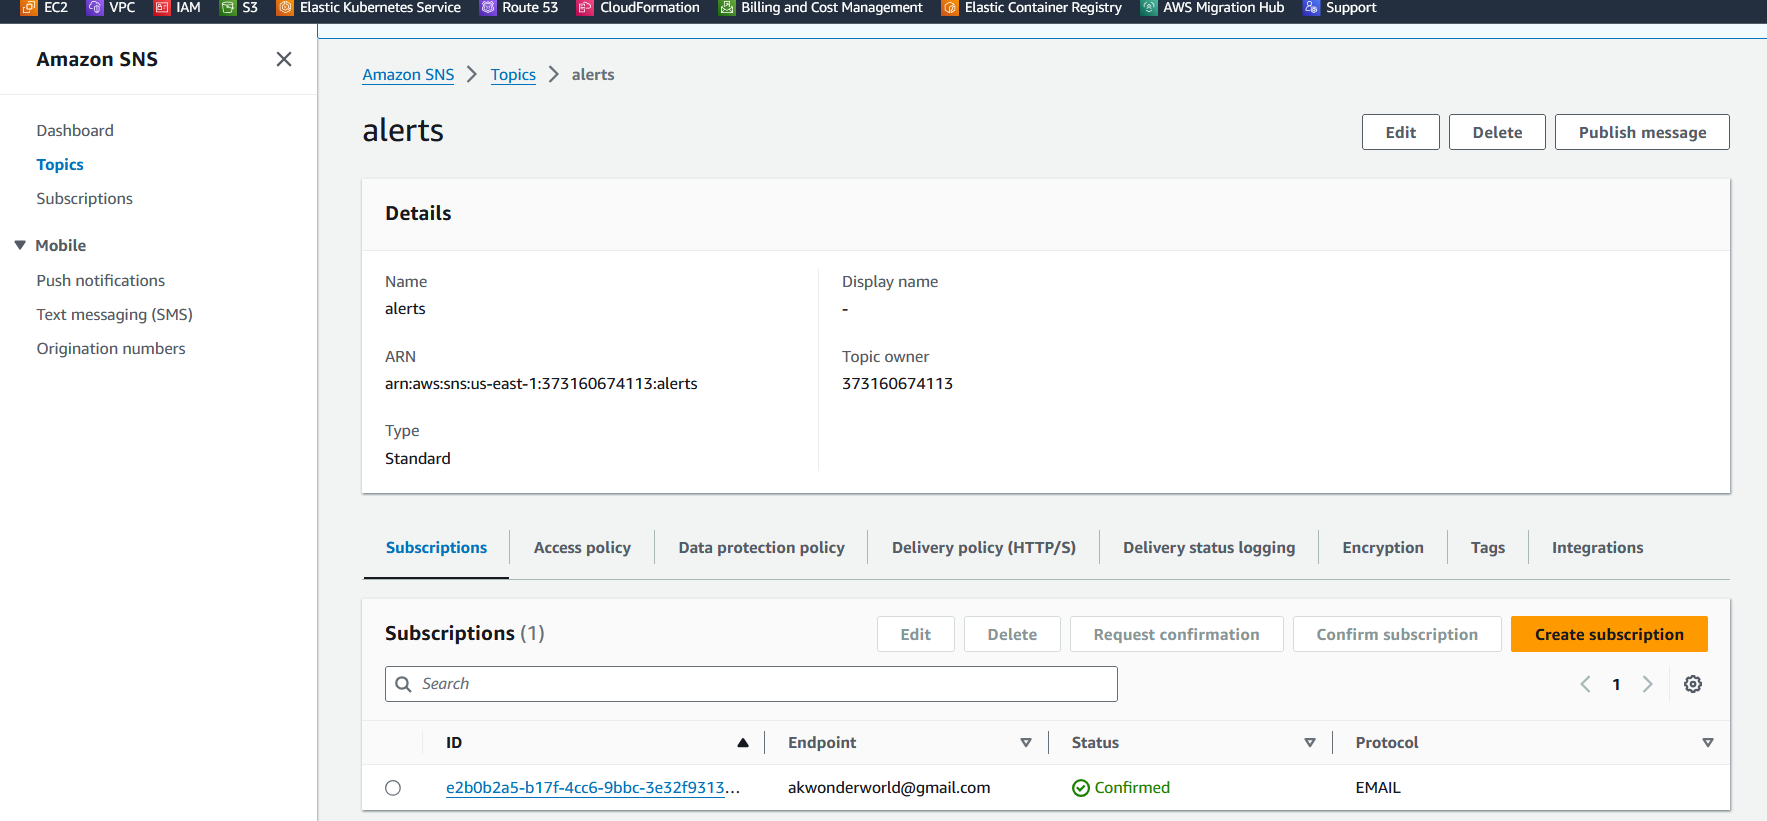
Verify the SNS & Topics
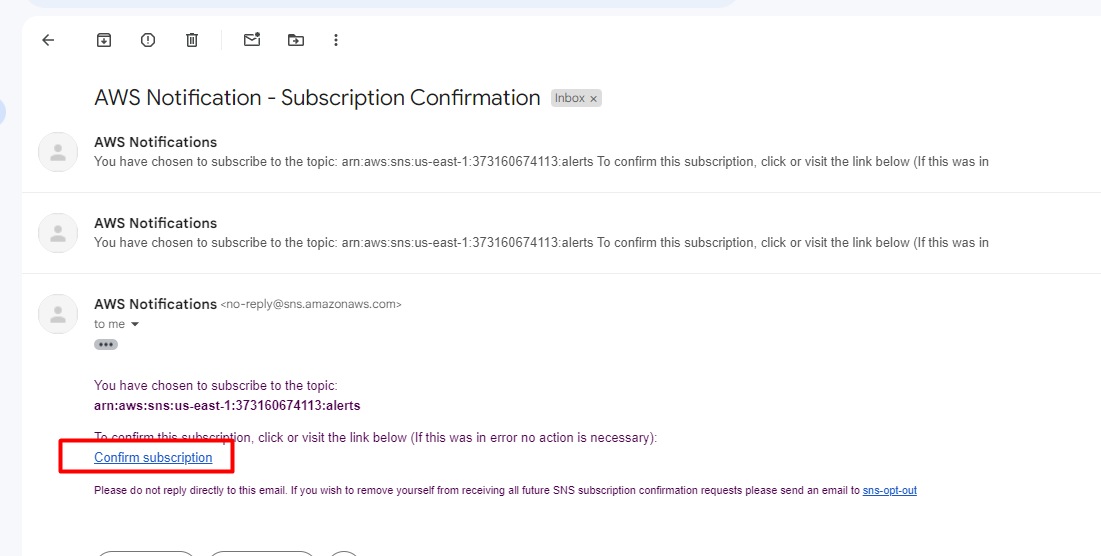
Once you open your Gmail account, find the AWS notification subscription confirmation email, and click on confirm subscription for the topic subscription.

Setup the Jenkins
Note down the public address of the VM and access it in the browser
<publicIP of VM :8080>
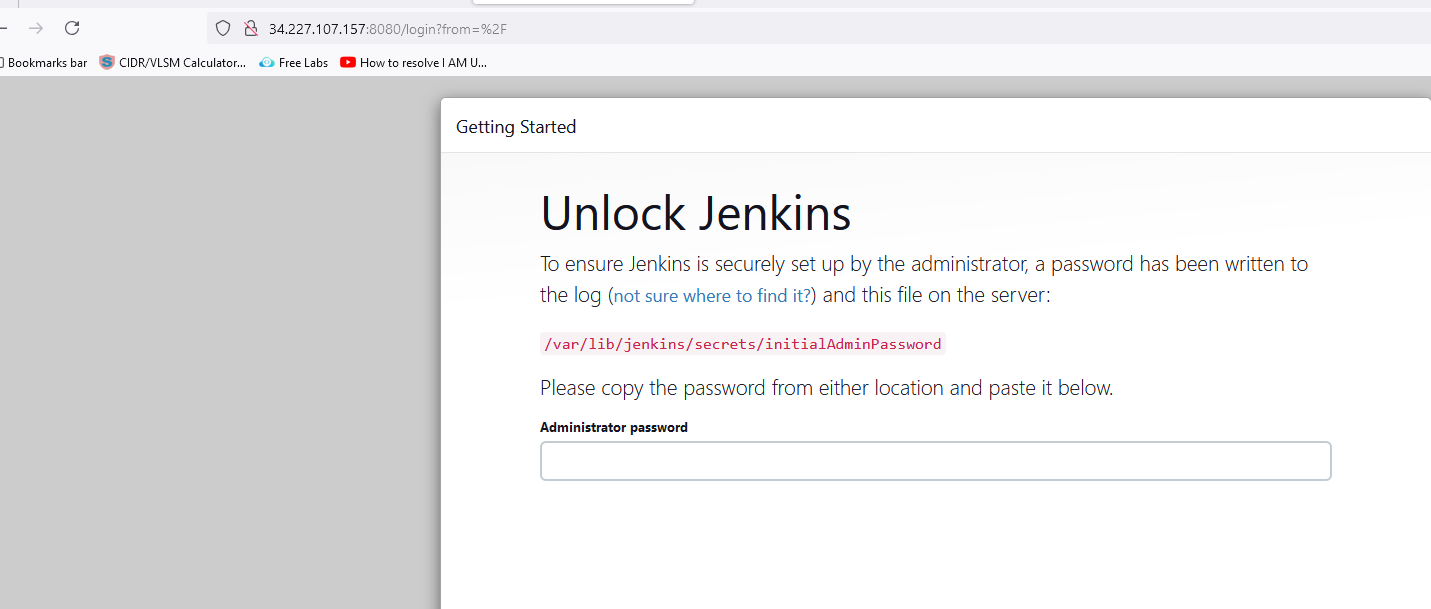
will run this command on the VM sudo cat /var/lib/jenkins/secrets/initialAdminPassword to get the first-time login password.

Install Plug-in in Jenkins.
We will install the following plug-in in Jenkins.
Dashboard⇒ Manage Jenkins⇒ plug-in
Eclipse Temurin installer
NodeJS
SonarQube Scanner
Docker
Docker Common
Docker Pipeline
Docker API
OWASP Dependency-Check
Email Extension Template
Pipeline: Stage View
Blue Ocean (Optional)
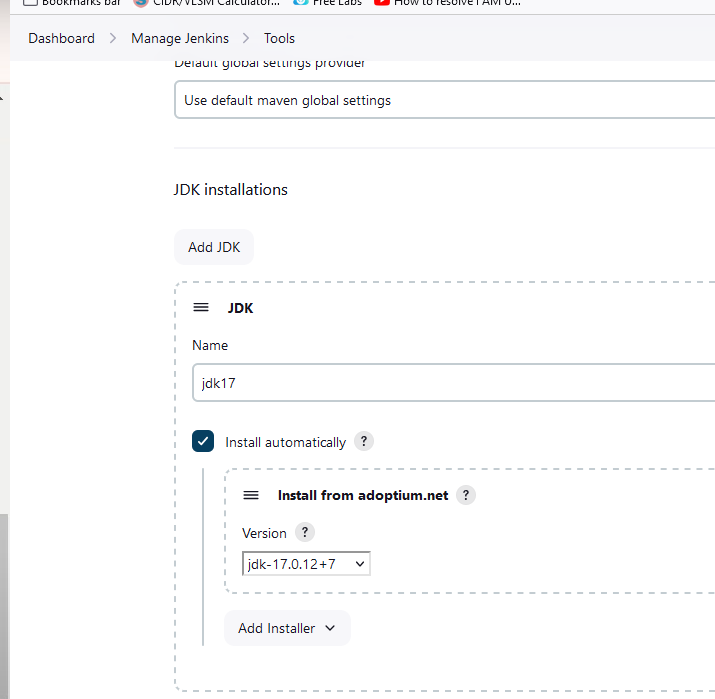
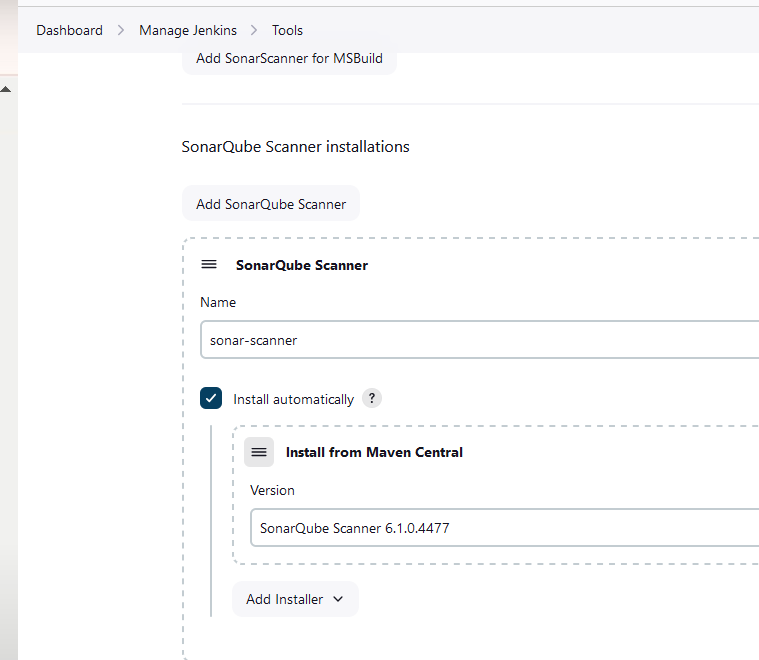
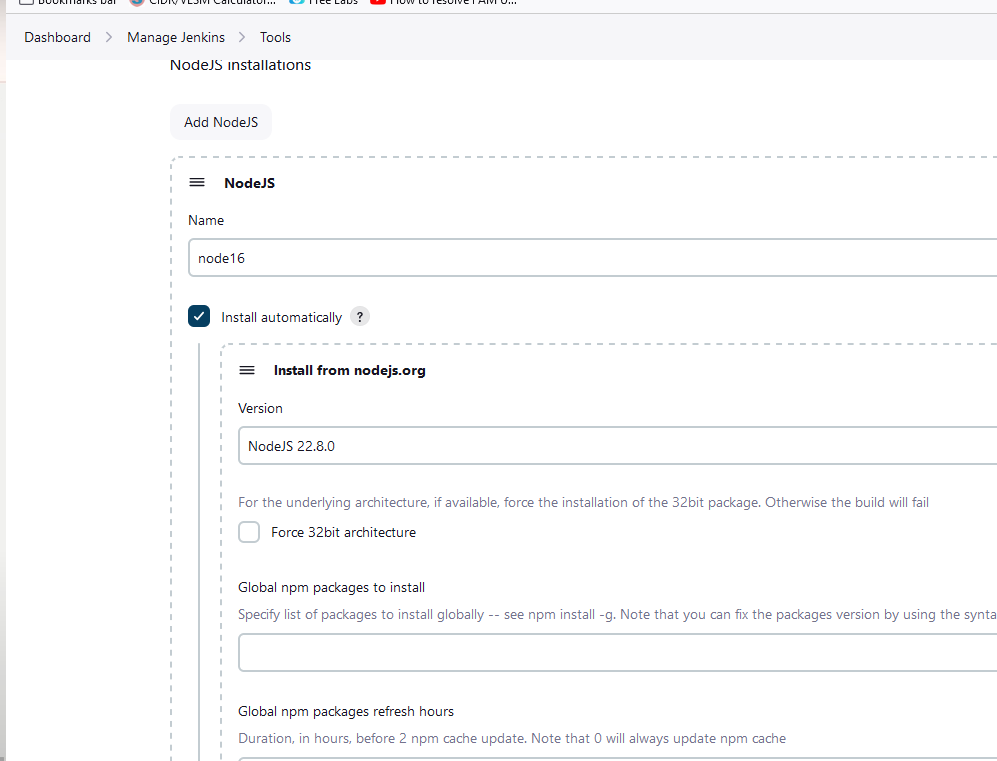
Configure the tools in Jenkins.
Setup the SonarQube
As we installed SonarQube as a container on the same Jenkins VM. So, we will select the public IP address of Jenkins.
<publicIP of VM :9000>
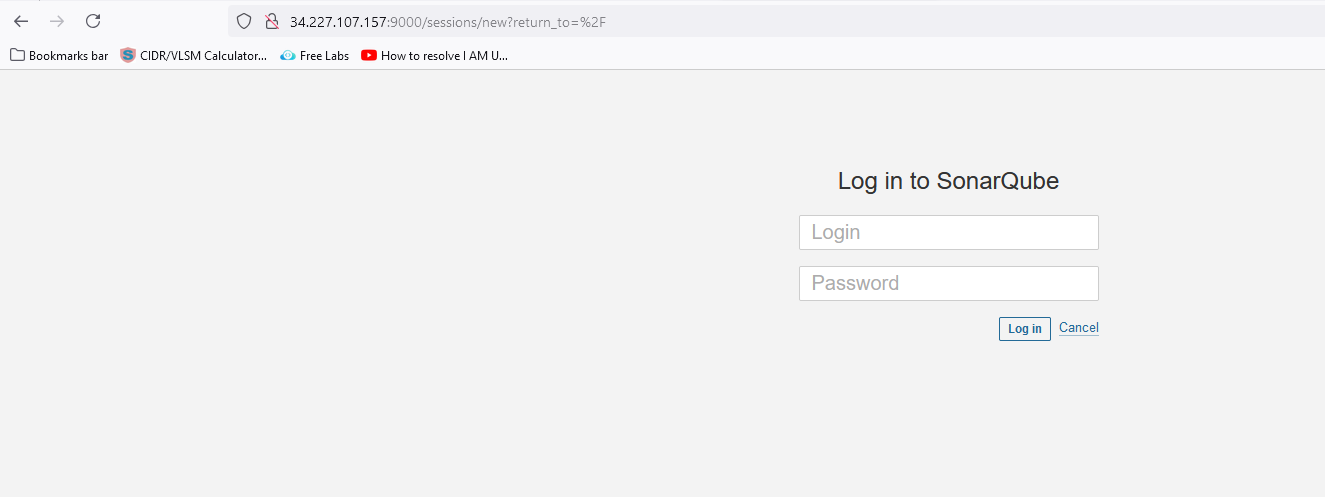
- The default username & password is
admin/adminand you need to change it.
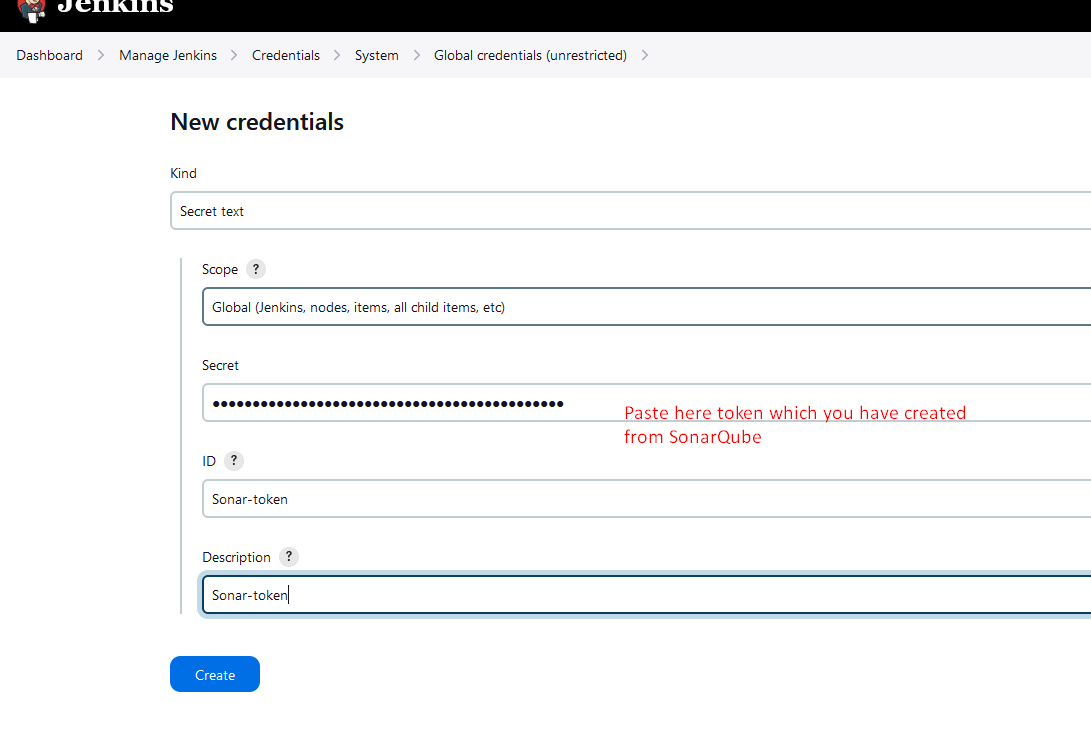
Intigrate SonarQube to Jenkins and vise-versa

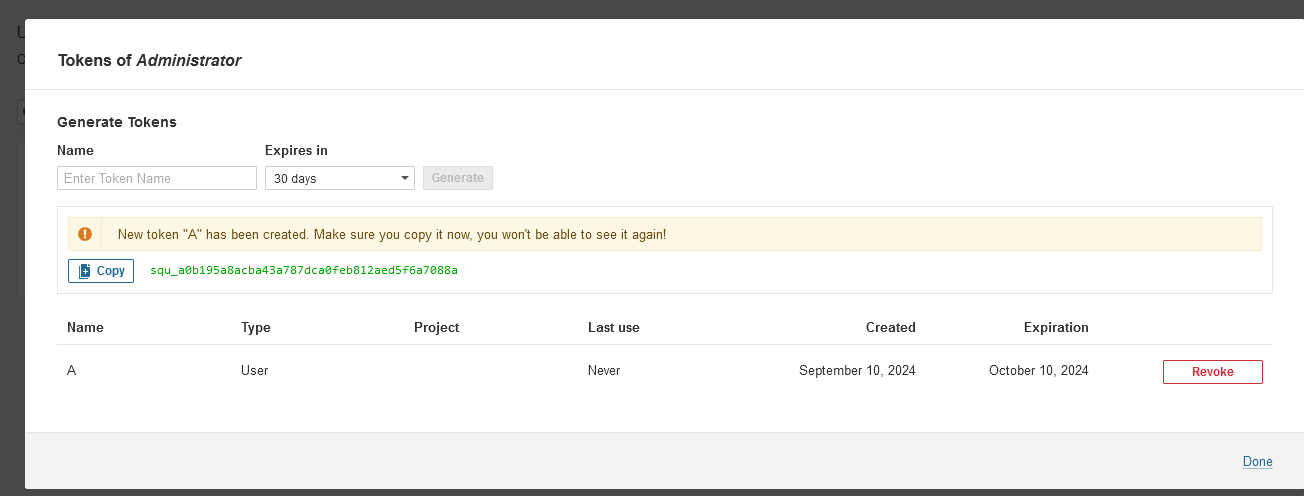
On Jenkins UI Console-
Dashboard
Manage Jenkins
Credentials
System
Global credentials (unrestricted)
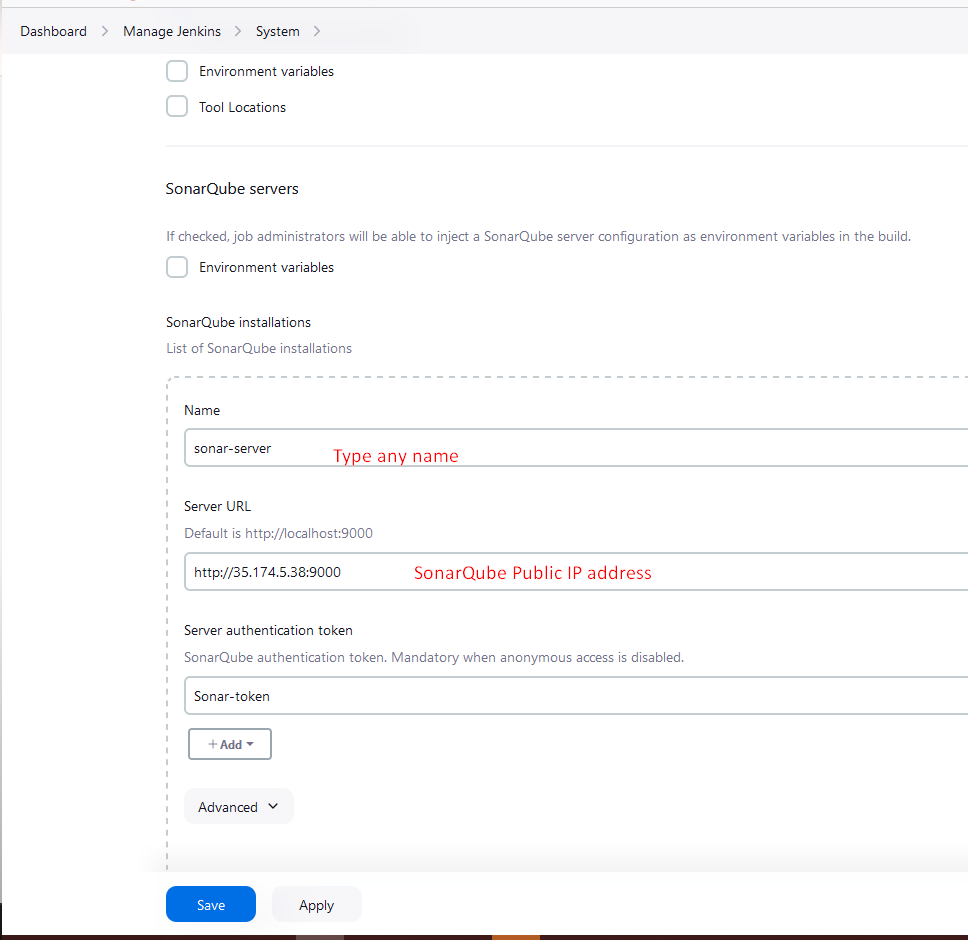
Configure QualityGateway: (SonarQube)
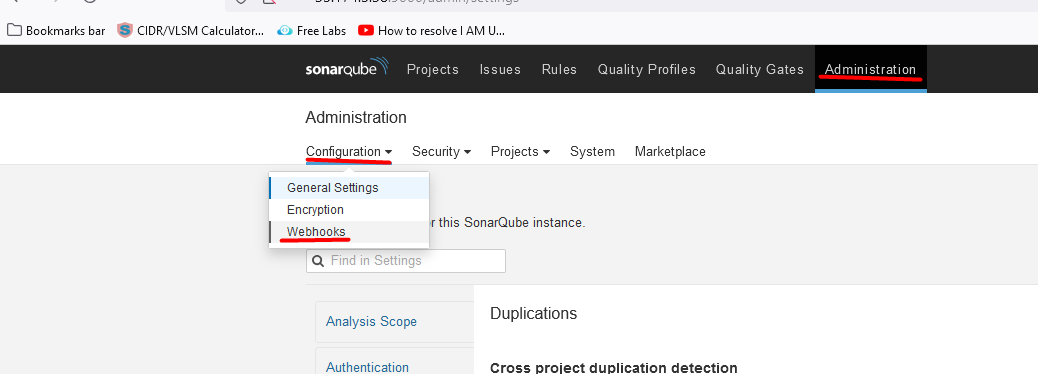
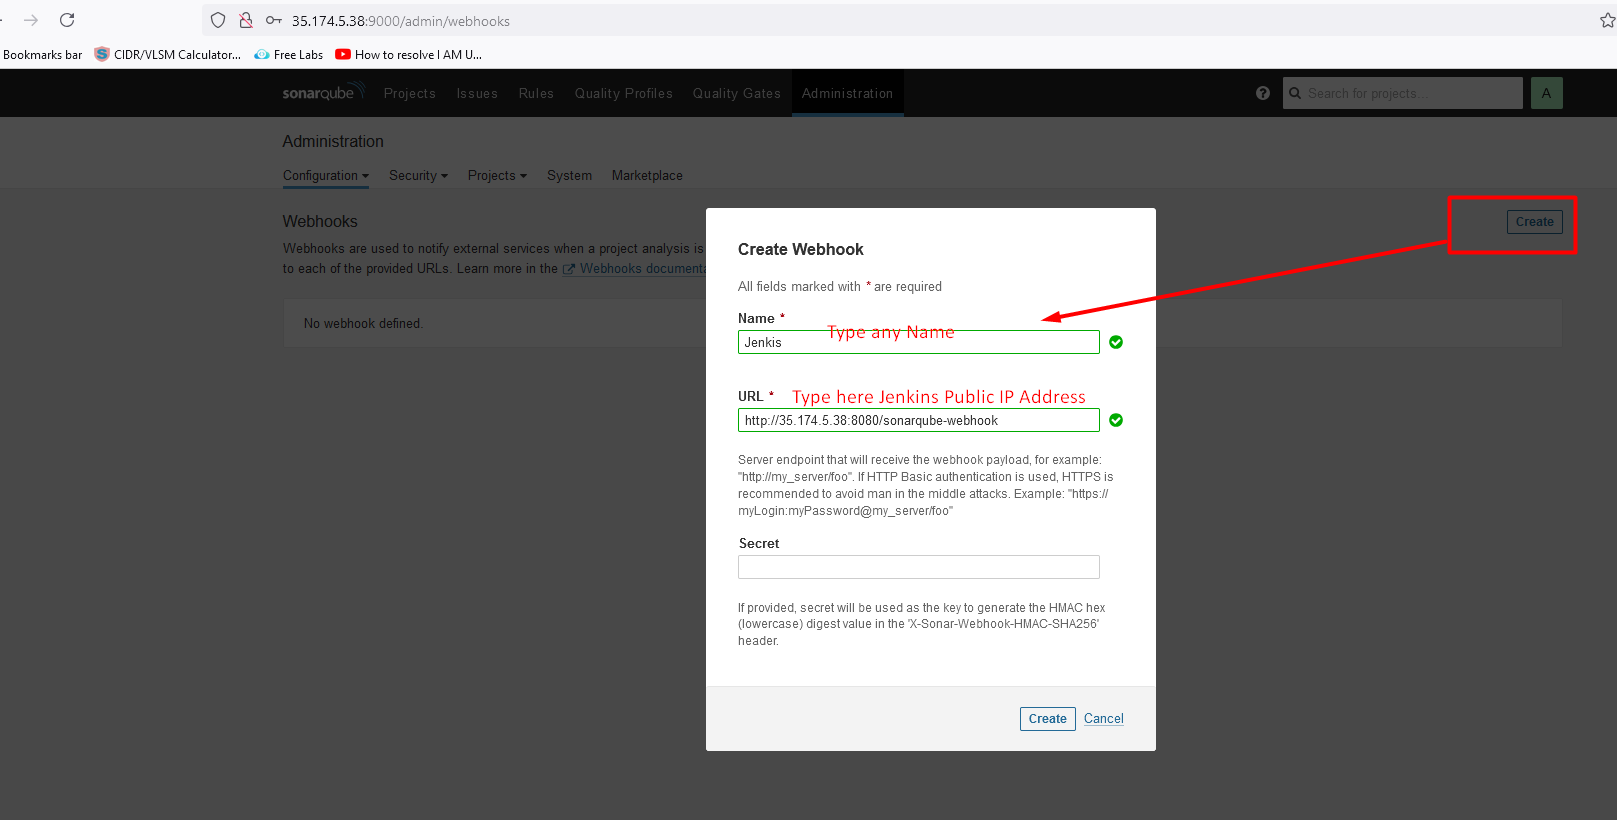

on Jenkins UI-
Dashboard
Manage Jenkins
System
Configure the Docker credential

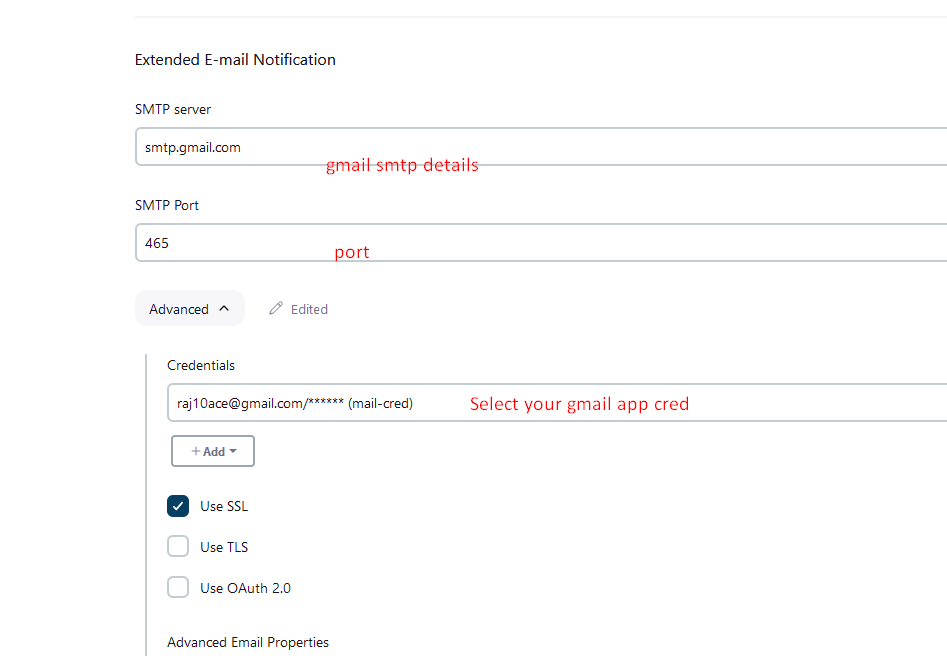
Extended E-mail Notification
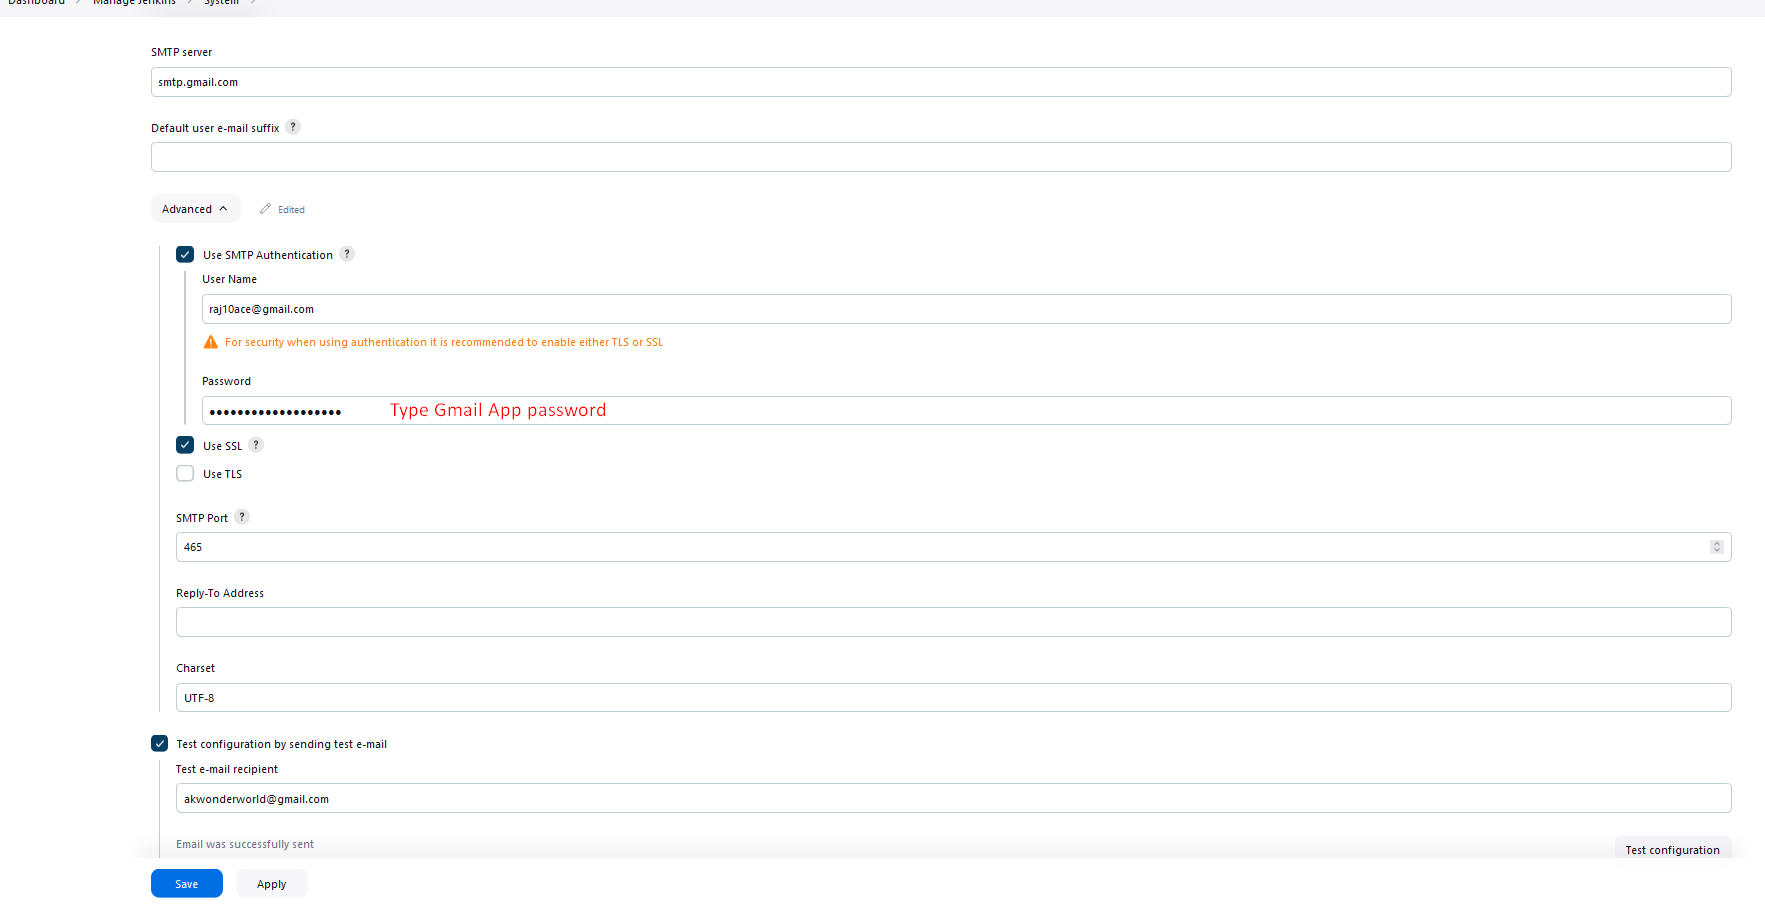
configure the password for email notification apps

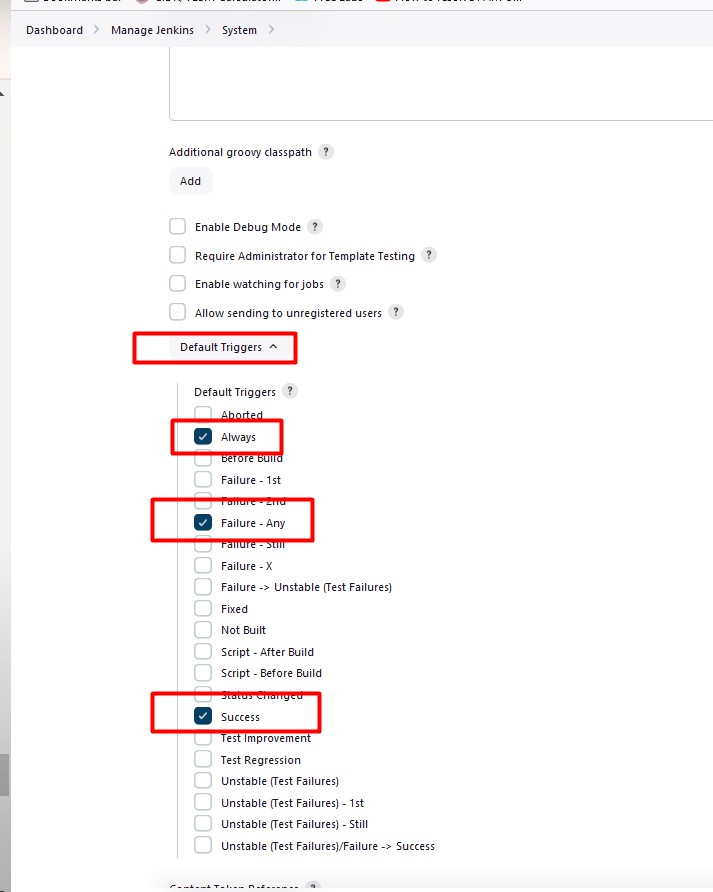
e-mail notification setup
got email in Gmail inbox-

Create a Pipeline for CI/CD
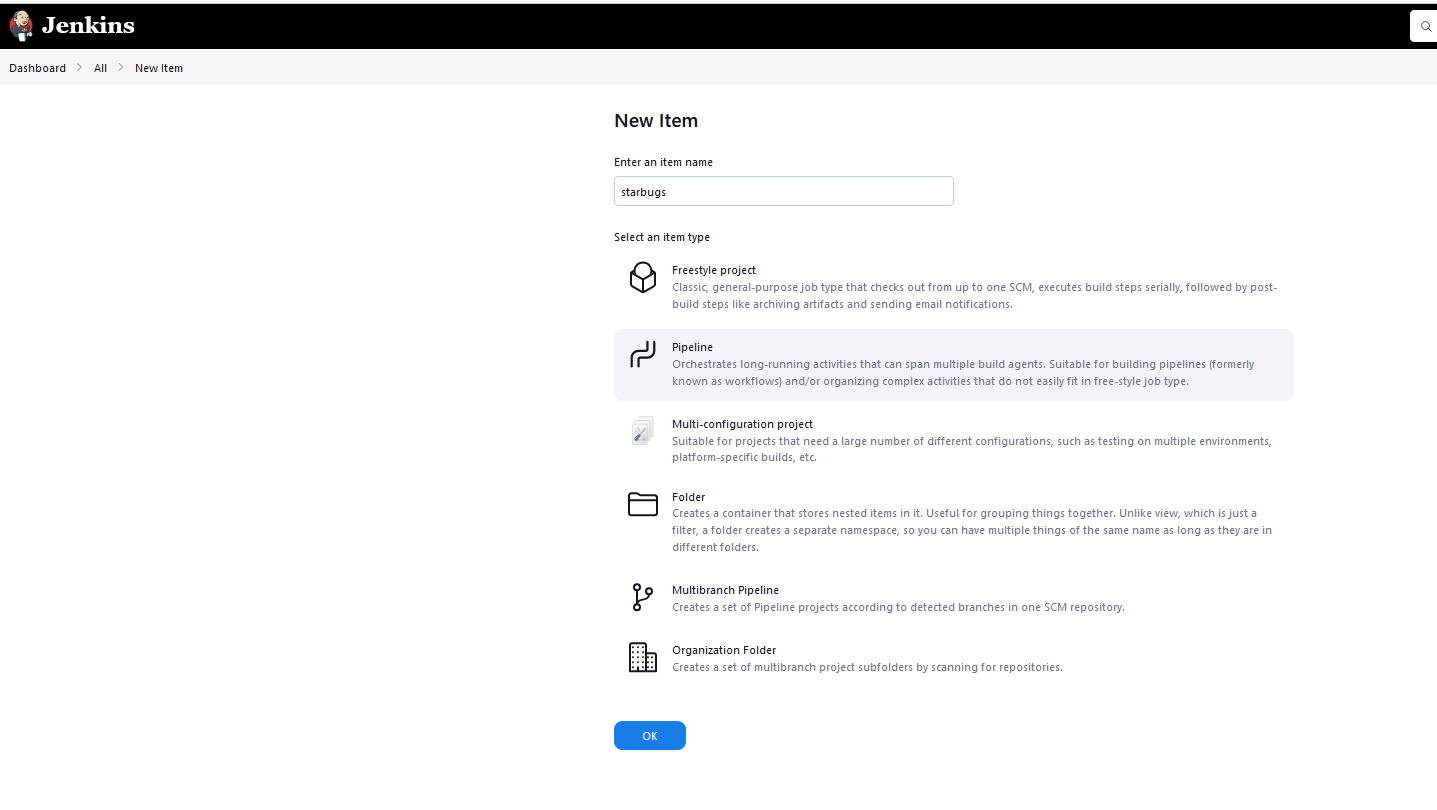
  pipeline {
      agent any
      tools {
          jdk 'jdk17'
          nodejs 'node16'
      }
      environment {
          SCANNER_HOME=tool 'sonar-scanner'
      }
      stages {
          stage ("clean workspace") {
              steps {
                  cleanWs()
              }
          }
          stage ("Git checkout") {
              steps {
                  git branch: 'main', url: 'https://github.com/mrbalraj007/starbucks.git'
              }
          }
          stage("Sonarqube Analysis "){
              steps{
                  withSonarQubeEnv('sonar-server') {
                      sh ''' $SCANNER_HOME/bin/sonar-scanner -Dsonar.projectName=starbucks \
                      -Dsonar.projectKey=starbucks '''
                  }
              }
          }
          stage("quality gate"){
             steps {
                  script {
                      waitForQualityGate abortPipeline: false, credentialsId: 'Sonar-token'
                  }
              }
          }
          stage("Install NPM Dependencies") {
              steps {
                  sh "npm install"
              }
          }
          stage('OWASP FS SCAN') {
              steps {
                  dependencyCheck additionalArguments: '--scan ./ --disableYarnAudit --disableNodeAudit', odcInstallation: 'DP-Check'
                  dependencyCheckPublisher pattern: '**/dependency-check-report.xml'
              }
          }
          stage ("Trivy File Scan") {
              steps {
                  sh "trivy fs . > trivy.txt"
              }
          }
          stage ("Build Docker Image") {
              steps {
                  sh "docker build -t starbucks ."
              }
          }
          stage ("Tag & Push to DockerHub") {
              steps {
                  script {
                      withDockerRegistry(credentialsId: 'docker') {
                          sh "docker tag starbucks balrajsi/starbucks:latest "
                          sh "docker push balrajsi/starbucks:latest "
                      }
                  }
              }
          }
          stage('Docker Scout Image') {
              steps {
                  script{
                     withDockerRegistry(credentialsId: 'docker', toolName: 'docker'){
                         sh 'docker-scout quickview balrajsi/starbucks:latest'
                         sh 'docker-scout cves balrajsi/starbucks:latest'
                         sh 'docker-scout recommendations balrajsi/starbucks:latest'
                     }
                  }
              }
          }
          stage ("Deploy to Conatiner") {
              steps {
                  sh 'docker run -d --name starbucks -p 3000:3000 balrajsi/starbucks:latest'
              }
          }
      }
      post {
      always {
          emailext attachLog: true,
              subject: "'${currentBuild.result}'",
              body: """
                  <html>
                  <body>
                      <div style="background-color: #FFA07A; padding: 10px; margin-bottom: 10px;">
                          <p style="color: white; font-weight: bold;">Project: ${env.JOB_NAME}</p>
                      </div>
                      <div style="background-color: #90EE90; padding: 10px; margin-bottom: 10px;">
                          <p style="color: white; font-weight: bold;">Build Number: ${env.BUILD_NUMBER}</p>
                      </div>
                      <div style="background-color: #87CEEB; padding: 10px; margin-bottom: 10px;">
                          <p style="color: white; font-weight: bold;">URL: ${env.BUILD_URL}</p>
                      </div>
                  </body>
                  </html>
              """,
              to: 'provide_your_Email_id_here',
              mimeType: 'text/html',
              attachmentsPattern: 'trivy.txt'
          }
      }
  }
Pipeline Status
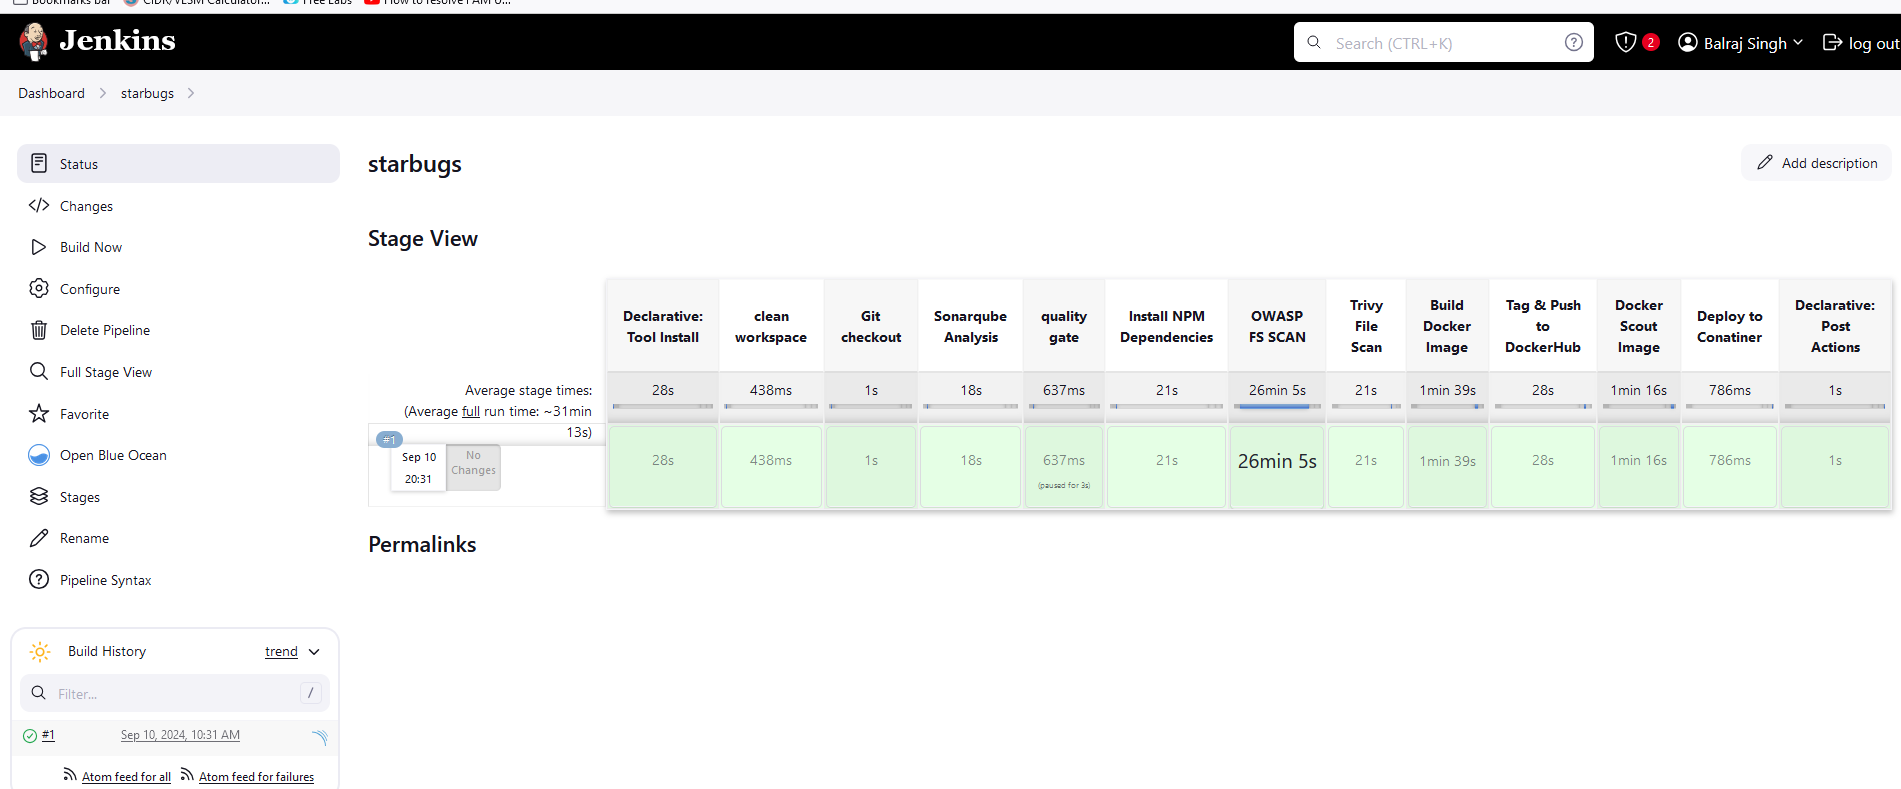
Email Notification for a successful build.
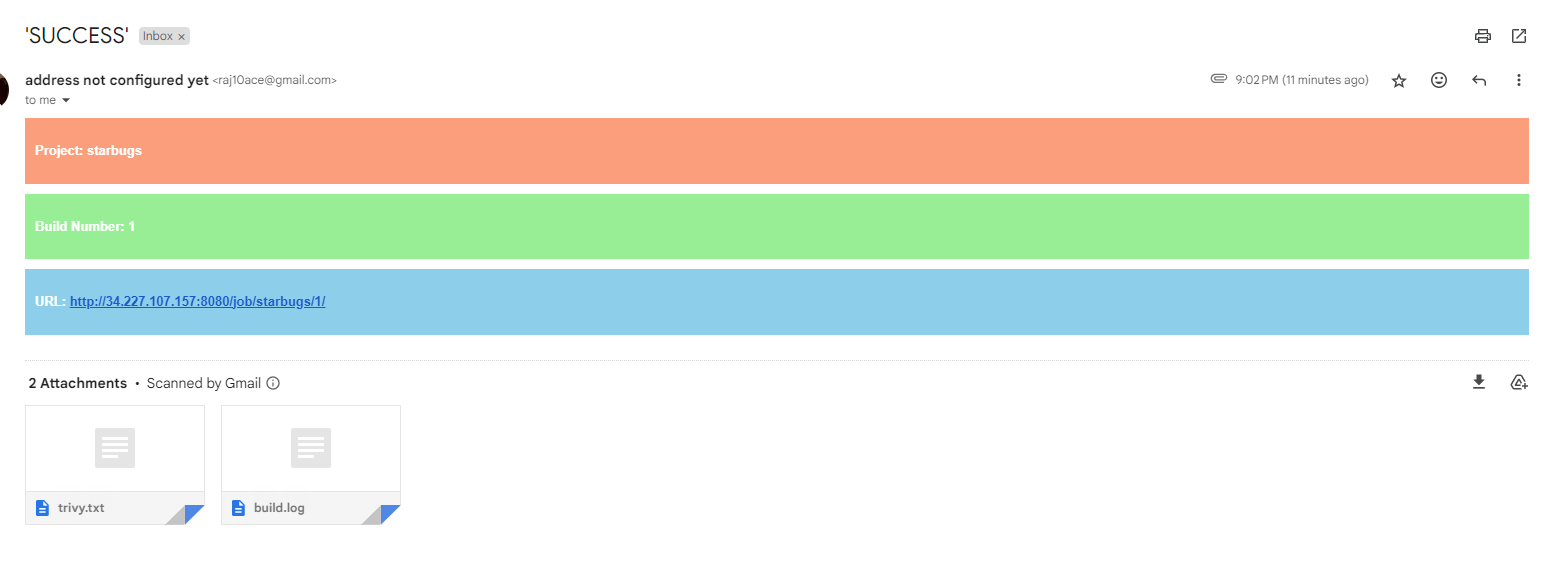
To verify the container image in
Docker hub
To verify the container image in
Jinkins Server
To verify the application
As we build the container on the same Jenkins VM. So, we will select the public IP address of Jenkins.
<publicIP of VM :3000>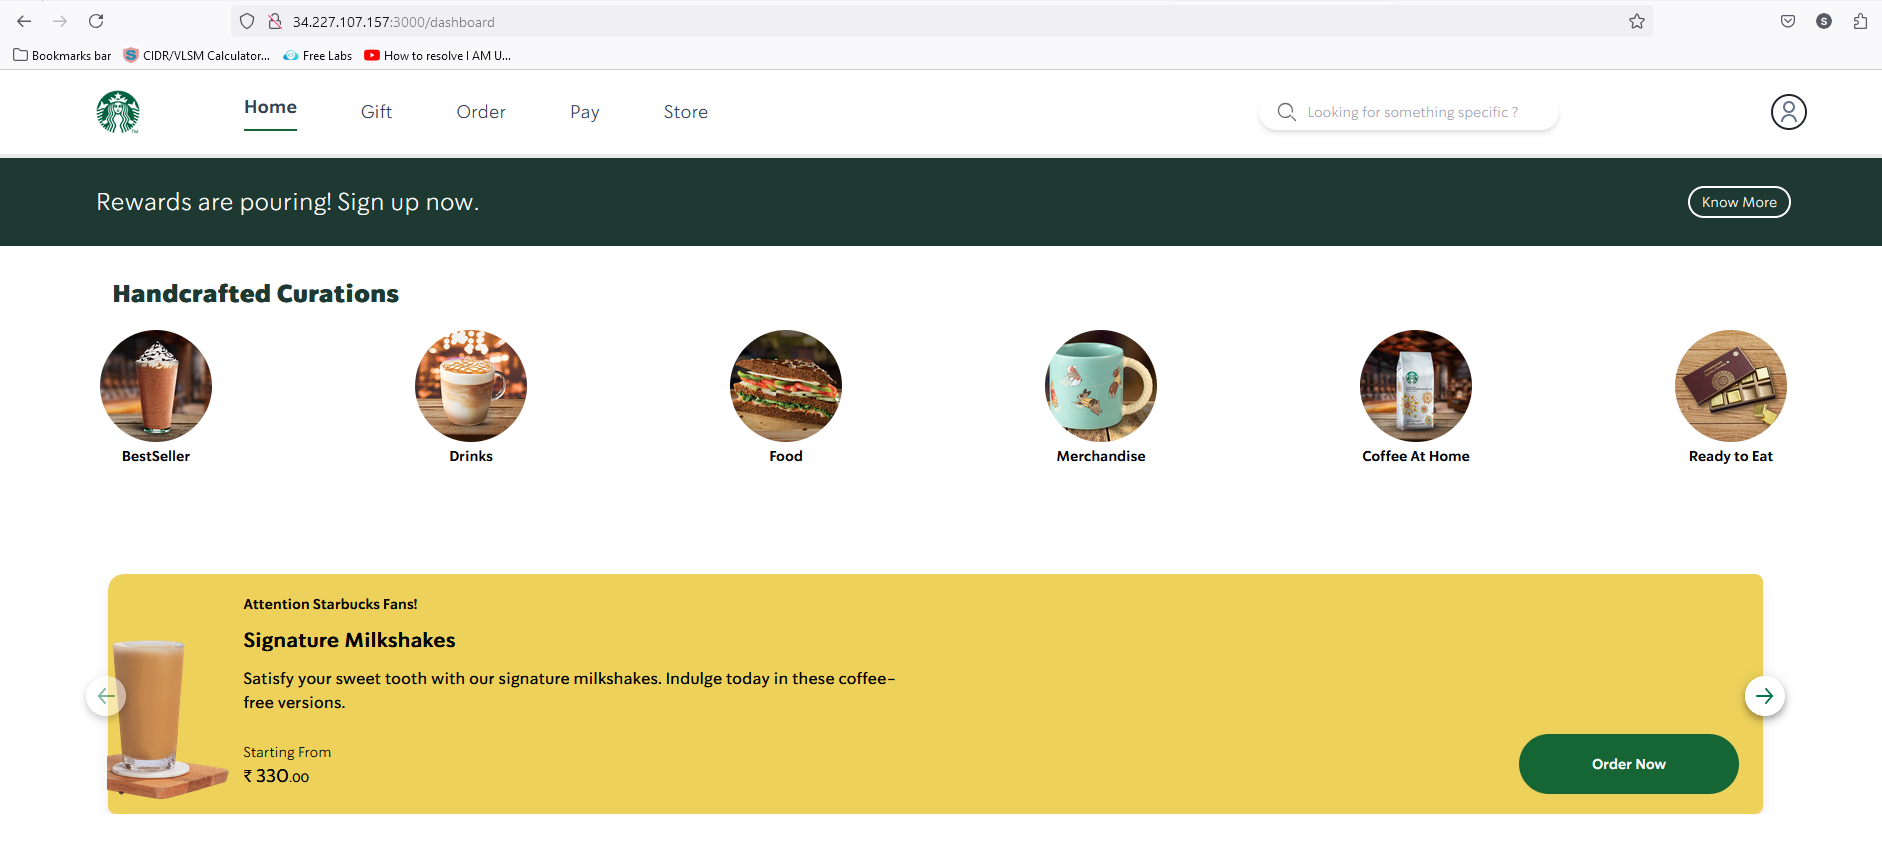
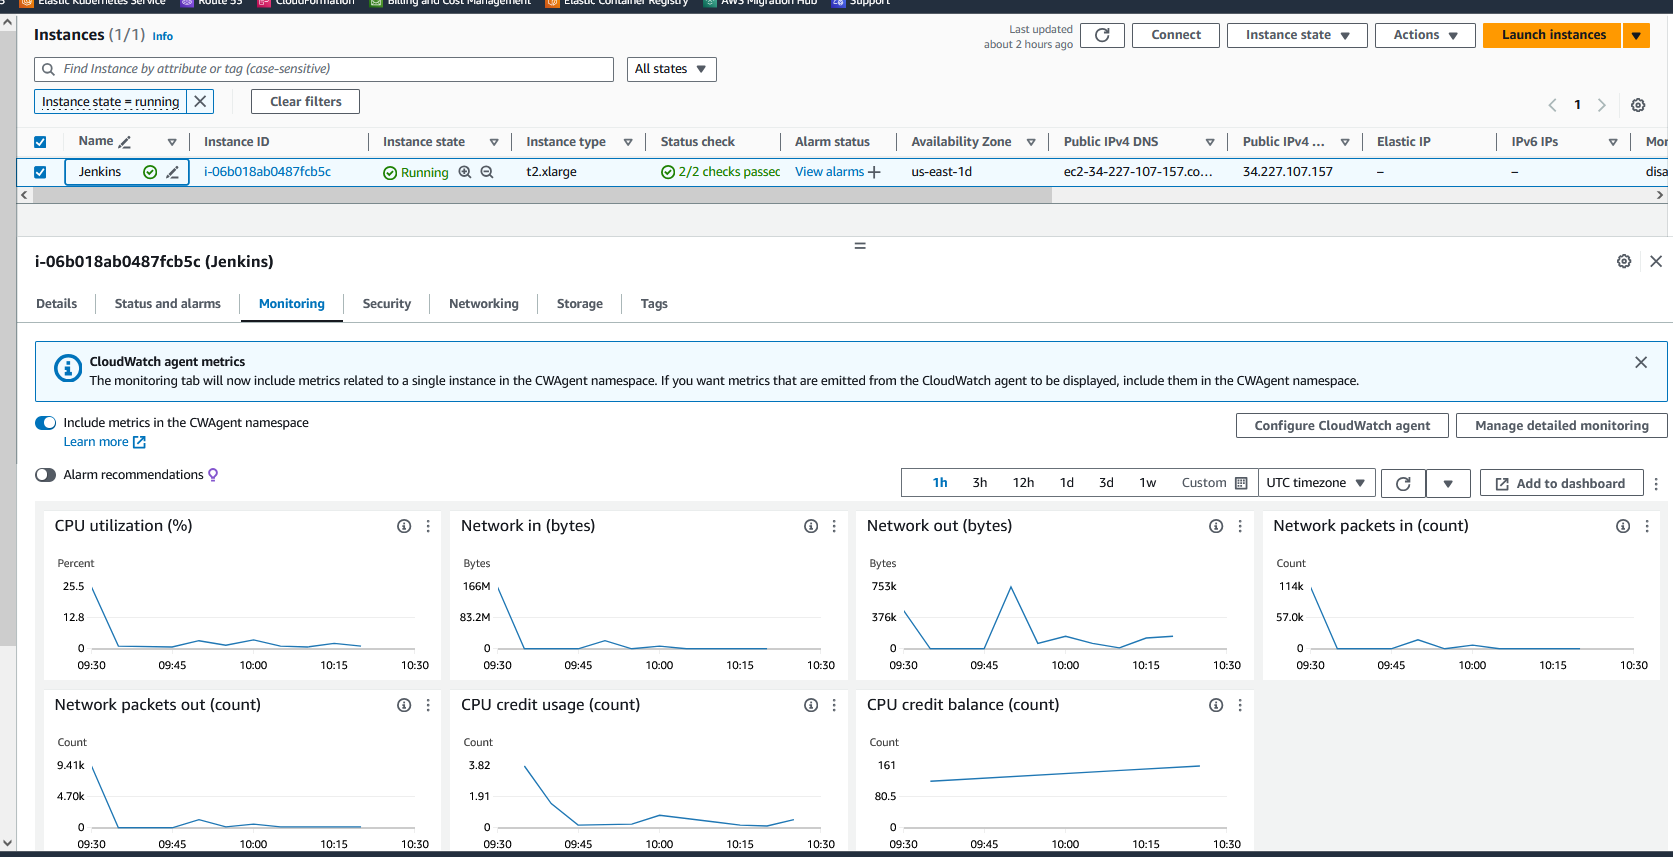
EC2 resource details
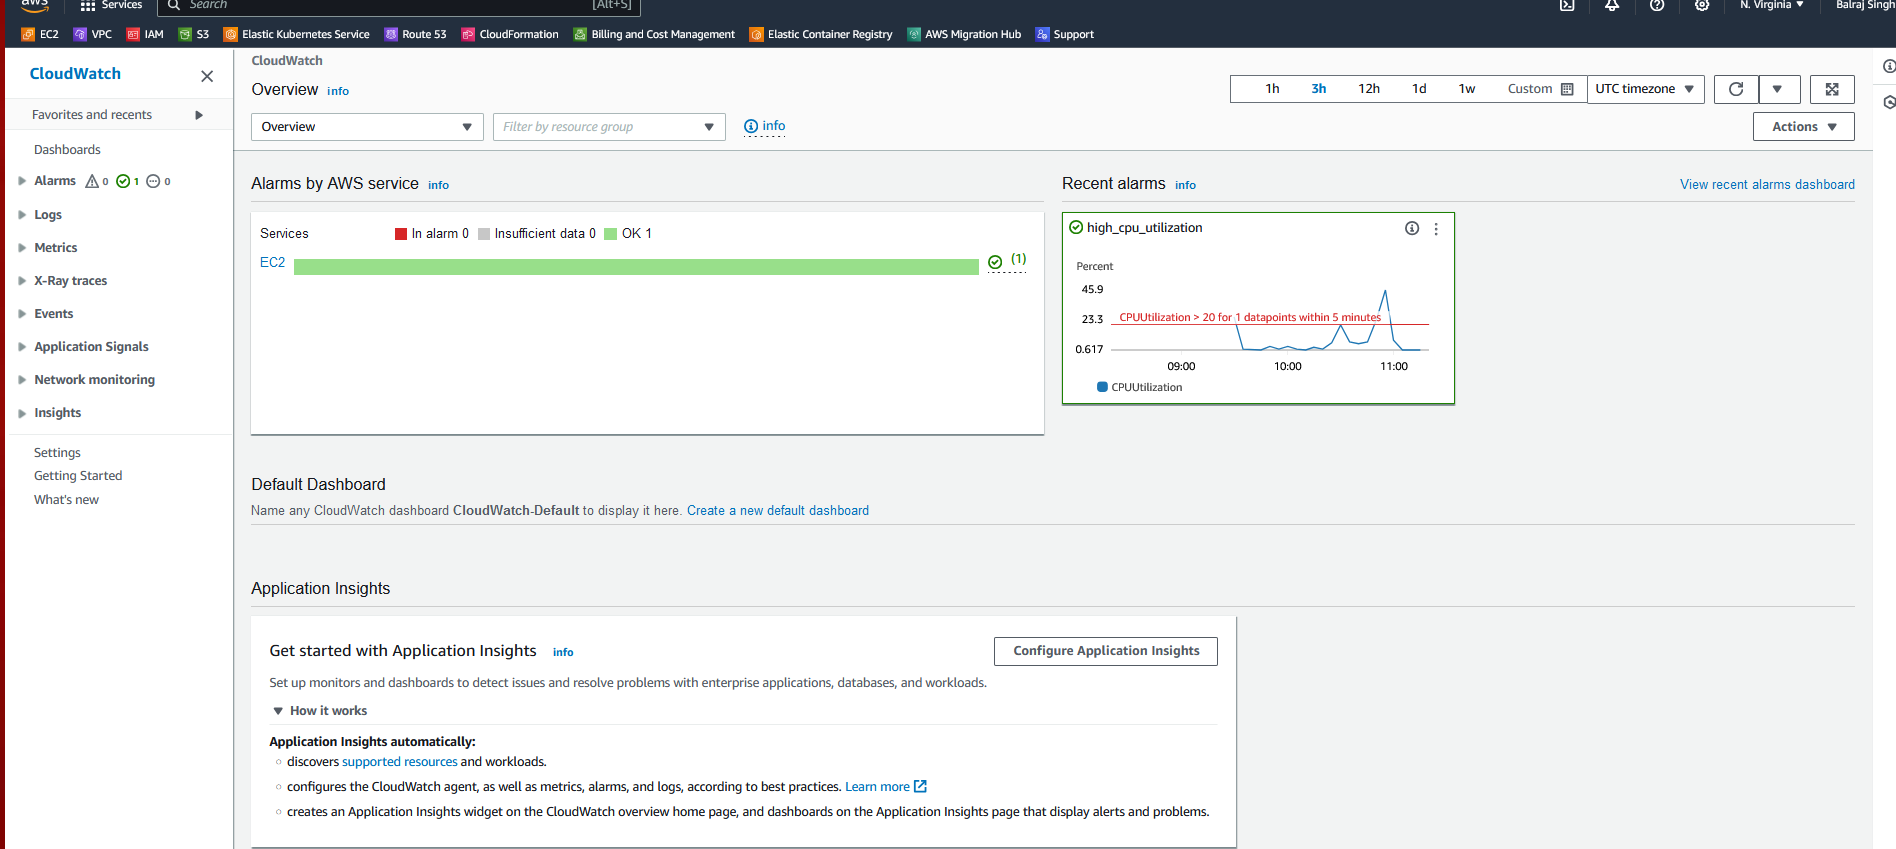
CloudWatch Status.
Environment Cleanup:
- As we are using Terraform, we will use the following command to delete the environment
terraform destroy --auto-approve
Time to delete the Virtual machine.
Go to folder "11.Real-Time-DevOps-Project/Terraform_Code" and run the terraform command.
    cd Terraform_Code/

    $ ls -l
    Mode                 LastWriteTime         Length Name
    ----                 -------------         ------ ----
    da---l          10/09/24   9:48 PM                Terraform_Code

    Terraform destroy --auto-approve

Key Takeaways:
Automated CI/CD Pipeline: Automating the build, test, and deployment process improves efficiency and reduces manual intervention.
Error Handling: Ensure all required tools and configurations are in place to avoid build failures.
Monitoring and Alerts: Utilize CloudWatch and SNS to monitor system performance and receive timely notifications.
Enhanced Security: Integration of OWASP, Docker Scout, and Dependency-Check ensures a secure deployment pipeline.
Code Quality: SonarQube helps maintain high code quality standards.
What to Avoid:
Skipping Security Scans: Always include security scans to identify and mitigate vulnerabilities.
Ignoring Resource Monitoring: Regularly check resource utilization to prevent potential issues. Overlooking Dependency Management: Regularly update and check dependencies for vulnerabilities.
Key Benefits:
Efficiency: Automating pipeline stages saves time and reduces manual errors.
Security: Regular scans with Docker Scout and OWASP Dependency-Check help identify and fix vulnerabilities.
Reliability: Continuous integration and deployment ensure consistent and reliable application updates.
Why Use This Project:
- Deploying a Starbucks clone using this approach not only demonstrates practical skills in integrating various DevSecOps tools but also highlights the importance of security and efficiency in modern software deployment. It showcases how to build, test, and deploy applications securely and efficiently, leveraging cloud services and CI/CD practices.
Use Case:
- This setup is ideal for development teams looking to implement a robust CI/CD pipeline to automate their build, test, and deployment processes. It ensures high-quality code delivery with continuous monitoring and security checks.
Ref Link
Subscribe to my newsletter
Read articles from Balraj Singh directly inside your inbox. Subscribe to the newsletter, and don't miss out.
Written by

Balraj Singh
Balraj Singh
Tech enthusiast with 15 years of experience in IT, specializing in server management, VMware, AWS, Azure, and automation. Passionate about DevOps, cloud, and modern infrastructure tools like Terraform, Ansible, Packer, Jenkins, Docker, Kubernetes, and Azure DevOps. Passionate about technology and continuous learning, I enjoy sharing my knowledge and insights through blogging and real-world experiences to help the tech community grow!