How to Build a Mood-Based Spotify Playlists Generator with React and TailwindCSS
 Kellia Umuhire
Hey there, music lover! Let’s dive into building an app that customizes Spotify playlists based on your mood using React and TailwindCSS. 🎶
Prerequisites
Basic understanding of JavaScript and React.
A Spotify Developer account (required for API access).
Step 1: Setting Up the Project it📀
We’ll use Vite to set up our React project, TailwindCSS for styling, and Axios library for making network requests.
To get started, open your terminal and run the following commands in order:
# Create a new Vite project
npm create vite@latest my-mood-playlist

# Navigate to the project directory
cd my-mood-playlist

# Install all dependencies
npm install

# Install TailwindCSSS, PostCSS, Autoprefixer, and Axios
npm install -D tailwindcss postcss autoprefixer axios

# Initiate `tailwind.config.js` file
npx tailwindcss init
Now, open tailwind.config.js file and set the content paths:
/** @type {import('tailwindcss').Config} */
export default {
  content: [
    './src/**/*.{js,jsx,ts,tsx}',
  ],
  theme: {
    extend: {},
  },
  plugins: [],
}
For PostCSS configuration, create a new file called postcss.config.js in the root directory and add the following content:
export default {
  plugins: {
    tailwindcss: {},
    autoprefixer: {},
  }
}
To use TailwindCSS classes in our files, open src/index.css and import the following Tailwind directives. Also, add the custom button class that we’ll use later:
@tailwind base;
@tailwind components;
@tailwind utilities;

@layer components {
  .btn {
    @apply text-white font-bold py-2 px-4 rounded-full transition-all duration-300 capitalize;
  }
}
You can replace everything inside App.jsx with the following content for now:
export default function App() {
  return (
    <div className="bg-black min-h-screen text-white p-8">
      <h1 className="text-3xl font-bold mb-6">Select Your Mood</h1>
    </div>
  );
}
Let's clean up some unnecessary files and add ones we will use later. Update your project structure to look like this:
MOOD-PLAYLIST/
├── node_modules/
├── public/
│   └── vite.svg
├── src/
│   ├── components/
│   │   └── CurrentPlaylist.jsx
│   ├── hooks/
│   │   ├── useFetchPlaylists.jsx
│   │   └── useSpotifyAuth.jsx
│   ├── App.jsx
│   ├── index.css
│   └── main.jsx
├── .env
├── .gitignore
├── eslint.config.js
├── index.html
├── package-lock.json
├── package.json
├── postcss.config.js
├── README.md
├── tailwind.config.js
└── vite.config.js
Run this command to start your app and access it in your browser at http://localhost:5173:
npm run dev
Now, let’s get the party started!! 🕺💃
Step 2: Setting Up Spotify 🎶
We’ll use the Spotify API to fetch playlists, but first, we need to be authenticated. In this section, we'll cover how to get the access token and then create a hook to fetch playlists based on the mood using the token.
You might have noticed in the project structure, there's a folder called hooks inside src with two files: useSpotifyAuth.jsx and useFetchPlaylists.jsx. These hooks will handle fetching data from the Spotify API—first the token, then the playlists. Let’s start with useSpotifyAuth.
2.1.1 Create a Spotify Developer Account
Go to the Spotify Developer Dashboard and log in with your Spotify account.
Create a new app: You’ll get a Client ID and Client Secret. Keep these handy as we’ll use them to authenticate with the API.
Redirect URI: Add a redirect URI (e.g.,
http://localhost:5173/callback) in your Spotify app settings. This will be used during the OAuth process.
2.1.2 Set up Authentication
Add the Client ID and Client Secret in the .env file. Preferably, name the Client ID as VITE_SPOTIFY_CLIENT_ID and the Client Secret as VITE_SPOTIFY_CLIENT_SECRET.
Now, open src/hooks/useSpotifyAuth.jsx and add this content:
import { useEffect, useState } from "react";
import axios from "axios";

const client_id = import.meta.env.VITE_SPOTIFY_CLIENT_ID;
const client_secret = import.meta.env.VITE_SPOTIFY_CLIENT_SECRET;

export default function useSpotifyAuth() {
  const [token, setToken] = useState();
  const [error, setError] = useState();

  const fetchAccessToken = async () => {
    try {
      const basicAuth = btoa(`${client_id}:${client_secret}`);

      const { data } = await axios.post(
        "https://accounts.spotify.com/api/token",
        {
          grant_type: "client_credentials",
        },
        {
          headers: {
            Authorization: `Basic ${basicAuth}`,
            "Content-Type": "application/x-www-form-urlencoded",
          },
        }
      );

      setToken(data.access_token);

      // Set a timeout to refresh the token every 1 hour
      setTimeout(fetchAccessToken, 3600 * 1000);
    } catch (error) {
      setError(error);
    }
  };

  useEffect(() => {
    fetchAccessToken();

    return () => clearTimeout(fetchAccessToken);
  }, []);

  return { token, error };
}
In this hook, we first import the Client ID and Secret from .env. Then, we create two states: token for the access token and error for any errors. Next, we define a function fetchAccessToken that handles getting the access token from https://accounts.spotify.com/api/token. Notice that right after try {, we encode the client ID and secret using btoa for basic authentication, which we then pass as a header in the Axios request. After making the request and extracting the data, we set the token to data.access_token and set a timeout to call the function every hour, as the access token lasts for an hour.
We call our function inside useEffect with an empty array dependency so that it only runs once, and we clear the timeout. The hook then returns the token and error.
2.2. Fetching Playlists
Navigate to src/hooks/useFetchPlaylists.jsx and add the following content:
import { useState, useEffect } from "react";
import axios from "axios";

export default function useFetchPlaylists(token, mood) {
  const [playlists, setPlaylists] = useState([]);
  const [loading, setLoading] = useState();
  const [error, setError] = useState();

  const fetchPlaylists = async () => {
    setLoading(true);
    try {
      const { data } = await axios.get(
        `https://api.spotify.com/v1/search?q=${mood}&type=playlist&limit=10`,
        {
          headers: {
            Authorization: `Bearer ${token}`,
          },
        }
      );

      setPlaylists(data.playlists.items);
      setLoading(false);
    } catch (error) {
      setError(error);
      setLoading(false);
    }
  };

  useEffect(() => {
    if (token && mood) {
      fetchPlaylists();
    }
  }, [token, mood]);

  return { playlists, loading, error };
}
This hook takes two parameters: token for the access token and mood for the mood we’re searching for. We define the playlists, loading, and error states. Inside the fetchPlaylists function, we start by setting loading to true. We then fetch the data and set the playlists to data.playlists.items. After that, we set loading to false. If there’s an error (inside catch), we set the error state to the error and also set loading to false.
Inside useEffect, we call fetchPlaylists when token and mood are defined. The hook returns the playlists, loading, and error.
Now, let’s move on to something more visual!
Step 3: The Visuals 😁
On the interface, we need to select a mood and see playlists related to that mood. When you click on any playlist, it should start playing, letting you enjoy the music. To achieve this, we need mood buttons, a section to display the playlists, and another for the currently playing playlist.
3.1. The Moods
One way to keep our code clean is to group the moods in one array and use it to display them inside our component. We’ll need two states: a mood state to track the desired mood and currentPlaylist for the selected playlist.
Open App.jsx and add the MOODS array before the export. Then, add the mood state and the code to map through this array to display each mood:
import { useState } from "react";

const MOODS = [
  { name: "happy", emoji: "😊", color: "green" },
  { name: "sad", emoji: "😢", color: "blue" },
  { name: "angry", emoji: "😡", color: "red" },
  { name: "calm", emoji: "😌", color: "purple" },
];

export default function App() {
  const [mood, setMood] = useState("");
  const [currentPlaylist, setCurrentPlaylist] = useState(null);

  return (
    <div className="bg-black min-h-screen text-white p-8">
      <h1 className="text-3xl font-bold mb-6">Select Your Mood</h1>

      {/* Display moods */}
      <div className="flex space-x-4 mb-10">
        {MOODS.map((mood) => (
          <button
            key={mood.name}
            onClick={() => setMood(mood.name)}
            className={`btn bg-${mood.color}-500 hover:bg-${mood.color}-400`}
          >
            {mood.emoji} {mood.name}
          </button>
        ))}
      </div>
    </div>
  );
}
3.2. The Playlists
Import the hooks (useSpotifyAuth and useFetchPlaylists) and call them right after the mood state. Remember that both hooks also export error? We need to handle it properly. Update your App.tsx:
import { useState } from "react";
/** Import the hooks */
import useSpotifyAuth from "./hooks/useSpotifyAuth";
import useFetchPlaylists from "./hooks/useFetchPlaylists";

const MOODS = [...];

export default function App() {
  const [mood, setMood] = useState("");
  const [currentPlaylist, setCurrentPlaylist] = useState(null);

  /** Invoke them */
  const { token, error: authError } = useSpotifyAuth();
  const { playlists, loading, error } = useFetchPlaylists(token, mood);

  /** Handle errors */
  if (error || authError) return <div>Error: {error.message}</div>;

  return (...);
}
Next, we’re going to display the playlists below the buttons. If you check the response for fetching the playlists in your inspector’s network tab, you'll see an object with playlists that contains items (playlists). Each item inside items has various properties. For our app, we’ll mainly use id, images to show the playlist image, and external_urls.spotify to play the playlist. Now, we’re going to add a div to display the playlists in App.jsx. Add the following code below the div containing the mood buttons:
<div className="flex gap-10 justify-between">
  {loading ? (
    <p className="text-gray-400 text-center">Loading playlists...</p>
  ) : playlists.length > 0 ? (
    <ul className="grid grid-cols-4 gap-5 w-2/3">
      {playlists.map((playlist) => (
        <img
          key={playlist.id}
          src={playlist.images[0].url}
          alt={playlist.name}
          className="rounded-lg w-full h-full object-contain cursor-pointer"
          onClick={() => setCurrentPlaylist(playlist.id)}
        />
      ))}
    </ul>
  ) : (
    <p className="text-gray-400 text-center">
      Click on any button to see the playlists!
    </p>
  )}
</div>
Now, when you click a mood button in the browser, you will see the playlists!
3.3. Play The Playlist!
When you want to share a playlist or song on Spotify and click on Share, you get two options: Copy Song Link and Embed Track. The second option gives you a block of code, which is an iframe with a src attribute containing the link in the format https://open.spotify.com/embed/playlist/${playlistId}. To display and play a playlist, we can use this iframe and the selected playlist’s id. To keep our code clean, we can add the code inside src/components/CurrentPlaylist.jsx:
export default function CurrentPlaylist({ id }) {
  return (
    <div className="w-1/3 bg-gray-800 p-4 rounded-2xl h-fit">
      {id ? (
        <iframe
          src={`https://open.spotify.com/embed/playlist/${id}`}
          width="100%"
          height="400"
          allowFullScreen=""
          allow="autoplay; clipboard-write; encrypted-media; fullscreen; picture-in-picture"
          loading="lazy"
        ></iframe>
      ) : (
        <p className="text-gray-400 text-center">
          The current playlist will appear here
        </p>
      )}
    </div>
  );
}
Next, add this component to our App.jsx. The final code will look like this:
import { useState } from "react";
import useSpotifyAuth from "./hooks/useSpotifyAuth";
import useFetchPlaylists from "./hooks/useFetchPlaylists";
import CurrentPlaylist from "./components/CurrentPlaylist";

const MOODS = [
  { name: "happy", emoji: "😊", color: "green" },
  { name: "sad", emoji: "😢", color: "blue" },
  { name: "angry", emoji: "😡", color: "red" },
  { name: "calm", emoji: "😌", color: "purple" },
];

export default function App() {
  const [mood, setMood] = useState("");
  const [currentPlaylist, setCurrentPlaylist] = useState(null);

  /** Invoke the hooks */
  const { token, error: authError } = useSpotifyAuth();
  const { playlists, loading, error } = useFetchPlaylists(token, mood);

  /** Handle errors */
  if (error || authError) return <div>Error: {error.message}</div>;

  return (
    <div className="bg-black min-h-screen text-white p-8">
      <h1 className="text-3xl font-bold mb-6">Select Your Mood</h1>

      {/* Display mood buttons */}
      <div className="flex space-x-4 mb-10">
        {MOODS.map((mood) => (
          <button
            key={mood.name}
            onClick={() => setMood(mood.name)}
            className={`btn bg-${mood.color}-500 hover:bg-${mood.color}-400`}
          >
            {mood.emoji} {mood.name}
          </button>
        ))}
      </div>

      {/* Display playlists */}
      <div className="flex gap-10 justify-between">
        {loading ? (
          <p className="text-gray-400 text-center">Loading playlists...</p>
        ) : playlists.length > 0 ? (
          <ul className="grid grid-cols-4 gap-5 w-2/3">
            {playlists.map((playlist) => (
              <img
                key={playlist.id}
                src={playlist.images[0].url}
                alt={playlist.name}
                className="rounded-lg w-full h-full object-contain cursor-pointer"
                onClick={() => setCurrentPlaylist(playlist.id)}
              />
            ))}
          </ul>
        ) : (
          <p className="text-gray-400 text-center">
            Click on any button to see the playlists!
          </p>
        )}

        {/* Display the current playlist */}
        <CurrentPlaylist id={currentPlaylist} />
      </div>
    </div>
  );
}
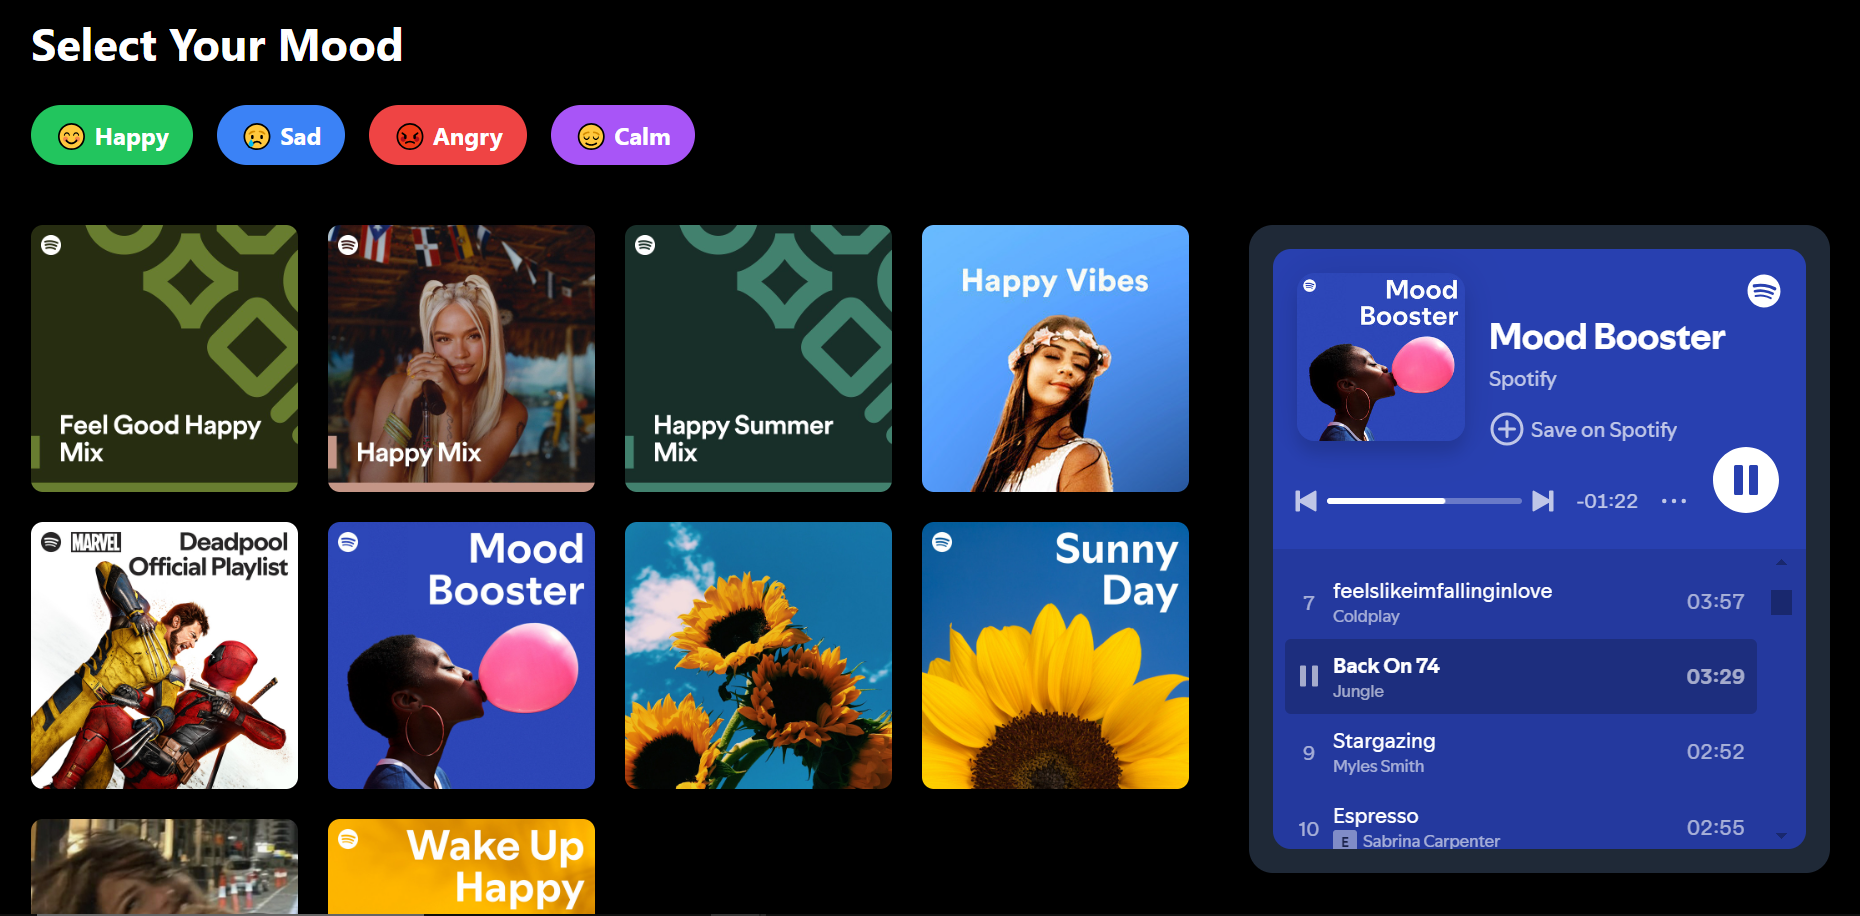
Once you view your site in the browser, it will look something like this:

Conclusion
You've made it to the end! 🎉 You've just built an awesome React app that's perfectly tuned to your mood. How cool is that?
Now, it's your turn to take this project and make it your own. Add new features, tweak the design, or integrate other APIs. Keep coding and stay awesome! 🚀🌟
Subscribe to my newsletter
Read articles from Kellia Umuhire directly inside your inbox. Subscribe to the newsletter, and don't miss out.
Written by
