Conquer Version Control: A Deep Dive into Git & GitHub
 Ashutosh Pandey
File System:
A file system is where you store and organize files on your computer or server (like folders and files you see in Windows Explorer or Mac Finder).
It keeps track of your files but doesn’t save old versions or changes.
If you overwrite or delete a file, it’s lost unless you have a backup.
Example: When you save a document on your desktop, it gets stored in your computer’s file system. But if you make changes to that document, the older version is gone unless you manually save different versions.
Version Control System (VCS):
A version control system tracks changes to your files over time.
It allows you to go back to previous versions, compare changes, and collaborate with others without losing work.
Even if you make changes or delete something, the VCS keeps a history, so you can recover older versions.
Example: If you're writing code in Git and you make changes, Git tracks those changes. You can go back to any previous version, see what was changed, and even work with multiple people without overwriting each other’s work.
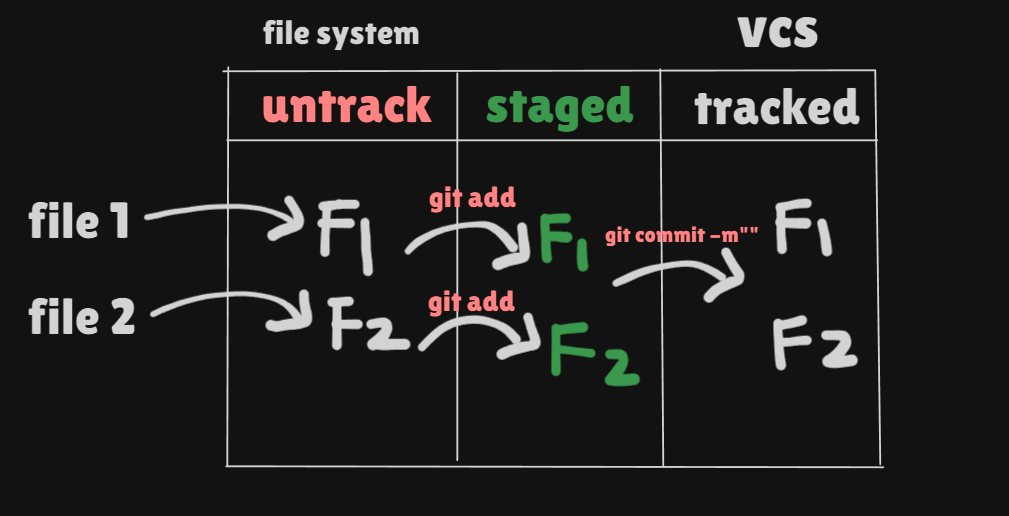
Git is a free and open-source version control system designed to handle projects of any size. It helps you track changes in files, collaborate with others, and maintain a history of your work.
Key Features of Git:
Version Control: It tracks every change made to files, allowing you to view the history, go back to previous versions, and undo mistakes.
Collaboration: Multiple people can work on the same project without overwriting each other’s changes.
Branches: Git allows you to create separate branches of a project, so you can work on different features without affecting the main project. Later, you can merge the changes.
Distributed: Each user has a full copy of the project’s history on their local machine, so you don’t rely on a central server.
HASH
Git uses hashing to track every change you make to your project. Each change (or commit) is given a unique hash, which acts like a snapshot of your project at that moment. This makes it easy to identify and retrieve specific versions of your work.
Hash is also called commit id. It makes a unique id for commit and we can go back to the any version we want.
Simple Example:
You make a change to a file (like adding a new line of code).
When you commit this change, Git generates a unique hash (using a SHA-1 algorithm) based on the content of the change, the author, and other details.
The hash looks something like this:
6a7b34c...
This hash is like an ID for that specific change. Even if you make another small change, Git will generate a completely different hash for the new commit.
Common Git Terms:
Repository (Repo): A storage space where your project files and their history are stored.
Commit: A snapshot of your project at a specific time. It records the changes you’ve made.
Branch: A separate version of your project where you can make changes without affecting the main project.
Merge: Combining changes from one branch into another.
Clone: Making a copy of an existing repository to your local machine.
Pull: Fetching the latest changes from a remote repository.
Push: Sending your changes to a remote repository (e.g., GitHub).
Commands
Head always points to the latest change/commit you are working in the repository.
git init: Initializes a new Git repository.git clone: Copies a remote repository to your local machine.- Example ->
git clonehttps://github.com/username/repo.git
- Example ->
git status: Shows the status of your working directory and staged changes.git add: Stages changes to prepare them for commit.- Example ->
git add filenameorgit add .(this adds all the files to be added)
- Example ->
git commit -m "": Saves your changes with a descriptive message.- Example ->
git commit -m "Added new feature"
- Example ->
git push: Uploads local commits to a remote repository.Example ->
git push origin main=> this command sends your local changes to themainbranch of theoriginremote.origin: The default name for the remote repository you cloned from or have set up. It's a shorthand reference to the remote URL.
Using git push origin main
, you are pushing your localmainbranch's code to themainbranch of the remote repository namedorigin`.
git pull: Fetches and merges changes from a remote repository.- Example ->
git pull origin main=> this command gets the latest changes from themainbranch of theoriginremote and merges them into your local branch.
- Example ->
git branch: Lists or creates branches.- Example ->
git branch -b branch-name
- Example ->
git checkout: Switches between branches or commits.- Example ->
git checkout branch-name
- Example ->
git merge: Combines changes from one branch into another.- Example ->
git merge branch-name
- Example ->
git log: Shows the commit history of the repository.git log ---oneline=> to display log in short one line.
git remote: Manages remote repository connections.git diff: Displays the differences between your files.git reset: Unstages changes from the staging area.Set global username and email for Git (Locally).
git config --global user.name "<your username>"  #sets username
git config --global user.email "<your email>" #sets email
- Clone an existing Git Repository
git clone <repository URL>
- Add remote origin URL
git remote add origin <your remote git URL>
- Fetch all the remote branches
git fetch
I] What is the meaning of On branch master nothing to commit, working tree clean ?
You're on the
masterbranch.There are no changes to be committed (no modifications or new files).
Your working directory is clean (everything is up to date).
II] The master branch was traditionally the default or main branch in Git, often considered the core branch from which other branches are created. However, in many modern practices, the main branch is now named main instead of master, to better reflect inclusivity and modern naming conventions.
Branch
Branching in Git allows you to create separate "lines" of development in your project. Each branch is an independent version of the codebase where you can experiment, add features, or fix bugs without affecting the main project.
Branch: A branch is a pointer to a specific commit in the Git history. By default, Git starts with a
main(ormaster) branch.HEAD: HEAD is a reference to the current branch or commit you're working on
Key Git Branching Commands:
Create branch:
git branch -b <branch-name>Switch branch:
git checkout <branch-name>orgit switch <branch-name>both does the same work.Create & switch:
git checkout -b <branch-name>View branches:
git branchMerge branch:
git merge <branch-name>Delete branch:
git branch -d <branch-name>
Git vs. GitHub
Git:
Developed by Linus Torvalds
Local version control system.
Tracks changes, commits, and branches on your machine.
Works offline.
Manages repository history.
GitHub:
Acquired and managed by Microsoft.
Cloud-based platform for Git repositories.
Hosts repositories online for collaboration.
Enables remote access and sharing.
Provides additional features like pull requests, issues, and project management.
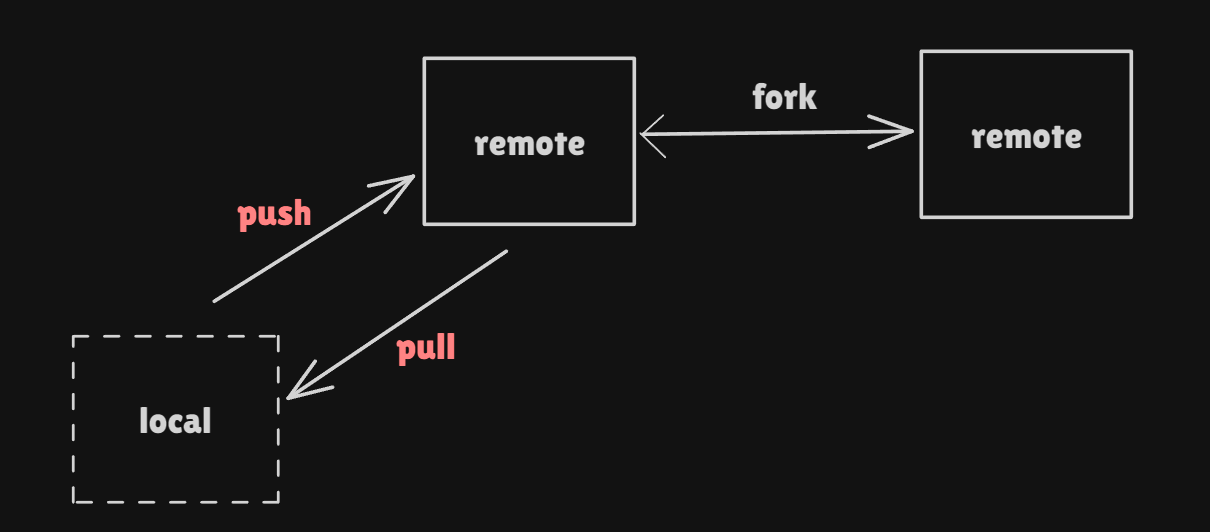
We can push the file from local to remote repo via two methods
SSH
PAT -> Personal access token
I] Pushing via SSH
Create a new key pair with the command
ssh-keygen -t, both private and public keys are generated.Copy the public key and add it in GitHub->settings->SSH and GPG keys.
We clone any project/repo on which we want to push via SSH.
Now create a new branch(demo) => create file (f1.txt) which is to be added.
Now add the file (f1.txt) and commit it.
These files are on new branch (demo) , but not in master/main branch.
To push it to the demo branch we use
git push origin demo, this will push the code to the demo branch, !! Note => Master branch is still unaffected to get the changes in master we have to merge the branches.
II] Pushing Via PAT
To push to a Git repository using a Personal Access Token (PAT), follow these steps:
Generate a PAT:
Go to your GitHub account settings.
Navigate to "Developer settings" > "Personal access tokens".
Generate a new token with the required permissions (e.g.,
repofor full control over private repositories).
Use PAT for Git operations: When prompted for a username and password while performing Git operations (e.g.,
git push), use the following:Username: Your GitHub username.
Password: The generated Personal Access Token. Alternatively, you can include the PAT directly in the repository URL (though it's less secure):
git remote set-url origin https://<username>:<PAT>@github.com/<username>/<repository>.git
Push Changes: After setting the remote URL or when prompted for credentials, you can push your changes:
git push origin branch-nameReplacebranch-namewith the branch you're pushing to.
Using PATs is recommended over using passwords, especially since GitHub has discontinued password-based authentication for Git operations.
Branching Strategies
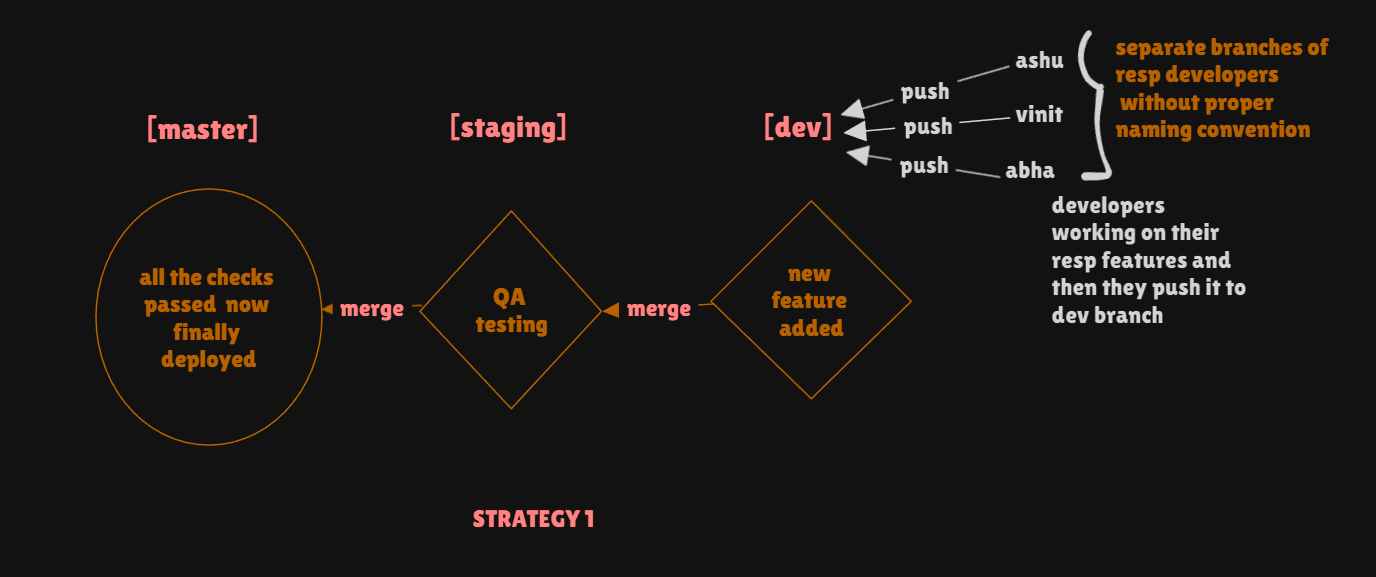
Strategy 1 (BASIC NOT OPTIMAL )
This strategy consists of majorly 3 branches namely -> master , staging , and dev
Master -> The
masterbranch (ormainin some projects) is the production-ready branch. It contains code that is stable and ready to be deployed to production.Staging -> The
stagingbranch is a pre-production branch used for testing and quality assurance (QA). It acts as a middle ground betweendevandmaster.Dev -> The
devbranch is the development branch where active development happens. It serves as the integration point for feature branches.
WORKFLOW => Developers work on a feature by creating their own branches from the dev branch. Each developer may name their branch without following a proper naming convention (e.g., branches named Ashutosh, Shubham, Ankit). These branches are used to develop individual features. Once the features are completed, they are merged into the dev branch. Since multiple developers are working on different features, the dev branch contains all the new features. After development, the dev branch is merged into the staging branch, where the features are thoroughly tested to ensure stability. Once testing is complete and the code is verified to be stable, the changes from the staging branch are merged into the production master branch, making the new features live in production.
Strategy 2 (Better than 1st)
This Strategy consists of three main branches namely -> Master , QA , Dev and Feature.
In this strategy whole process is automated with the help of Jenkins.
In this strategy developers make a branch to develop features from the dev branch itself with proper naming conventions. (ex -> "feature/login" , "feature/button" ...)
Feature branch consists of the features which are being developed by developers.

Workflow => In this strategy, the repository has four main branches:
master,QA,dev, andfeature. Developers begin by creating a feature branch from thedevbranch, using a proper naming convention (e.g.,feature/login,feature/button) to clearly describe the feature they are working on. Each developer works in their respective feature branch to implement new functionality or fix bugs.
Once the feature is developed and tested locally, it is merged back into the dev branch. Multiple developers can create feature branches, ensuring that their work remains organized and easy to track. After merging all feature branches into dev, the branch is pushed to the QA branch for further testing.
The QA branch is used to test the combined features and ensure there are no issues. Once all tests pass and the code is stable, the QA branch is merged into the master branch. This final merge deploys the code to production, making the new features live. This strategy promotes a clear separation of development, testing, and production stages while maintaining structured naming conventions for better organization and tracking.
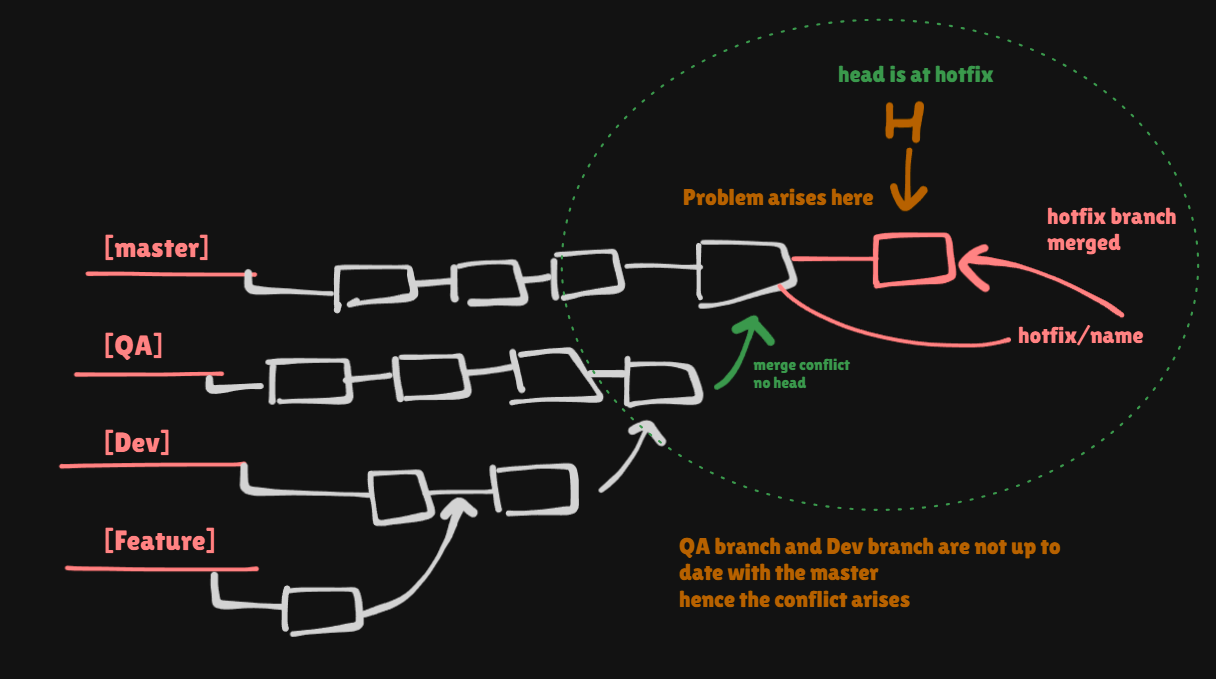
What if the production encounters a Bug ?
In this strategy, if a bug is found in the master branch (production), a new branch called hotfix is created directly from master. The naming convention typically follows something like hotfix/issue-name (e.g., hotfix/login-issue). This branch allows the bug to be fixed immediately without affecting ongoing development in the dev branch. Once the bug is fixed in the hotfix branch, it is merged back into the master branch to apply the fix in production. Hotfixes are typically used for small but critical issues that cause an immediate impact on the production environment. These could be bugs, security vulnerabilities, or other problems that need to be resolved quickly.
PROBLEM FACED IN HOTFIX
When a hotfix is applied directly to the master branch, the dev and QA branches remain unaware of the bug fix, which can lead to merge conflicts later. This happens because the master branch now contains changes that aren't reflected in the dev or QA branches. When developers finish working on new features and merge them from dev to QA and eventually into master, conflicts may arise as the master branch has already moved forward with the hotfix. To prevent this, after applying the hotfix to master, it is crucial to immediately merge the fix into both the dev and QA branches. This ensures that the bug fix is present across all active branches, keeping the codebases synchronized.
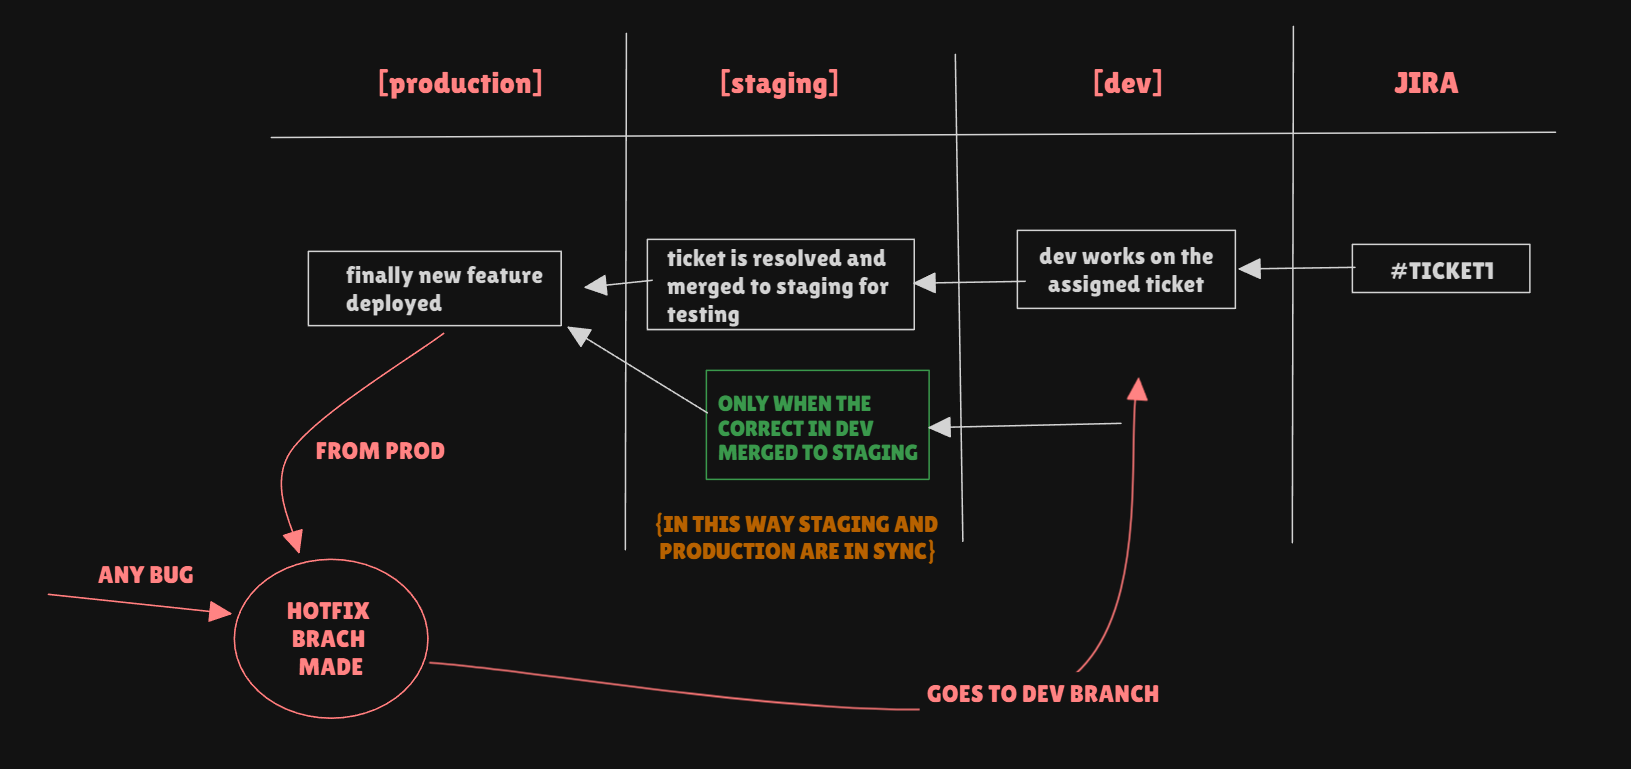
- Strategy 3 (Most Optimal) In this workflow, we use a structured branching strategy along with Jira for task management and automation. The process is organized as follows:
Workflow =>
Branching and Ticket Creation:
Jira Kanban Board: Includes columns like To Do, In Progress, Ready to Test, and Merge to Prod.
Each task or feature starts with a Jira ticket. The ticket is assigned to the "To Do" column on the Kanban board.
Developers create a feature branch from the
devbranch, named with the ticket number and work name (e.g.,feature/TICKET-123-work-name).
Development and Automation:
As developers work on the ticket, they make commits to their branch.
Jira is integrated to automatically update the ticket status to "In Progress" when commits are made to the branch.
Testing and Merging:
Once development is complete, the ticket moves to the "Ready to Test" column.
QA engineers test the feature. If the testing is successful, the ticket moves to the "Merge to Prod" column.
The feature is then merged into the
stagingbranch for final testing and review.
Deployment:
After successful testing in
staging, the feature is merged into theproductionbranch.The feature is then deployed to the production environment.
By automating the workflow through Jira and using this structured process, the development cycle is streamlined, ensuring that each feature is tracked from initial creation through to deployment, with clear visibility and updates at each stage.
In the case of a hotfix, the workflow is as follows
Ticket Creation:
- A Jira ticket is created for the hotfix. This ticket is immediately moved to the "In Progress" column on the Kanban board.
Branching and Development:
- A hotfix branch is created directly from the
productionbranch, named with the ticket number and a description of the issue (e.g.,hotfix/TICKET-456-critical-bug).
- A hotfix branch is created directly from the
Bug Fixing:
- The bug is fixed on the hotfix branch. Once the fix is implemented, the ticket status is updated to "Ready to Test" on Jira.
Testing and Merging:
The QA team tests the hotfix. After successful testing, the ticket moves to the "Merge to Prod" column.
The hotfix branch is then merged into the
productionbranch to apply the fix.
Syncing Branches:
- To avoid conflicts with ongoing development, the hotfix branch is also merged into the
devbranch. This ensures that the fix is included in future development work and keeps the codebases synchronized.
- To avoid conflicts with ongoing development, the hotfix branch is also merged into the
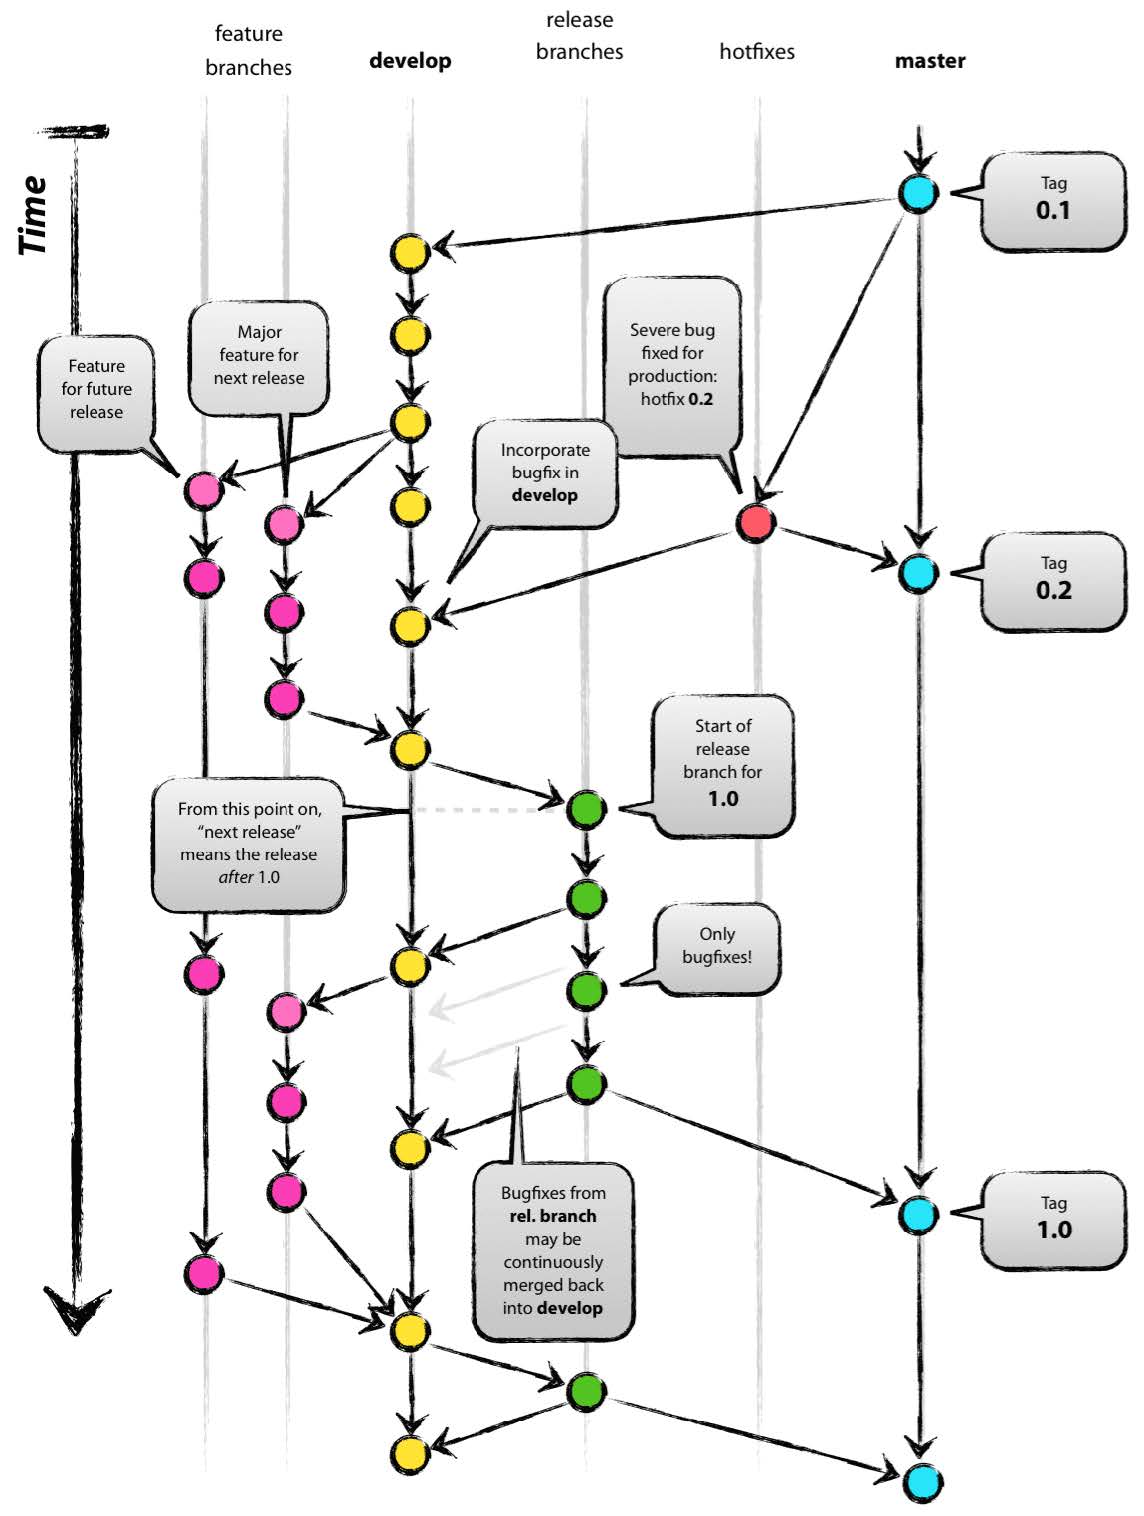
One of the Best Strategies
REVERT AND RESET
In Git, revert and reset are used to undo changes, but they do so in different ways and serve different purposes. Here's a comparison:
git revert
Purpose: To create a new commit that undoes the changes made by a previous commit. This is useful when you need to undo changes while preserving the commit history.
Usage:
git revert <commit>Effect: It creates a new commit that reverses the changes of the specified commit. The original commit remains in the history.
Best For: Undoing changes in a public branch where you want to preserve the history and avoid disrupting other collaborators.
Example:
git revert a1b2c3d4 This command will create a new commit that undoes the changes introduced by commit a1b2c3d4.
git reset
Purpose: To move the current branch to a different commit, potentially altering the commit history. This is useful for undoing changes locally or discarding commits.
Usage:
git reset [--soft|--mixed|--hard] <commit>soft: Moves the branch pointer but leaves working directory and index unchanged.mixed(default): Moves the branch pointer and updates the index, but leaves the working directory unchanged.hard: Moves the branch pointer and updates both the index and working directory, discarding all changes.
Effect: Can alter the commit history, especially with
--hardand--mixed. Useful for undoing local changes but should be used with caution on shared branches.Best For: Local development where you need to discard changes or reset to a previous state. Avoid using
--hardon shared branches to prevent data loss.
Example:
Soft Reset:
git reset --soft HEAD~1This moves the branch back by one commit but keeps the changes in the working directory.Mixed Reset:
git reset HEAD~1This removes the last commit and unstages the changes, but keeps them in the working directory.Hard Reset:
git reset --hard HEAD~1This discards the last commit and any changes in the working directory.
MERGE AND REBASE
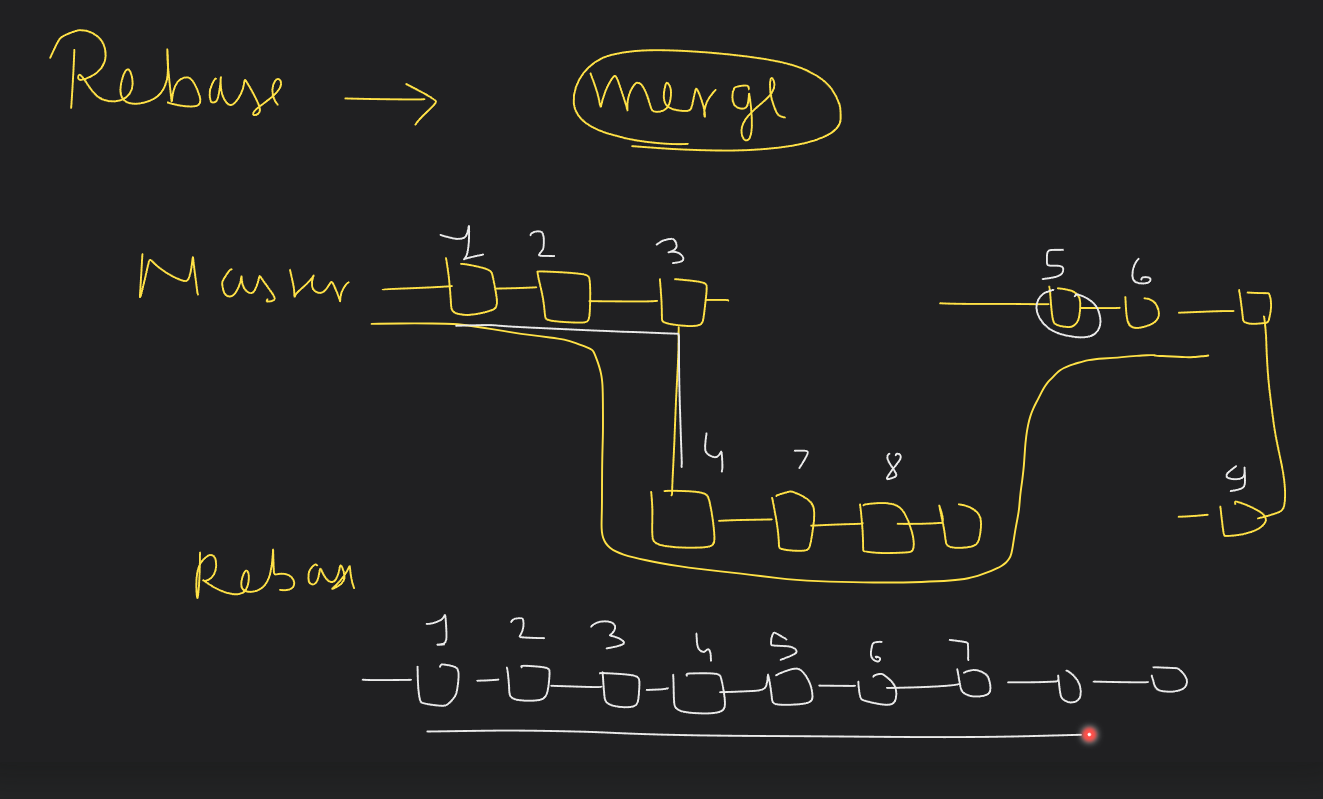
Git Merge
What it does: Combines changes from one branch into another.
How it works:
You take changes from one branch (e.g.,
feature-branch) and add them to another branch (e.g.,main). Tree like structure formed here .Git creates a special "merge commit" to show that the two branches have been combined.
When to use:
When you want to keep the history of both branches and show that they were merged together.
Good for combining work from different people or teams.
Merging can also be done with pull request on GitHub.
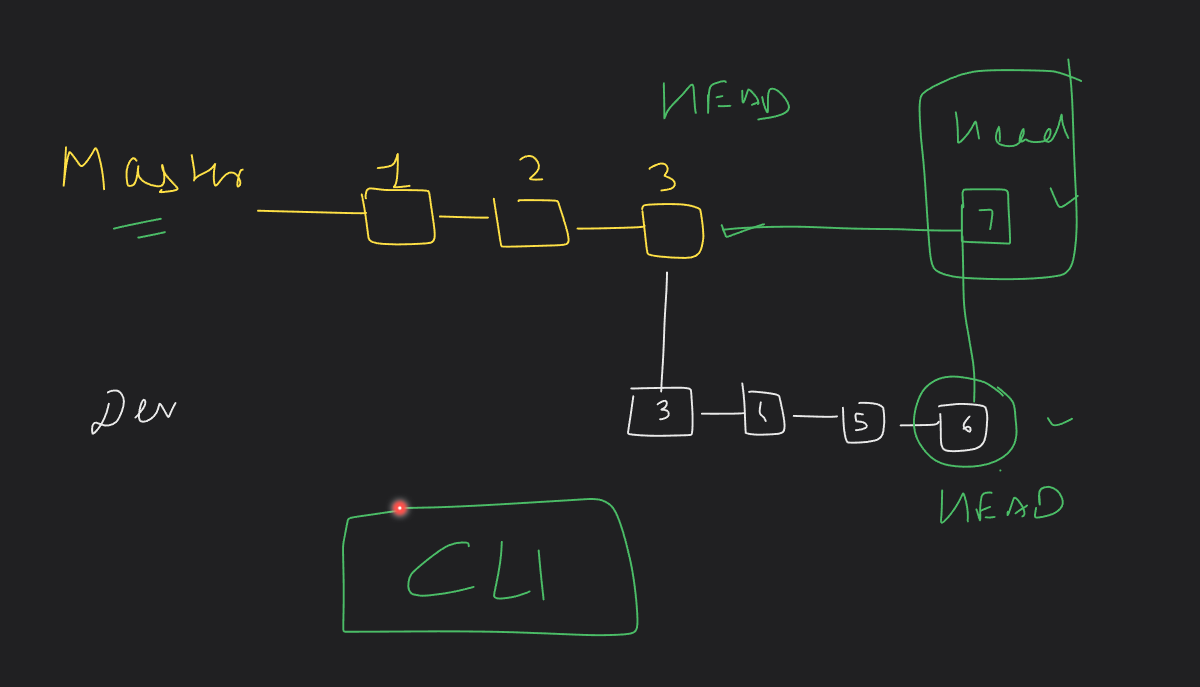
Example -> suppose you have 2 branches master and dev (2 commits behind of master) therefore we merge from master to dev, this creates a new merge commit in dev and hence both branches are merged.
Git Rebase
What it does: Moves your changes to the top of another branch.
How it works:
You take your changes from your branch (e.g.,
feature-branch) and replay them on top of another branch (e.g.,main). Linear Structure formed.This makes it look like your changes were made directly on top of the latest version of
main.
When to use:
When you want a clean, straight line of commits.
Useful for keeping your branch up-to-date before merging it into the main branch.
Summary
Merge: Combines branches and keeps all the history. Adds a merge commit to show the branches joined together.
Rebase: Moves your changes to the top of another branch, making the history look cleaner and more linear.
Use merge for preserving history and rebase for a cleaner, simpler history.
Cherry-Pick
What it does: Allows you to apply a specific commit from one branch to another branch.
How it works:
You pick a particular commit (a snapshot of your changes) from one branch and apply it to your current branch.
This is useful if you want to bring just one or a few specific changes from one branch to another without merging everything.
When to use:
- When you need to take a specific fix or feature from one branch and apply it to another branch.
Example:
git cherry-pick <commit-hash>
This command takes the changes from the commit with the specified hash and applies them to your current branch.
Stash
What it does: Temporarily saves your uncommitted changes so you can work on something else and come back to them later.
How it works:
When you’re working on changes and need to switch tasks or branches, you can stash your work.
Git saves your changes and reverts your working directory to the state of the last commit.
You can later apply the saved changes back to your working directory when you’re ready.
When to use:
- When you need to switch branches or tasks but don’t want to commit your current work yet.
Example:
git stash
This command saves your changes and reverts your working directory to the last commit. You can later retrieve your changes with:
git stash pop
or
git stash apply
Squash
What it does: Combines multiple commits into a single commit.
How it works:
If you have several commits in a branch and want to combine them into one commit for a cleaner history, you use squash.
This is usually done during a rebase or merge to make the commit history more organized.
When to use:
- When you want to tidy up your commit history before merging a branch into the main branch.
Example:
git rebase -i HEAD~3
This command opens an editor where you can choose to squash the last three commits into one.
Summary:
Cherry-Pick: Apply a specific commit from one branch to another.
Stash: Temporarily save your work to switch tasks or branches.
Squash: Combine multiple commits into one for a cleaner history.
Merge Conflict Resolution
A merge conflict happens when you're working on a project with others (or on different branches yourself), and two changes to the same part of the code (or file) don't agree with each other. Git doesn't know which change to keep, so it asks you to resolve the conflict manually.
Example Scenario
You are working on a project.
- You create a branch called
feature-aand start working on some code.
- You create a branch called
Someone else is also working on the same project.
- They are on the
mainbranch and change the same part of the code you're working on.
- They are on the
Both of you make different changes to the same file.
On the
feature-abranch, you update a function to print"Hello from Feature A!".On the
mainbranch, someone updates the same function to print"Hello from Main!".
You try to merge
maininto yourfeature-a.- Git will notice that the function was modified differently in both branches and doesn't know which version to keep, so it raises a merge conflict.
What Happens When a Conflict Occurs?
When you attempt the merge, Git marks the conflict in the file like this:
function greet() {
<<<<<<< HEAD
  console.log("Hello from Feature A!");
=======
  console.log("Hello from Main!");
>>>>>>> main
}
The code between
<<<<<<< HEADand=======is from yourfeature-abranch.The code between
=======and>>>>>>> mainis from themainbranch.
How to Resolve the Conflict
You now have to decide which version to keep:
Keep the code from
feature-a(your version).Keep the code from
main(the other version).Combine both changes into something that makes sense.
Final Steps
After you've edited the file, you mark the conflict as resolved:
git add <filename>
git commit
Connect with Me
Subscribe to my newsletter
Read articles from Ashutosh Pandey directly inside your inbox. Subscribe to the newsletter, and don't miss out.
Written by

Ashutosh Pandey
Ashutosh Pandey
"As a curious and driven student, I'm passionate about exploring the intersection of technology and innovation. Currently, I'm delving into the worlds of DevOps, Cloud Computing, and Artificial Intelligence/Machine Learning (AI/ML). With a keen interest in streamlining processes, optimizing systems, and harnessing the power of data, I'm dedicated to developing expertise in these cutting-edge fields. Through continuous learning and hands-on experimentation, I aim to unlock new possibilities and drive meaningful impact in the tech landscape."