Mastering Zero-Downtime Deployments with Terraform
 vijayaraghavan vashudevan
⛈️This article will explain in detail to understand the key concepts and techniques behind zero-downtime deployments, such as blue/green deployment and canary releases⛈️
🍂Synopsis:
📽️Use Terraform to deploy infrastructure updates with zero downtime. Implement blue/green deployment strategies or canary releases using load balancers and carefully manage updates to your web application
🍂Zero-Downtime Deployment:
📽️In real-world examples, this is all you would need because the actual web server code would be defined in the AMI. You can also add an input variable to control the text the User Data script returns from its one-liner HTTP server:
 variable "ami" {
  description = "The AMI to run in the cluster"
  type= string
  default  = "ami-0fb653ca2d3203ac1"
}

 variable "server_text" {
  description = "The text the web server should return"
  type = string
  default = "Hello, World"
 }
Now you need to update the modules/services/webserver-cluster/user-data.sh
 #!/bin/bash
 cat > index.html <<EOF
 <h1>${server_text}</h1>
 <p>DB address: ${db_address}</p>
 <p>DB port: ${db_port}</p>
 EOF
launch configuration in modules/services/webserver-cluster/main.tf
 resource "aws_launch_configuration" "example" {
  image_id = var.ami
  instance_type = var.instance_type
  security_groups = [aws_security_group.instance.id]
  user_data = templatefile("${path.module}/user-data.sh", {
    server_port = var.server_port
    db_address  = data.terraform_remote_state.db.outputs.address
    db_port = data.terraform_remote_state.db.outputs.port
    server_text = var.server_text
  })

 # Required when using a launch configuration with an auto scaling group.
 lifecycle {
    create_before_destroy = true
  }
 }
In staging environment, in live/stage/services/webserver-cluster/main.tf
 module "webserver_cluster" {
  source = "../../../../modules/services/webserver-cluster"
  ami = "ami-0fb653ca2d3203ac1"
  server_text = "New server text"
  cluster_name = "webservers-stage"
  db_remote_state_bucket = "(YOUR_BUCKET_NAME)"
  db_remote_state_key = "stage/data-stores/mysql/terraform.tfstate"

  instance_type = "t2.micro"
  min_size  = 2
  max_size  = 2
  enable_autoscaling = false
 }
📽️As you can see, Terraform wants to make two changes: first, replace the old launch configuration with a new one that has the updated user_data; and second, modify the Auto Scaling Group in place to reference the new launch configuration. There is a problem here: merely referencing the new launch configuration will have no effect until the ASG launches new EC2 Instances.
📽️One option is to destroy the ASG (e.g., by running terraform destroy) and then re-create it (e.g., by running terraform apply). The problem is that after you delete the old ASG, your users will experience downtime until the new ASG comes up. What you want to do instead is a zero-downtime deployment. The way to accomplish that is to create the replacement ASG first and then destroy the original one.
🍂Advantages of this lifecycle setting to get a zero-downtime deployment:
Configure the name parameter of the ASG to depend directly on the name of the launch configuration. Each time the launch configuration changes (which it will when you update the AMI or User Data), its name changes, and therefore the ASG’s name will change, which forces Terraform to replace the ASG.
Set the create_before_destroy parameter of the ASG to true so that each time Terraform tries to replace it, it will create the replacement ASG before destroying the original.
Set the min_elb_capacity parameter of the ASG to the min_size of the cluster so that Terraform will wait for at least that many servers from the new ASG to pass health checks in the ALB before it begins destroying the original ASG.
 resource "aws_autoscaling_group" "example" {
  # Explicitly depend on the launch configuration's name so each time it's
  # replaced, this ASG is also replaced

  name = "${var.cluster_name}-${aws_launch_configuration.example.name}"

  launch_configuration = aws_launch_configuration.example.name
  vpc_zone_identifier  = data.aws_subnets.default.ids

  target_group_arns = [aws_lb_target_group.asg.arn]
  health_check_type  = "ELB"

  min_size = var.min_size
  max_size = var.max_size

  # Wait for at least this many instances to pass health checks before
  # considering the ASG deployment complete
  min_elb_capacity = var.min_size

  # When replacing this ASG, create the replacement first, and only delete the
  # original after
 lifecycle {
    create_before_destroy = true
  }
 tag {
    key = "Name"
    value  = var.cluster_name
    propagate_at_launch = true
  }

 dynamic "tag" {
    for_each = {
      for key, value in var.custom_tags:
      key => upper(value)
      if key != "Name"
    }
 content {
      key  = tag.key
      value = tag.value
      propagate_at_launch = true
    }
  }
 }
📽️The key thing to notice is that the aws_autoscaling_group resource now says forces replacement next to its name parameter, which means that Terraform will replace it with a new ASG running your new AMI or User Data. Run the apply command to kick off the deployment, and while it runs, consider how the process works.
🍂Create before destroy process with ASG example:
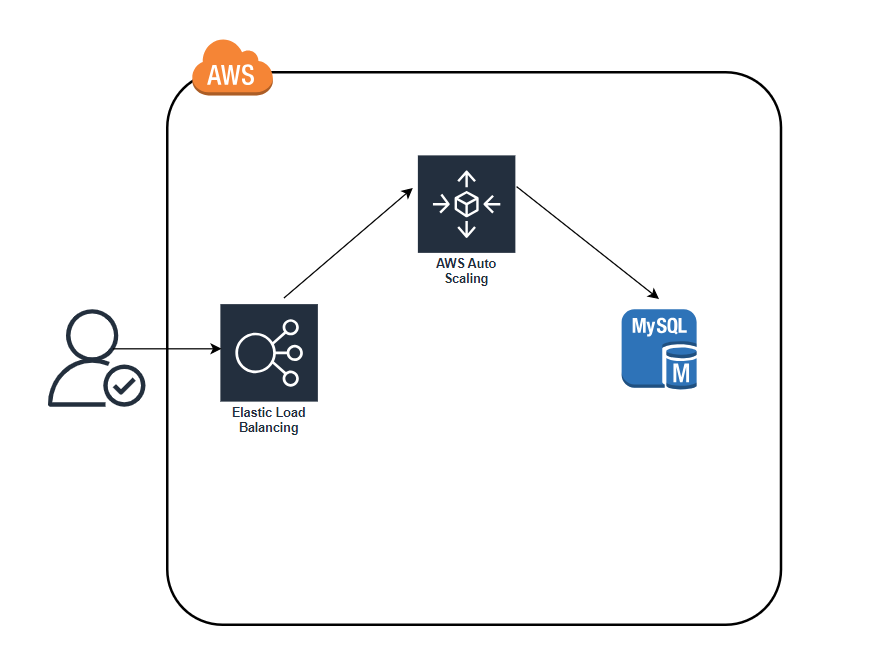
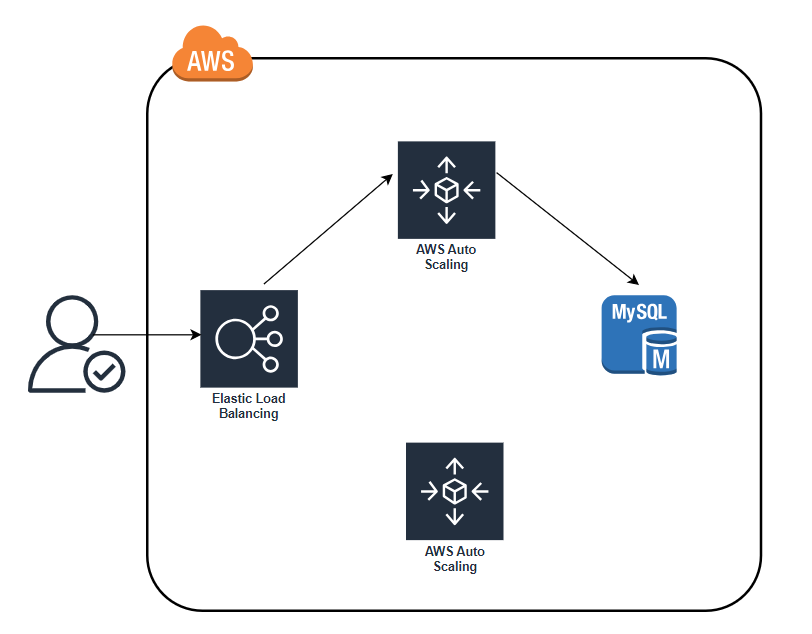
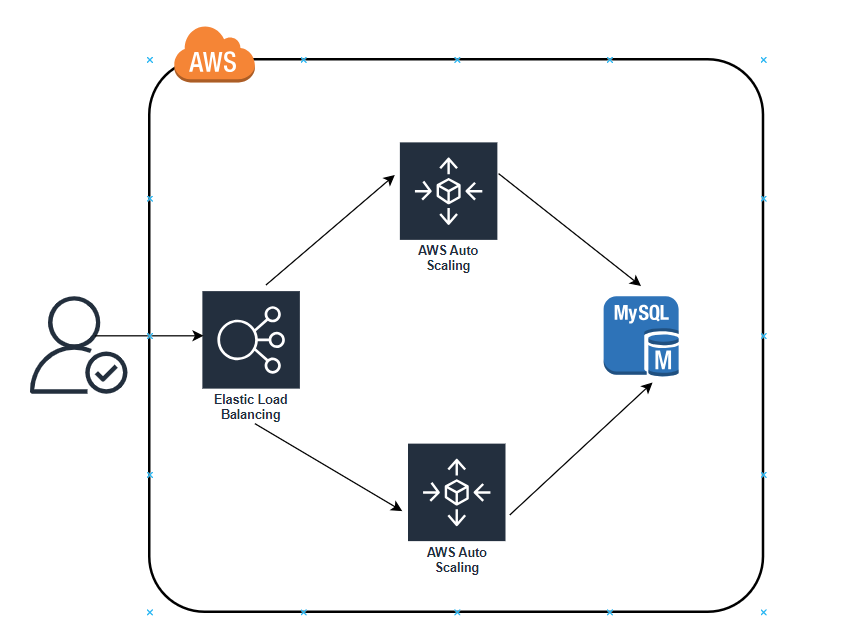
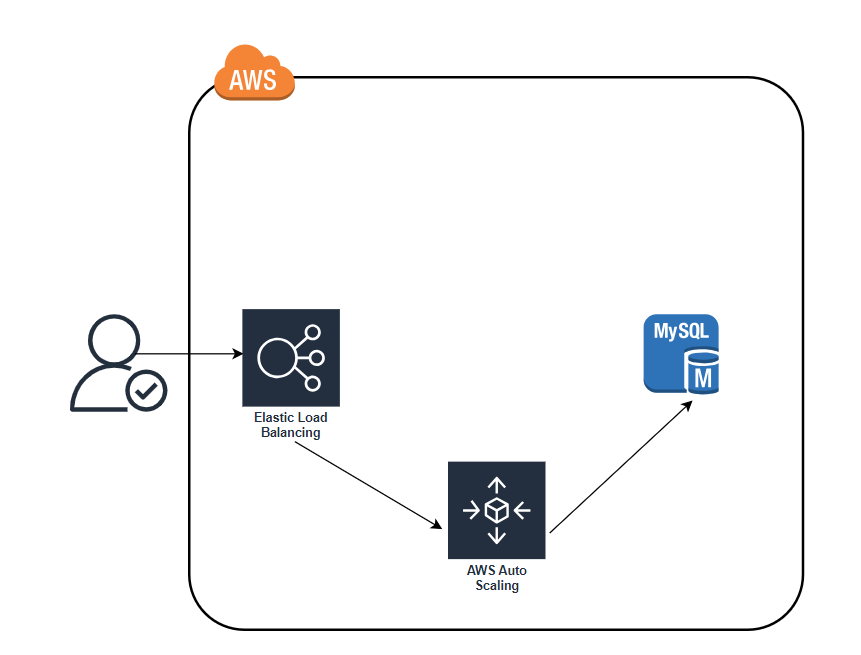
📽️You make an update to some aspect of the launch configuration, such as switching to an AMI that contains v2 of your code, and run the apply command.

📽️After a minute or two, the servers in the new ASG have booted, connected to the database, registered in the ALB, and started to pass health checks. At this point, both the v1 and v2 versions of your app will be running simultaneously; and which one users see depends on where the ALB happens to route them

📽️After min_elb_capacity servers from the v2 ASG cluster have registered in the ALB, Terraform will begin to undeploy the old ASG, first by deregistering the servers in that ASG from the ALB, and then by shutting them down

📽️After a minute or two, the old ASG will be gone, and you will be left with just v2 of your app running in the new ASG

📽️As an added bonus, if something went wrong during the deployment, Terraform will automatically roll back. For example, if there were a bug in v2 of your app and it failed to boot, the Instances in the new ASG will not register with the ALB. Terraform will wait up to wait_for_capacity_timeout (default is 10 minutes) for min_elb_capacity servers of the v2 ASG to register in the ALB, after which it considers the deployment a failure, deletes the v2 ASG, and exits with an error
🕵🏻I also want to express that your feedback is always welcome. As I strive to provide accurate information and insights, I acknowledge that there’s always room for improvement. If you notice any mistakes or have suggestions for enhancement, I sincerely invite you to share them with me.
🤩 Thanks for being patient and following me. Keep supporting 🙏
Clap👏 if you liked the blog.
For more exercises — please follow me below ✅!
#aws #terraform #cloudcomputing #IaC #DevOps #tools #operations #30daytfchallenge #HUG #hashicorp #HUGYDE #IaC #developers #awsugmdu #awsugncr #automatewithraghavan
Subscribe to my newsletter
Read articles from vijayaraghavan vashudevan directly inside your inbox. Subscribe to the newsletter, and don't miss out.
Written by

vijayaraghavan vashudevan
vijayaraghavan vashudevan
I'm Vijay, a seasoned professional with over 13 years of expertise. Currently, I work as a Quality Automation Specialist at NatWest Group. In addition to my employment, I am an "AWS Community Builder" in the Serverless Category and have served as a volunteer in AWS UG NCR Delhi and AWS UG MDU, a Pynt Ambassador (Pynt is an API Security Testing tool), and a Browserstack Champion. Actively share my knowledge and thoughts on a variety of topics, including AWS, DevOps, and testing, via blog posts on platforms such as dev.to and Medium. I always like participating in intriguing discussions and actively contributing to the community as a speaker at various events. This amazing experience provides me joy and fulfillment! 🙂