Kickstart Your Fullstack Journey: Building Your First Next.js Project
 Mayank Sharma
Introduction
Next.js is a powerful React framework that enables developers to build server-side rendered and static web applications with ease. Whether you’re a seasoned developer or just starting, Next.js offers a robust set of features that can help you create high-performance web applications. In this post, we’ll walk through setting up your first Next.js project and building a simple full-stack application.

Why Next.js?
Next.js provides several advantages for full-stack development:
Server-Side Rendering (SSR): Improves performance and SEO.
Static Site Generation (SSG): Generates static pages at build time.
API Routes: Allows you to create API endpoints within your application.
File-based Routing: Simplifies the creation of routes.
Setting Up Your Next.js Project
Step 1: Install Node.js and npm
Before you start, make sure you have Node.js and npm installed on your machine. You can download them from the Node.js official website.
Step 2: Create a New Next.js Project
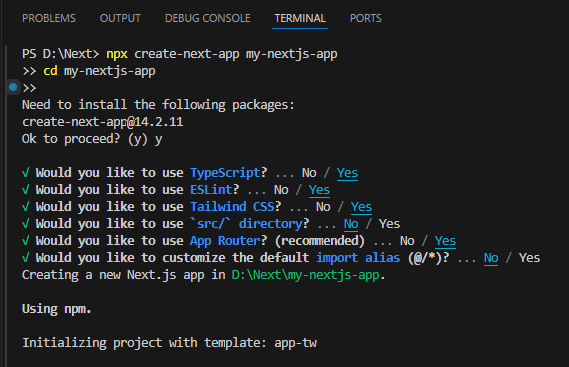
Open your terminal and run the following command to create a new Next.js project:

This command will create a new directory called my-nextjs-app with all the necessary files and dependencies.
!Next.js Setup
During the setup, you’ll be prompted to make several selections:
Would you like to use TypeScript?: Choose ‘No’ or ‘Yes’ based on your preference.
Would you like to use ESLint?: Choose ‘No’ or ‘Yes’ to include linting in your project.
Would you like to use Tailwind CSS?: Choose ‘Yes’ to include Tailwind CSS for styling.
Would you like to use src/ directory?: Choose ‘No’ or ‘Yes’ based on your project structure preference.
Would you like to use App Router?: Choose ‘Yes’ to use the recommended App Router.
Would you like to customize the default import alias (@/*)?: Choose ‘No’ or ‘Yes’ to customize import paths.
Here’s an example of what the setup process might look like:

Step 3: Start the Development Server
Navigate to your project directory and start the development server:

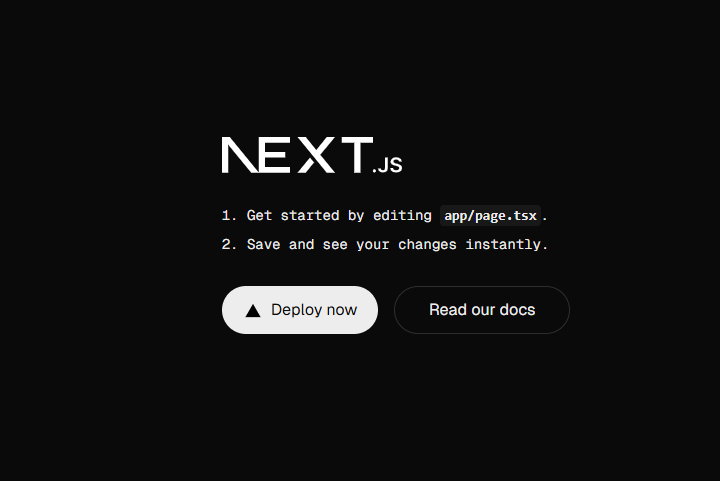
Open your browser and go to http://localhost:3000. You should see the default Next.js welcome page.
Understanding the Development Server Output
After running the npm run dev command, you should see the following output in your terminal:

r
This screen indicates that your Next.js development server is up and running. Here’s a breakdown of what you see:
Get started by editing
pages/index.tsx: This message suggests that you can start by editing theindex.tsxfile in thepagesdirectory. This is the main entry point for your application.Save and see your changes instantly: Next.js supports hot reloading, which means any changes you make to your files will be reflected instantly in your browser without needing to restart the server.
Deploy now: This button allows you to deploy your application to a hosting service like Vercel with a single click.
Read our docs: This button links to the Next.js documentation, which is a great resource for learning more about the framework.
Additional Links: At the bottom, you have links to “Learn”, “Examples”, and “Go to nextjs.org” for further exploration.
Next Steps
Now that your development server is running, you can start building your application. Here are some initial steps you can take:
Edit the Home Page: Open the
pages/index.tsxfile and make some changes to see how hot reloading works.Explore the Documentation: Click on the “Read our docs” button to dive deeper into Next.js features and best practices.
Deploy Your Application: If you’re ready to share your application, click on the “Deploy now” button to deploy it to Vercel.
Conclusion
Congratulations! You’ve successfully set up your Next.js project and started the development server. You’ve learned how to navigate the initial setup and understand the output of the npm run dev command. Next.js is a versatile framework that can help you build powerful web applications with ease.
Stay tuned for more tutorials on full-stack development with Next.js, and don’t forget to follow me for more tech insights and tutorials!
Subscribe to my newsletter
Read articles from Mayank Sharma directly inside your inbox. Subscribe to the newsletter, and don't miss out.
Written by