Basic Apache2 Configuration
 Oke kolawole sunday
Managing web servers is one of the most common tasks systems administrators and Software Engineers have in common. The web server could be hosting an informational website, a content management system, or even a full blown e-commerce site. Whatever the content is, it's important to understand how to manage the web server that is being used to serve those pages.
In this lab, you will install Apache2, a widely used web server software. You'll enable a site that is different from the default and enable additional features on the server. However i will be incorporating Nginx to this content aswell, as Nginx was built to improve Apache2.
Linux commands reminder
In this lab, we'll use a number of Linux commands that were already explained during Course 3. Here is a reminder of these commands and their actions:
sudo <command>: executes a command with administrator rightsapt update: updates the list of available packages to be installedapt install package: installs the given package in the systemls <directory>: lists the files in a directorycp <old> <new>: creates a copy of the old file with the new namemv <old> <new>: moves or renames the old file to the new namevim <file>: opens a text editor to edit the filecat <file>: outputs the whole contents of a file
We will also be using the service command shown in a previous lab, and we will present a number of new commands like a2ensite or a2dismod. Remember that you can always read the manual page using man <command_name> to learn more about a command.
While you can copy and paste the commands that are presented in this lab, we recommend typing them out manually, to help with understanding and remember them.
Install Apache on Linux Host
sudo apt update
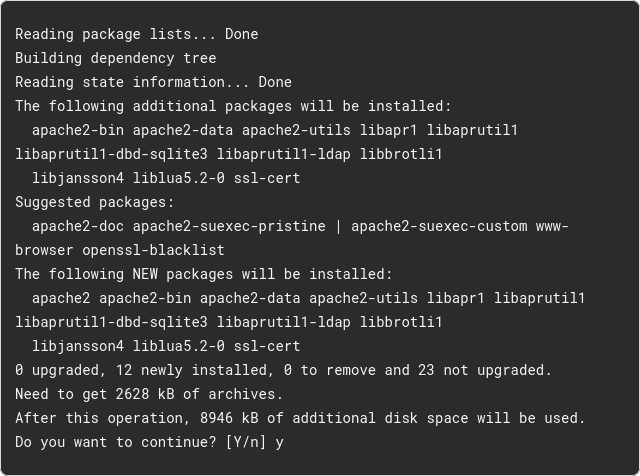
sudo apt install apache2

sudo service apache2 status

sudo service apache2 start
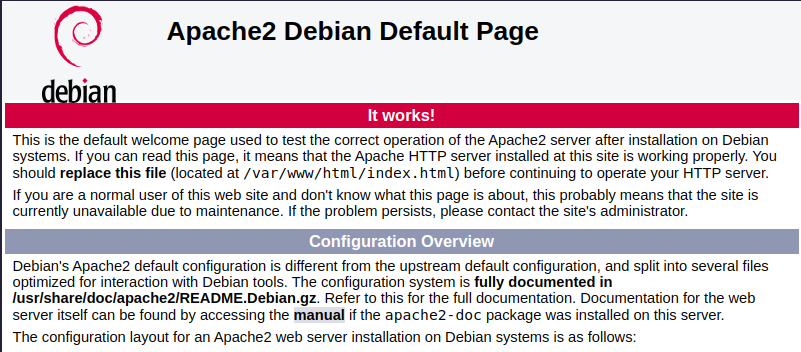
You should get this result once your apache2 is up and running
Configuring sites
The default site lets us know that our web server is working. We now need to make sure the web server is serving our site, not the default one. Let's dive into how websites are managed by Apache2.
On any web server, you can have several sites running at the same time. Which site the user sees is determined by the port on which the website is served and the hostname used to reach the machine. Remember that many names can be used when referring to the same IP address.
For example, you could have an institutional site running on http://www.example.com and an e-commerce site running on http://shop.example.com, with both hosted on the same machine. This is known as Virtual Hosts.
The list of sites that are available is located in /etc/apache2/sites-available. Let's look at what the contents of that directory looks like.
ls -l /etc/apache2/sites-available

We see that there are two websites available. The default website configured by 000-default.conf is the one we've visited, and the default encrypted website is managed by default-ssl.conf.
Let's look at the contents of the 000-default.conf file to learn more about how the default website is configured.
<VirtualHost *:80> # The ServerName directive sets the request scheme, hostname and port that # the server uses to identify itself. This is used when creating # redirection URLs. In the context of virtual hosts, the ServerName # specifies what hostname must appear in the request's Host: header to # match this virtual host. For the default virtual host (this file) this # value is not decisive as it is used as a last resort host regardless. # However, you must set it for any further virtual host explicitly. #ServerName www.example.com ServerAdmin webmaster@localhost DocumentRoot /var/www/html # Available loglevels: trace8, ..., trace1, debug, info, notice, warn, # error, crit, alert, emerg. # It is also possible to configure the loglevel for particular # modules, e.g. #LogLevel info ssl:warn ErrorLog ${APACHE_LOG_DIR}/error.log CustomLog ${APACHE_LOG_DIR}/access.log combined # For most configuration files from conf-available/, which are # enabled or disabled at a global level, it is possible to # include a line for only one particular virtual host. For example the # following line enables the CGI configuration for this host only # after it has been globally disabled with "a2disconf". #Include conf-available/serve-cgi-bin.conf </VirtualHost> # vim: syntax=apache ts=4 sw=4 sts=4 sr noet
cat /etc/apache2/sites-available/000-default.conf
Lines that begin with # are comments. This gives us information on what the different parameters and settings mean. The actual configuration is very simple, those without #.
The details indicates that the service will be listening on port 80 (:80) for all IPs. It then states the email address for the administrator of the service, the main path for the website, and the paths for the error and access logfiles.
Moving the website to the right location
We see that the directory where the default website is located is /var/www/html. It's standard practice to have all websites inside /var/www, so we should put ours there as well. Let's move it from its current location into /var/www/ourcompany.
sudo mv /opt/devel/ourcompany /var/www/ourcompany
The mv command (as many others on Linux) doesn't print any output when it succeeds. In order to see if it worked, let's look at the contents of /var/www
ls -l /var/www

Alright, we now have our website in the right place. Let's go back to configuring our site in Apache2.
Creating a new available site
We want to create our own site, so let's make a copy of the default site and then edit the new file.
cd /etc/apache2/sites-available
sudo cp 000-default.conf 001-ourcompany.conf
sudo vim 001-ourcompany.conf
The last command will open the nano text editor. We will be able to edit the file and change it as needed. In this case, we are going to change the directory where the files are stored. Instead of /var/www/html we will put our site in /var/www/ourcompany, so let's change that in the configuration file.
<VirtualHost *:80> # The ServerName directive sets the request scheme, hostname and port that # the server uses to identify itself. This is used when creating # redirection URLs. In the context of virtual hosts, the ServerName # specifies what hostname must appear in the request's Host: header to # match this virtual host. For the default virtual host (this file) this # value is not decisive as it is used as a last resort host regardless. # However, you must set it for any further virtual host explicitly. #ServerName www.example.com ServerAdmin webmaster@localhost DocumentRoot /var/www/ourcompany # Available loglevels: trace8, ..., trace1, debug, info, notice, warn, # error, crit, alert, emerg. # It is also possible to configure the loglevel for particular # modules, e.g. #LogLevel info ssl:warn ErrorLog ${APACHE_LOG_DIR}/error.log CustomLog ${APACHE_LOG_DIR}/access.log combined # For most configuration files from conf-available/, which are # enabled or disabled at a global level, it is possible to # include a line for only one particular virtual host. For example the # following line enables the CGI configuration for this host only # after it has been globally disabled with "a2disconf". #Include conf-available/serve-cgi-bin.conf </VirtualHost> # vim: syntax=apache ts=4 sw=4 sts=4 sr noet
Enabling and disabling sites
We have now added a site that points to the right location, but this site is not yet enabled. The default site is still currently enabled. Apache2 allows us to have sites that are available and not necessarily enabled, to avoid disruptive changes. The enabled sites are managed in /etc/apache2/sites-enabled. Let's look at the contents of that directory:
ls -l /etc/apache2/sites-enabled
The arrows that we see show that this file is a symbolic link to the file in the sites-available directory. In other words, enabling or disabling a site in Apache2 is simply creating or removing a symbolic link between the sites-available and sites-enabled directories.
To simplify matters, there are a couple of commands a2ensite and a2dissite, that manage these symlinks for us (the names come from Apache2 enable/disable site). Let's use these commands to enable our new site and disable the default site.
sudo a2ensite 001-ourcompany.conf
#To disable
sudo a2dissite 001-ourcompany.conf
Also for Nginx to enable our new site and disable the default site. Use the following
sudo ln -s /etc/nginx/sites-available/example.com /etc/nginx/sites-enabled/;
#To disable
sudo unlink /etc/nginx/sites-enabled/example.com;

ls -l /etc/apache2/sites-enabled

And now let's look at the contents of the directory again:
ls -l /etc/apache2/sites-enabled

Our site is enabled!
But, as the a2 commands were telling us, if you reload the page pointing to your machine, you'll see that the default website is still the one being served. One more step is needed to make Apache2 notice that the configuration was changed: we need to tell the service to reload.
sudo service apache2 reload
This command doesn't give any output if it succeeds; to know if it worked, we need to visit the webpage. Do you see the institutional website?
NB: Test Apache2/Nginx Configuration
Before reloading Apache2/Nginx, it's a good idea to test the configuration for syntax errors:
sudo nginx -t
If there are no errors, you should see output like:
nginx: configuration file /etc/nginx/nginx.conf test is successful
Configuring location to your site
In Nginx/Apache2, the location directive is used to define how Apache2 should process requests for different URLs. It allows you to match and handle specific paths or request patterns and specify different configurations, such as serving files, proxying to a backend, or applying specific rules.
Modifying your location
Exact matching: The
=modifier forces an exact match of the request URI.location = / { # This matches only the root URL "/" }Prefix Matching( No modifiers): If no modifier is provided, it matches any request that begins with the specified path.
  location /images/ {
      # Matches any URL that starts with "/images/"
  }
Regular Expression Match (
~and~*):~: Case-sensitive regular expression match.~*: Case-insensitive regular expression match.location ~ \.jpg$ { # Matches URLs ending with ".jpg" (case-sensitive) } location ~* \.(jpg|jpeg|png)$ { # Matches URLs ending with ".jpg", ".jpeg", or ".png" (case-insensitive) }
Prefix Match with Longest Match (
^~): If^~is used, Nginx will choose this block if the beginning of the URL matches, and it will skip checking regex locations.location ^~ /static/ { # Matches URLs starting with "/static/" and stops further regex checks }Configuring redirection to your site
  location /old-page {
      return 301 /new-page;
  }
Redirects requests for
/old-pageto/new-page.
Proxying to a Backend:
location /api/ {
    proxy_pass http://backend_server;
}
This proxies requests starting with /api/ to a backend server.
Matching File Extensions:
location ~* \.(jpg|jpeg|png|gif)$ {
    root /var/www/images;
    expires 30d;  # Cache images for 30 days
}
Thank You
Subscribe to my newsletter
Read articles from Oke kolawole sunday directly inside your inbox. Subscribe to the newsletter, and don't miss out.
Written by

