Java Database Connectivity (JDBC)
 Chirag Radhakrishna
In today’s world, data is at the core of everything we do. Just as we rely on effective data utilization on the front end, we also need robust solutions on the back end to manage and process this data. This involves employing back-end frameworks such as databases or large-scale data warehouses, which are essential for storing, organizing, and analyzing data efficiently.
By utilizing a database, we can handle large volumes of data effectively and efficiently, keeping the data management process separate from the front-end framework. Just as there are numerous tools and frameworks available for front-end development, the same diversity exists for back-end solutions. This variety allows us to choose the most suitable back-end tools, such as databases or data warehouses, to meet our specific needs and optimize data handling.
Now, a question arises, how do we establish a connection between the front-end and back-end if both are written using different tools?? This is where we need to make use of intermediate frameworks or connecting APIs.
Recently, I worked on a project that was based on database-connectivity. The front-end was developed using Java and the backend database and tables were written using SQL. Now, I had to establish the linkage between the Java Application and the MySQL database.
WHAT IS JDBC ?
The Java Database Connectovoty (JDBC) is an application programming interface that helps connect Java applications / programs to a relational database (Ex: MySQL). I was able to connect my Java application to the MySQL database using this JDBC API of Java.
It is part of the Java Standard Edition platform, from Oracle Corporation.
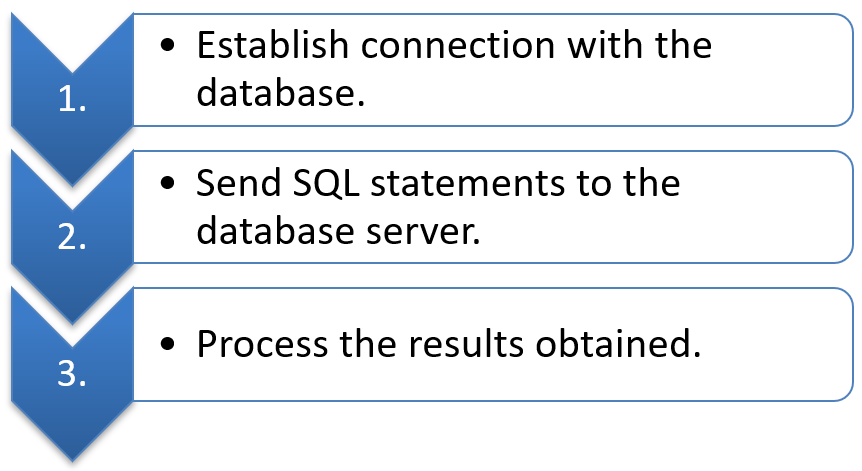
It mainly does the following tasks from within a Java application code:

There are four main classes in the JDBC API hierarchy that are generally used for database connectivity. These are:
DriverManager Class: The JDBC DriverManager class loads the JDBC driver needed to access a particular data source, locates and logs on to the database, and returns a Connection Object.
Connection Class: The JDBC Connection class manages the communication between a Java client application and a specific database, including passing SQL statements to the DBMS and managing transactions.
Statement Class: The JDBC Statement Class contains SQL strings that are submitted to the DBMS. An SQL Select statement returns a ResultSet object that contains the data retrieved as the result of an SQL statement.
ResultSet Class: The JDBC ResultSet class provides predefined methods to access, analyze, and convert data values returned by the SQL Select Statement.
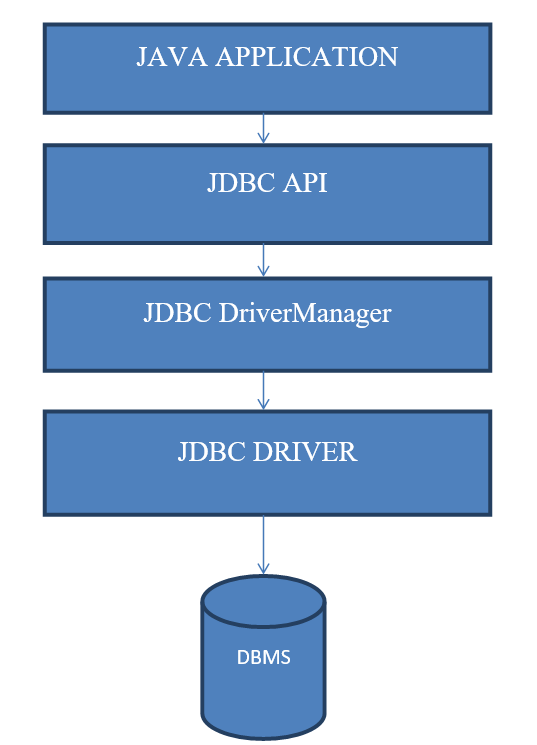
JDBC ARCHITECTURE

SEQUENCE OF STATEMENTS TO BE INCLUDED IN THE FRONT-END
To ensure the Java application can access the database, we need to include the MySQL Connector / J Library. This library provides the JDBC (Java Database Connectivity) driver necessary for your Java application to communicate with a MySQL database.
Below is a sequence of statements that helps establish connectivity with a MySQL database to fetch records from a particular table-
private void jButton4ActionPerformed(java.awt.event.ActionEvent evt)
{
    DefaultTableModel mod = (DefaultTableModel)jTable1.getModel();
    if(mod.getRowCount()==0)
    {
        try
        {
            Class.forName("java.sql.Driver");
            Connection con = DriverManager.getConnection("jdbc:mysql://localhost/DatabaseName","database account","database password");
            Statement stmt = con.createStatement();
            String query = "SELECT * FROM TableName;";
            ResultSet rs = stmt.executeQuery(query);
            while(rs.next())
            {
                String n1 = rs.getString("Attribute 1");
                String n2 = rs.getString("Attribute 2");
                String n3 = rs.getString("Attribute 3");
                mod.addRow(new Object[]{n1,n2,n3});
            }
            rs.close();
            con.close();
            stmt.close();
        }
        catch(Exception e )
        {
            JOptionPane.showMessageDialog(null, e);
        }
      }
}
We should utilize a try-catch approach while attempting to establish connectivity with any given database. This is because the connection may or may not be established. Utilizing this approach helps us understand the reasons for a connection not working.
If the query is executed successfully, then the catch-block is not executed. But if the catch-block is executed, then we can look at the error displayed and fix the possible bugs. Using a JOptionPane Message Dialog is valuable for identifying and displaying the errors.
- Register the JDBC Driver
Class.forName("java.sql.Driver");
or,
DriverManager.registerDriver(new com.mysql.cj.jdbc.Driver());
The above statement helps register the JDBC Driver on your machine with the JDBC DriverManager.
- Create a Connection Object / Session
Connection con = DriverManager.getConnection("jdbc:mysql://localhost/DatabaseName","database account","database password");
After registering the Driver, the next step is to establish a connection. This can be achieved by the creation of a Connection Object. The getConnection() method of the DriverManager class helps establish the connection with the database and will also perform the login operation (if required). Hence, in the above code snippet, two parameters include the credentials required to login to the database.
- Create a Statement Object
Statement stmt = con.createStatement();
The connection object of the Connection class helps us establish the connection. After establishing the connection, we can perform operations on the various tables or fetch records. This can be achieved by passing queries to the database from the Java program. For this, we require a statement object*, which can be created using the **Statement Class.*
For a particular connection, we create a statement object using createStatement() method.
- Frame a query statement to be executed
String query = "SELECT * FROM TableName;";
Now we can write queries that can be performed. The queries written in SQL can be framed as a String object in Java. These queries can be passed on to the respective tables and will be executed accordingly.
- Executing the Query
ResultSet rs = stmt.executeQuery(query);
The executeQuery() method of the Statement Class is used to execute SELECT (data retrieval) statements. The executeUpdate() method is used to execute INSERT, UPDATE, and DELETE (data manipulation) statements.
- Working with the ResultSet Object Cursor (For data retrieval)
while(rs.next())
            {
                String n1 = rs.getString("Attribute 1");
                String n2 = rs.getString("Attribute 2");
                String n3 = rs.getString("Attribute 3");
                mod.addRow(new Object[]{n1,n2,n3});
            }
When we execute the SELECT statement, a set of records from the queried table are returned and stored in the ResultSet object. We can make use of a while loop to iterate over each individual record and fetch the data.
Moving across various records in the ResultSet Object can be done by the positioning of the cursor in the Object. In the above code snippet, the ResultSet Object is rs. rs.first() helps position the cursor at the first record in the ResultSet. rs.next() helps move from one record to the next.
There are a series of methods to obtain each individual value constituting a record.
For example,
getString() - helps obtain String values.
getInt() - helps obtain Integer values.
getDate() - helps obtain a Date.
- Clean the Environment
rs.close();
con.close();
stmt.close();
After executing the required queries and working with the database, it is important to close the connection. We need to close the ResultSet, Statement, and Connection objects. This is an important step that often tends to be overlooked.
CONCLUSION
Hence, by using such APIs like JDBC, we can connect a front-end application to a back-end. There are many such APIs that help connect a related front-end technology to a database.
Subscribe to my newsletter
Read articles from Chirag Radhakrishna directly inside your inbox. Subscribe to the newsletter, and don't miss out.
Written by
