Secure Firebase API Keys/Secrets: A Guide to Using xcconfig for Security
 Nasir
NasirTable of contents

In collaborative iOS development, ensuring the security & separation of development, QA, & production environments is crucial.
I’m working on an iOS app with a team of freelancers. We hold daily meetings to discuss features, & I’ve added them as contributors to the GitHub repository. While they handle feature development, I take care of final testing with production data & credentials, then deploy the app to the App Store.
When preparing the app for the App Store, we use production configurations that include sensitive information like URLs, API keys, & client IDs. For obvious reasons, this data should remain confidential & must never be pushed to version control.
So, how do we manage this securely?
For dev environment, I can safely share the configuration files with the team & commit them to GitHub. However, production settings remain secured, stored only on my machine, with backups accessible only to me & the client.
This is where configuration setting files (xcconfig) become invaluable. They allow us to define different configurations for each environment, ensuring sensitive production data remains protected while enabling smooth development. In this context, I’ll use Firebase, a widely-used backend-as-a-service, as an example to demonstrate how xcconfig files streamline this process.
Create a new iOS project & note down the bundle identifier.
To effectively manage separate environments for development & production, it's best to create two distinct Firebase projects. You can name them <awesome-app>-dev & <awesome-app>-prod.
Navigate to the Firebase Console & set up two separate Firebase projects. You can use the same or different Google accounts to manage these projects.
Ensure that you provide the same bundle identifier when setting up the Firebase project, then register the app.
Firebase will offer a file named GoogleService-Info.plist for download, which is crucial for the configuration.
Download this file & drag it into your Xcode project. This file contains key-value pairs essential for Firebase integration.
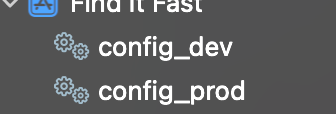
Next, in Xcode, create two configuration settings files by searching for Configuration Settings File. Name these files config_dev.xcconfig & config_prod.xcconfig.

Open the GoogleService-Info.plist file, which contains a set of key-value pairs used to configure Firebase services in your app.
Identify and note down the specific keys and values you’ll need. In my case, the necessary keys were: API_KEY, GCM_SENDER_ID, BUNDLE_ID, PROJECT_ID, GOOGLE_APP_ID, and STORAGE_BUCKET.
To maintain consistency and clarity, I applied a naming convention to differentiate these Firebase keys, such as FIRE_API_KEY.
These key-value pairs were then added to the .xcconfig file, following the format shown below.
config_dev.xcconfig file

config_prod.xcconfig file
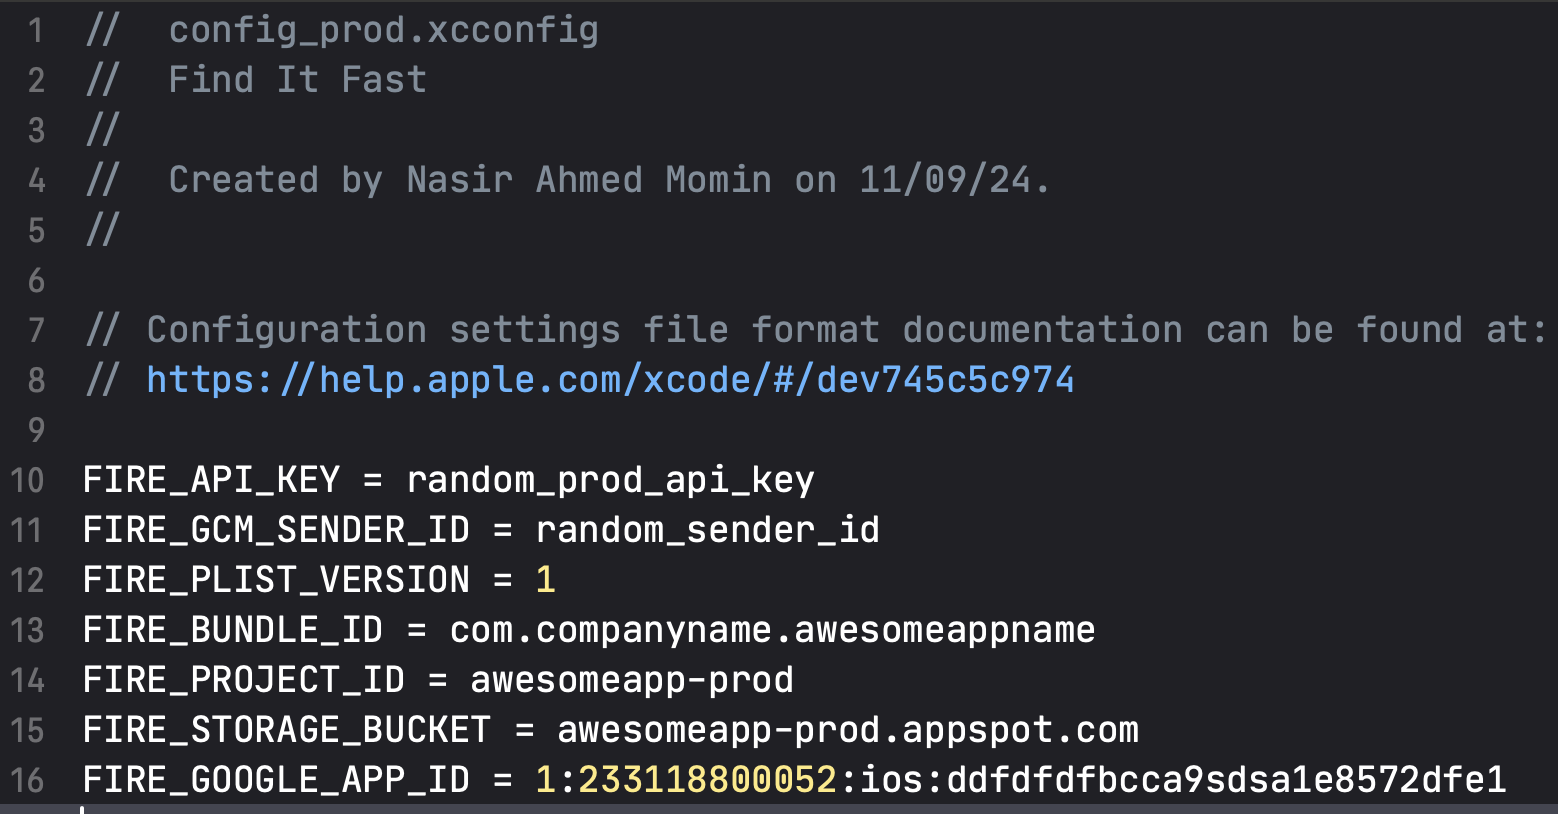
Once the keys & values are mapped together, we don’t need GoogleService-Info.plist anymore, you can delete & keep it somewhere outside of Xcode & git reach.
Now we arrive at the most crucial and challenging step: configuring Xcode.
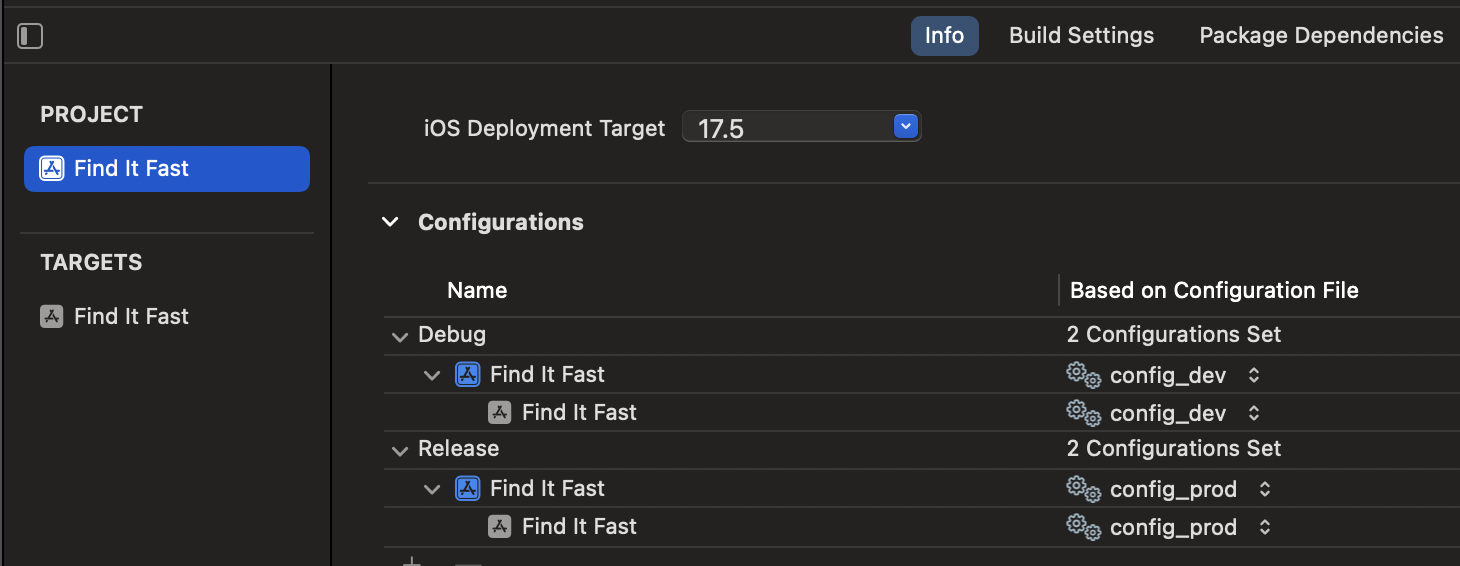
Go to the Project Navigator → Select your Xcode project file → Choose the Project (not the Target) → Navigate to the Info tab → Under the Configurations section, assign config_dev.xcconfig for the Debug configuration and config_prod.xcconfig for the Release configuration, as shown below.
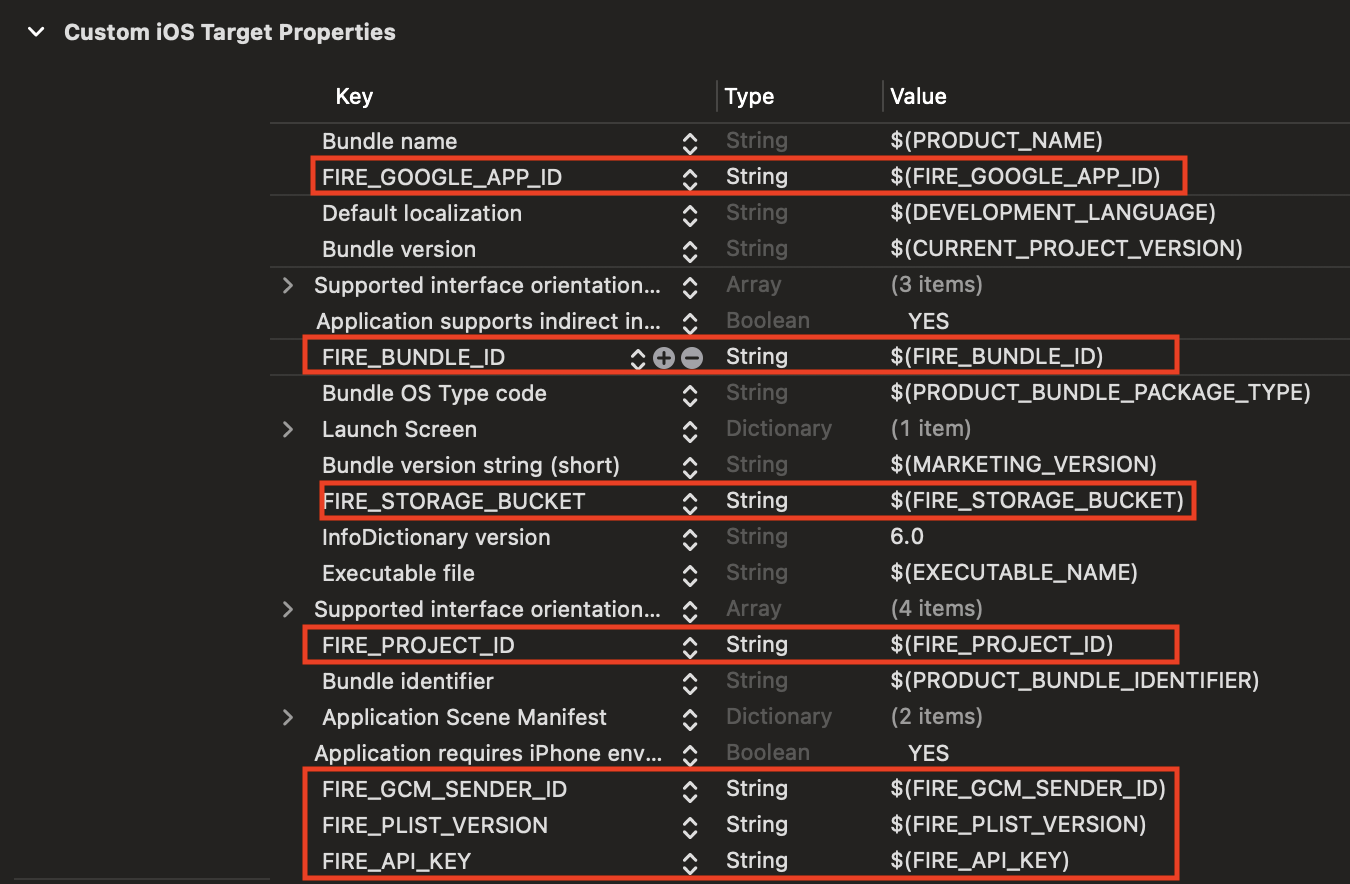
Next, navigate to the Project Navigator → Select your Xcode project file → Choose the Target → Go to the 'Custom iOS Target Properties' section.
Here, add the keys and corresponding values from the .xcconfig file. For consistency, I used the same key naming conventions in both the .plist and .xcconfig files, as shown below.
Now, head over to Build Settings, and you'll notice that a new .plist file has been generated.
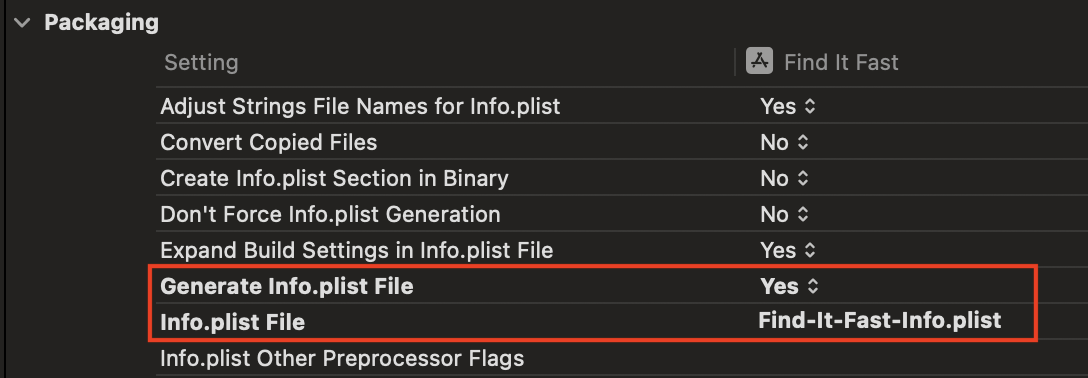
In this newly generated .plist file, you'll see the corresponding keys and values automatically populated.
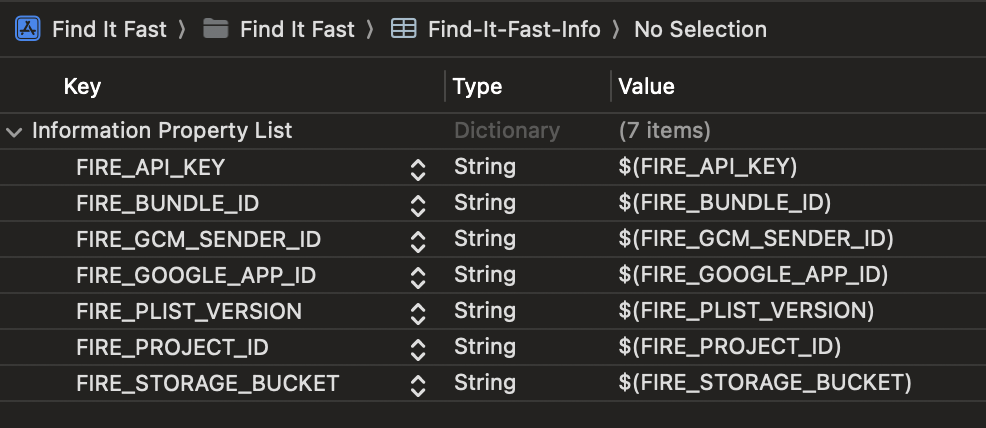
Note: This setup and configuration is applicable in Xcode 14+ since newer projects no longer include a separate Info.plist file by default. For older projects, you can directly add the required keys and values in the existing Info.plist file.
Since we are not using the GoogleService-Info.plist file, we can utilize the default implementation of the FirebaseApp.configure() API. To do this, add the Firebase package dependency to your Xcode project. In this project, I used Swift Package Manager (SPM).

For projects created in Xcode 14+, the AppDelegate file is not included by default. You'll need to explicitly implement it by adding @UIApplicationDelegateAdaptor(AppDelegate.self) var delegate, and then create a new AppDelegateclass as shown below."
import SwiftUI
import FirebaseCore

@main
struct Find_It_FastApp: App {
    // register app delegate for Firebase setup
    @UIApplicationDelegateAdaptor(AppDelegate.self) var delegate

    var body: some Scene {
        WindowGroup {
            ContentView()
        }
    }
}

class AppDelegate: NSObject, UIApplicationDelegate {
    func application(_ application: UIApplication,
                     didFinishLaunchingWithOptions launchOptions: [UIApplication.LaunchOptionsKey : Any]? = nil) -> Bool {

        let plist = Configuration.config
        let options = FirebaseOptions(googleAppID: plist.firebaseAppId, gcmSenderID: plist.firebaseGcmSenderId)
        options.apiKey = plist.firebaseApiKey
        options.projectID = plist.firebaseProjectId

        FirebaseApp.configure(options: options)

        return true
    }
}
As you can see in the didFinishLaunchingWithOptions method, I’m not using the default FirebaseApp.configure()API call because we are not relying on the GoogleService-Info.plist file. Instead, I manually provide the required fields to the Firebase framework.
To assist with fetching, encoding, and decoding key-value pairs, I've added utility functions to simplify these processes. Below, you’ll find the utility functions, which you can directly copy into your project.
struct Configuration {
    static var config: PlistConfig = {
        guard let url = Bundle.main.url(forResource: "Info", withExtension: "plist") else {
            fatalError("Couldn't find Info.plist file.")
        }
        do {
            let decoder = PropertyListDecoder()
            let data = try Data(contentsOf: url)
            return try decoder.decode(PlistConfig.self, from: data)
        } catch let error {
            fatalError("Couldn't parse Config.plist data. \(error.localizedDescription)")
        }
    }()
}

struct PlistConfig: Codable {
    let firebaseApiKey: String
    let firebaseGcmSenderId: String
    let firebasePListVersion: String
    let firebaseBundleId: String
    let firebaseProjectId: String
    let firebaseStorageBucket: String
    let firebaseAppId: String

    enum CodingKeys: String, CodingKey {
        case firebaseApiKey = "FIRE_API_KEY"
        case firebaseGcmSenderId = "FIRE_GCM_SENDER_ID"
        case firebasePListVersion = "FIRE_PLIST_VERSION"
        case firebaseBundleId = "FIRE_BUNDLE_ID"
        case firebaseProjectId = "FIRE_PROJECT_ID"
        case firebaseStorageBucket = "FIRE_STORAGE_BUCKET"
        case firebaseAppId = "FIRE_GOOGLE_APP_ID"
    }
}

extension PlistConfig {
    func toJSON() -> String? {
        let encoder = JSONEncoder()
        do {
            let jsonData = try encoder.encode(self)
            let jsonString = String(data: jsonData, encoding: .utf8)
            print("jsonString \(jsonString)")
            return jsonString
        } catch {
            print("Error encoding PlistConfig to JSON: \(error)")
            return nil
        }
    }
}
Ensure that you include the necessary fields based on the Firebase services you are using, as each service may require different configuration parameters.
Once everything is good, you can observe that there are no exception thrown for missing Firebase configuration.
The FirebaseApp.configure() API call does not throw any exceptions, making it impossible to catch and handle app crashes. The only solution is to verify the configuration during development and before uploading to TestFlight.
I hope you find this guide useful. I welcome your thoughts and feedback in the comments.
Subscribe to my newsletter
Read articles from Nasir directly inside your inbox. Subscribe to the newsletter, and don't miss out.
Written by

Nasir
Nasir
App developer in iOS & Flutter