Chapter 27:Exploring Associations in Java: One-to-One, One-to-Many, Many-to-One, and Many-to-Many Relationships
 Rohit Gawande
Table of contents
- Overview of This Chapter
- 1. Introduction to Relationships Between Classes
- 2. HAS-A Relationship Basics
- 7. Code Reusability and Object Class Methods
- 7.1 Understanding the toString() Method
- 7.2 Understanding the equals() Method
- 7.3 How Overriding Helps in Custom Output and Reusability
- 7.4 Practical Demonstration with a Student Class
- 1.One-to-One Association
- 2.One-to-Many Association in Java
- 3.Many-To-One Association in Java:
- 4.Many-to-Many Association in Java
This chapter is part of the Core Java series, which itself is an integral part of the Full Stack Java Development series. Each chapter in this series is designed to help learners not only understand Java at its core but also prepare effectively for interviews by diving into real-world coding examples, practical applications, and clear conceptual explanations.
So far, we have explored different aspects of Java, including the IS-A relationship that represents inheritance between classes. Today, we turn our attention to another equally important concept in object-oriented programming: the HAS-A relationship.
The relationship between two classes in Java can be broadly classified into two categories:
IS-A relationship – which represents inheritance.
HAS-A relationship – which represents association or composition between classes.
While the IS-A relationship is about reusability and inheritance, the HAS-A relationship is about establishing associations and dependencies between classes to model real-world scenarios more effectively. This concept is not just academic; it forms the backbone of Dependency Injection, Association mappings, and object collaboration in large-scale enterprise applications.
In this chapter, we will embark on a detailed journey to understand how HAS-A relationships are formed, why they matter, and how they are implemented in Java. We will go step by step, starting from the very basics of relating two classes, moving towards dependency injection techniques, and finally exploring different types of associations (One-to-One, One-to-Many, Many-to-One, and Many-to-Many). Along the way, we will use real-world analogies, interview-style questions, and practical code examples to solidify our understanding.
Overview of This Chapter
Before diving deeper, let’s look at the flow of this chapter. This will help us structure our learning journey in an organized manner:
Introduction to Relationships Between Classes
Revisiting IS-A vs HAS-A relationships.
Understanding why HAS-A relationships exist.
HAS-A Relationship Basics
Example with
CarandEngine.Why “Engine IS-A Car” does not make sense.
Correct representation: “Car HAS-A Engine.”
Code demonstration of HAS-A relationship.
Dependency Injection in HAS-A Relationship
Concept of target object and dependent object.
Process of injecting dependencies.
Constructor Dependency Injection.
Setter Dependency Injection.
Practical examples:
CarandEngine,StudentandAddress,EmployeeandAccount.
Relationships in Java Applications
Why defining relationships matters in enterprise applications.
Memory utilization, code reusability, execution time optimization, and data navigation.
Overview of three relationship types: HAS-A, IS-A, USE-A.
HAS-A vs IS-A Relationship
Conceptual differences explained.
Impact on data flow and reusability.
Associations in Java
Introduction to associations.
Four types of associations:
One-to-One Association.
One-to-Many Association.
Many-to-One Association.
Many-to-Many Association.
Theoretical explanation and code examples for each.
Code Reusability and Object Class Methods
Understanding
toString()andequals()methods.How overriding helps in custom output.
Practical demonstration with a
Studentclass.
One-to-One Association Example
EmployeeandAccountclasses.Constructor injection demonstration.
Explanation of data navigation with diagrams.
One-to-Many Association Example
DepartmentandEmployeeclasses.Array of reference variables.
Practical example with department having multiple employees.
Many-to-One Association Example
StudentandBranchclasses.Constructor and setter injection demonstrations.
Multiple students sharing the same branch.
Many-to-Many Association Example
StudentandCourseclasses.Multiple students mapped to multiple courses.
Demonstrating real-world applications in education systems.
Conclusion
Why HAS-A relationships are extensively used in projects.
How they complement IS-A relationships.
Importance for interview preparation and system design.
1. Introduction to Relationships Between Classes
When we start learning object-oriented programming, one of the first things we are taught is that classes do not exist in isolation. Real-world systems are complex, and their representation in code requires classes to work together. To make this possible, we define relationships between classes in Java. These relationships enable objects to communicate, share data, and collaborate with one another in order to achieve functionality that mirrors real-world behavior.
There are two primary ways in which relationships between classes are represented in Java: the IS-A relationship and the HAS-A relationship. The IS-A relationship is established using inheritance through the extends keyword. For example, if we say that a Dog class extends the Animal class, it implies that a Dog IS-A Animal. This makes sense because in real life, every dog is indeed an animal. Inheritance, therefore, models hierarchies that are logical and based on generalization and specialization.
But not all real-world connections can be represented using IS-A relationships. Consider a scenario where we have a Car and an Engine. If we attempt to connect them using inheritance, we would end up writing class Engine extends Car. This translates to the statement “An Engine IS-A Car.” If we think carefully, this statement does not make any logical sense. An engine is not a car. An engine is only a part of a car. This is where the IS-A relationship fails us, and this is why another type of relationship exists—the HAS-A relationship.
HAS-A relationships are used to express that one object is composed of another or that one object contains another. Instead of implying that one class is a subtype of another, we use HAS-A to express that one class has a reference to another. For example, a Car HAS-A Engine. This kind of relationship is extremely common in software development because it allows us to represent real-world systems more accurately.
The existence of HAS-A relationships is also crucial for implementing the concept of dependency injection, which we will discuss in depth later. Without HAS-A relationships, classes would be forced into unnatural hierarchies, limiting the reusability and maintainability of our code. Thus, both IS-A and HAS-A relationships are essential in Java, each serving a distinct purpose. IS-A is about inheritance and code reuse, while HAS-A is about association and composition between classes.
2. HAS-A Relationship Basics
To truly understand the importance of HAS-A relationships, let us return to the example of the Car and the Engine. Imagine that we are tasked with designing these two classes in Java. We might start by defining them separately:
class Car {
}

class Engine {
}
At this stage, both classes are independent and do not share any relationship. The question is: how do we relate them? If we mistakenly attempt to establish a relationship using inheritance, we might write:
class Engine extends Car {
}
But as we discussed earlier, this means “Engine IS-A Car.” In plain English, this suggests that an engine is a car, which is simply not true. An engine cannot function as a car; it is just one of the parts required for a car to operate. So inheritance, in this context, is not only incorrect but also misleading.
The correct way to model this scenario is to say that a Car HAS-A Engine. In other words, the car contains an engine as one of its components. This is represented in Java not through inheritance but through composition. We achieve this by declaring a reference to the Engine class inside the Car class.
class Engine {
}

class Car {
    // HAS-A relationship
    Engine engine;
}
Here, the Car class contains a reference to an Engine object. This reference acts as an instance variable, meaning that every car object we create will internally have an engine reference. The moment we initialize this reference, we effectively bind the car with its engine, establishing a HAS-A relationship.
This is much closer to real-world modeling. A car without an engine is incomplete, and an engine alone cannot function as a car. By combining them through a HAS-A relationship, we capture the correct semantics of the real world in our Java code.
One important point to note is that in a HAS-A relationship, one class is called the target object (in this case, the car), while the other is known as the dependent object (the engine). The car depends on the engine for functionality, and the engine is injected into the car to make it operational. This act of injecting one object into another is known as dependency injection, and it forms the foundation for building loosely coupled systems, which are easier to maintain and extend.
Thus, with the example of the car and engine, we have not only understood the need for HAS-A relationships but also laid the foundation for understanding advanced concepts such as dependency injection and associations, which we will explore in the upcoming sections.
3. Dependency Injection in HAS-A Relationship
When we talk about HAS-A relationships in Java, one of the most important concepts that emerges is Dependency Injection (DI). To understand this better, let’s revisit the nature of HAS-A relationships.
In a HAS-A relationship, one class depends on another class to perform its work. For example, a Car depends on an Engine. Without the engine, the car cannot move. Similarly, a Student might depend on an Address object, or an Employee might depend on an Account object. In such cases, the class that depends on another is called the target object, while the class being used is called the dependent object.
The process of supplying or injecting the dependent object into the target object is technically called Dependency Injection. This is a fundamental design principle in Java application development because it reduces coupling between classes and makes code easier to maintain, test, and extend.
In simple terms:
Dependent Object: The object that provides functionality or data (e.g.,
Engine,Address,Account).Target Object: The object that uses the dependent object (e.g.,
Car,Student,Employee).
Imagine a car manufacturing company. The car is assembled separately, and the engine is manufactured separately. Only when the engine is fitted into the car does it become functional. Similarly, in Java, we build classes separately and then inject dependencies into them, making the overall system work seamlessly.
Process of Injecting Dependencies
The injection process is straightforward. First, the dependent object must be created and properly initialized. Then, it is passed into the target object either at the time of object creation or afterward using a setter method. This decouples the creation process from the usage process, enabling more flexible and maintainable code.
There are two main ways to achieve dependency injection in Java:
Constructor Dependency Injection
When a dependent object is supplied to the target object through its constructor, it is known as Constructor Dependency Injection. In this method, the target object requires the dependent object at the very moment of its creation. If the dependent object is not available, the target object cannot be instantiated successfully. This ensures that the target object always has its required dependencies before it is used.
Example: A Car cannot exist without an Engine. Therefore, while creating the Car object, we inject the Engine object via the constructor.
class Engine {
    // Dependent Object
}

class Car {
    private Engine engine; // HAS-A Relationship

    // Constructor Injection
    public Car(Engine engine) {
        this.engine = engine;
    }
}
Here, the Car object cannot be created without first providing an Engine. This enforces strong consistency in the design.
Setter Dependency Injection
The second approach is Setter Dependency Injection, where the dependent object is supplied to the target object via a setter method after the target object has already been created. This approach provides flexibility because the target object can exist independently, and dependencies can be set or modified at a later stage.
Example: A Student might be created first without an Address. Later, the Address object can be injected into the Student object using a setter method.
class Address {
    // Dependent Object
}

class Student {
    private Address address; // HAS-A Relationship

    // Setter Injection
    public void setAddress(Address address) {
        this.address = address;
    }
}
With this approach, we can reconfigure dependencies at runtime if needed. It is particularly useful when working with frameworks like Spring, where beans are managed and dependencies are injected dynamically.
Practical Examples of Dependency Injection
Let’s look at a few real-world examples that demonstrate HAS-A relationships and dependency injection clearly.
Car and Engine – The car is the target object, and the engine is the dependent object. Without injecting the engine into the car, the car cannot move. This demonstrates a tight HAS-A relationship with constructor injection.
Student and Address – A student object is the target, and the address object is the dependent. Here, a setter injection is more practical because a student can be created first, and then the address can be updated or changed later.
Employee and Account – An employee (target object) requires an account (dependent object). This scenario often uses constructor injection, as every employee is expected to be associated with an account from the very beginning.
These examples make it evident that dependency injection not only establishes HAS-A relationships but also makes them more structured and practical in real-world systems.
4. Relationships in Java Applications
Now that we understand dependency injection and its role in HAS-A relationships, let’s step back and look at why relationships between classes are essential in Java applications.
In software development, applications are rarely built with a single class. Real-world systems require multiple entities (classes) to interact with each other. Defining meaningful relationships between these entities allows us to build systems that are modular, maintainable, and closer to real-world problem modeling.
Why Defining Relationships Matters
When we define relationships correctly in Java applications, we achieve several critical benefits:
Memory Utilization: By establishing proper relationships, we avoid creating redundant objects. For instance, if multiple students belong to the same branch, we don’t need separate branch objects for each student. Instead, all students can share one branch object. This significantly optimizes memory usage.
Code Reusability: Relationships allow us to reuse code effectively. A dependent object like
Enginecan be reused in multiple car objects without rewriting the logic. Similarly, anAddressobject can be shared among different target objects whenever required.Execution Time Optimization: Establishing relationships reduces the overhead of managing multiple independent objects. By linking dependent objects with targets, communication becomes straightforward, improving execution time.
Data Navigation: Relationships make it easy to traverse from one class to another. For example, by navigating from an employee object, we can access the details of its associated account. This flow mirrors real-world data access and enhances the usability of applications.
Overview of Relationship Types
In Java, we commonly define three types of relationships between entities:
HAS-A Relationship – This is the most extensively used relationship in projects. It represents associations and compositions between classes, allowing objects to collaborate and share data.
IS-A Relationship – This represents inheritance between classes and is achieved using the
extendskeyword. It primarily focuses on code reusability, enabling child classes to inherit behavior from parent classes.USE-A Relationship – This is less commonly used compared to the other two. It typically represents temporary usage of one object by another, often within a method call, without forming a permanent association.
Each of these relationships plays a distinct role in Java application development. While IS-A emphasizes hierarchy and reusability, HAS-A emphasizes composition and collaboration, and USE-A represents short-term usage. Together, they form the building blocks of object-oriented programming in Java.
Perfect, Rohit. You want me to now expand Section 5 (HAS-A vs IS-A Relationship) and Section 6 (Associations in Java) into full professional blog-style explanations while keeping your raw content’s flow intact. I’ll do it in long storytelling, passage-style format (no bullets), ensuring that the grammar, clarity, and tone are polished for interview preparation and Hashnode blogging.
Here’s the expanded draft:
5. HAS-A vs IS-A Relationship
When working with object-oriented programming in Java, one of the most common questions that arises is how two classes are related. This relationship may either be an inheritance relationship, where one class becomes a specialized version of another, or it may be an association, where one class makes use of the other to perform its functions. These two approaches are formally described as the IS-A relationship and the HAS-A relationship, and while they often appear similar at first glance, the differences between them are significant and highly relevant in the design of enterprise applications.
The IS-A relationship is achieved using inheritance in Java through the extends keyword. It establishes a hierarchical relationship between classes where the child class inherits the properties and behaviors of its parent. For instance, when a Dog class extends an Animal class, the statement “Dog IS-A Animal” makes perfect sense. This type of relationship is heavily used when we want to ensure code reusability, because the child class inherits existing methods and can override or extend them as needed. IS-A is therefore best suited for situations where one class is logically a subtype of another, ensuring specialization and extension of behavior.
On the other hand, the HAS-A relationship represents association between classes. It is not about hierarchy but about collaboration. A Car does not extend Engine, because it makes no sense to say that an engine is a type of car or vice versa. Instead, we say that a Car HAS-A Engine. This means that within the Car class, we maintain a reference to an Engine object, allowing the car to function. HAS-A relationships are the backbone of object composition in Java, enabling us to create complex systems where multiple objects interact with one another without forcing illogical inheritance structures.
From a data flow perspective, the difference becomes even clearer. In an IS-A relationship, data flows down the inheritance chain, where subclasses automatically inherit fields and methods of their parent class. In contrast, in a HAS-A relationship, data navigation happens through association: one object can access the data of another through the reference variable maintained within it. For example, when an Employee object HAS-A reference to an Account object, it can access account details by navigating through that reference, thereby achieving communication between classes.
From a reusability perspective, IS-A relationships promote reusability by extending functionality that already exists in a parent class. The child class avoids rewriting code because it can directly inherit behavior. HAS-A relationships, however, promote reusability through composition. Instead of building everything from scratch or creating forced inheritance, we use existing independent classes as building blocks inside new classes. This allows for greater flexibility, because classes are not tightly bound by inheritance hierarchies and can be replaced or modified without affecting other parts of the system.
Thus, while both IS-A and HAS-A are ways of defining relationships in Java, they serve very different purposes. IS-A is about specialization through inheritance, while HAS-A is about association and dependency injection. Both are equally important in real-world application design, and understanding when to apply one over the other is one of the hallmarks of good system design and a common area of focus in interviews.
6. Associations in Java
To further understand the HAS-A relationship, we need to dive into the concept of associations in Java. Association is essentially the process of establishing a relationship between two or more classes such that communication between them becomes simple and effective. This relationship is expressed using the HAS-A model, where one class contains references to another class either as a single instance or as a collection of instances.
In the context of application development, associations are extremely powerful. Large applications are rarely built using a single monolithic class. Instead, they are made up of many smaller entities that collaborate to deliver functionality. Association ensures that these entities can communicate and share data with one another. For example, an Employee class may be associated with an Address class to represent where the employee lives, or with an Account class to represent the employee’s bank account details. By declaring reference variables of one class inside another, associations are formed that make this communication seamless.
There are four primary types of associations in Java, each serving different modeling requirements.
The first is the One-to-One Association. This is a relationship where one instance of an entity is mapped with exactly one instance of another entity. A real-world example is the relationship between an Employee and an Account. Every employee has exactly one account, and this association can be modeled in Java by defining an Account reference inside the Employee class. When this association is implemented, it ensures that for every employee object created, there is a corresponding account object linked to it.
The second type is the One-to-Many Association. This occurs when a single instance of an entity is associated with multiple instances of another entity. Consider a Department that has many Employee objects. A department is unique, but it may contain several employees, and this can be modeled in Java by declaring an array or a collection of employee references inside the Department class. This allows us to represent the relationship where one department object maintains a connection to multiple employee objects.
The third type is the Many-to-One Association. In this case, multiple instances of one entity are linked to a single instance of another entity. A common example is multiple students joining the same branch in a college. Each student is unique, but they all share the same branch object. In Java, this is achieved by declaring a branch reference inside the Student class, such that all students point to the same branch instance.
The fourth and final type is the Many-to-Many Association. This is the most flexible form of association, where multiple instances of one entity are mapped to multiple instances of another entity. A classic real-world example is students and courses. One student can enroll in multiple courses, and one course can have multiple students. In Java, this is represented by declaring arrays or collections of one entity inside another, often with each student maintaining a collection of courses. This type of association is heavily used in modeling complex relationships in enterprise systems such as learning management platforms, e-commerce systems, and customer relationship management applications.
In practice, associations are not only about creating references but also about enabling data navigation. By being inside one class, we can easily access the details of another associated class. For example, from within the Employee class, we can navigate to the associated Account class and retrieve account details. This makes associations critical in ensuring smooth communication and collaboration between entities.
Associations also highlight the importance of dependency injection. By injecting one object into another, either through constructors or setters, we ensure that the dependent object is always available for the target object to function properly. This mechanism is what allows real-time data flow between interconnected objects, making association a cornerstone in the design of modular and maintainable Java applications.
Therefore, associations in Java represent the true power of the HAS-A relationship. They allow developers to break down complex systems into simpler, interacting parts, ensuring reusability, modularity, and clarity in design. Whether it is One-to-One, One-to-Many, Many-to-One, or Many-to-Many, associations bring structure and order to the world of object-oriented programming.
7. Code Reusability and Object Class Methods
One of the biggest advantages of object-oriented programming is code reusability. Instead of writing the same logic again and again, Java allows us to design classes in such a way that they can be extended, reused, and customized without duplicating effort. At the heart of this reusability lies the Object class—the root class of the entire Java class hierarchy. Every class in Java, whether explicitly or implicitly, inherits from the Object class.
This inheritance means that every class we create automatically gains access to several important methods defined in the Object class, such as:
toString()equals(Object obj)hashCode()clone()getClass()
Out of these, the two most commonly used (and most frequently asked about in interviews) are toString() and equals(). Understanding these methods and how to override them properly is key not only for writing clean and readable code but also for building systems that behave predictably in real-world applications.
In this section, we will focus on these two methods and see how overriding them improves both code reusability and customization.
7.1 Understanding the toString() Method
By default, when we print an object in Java (for example using System.out.println(object)), Java internally calls the toString() method of that object. The default implementation, inherited from the Object class, returns a string that contains:
The class name of the object.
The “@” symbol.
The hashcode of the object in hexadecimal format.
For example:
class Student {
    int id;
    String name;

    Student(int id, String name) {
        this.id = id;
        this.name = name;
    }
}

public class Test {
    public static void main(String[] args) {
        Student s1 = new Student(101, "Rohit");
        System.out.println(s1);
    }
}
Output:
Student@15db9742
This default output is rarely useful in real applications. As developers, we usually want meaningful information—like a student’s ID and name—instead of memory hashcodes.
This is where overriding comes in. By overriding the toString() method, we can customize the way our object is represented as a string.
Overriding toString()
class Student {
    int id;
    String name;

    Student(int id, String name) {
        this.id = id;
        this.name = name;
    }

    @Override
    public String toString() {
        return "Student[ID=" + id + ", Name=" + name + "]";
    }
}

public class Test {
    public static void main(String[] args) {
        Student s1 = new Student(101, "Rohit");
        System.out.println(s1);
    }
}
Output:
Student[ID=101, Name=Rohit]
Now, instead of printing a meaningless memory reference, the object gives us meaningful, readable information. This makes debugging, logging, and even displaying objects in user interfaces much easier.
7.2 Understanding the equals() Method
Another crucial method from the Object class is equals(Object obj). Its purpose is to compare two objects to check if they are “equal.”
By default, the equals() method compares object references (i.e., memory addresses), not actual content. This means that two objects with the same values will not be considered equal unless they are literally the same object in memory.
Example:
class Student {
    int id;
    String name;

    Student(int id, String name) {
        this.id = id;
        this.name = name;
    }
}

public class Test {
    public static void main(String[] args) {
        Student s1 = new Student(101, "Rohit");
        Student s2 = new Student(101, "Rohit");

        System.out.println(s1.equals(s2)); // false
    }
}
Output:
false
Even though both students have the same ID and name, the default equals() method considers them different because they are two different objects in memory.
Overriding equals()
To compare objects based on their content rather than their memory addresses, we must override the equals() method.
class Student {
    int id;
    String name;

    Student(int id, String name) {
        this.id = id;
        this.name = name;
    }

    @Override
    public boolean equals(Object obj) {
        if (this == obj) return true; // Same reference
        if (obj == null || getClass() != obj.getClass()) return false;

        Student student = (Student) obj;
        return id == student.id && name.equals(student.name);
    }
}

public class Test {
    public static void main(String[] args) {
        Student s1 = new Student(101, "Rohit");
        Student s2 = new Student(101, "Rohit");

        System.out.println(s1.equals(s2)); // true
    }
}
Output:
true
Now, objects with the same content are considered equal, even if they are different objects in memory.
7.3 How Overriding Helps in Custom Output and Reusability
By overriding methods like toString() and equals(), we achieve:
Custom Output:
- Instead of relying on the default, less-informative representations, we can define outputs that suit our project requirements.
Code Reusability:
- A well-implemented
equals()method can be reused across multiple classes and collections (HashSet,HashMap, etc.), ensuring consistent behavior when comparing objects.
- A well-implemented
Better Debugging and Maintenance:
- Overridden methods make debugging much easier since the object’s state is clearly visible in logs and error messages.
Professional Application Development:
- Large-scale systems often involve complex objects. Customizing their behavior at the root (via overriding) saves effort across the application lifecycle.
7.4 Practical Demonstration with a Student Class
Let’s combine everything into one interview-style practical demonstration:
class Student {
    int id;
    String name;

    Student(int id, String name) {
        this.id = id;
        this.name = name;
    }

    @Override
    public String toString() {
        return "Student[ID=" + id + ", Name=" + name + "]";
    }

    @Override
    public boolean equals(Object obj) {
        if (this == obj) return true;
        if (obj == null || getClass() != obj.getClass()) return false;

        Student student = (Student) obj;
        return id == student.id && name.equals(student.name);
    }
}

public class Test {
    public static void main(String[] args) {
        Student s1 = new Student(101, "Rohit");
        Student s2 = new Student(101, "Rohit");
        Student s3 = new Student(102, "Amit");

        // Custom toString()
        System.out.println(s1); // Student[ID=101, Name=Rohit]

        // Custom equals()
        System.out.println(s1.equals(s2)); // true
        System.out.println(s1.equals(s3)); // false
    }
}
Output:
Student[ID=101, Name=Rohit]
true
false
This example demonstrates both code reusability and practical benefits of overriding toString() and equals().
Importance of Overriding toString()
Overriding the toString() method is crucial for improving the readability and debuggability of your code. Here are some key benefits:
Improved Logging and Debugging: When logging or debugging your application, meaningful output from
toString()helps you quickly understand the state of an object.Cleaner Output: Instead of cryptic outputs like class names and hashcodes, you can print an object’s actual data.
Readable Code: Code that involves printing or logging objects becomes much easier to read and maintain when the
toString()method is properly overridden.Use in Collections: When objects are used in collections such as lists, sets, or maps, overriding
toString()ensures that the collection’stoString()method also produces meaningful output for each object in the collection.
How the toString() Method Fits in OOP
Java is an object-oriented programming language (OOP), meaning that everything is modeled as objects. To maintain the principles of OOP, such as encapsulation and code reusability, you need to ensure that your objects are easily understandable and manageable. The toString() method plays a significant role in this.
Object Representation
In OOP, an object is an instance of a class, and it contains data (fields) and behaviors (methods). When you override toString(), you give meaning to how the object is represented as a string. This makes it easier for other developers (or yourself) to work with objects in a readable manner.
Has-A Relationship and toString()
In the code example above, the Student class represents a Has-A relationship. This relationship signifies that a class contains another class or object. In our example, the Student class could have additional objects such as Address, Course, or Department. Each of these would have its own toString() method that can be called when printing the Student object.
In Java, understanding and overriding the toString() method is essential for effective object representation and communication.
By customizing the toString() method, you can make debugging, logging, and displaying information about your objects much easier. It enhances code reusability, maintainability, and readability, especially in larger projects where objects are used extensively. Furthermore, it fits well into the object-oriented nature of Java and is particularly useful in modeling relationships such as Has-A, where one class contains objects of another class.
Associations in Java
In Java, associations represent relationships between entities, helping organize and manage interactions between objects. To establish associations between different entities, we declare either a single reference or an array of reference variables of one entity class in another class. This concept helps achieve various types of relationships between objects in Java.
1.One-to-One Association
A One-to-One association is a relationship where one instance of a class (target object) is associated with exactly one instance of another class (dependent object). This is often implemented using a reference variable in the target class to hold an instance of the dependent class.
Memory Mapping of One-to-One Association
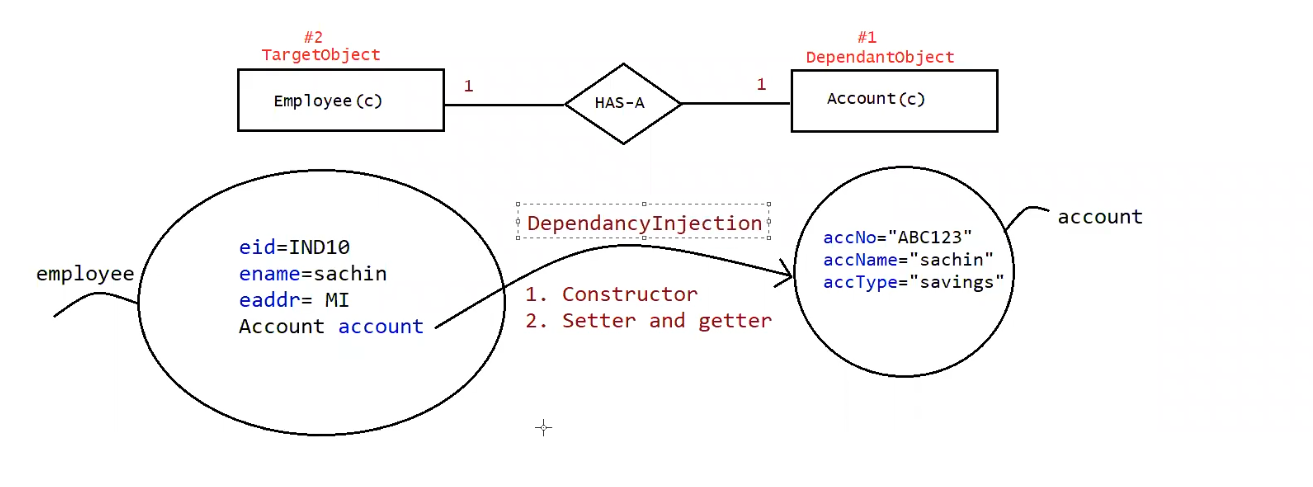
Let’s use an example where the Employee class has an association with the Account class. Here, an Employee "has a" single Account, creating a One-to-One relationship. The memory map for this association can be visualized as:
| Target Object (Employee) | Has-A | Dependent Object (Account) |
| Employee (eid, ename, eAdd) | ← | Account (accNo, accName, accType) |
Explanation in Table
| Field Name (Employee) | Field Name (Account) | Relationship Type | Explanation |
| eid | accNo | One-to-One | Each employee has one account |
| ename | accName | Account name is linked with employee | |
| eAdd | accType | Account type belongs to the employee |
Why Declare the Dependent Object First?
In this design, we declare the dependent object (Account) first before the target object (Employee) because the target object needs to "have" the dependent object. In other words, the target object (Employee) depends on the data provided by the dependent object (Account) to function properly. This sequence is essential to ensure the relationship is set up accurately when creating the target object.
Example: One-to-One Association in Java
Let’s break down a Java program that demonstrates the One-to-One association between an Employee and their Account:
Code Implementation
package Inhrtance.bean;

// Dependent Object
public class Account {
    String accNo;
    String accName;
    String accType;

    // Constructor to initialize Account details
    public Account(String accNo, String accName, String accType) {
        this.accNo = accNo;
        this.accName = accName;
        this.accType = accType;
    }
}
Here, the Account class represents the dependent object. The Employee class will be the target object:
package Inhrtance.bean;

public class Employee {
    private String eid;
    private String ename;
    private String eAdd;

    // HAS-A relationship
    Account account;

    // Constructor Injection
    public Employee(String eid, String ename, String eAdd, Account account) {
        this.eid = eid;
        this.ename = ename;
        this.eAdd = eAdd;
        this.account = account;
    }

    // Method to get employee details
    public void getEmployeeDetail() {
        System.out.println("Employee Details are:");
        System.out.println("EMPID: " + eid);
        System.out.println("EMPNAME: " + ename);
        System.out.println("EMPADD: " + eAdd);
        System.out.println();
        System.out.println("Account Details are:");
        System.out.println("ACCNO: " + account.accNo);
        System.out.println("ACCNAME: " + account.accName);
        System.out.println("ACCTYPE: " + account.accType);
    }
}
Finally, the TestApp1 class serves as the driver class, where we create instances of Account and Employee and display their details:
package Inhrtance.main;

import Inhrtance.bean.Account;
import Inhrtance.bean.Employee;

public class TestApp1 {
    public static void main(String[] args) {
        // Create Account object
        Account account = new Account("ABC123", "Rohit", "Saving");

        // Create Employee object with Account object injected
        Employee employee = new Employee("HFh1", "Rohit", "Jh", account);

        // Get employee details
        employee.getEmployeeDetail();
    }
}
Output:
Employee Details are:
EMPID: HFh1
EMPNAME: Rohit
EMPADD: Jh

Account Details are:
ACCNO: ABC123
ACCNAME: Rohit
ACCTYPE: Saving
How One-to-One Association Works
Constructor Injection: In the above code, the
Employeeobject holds a reference to theAccountobject. The reference is passed using the constructor (constructor injection). This injects the dependency of the account into the employee.Data Navigation: Once the association is set up, we can navigate through the
Employeeclass to access data from theAccountclass. This is demonstrated in thegetEmployeeDetail()method, where account details are accessed through the employee object.
Memory Representation of One-to-One Association
The memory representation would look something like this:
Conclusion: One-to-One Associations in Java
One-to-One associations are essential in representing simple relationships between entities in object-oriented programming. They enhance modularity, memory utilization, and data navigation. In the provided example, the Employee class holds a reference to a single Account object, creating a clear, maintainable, and well-structured association between these two entities.
2.One-to-Many Association in Java
In object-oriented programming (OOP), an association represents a relationship between two or more classes. The One-to-Many association is a specific type of association where one instance of a class (the target object) is associated with multiple instances of another class (the dependent object). This relationship is often used in real-world scenarios, such as a single department having multiple employees or a team consisting of several players.
One-to-Many Association Overview
In the context of One-to-Many relationships, a single target object is linked to multiple dependent objects. For instance, a Department (target object) can have multiple Employees (dependent objects). This relationship allows data navigation, as the target object (department) can access the details of all associated dependent objects (employees).
Memory Mapping of One-to-Many Association
Consider the following scenario:
Target Object:
DepartmentDependent Object:
Employee
In a One-to-Many association, the target object (Department) holds a reference to an array of dependent objects (Employee[]). This means the target class has an array that can store references to multiple instances of the dependent class.
Below is the memory map for this association:
| Target Object (Department) | Has-A | Dependent Objects (Employees) |
Department (d_id, dname) | ← | Employee[3] (eid, ename, eaddr) |
Here, the Department holds a reference to an array of Employee objects. Each Employee object is independent but linked through the Department.
One-to-Many Association Example
Now, let's walk through a working code example of One-to-Many association in Java. The relationship involves a Department class and an Employee class.
Code Implementation
The Employee class serves as the dependent object:
package in.rohit.bean;

// Dependent Object
public class Employee {
    String eid;
    String ename;
    String eaddr;

    // Constructor to initialize Employee details
    public Employee(String eid, String ename, String eaddr) {
        super();
        this.eid = eid;
        this.ename = ename;
        this.eaddr = eaddr;
    }
}
The Department class is the target object that holds an array of Employee objects:
package in.rohit.bean;

public class Department {
    private String d_id;
    private String dname;

    // HAS-A Variable for One-to-Many association
    private Employee[] emps;

    // Constructor Injection
    public Department(String d_id, String dname, Employee[] emps) {
        super();
        this.d_id = d_id;
        this.dname = dname;
        this.emps = emps;
    }

    // Method to get Department details
    public void getDepartmentDetails() {
        System.out.println("Department Details Are:");
        System.out.println("=======================");
        System.out.println("Department ID:: " + d_id);
        System.out.println("Department NAME:: " + dname);
        System.out.println();
        System.out.println("Employee Details Are::");
        System.out.println("=======================");
        for (Employee employee : emps) {
            System.out.println("Employee ID:: " + employee.eid);
            System.out.println("Employee NAME:: " + employee.ename);
            System.out.println("Employee ADDRESS:: " + employee.eaddr);
        }
    }
}
In the TestApp class, we create instances of Employee and associate them with a Department:
package in.rohit.main;

import in.rohit.bean.Department;
import in.rohit.bean.Employee;

public class TestApp {
    public static void main(String[] args) {
        // Create Employee objects
        Employee e1 = new Employee("45", "Rohit", "MI");
        Employee e2 = new Employee("3", "Shikhar", "SRH");
        Employee e3 = new Employee("18", "Virat", "RCB");

        // Create an Employee array to hold the employees
        Employee[] emps = new Employee[3];
        emps[0] = e1;
        emps[1] = e2;
        emps[2] = e3;

        // Create a Department object and associate the Employee array with it
        Department d = new Department("IPL18", "BCCI", emps);

        // Get Department details along with the employees
        d.getDepartmentDetails();
    }
}
Output:
Department Details Are:
=======================
Department ID:: IPL18
Department NAME:: BCCI

Employee Details Are::
=======================
Employee ID:: 45
Employee NAME:: Rohit
Employee ADDRESS:: MI
Employee ID:: 3
Employee NAME:: Shikhar
Employee ADDRESS:: SRH
Employee ID:: 18
Employee NAME:: Virat
Employee ADDRESS:: RCB
Explanation
Department Class:
It has fields
d_id(department ID) anddname(department name).The
Departmentclass also has a reference to an array ofEmployeeobjects. This array represents the multiple employees associated with the department.
Employee Class:
Each
Employeeobject has fieldseid(employee ID),ename(employee name), andeaddr(employee address).These fields store the individual details of each employee.
HAS-A Relationship:
The
Departmentclass has a HAS-A relationship with theEmployeeclass via an array ofEmployeeobjects.This relationship is established during the creation of the
Departmentobject, where the array of employees is passed into the department’s constructor.
Data Navigation in One-to-Many Association
In the example, the Department class has a method getDepartmentDetails(), which allows navigation through the associated Employee[] array. This demonstrates how the target object (department) can access the details of the dependent objects (employees).
Memory Map of One-to-Many Association
The memory structure of this One-to-Many association is depicted below:
Memory Map Visualization:
       +-------------------+           +-------------------+
       |   Department       |           |   Employee Array   |
       |-------------------|           |-------------------|
       | d_id = "IPL18"     |           | Emp[0] -> e1       |
       | dname = "BCCI"     | --------> | Emp[1] -> e2       |
       | Emp[] (3 elements) |           | Emp[2] -> e3       |
       +-------------------+           +-------------------+

                                            +-------+
                                            | e1    |
                                            | "45"  |
                                            | Rohit |
                                            | MI    |
                                            +-------+

                                            +-------+
                                            | e2    |
                                            | "3"   |
                                            | Shikhar|
                                            | SRH   |
                                            +-------+

                                            +-------+
                                            | e3    |
                                            | "18"  |
                                            | Virat |
                                            | RCB   |
                                            +-------+
Table Representation of One-to-Many Association
| Field Name (Department) | Field Name (Employee) | Relationship Type | Explanation |
d_id | eid | One-to-Many | A department has multiple employees |
dname | ename | Employees belong to one department | |
Employee[] | eaddr | Employee details are stored in an array in the department |
Key Points in One-to-Many Association:
Dynamic Associations:
- Employees can be added to the department dynamically, and we use an array of
Employeeobjects to store these associations.
- Employees can be added to the department dynamically, and we use an array of
Scalability:
- This approach is scalable since the
Departmentclass can easily manage any number of employees by simply adjusting the size of the array. If there are more employees, we can increase the array size or use more advanced data structures likeArrayList.
- This approach is scalable since the
Modularity:
- The modular nature of OOP allows us to maintain each entity separately. Each
Employeeobject is independent but can be easily associated with anyDepartmentobject, making the design reusable.
- The modular nature of OOP allows us to maintain each entity separately. Each
Constructor Injection:
- In this example, we use constructor injection to inject the array of employees into the department. This ensures that the association is created at the time the
Departmentobject is instantiated.
- In this example, we use constructor injection to inject the array of employees into the department. This ensures that the association is created at the time the
Conclusion
The One-to-Many association is crucial in real-world scenarios, especially when managing relationships between entities such as departments and employees, teams and players, or schools and students. By using this association, we can easily navigate between related entities, store multiple related objects, and maintain a structured, scalable system. The code example clearly demonstrates how the target object (Department) can access and manage multiple dependent objects (Employees), leading to efficient data organization and retrieval.
3.Many-To-One Association in Java:
One of the fundamental types of associations is the Many-to-One (M:1) Association. This relationship allows multiple instances of one entity to be associated with a single instance of another entity. In this detailed exploration, we will dissect the Many-to-One association in Java, illustrating it through examples, code snippets, and a detailed memory map.
1. Understanding Many-to-One Association
In a Many-to-One association, one class (the "many" side) holds references to another class (the "one" side). This setup is essential in scenarios where multiple entities share a common reference or resource. For example, in an educational system, multiple students may be enrolled in a single branch or department. Here’s how this can be represented:
Student Class (Many side): Represents individual students.
Branch Class (One side): Represents a branch or department where multiple students are enrolled.
The many side will have a reference to the one side, but not the other way around. This means that each student knows which branch they belong to, but each branch does not need to know about all its students directly.
2. Memory Map
To visualize the Many-to-One association, we use a memory map showing how objects are related. Let’s use the example of students and branches.
Memory Map Diagram:
+-------------------------+
|         Branch          |
|-------------------------|
| name: "CSE"             |
| id: "CT"                |
| cost: 115000            |
+-------------------------+
          |
          | 1
          |
          v
+-------------------------+    +-------------------------+    +-------------------------+
|         Student         |    |         Student         |    |         Student         |
|-------------------------|    |-------------------------|    |-------------------------|
| id: "45"                |    | id: "18"                |    | id: "4"                 |
| name: "Rohit"           |    | name: "Virat"           |    | name: "Shikhar"         |
| address: "MI"           |    | address: "RCB"          |    | address: "SRH"          |
| branch: (CSE Branch)    |    | branch: (CSE Branch)    |    | branch: (CSE Branch)    |
+-------------------------+    +-------------------------+    +-------------------------+
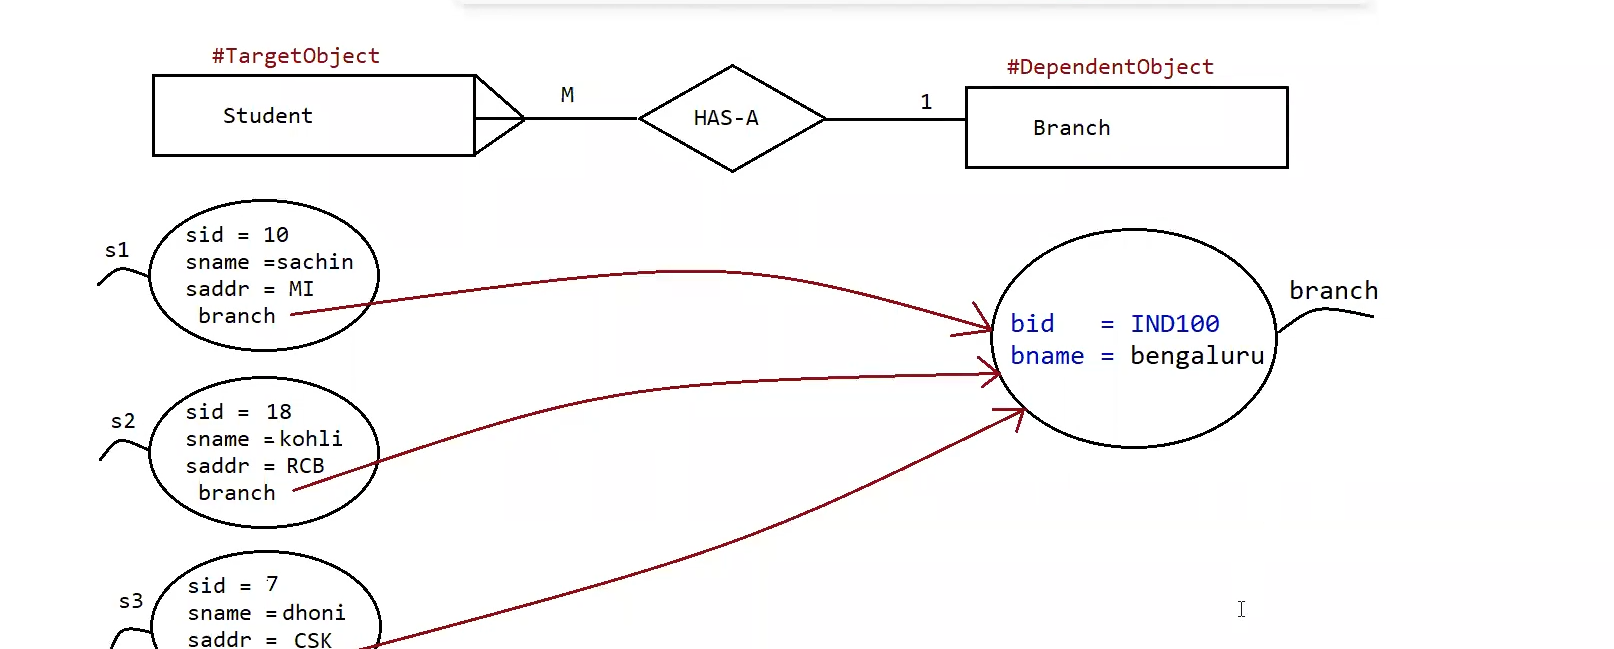
In this memory map:
The
Branchobject is shared by multipleStudentobjects.Each
Studentobject has a reference to a singleBranch.
3. Code Example: Many-to-One Association
Here’s a complete Java example illustrating a Many-to-One association where multiple Student instances are linked to a single Branch.
Constructor Injection:-
Branch Class:
package in.rohit.bean;

public class Branch {
    String name;
    String id;
    Integer cost;

    public Branch(String name, String id, int cost) {
        super();
        this.name = name;
        this.id = id;
        this.cost = cost;
    }

    // Getters and Setters
    public String getName() {
        return name;
    }

    public void setName(String name) {
        this.name = name;
    }

    public String getId() {
        return id;
    }

    public void setId(String id) {
        this.id = id;
    }

    public Integer getCost() {
        return cost;
    }

    public void setCost(Integer cost) {
        this.cost = cost;
    }
}
Student Class:
package in.rohit.bean;

public class Student {
    private String id;
    private String name;
    private String address;
    private Branch branch; // Reference to the Branch

    public Student(String id, String name, String address, Branch branch) {
        super();
        this.id = id;
        this.name = name;
        this.address = address;
        this.branch = branch;
    }

    public void getDetails() {
        System.out.println("Branch Details Are:");
        System.out.println("=======================");
        System.out.println("Branch ID: " + branch.getId());
        System.out.println("Branch Name: " + branch.getName());
        System.out.println("Branch Cost: " + branch.getCost());
        System.out.println();
        System.out.println("Student Details Are:");
        System.out.println("=======================");
        System.out.println("Student ID: " + id);
        System.out.println("Student Name: " + name);
        System.out.println("Student Address: " + address);
    }

    // Getters and Setters
    public String getId() {
        return id;
    }

    public void setId(String id) {
        this.id = id;
    }

    public String getName() {
        return name;
    }

    public void setName(String name) {
        this.name = name;
    }

    public String getAddress() {
        return address;
    }

    public void setAddress(String address) {
        this.address = address;
    }

    public Branch getBranch() {
        return branch;
    }

    public void setBranch(Branch branch) {
        this.branch = branch;
    }
}
Test Application:
package in.rohit.main;

import in.rohit.bean.Branch;
import in.rohit.bean.Student;

public class TestApp {
    public static void main(String[] args) {
        // Creating a Branch object
        Branch branch = new Branch("CSE", "CT", 115000);

        // Creating Student objects
        Student s1 = new Student("45", "Rohit", "MI", branch);
        Student s2 = new Student("18", "Virat", "RCB", branch);
        Student s3 = new Student("4", "Shikhar", "SRH", branch);

        // Displaying details of each student
        s1.getDetails();
        s2.getDetails();
        s3.getDetails();
    }
}
Explanation:
Branch Class:
The
Branchclass represents the "one" side of the Many-to-One association.It contains attributes like
name,id, andcost.
Student Class:
The
Studentclass represents the "many" side.Each
Studentinstance has a reference to aBranchobject.The
getDetailsmethod prints both student and branch details.
Test Application:
An instance of
Branchis created.Multiple
Studentinstances are created, each associated with the sameBranch.The
getDetailsmethod is called to display the details.
Expected Output:
Student1 details are:
Student1 ID ::45
Student1 Name::Rohit
Student1 Address ::MI
Branch Details Are::
Branch ID::CT
Branch Name::CSE
Branch Cost::115000

Student2 details are:
Student2 ID ::18
Student2 Name::Virat
Student2 Address ::RCB
Branch Details Are::
Branch ID::CT
Branch Name::CSE
Branch Cost::115000

Student3 details are:
Student3 ID ::4
Student3 Name::Shikhar
Student3 Address ::SRH
Branch Details Are::
Branch ID::CT
Branch Name::CSE
Branch Cost::115000
Explanation of the Output
Each
Studentinstance displays its own details, including ID, Name, and Address.Following each student's details, the branch details (which are shared) are displayed.
As all students are associated with the same branch, the branch information is identical for each student.
This output demonstrates the Many-to-One association where multiple Student objects are related to a single Branch object.
You're right, you provided a version of the code that uses setter injection. I'll explain how this affects the output and include the necessary details about setter injection.
Explanation with Setter Injection
Setter Injection is another method to achieve dependency injection where dependencies are provided through setter methods rather than through the constructor. This allows for more flexibility in setting or updating dependencies after the object is created.
Branch Class:
package in.rohit.bean;
// Dependent Object
public class Branch {
    String name;
    String add;
    String id;

    // Getters and Setters
    public String getName() {
        return name;
    }

    public void setName(String name) {
        this.name = name;
    }

    public String getId() {
        return id;
    }

    public void setId(String id) {
        this.id = id;
    }

    public String getAdd() {
        return add;
    }

    public void setAdd(String add) {
        this.add = add;
    }
}
Student Class:
package in.rohit.bean;
// Target Object
public class Student {
    private String id;
    private String name;
    private String add;
    // HAS-A variable
    private Branch branchCSE;

    // Getters and Setters
    public String getId() {
        return id;
    }

    public void setId(String id) {
        this.id = id;
    }

    public String getName() {
        return name;
    }

    public void setName(String name) {
        this.name = name;
    }

    public String getAdd() {
        return add;
    }

    public void setAdd(String add) {
        this.add = add;
    }

    public Branch getBranchCSE() {
        return branchCSE;
    }

    public void setBranchCSE(Branch branchCSE) {
        this.branchCSE = branchCSE;
    }
}
TestApp Class:
package in.rohit.main;
import in.rohit.bean.Branch;
import in.rohit.bean.Student;

public class TestApp {
    public static void main(String[] args) {
        // Creating Branch Object
        Branch branch = new Branch();
        branch.setName("Nagpur");
        branch.setAdd("Hingna");

        // Creating Student Objects and using Setter Injection
        Student s1 = new Student();
        s1.setId("123");
        s1.setName("Rohit");
        s1.setAdd("Shantinagar");
        s1.setBranchCSE(branch);

        Student s2 = new Student();
        s2.setId("456");
        s2.setName("Nikhil");
        s2.setAdd("Burdi");
        s2.setBranchCSE(branch);

        Student s3 = new Student();
        s3.setId("897");
        s3.setName("Rohit2");
        s3.setAdd("Shanti");
        s3.setBranchCSE(branch);

        // Printing Student Details
        System.out.println();
        System.out.println("Student1 details are:");
        System.out.println("Student1 ID ::" + s1.getId());
        System.out.println("Student1 Name::" + s1.getName());
        System.out.println("Student1 Address ::" + s1.getAdd());
        System.out.println("Branch Details Are::");
        System.out.println("Branch ID::" + s1.getBranchCSE().getId());
        System.out.println("Branch Name::" + s1.getBranchCSE().getName());
        System.out.println("Branch Address::" + s1.getBranchCSE().getAdd());
        System.out.println();

        System.out.println("Student2 details are:");
        System.out.println("Student2 ID ::" + s2.getId());
        System.out.println("Student2 Name::" + s2.getName());
        System.out.println("Student2 Address ::" + s2.getAdd());
        System.out.println("Branch Details Are::");
        System.out.println("Branch ID::" + s2.getBranchCSE().getId());
        System.out.println("Branch Name::" + s2.getBranchCSE().getName());
        System.out.println("Branch Address::" + s2.getBranchCSE().getAdd());
        System.out.println();

        System.out.println("Student3 details are:");
        System.out.println("Student3 ID ::" + s3.getId());
        System.out.println("Student3 Name::" + s3.getName());
        System.out.println("Student3 Address ::" + s3.getAdd());
        System.out.println("Branch Details Are::");
        System.out.println("Branch ID::" + s3.getBranchCSE().getId());
        System.out.println("Branch Name::" + s3.getBranchCSE().getName());
        System.out.println("Branch Address::" + s3.getBranchCSE().getAdd());
    }
}
Expected Output with Setter Injection
Student1 details are:
Student1 ID ::123
Student1 Name::Rohit
Student1 Address ::Shantinagar
Branch Details Are::
Branch ID::Nagpur
Branch Name::Hingna
Branch Address::Hingna

Student2 details are:
Student2 ID ::456
Student2 Name::Nikhil
Student2 Address ::Burdi
Branch Details Are::
Branch ID::Nagpur
Branch Name::Hingna
Branch Address::Hingna

Student3 details are:
Student3 ID ::897
Student3 Name::Rohit2
Student3 Address ::Shanti
Branch Details Are::
Branch ID::Nagpur
Branch Name::Hingna
Branch Address::Hingna
Key Points:
Branch Initialization: The
Branchobject is created first and its properties are set using setter methods.Student Initialization: Each
Studentobject is created and initialized using setter methods to assign its ID, Name, Address, and the previously createdBranchobject.Branch Details: For each student, the branch details are fetched using the
getBranchCSE()method which returns the branch object and its details are printed.
The output confirms that all students share the same branch details due to the Many-to-One relationship.
4. Memory Map and Table Representation
Memory Map:
+-------------------------+       +-------------------------+       +-------------------------+
|         Branch          |       |         Branch          |       |         Branch          |
|-------------------------|       |-------------------------|       |-------------------------|
| name: "CSE"             |       | name: "CSE"             |       | name: "CSE"             |
| id: "CT"                |       | id: "CT"                |       | id: "CT"                |
| cost: 115000            |       | cost: 115000            |       | cost: 115000            |
+-------------------------+       +-------------------------+       +-------------------------+
          ^                             ^                               ^
          |                             |                               |
          | 1                           | 1                             | 1
          |                             |                               |
+-------------------------+       +-------------------------+       +-------------------------+
|         Student         |       |         Student         |       |         Student         |
|-------------------------|       |-------------------------|       |-------------------------|
| id: "45"                |       | id: "18"                |       | id: "4"                 |
| name: "Rohit"           |       | name: "Virat"           |       | name: "Shikhar"         |
| address: "MI"           |       | address: "RCB"          |       | address: "SRH"          |
| branch: (CSE Branch)    |       | branch: (CSE Branch)    |       | branch: (CSE Branch)    |
+-------------------------+       +-------------------------+       +-------------------------+
Table Representation:
| Student ID | Student Name | Student Address | Branch ID | Branch Name | Branch Cost |
| 45 | Rohit | MI | CT | CSE | 115000 |
| 18 | Virat | RCB | CT | CSE | 115000 |
| 4 | Shikhar | SRH | CT | CSE | 115000 |
5. Conclusion
The Many-to-One association in Java effectively models scenarios where multiple instances of one entity (e.g., students) are linked to a single instance of another entity (e.g., branch). By understanding and implementing this association, you can create more efficient and organized code that mirrors real-world relationships.
4.Many-to-Many Association in Java
Many-to-Many Association is a relationship where multiple instances of one entity are associated with multiple instances of another entity. For instance, multiple students can enroll in multiple courses, and each course can have multiple students enrolled.
Key Concepts
Many-to-Many Relationship: Each instance of entity A can be related to multiple instances of entity B and vice versa.
Target Object: The entity that contains or references multiple instances of another entity.
Dependent Object: The entity that is referenced by or associated with multiple instances of the target object.
In this scenario, we have a Student entity associated with multiple Course entities, and each Course entity can be associated with multiple Student entities.
Implementation and Code
Classes
Course Class: Represents the course with attributes like
name,id, andcost.package in.rohit.bean; // Dependent Object public class Course { String name; String id; Integer cost; // Constructor public Course(String name, String id, int cost) { super(); this.name = name; this.id = id; this.cost = cost; } }Student Class: Represents the student with attributes like
sid,sname,saddr, and an array ofCourseobjects.package in.rohit.bean; import in.rohit.bean.Course; // Target Object public class Student { private String sid; private String sname; private String saddr; // Has-A Relationship Course[] course; // Constructor Injection public Student(String sid, String sname, String saddr, Course[] course) { super(); this.sid = sid; this.sname = sname; this.saddr = saddr; this.course = course; } // Method to get Student Details public void getStudentDetails() { System.out.println("SID :" + sid); System.out.println("SNAME :" + sname); System.out.println("SADDR :" + saddr); System.out.println("Course Details:"); for (Course c : course) { System.out.println("Course ID :" + c.id); System.out.println("Course Name :" + c.name); System.out.println("Course Cost :" + c.cost); System.out.println("----------------"); } } }TestApp Class: Demonstrates the creation of
StudentandCourseobjects and how the many-to-many relationship is represented.package in.rohit.main; import in.rohit.bean.Course; import in.rohit.bean.Student; public class TestApp { public static void main(String[] args) { // Creating Course Objects Course c1 = new Course("Al", "JAVA", 1000); Course c2 = new Course("B1", "Full Stack Web Development", 2000); Course c3 = new Course("C1", "DSA", 3000); Course[] courses = new Course[3]; courses[0] = c1; courses[1] = c2; courses[2] = c3; // Creating Student Objects with Courses Student s1 = new Student("10", "Rohit", "MI", courses); Student s2 = new Student("18", "Kohli", "RCB", courses); Student s3 = new Student("5", "Shikhar", "SRH", courses); // Getting all student details s1.getStudentDetails(); s2.getStudentDetails(); s3.getStudentDetails(); } }
Output
The output demonstrates how each student is associated with all courses. The getStudentDetails() method prints details of each student along with the details of all courses they are enrolled in.
Expected Output
SID :10
SNAME :Rohit
SADDR :MI
Course Details:
Course ID :Al
Course Name :JAVA
Course Cost :1000
----------------
Course ID :B1
Course Name :Full Stack Web Development
Course Cost :2000
----------------
Course ID :C1
Course Name :DSA
Course Cost :3000
----------------

SID :18
SNAME :Kohli
SADDR :RCB
Course Details:
Course ID :Al
Course Name :JAVA
Course Cost :1000
----------------
Course ID :B1
Course Name :Full Stack Web Development
Course Cost :2000
----------------
Course ID :C1
Course Name :DSA
Course Cost :3000
----------------

SID :5
SNAME :Shikhar
SADDR :SRH
Course Details:
Course ID :Al
Course Name :JAVA
Course Cost :1000
----------------
Course ID :B1
Course Name :Full Stack Web Development
Course Cost :2000
----------------
Course ID :C1
Course Name :DSA
Course Cost :3000
----------------
Memory Map Diagram
Visual Representation
+--------------------+     +--------------------+     +--------------------+
|     Student s1     |     |     Student s2     |     |     Student s3     |
+--------------------+     +--------------------+     +--------------------+
|  sid: "10"        |     |  sid: "18"        |     |  sid: "5"         |
|  sname: "Rohit"   |     |  sname: "Kohli"   |     |  sname: "Shikhar" |
|  saddr: "MI"      |     |  saddr: "RCB"     |     |  saddr: "SRH"     |
|  courses: [       |     |  courses: [       |     |  courses: [       |
|    c1, c2, c3     |     |    c1, c2, c3     |     |    c1, c2, c3     |
|  ]                 |     |  ]                 |     |  ]                 |
+--------------------+     +--------------------+     +--------------------+
        |                       |                       |
        |                       |                       |
        |                       |                       |
        |                       |                       |
        V                       V                       V
+--------------------+     +--------------------+     +--------------------+
|       Course c1    |     |       Course c2    |     |       Course c3    |
+--------------------+     +--------------------+     +--------------------+
|  id: "Al"         |     |  id: "B1"         |     |  id: "C1"         |
|  name: "JAVA"     |     |  name: "Full Stack|     |  name: "DSA"     |
|  cost: 1000       |     |    Web Development"|     |  cost: 3000      |
+--------------------+     +--------------------+     +--------------------+
        ^                       ^                       ^
        |                       |                       |
        |                       |                       |
        |                       |                       |
        +-----------------------+-----------------------+
              Many-to-Many Association
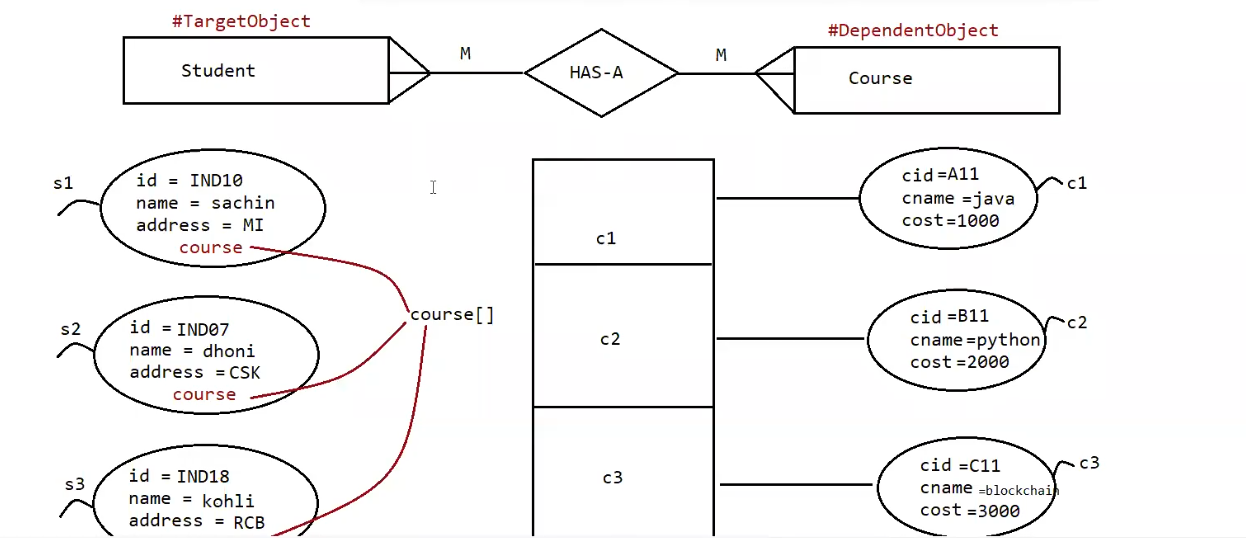
Explanation of the Memory Map
Student Objects (
s1,s2,s3):Each student (
s1,s2,s3) has a list of courses.sid: Student ID (e.g., "10", "18", "5")
sname: Student Name (e.g., "Rohit", "Kohli", "Shikhar")
saddr: Student Address (e.g., "MI", "RCB", "SRH")
courses: Array of
Courseobjects that the student is enrolled in. Each student has all the courses (c1,c2,c3).
Course Objects (
c1,c2,c3):Each course (
c1,c2,c3) is linked to all students.id: Course ID (e.g., "Al", "B1", "C1")
name: Course Name (e.g., "JAVA", "Full Stack Web Development", "DSA")
cost: Course Cost (e.g., 1000, 2000, 3000)
Arrows:
From
StudenttoCourse: Each student (s1,s2,s3) is associated with every course (c1,c2,c3), as each student is enrolled in all courses.From
CoursetoStudent: Each course (c1,c2,c3) is associated with every student (s1,s2,s3), as each course is taken by all students.
Table Representation
Here’s a table showing the Many-to-Many relationship, with each student having all courses and each course having all students:
| Student ID | Student Name | Student Address | Courses Enrolled |
| 10 | Rohit | MI | ID: Al, Name: JAVA, Cost: 1000 |
| ID: B1, Name: Full Stack Web Development, Cost: 2000 | |||
| ID: C1, Name: DSA, Cost: 3000 | |||
| 18 | Kohli | RCB | ID: Al, Name: JAVA, Cost: 1000 |
| ID: B1, Name: Full Stack Web Development, Cost: 2000 | |||
| ID: C1, Name: DSA, Cost: 3000 | |||
| 5 | Shikhar | SRH | ID: Al, Name: JAVA, Cost: 1000 |
| ID: B1, Name: Full Stack Web Development, Cost: 2000 | |||
| ID: C1, Name: DSA, Cost: 3000 |
Summary
In this Many-to-Many relationship, every student is associated with every course, and every course is associated with every student. The memory map and table above accurately represent this comprehensive many-to-many association.
Conclusion
The Has-A relationship and dependency injection are vital for creating flexible, maintainable, and modular applications in Java. They help separate concerns and allow objects to collaborate without being tightly coupled. Mastering these concepts, along with different types of associations, will greatly enhance your ability to design and implement complex systems efficiently.
Thank You!
I appreciate you taking the time to read this post. I hope you found the information helpful and insightful. If you have any questions or feedback, feel free to reach out!
For more content on related topics, check out my other series:
DSA Series: Dive into the world of Data Structures and Algorithms with detailed explanations and code examples.
Full Stack Java Development Series: Explore the comprehensive guide on Full Stack Java Development, covering various technologies and practices.
You might also find these posts interesting:
Inner Class & Introduction to Interface – A detailed look into inner classes and interface fundamentals in Java.
Connect with me on social media for updates and more:
LinkedIn: Follow me for professional updates and networking opportunities.
GitHub: Check out my repositories for code samples and projects.
LeetCode: Explore my LeetCode profile for coding challenges and problem-solving skills.
Your feedback and engagement are invaluable. Feel free to reach out with questions, comments, or suggestions. Happy coding!
Rohit Gawande
Full Stack Java Developer | Blogger | Coding Enthusiast
Subscribe to my newsletter
Read articles from Rohit Gawande directly inside your inbox. Subscribe to the newsletter, and don't miss out.
Written by
Rohit Gawande
Rohit Gawande
🚀 Tech Enthusiast | Full Stack Developer | System Design Explorer 💻 Passionate About Building Scalable Solutions and Sharing Knowledge Hi, I’m Rohit Gawande! 👋I am a Full Stack Java Developer with a deep interest in System Design, Data Structures & Algorithms, and building modern web applications. My goal is to empower developers with practical knowledge, best practices, and insights from real-world experiences. What I’m Currently Doing 🔹 Writing an in-depth System Design Series to help developers master complex design concepts.🔹 Sharing insights and projects from my journey in Full Stack Java Development, DSA in Java (Alpha Plus Course), and Full Stack Web Development.🔹 Exploring advanced Java concepts and modern web technologies. What You Can Expect Here ✨ Detailed technical blogs with examples, diagrams, and real-world use cases.✨ Practical guides on Java, System Design, and Full Stack Development.✨ Community-driven discussions to learn and grow together. Let’s Connect! 🌐 GitHub – Explore my projects and contributions.💼 LinkedIn – Connect for opportunities and collaborations.🏆 LeetCode – Check out my problem-solving journey. 💡 "Learning is a journey, not a destination. Let’s grow together!" Feel free to customize or add more based on your preferences! 😊