Turn Your Terminal into a Personal Bio: How to Build a Fun npx Introduction Command in Minutes!
 Arvind Parekh
This article will guide you on how to create a terminal-based introduction for yourself—a fun and geeky way to let your friends and fellow developers know more about you. If you're a developer, why not introduce yourself through something developers use all the time—the terminal! 😎
Why Make a Terminal Introduction? 🤔
As developers, we spend a lot of time in the terminal—whether it’s running commands, deploying apps, or just managing our projects. So why not use that same space to share a bit about ourselves? It's a fun, nerdy way to introduce yourself that goes beyond the usual bio on LinkedIn or GitHub. Plus, it’s bound to catch people’s attention—whether it's a fellow dev, a potential collaborator, or even a recruiter. And honestly, it’s just a creative way to share your story with a touch of personality. 🙂
What Are We Building? 🔨
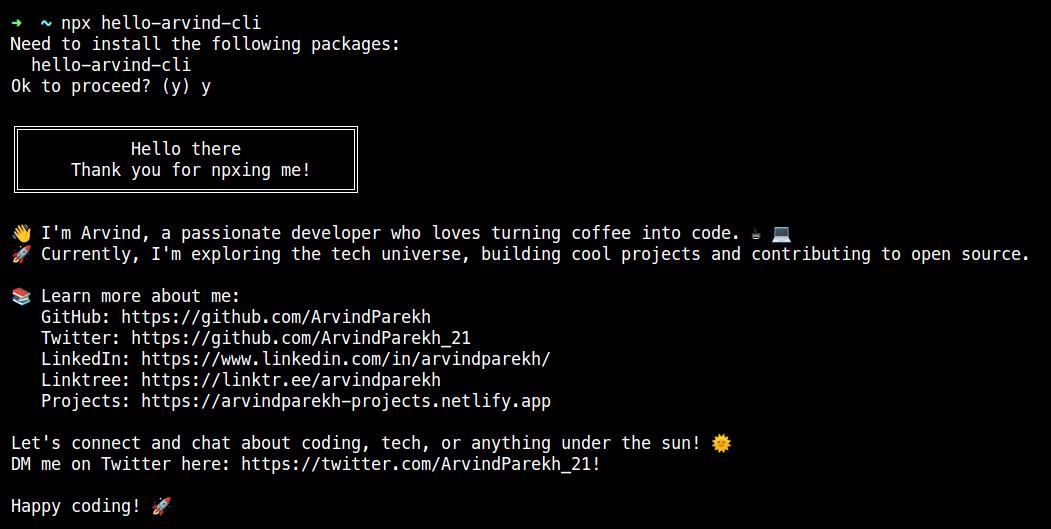
Before we dive in, here's what you'll be making by the end of this tutorial—a command-line tool that others can run directly from their terminal to learn more about you!
Here’s mine as an example:

Exciting, right? Let's get into it!
Step 1: Set Up Your npm Package 📦
First things first—let's create an npm package to house our terminal introduction script.
How to Set It Up:
Create a New Directory:
Open your terminal and create a new directory for your project.mkdir hello-terminal cd hello-terminalInitialize Your Project:
Now that you're in your new directory, initialize your project with npm. This creates apackage.jsonfile, which is essential for any npm package.npm init -y
This will generate a basic package.json file with some default values. You can always modify them later.
Step 2: Create Your Introduction Script 💻
Next, we’ll create the actual script that will run when someone uses your package.
Create a New JavaScript File:
Inside your project folder, create a file namedindex.js(or any name you prefer).touch index.jsWrite the Script:
Openindex.jsin your favourite text editor and write the script that introduces you. You can get creative here—add details about yourself, your skills, and links to your social media or portfolio.#!/usr/bin/env node console.log(` 👋 Hello! I’m [Your Name]. 🌟 [A brief description of yourself and your passions.] 💻 Skills: [List some of your skills or technologies you're familiar with.] Let's connect: 🌐 GitHub: https://github.com/[YourGitHubUsername] 🐦 Twitter: https://twitter.com/[YourTwitterHandle] 🔗 LinkedIn: https://linkedin.com/in/[YourLinkedInProfile] Thanks for checking out my terminal intro! 😄 `);
Pro tip: This is your moment to showcase your personality—have fun with it!
Step 3: Make Your Script Executable 🛠
To ensure your script runs properly, we need to make it executable.
Update Permissions:
Run the following command to make your script executable:chmod +x index.jsModify
package.json:
To allow users to run the script vianpx, add abinfield to yourpackage.jsonfile. This tells npm which script to execute when the package is run.Open
package.jsonand add the following under the"bin"section:"bin": { "hello-terminal": "./index.js" }
Step 4: Test Your Command Locally 🧪
Before we publish this to the npm registry, let’s test it locally to make sure everything works as expected.
Link the package locally:
Run the following command in your project directory:npm linkThis creates a symbolic link between your local package and a global installation, allowing you to test it.
Run your command:
Now, run your command using:npx hello-terminalIf everything goes well, you should see your custom introduction printed in the terminal!
Note: Once you're done testing, you can remove the symbolic link with
npm unlink.
Step 5: Publish Your Package to npm 📤
Now that your command is working locally, it’s time to share it with the world by publishing it to npm!
Create an npm Account:
If you don't already have an npm account, go ahead and create one here. After signing up, log in to npm from your terminal:npm loginPublish Your Package:
To publish your package, run the following command:npm publishBoom! Your package is now live and can be used by anyone with:
npx hello-terminal
Final Thoughts 💭
And there you have it—a cool and creative way to introduce yourself as a developer, straight from the terminal! 🎉 Whether you're sharing this with potential employers, collaborators, or just fellow coders, it's a fun way to showcase your skills and personality.
I'd love to see what you come up with, so feel free to share your terminal intros with me on Twitter! Let’s connect and inspire each other. 🌟
Subscribe to my newsletter
Read articles from Arvind Parekh directly inside your inbox. Subscribe to the newsletter, and don't miss out.
Written by

Arvind Parekh
Arvind Parekh
Full-Stack Developer | Open-Source Contributor | Loves 💻 | 🎸 | 🏃🏻♂️