Azure SQL Migration: A Step-by-Step Guide Using Azure Data Studio
 Rabiatu Mohammed
Table of contents
- Download and Install Azure Data Studio
- Creating a Project from the Database
- Connecting to Your Azure SQL Server
- Navigating Your Database and Viewing Details
- Deploying to Azure SQL Database
- Publishing the Database
- Finalizing the Database Publish
- Successful Deployment
- Managing Your Deployed Database
- Migration Assessment and SKU Recommendations
- Selecting the Target Platform for Migration
- Viewing the Assessment Results and Finalizing Target Selection
- Mapping Source and Target Databases
- Setting Up Azure Database Migration Service
- Registering the Data Migration Resource Provider
- Executing the Script for Self-Hosted Integration Runtime
- Configuring the Integration Runtime
- Registering the Integration Runtime
- Setting Up a New Integration Runtime Node
- Verifying the Azure Database Migration Service (DMS) Connection
- Configuring Data Source and Selecting Tables
- Running the Validation
- Monitoring the Migration Process

Organizations are increasingly looking for ways to optimize their data management processes. One of the most efficient ways to achieve this is by migrating on-premises databases to the cloud. This is where Azure SQL comes into play; a powerful, scalable, and secure cloud-based database solution offered by Microsoft.
Migrating your SQL databases to Azure SQL is not just a technological shift; it's a strategic move toward flexibility, enhanced security, and reduced infrastructure costs. Whether you're dealing with a legacy database or an enterprise-level system, Azure SQL allows you to future-proof your operations by taking advantage of cloud-native capabilities.
Download and Install Azure Data Studio
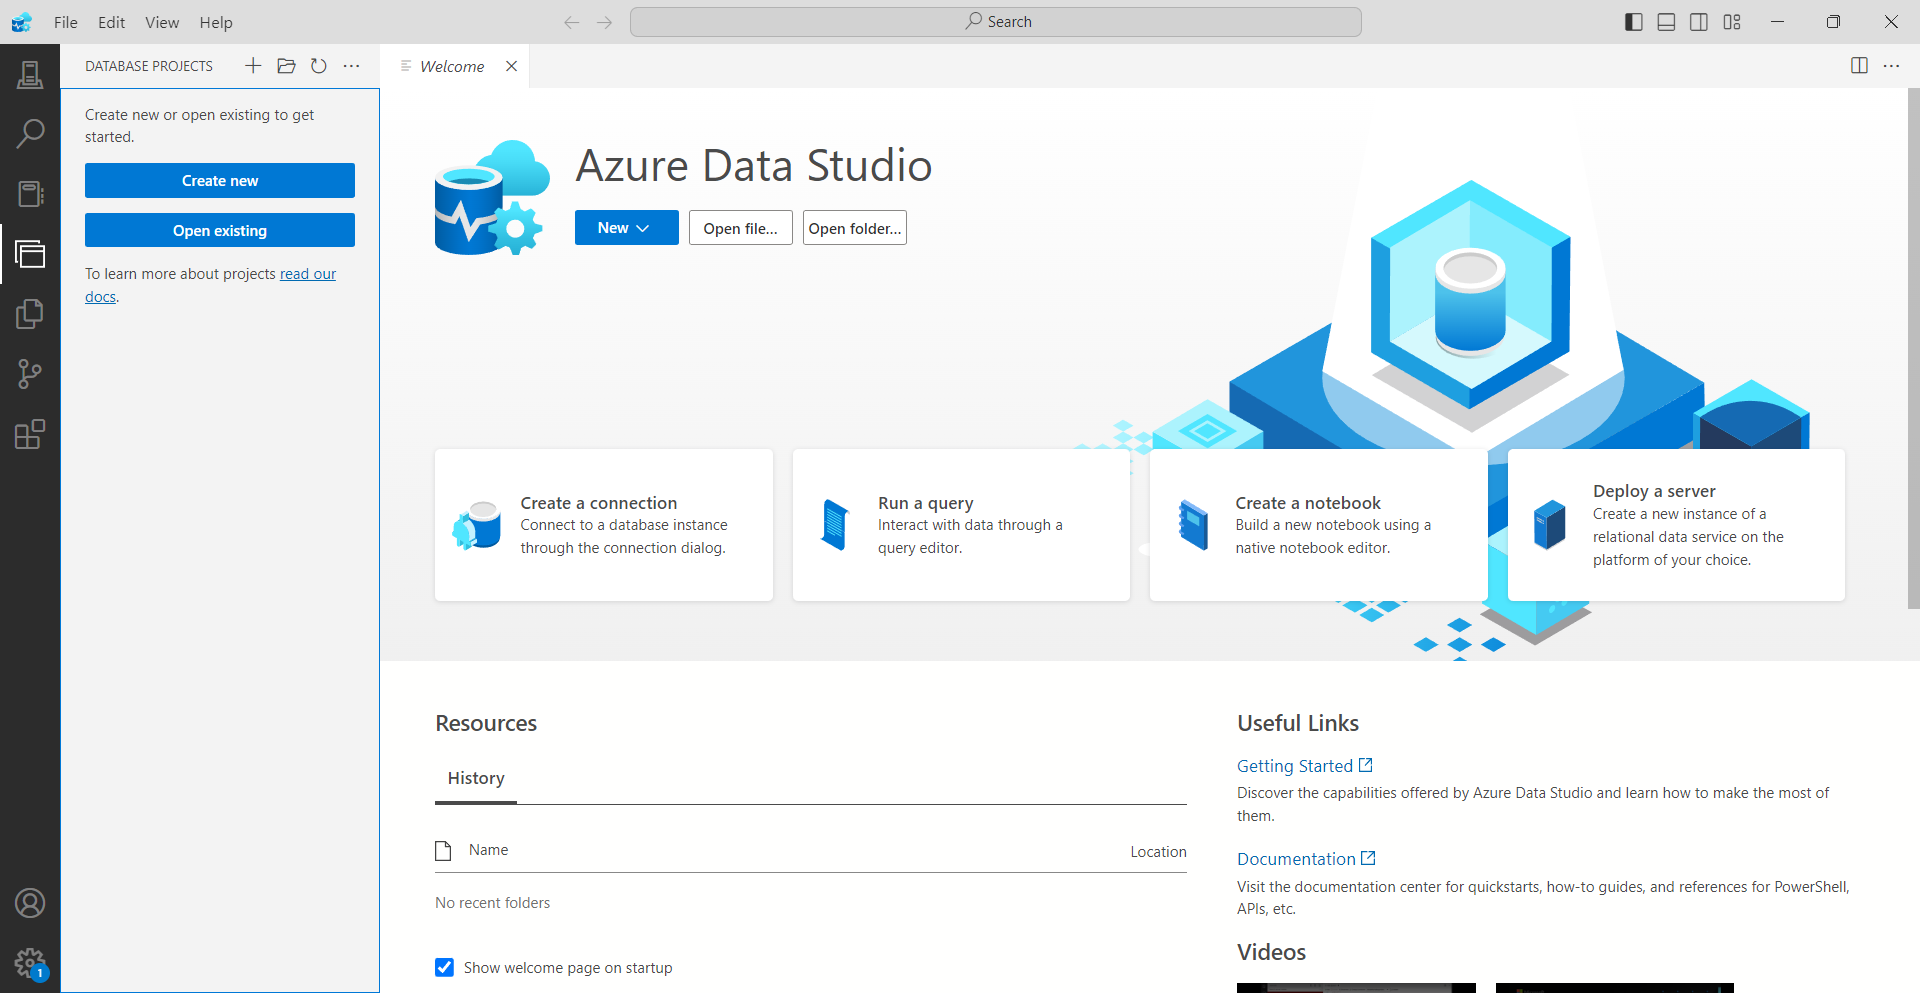
Before we dive into connecting to Azure SQL, let’s first make sure you have Azure Data Studio installed. If you haven’t already, you can download it from here. The installation is straightforward, and once it’s up and running, you’ll be greeted with a clean interface that looks like this:
Creating a Project from the Database
it’s time to create a project from the existing database. This step allows you to import all the necessary components from the source SQL database into a project that you’ll be migrating to Azure.
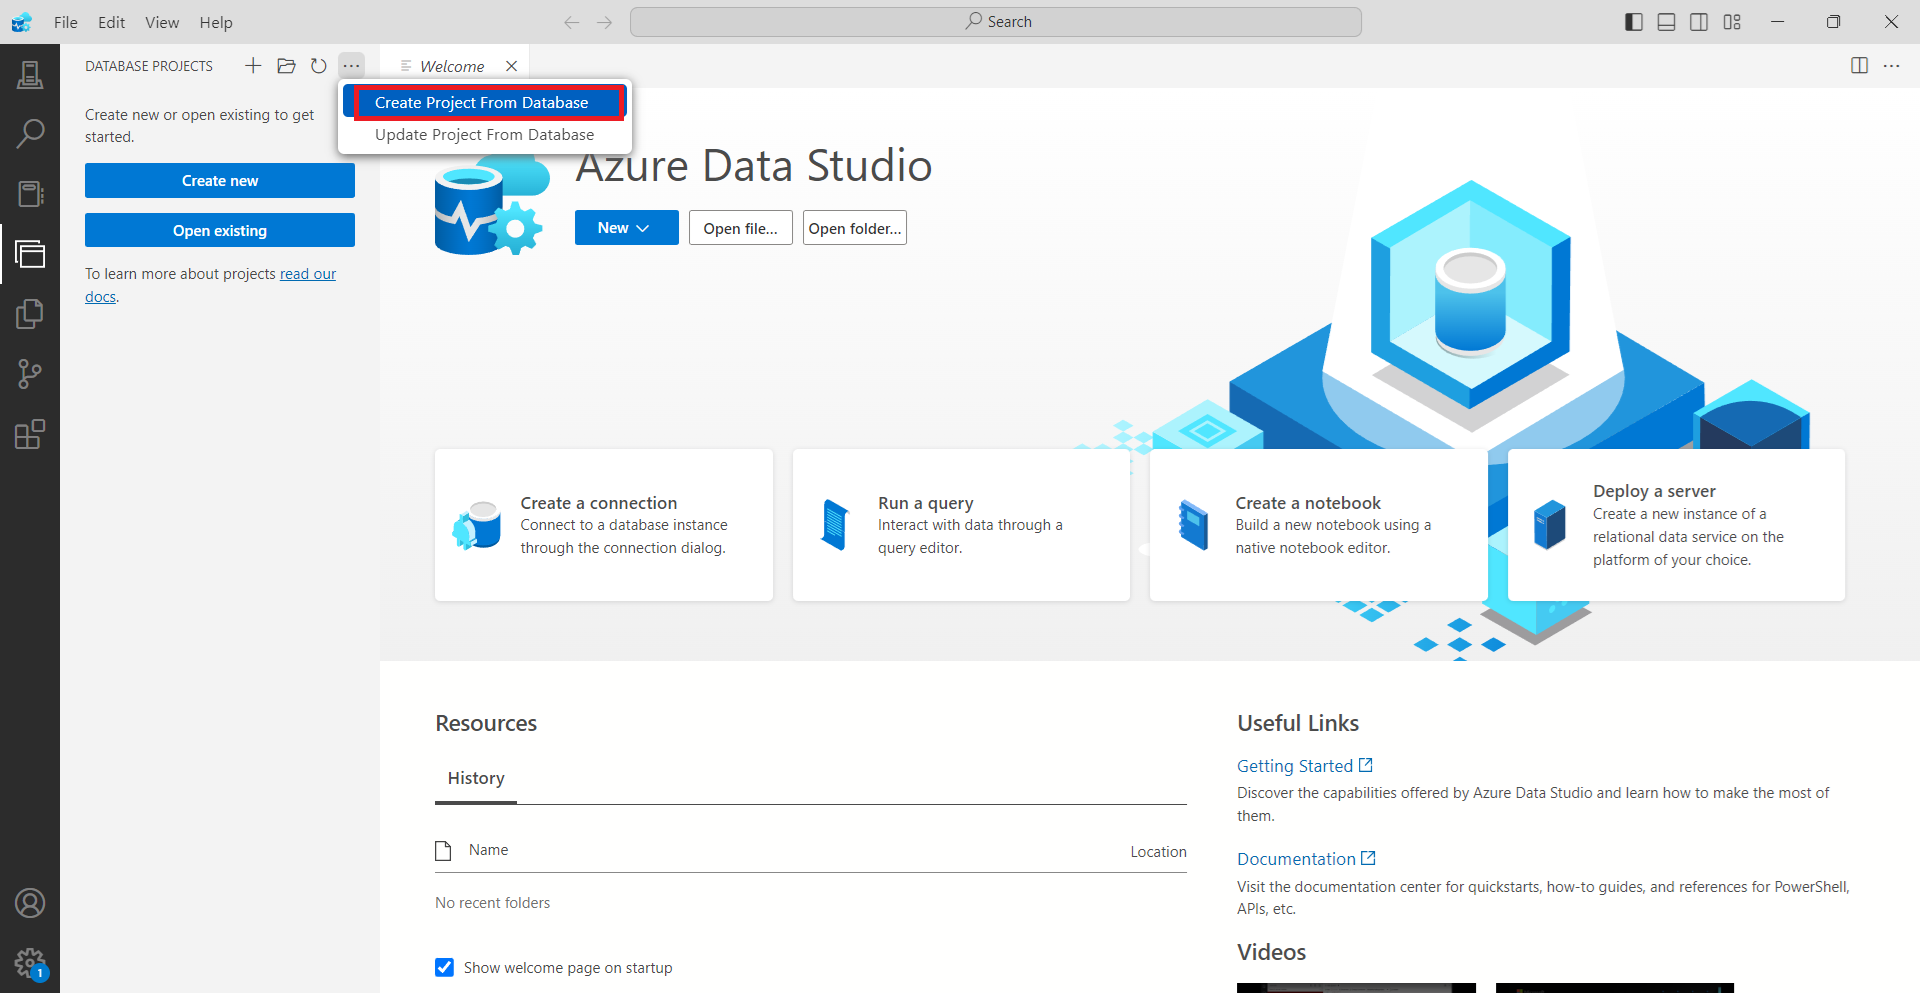
Open Azure Data Studio and navigate to the Database Projects section.
From here, click on the Create Project From Database option.
Connecting to Your Azure SQL Server
Now that Azure Data Studio is installed and running, the next step is to connect to your Azure SQL Server. This step is essential for managing your database and starting the migration process.
Open Azure Data Studio and go to the Connection pane.
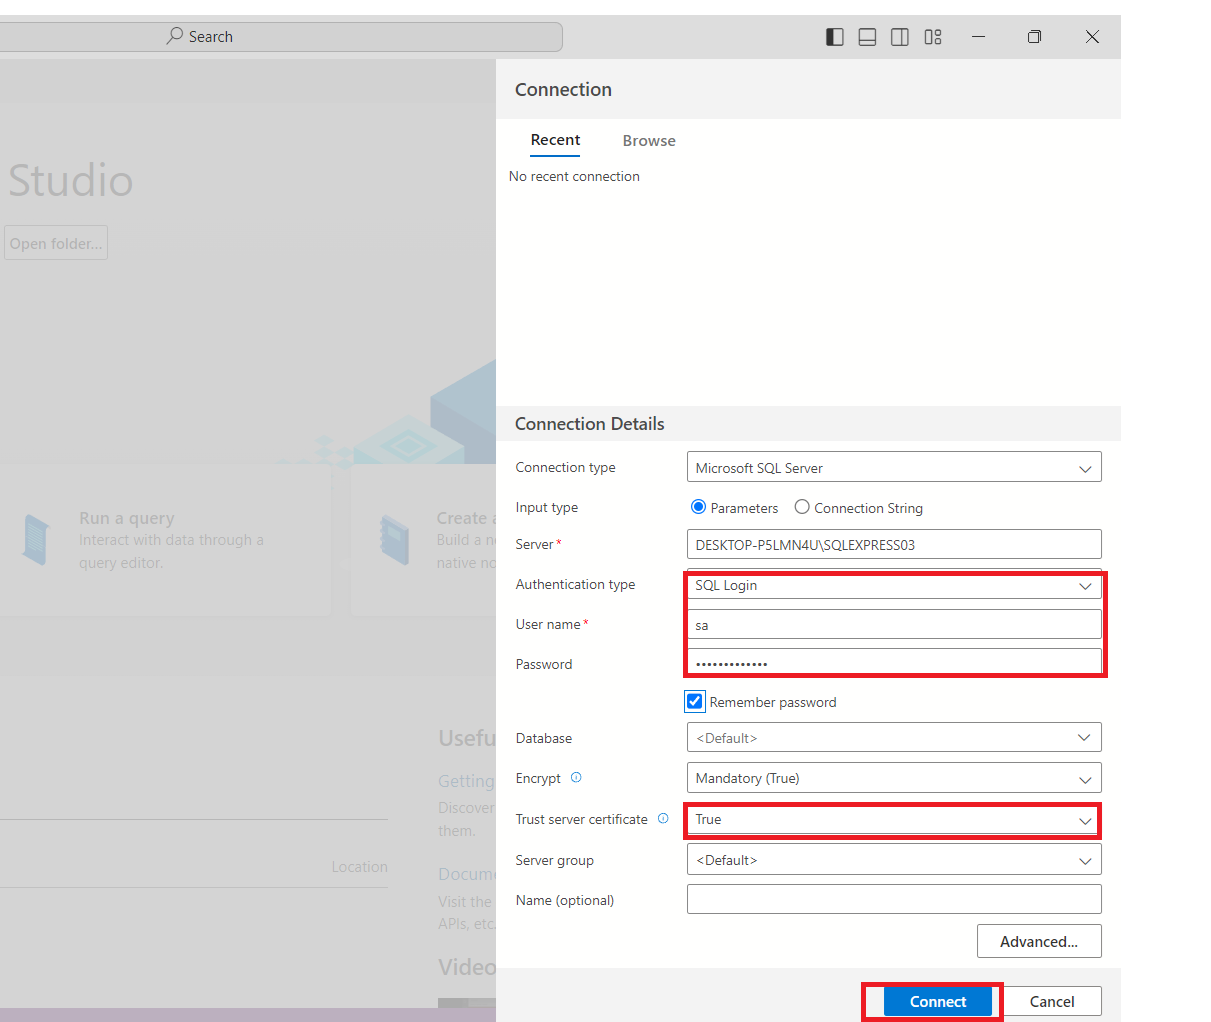
You’ll see the Connection Details window pop up, as shown below.
In the Server field, input your server’s name. If you’re unsure where to find it, go to your Azure Portal and check your SQL Server’s Overview section.
Choose SQL Login under Authentication Type and enter your username and password.
Make sure Encrypt is set to Mandatory (True) and, for testing environments, set Trust server certificate to True. In production, it’s best practice to leave this as False for security reasons.
Navigating Your Database and Viewing Details
Azure Data Studio will load all the available databases on that server. The screenshot here gives a view of what you can expect: on the left, you can explore Databases, Security, and Server Objects, while on the right, you’ll see a summary of key information such as the Backup Status and Database Size.
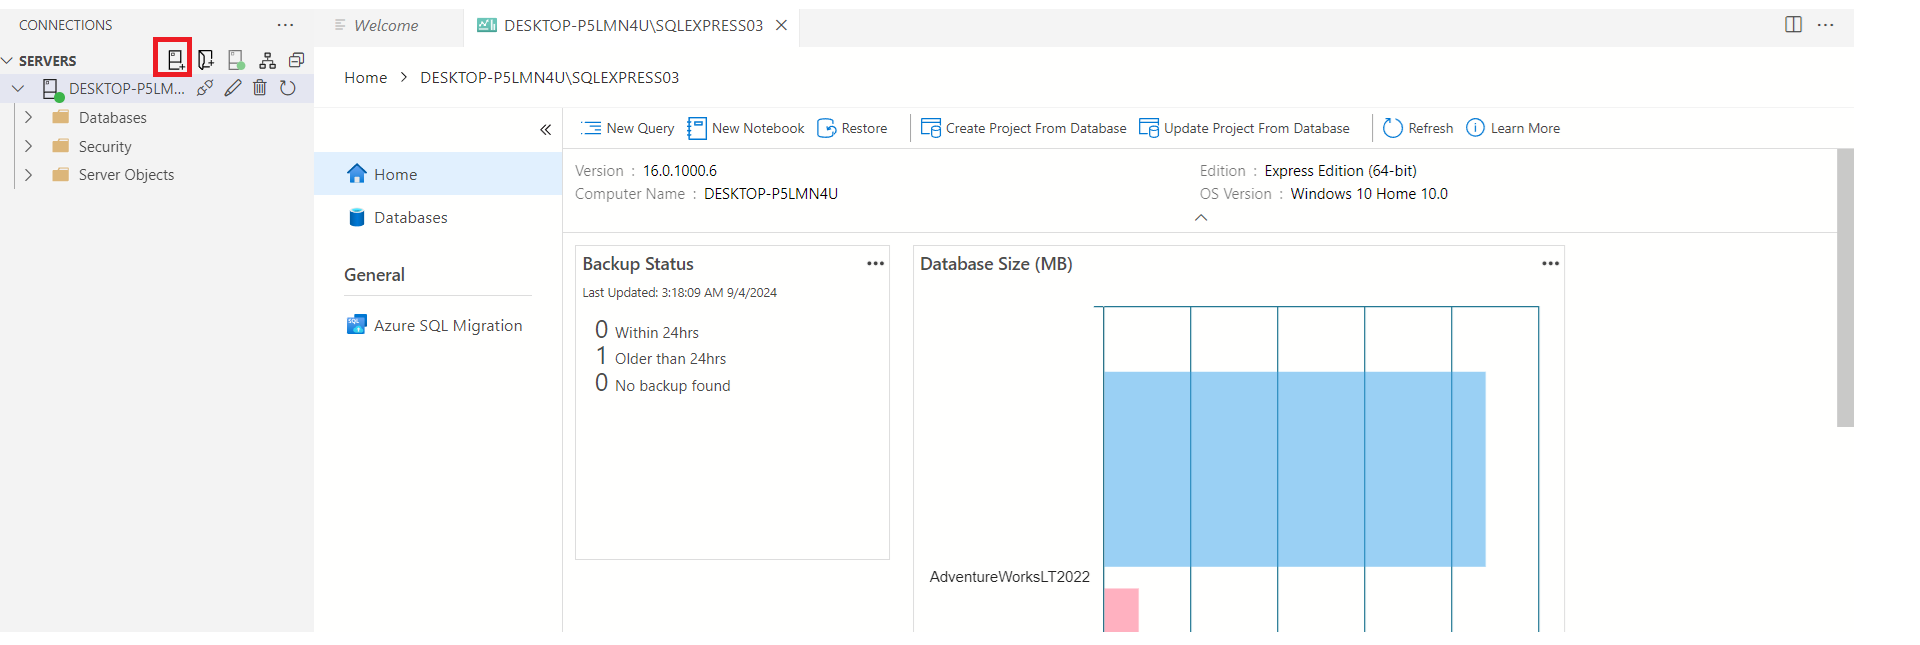
I connected to AdventureWorksLT2022; a sample database. The panel on the right-hand side provides valuable insights, like:
Backup status: This shows if any backups have been performed in the last 24 hours or beyond.
Database size: A quick snapshot of how much space your database is consuming.
Deploying to Azure SQL Database
With your project ready and validated, it’s time to move it to Azure SQL Database.

I opened Azure Data Studio and navigated to the Connection window.
I entered the necessary details, such as:
Server Name: You’ll find this in your Azure Portal under the SQL Server’s overview section. In my case, it was
rabiatusqlserver.database.windows.net.Authentication Type: I chose SQL Login and entered my username and password.
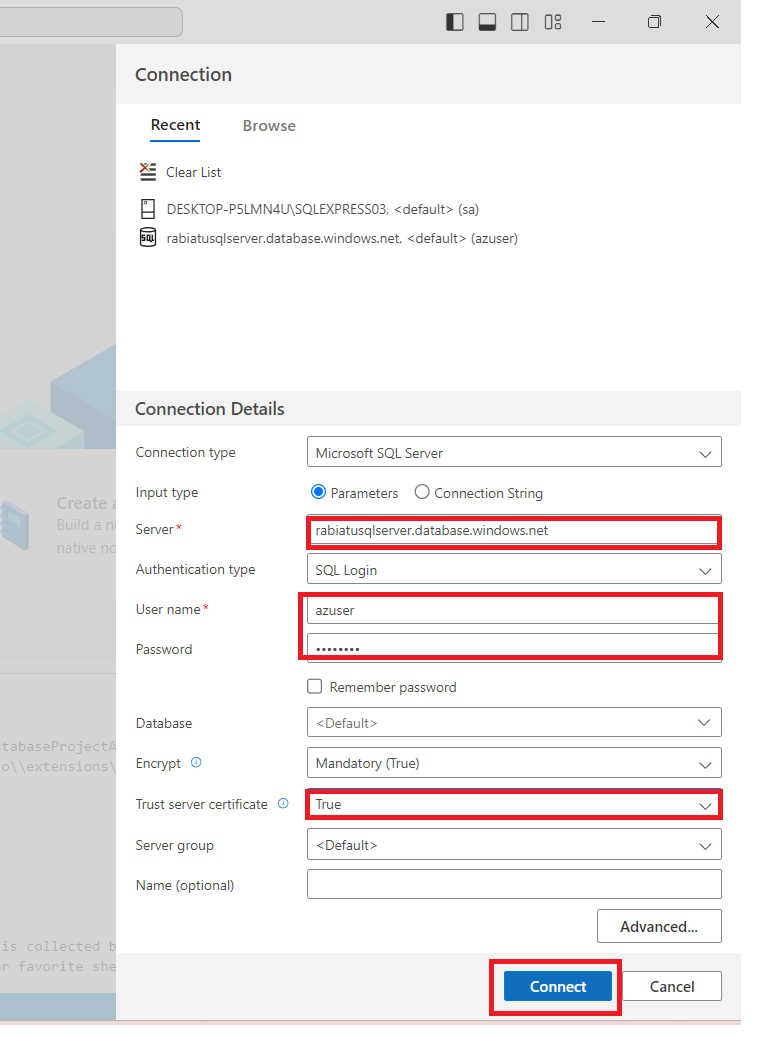
For added security, I made sure Encrypt was set to Mandatory (True). Since I was working in a testing environment, I also set Trust server certificate to True. If you’re working in production, I’d recommend leaving this unchecked for extra security.
Publishing the Database
With the database project created, the next step is to publish it to Azure. This step is crucial for deploying your database structure and ensuring that everything is in place before migrating data.
In Azure Data Studio, I right-clicked on the project I created and selected the Publish option from the menu, as shown below:
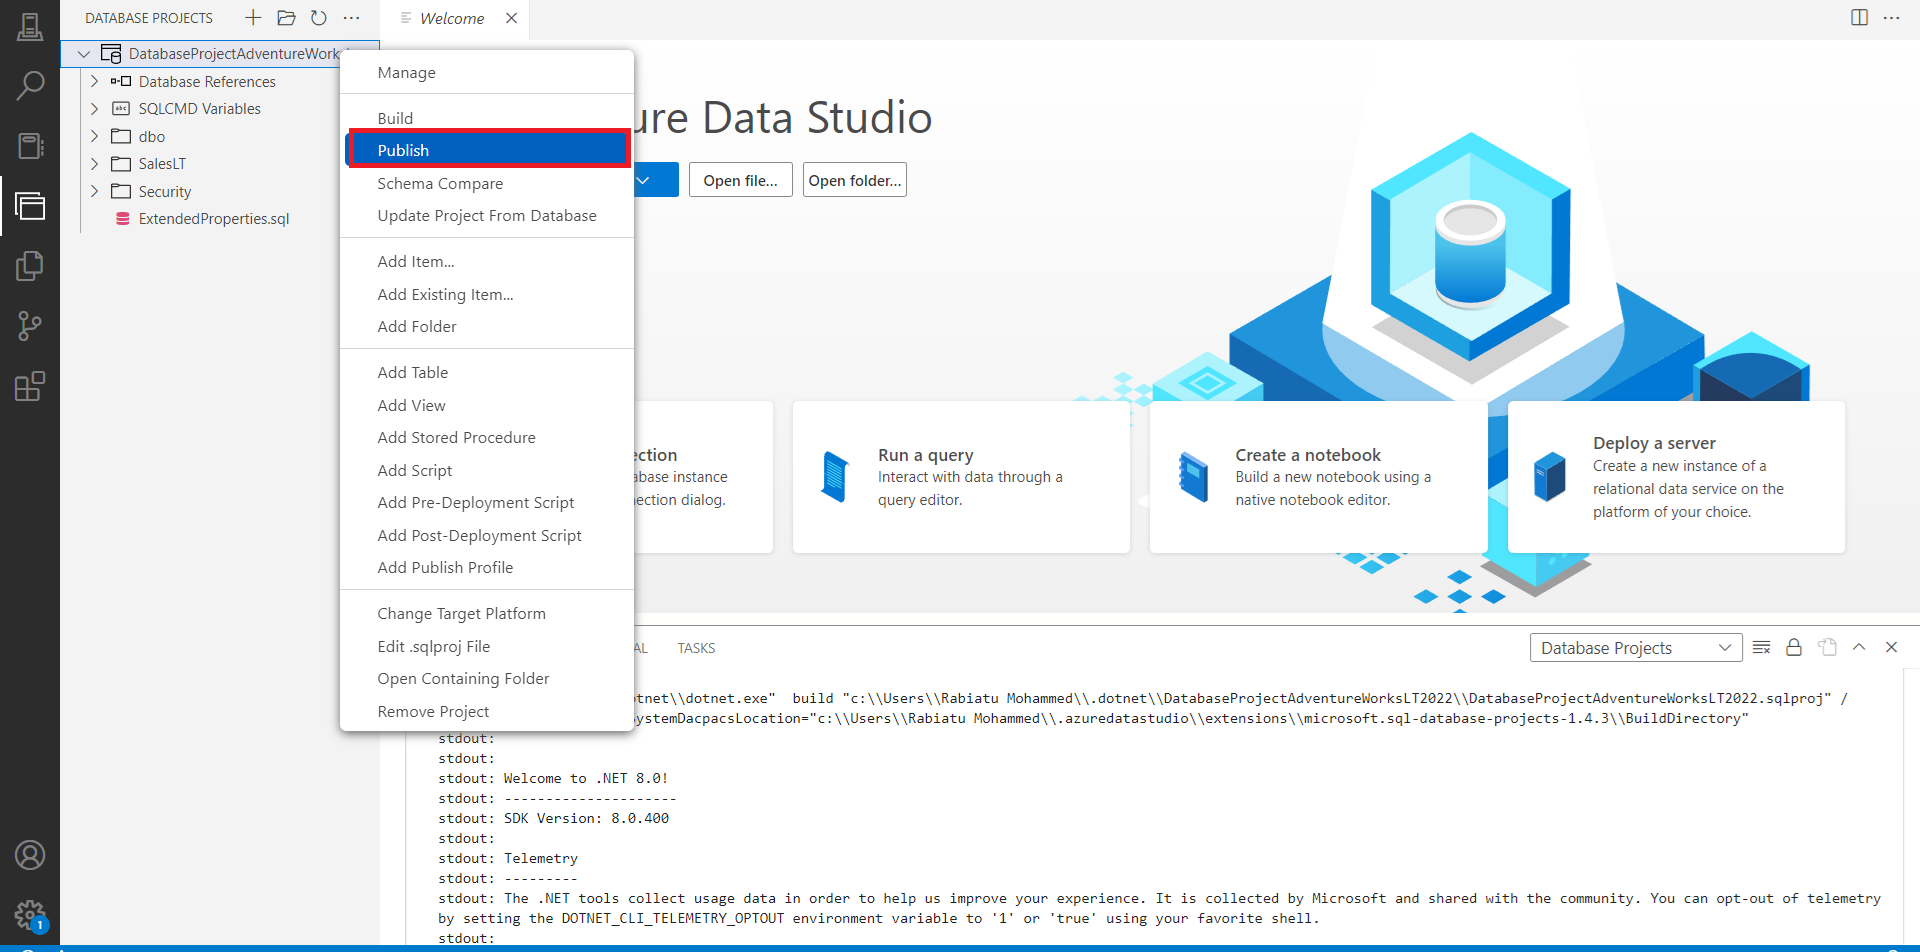
The publishing process pushes your local project (which includes the database schema and other essential components) to your Azure SQL database. It’s a simple way to ensure that the structure is ready before migrating the data itself.
Finalizing the Database Publish
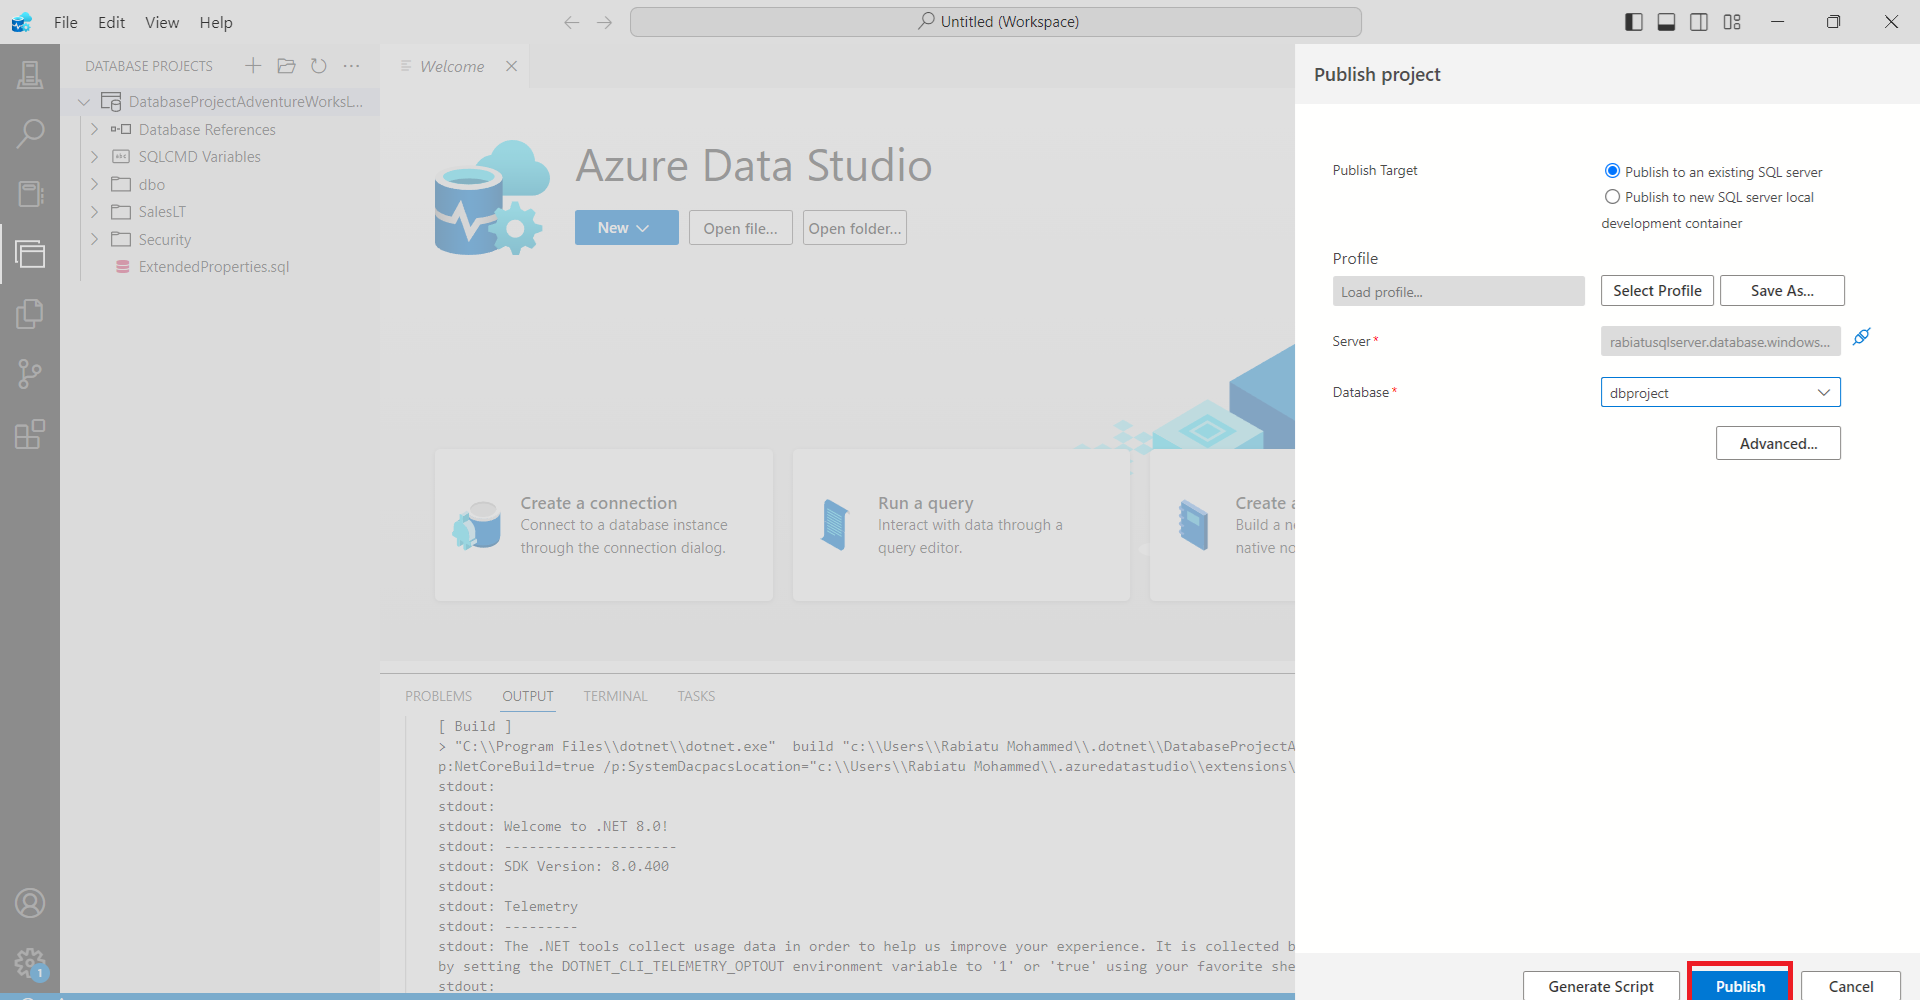
You’ve selected the Publish option, the next step is to choose the server and database you want to publish to.
In the Publish Project window, I selected the Server where I wanted to deploy my project (in my case, it was
rabiatusqlserver.database.windows.net) and the Database where the project would be published (dbproject).I made sure everything looked correct and clicked Publish to start the process.
Successful Deployment
After clicking Publish, Azure Data Studio began the process of deploying my project to the Azure SQL Server. Once the deployment was completed, I received a confirmation that the deployment was successful.
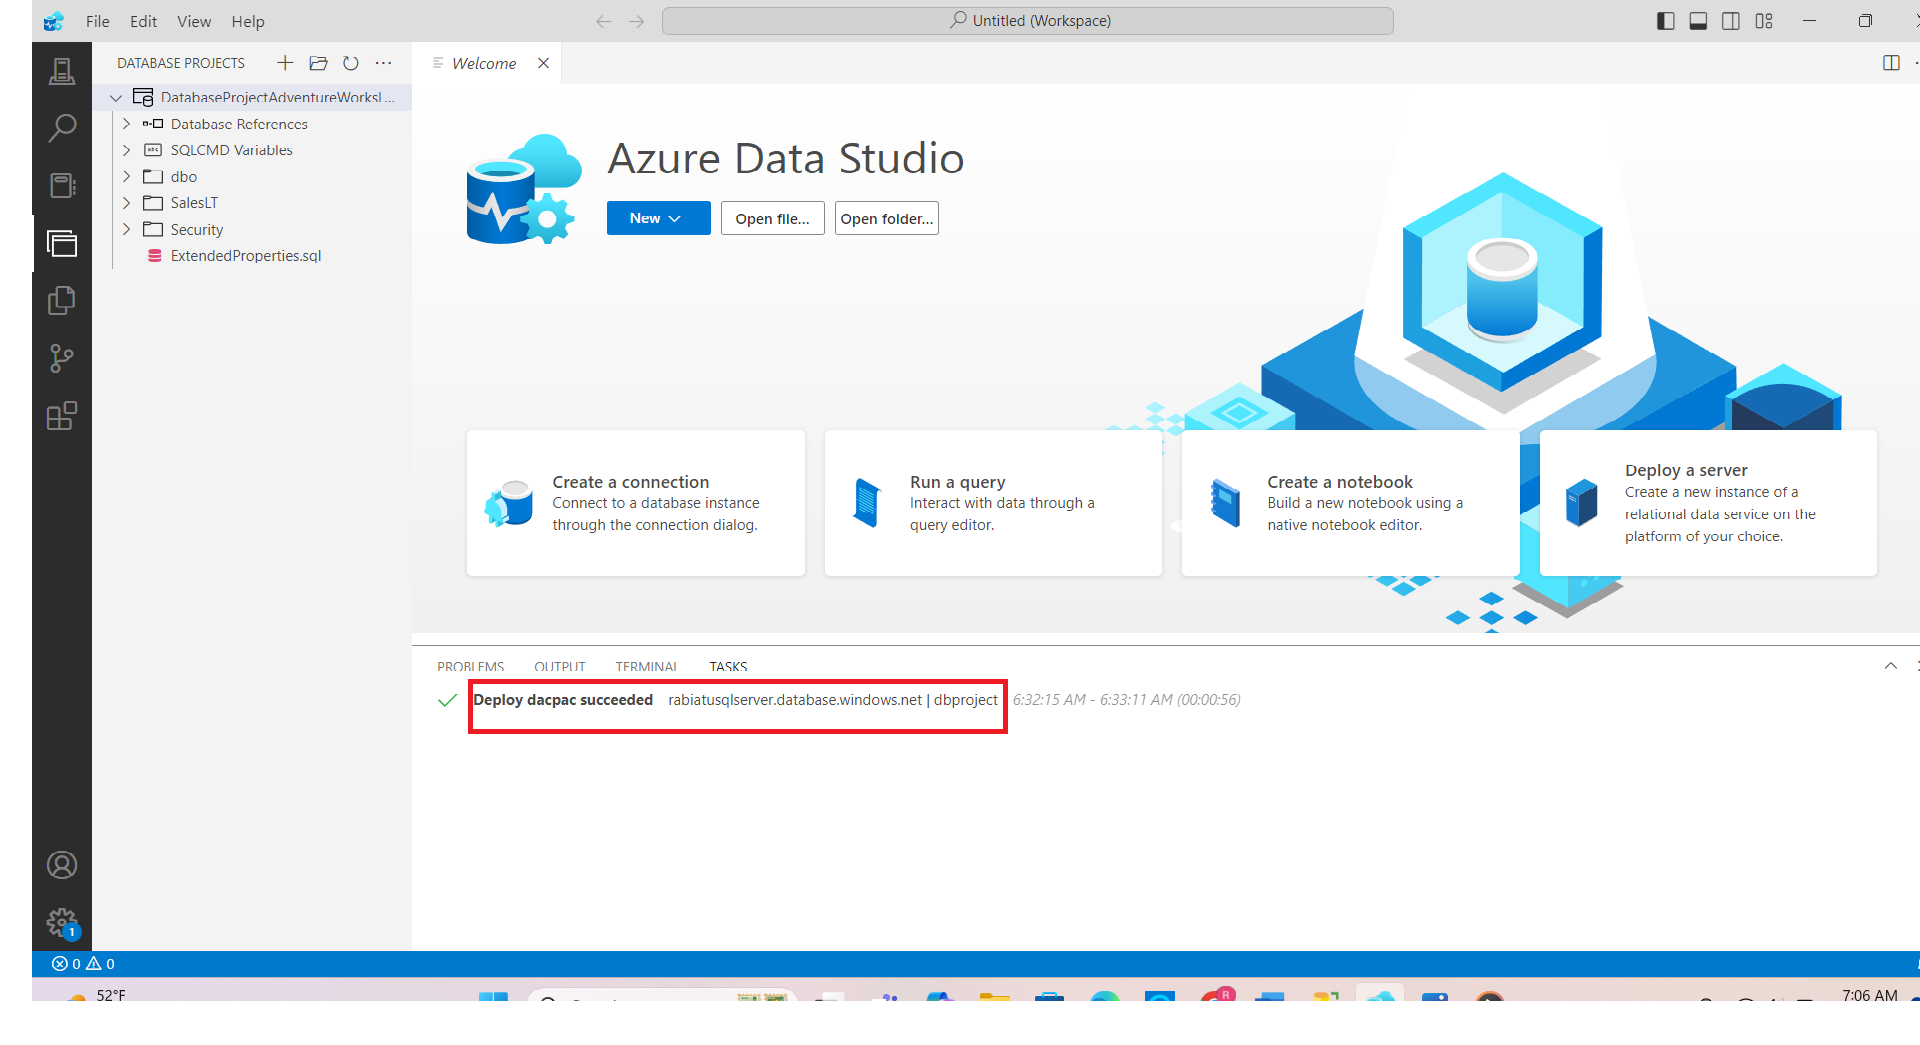
Seeing the message "Deploy dacpac succeeded" confirmed that my project was successfully deployed to the server.
Managing Your Deployed Database
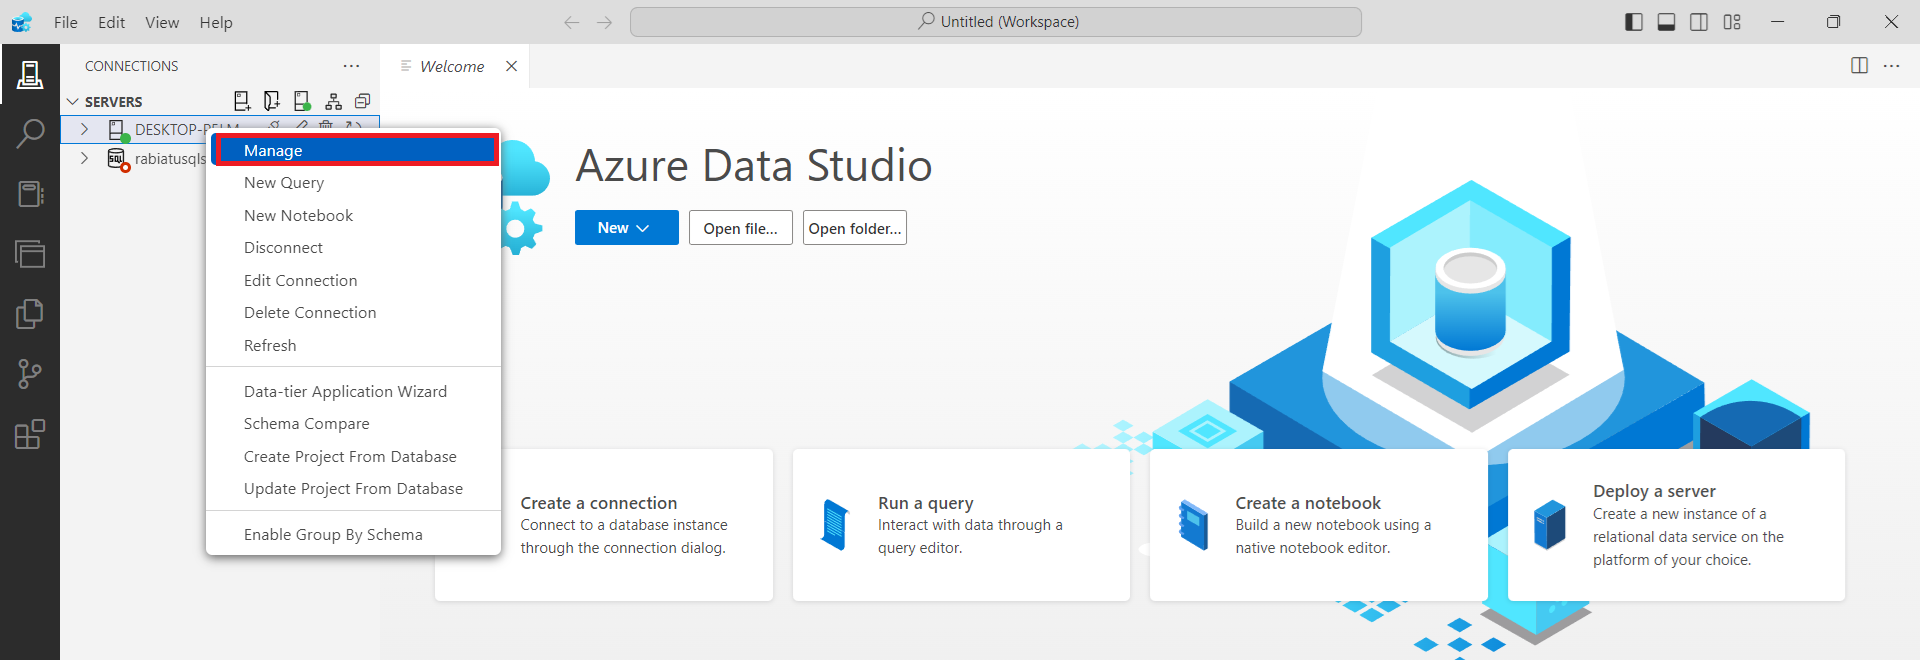
After successfully publishing the project, the next step was to manage the deployed database directly in Azure Data Studio.
I navigated to the server where my database was deployed.
Right-clicked on the server and selected Manage from the context menu, as shown below:
Migration Assessment and SKU Recommendations
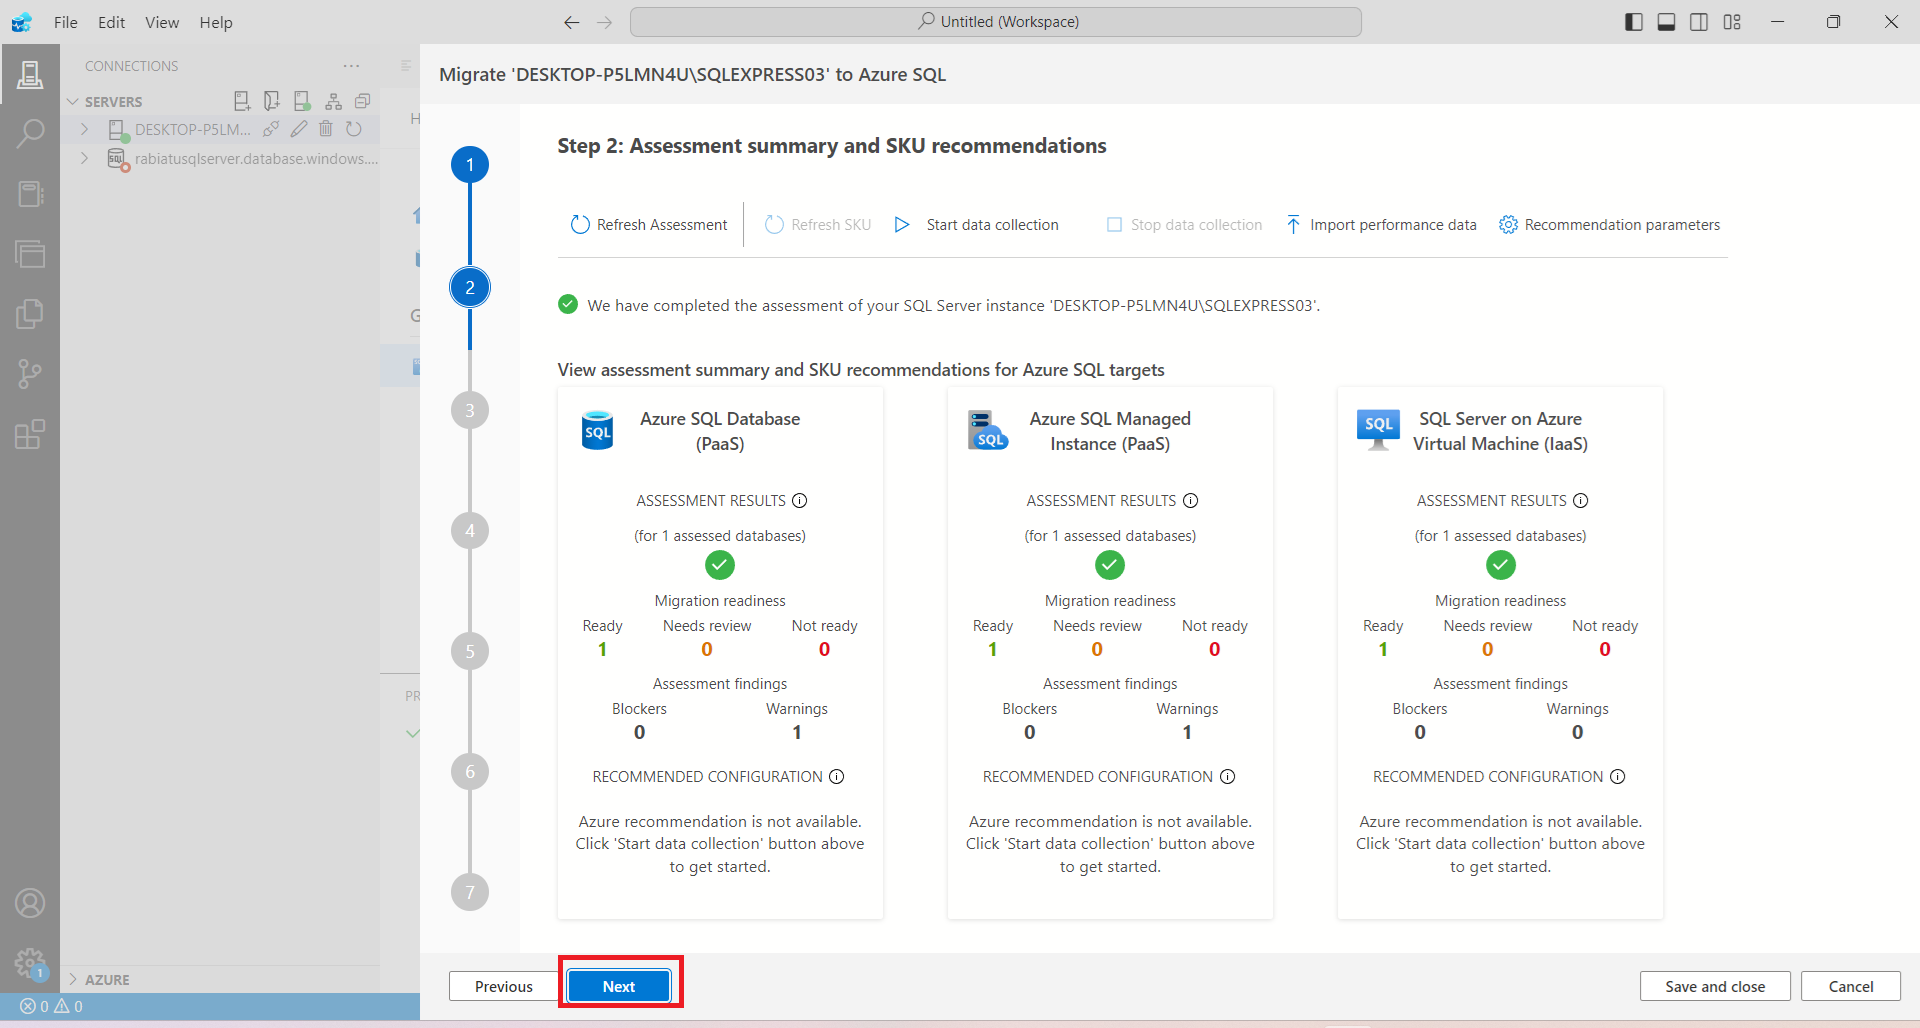
It's essential to assess your current SQL Server instance and get recommendations for the best Azure SQL target. Azure Data Studio provides a detailed assessment summary that helps determine the readiness of your database for migration.
I ran the assessment tool within Azure Data Studio to check the migration readiness of my SQL Server instance, which provided an easy-to-understand overview of my options. The assessment looked at various Azure SQL targets, including:
Azure SQL Database (PaaS)
Azure SQL Managed Instance (PaaS)
SQL Server on Azure Virtual Machine (IaaS)
Selecting the Target Platform for Migration
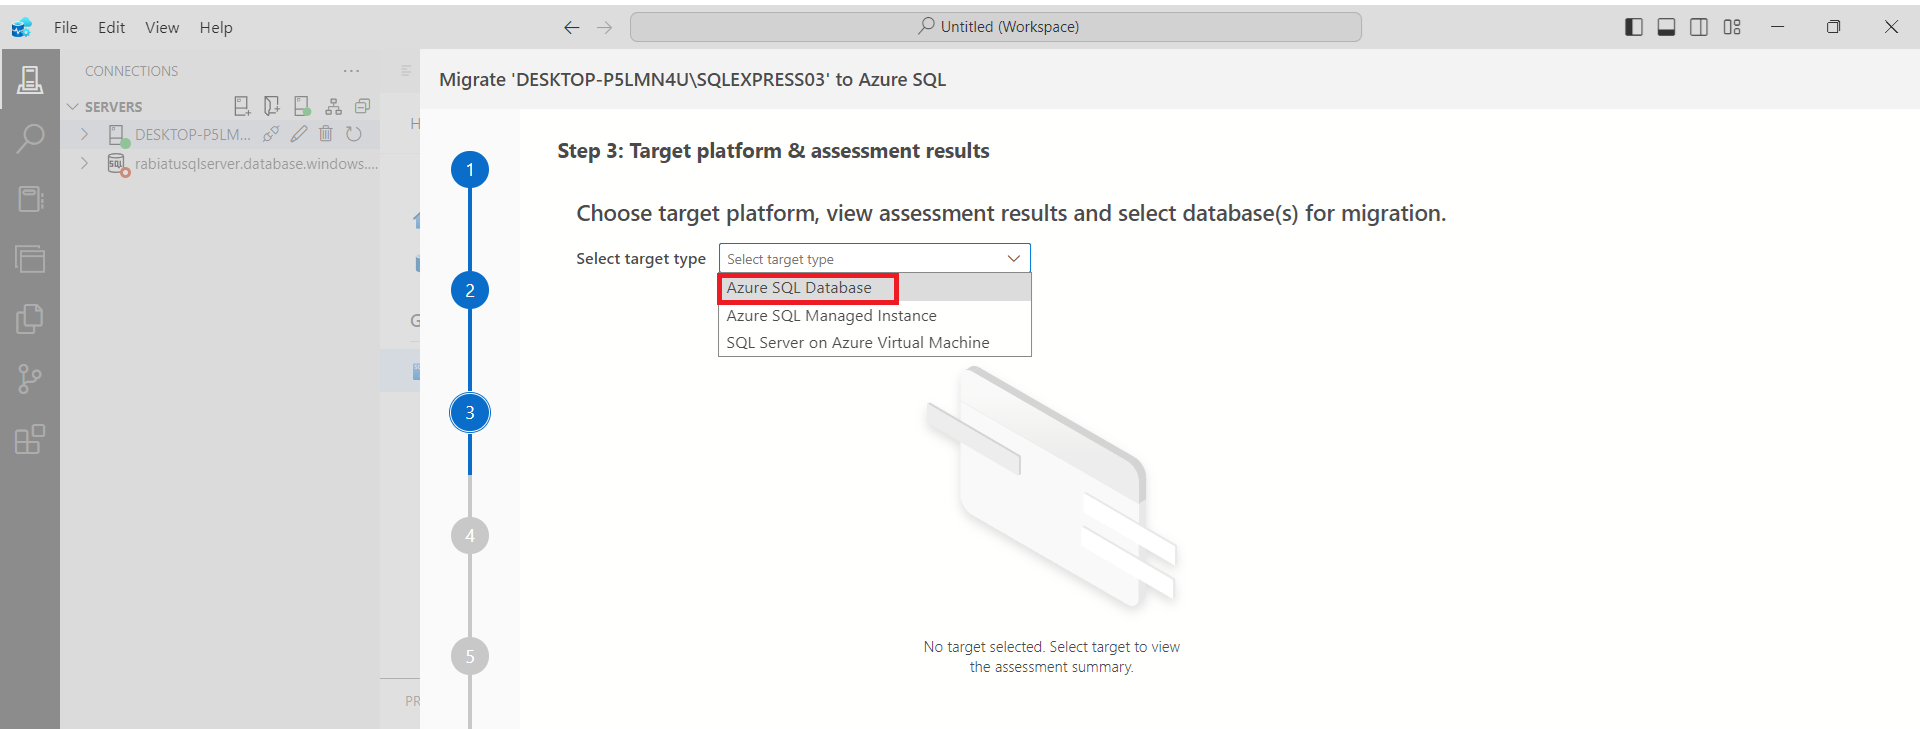
I chose Azure SQL Database, as it’s a fully managed service that takes care of backups, updates, and scaling automatically.
Viewing the Assessment Results and Finalizing Target Selection
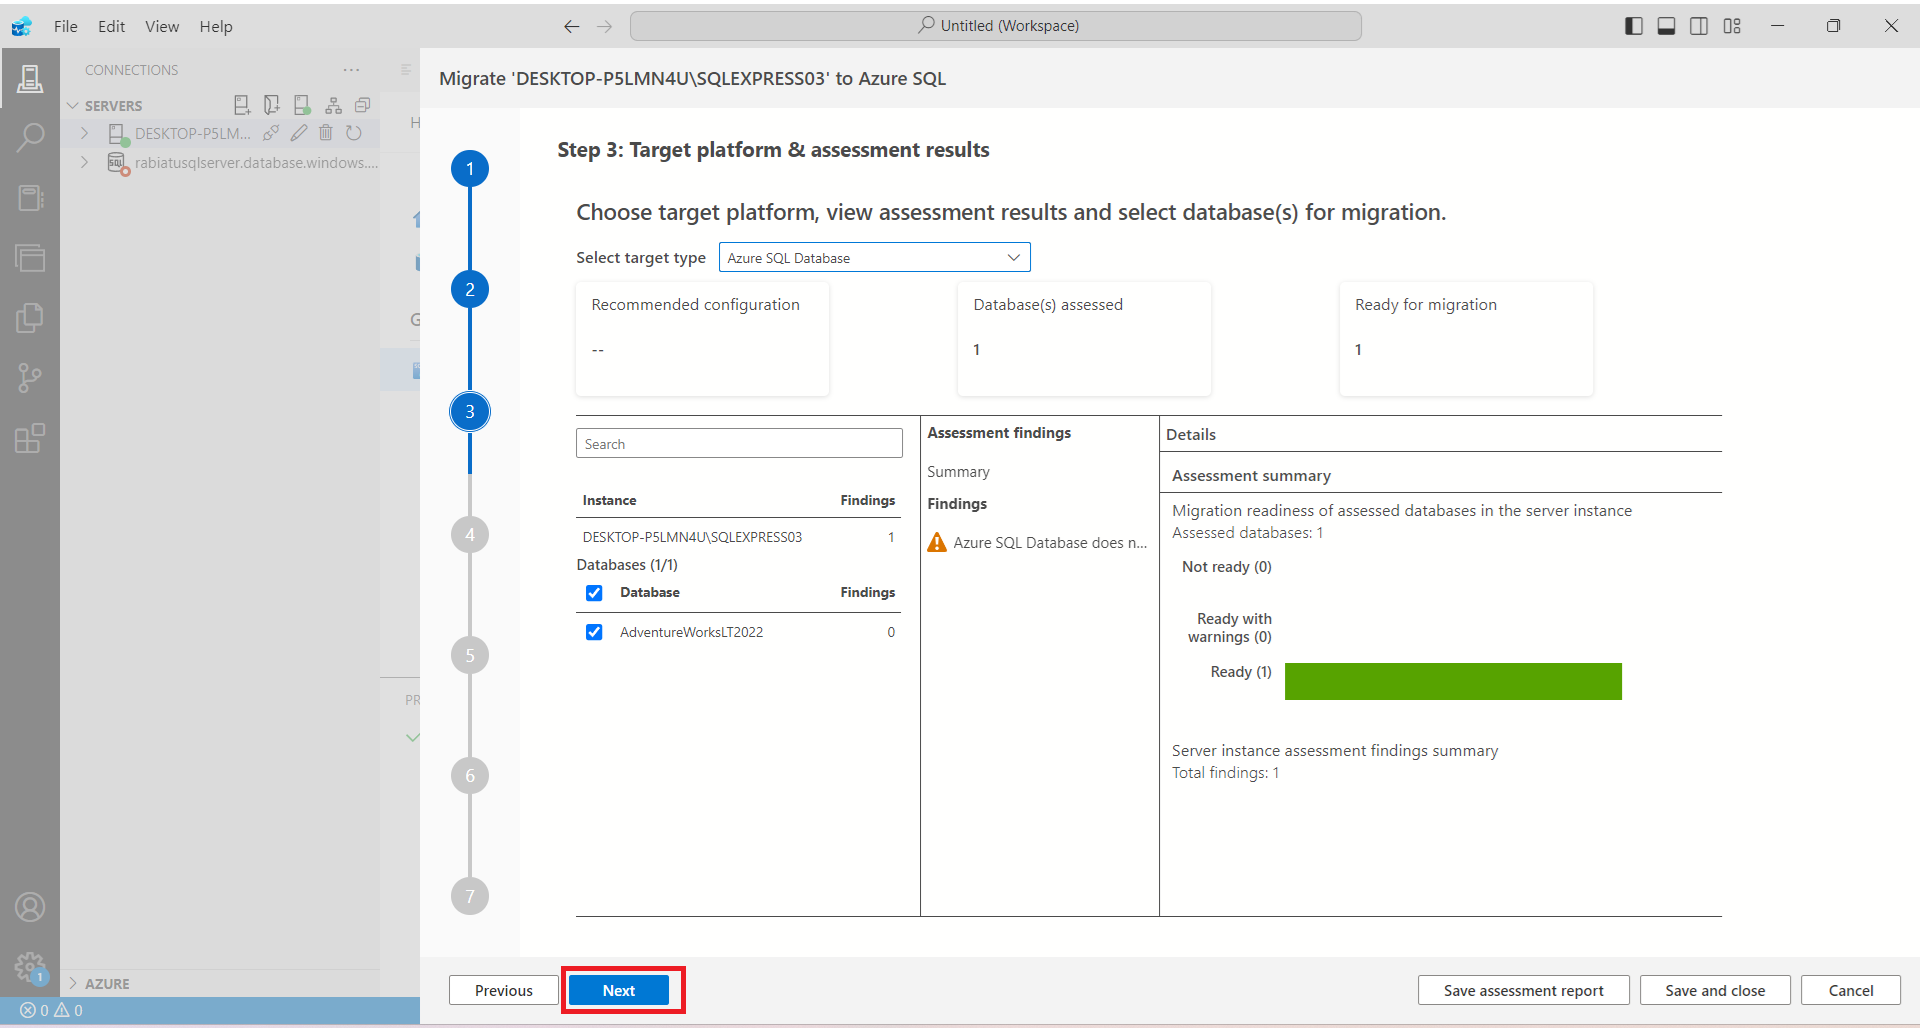
After selecting Azure SQL Database as the target platform, Azure Data Studio provided an overview of the assessment results for my selected database. This final check ensures that everything is ready to go before starting the migration.
Mapping Source and Target Databases
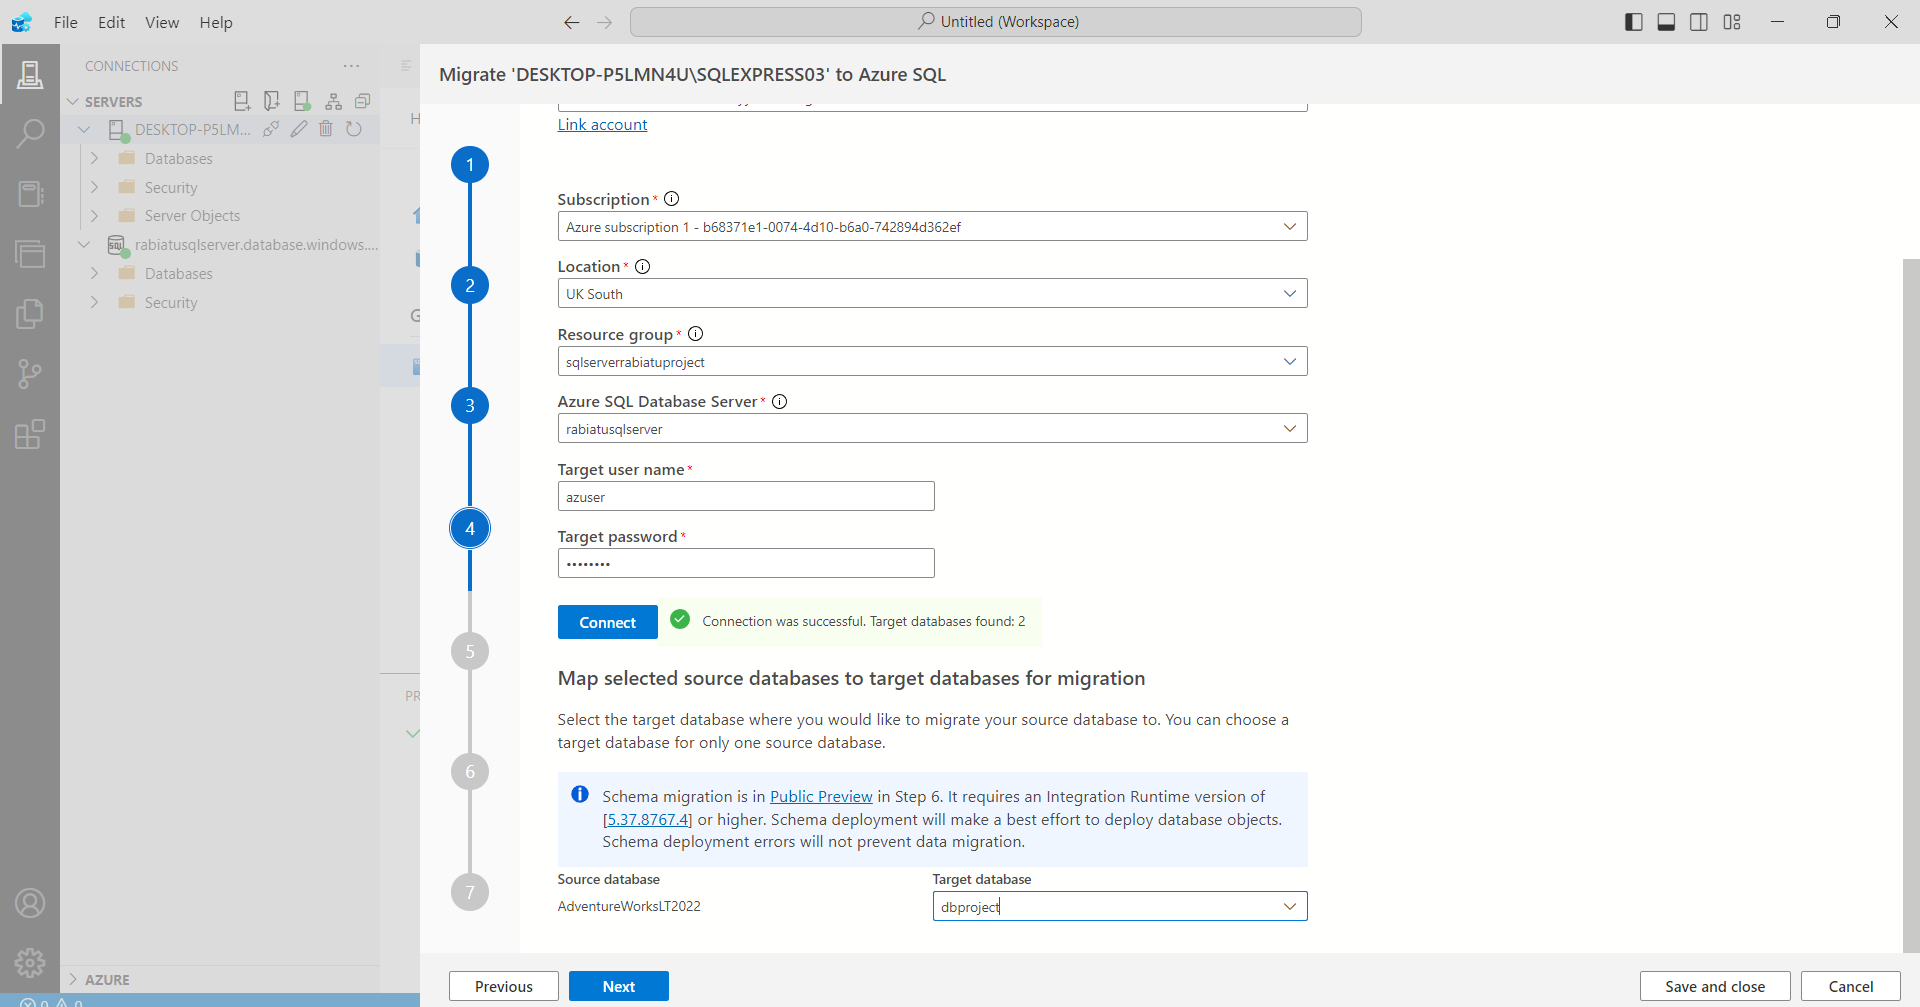
Now that the assessment and target selection are done, the next step is to map the source database to the target database for migration. This step ensures that the data from your on-premises or local SQL Server database is migrated to the appropriate Azure SQL Database.
I filled in the necessary details such as Subscription, Location, Resource Group, and the Azure SQL Database Server I created for the migration.
I entered my Target User Name and Password to authenticate the connection to Azure SQL. Once everything was correct, I clicked Connect, and as shown below, the connection was successful, with two target databases detected:
Under Map selected source databases, I mapped my AdventureWorksLT2022 source database to the target database dbproject on Azure SQL.
Setting Up Azure Database Migration Service
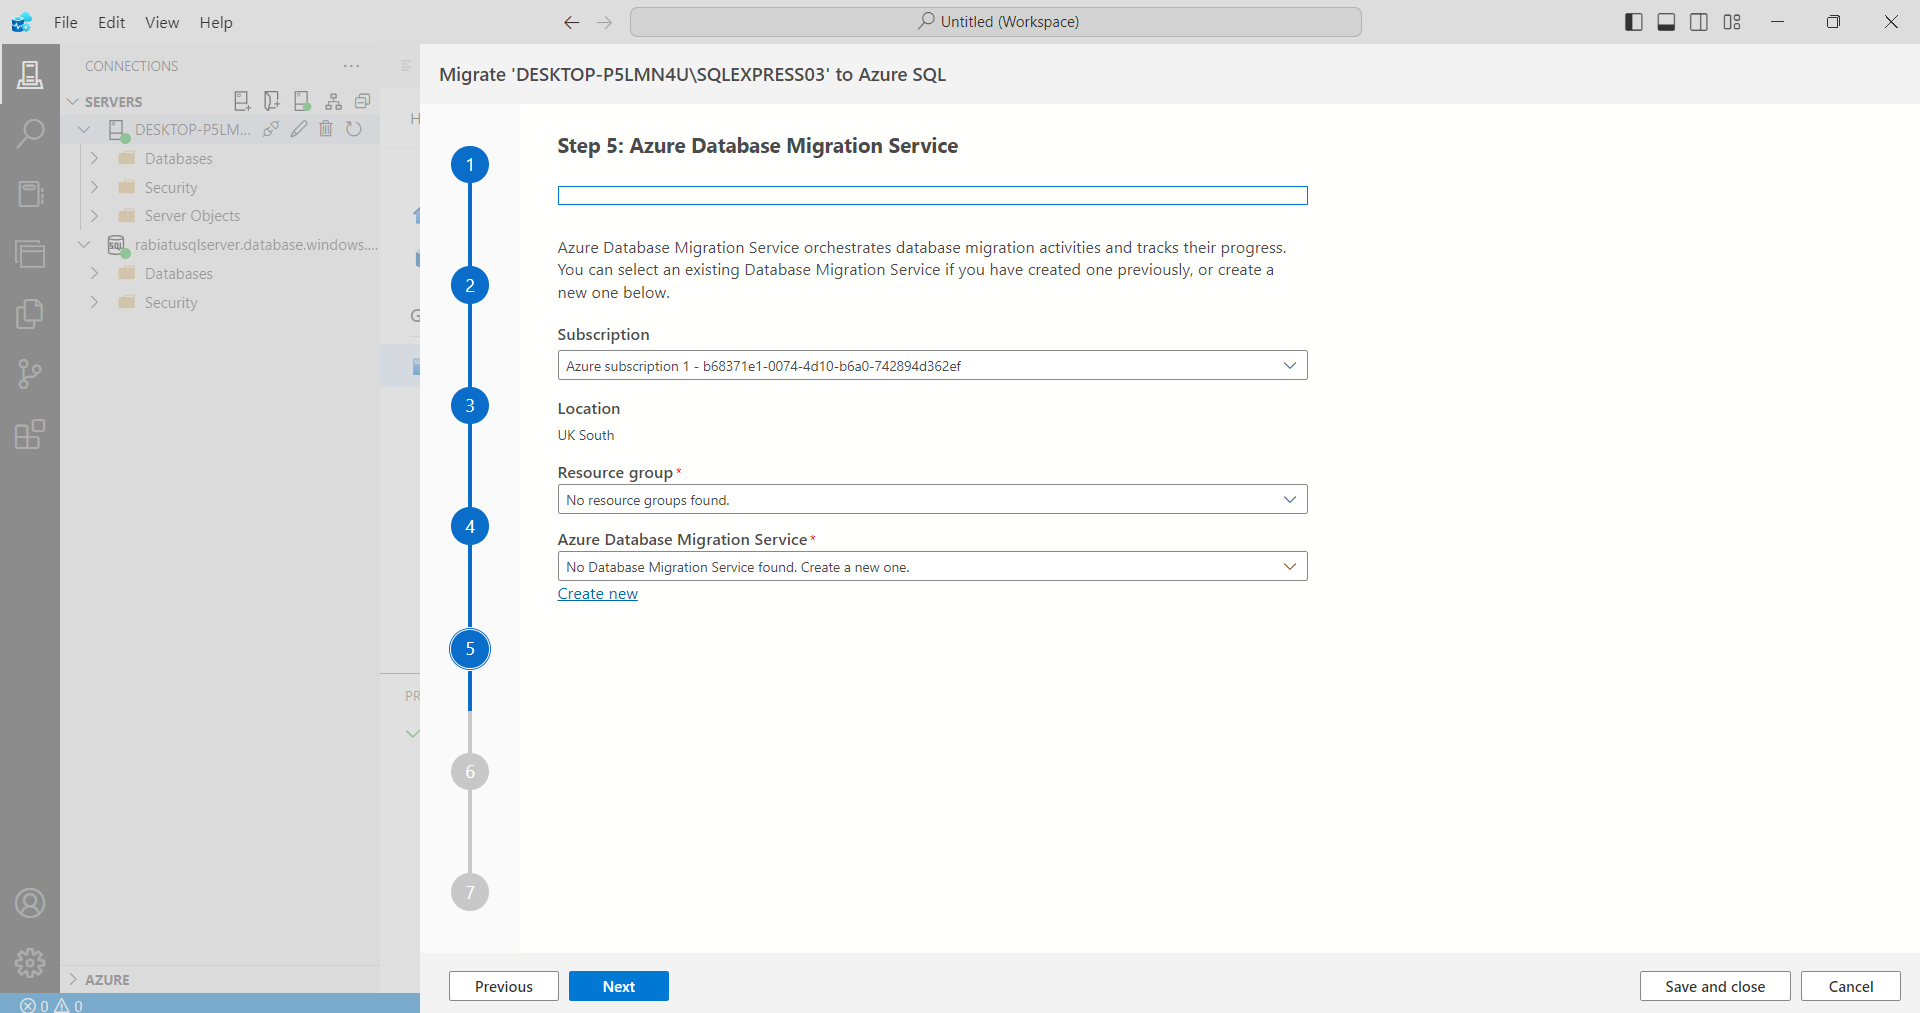
The next step in the process is configuring the Azure Database Migration Service (DMS). This service orchestrates the migration process and tracks its progress. If you haven’t set up a migration service before, you’ll need to create a new one during this step.
In the Azure Database Migration Service step, I entered details such as the Subscription, Location, and Resource Group.
Since I hadn’t set up a migration service before, I selected the Create new option under Azure Database Migration Service.
Registering the Data Migration Resource Provider
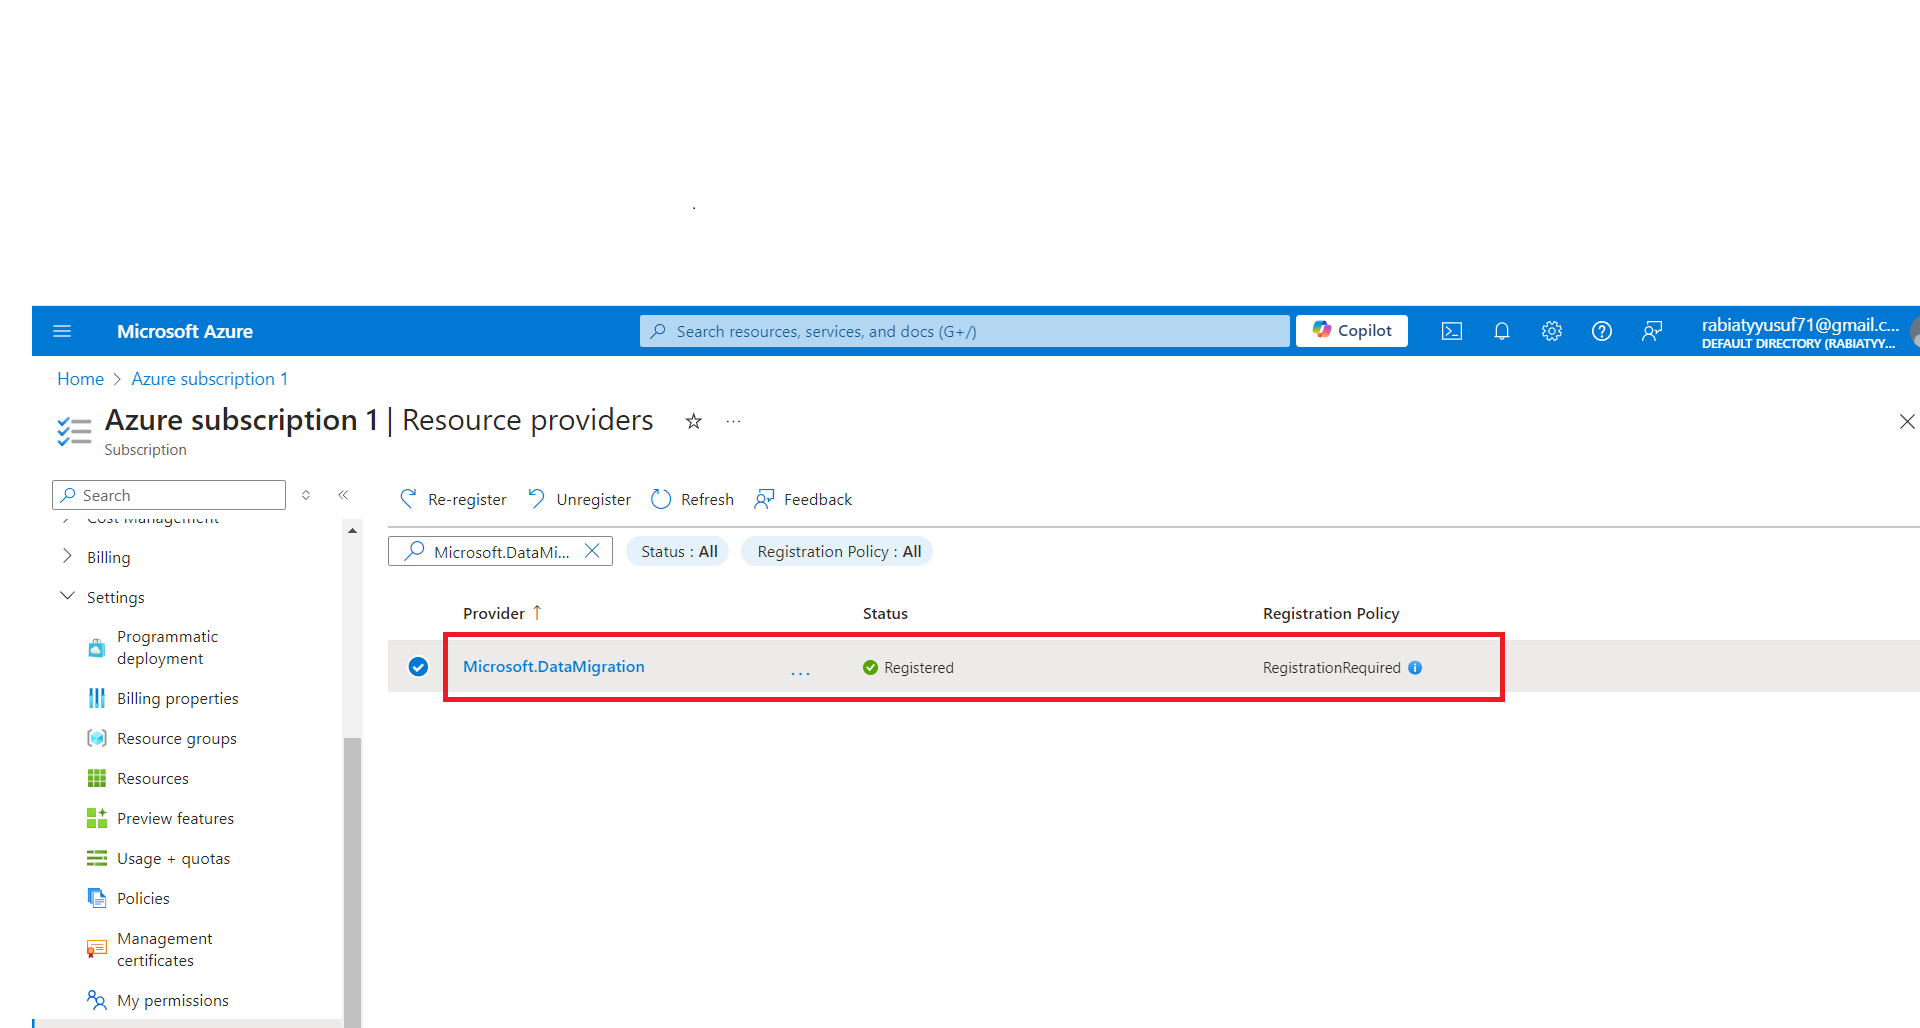
It's important to ensure that the Microsoft.DataMigration resource provider is registered in your Azure subscription. This provider orchestrates the database migration process and is required for the Azure Database Migration Service to work correctly.
In the Azure portal, I navigated to the Resource Providers section under my subscription.
I located the Microsoft.DataMigration provider and ensured that it was registered.
Executing the Script for Self-Hosted Integration Runtime
We need to set up the Self-hosted Integration Runtime (IR) to support the migration process. Azure Database Migration Service uses Azure Data Factory's Self-hosted Integration Runtime to upload backups from on-premises or local environments to Azure.
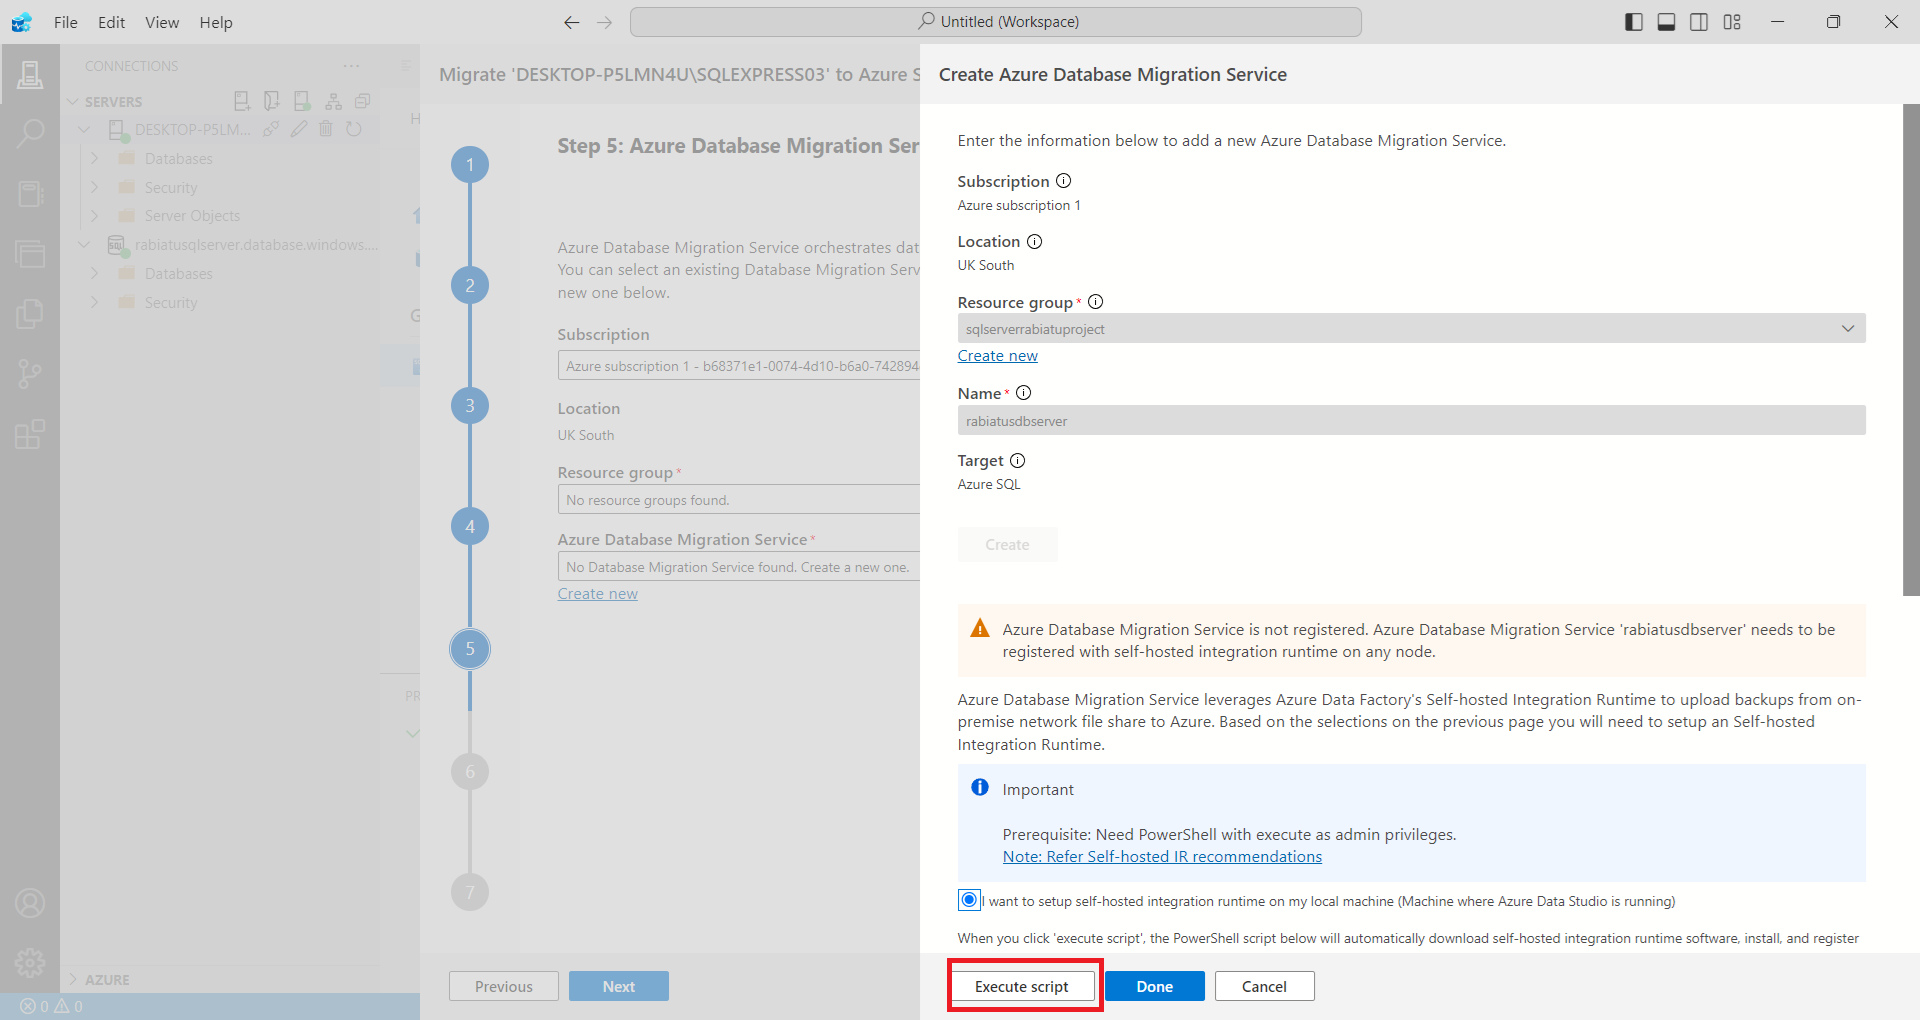
- After filling in the details for the Azure Database Migration Service, I was prompted to set up a Self-hosted Integration Runtime since this service wasn’t registered.
I selected the checkbox to install the Self-hosted IR on my local machine where Azure Data Studio is running, and then clicked Execute script. This step automatically generates and runs a PowerShell script to download and install the integration runtime software.
It’s important to have administrative privileges on your machine during this step, as the script will require elevated permissions to install and register the Self-hosted IR.
Configuring the Integration Runtime
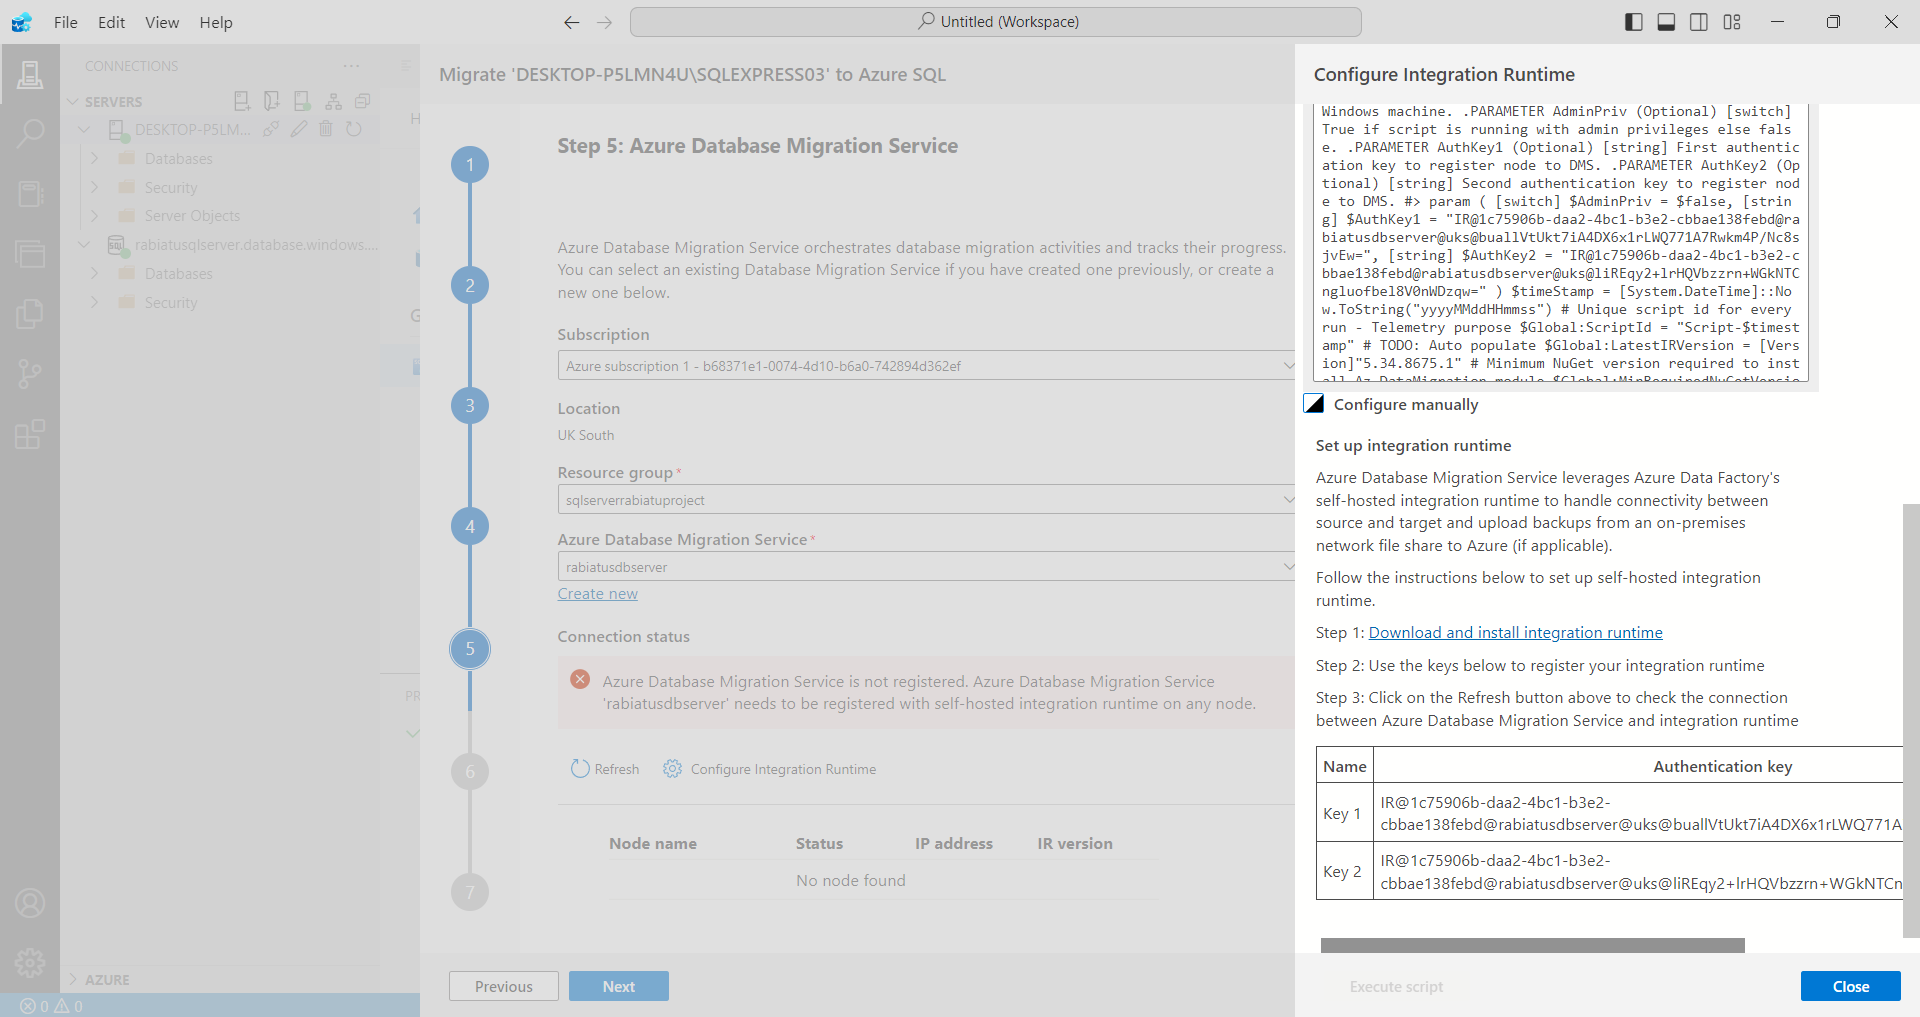
Now that the Self-hosted Integration Runtime has been installed, the next step is configuring it properly to facilitate the database migration. Azure Database Migration Service relies on this runtime to establish a secure connection between your local environment and Azure for uploading backups.
Download and install the Integration Runtime: If you haven’t already, use the link provided to download the installation package. Once installed, you can proceed to configure the runtime manually.
Configure the authentication keys: After installation, you will see two authentication keys. Copy these keys as you'll need them to authenticate the connection between your local machine and Azure. These keys ensure that the Integration Runtime can securely transfer your database to Azure.
Check the connection: After setting up the integration runtime, click Refresh to ensure that the connection between the Azure Database Migration Service and the Integration Runtime is established successfully.
Registering the Integration Runtime
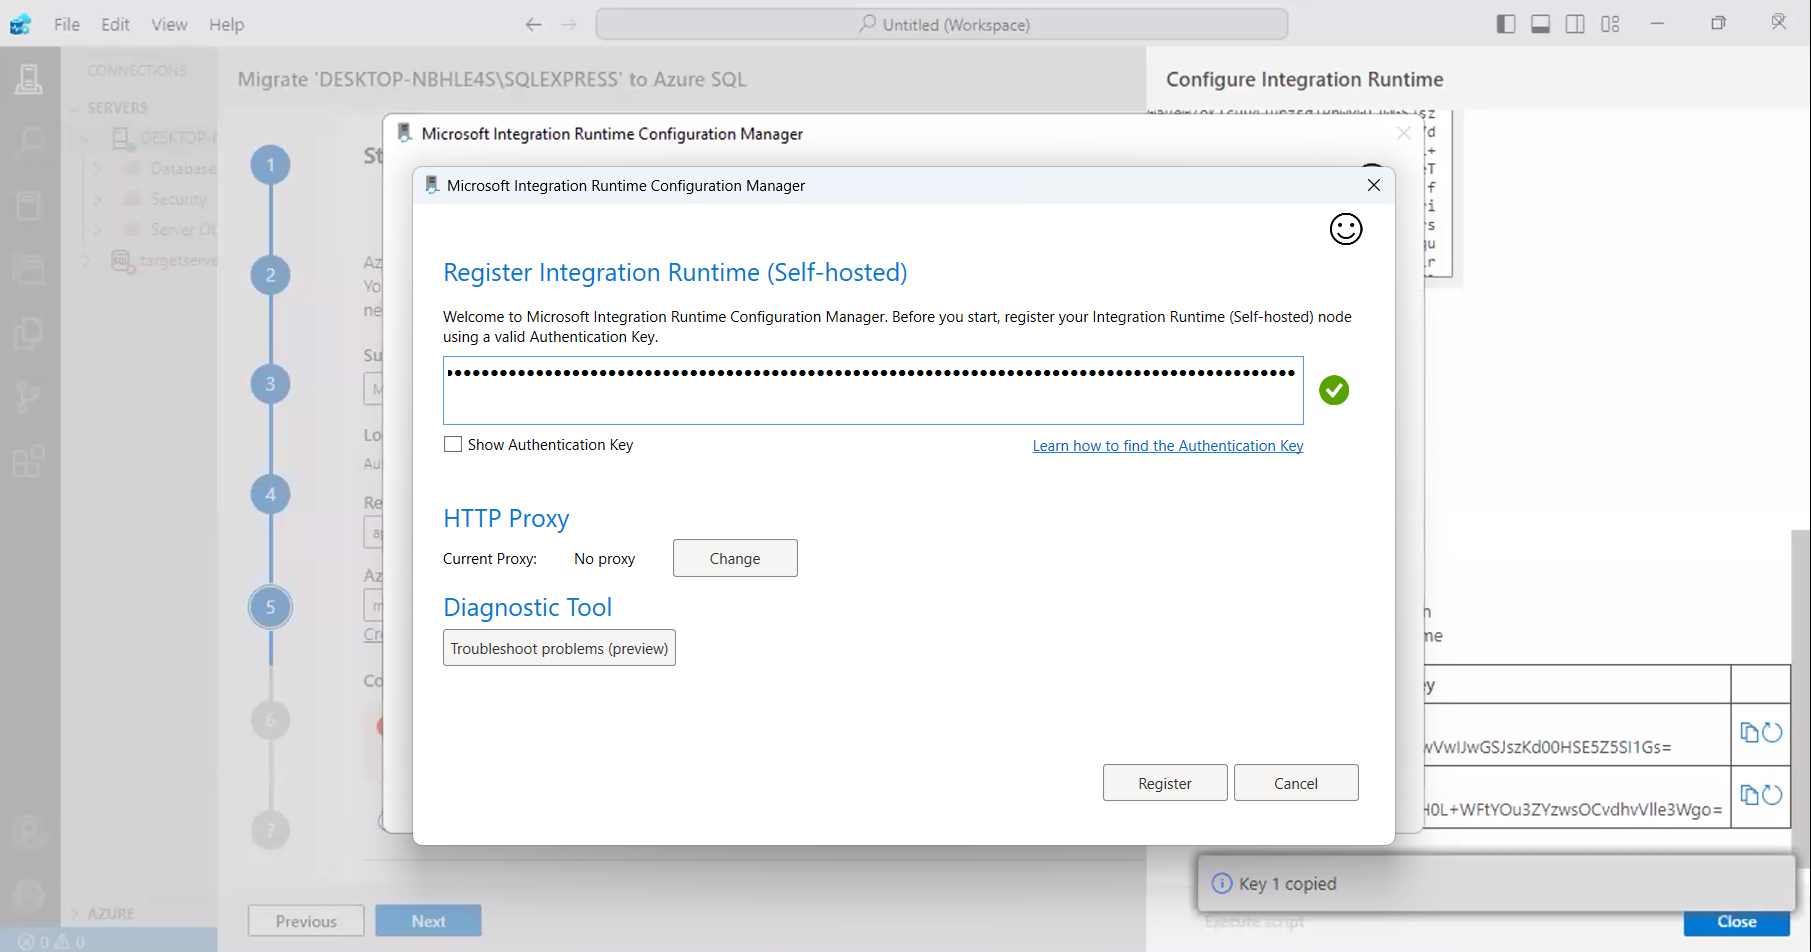
After configuring the Self-hosted Integration Runtime, the next step is to register it with Azure to ensure it can communicate between your local environment and the cloud.
Enter the Authentication Key: You will need to paste the authentication key provided during the previous step. This key is critical for establishing the connection between your local instance and the Azure environment.
HTTP Proxy Settings (Optional): If your organization uses a proxy for internet access, you can configure the HTTP Proxy settings here.
Diagnostic Tools: If there are any issues during this process, the Diagnostic Tool helps troubleshoot potential problems, ensuring a smoother setup.
Click Register: Once the authentication key is entered, simply click Register to complete the process.
Setting Up a New Integration Runtime Node
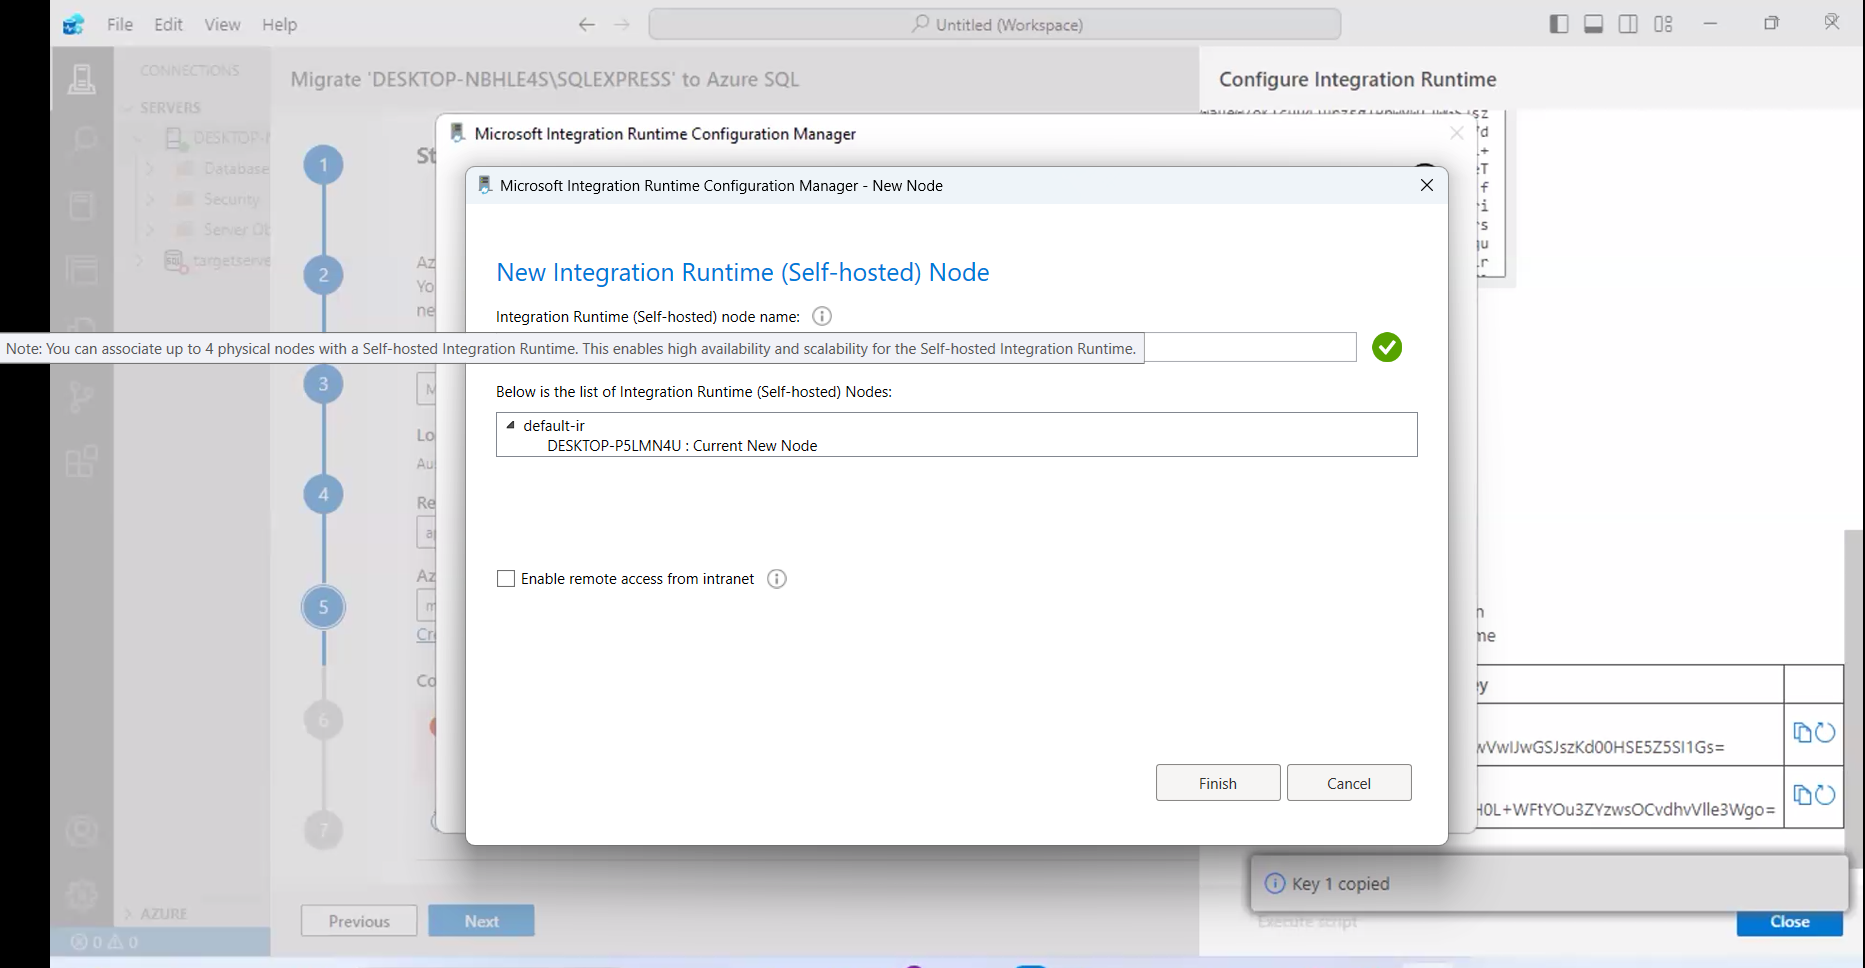
Now that we have registered the Self-hosted Integration Runtime, the next step is to configure it and create a new node. This node will serve as a physical or virtual machine that handles the data migration.
Name the Integration Runtime Node: Azure allows you to create up to four physical nodes for high availability and scalability. In this step, provide a descriptive name for the new node. This name will help you identify it among other potential nodes in your environment.
Enable Remote Access (Optional): If your node needs to be accessed remotely from other intranet locations, you can select the Enable remote access from intranet option. For most setups, this step can be skipped unless your architecture demands it.
Finish Setup: Once the node is named and remote access (if needed) is configured, click Finish to complete the node setup.
Verifying the Azure Database Migration Service (DMS) Connection
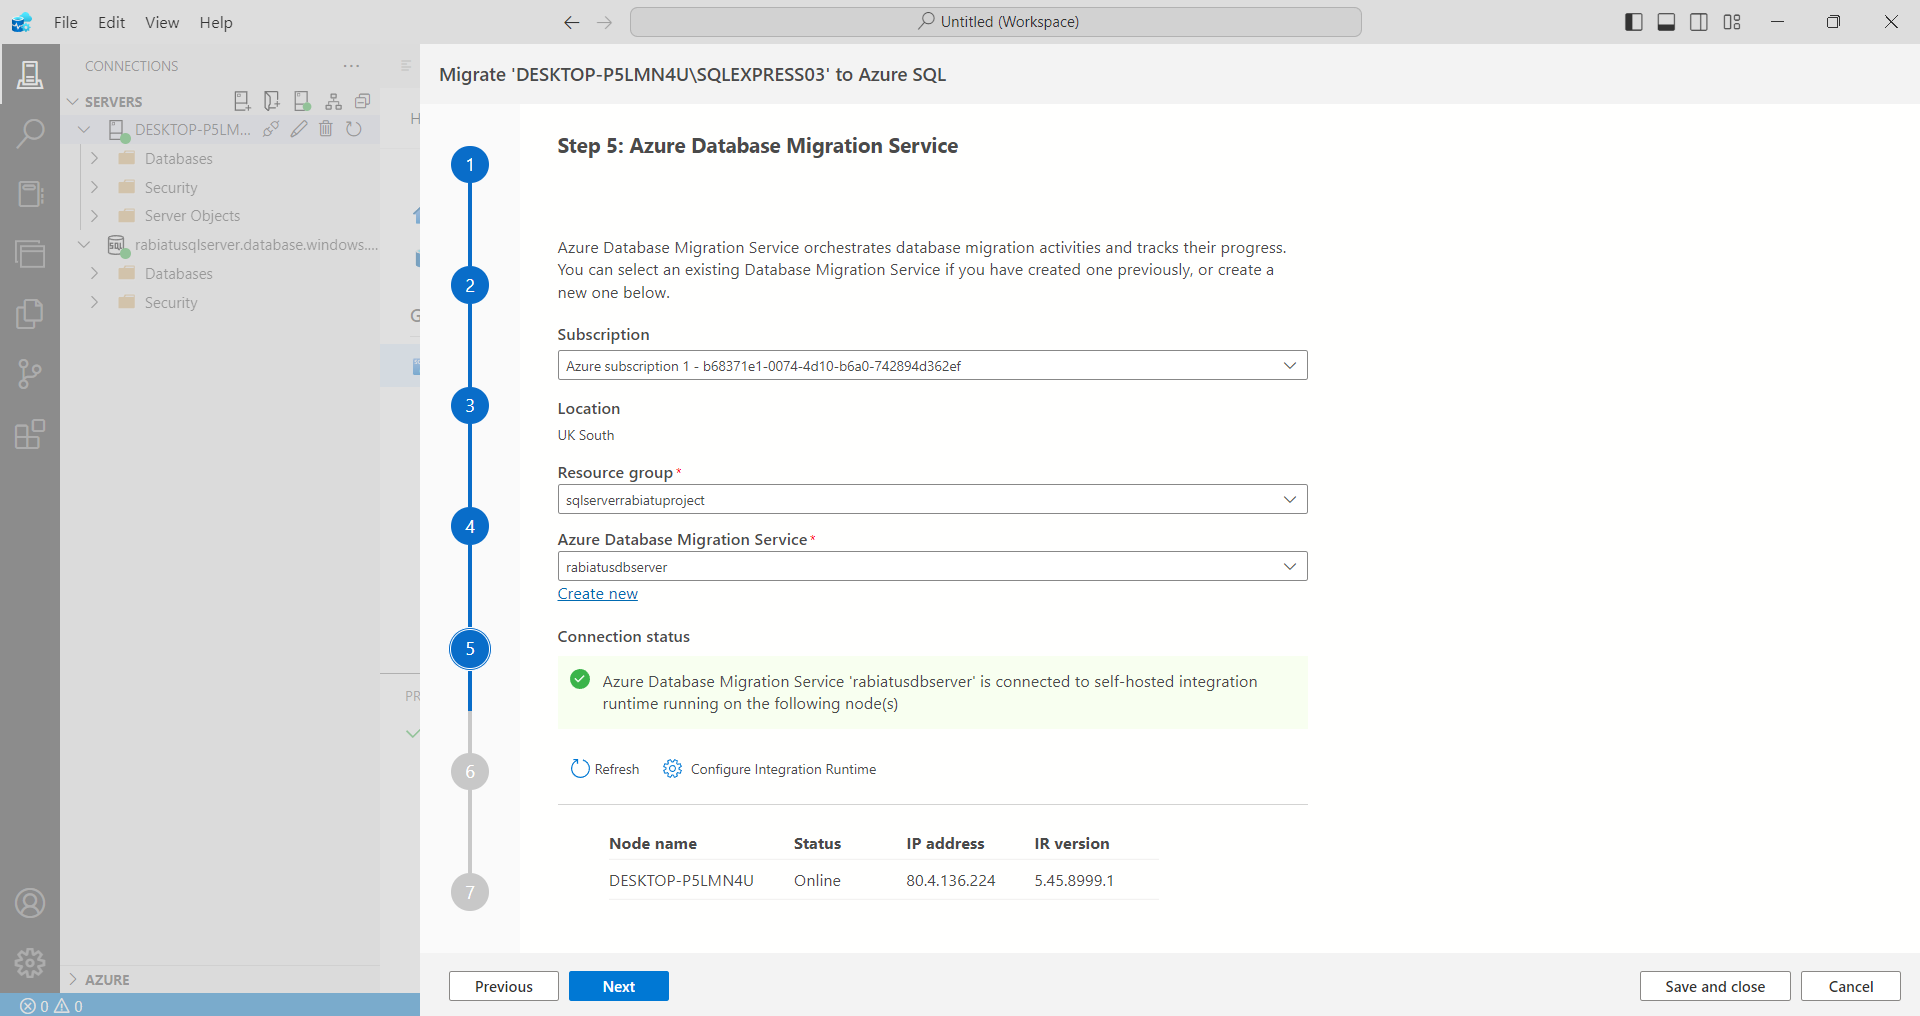
After successfully registering the Self-hosted Integration Runtime and adding a new node, it’s crucial to confirm that your Azure Database Migration Service (DMS) is properly connected to the node.
Subscription: The Azure subscription linked to your migration service.
Location: The regional location (e.g., UK South) where your resources are hosted.
Resource Group: The resource group you've created for your database migration project.
Azure Database Migration Service: The service name (e.g., rabiatusdbserver).
Connection Status: A green success message indicating that the service is connected to the self-hosted integration runtime.
Node Name: The name of the machine where the self-hosted IR is running (e.g., DESKTOP-P5LMN4U).
Status: The current status of the node (Online).
IP Address: The public IP address of the node.
IR Version: The version of the self-hosted integration runtime.
Configuring Data Source and Selecting Tables
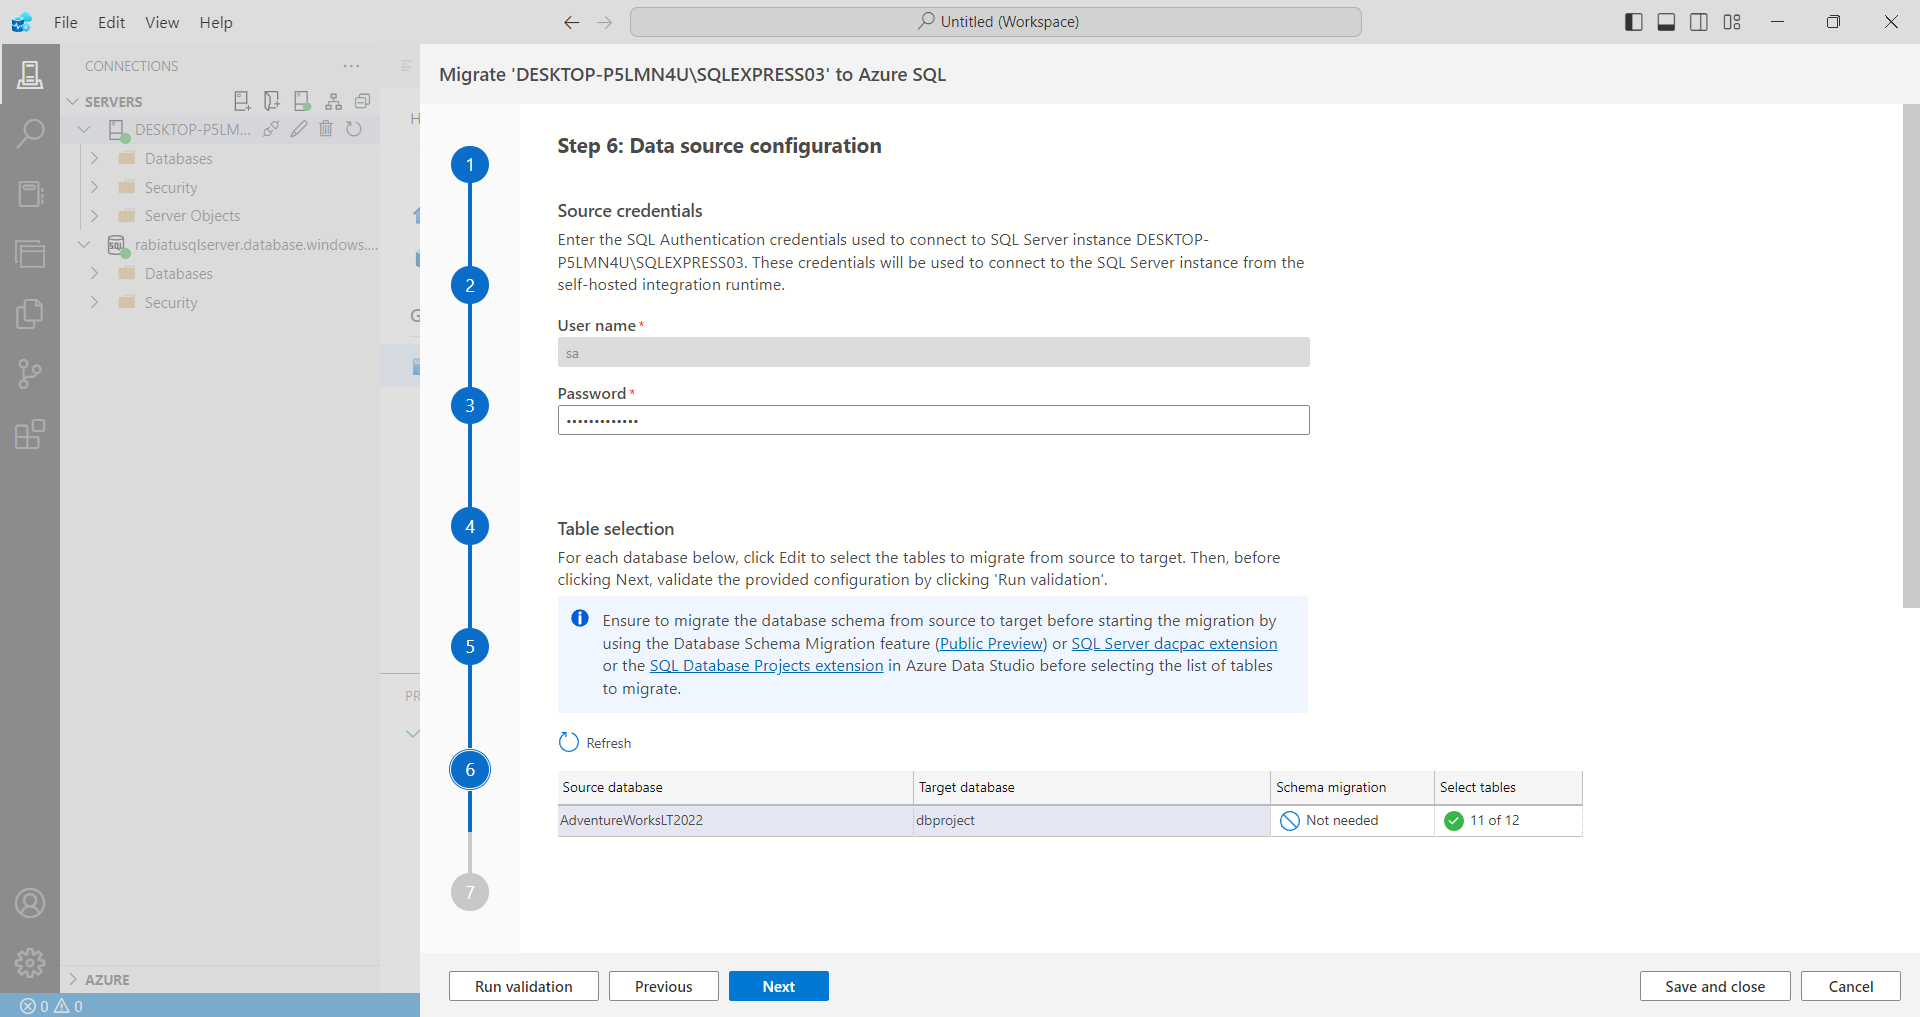
At this point in the migration process, it’s time to configure your data source and choose the tables you want to migrate. This step is crucial because it ensures that the right credentials and tables are transferred from your on-premises SQL Server to Azure SQL Database.
Source Credentials
First, you need to provide SQL authentication credentials that will be used to connect to your SQL Server instance. Ensure that these credentials have the appropriate permissions to access the databases you're migrating.
User Name: Input your SQL Server authentication username (e.g.,
sa).Password: Input the corresponding password.
These credentials will be used by Azure Data Studio to connect to your SQL Server instance from the self-hosted integration runtime.
Table Selection
Once your credentials are validated, you can move on to selecting the tables to migrate. You’ll see a list of databases available for migration. You can choose which tables from each database to migrate.
Running the Validation
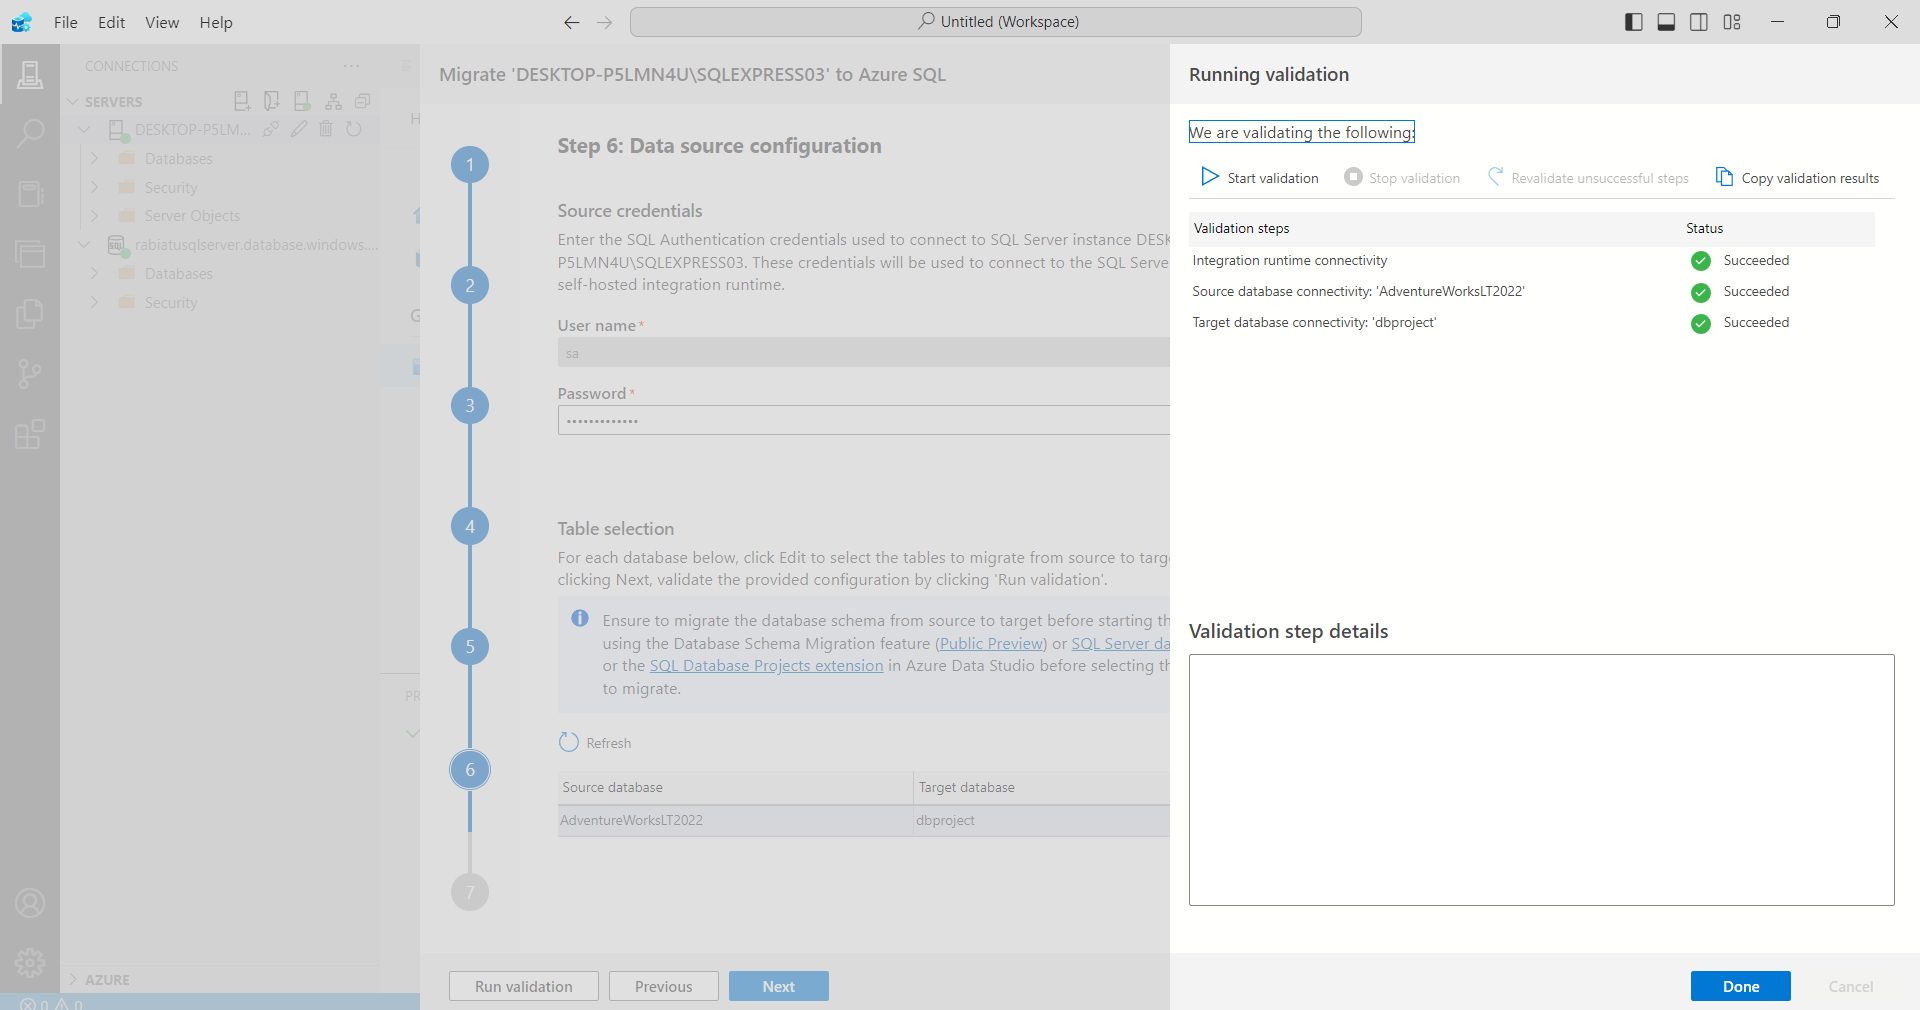
Once the data source configuration is set and tables are selected, the next crucial step is to run the validation process. This ensures that the connection between the source and target databases is established, and both systems are ready for migration. The validation will check for any potential issues before you proceed with the actual data transfer.
Validation Steps
Integration Runtime Connectivity:
Status: Succeeded
The self-hosted integration runtime is successfully connected, ensuring that it can manage the data migration.
Source Database Connectivity
Status: Succeeded
The connection to the AdventureWorksLT2022 database has been validated, confirming that the source database is ready for migration.
Target Database Connectivity
Status: Succeeded
The target database, dbproject, has also been validated successfully, ensuring that it's ready to receive the migrated data.
After running the validation and receiving all success statuses, you can click Done to proceed.
Monitoring the Migration Process
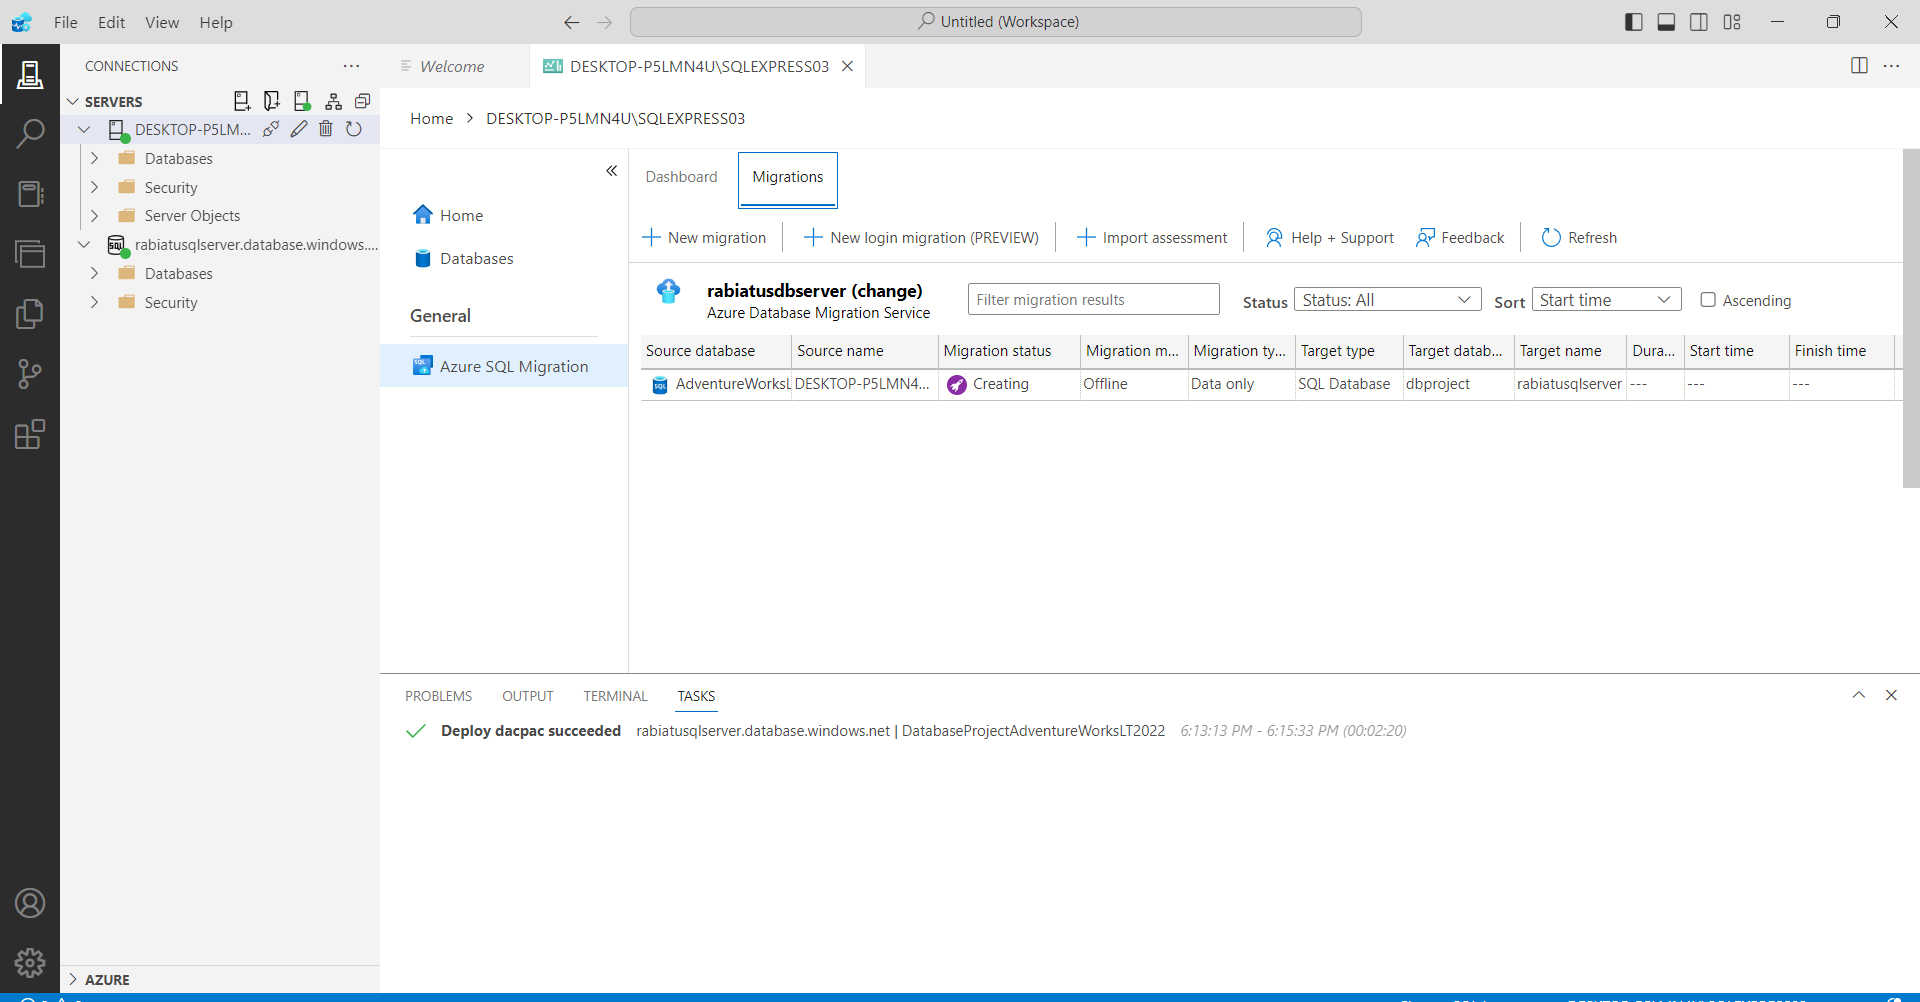
After initiating the migration process, you can monitor its progress directly from Azure Data Studio.
In this final step, you can see the migrated database, dbproject, successfully hosted on the rabiatusqlserver Azure SQL server. You can use the Query editor (preview) to interact with the tables that have been successfully migrated.
The tables listed under the dbo and SalesLT schemas, such as BuildVersion, Customer, Product, and SalesOrderDetail, indicate that the structure and data have been migrated. From here, you can start running SQL queries directly in the browser, explore the data, or manage the database as needed.
If you'd like to further verify the migration or execute specific queries to ensure everything is functioning correctly, you can do so within this environment or open the full capabilities of Azure Data Studio.
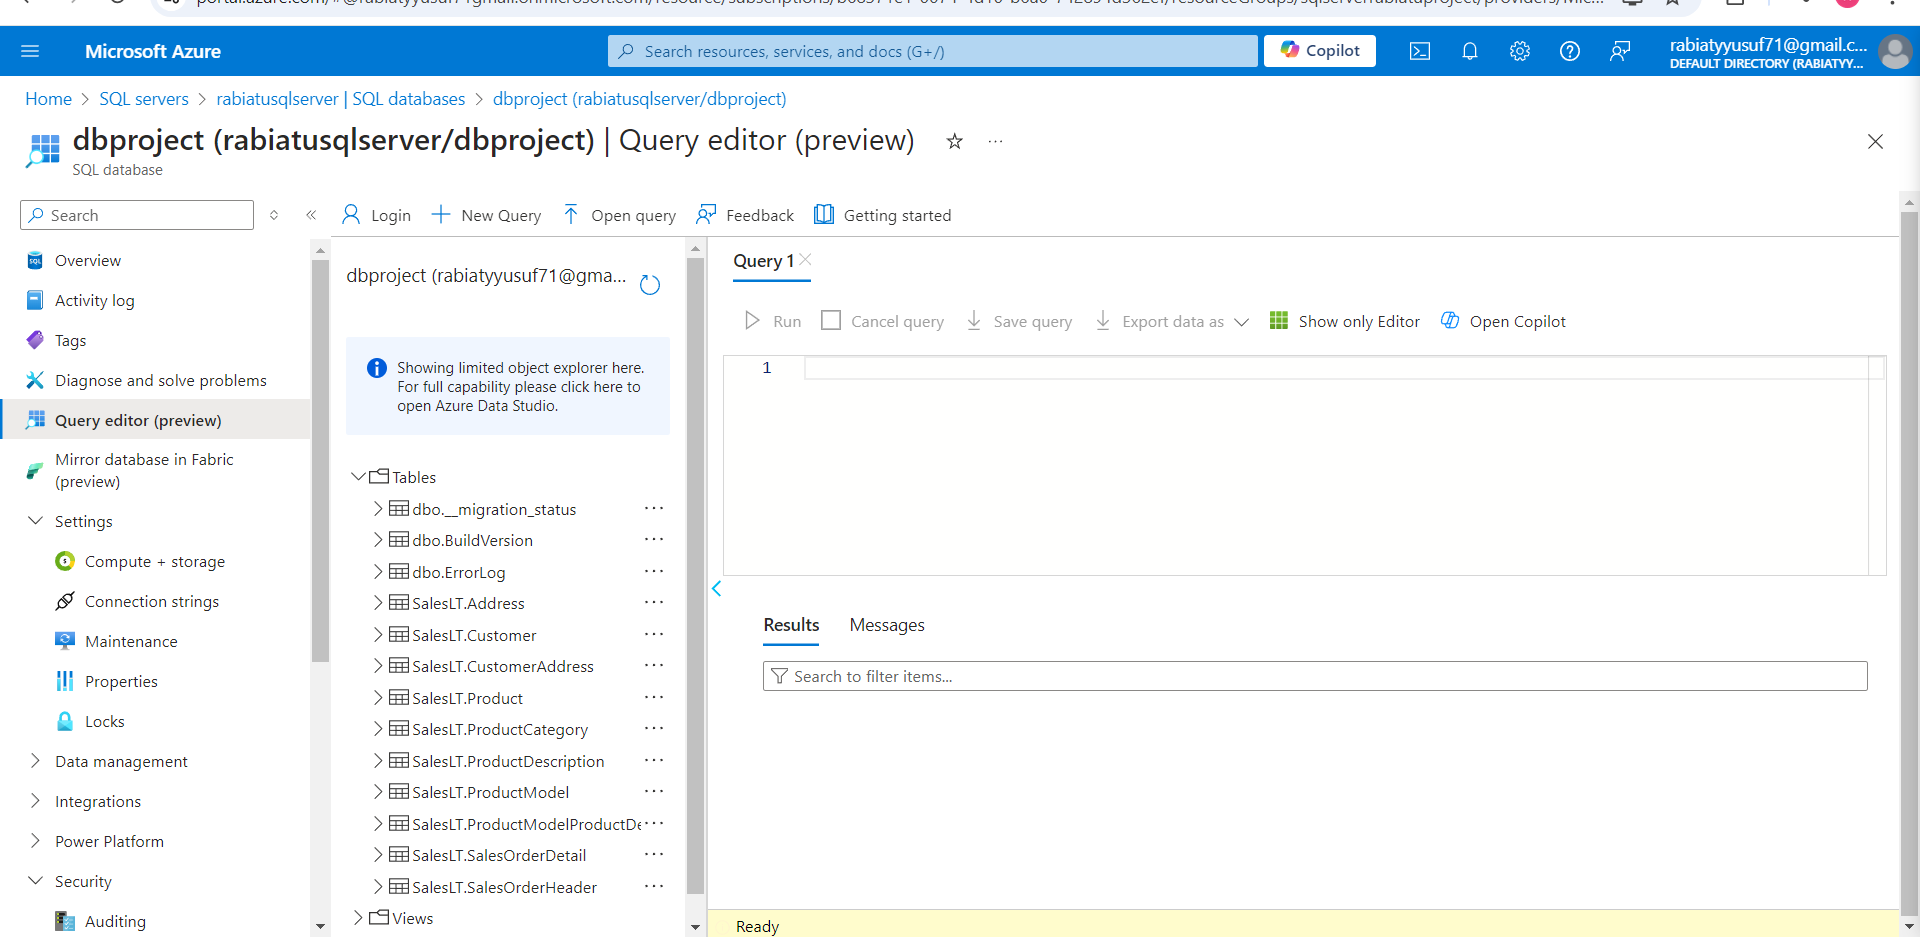
With the database fully migrated, you’ve now successfully completed the Azure SQL migration process!
Subscribe to my newsletter
Read articles from Rabiatu Mohammed directly inside your inbox. Subscribe to the newsletter, and don't miss out.
Written by

Rabiatu Mohammed
Rabiatu Mohammed
I work on securing, automating, and improving cloud environments. Always exploring better ways to build reliable, secure infrastructure.