Data Binding in Angular
 Bhupendra
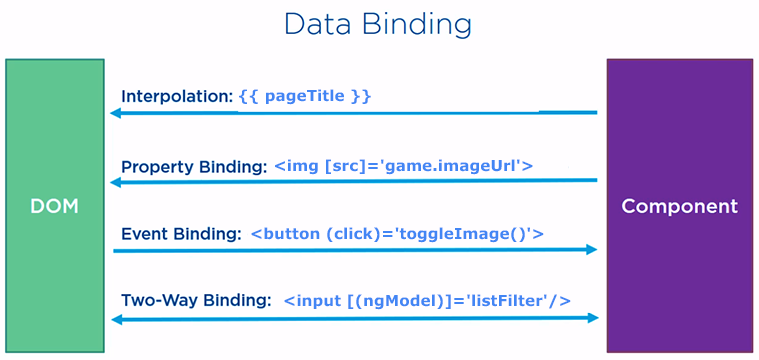
In Angular, bindings are a way to communicate between the component's data and the view (HTML template). There are several types of bindings in Angular, each suited to different scenarios. Let’s dive into the various types of data binding mechanisms with examples, and when to use each type:
1. Interpolation (One-Way Data Binding)
Description: Interpolation binds data from the component class to the view. It is a one-way data flow where the data flows from the component to the template.
Syntax: {{ expression }}
Example:
<!-- app.component.html -->
<h1>{{ title }}</h1>
// app.component.ts
export class AppComponent {
  title = 'Hello, Angular!';
}
Explanation: The value of the title property in the component is displayed inside the h1 tag in the template.
When to use: Use interpolation when you want to display a value from the component class inside the HTML. This is suitable for dynamically showing text or values, such as user input or fetched data, that don’t require any interaction back to the component.
2. Property Binding (One-Way Binding)
Description: Property binding is used to bind values to DOM properties (not HTML attributes) in the view. This also has a one-way flow from the component class to the DOM.
Syntax: [property]="expression"
Example:
<!-- app.component.html -->
<img [src]="imageUrl" alt="Angular Logo" />
// app.component.ts
export class AppComponent {
  imageUrl = 'https://angular.io/assets/images/logos/angular/angular.svg';
}
Explanation: The [src] binds the imageUrl property from the component to the src attribute of the img tag.
When to use: Use property binding when you want to dynamically set DOM properties such as src, disabled, or value. It’s useful when you want the UI to reflect changes made in the component data.
3. Attribute Binding
Description: Attribute binding sets the value of an HTML attribute, not a DOM property. Unlike property binding, it is useful when working with custom attributes or specific HTML attributes like aria, role, colspan, etc.
Syntax: [attr.attributeName]="expression"
Example:
<!-- app.component.html -->
<button [attr.aria-label]="buttonLabel">Click Me</button>
// app.component.ts
export class AppComponent {
  buttonLabel = 'Submit Button';
}
Explanation: The value of the buttonLabel property is dynamically assigned to the aria-label attribute of the button.
When to use: Use attribute binding when you need to work with attributes that are not directly supported by property binding, such as aria attributes for accessibility.
4. Style Binding
Description: Style binding is used to set inline styles for a DOM element. You can bind individual CSS properties or apply multiple styles.
Syntax:
Single style:
[style.property]="expression"Multiple styles:
[ngStyle]="stylesObject"
Example (Single style):
<!-- app.component.html -->
<p [style.color]="isRed ? 'red' : 'blue'">This text changes color</p>
// app.component.ts
export class AppComponent {
  isRed = true;
}
Example (Multiple styles):
<!-- app.component.html -->
<p [ngStyle]="{'font-size': fontSize, 'font-weight': fontWeight}">Styled Text</p>
// app.component.ts
export class AppComponent {
  fontSize = '20px';
  fontWeight = 'bold';
}
Explanation:
The first example dynamically sets the color of the text based on a boolean property
isRed.The second example dynamically applies multiple styles using the
ngStyledirective.
When to use: Use style binding when you need to apply dynamic inline styles to elements based on component properties or conditions.
5. Class Binding
Description: Class binding is used to add or remove classes on DOM elements conditionally. Like style binding, it can bind a single class or multiple classes.
Syntax:
Single class:
[class.className]="expression"Multiple classes:
[ngClass]="classesObject"
Example (Single class):
<!-- app.component.html -->
<p [class.active]="isActive">This text can be active</p>
// app.component.ts
export class AppComponent {
  isActive = true;
}
Example (Multiple classes):
<!-- app.component.html -->
<p [ngClass]="{'active': isActive, 'disabled': isDisabled}">This text has dynamic classes</p>
// app.component.ts
export class AppComponent {
  isActive = true;
  isDisabled = false;
}
Explanation:
The first example adds or removes the
activeclass based on the value of theisActiveproperty.The second example conditionally applies multiple classes using
ngClass.
When to use: Use class binding when you want to conditionally apply or remove classes based on component data.
6. Event Binding
Description: Event binding is used to handle DOM events, like click, keyup, change, etc. This is a one-way binding from the template to the component.
Syntax: (eventName)="expression"
Example:
<!-- app.component.html -->
<button (click)="onClick()">Click Me</button>
// app.component.ts
export class AppComponent {
  onClick() {
    alert('Button clicked!');
  }
}
Explanation: When the button is clicked, the onClick() method is invoked, and the alert is shown.
When to use: Use event binding when you want to capture user actions or DOM events and execute logic in your component, like form submissions, button clicks, or keyboard events.
7. Two-Way Data Binding
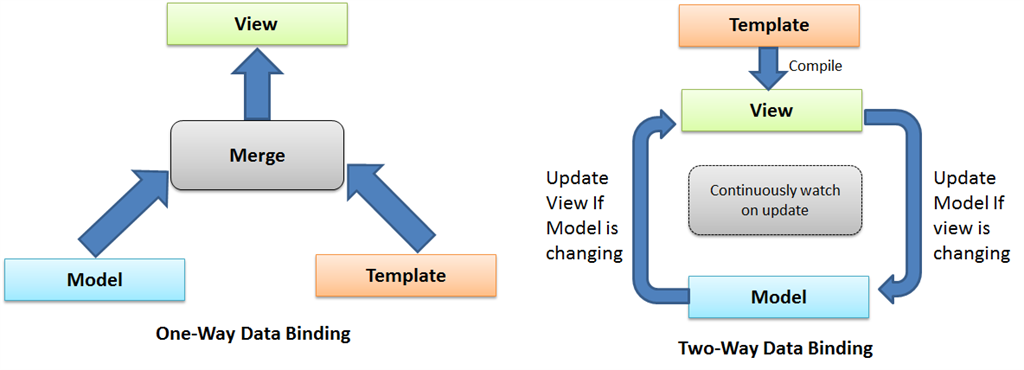
Description: Two-way data binding allows the component to bind data to the view and the view to update the component, creating a synchronized data flow. This is achieved using the [(ngModel)] directive (requires FormsModule).
Syntax: [(ngModel)]="property"
Example:
<!-- app.component.html -->
<input type="text" [(ngModel)]="name" />
<p>Your name is: {{ name }}</p>
// app.component.ts
export class AppComponent {
  name = '';
}
Explanation: The input field is bound to the name property. Any changes made in the input field automatically update name, and any changes in name reflect in the input field.
When to use: Use two-way data binding when you need bidirectional communication between the component and the view, such as in forms where user inputs need to be synced with component data.
Comparison of Bindings
One-way Data Binding: Component → View (e.g., Interpolation, Property Binding). Use when you only need to display data.
Event Binding: View → Component (e.g.,
(click)event). Use when you need to capture and respond to user actions.Two-way Data Binding: Component ↔ View (e.g.,
[(ngModel)]). Use in forms or inputs where data flows both ways.Style and Class Binding: Component → View. Use to apply dynamic styles or classes based on component logic.
Choosing the Right Binding
Display data: Use interpolation or property binding.
Update data in response to user input: Use event binding or two-way data binding.
Style dynamically: Use style or class binding.
Handling DOM events: Use event binding.

Example
To create an input field in Angular and display its value in an h1 tag using one-way data binding, you can use interpolation for displaying the value and bind the input element to a component property using [(ngModel)].
Steps:
Install FormsModule: You need to import
FormsModuleto use[(ngModel)]for two-way data binding.Component Class: Define the
inputValueproperty in the component class.
In your app.component.ts file:
import { Component } from '@angular/core';
import { FormsModule } from '@angular/forms';
@Component({
  selector: 'app-root',
  templateUrl: './app.component.html',
  imports: [ FormsModule],
  styleUrls: ['./app.component.css']
})
export class AppComponent {
  inputValue: string = '';  // This will hold the input value
}
- Component Template: Use
[(ngModel)]for one-way data binding from the input field to the component.
In your app.component.html file:
<input type="text" [(ngModel)]="inputValue" placeholder="Type something" />
<h1>{{ inputValue }}</h1>
Explanation:
The
[(ngModel)]="inputValue"binds the value from the input field to theinputValuevariable in the component.The
{{ inputValue }}inside theh1tag displays the value ofinputValue.
Now, when the user types into the input field, the value will be reflected in the h1 tag.
To achieve the same functionality without using ngModel from FormsModule, we can rely on event binding for one-way data flow. In this case, you would capture the input event from the text field and manually update the component property, which will be reflected in the h1 tag.
Here's how to do it using property binding and event binding:
Steps:
- Component Template: Use the
inputevent to bind to a function that updates the component property.
In your app.component.html file:
<input type="text" (input)="onInputChange($event)" placeholder="Type something" />
<h1>{{ inputValue }}</h1>
- Component Class: In the class, create a method that captures the input event and updates the
inputValue.
In your app.component.ts file:
import { Component } from '@angular/core';

@Component({
  selector: 'app-root',
  templateUrl: './app.component.html',
  styleUrls: ['./app.component.css']
})
export class AppComponent {
  inputValue: string = '';  // Holds the input value

  // Updates the inputValue when user types
  onInputChange(event: Event): void {
    const target = event.target as HTMLInputElement;
    this.inputValue = target.value;
  }
}
Explanation:
The
(input)event is bound to theonInputChange()method, which gets triggered every time the user types in the input field.The method updates the
inputValueproperty with the new value from the input field.The
{{ inputValue }}interpolation then reflects this value in theh1tag.
This method avoids using ngModel and still achieves the same result with manual event handling.
Subscribe to my newsletter
Read articles from Bhupendra directly inside your inbox. Subscribe to the newsletter, and don't miss out.
Written by

Bhupendra
Bhupendra
I'm a passionate software developer with a strong foundation in JavaScript, TypeScript, Node.js, and React. I've honed my skills in full-stack development and building scalable, user-friendly applications. I'm driven by creating innovative solutions that solve real-world problems and enhance user experiences. I'm a quick learner, constantly updating myself with the latest industry trends and best practices. Beyond technical skills, I value collaboration, problem-solving, and maintaining a growth mindset. I'm excited to contribute my expertise to a dynamic team and make a positive impact through technology.