Auto-Deploy your Turborepo to AWS using GitHub Workflows
 Monis Azeem
Table of contents
- Step 1 : Create an EC2 instance on AWS
- Step 2 : SSH into server
- Step 3 : Cloning the repo and running the next app on port 3000
- Step 4 : Buying and setting up custom domain.
- Step 5 : Nginx for reverse proxy
- Step 6 : Enable HTTPS and deploy certificate on domain
- Step 7 : Continuous Deployment using GitHub Workflows
- Some problems i went through which can help you and how i resolved them

I have deployed a Turborepo which has a next and express application to AWS and used GitHub Workflows for continuous deployment as soon as new code is pushed to repo. Used Nginx for reverse proxy and also enabled https on custom domain using certbot.
I have laid down some steps of how you can do it too and also mentioned some mistakes i made which were small but cost me hours.
So let’s get started!
Step 1 : Create an EC2 instance on AWS
Create an account on AWS and click on launch instance by heading over to EC2 section. Select Amazon Machine Image which is basically just a template of OS and other applications which will help you perform operations on your AWS machine.
I have used Ubuntu here. You can also select Ubuntu if you want to follow along.
Create a new .pem key-pair file and download it. You can now launch an instance.
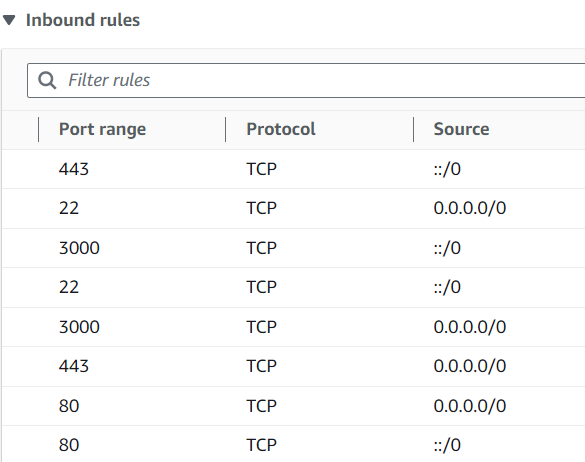
We now need to set up in-bound rules in our instance settings. Head over to security section in your instance settings and open port 80, 443 and 22 for both IPv4 and IPv6. You can also open 3000 port for testing.

80 and 443 ports are opened to allow HTTP and HTTPS traffic respectively to our EC2 instance. Port no. 22 is opened so that we can SSH into our EC2 instance.
Note - You can also limit SSH access from a specific IP address by entering it in the source section.
Step 2 : SSH into server
Now SSH into server by entering this command below.
Make sure you run this command where your .pem file is located by moving on to that specific folder in your terminal
ssh -i <.pem file name>[space]<amazon-machine-image-name>@<instance url>
You have successfully SSH’d into server when you will see your machine image name and ip in the terminal.
Note - I am using an Ubuntu machine here so i will SSH into server as a ubuntu user rather than root user. If you want more privileges then change to root user. Run commands using ‘sudo’ on your terminal too.
Step 3 : Cloning the repo and running the next app on port 3000
Clone the repo inside the machine and install node, npm and pm2 on the machine. Whenever i mention machine that means AWS machine.
Run npm install and npm run build like we do in local development environment and start the next app. Here i am running next.js application on localhost:3000. If you are doing the same, then this can be verified by entering :3000 in the browser. You will see that our app is working on <instance url>:3000 like below.

If you are unable to see your app working like this, try to run your app in local development environment or debug what went wrong until now.
Step 4 : Buying and setting up custom domain.
Now we need a real domain where user can access the app.
Initially, we were able to access the app using <instance_url>:3000. Now, we have bought a domain, we will route the user to the app running on AWS by creating an A record in the domain setting.
Create an A record and enter the IPv4 address of the instance in the DNS management settings. IPv4 address of the instance is at the same place as the instance URL.
DNS management settings are on the platform from where you have bought the domain which looks something like this for the domain i bought turborepo.tech

Our app will work on <domain_name>:3000
Note - If you are a student then you can get a free domain from GitHub Student Developer pack.
Step 5 : Nginx for reverse proxy
Our app will still run on <domain_name>:3000 so we will set up a reverse proxy using nginx.
Nginx will listen on port 80 for specific URL, in my case turborepo.tech . If user hit that specific URL, then we will serve the user the app that is running on localhost:3000. In this way, we don’t have to enter port number with domain name every time we visit a website.
Install nginx on our machine for reverse proxy and add below code in /etc/nginx/nginx.conf file
events {
    worker_connections 1024;
}

http {
    server {
        listen 80;
        server_name <domain_name>;

        location / {
            proxy_pass http://localhost:3000;
            proxy_http_version 1.1;
            proxy_set_header Upgrade $http_upgrade;
            proxy_set_header Connection 'upgrade';
            proxy_set_header Host $host;
            proxy_cache_bypass $http_upgrade;
        }

}
}
Recap - User will visit the domain name, it will hit the instance IPv4 address. AWS machine is listening on port 80 from <domain_name> and will serve app running on localhost:3000 to the user.
Step 6 : Enable HTTPS and deploy certificate on domain
Now, we need to deploy certificate and enable https on our domain
It is pretty easy by following the commands on certbot website or you can execute the commands below and you will successfully enable HTTPS on your website.
Note - If you are using AWS, you don’t need to install snapd
sudo snap install --classic certbot
sudo ln -s /snap/bin/certbot /usr/bin/certbot
sudo certbot --nginx
Step 7 : Continuous Deployment using GitHub Workflows
Now you have done everything and you have successfully deployed your application on AWS.
But there is still a catch. What if you changed some code in your GitHub repo. You can ssh into AWS machine everytime and pull the latest code but we can automate it using GitHub Workflows.
Now you need two more files, one is deploy.sh inside your Next.js app folder and other one .yaml file in .github/workflows folder in your monorepo.
GitHub repo for reference - https://github.com/monis07/my-turborepo
.yaml file will have instructions to ssh into the machine. It has everything when to do it and what all commands to execute when GitHub machine get SSH access to AWS machine.
# .yaml file code:
name: Deploy Next App

on:
  push:
# ssh into the machine when there is code change in next-app or ui folder
    paths:
      - 'apps/next-app/**'
      - 'packages/ui/**'
    branches:
      - main

jobs:
  deploy:
    runs-on: ubuntu-latest

    steps:
    - name: Checkout code
      uses: actions/checkout@v2

    - name: SSH into the machine to deploy
      env:
# go to your repo settings and put your .pem file content under GitHub secrets
        SSH_PRIVATE_KEY: ${{ secrets.SSH_PRIVATE_KEY }}
# fetch your private key and put it in keyfile file and change it's permissions.
# then use it to SSH into the machine and execute deploy.sh file
      run: |
        echo "$SSH_PRIVATE_KEY" > keyfile
        chmod 600 keyfile
        ssh -o StrictHostKeyChecking=no -t -i keyfile <amazon-machine-image-name>@<instance_url> "sudo bash /home/ubuntu/my-turborepo/apps/next-app/deploy.sh"
Note : Before you automate everything using .yaml file. Please fetch the latest code which contains deploy.sh manually using git pull origin main on your AWS machine and start the next app as the root user because your .yaml file will run your deploy.sh file. So it needs to be present there beforehand the very first time.
Run pm2 commands as root user.
deploy.sh has all the instructions that your AWS machine needs to execute. Like pulling the latest code, stopping your already running next-app and executing it again, etc.
 #!/bin/bash
export PATH=$PATH:/home/ubuntu/.nvm/versions/node/v20.17.0/bin
# this line gives us access to node, npm in this file. it is helpful if we are using node or npm in this file
# these commands will pull the latest code and restart the next app using pm2
cd /home/ubuntu/my-turborepo
git pull origin main
npm install
npm run build
pm2 stop NextApp
pm2 start ecosystem.config.js
Some problems i went through which can help you and how i resolved them
First time you SSH into the machine through your terminal, you need to enter yes so that you are saved as a list of known hosts. Known hosts are public keys of your AWS server which are used to secure and authenticate SSH connection.
List of known_hosts is downloaded using
ssh-keyscan <domain_name>command and is saved in your .ssh folder on the GitHub machine which GitHub actions uses. So the first time your GitHub machine SSH into AWS machine, you don’t need to enter yes in the terminal.but i was still getting an error “Host key verification failed” so i removed the known_hosts functionality and added -o StrictHostKeyChecking=no while SSH into AWS machine. You can SSH into machine without public keys.
Now I would not recommend this on big production server. I don't know what could happen but you could definitely do this on your hobby project.
GitHub Secrets -
You need to add key-pair .pem file in GitHub Secrets and access that inside .yaml file. I made a mistake of copying it wrong. Just do Ctrl + A, Ctrl + C and Ctrl + V into your GitHub secrets. Make sure you copy BEGIN RSA PRIVATE KEY and END RSA PRIVATE KEY.ecosystem.config.js file of pm2 -
In deploy.sh file, to make pm2 run an npm script like i have done, you need an ecosystem.config.js file and put the same code as me in your file. Add run before the script u are trying to run in ecosystem.config.js file// ecosystem.config.js code // start-next is the script defined in our package.json // "start-next": "cd apps/next-app && sudo rm -rf .next && sudo npm run build && npm run start", module.exports = { apps: [ { name: "NextApp", script: "npm", args: "run start-next", cwd: "./", interpreter: "node", env: { NODE_ENV: "production", } } ] }Build error in Next -
I was pulling the latest code and building the whole monorepo. I was unable to see changes that i made in Next.js app on my URL.So what i had to do is, i had to remove the ".next" folder before i run next app.
I built it again and did npm run start. Make sure you build using the sudo command.
"start-next": "cd apps/next-app && sudo rm -rf .next && sudo npm run build && npm run start"
This was all from my side. I hope this was helpful! 🙂
You can refer for code to GitHub repo - https://github.com/monis07/my-turborepo
Live Link - https://turborepo.tech/
LinkedIn - https://www.linkedin.com/in/monisazeem/
Subscribe to my newsletter
Read articles from Monis Azeem directly inside your inbox. Subscribe to the newsletter, and don't miss out.
Written by

Monis Azeem
Monis Azeem
I am currently building browzerai - An AI assistant for browser. (browzerai.com). Supported by Microsoft for Startups Love to build applications using Next.js, Typescript, Express.js, MongoDB B.Tech in Information Technology from CGC Landran. monisazeem@gmail.com https://www.github.com/monis07