Linux LVM - Creating, Extending, and Shrinking Logical Volumes
 Dinesh Kumar K
Linux LVM (Logical Volume Manager) is a system for managing disk storage, allowing you to create, resize, and delete partitions more flexibly than traditional partitioning schemes. LVM gives you the power to manage multiple hard drives as a single volume group, dynamically allocate storage, and resize partitions without downtime. This guide covers the steps to create and manage LVM on Linux.
Prerequisites:
You should have root or sudo privileges.
Make sure you have unused disk space or a spare disk available for creating an LVM.
Steps to Create LVM in Linux
Step 1: Install LVM
Before using LVM, ensure the lvm2 package is installed:
sudo apt update

sudo apt install lvm2

Step 2: Identify Available Disks
Use the lsblk command to list available disks:
lsblk
This will show a list of disks.
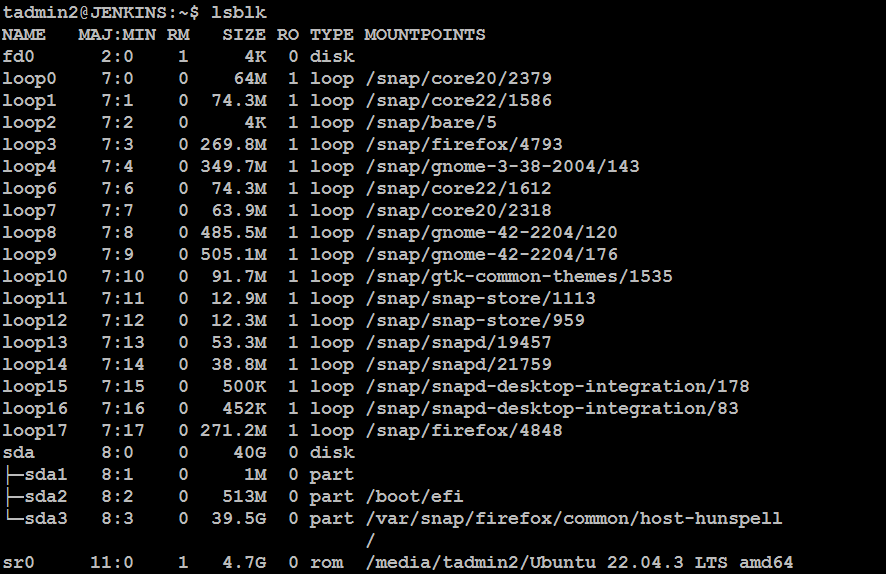
From the lsblk output, here's a summary of available disks:
sda(40 GB): This is your main disk with three partitions:sda1(1 MB): Unallocated partition.sda2(513 MB): EFI boot partition mounted at/boot/efi.sda3(39.5 GB): The main partition mounted at/.
The rest of the listed items are loop devices (snap packages) and an optical drive (sr0), which cannot be used for LVM.
It appears you do not have any unused or unallocated physical disks like /dev/sdb for LVM creation. If you'd like to proceed with LVM on your current setup, one option is to shrink an existing partition or attach a new virtual disk if you're in a virtualized environment.
Step 3: Add a new disk
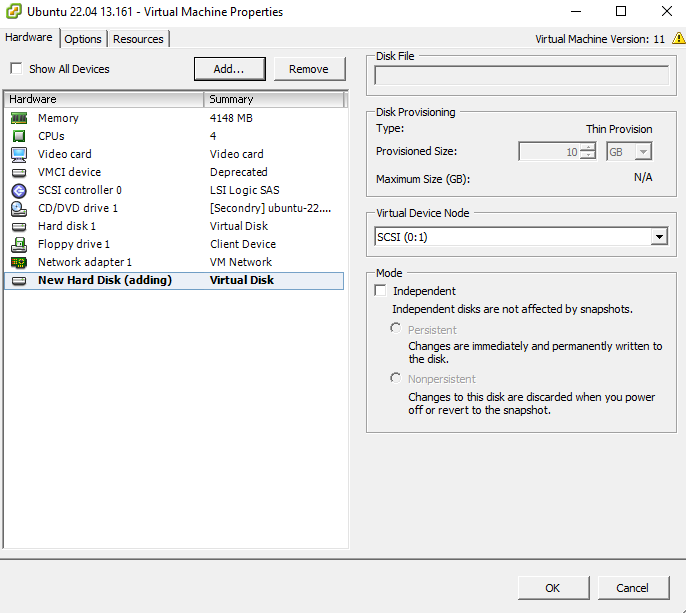
I am using a VM on vSphere. Here are the steps to add a new virtual disk in vSphere
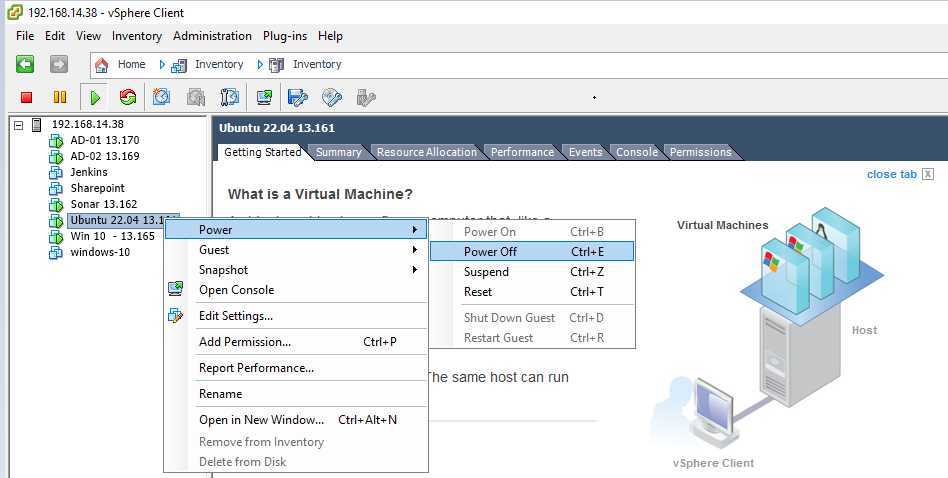
Log in to your vSphere Client. > Power off the virtual machine we want to modify.
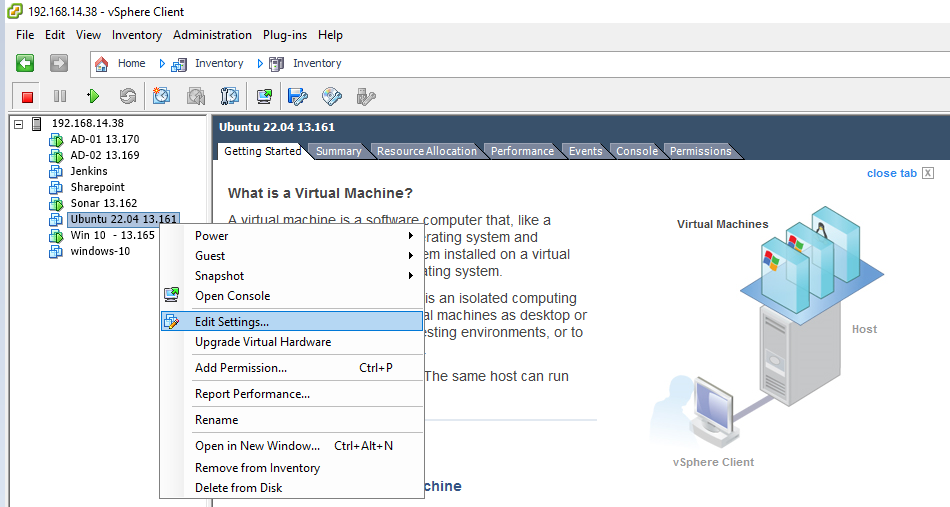
Right-click the VM and choose Edit Settings.
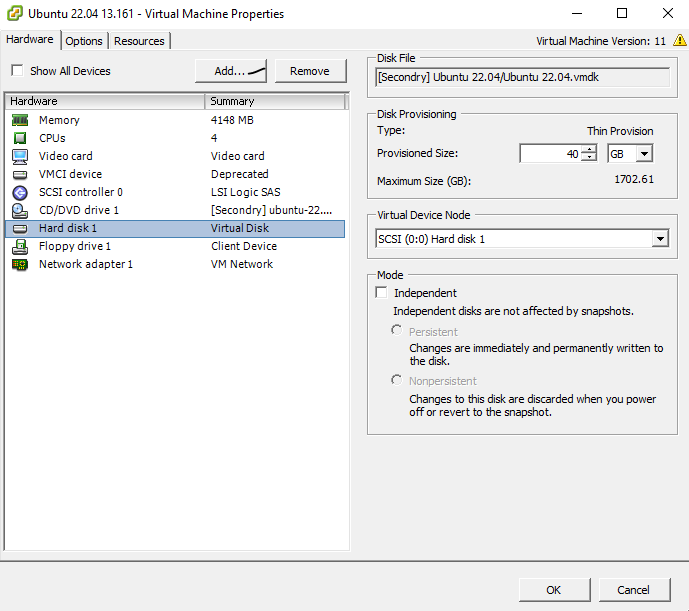
In the Virtual Harddisk tab, click Add at the top.
Select Hard Disk > Click Next
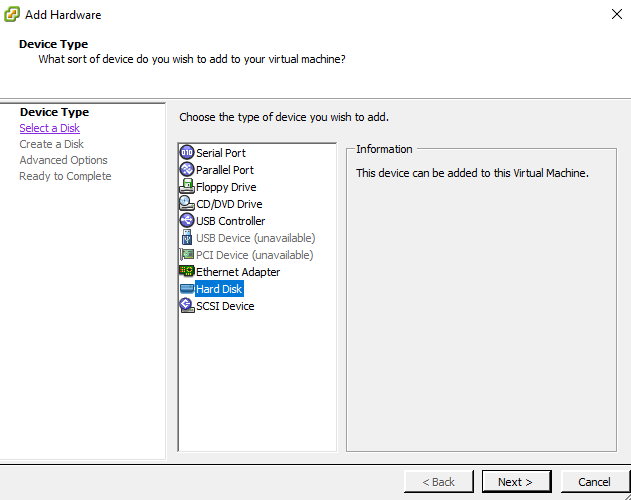
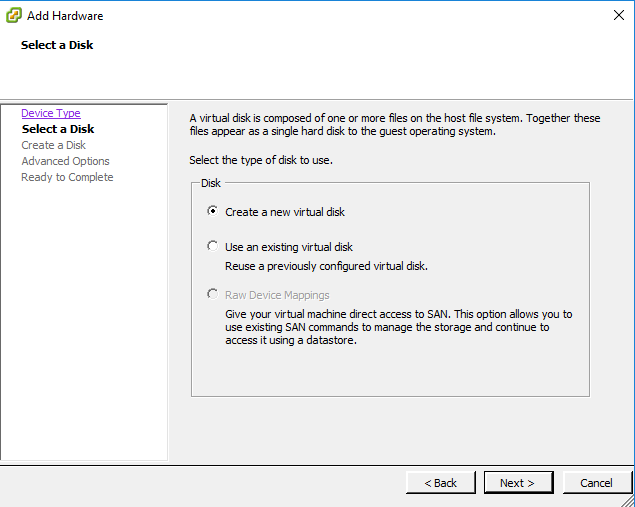
Add New Virtual Disk:
Select Create a new virtual disk. > Click Next
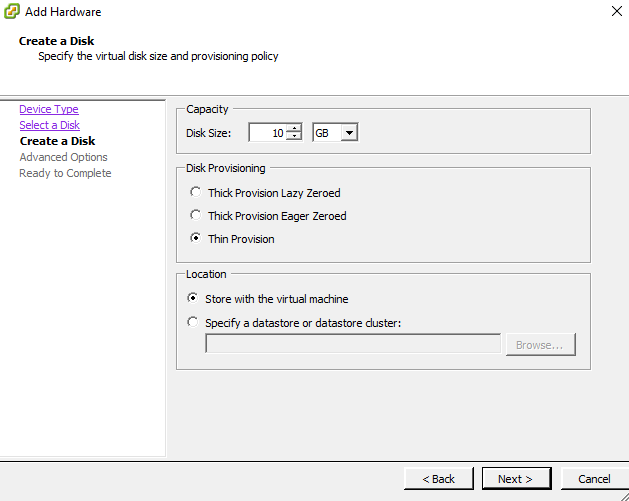
Specify the disk size (e.g., 10GB).
Choose the type of disk provisioning > Select Thin Provision
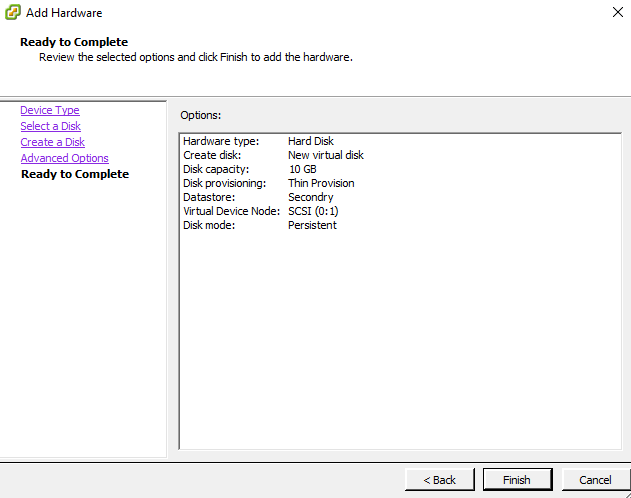
Click Finish
Click OK to save the settings.
Power on the VM.
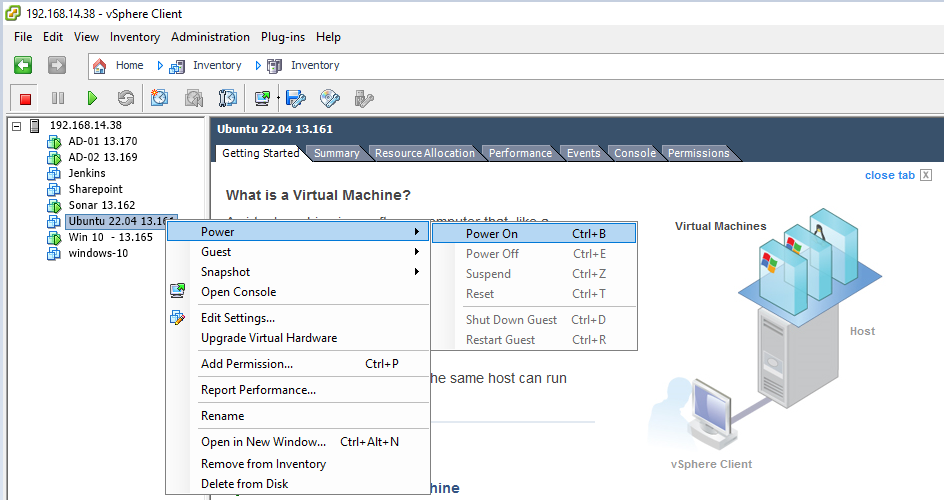
Step 4 :Verify the New Disk is Recognized:
Once the VM is powered on, log in to the Linux system.
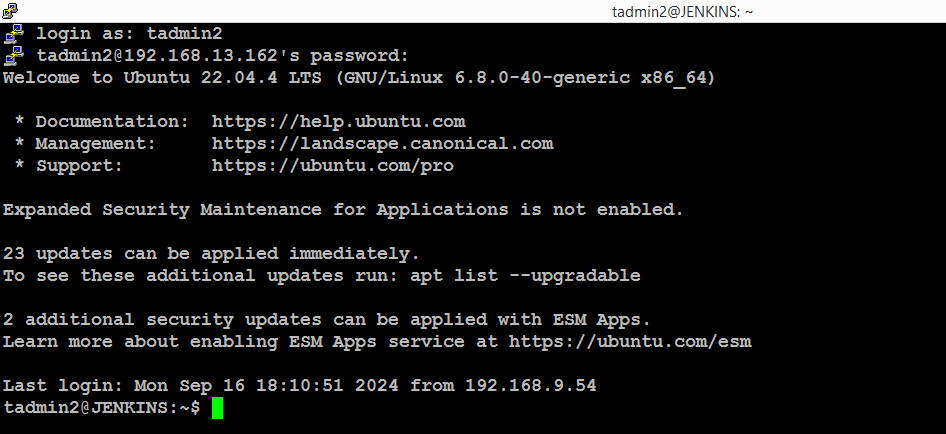
Run the following command to verify the new disk is recognized:
lsblk
You should see a new disk, likely labeled as /dev/sdb or /dev/sdc (depending on your setup).
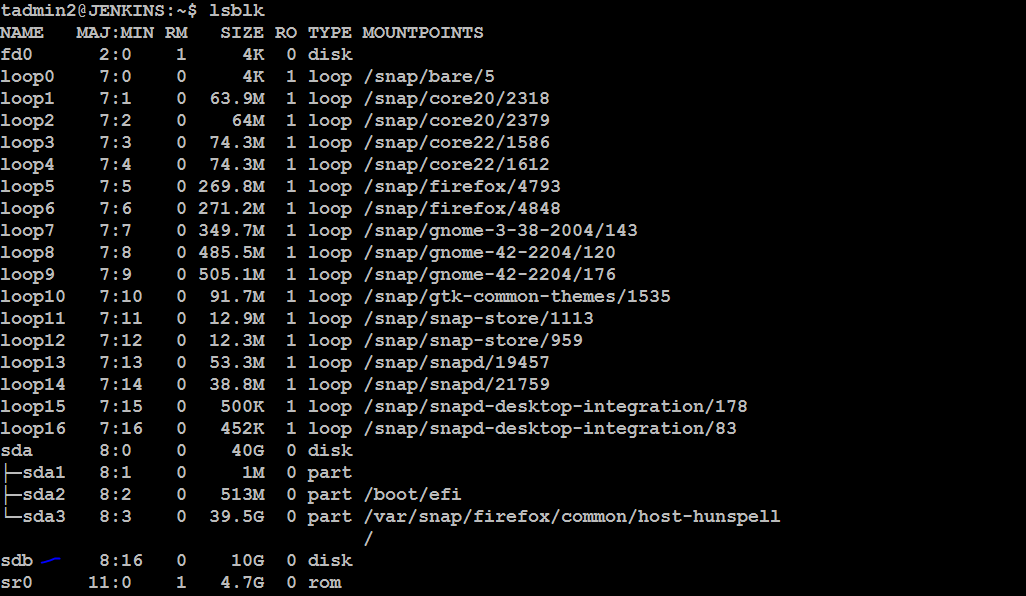
If the new disk does not appear, run:
sudo partprobe
Step 5: Create Physical Volumes (PV)
Once the new disk is detected, initialize it for LVM:
sudo pvcreate /dev/sdb

To verify the physical volumes:
sudo pvdisplay

If want, You can initialize multiple disks:
sudo pvcreate /dev/sdb /dev/sdc
Step 6: Create a Volume Group (VG)
Add the new physical volume to a volume group:
sudo vgcreate my_volume_group /dev/sdb

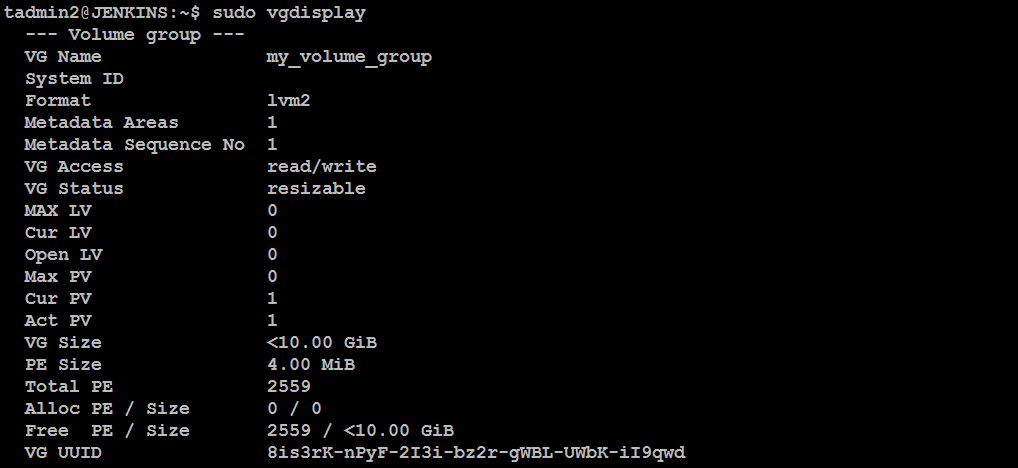
You can verify the volume group:
sudo vgdisplay
Step 7: Create Logical Volumes (LV)
Logical Volumes are the partitions you create from the volume group. Use lvcreate to create a logical volume:
sudo lvcreate -L 8G -n my_logical_volume my_volume_group

-L 8G: Allocates 8GB of space.-n my_logical_volume: Names the logical volume.my_volume_group: Specifies the volume group from which to allocate space.
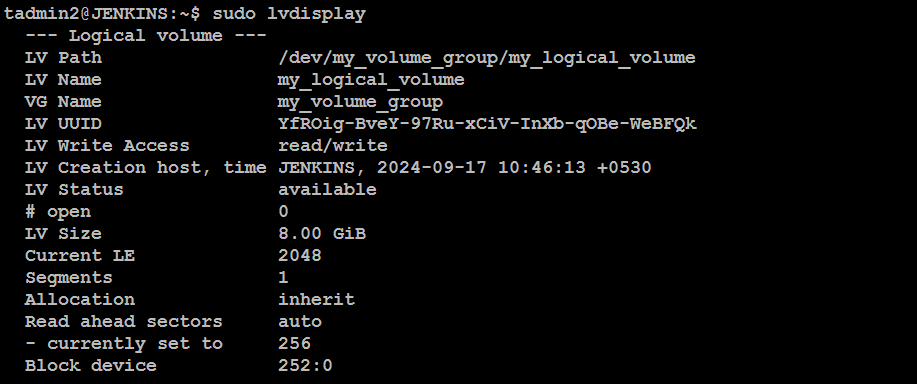
To verify the logical volume:
sudo lvdisplay
Step 8: Format the Logical Volume
Format the logical volume with a filesystem (e.g., ext4):
sudo mkfs.ext4 /dev/my_volume_group/my_logical_volume

Step 9: Mount the Logical Volume
Mount the logical volume to a directory:
sudo mkdir /mnt/my_lvm
sudo mount /dev/my_volume_group/my_logical_volume /mnt/my_lvm

To ensure the volume mounts automatically after a reboot, add the following line to /etc/fstab:
Open the /etc/fstab File: Open the /etc/fstab file in a text editor with root privileges:
sudo nano /etc/fstab
Add an Entry for the Logical Volume: Add the following line at the end of the file. Replace /dev/my_volume_group/my_logical_volume with the actual path of your logical volume, and /mnt/my_lvm with your mount point:
/dev/my_volume_group/my_logical_volume /mnt/my_lvm ext4 defaults 0 0
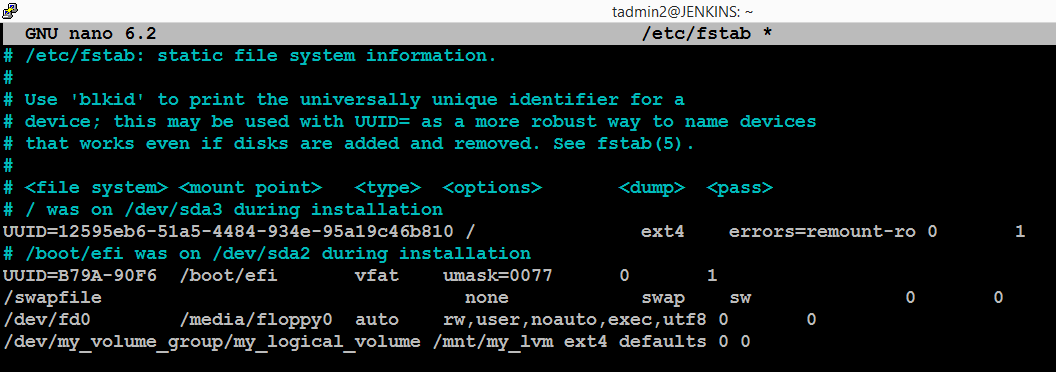
/dev/my_volume_group/my_logical_volume: This is the device path of the logical volume./mnt/my_lvm: This is the directory where the logical volume will be mounted.ext4: This is the filesystem type. If you formatted the logical volume with a different filesystem (e.g.,xfs), replaceext4with that.defaults: These are the default mount options.0 0: The first0means not to dump the filesystem, and the second0indicates that this filesystem should not be checked on boot.
Save the Changes:
In Nano, press CTRL + O to save, and then CTRL + X to exit the editor.
Test the Configuration:
You can test that your new entry is correct without rebooting by running:
sudo mount -a

If no errors are shown, your logical volume is now mounted.
Verify the Mount:
To verify that it's mounted, run:
df -h
You should see your logical volume listed under the mount point (/mnt/my_lvm).

It looks like your logical volume is successfully mounted.
This indicates that:
The logical volume is mounted on
/mnt/my_lvm.It has a total size of 7.8 GB, with 24 KB used and 7.4 GB available.
Step 10: Extend Logical Volumes
To manage the size of logical volumes in LVM (Logical Volume Manager), you can either extend or shrink them based on your needs.
Extending a Logical Volume
Check the Available Free Space
First, check the available space in your volume group:
sudo vgdisplay
Look for the Free PE / Size line to see how much free space is available.
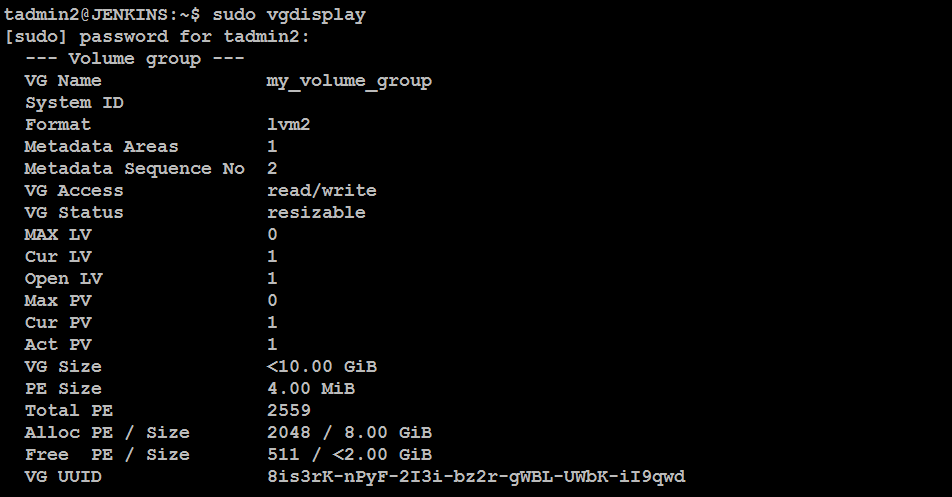
It looks like your volume group, my_volume_group, has 2.00 GiB of free space available. Here’s how you can extend a logical volume with this free space:
Check the Logical Volume
First, identify the logical volume you want to extend. Use the following command to list your logical volumes:
sudo lvdisplay
Look for the LV Name and LV Size that you wish to extend.
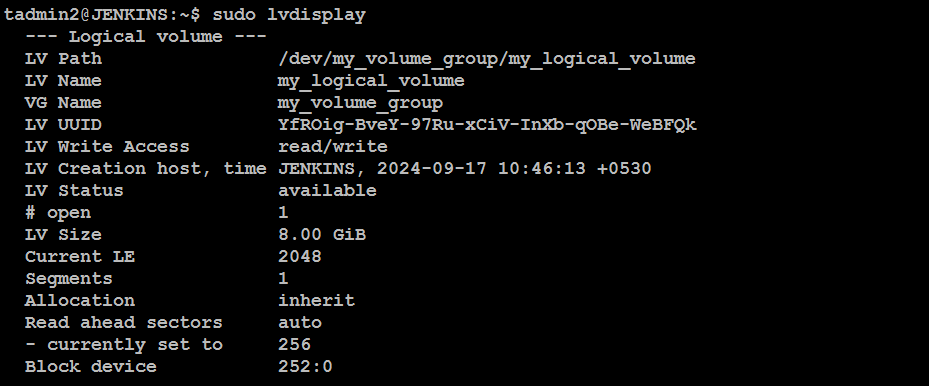
Extend the Logical Volume
To extend the logical volume, use the lvextend command. You can specify the size to increase by:
sudo lvextend -L +1G /dev/my_volume_group/my_logical_volume

Resize the Filesystem
After extending the logical volume, you need to resize the filesystem to use the new space.
For ext4 filesystems, use:
sudo resize2fs /dev/my_volume_group/my_logical_volume

For xfs filesystems, use:
sudo xfs_growfs /dev/my_volume_group/my_logical_volume
Replace /mnt/my_lvm with the mount point of your logical volume.
Verify the Changes
Finally, verify that the logical volume has been extended and the filesystem has been resized:
sudo lvdisplay
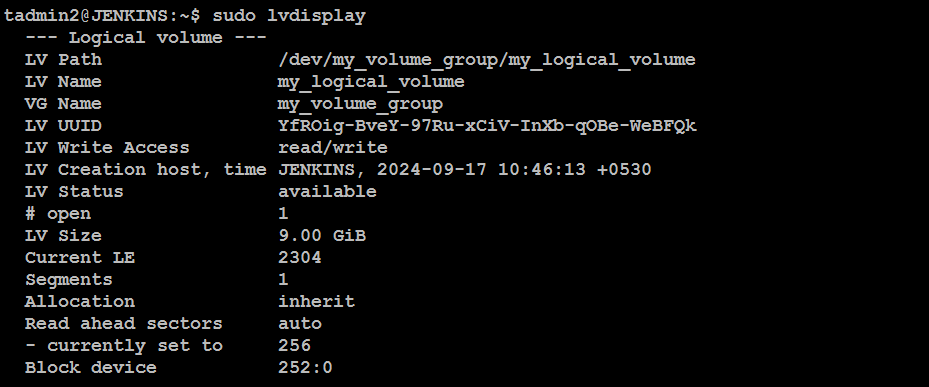
Now logical volume my_logical_volume has been successfully extended to 9.00 GiB. This output confirms that the extension was successful.
df -h

The output of df -h shows that your logical volume /dev/mapper/my_volume_group-my_logical_volume is now 8.8 GiB in size, which aligns with the 9.00 GiB size you set for the logical volume.
It looks like the filesystem has been successfully resized to use the new space.
Step 11: Shrink Logical Volumes
Backup Your Data
Before shrinking a logical volume, make sure to back up any important data. Shrinking can potentially lead to data loss if not done carefully.
Unmount the Filesystem
If possible, unmount the filesystem to avoid data corruption. This step is particularly important for shrinking filesystems.
sudo umount /mnt/my_lvm

Check Filesystem Consistency
Ensure that the filesystem is clean. For ext4 filesystems, use:
sudo e2fsck -f /dev/my_volume_group/my_logical_volume

Resize the Filesystem
Shrink the filesystem before shrinking the logical volume. For ext4, use:
Here, 5G is the new size for the filesystem. Adjust this based on how much space you want to keep.
sudo resize2fs /dev/my_volume_group/my_logical_volume 5G
It looks like the filesystem has been successfully resized to accommodate the new size of 5G. The output indicates that the filesystem has been resized to 1,310,720 blocks, which corresponds to a total size of around 5G (since each block is 4k).

For xfs, shrinking is not supported directly. You would need to back up the data, recreate the filesystem, and restore the data.
Shrink the Logical Volume
After resizing the filesystem, shrink the logical volume using:
sudo lvreduce -L 5G /dev/my_volume_group/my_logical_volume
Here, 5G should be less than or equal to the size you set with resize2fs.

The logical volume has been successfully resized to 5.00 GiB, as indicated by the output.
Just to summarize:
You resized the filesystem to 5G using
resize2fs.You then shrank the logical volume to 5G using
lvreduce.
Remount the Filesystem:
sudo mount /dev/my_volume_group/my_logical_volume /mnt/my_lvm

Verify the Changes:
Check the new sizes with:
sudo lvdisplay
df -h
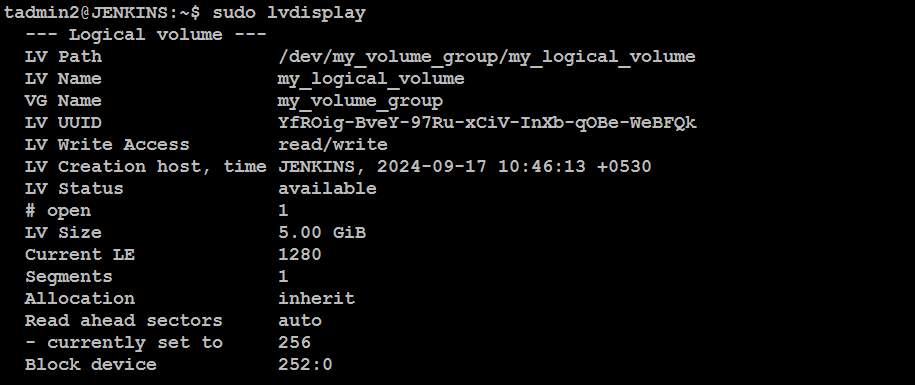
The output from lvdisplay confirms that the logical volume size has been successfully reduced to 5.00 GiB. Here's a summary of the relevant details:
LV Path:
/dev/my_volume_group/my_logical_volumeLV Size: 5.00 GiB
df -h

The df -h output shows that the filesystem on the logical volume /dev/mapper/my_volume_group-my_logical_volume has been resized to approximately 4.9 GiB, which aligns with the 5.00 GiB you set for the logical volume.
Here’s a summary:
Filesystem Size: 4.9G
Used: 24K
Available: 4.6G
Mounted on: /mnt/my_lvm
Summary of Commands
Extending:
sudo vgdisplay  # Check available space
sudo lvextend -L +5G /dev/my_volume_group/my_logical_volume  # Extend LV
sudo resize2fs /dev/my_volume_group/my_logical_volume  # Resize filesystem
Shrinking:
sudo e2fsck -f /dev/my_volume_group/my_logical_volume  # Check filesystem
sudo resize2fs /dev/my_volume_group/my_logical_volume 5G  # Shrink filesystem
sudo lvreduce -L 5G /dev/my_volume_group/my_logical_volume  # Shrink LV
Conclusion
LVM provides a robust and flexible way to manage storage on Linux. With these steps, you've created and managed LVM partitions, giving you more control over how you allocate and resize storage. By using LVM, you can easily expand storage, create backups, and manage multiple drives more efficiently than traditional partitioning methods.
Subscribe to my newsletter
Read articles from Dinesh Kumar K directly inside your inbox. Subscribe to the newsletter, and don't miss out.
Written by

Dinesh Kumar K
Dinesh Kumar K
Hi there! I'm Dinesh, a passionate Cloud and DevOps enthusiast. I love to dive into the latest new technologies and sharing my journey through blog.