Understanding the Concept of Shaders in Unity: A Step-by-Step Guide to Creating a Custom Color Blend Shader
 Md Maruf Howlader
As a developer or learner you feel very wired while writing shader code, and you frequently forget shader node while using ShaderGraph, you cannot utilize ShaderGraph properly until you know how does it work in shader script work in backend.
Let's start with Unity shaders in a way that provides lasting knowledge.
Create a Unity URP Project: Set up a scene.
Create a Shader Folder: Inside the
Assetsfolder, create a new folder named "Shader."Create a Custom Shader: Right-click in the Shader folder and select
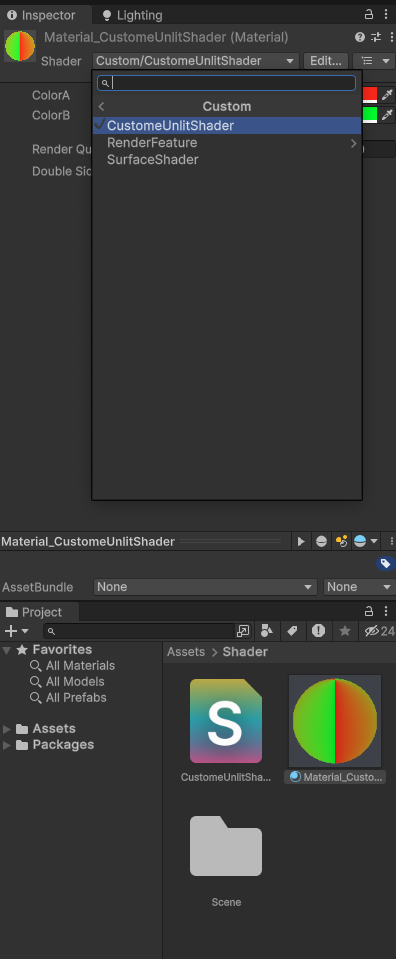
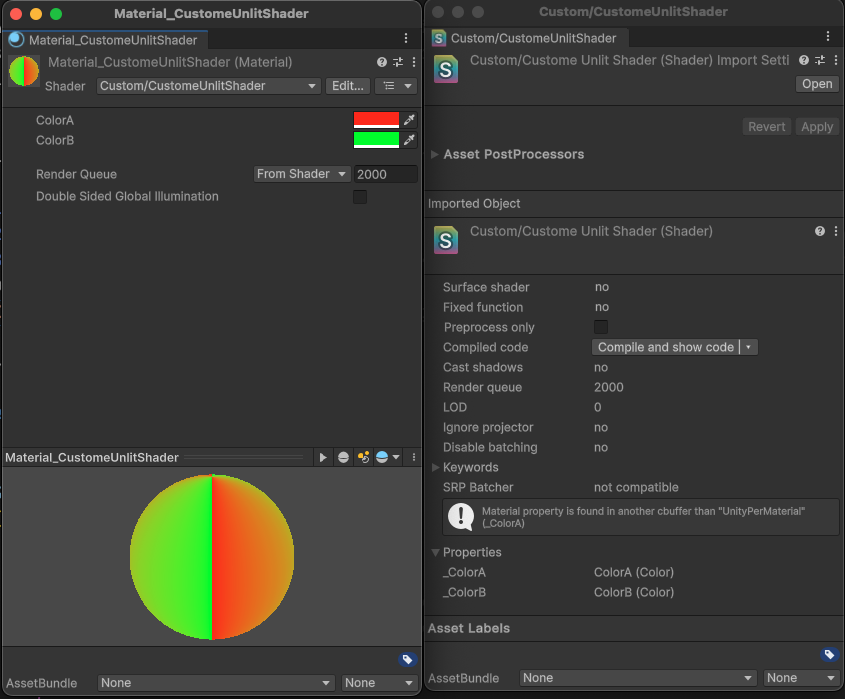
Shader > Unlit Shader. Double-click to open it in script editor. Change the first line from"Unlit/CustomeUnlitShader"to"Custom/CustomeUnlitShader". You’ll see something like this:Create a material in Unity, assign this shader to this material from Inspector Window.

Simple Shader Script
Shader "Custom/CustomeUnlitShader"
{
    Properties
    {
        _ColorA("ColorA", Color) = (1,0,0,1)
        _ColorB("ColorB", Color) = (0,1,0,1)
    }
    SubShader
    {
        Pass
        {
            CGPROGRAM
            #pragma vertex vert
            #pragma fragment frag

            #include "UnityCG.cginc"

            struct appdata
            {
                float4 vertex : POSITION;
                float2 uv : TEXCOORD0;
            };

            struct v2f
            {
                float4 vertex : SV_POSITION;
                float2 uv : TEXCOORD0;
            };

            fixed4 _ColorA;
            fixed4 _ColorB;

            v2f vert (appdata v)
            {
                v2f o;
                o.vertex = UnityObjectToClipPos(v.vertex);
                o.uv = v.uv;
                return o;
            }
            fixed4 frag (v2f i) : SV_Target
            {
                return lerp(_ColorA, _ColorB, i.uv.x);
            }
            ENDCG
        }
    }
}
Now try to understand what is ShaderLab and HLSL (High-Level Shading Language)
ShaderLab:
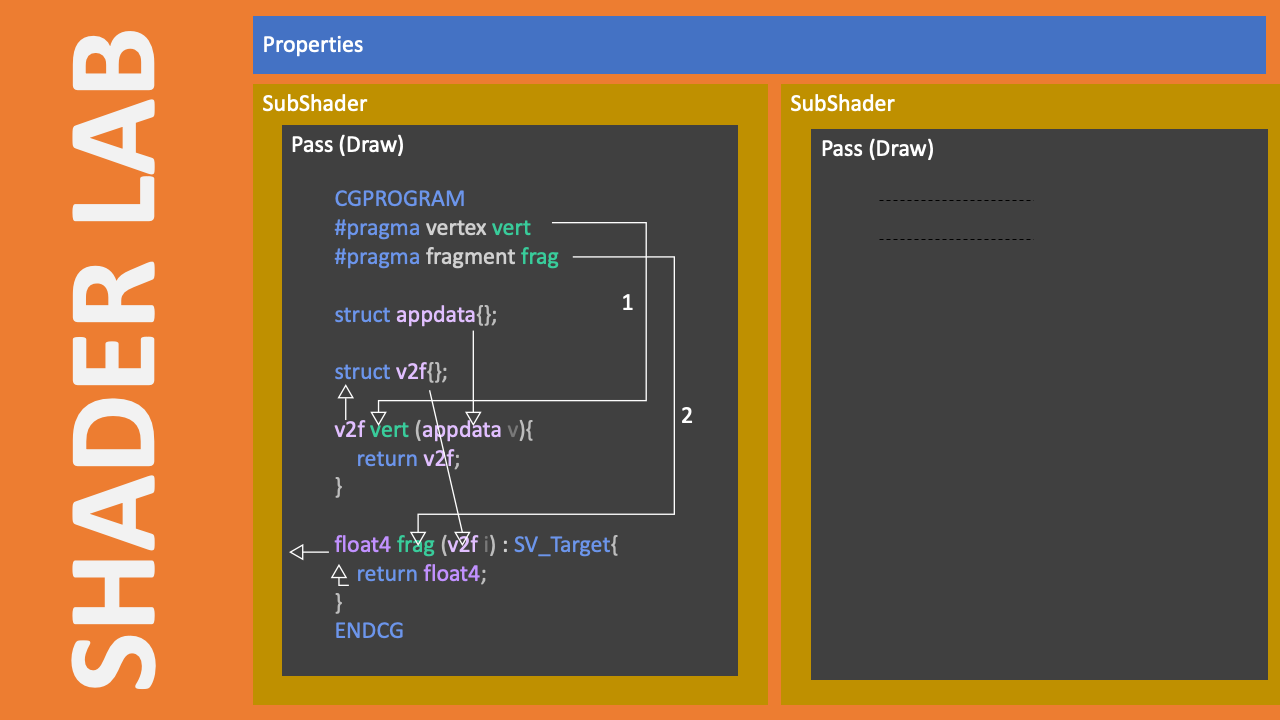
ShaderLab is the high-level language Unity uses to define the overall STRUCTURE of a shader, including things like properties, subshaders, passes, and fallback behavior.
In this code, the following sections are ShaderLab:
Shader "Custom/CustomeUnlitShader"      // Shader definition starts with ShaderLab
{
    Properties                       // Defines shader properties
    {
        _ColorA("ColorA", Color) = (1,0,0,1) // Expose _ColorA to the Unity Editor with the label ColorA
        _ColorB("ColorB", Color) = (0,1,0,1) // Expose _ColorB to the Unity Editor with the label ColorB

    }

    SubShader                        // Defines a rendering pass
    {
        Pass                        // Defines a single pass (rendering stage)
        {
            CGPROGRAM               // Start of the HLSL code block
            ENDCG                   // End of the HLSL code block
        }
    }
}
Step-by-Step Explanation
1. Shader Declaration
Shader "Custom/CustomeUnlitShader"
- The
Shaderblock defines the entire shader and gives it a name. In this case, the shader is called"Custom/CustomeUnlitShader". The name you give it is how it will appear in Unity’s material dropdown. The"Custom/"prefix creates a custom category in Unity's shader menu.
2. Properties Block
Properties
{
    _ColorA("ColorA", Color) = (1,0,0,1)
    _ColorB("ColorB", Color) = (0,1,0,1)
}
- The
Propertiesblock defines inputs that can be adjusted in Unity's Inspector when this shader is assigned to a material. Here, we define a color property called_ColorA. The string"ColorA"is the label for this property in Unity's Inspector, and theColorkeyword specifies its data type. The value(1, 0, 0, 1)is the default color (red, in this case). The components represent RGBA (Red, Green, Blue, Alpha). Similarly_ColorB properties contains green color channel value.

3. SubShader Block
SubShader
{
    // Pass block goes here
}
- A shader can contain one or more
SubShaders. EachSubShadercontains a set of instructions for rendering the object. Unity automatically chooses the appropriateSubShaderbased on the hardware the game is running on. For this simple shader, we only have oneSubShader, but more complex shaders may contain multipleSubShadersfor different rendering techniques or fallback methods for lower-end hardware.
4. Pass Block
Pass
{
    // CGPROGRAM block goes here
}
The
Passblock defines a single rendering pass. Most shaders will have just onePass, but more advanced shaders might use multiple passes to achieve effects like shadows or multi-layered rendering. Each pass handles how the object is drawn on the screen. For this shader, we use a single pass.CGPROGRAM and ENDCG: These lines mark the beginning and end of the HLSL (CG) code block where the actual shader logic is written.
ShaderLab wraps the HLSL code that defines how the shader actually works.
Before understanding HLSL in details lets learn a few basic things:
What is a Shader?
A shader is a small program that runs on the GPU to determine the appearance of an object. In Unity, shaders control the visual aspects such as lighting, shadows, colors, and textures.
Types of Shaders in Unity
Here’s a simplified list of shader types:
Lit Shader:
- Renders materials with lighting and surface details like reflections and shadows.
Unlit Shader:
- Renders materials without lighting or shadows, providing a flat appearance.
Sprite Lit Shader:
- Applies lighting effects to 2D sprites, making them react to lights in the scene.
Decal Shader:
- Projects 2D textures onto 3D surfaces, like graffiti or damage marks.
Fullscreen Shader:
- Applies post-processing effects that cover the entire screen.
Similar this there exist a lots of shader for different purpose like : Terrain Shader, Baked Lit Shader, Particle lit/Unlit Shader
Shader Graph: A visual node base tool that allows you to create custom shaders visually without writing code. You can create all kinds of shaders (Lit, Unlit, Custom) by connecting nodes.
Here in this example we created a basic Unlit Shader. If we can understand this shader HLSL workflow then we can easily comparatively understand others shaders.
HLSL (CG):
Within the CGPROGRAM and ENDCG block, the code is written in HLSL (or CG, a variant of HLSL). This is where you define how the shader are processed.
The following sections are HLSL:
            #pragma vertex vert
            #pragma fragment frag

            #include "UnityCG.cginc"

            struct appdata
            {
                float4 vertex : POSITION;
                float2 uv : TEXCOORD0;
            };

            struct v2f
            {
                float4 vertex : SV_POSITION;
                float2 uv : TEXCOORD0;
            };

            float4 _ColorA;
            float4 _ColorB;

            v2f vert (appdata v)
            {
                v2f o;
                o.vertex = UnityObjectToClipPos(v.vertex);
                o.uv = v.uv;
                return o;
            }
            float4 frag (v2f i) : SV_Target
            {
                return lerp(_ColorA, _ColorB, i.uv.x);
            }
In a URP Unlit shader, there are two key parts: the Vertex Shader and the Fragment (or Pixel) Shader.
Vertex Shaders: These shaders allow you to manipulate the geometry of objects by processing each vertex individually. You can move, rotate, scale, or transform the position of an object’s vertices in 3D space using this part of the shader. However, vertex shaders do not directly handle color or texture; their main job is geometry manipulation.
Fragment (Pixel) Shaders: These shaders work on individual pixels and are responsible for determining their color, brightness, and other surface properties. You can use this part to set the final appearance of each pixel, including how it should be colored or textured.
5. Specify Vertex Shader and Fragment Shader
CGPROGRAM
    #pragma vertex vert
    #pragma fragment frag
As define a unlit shader will look for two method to execute its Vertex Shader and Fragment Shader task.
Here
vertandfragare two function name. The#pragma vertex vertdirective specifies that the functionvertwill be used as the vertex shader.while
#pragma fragment fragspecifies that the functionfragwill be used as the fragment shader.
#include "UnityCG.cginc" provides access to a library of useful shader functions and macros that simplify shader development.
6. Structure Definitions for Data Flow
We will define two data structure for taking input for Vertex Shader, another is passing vertex information to Fragment Shader.
Basic knowledge : Vertex - Provides vertex positions for transformations of a 3d model and uv - Provides texture coordinates for mapping textures onto the model.
 struct appdata
            {
                float4 vertex : POSITION;
                float2 uv : TEXCOORD0;
            };
The vertex shader processes each vertex of the 3D model. Here, the
appdatastructure represents the input data to the vertex shader, with thevertexfield holding the position of each vertex in object space.POSITIONis a semantic that tells the GPU that this variable represents the vertex position in 3D space, which will be used in the vertex shader.float2 uv : TEXCOORD0: Holds the texture coordinates (UV mapping) for each vertex. TheTEXCOORD0semantic tells the GPU that this field contains UV coordinates used for texture sampling in the fragment shader.
Semantics are predefined labels or annotations used to describe the purpose of certain data in the GPU pipeline, such as vertex positions, texture coordinates, or pixel colors. These labels help the graphics pipeline correctly interpret the data during rendering.
struct v2f
            {
                float4 vertex : SV_POSITION;
                float2 uv : TEXCOORD0;
            };
The
v2f(Vertext to Fragment) structure represents the data that is passed from the vertex shader to the fragment shader. In this case, it only passes the position (pos), which is necessary to position the object in 3D space.after the vertex shader has processed the vertex, the position data (with the
SV_POSITIONsemantic) is used to determine where the corresponding pixel should be drawn on the screen.float2 uv : TEXCOORD0: Holds the texture coordinates (UV mapping) for each vertex. TheTEXCOORD0semantic tells the GPU that this field contains UV coordinates used for texture sampling in the fragment shader.
7. Variable Declaration
float4 _ColorA;
float4 _ColorB;
- We already define a a variable
_ColorAand_ColorBat Properties section of ShaderLab section. Now we have to declare that_ColorAand_ColorBvariables, under CGPROGRAM once again. This redundancy is necessary because thePropertiesblock defines the inputs for Unity's editor, while variables insideCGPROGRAMare used for actual GPU calculations. Thefloat4type represents four floating-point values (Red, Green, Blue, and Alpha).
v2f vert (appdata v)
            {
                v2f o;
                o.vertex = UnityObjectToClipPos(v.vertex);
                o.uv = v.uv;
                return o;
            }
The
vertfunction is our vertex shader. It takes anappdatainput (which contains vertex position data) and outputs av2fstruct. TheUnityObjectToClipPosfunction transforms the object-space vertex position into clip space, which is the space the GPU uses to render the object on the screen.UnityObjectToClipPos(v.vertex)Uses a function fromUnityCG.cgincto transform the vertex position to clip space.o.uv = v.uv: we just Pass the texture coordinates to the fragment shader.
Vertex in Clip space:
Vertex coordinates are transformed in such a way that objects can be easily mapped to screen space.
It’s named clip space because vertices that fall outside a specific region (the "viewing frustum") are clipped or discarded, meaning they won't be rendered on the screen.
8. Fragment Shader
The frag function is the fragment shader function, which computes the color of each pixel. Here’s a breakdown of what this function does:
float4 frag (v2f i) : SV_Target
{
    return lerp(_ColorA, _ColorB, i.uv.x);
}
Breakdown:
float4: The return type, representing the color of a pixel.float4has four components (red, green, blue, alpha).v2f i: The input parameter, which is av2fstructure passed from the vertex shader. It contains the interpolated position and texture coordinates.: SV_Target: The semantic indicating that this function returns the final color for each pixel.lerp(a, b, t): A linear interpolation function. It interpolates between two valuesaandbbased on a factort.i.uv.x: The x-component of the texture coordinates, used as the interpolation factort.
UV Mapping of a 3D Model
Before diving into the code, it's important to understand UV mapping. UV mapping is a technique used to apply a 2D texture to a 3D model. Each 3D model has a UV map that specifies how the 2D texture wraps around the 3D surface.
u: The horizontal coordinate, ranging from0to1.v: The vertical coordinate, also ranging from0to1.
How It Works:
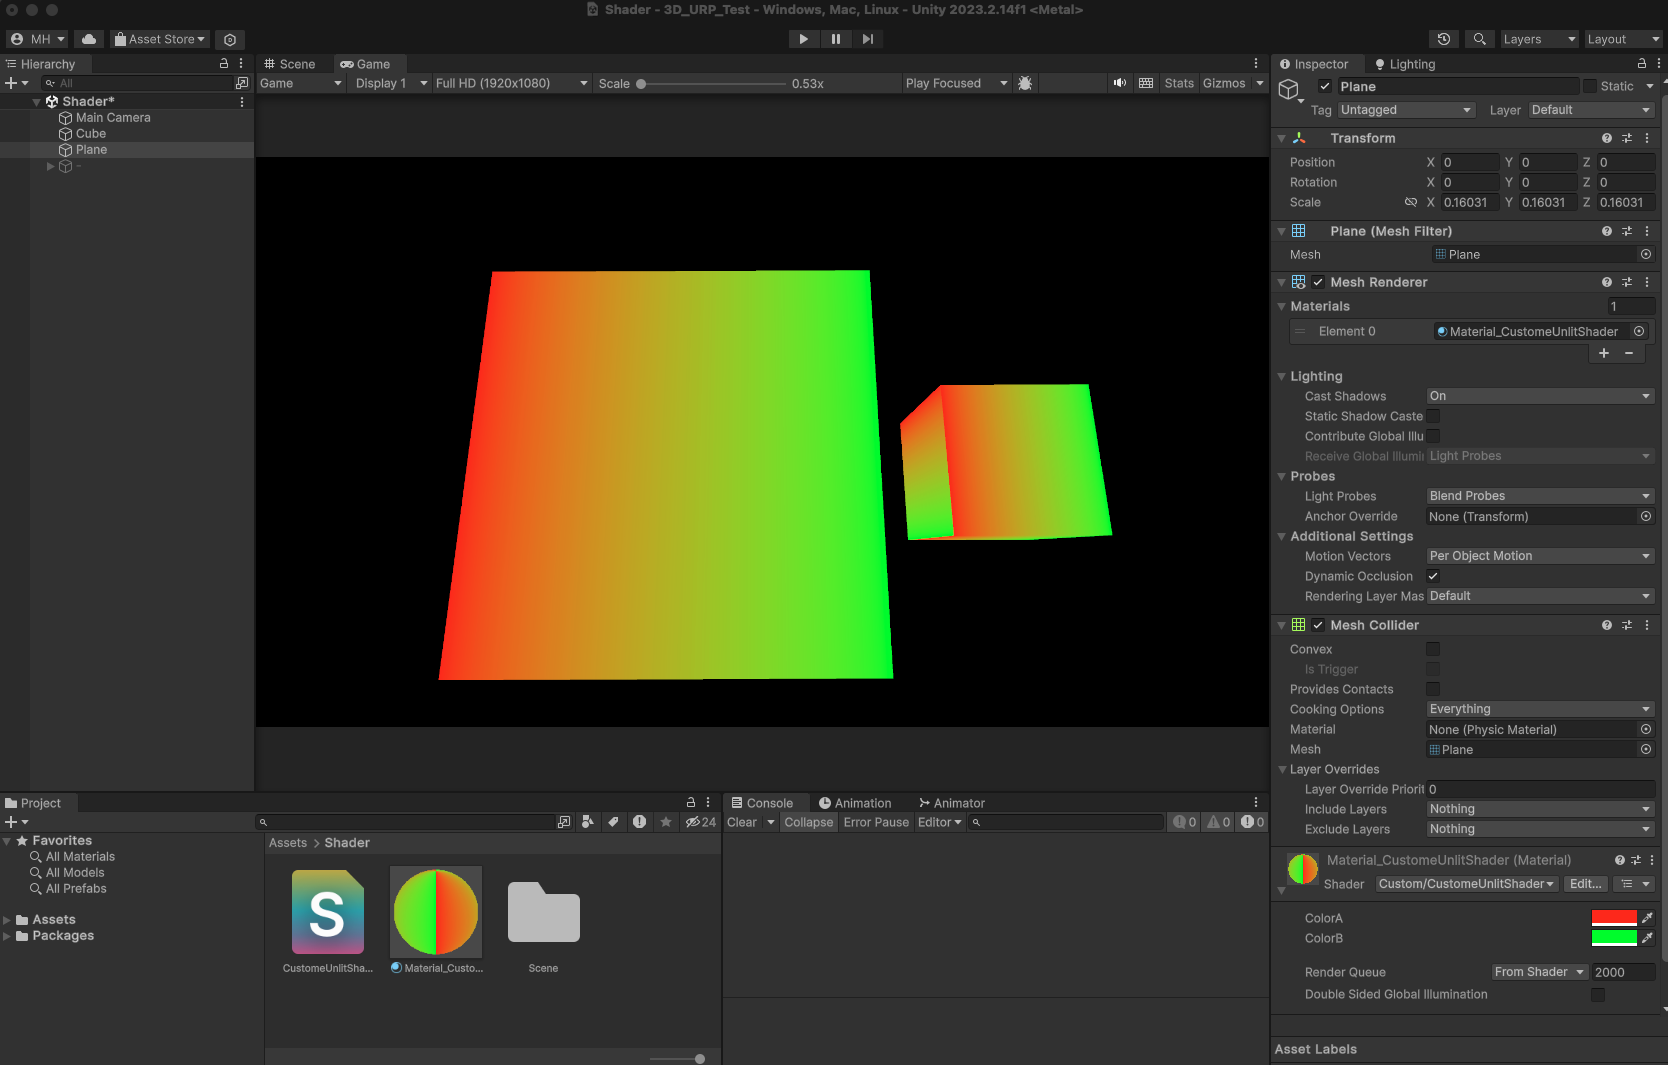
i.uv.x: Provides the interpolation factor between0and1, based on the texture coordinates from the vertex shader.lerp(_ColorA, _ColorB, i.uv.x): Interpolates between_ColorAand_ColorBbased oni.uv.x. Wheni.uv.xis0, the output color is_ColorA. Wheni.uv.xis1, the output color is_ColorB. Values between0and1blend the colors proportionally.

Drag and drop the material (use this shader) into a 3d model in Unity Scene. This fragment shader smoothly transitions between two colors based on the texture coordinate's x value.
Summarized Learning:
We explored a simple Unlit Shader script that smoothly transitions between two colors based on the UV coordinates.
ShaderLab handles the overall structure, defining properties and organising the passes.
HLSL (inside the
CGPROGRAMblock) handles the actual GPU operations, including vertex transformation and color blending.By mastering this basic shader structure, you'll gain a solid foundation for creating more complex shaders, such as lit shaders or shaders with multiple passes for advanced effects like shadows or reflections.
Where to go:
To learn how to advanced code inside HLSL section, read Microsoft, NVIDIA
Thank you for reading! if you like this, lets connect: LinkedIn
Subscribe to my newsletter
Read articles from Md Maruf Howlader directly inside your inbox. Subscribe to the newsletter, and don't miss out.
Written by

Md Maruf Howlader
Md Maruf Howlader
Passionate Unity Game Developer with blending technical skills and creativity to craft immersive gaming experiences 🎮 . I specialize in gameplay mechanics, visual fidelity, and writing clean code. I’m driven by game design principles and love creating engaging, interactive experiences. Always eager to learn and explore new gaming trends! Let's connect! 🌟🚀