Building a Real-Time Collaborative Drawing App with Next.js, Socket.IO, and Strapi
 Oduor Jacob Muganda
Introduction
In today's digital age, collaborative tools have become important. Collaborative tools enable teams and individuals to work together seamlessly. Teams and individuals can work together, regardless of their physical location. One tool that has gained significant popularity is a real-time collaborative drawing app. The application is for real-time collaboration. It lets multiple users draw and interact together at the same time. Multiple users can draw and interact with each other simultaneously on a shared canvas.
In this tutorial, you'll learn how to build a Real-Time Collaborative Drawing App. You'll use Next.js, Socket.IO, and Strapi. Next.js will serve as the front-end framework and allows for server-side rendering for the application. Socket.IO is a library that enables real-time, bidirectional communication between clients and servers. Facilitating the seamless exchange of data in real-time. While the real-time collaboration will be handled by Socket.IO, Strapi will be responsible for storing the drawn canvases persistently.
Prerequisites
Before you start building, you will need the following:
Set up Strapi for Canvas Storage
Strapi provides a persistent data managing platform. You need to set up a data storage in it.
Install Strapi
To work with Strapi, you have to install it in your system. Open your terminal and run the following command:
npx create-strapi-app@latest realtimecanvas --quickstart
The command creates a project named realtimecanvas. Go to realtimecanvas in your terminal. Run the command below to start Strapi.
npm run develop
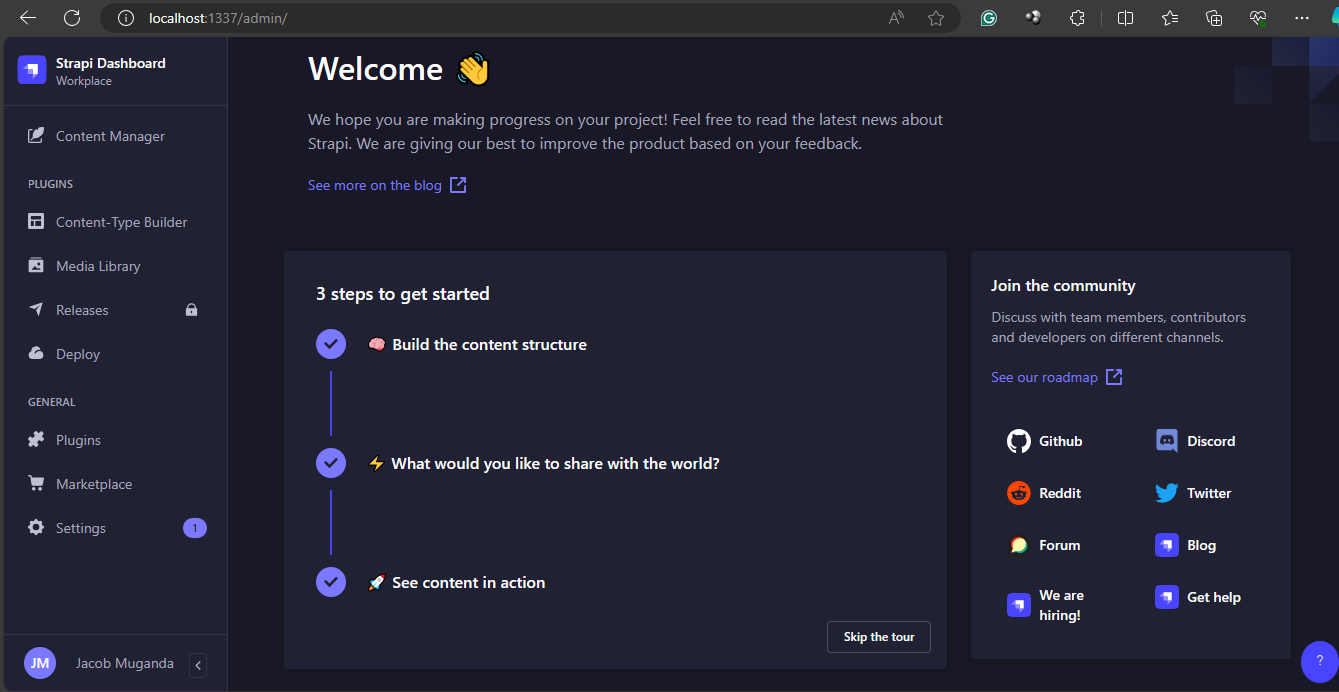
Open your browser and paste http://localhost:1337/admin to launch the admin panel. Enter the required details for authentication to access the dashboard.
Create a Collection Type for Storing Canvas
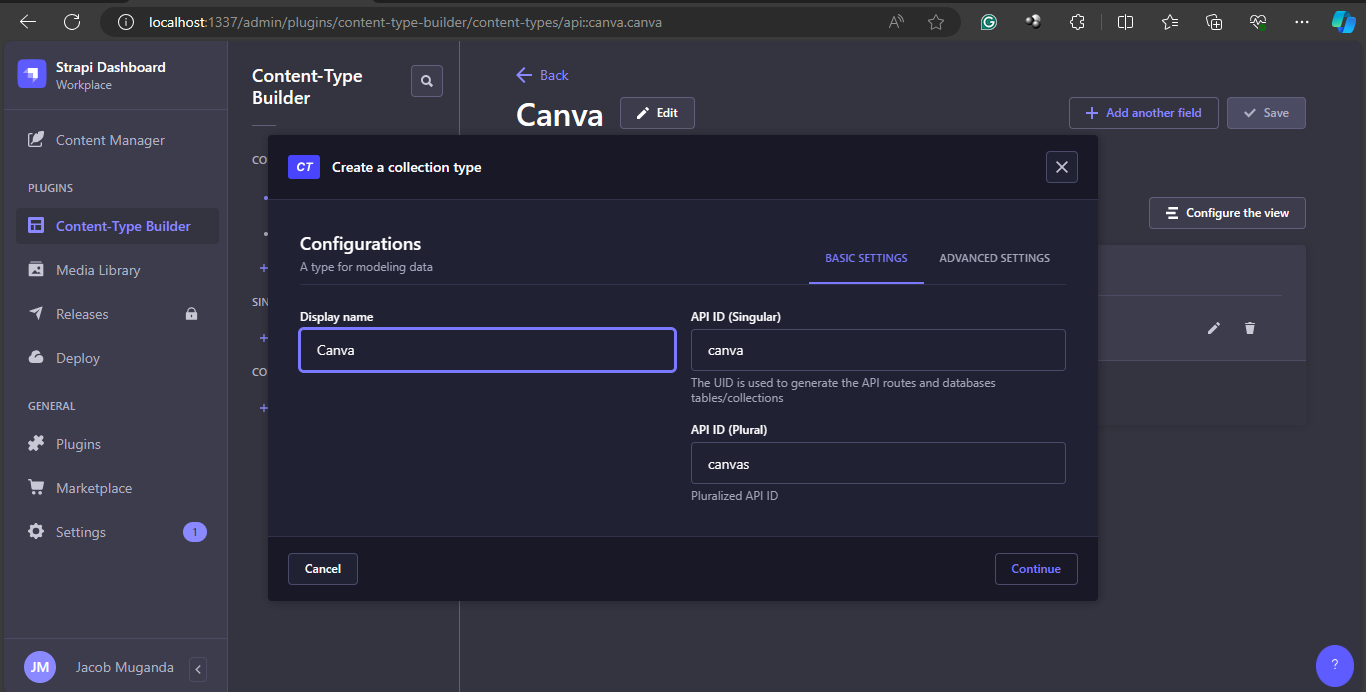
On the left panel of the dashboard, click on Content-Type Builder to create a new collection type and name it Canva. Click continue to proceed with the creation process.
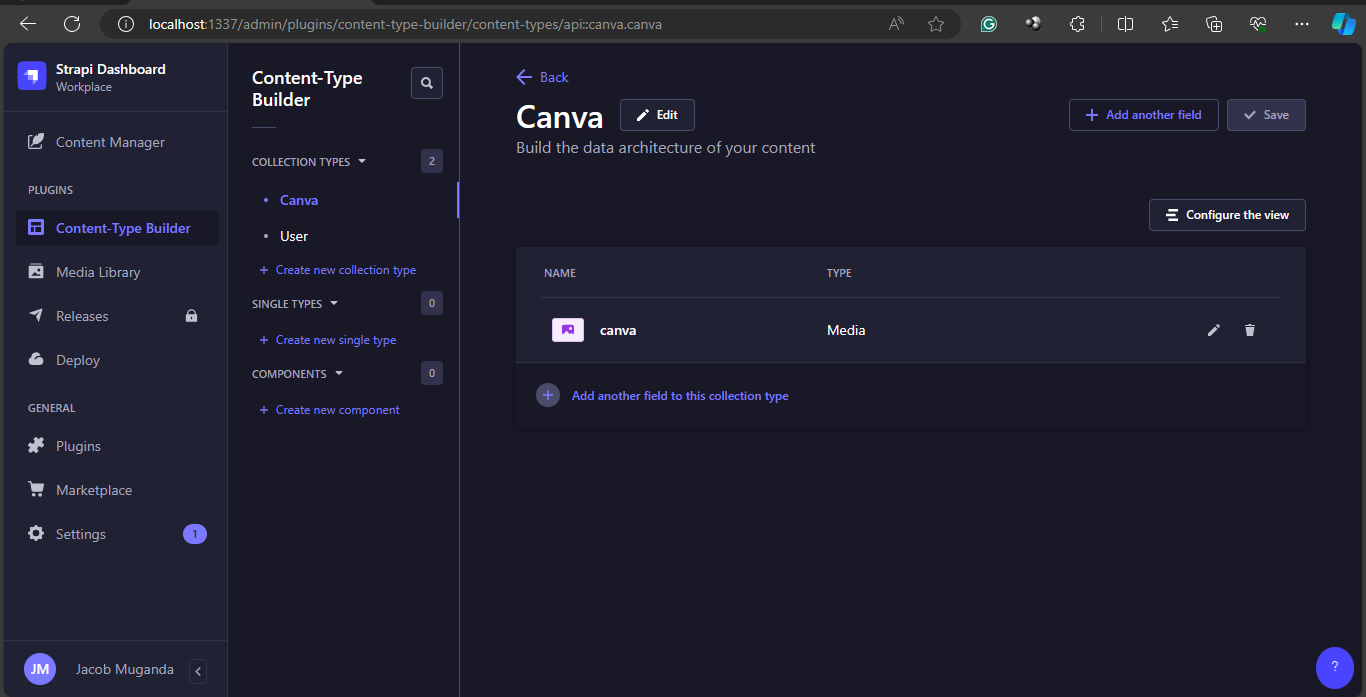
Create fields for your collection type. Select Media as the field and name it Image. Click save and then publish to finish up the creation process.
Allow API Public Access
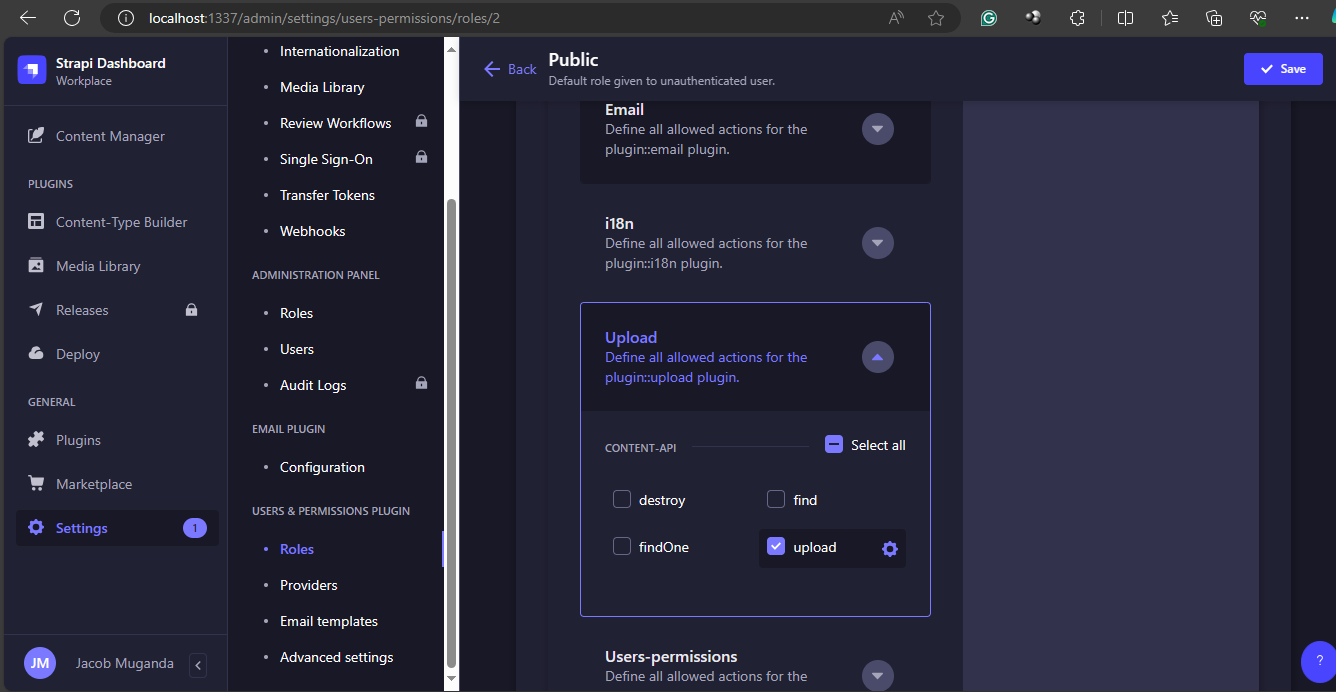
To store your canvas in Strapi from your application, go to the Public section in Roles under Settings. Select Upload then check the upload field. An endpoint /api/upload/ is generated. It will be used by the application to communicate to Strapi.
Set up the Development Environment
Create a directory for your project. Using an IDE of your choice, navigate to that directory. Run the following command to initialize your project.
npx create-next-app@latest
The terminal prompts you to enter the name of your project. Also, accept TypeScript, ESlint, and Tailwind CSS. They are required in the application development.
Install Required Dependencies
To install these dependencies, run this command in your terminal.
npm install @mui/icons-material react-color axios
The @mui/icons-material library makes it easy to add well-designed and versatile icons to your app. The react-color library provides a wide color range to pick from. This is vital during drawing. Axios is used to make HTTP requests. It handles responses and works with APIs in your application. The client side uses the installed libraries above. Proceed to install libraries needed for the server side. Run the command:
npm install socket.io express nodemon ts-node @types/node
Here is what each library performs. The socket.io library enables real-time, two-way communication. It uses events to connect the browser and the server. Express library provides a set of features and tools for building web servers and APIs. It handles HTTP requests, routing and middleware integration. Nodemod is used to keep the server running. It automatically restarts the server when you make changes to your TypeScript files. ts-node allows you to run your TypeScript files directly, without transpiling them first. @types/node library allows you to use Node.js modules in your TypeScript code. As it benefits from type checking, code completion, and other TypeScript features.
Create the Drawing App
The application has both client-side and server-side. You begin by developing the client-side.
Importing Libraries and Declarations
Import necessary modules and libraries. That is React hooks, the useDraw custom hook, the ChromePicker component from react-color, Socket.IO, and Axios. Define types and interfaces for data structures used in the app. These include Point, DrawLineProps, Draw, and CanvasImageData. Then Create a Socket.IO instance and an Axios instance for making API requests.
'use client'
import { FC, useEffect, useState } from 'react'
import { useDraw } from '../hooks/useDraw'
import { ChromePicker } from 'react-color'
import { io, Socket } from 'socket.io-client'
import { drawLine } from '../utils/drawLine'
import axios, { AxiosInstance } from 'axios'
import strapiApiClient from './api'

const socket: Socket = io('http://localhost:3001')

interface PageProps {}

type DrawLineProps = {
  prevPoint: Point | null
  currentPoint: Point
  color: string
}

type Point = {
  x: number
  y: number
}

type Draw = {
  prevPoint: Point | null
  currentPoint: Point
  ctx: CanvasRenderingContext2D
}

interface CanvasImageData {
  id: number;
  attributes: {
    createdAt: string;
    updatedAt: string;
    publishedAt: string;
    image?: {
      data: {
        id: number;
        attributes: {
          url: string;
        };
      };
    };
  };
}
Page Component
This is the main component that renders the canvas and associated controls. It initializes state variables for color, canvas reference, and canvas image. Make a custom folder and have a hook called useDraw.ts. You use typescript to overcome the use of outdated react versions. The useDraw hook is used to manage the canvas drawing functionality.
const Page: FC<PageProps> = ({}) => {
  const [color, setColor] = useState<string>('#000')
  const { canvasRef, onMouseDown, clear } = useDraw(createLine)
  const [canvasImage, setCanvasImage] = useState<string | null>(null)

  useEffect(() => {
    const ctx = canvasRef.current?.getContext('2d')
    socket.emit('client-ready')

    socket.on('get-canvas-state', () => {
      if (!canvasRef.current?.toDataURL()) return
      console.log('sending canvas state')
      socket.emit('canvas-state', canvasRef.current.toDataURL())
    })

    socket.on('canvas-state-from-server', (state: string) => {
      console.log('I received the state')
      const img = new Image()
      img.src = state
      img.onload = () => {
        ctx?.drawImage(img, 0, 0)
      }
    })

    socket.on('draw-line', ({ prevPoint, currentPoint, color }: DrawLineProps) => {
      if (!ctx) return console.log('no ctx here')
      drawLine({ prevPoint, currentPoint, ctx, color })
    })

    socket.on('clear', clear)

    return () => {
      socket.off('draw-line')
      socket.off('get-canvas-state')
      socket.off('canvas-state-from-server')
      socket.off('clear')
    }
  }, [canvasRef])

  function createLine({ prevPoint, currentPoint, ctx }: Draw) {
    socket.emit('draw-line', { prevPoint, currentPoint, color })
    drawLine({ prevPoint, currentPoint, ctx, color })
  }
The useEffect hook sets up Socket.IO event listeners and emitters. It listens for the get-canvas-state event and sends the current canvas state to the server. It then listens for the canvas-state-from-server event and updates the canvas with the received state. It also listens for the draw-line event and draws a line on the canvas based on the received data. Finally, it listens for the clear event and clears the canvas. The cleanup function removes the event listeners when the component unmounts.
The createLine function creates a new line on the canvas. It emits the draw-line event to the server with the line data. It then calls the drawLine utility function to draw the line on the canvas.
Saving the Canvas as an Image to Strapi
This function saves the canvas image to the Strapi API. It then converts the canvas data to a Blob and creates a FormData object with the Blob. Further, it uploads the image to Strapi using the strapiApiClient and the /upload endpoint. Finally, it saves the canvas image data to Strapi using the strapiApiClient and the /canvas endpoint.
  const saveCanvasImage = async () => {
    try {
      const canvasDataURL = canvasRef.current?.toDataURL('image/png')
      if (canvasDataURL) {
        const blobData = await fetch(canvasDataURL).then(res => res.blob())
        const formData = new FormData()
        formData.append('files', blobData, 'canvas.png')

        // Upload the image to Strapi
        const uploadResponse = await strapiApiClient.post('/upload', formData, {
          headers: {
            'Content-Type': 'multipart/form-data',
          },
        })

        console.log('Upload response:', uploadResponse.data)

        // Save the canvas image data to Strapi
        const imageId = uploadResponse.data[0].id
        await strapiApiClient.post('/canvas', { data: { image: imageId } })

        console.log('Canvas image saved successfully')
      }
    } catch (error) {
      console.error('Error saving canvas image:', error)
    }
  }
In the image provided, you can see four entries. They are in the canvas collection type. Each one represents a saved canvas image. The entries display the ID, creation date, and update date for each saved canvas image.
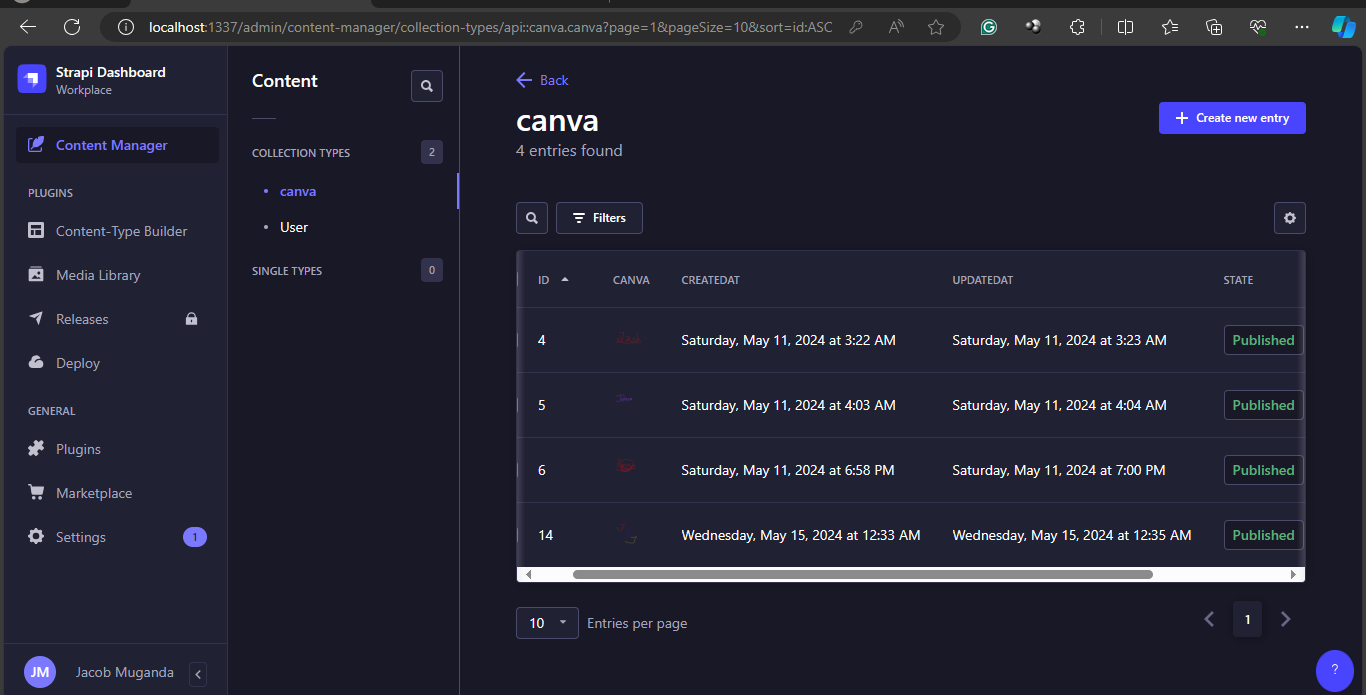
When you click Save Canvas Image, a new entry is created in the canva collection. It has the uploaded canvas image linked to it. This allows you to manage and access the saved canvas images through the Strapi Content Manager interface.
Rendering the Canvas Page
The component renders a div. It contains the ChromePicker for color selection, buttons for clearing and saving the canvas, and the canvas itself. The canvas element is bound to the canvasRef from the useDraw hook and the onMouseDown event handler.
  return (
    <div className='w-screen h-screen bg-white flex justify-center items-center'>
      <div className='flex flex-col gap-10 pr-10'>
        <ChromePicker color={color} onChange={e => setColor(e.hex)} />
        <button
          type='button'
          className='p-2 rounded-md border border-black'
          onClick={() => socket.emit('clear')}
        >
          Clear canvas
        </button>
        <button
          type='button'
          className='p-2 rounded-md border border-black'
          onClick={saveCanvasImage}
        >
          Save Canvas Image
        </button>
      </div>
      <canvas
        ref={canvasRef}
        onMouseDown={onMouseDown}
        width={750}
        height={750}
        className='border border-black rounded-md'
      />
    </div>
  )
}

export default Page
This code renders the main UI components for the drawing application.
Setting up the Server-side
The server is built using Express.js, a popular Node.js web application framework. It creates an HTTP server and initializes a Socket.IO instance for real-time communication.
import express, { Request, Response } from 'express';
import http from 'http';
const app = express();
const server = http.createServer(app);
const io = require('socket.io')(server, {
  cors: {
    origin: '*',
  },
});
The multer library is used for handling file uploads, and fs is used for file system operations.
Handling File for Uploads
The server sets a storage configuration for multer. It says where to store uploaded files and how to name them.
const storage = multer.diskStorage({
  destination: function (req, file, cb) {
    cb(null, 'upload/');
  },
  filename: function (req, file, cb) {
    cb(null, Date.now() + '-' + file.originalname);
  },
});

const upload = multer({ storage: storage });
The /upload route is defined to handle file uploads using the multer middleware.
app.post('/upload', upload.single('file'), (req: Request, res: Response) => {
  if (!req.file) {
    return res.status(400).send('No file uploaded.');
  }

  const filePath = req.file.path;
  const imageId = req.file.filename;
  const fileData = fs.readFileSync(filePath);

  canvasImageData = { id: imageId, data: fileData };

  res.status(200).json({ id: imageId });
});
When you upload the file, the server reads the file data. It then stores the data in the canvasImageData variable. You can access later.
Handling Socket.IO Events
The server listens for various Socket.IO events emitted by the clients.
io.on('connection', (socket: any) => {
  socket.on('client-ready', () => {
    socket.broadcast.emit('get-canvas-state');
  });

  socket.on('canvas-state', (state: any) => {
    console.log('received canvas state');
    socket.broadcast.emit('canvas-state-from-server', state);
  });

  socket.on('draw-line', ({ prevPoint, currentPoint, color }: any) => {
    socket.broadcast.emit('draw-line', { prevPoint, currentPoint, color });
  });

  socket.on('clear', () => io.emit('clear'));
});
When a client is ready, as signaled by the client-ready event, the server broadcasts a get-canvas-state event to other clients. It requests the current canvas state. Clients send the canvas state through the canvas-state event. The server then broadcasts it to other clients using the canvas-state-from-server event. The same thing happens when a client draws a line. They emit the draw-line event. The server then sends the line data to other clients using the same event. If a client clears the canvas by triggering the clear event, the server sends the clear event to all clients.
Starting the Server
Finally, the server starts listening on port 3001.
server.listen(3001, () => {
  console.log('✔️ Server listening on port 3001');
});
With this server-side code, the drawing application can handle real-time collaboration. Allowing multiple users to draw on the same canvas simultaneously. Additionally, users can upload and save their canvas images to Strapi API backend.
Test the Application
See how the application works as depicted in the gif below.
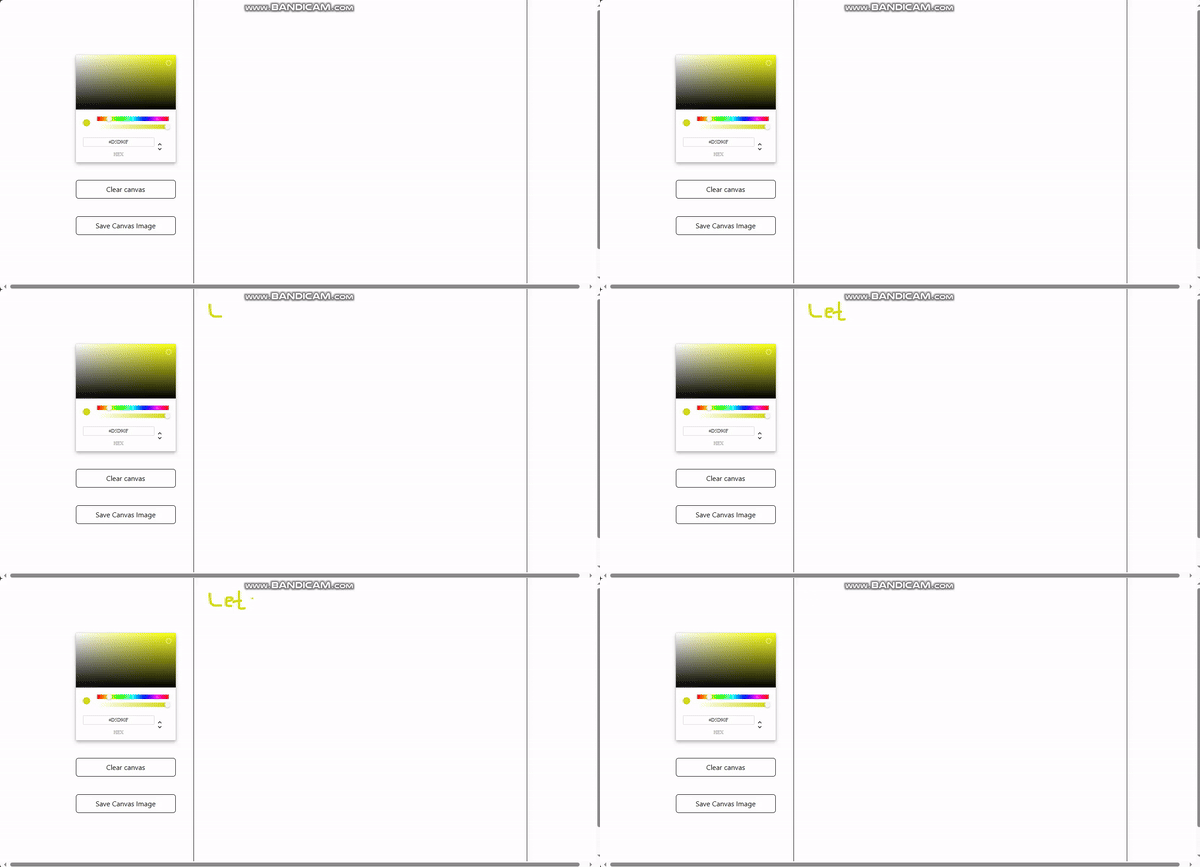
It demonstrates the application in action.
Conclusion
In this tutorial, you learned to build a real-time collaborative drawing application. You used Next.js, Socket.IO, and Strapi. The app lets many users draw together on a shared canvas. It keeps the canvas in sync in real-time using Socket.IO. The server-side code handles real-time collaboration and file uploads. The client-side code manages the user interface, drawing, and saving canvas images to the Strapi API backend.
Additional Resources
Complete source code for the application in GitHub repository.
Strapi backend in GitHub repository.
Subscribe to my newsletter
Read articles from Oduor Jacob Muganda directly inside your inbox. Subscribe to the newsletter, and don't miss out.
Written by

Oduor Jacob Muganda
Oduor Jacob Muganda
👨💻 Experienced Software Developer & Data Scientist 👨🔬 Passionate about leveraging cutting-edge technology to solve complex problems and drive innovation. With a strong background in both programming and data science, I specialize in building robust software solutions and extracting actionable insights from data. 🖥️ As a Software Developer: Proficient in multiple programming languages including Python, JavaScript, Java, and C++. Skilled in full-stack web development, with expertise in frontend (HTML/CSS/JavaScript) and backend (Node.js, Django, Flask). Experienced in developing scalable web applications, e-commerce platforms, and social media platforms. 📊 As a Machine Learning Engineer: Expertise in data analysis, machine learning, and predictive modeling using Python libraries such as NumPy, Pandas, Scikit-learn, TensorFlow, and PyTorch. Skilled in data visualization and storytelling with tools like Matplotlib, Seaborn, and Plotly. Proficient in handling big data with technologies like Apache Spark and Hadoop. 🚀 I thrive on tackling challenging problems and transforming data into actionable insights that drive business growth and innovation. Whether it's developing a user-friendly web application or building predictive models to optimize business processes, I'm dedicated to delivering impactful solutions that exceed expectations. Let's connect and collaborate on exciting projects that push the boundaries of technology and data science! 🌟