FORMS in HTML
 dheeraj koranga
1. <form> Element
The <form> element is used to create an HTML form for user input. It acts as a container for various types of form controls such as text fields, checkboxes, radio buttons, etc., that allow users to input data and submit it to a server for processing.<form action="/submit-form"
2. action Attribute
The action attribute in the <form> tag specifies where the form data should be sent when the form is submitted. The value is usually a URL to the server-side script (like PHP, Python, etc.) that will process the form data.
<form action="/submit-form" method="POST">
    <!-- Form controls go here -->
  </form>
In this case, when the form is submitted, the data will be sent to the /submit-form URL.
3. <input> Tag
The <input> tag is used to create various types of input fields in a form. It's one of the most versatile form elements, as it allows you to create text fields, radio buttons, checkboxes, buttons, etc., depending on the type attribute.
Example:
<input type="text" id="name" name="name">
4. type Attribute
The type attribute in the <input> tag specifies the type of input control to display. Different types of input fields provide different user experiences. Common types include:
text: A standard single-line text input.email: A field for email addresses.password: A field where input is hidden (useful for passwords).checkbox: A checkbox input.radio: A radio button input.submit: A submit button for the form
<form action="/action">
    <input type="text">
    <input type="email">
    <input type="password">
    <input type="checkbox">
    <input type="radio">
    <input type="submit">
</form>

5. placeholder Attribute
The placeholder attribute specifies a short hint that describes the expected value of the input field. It is displayed inside the input field when it is empty and disappears once the user starts typing.
Example:
<form action="/action"></form>
    <input type="text" placeholder="enter text">
    <input type="email" placeholder="enter you email">
</form>

6. id Attribute
The id attribute is used to uniquely identify an HTML element. It is especially useful when you need to associate a <label> with an input field using the for attribute, or when you want to target a specific element with JavaScript or CSS.
type="text" id="phone" name="phone" placeholder="Enter your phone number">
7. <label> Element
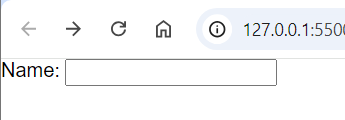
The <label> element defines a label for an input element. It improves accessibility, making it easier for screen readers to associate labels with form controls. Labels help users understand what type of input is expected.
The <label> can be associated with an input element by using the for attribute, which should match the id of the corresponding input field.
Example:
<label for="name">Name:</label>
<input type="text" id="name" name="name">

8. for Attribute
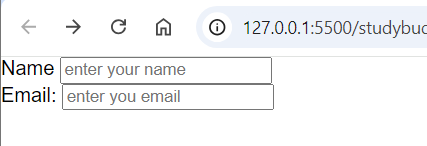
The for attribute is used within a <label> tag to explicitly bind the label to a specific input element. Its value should match the id of the input field.
Example:
<div>
    <label for="username">Name</label>
    <input type="text" id="username" placeholder="enter your name"></div>
<div>
    <label for="email">Email:</label>
    <input type="email" id="email" placeholder="enter you email">
</div>

Complete Example of a Form:
<form action="/submit-form" method="POST">
    <label for="name">Name:</label>
    <input type="text" id="name" name="name" placeholder="Enter your name">
    <br>
    <label for="email">Email:</label>
    <input type="email" id="email" name="email" placeholder="Enter your email">
    <br>
    <label for="password">Password:</label>
    <input type="password" id="password" name="password" placeholder="Enter your password">
    <br>
    <input type="submit" value="Submit">
  </form>

<form>: The form element with theaction="/submit-form", specifying where the form data is sent.<label>: Each label is associated with an input field via theforattribute, which matches theidof the input.<input>: Different types of input fields are used for text, email, and password.placeholder: Provides hints inside the input fields before any user input.id: Uniquely identifies each input field, making it accessible and easily manipulable via CSS or JavaScript.
Name Attribute
The name attribute in HTML is used to specify a name for an input element within a form. This attribute is essential because it identifies the form field data when it is sent to the server upon form submission. Each form control (like <input>, <textarea>, <select>, etc.) should have a unique name attribute, allowing the server to process the corresponding data.
<form action="/server">
    <label for="username">Username:</label>
    <input type="text" id="username" name="username" placeholder="Enter your username">

    <label for="password">Password:</label>
    <input type="password" id="password" name="password" placeholder="Enter your password">

    <input type="submit" value="Login">
</form>
whenever you submit the form with the name attribute it will send the data in name-value pair. see the below image

after submitting the value the data will be sent to the desired URL

Why is the name Attribute Important?
Form Data Submission: Without the
nameattribute, the form data from that field won't be included when submitting the form.Example without
name:htmlCopy code<input type="text" id="username" placeholder="Enter your username">This input won't send any data to the server when the form is submitted, as it has no
nameattribute.Server-Side Processing: The server uses the
nameattribute to process form data. For example, in Python (with Flask), PHP, or Node.js, the server expects a field's data to be associated with thenamekey.
Summary:
The
nameattribute assigns a unique identifier to each form element.It is essential for the server to recognize and process form data properly.
Without the
nameattribute, the form field's data will not be sent during form submission.
Subscribe to my newsletter
Read articles from dheeraj koranga directly inside your inbox. Subscribe to the newsletter, and don't miss out.
Written by
