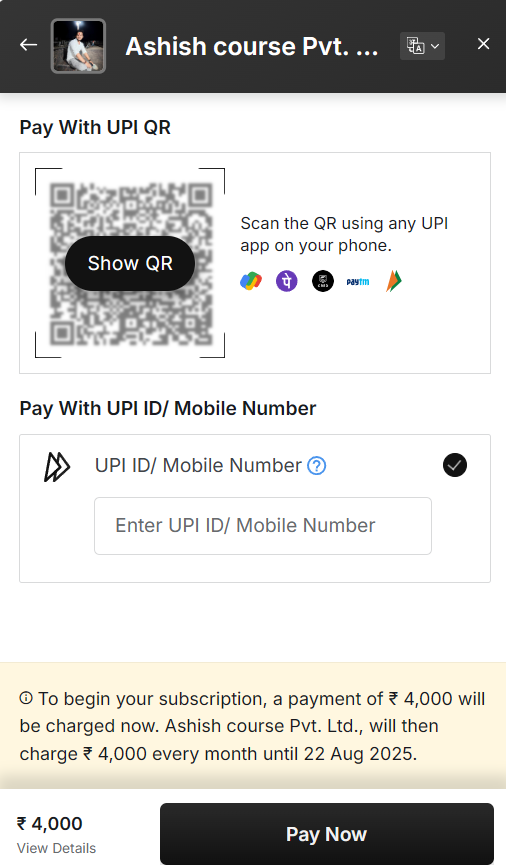
💻Payment Gateway 📸
 Ashish Prabhakar
📸 Razorpay Payment Integration
Welcome to the Razorpay Payment Integration project! This project demonstrates a simple integration of Razorpay into a web application using React and Node.js.
🛠️ Technologies Used
React.js for the frontend
Node.js with Express for the backend
Axios for making API requests
Tailwind CSS for styling
Razorpay API for payment processing
💥Frontend : React J.S
Razorpay is a payment gateway that offers a secure and affordable way for businesses to accept and disburse payments online. It's a popular payment gateway for businesses in India, and it accepts payments in almost all currencies,INR USD and many more.
To integrate Razorpay in the frontend using React.js, follow these steps. You'll need to install the Razorpay script, configure it, and handle payments directly from your React app.
Steps to Integrate Razorpay in React.js
1. Install Razorpay Script in Your React App
First, you need to load the Razorpay script into your React application. One way to do this is by dynamically adding the Razorpay checkout script in your index.html file or directly within your React component.
Option 1: Add Script in index.html
<script src="https://checkout.razorpay.com/v1/checkout.js"></script>
Alternatively, you can load the Razorpay script in your component using a dynamic script loader.
<!DOCTYPE html>
<html lang="en">
  <head>
    <meta charset="utf-8" />
    <link rel="icon" href="%PUBLIC_URL%/favicon.ico" />
    <meta name="viewport" content="width=device-width, initial-scale=1" />
    <meta name="theme-color" content="#000000" />
    <meta
      name="description"
      content="Web site created using create-react-app"
    />
    <link rel="apple-touch-icon" href="%PUBLIC_URL%/logo192.png" />

    <link rel="manifest" href="%PUBLIC_URL%/manifest.json" />

    <title>Razorpay Payment</title>
  </head>
  <body>
    <noscript>You need to enable JavaScript to run this app.</noscript>
    <div id="root"></div>
  </body>
  <script src="https://checkout.razorpay.com/v1/checkout.js"></script> //
</html>
Create the Checkout Handler
Now, let's write a function to handle the Razorpay checkout. This will be called when the user clicks on the "Pay Now" button.
      const options = {
      key,
      amount: order.amount,
      currency: "INR",
      name: "Ashish Pvt. Ltd.",
      description: "Tutorial of RazorPay",
      image: "https://avatars.githubusercontent.com/u/141730191?v=4",
      order_id: order.id,
      callback_url: "http://localhost:4000/api/paymentverification",
      prefill: {
        name: "Ashish Prabhakar",
        email: "ashishprabhakar1010@gmail.com",
        contact: "**********",
      },
      notes: {
        address: "Razorpay Corporate Office",
      },
      theme: {
        color: "#121212",
      },
    };
    const paymentObject = new window.Razorpay(options);
    paymentObject.open();
  };
🚀 Features
Easy integration with Razorpay payment gateway
Secure payment handling with Razorpay API keys
Responsive design with Tailwind CSS
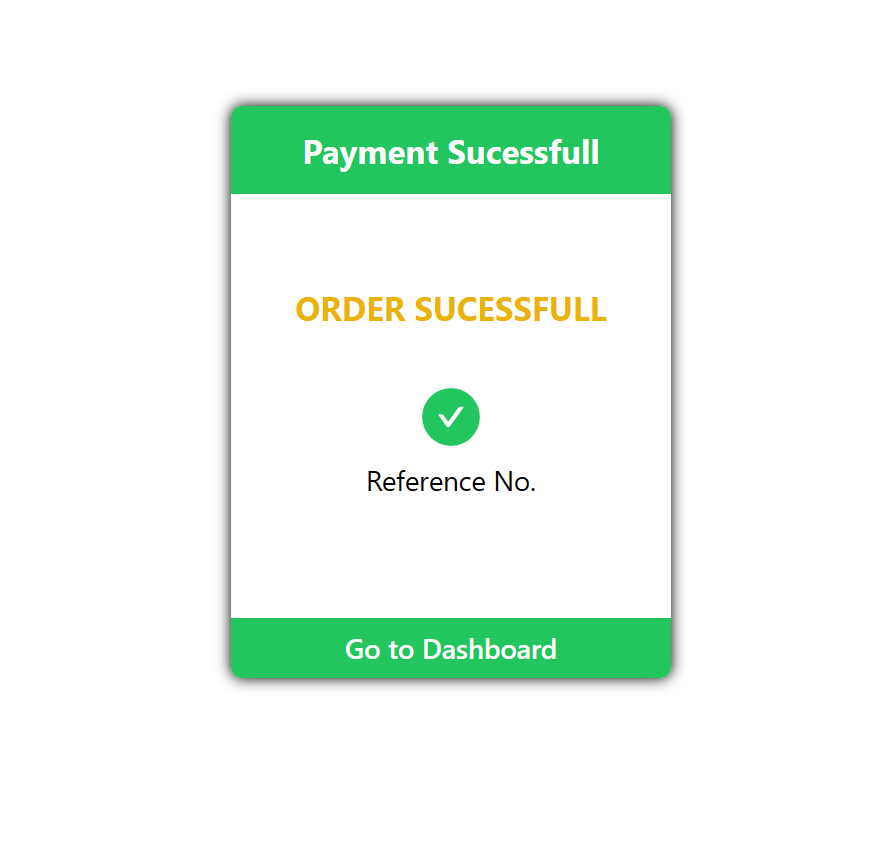
After the Payment has been sucessfull you Redirect to sucessfull page
import React from "react";
import { AiFillCheckCircle } from "react-icons/ai";
import { Link, useSearchParams } from "react-router-dom";
const PaymentSuccess = () => {
  const seachQuery = useSearchParams()[0];

  const referenceNum = seachQuery.get("reference");
  return (
    <>
      <div className="min-h-[90vh] flex items-center justify-center text-white">
        <div className="w-80 h-[26rem] flex flex-col justify-center items-center shadow-[0_0_10px_black] rounded-lg relative">
          <h1 className="bg-green-500 text-center absolute top-0 w-full py-4 text-2xl font-bold rounded-tl-lg rounded-tr-lg">
            Payment Sucessfull
          </h1>

          <div className="px-4 flex flex-col items-center justify-center space-y-2">
            <div className="text-center space-y-2 ">
              <h2 className="text-2xl font-bold text-yellow-500 uppercase">
             Order Sucessfull
              </h2>
              <p className="text-left ">Now You Can Enjoy All the Courses </p>
            </div>
            <AiFillCheckCircle className="text-green-500 text-5xl" />
          <p className="text-black text-xl">Reference No.{referenceNum}</p>
          </div>
          <Link
            to="/"
            className="bg-green-500 hover:bg-green-600 transition-all ease-in-out duration-300 absolute bottom-0 w-full py-2 text-xl font-semibold text-center rounded-br-lg rounded-bl-lg"
          >
            <button>Go to Dashboard</button>
          </Link>
        </div>
      </div>

    </>
  );
};

export default PaymentSuccess;
SucessFull Pages Look’s

{
  "name": "Ashish Razorpay Frontend ",
  "version": "0.1.0",
  "private": true,
  "proxy": "http://localhost:4000",
  "dependencies": {
    "@chakra-ui/react": "^2.2.1",
    "@emotion/react": "^11.9.3",
    "@emotion/styled": "^11.9.3",
    "@testing-library/jest-dom": "^5.16.4",
    "@testing-library/react": "^13.3.0",
    "@testing-library/user-event": "^13.5.0",
    "axios": "^0.27.2",
    "framer-motion": "^6.3.16",
    "react": "^18.2.0",
    "react-dom": "^18.2.0",
    "react-icons": "^5.3.0",
    "react-router-dom": "^6.3.0",
    "react-scripts": "5.0.1",
    "web-vitals": "^2.1.4"
  },
  "scripts": {
    "start": "react-scripts start",
    "build": "react-scripts build",
    "test": "react-scripts test",
    "eject": "react-scripts eject"
  },
  "eslintConfig": {
    "extends": [
      "react-app",
      "react-app/jest"
    ]
  },
  "browserslist": {
    "production": [
      ">0.2%",
      "not dead",
      "not op_mini all"
    ],
    "development": [
      "last 1 chrome version",
      "last 1 firefox version",
      "last 1 safari version"
    ]
  },
  "devDependencies": {
    "autoprefixer": "^10.4.20",
    "postcss": "^8.4.47",
    "tailwindcss": "^3.4.12"
  }
}
💥💻Backend:Node.JS
Razorpay is a payment gateway that provides a variety of services for businesses and individuals, including payment gateway services, transaction processing, and fund settlement. Here are some things to know about Razorpay in the backend:
Authentication
Razorpay uses API keys and API secrets to authenticate applications
Payment flow
Customer places an order
Server creates the order
Order ID is returned
Order ID is passed to checkout
Payment details are collected
Bank authenticates the payment
we have create the express js and setup the server in the backend file
import express from "express";
import { config } from "dotenv";
import paymentRoute from "./routes/paymentRoutes.js";
config({ path: "./config/config.env" });

export const app = express();
app.use(express.json());
app.use(express.urlencoded({ extended: true }));

//here the code for the calling the router in the middleware
app.use("/api", paymentRoute);

app.get("/api/getkey", (req, res) =>
  res.status(200).json({ key: process.env.RAZORPAY_API_KEY })
);
the we have to setup the envionmental variable in the node js backend
PORT = 4000

RAZORPAY_API_KEY= ""

RAZORPAY_API_SECRET=""

MONGO_URI=""
//set up as per your id in the backend
🌿connected to mongodb
To connect to a MongoDB, retrieve the hostname and port information from Cloud Manager and then use a MongoDB client, such as mongosh or a MongoDB driver, to connect. To connect to a cluster, retrieve the hostname and port for the mongos process.
import mongoose from "mongoose";

export const connectDB = async () => {
  const { connection } = await mongoose.connect(process.env.MONGO_URI, {
    useNewUrlParser: true,
    useUnifiedTopology: true,
  });
  console.log(`Mongodb is connected with ${connection.host}`);

};
then run the command nodemon server.js
📝 How to Install and Run
1. Clone the repository:
git clone https://github.com/ashish8513/Razorpay-Payment-Tutorial
Subscribe to my newsletter
Read articles from Ashish Prabhakar directly inside your inbox. Subscribe to the newsletter, and don't miss out.
Written by

Ashish Prabhakar
Ashish Prabhakar
Heyy!! I am Ashish Prabhakar Final Year Student on Bachelor of Computer Application with a passionate Full Stack Developer with a strong focus on building scalable and efficient web applications. My expertise lies in the MERN stack (MongoDB, Express.js, React.js, Node.js), Open to new opportunities in software development and eager to contribute to innovative projects on Full Stack Development