Effortless Web and Database Deployment with Docker Compose
 Vishawnath Sethi
Table of contents
- Introduction
- What is Docker Compose?
- Key Concepts
- What if Docker Compose is Not Installed?
- Getting Started with Docker Compose
- Configuration Breakdown
- Accessing the Web App and MySQL Database Locally
- Issues Faced During the Task and Their Fixes
- Testing Connectivity Between Web and Database Containers
- Main Outcome of the Project
Introduction
In the world of Docker, managing multiple containers can be a challenge. Docker Compose is a tool that helps simplify this process by allowing you to define and manage multi-container applications. Let’s dive into what Docker Compose is and how it can make working with Docker easier.
What is Docker Compose?
Docker Compose is a tool used for defining and running multi-container Docker applications. Instead of running multiple docker run commands, you use a single file to configure your application’s services, networks, and volumes.
Key Concepts
Compose File: This is where you define your multi-container application. It uses YAML (a human-readable data format) to specify the configuration.
Service: A container that you want to run. Each service runs a specific image and configuration.
Network: Services can communicate with each other over defined networks.
Volume: A persistent storage that containers can use to share data.
What if Docker Compose is Not Installed?
Docker Compose usually comes pre-installed with Docker Desktop, but if it isn’t available, here’s how to install it.
1. Install Docker Compose on Linux
If you’re using Linux, Docker Compose may not be installed by default. You can install it manually by following these steps:
sudo curl -L "https://github.com/docker/compose/releases/download/v2.11.2/docker-compose-$(uname -s)-$(uname -m)" -o /usr/local/bin/docker-compose
This command downloads the Docker Compose binary for your system. Here’s what each part does:
sudo: Ensures you have administrative privileges to install Docker Compose.curl: Download the file from the internet.-L: Follows redirects to ensure the file is properly downloaded."https://github.com/docker/compose/releases/download/v2.11.2/docker-compose-$(uname-s)-$(uname -m)": The URL for the Docker Compose release version. It selects the right version based on your system’s operating system and architecture (uname -sanduname -m).-o /usr/local/bin/docker-compose: Specifies where to save the Docker Compose binary.
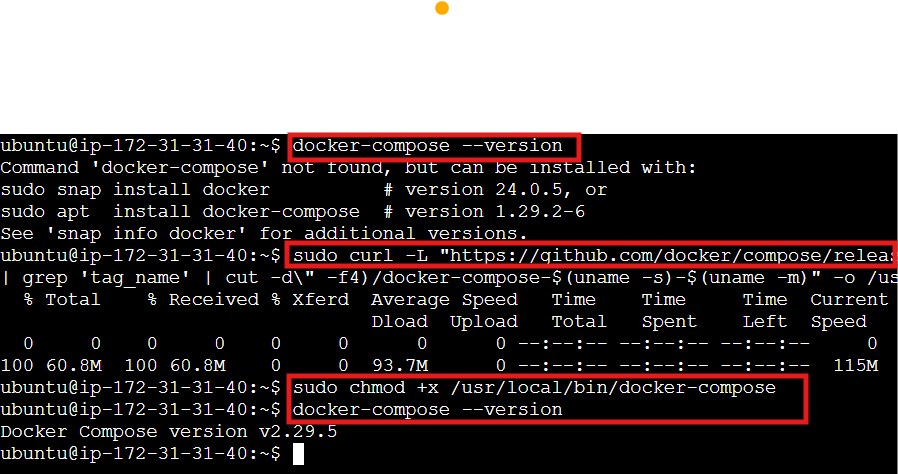
Next, set the proper permissions for the downloaded file:
sudo chmod +x /usr/local/bin/docker-compose
This makes the file executable.
Verify that Docker Compose is installed:
docker-compose --version
2. Install Docker Compose on Windows or macOS
Docker Compose is bundled with Docker Desktop for both Windows and macOS. Just make sure you have Docker Desktop installed, and Docker Compose should work automatically.
Getting Started with Docker Compose
1. Create a docker-compose.yml File
The core of Docker Compose is the docker-compose.yml file. This file defines all the services, networks, and volumes that your application needs. Here’s a simple example:
version: '3'  # Specifies the Docker Compose file format version

services:  # Defines the services (containers) in your app
  web:
    image: nginx:alpine  # Uses the Nginx image with a small footprint
    ports:
      - "8081:80"  # Maps container port 80 to host port 8081 for accessing the web app

  db:
    image: mysql:5.7  # Uses the MySQL 5.7 image
    ports:
      - "3306:3306"  # Maps container port 3306 to host port 3306 for database access
    environment:
      MYSQL_ROOT_PASSWORD: example  # Sets the root password for MySQL
    volumes:
      - db-data:/var/lib/mysql  # Persists database data using a Docker volume

volumes:
  db-data:  # Defines the volume for MySQL data storage
Configuration Breakdown
version: '3'
Specifies the format version of the Docker Compose file.services:
Lists the containers to be managed.web:
Configures the Nginx web server.image: nginx:alpine
Uses a lightweight Nginx image.ports: "8081:80"
Redirects web traffic from port 8081 on your host to port 80 in the container, making the web app accessible athttp://localhost:8081.
db:
Configures the MySQL database.image: mysql:5.7
Uses MySQL version 5.7.ports: "3306:3306"
Redirects database traffic from port 3306 on your host to port 3306 in the container, allowing local access to the database.environment: MYSQL_ROOT_PASSWORD: example
Sets the root password for MySQL toexample.volumes: db-data:/var/lib/mysql
Uses a volume nameddb-datato store database files, ensuring data persists even if the container is restarted.
volumes:
Defines the volume for persistent storage of database data.db-data:
Creates a named volume for MySQL data.
This configuration ensures your web and database services are properly set up and accessible, with persistent storage for database files.
2. Start Your Application
To start your application, navigate to the directory containing your docker-compose.yml file and run:
docker-compose up
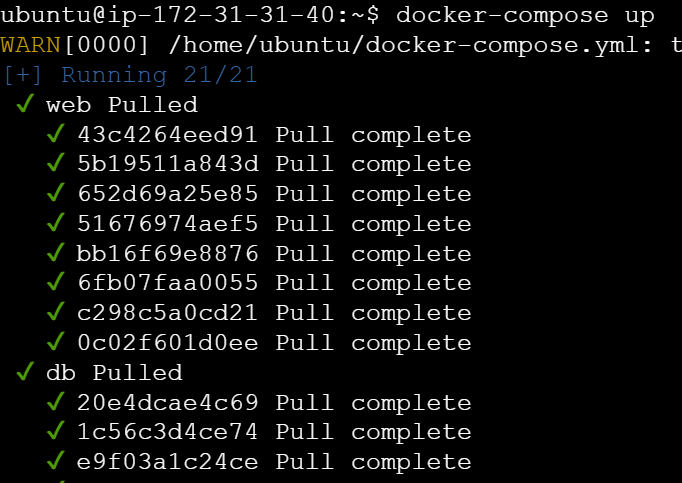


This command reads the docker-compose.yml file & creates the necessary containers, and starts them. If you want to run it in the background, use:
docker-compose up -d
3. Manage Your Application
You can manage your application using several Docker Compose commands:
Stop the application:
docker-compose down
This stops and removes the containers created by
docker-compose up.View logs:
docker-compose logs
This command shows the logs from all the containers.
Scale services:
docker-compose up --scale web=3
This command scales the
webservice to 3 replicas.
Accessing the Web App and MySQL Database Locally
After you've started your multi-container application using Docker Compose, you’ll want to access the web app (Nginx) and MySQL database running inside the containers. Here's how you can do it.
1. Accessing the Nginx Web App Locally
Once the docker-compose up the command is run, the Nginx container is started and accessible via your browser.
URL to access:: localhost:8081
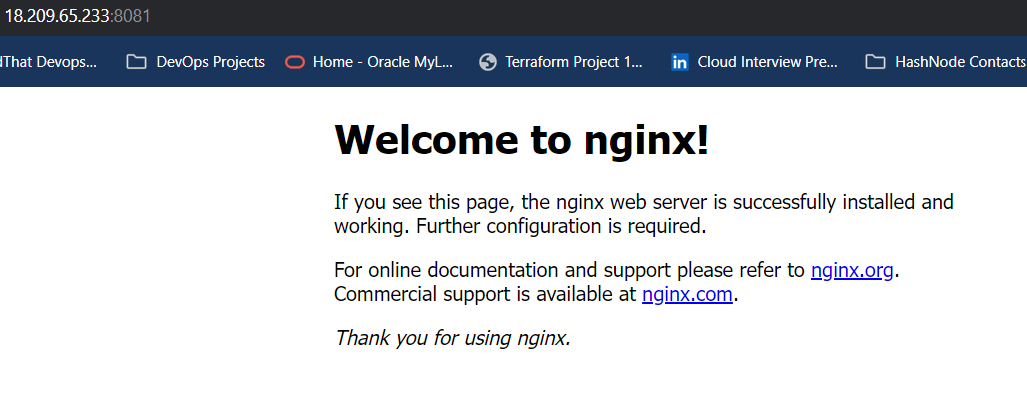
Purpose: This lets you interact with the web application running inside the container as if it were hosted directly on your local machine.
2. Accessing the MySQL Database Locally
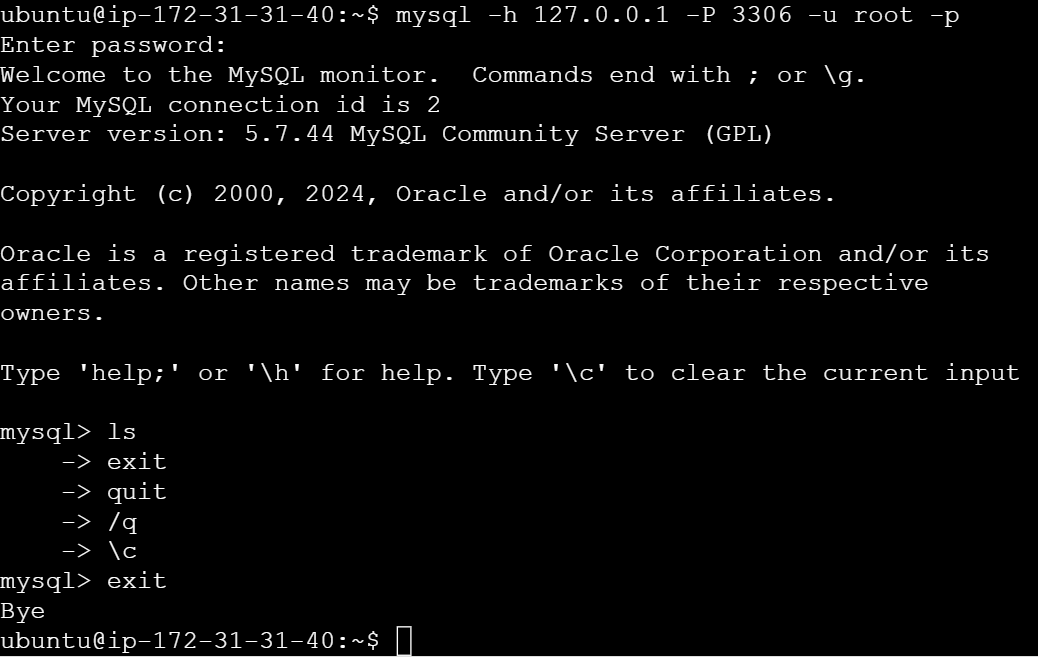
mysql -h 127.0.0.1 -P 3306 -u root -p
mysql: This starts the MySQL command-line client.-h 127.0.0.1: Specifies the host to connect to.127.0.0.1means your local machine (localhost).-P 3306: Specifies the port number to use for the connection.3306is the default port for MySQL.-u root: Specifies the MySQL username to log in as.rootis the default administrative user.-p: Prompts you to enter the password for therootuser.
So, this command connects you to a MySQL server running on your local machine using port 3306 and lets you log in as the root user. You’ll be asked to enter the password after running the command.
Issues Faced During the Task and Their Fixes
1. MySQL Connection Error
Issue: Unable to connect to MySQL server (ERROR 2003 (HY000): Can't connect to MySQL server on '127.0.0.1:3306').
Fix:
Ensure MySQL Container is Running: Use
docker psto check if the container is up.Check Port Mapping: Verify the port mapping in
docker-compose.yml("3306:3306").Verify Network Configuration: Use
docker inspect <container_id>to check port bindings.Use Internal IP: If on a remote server, use the container’s internal IP for connection.
2. Exiting MySQL
Issue: Unable to exit the MySQL prompt.
Fix:
Cancel Command: Type
\cto cancel the current command.Exit MySQL: Type
exit;orquit;to exit the MySQL prompt. Ensure commands are terminated with a semicolon (;).
Testing Connectivity Between Web and Database Containers
To ensure that the web container can successfully communicate with the database container, follow these steps:
1. Access the Web Container
First, gain access to the shell of the web container using Docker Compose:
docker-compose exec web sh

If your container uses bash, use:
docker-compose exec web bash
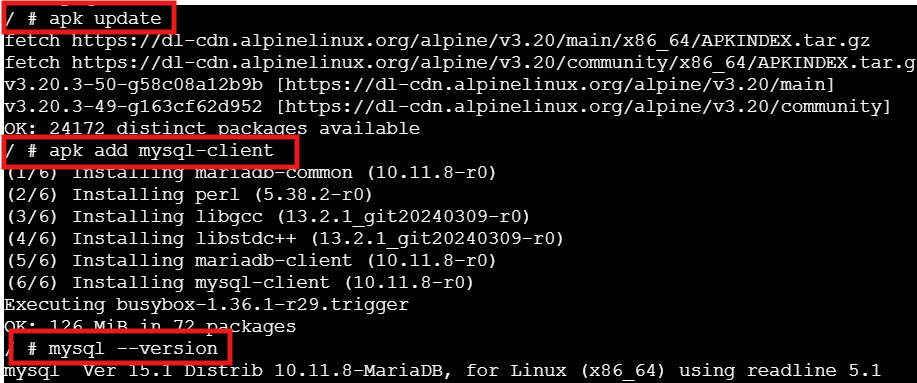
2. Check for MySQL Client Installation
Verify if the MySQL client is installed by running:
mysql --version

If the MySQL client is not installed, you will need to install it.
3. Install MySQL Client (If Not Installed)
For Debian/Ubuntu-based containers:
apt-get update
apt-get install -y mysql-client
For Alpine-based containers:
apk update
apk add mysql-client
For CentOS/RHEL-based containers:
yum install -y mysql
or
dnf install -y mysql
4. Test Database Connectivity
Once the MySQL client is installed, test the connection to the database container using the following command:
mysql -h db -u root -pexample -e "SHOW DATABASES;"
Explanation:
-h db: Specifies the hostname of the database service, which isdbin this case.-u root: Specifies the MySQL username (root).-pexample: Provides the password for the MySQL user (example).-e "SHOW DATABASES;": Executes the SQL command to list all databases.
Output:
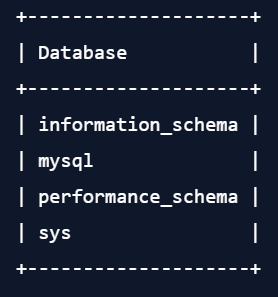
The output confirms that the web container successfully connected to the MySQL database container and was able to retrieve the list of databases.
Main Outcome of the Project
The main outcome of this Docker Compose project is to easily manage a web server and a database using a single configuration file. Here's what you achieve:
Simple Setup: Start both services with one command (
docker-compose up).Easy Configuration: The
docker-compose.ymlfile outlines how everything is set up, making it easy to understand and adjust.Flexible Scaling: Quickly scale services up or down as needed.
In the end, you have a web server and a database running smoothly in separate containers but working together effortlessly.
Subscribe to my newsletter
Read articles from Vishawnath Sethi directly inside your inbox. Subscribe to the newsletter, and don't miss out.
Written by

Vishawnath Sethi
Vishawnath Sethi
🌟 Vishawnath Sethi | DevOps Engineer & Cloud Enthusiast 🌟 I have nearly 2 years of hands-on experience in DevOps and cloud technologies, complemented by AWS and Azure certifications. Each day, I strive to upskill and share my journey in this dynamic field. I’m passionate about optimizing workflows and enhancing application deployment. Join me as I explore the latest trends, share insights, and empower others on their cloud and DevOps paths. Let’s connect and grow together in this exciting landscape!