Terraform HCP Practical learning
 Mohamed El Eraki
Inception
Hello everyone, This article is part of The Terraform + AWS series, And it does not depend on any other article, I use this series to publish-out AWS + Terraform Projects & Knowledge.
This Article is written down based on HashiCorp Docs with summarizing, collecting, providing practical learning, and listing down the important points.
Overview
In advanced level of using 𝐈𝐚𝐂 - 𝐓𝐞𝐫𝐫𝐚𝐟𝐫𝐨𝐦, you will be required to 𝐛𝐮𝐢𝐥𝐝 your 𝐞𝐧𝐯𝐢𝐫𝐨𝐧𝐦𝐞𝐧𝐭 in 𝐦𝐮𝐥𝐭𝐢𝐩𝐥𝐞 𝐫𝐞𝐠𝐢𝐨𝐧𝐬/𝐚𝐜𝐜𝐨𝐮𝐧𝐭 providing 𝐃𝐞𝐯&𝐏𝐫𝐨𝐝 environment or 𝐇𝐢𝐠𝐡 𝐚𝐯𝐚𝐢𝐥𝐚𝐛𝐢𝐥𝐢𝐭𝐲.
There're multiple ways Achieving that using Terraform and one of them is the one provided by HashiCorp, 𝐇𝐚𝐬𝐡𝐢𝐂𝐫𝐨𝐩 𝐂𝐥𝐨𝐮𝐝 𝐩𝐥𝐚𝐭𝐟𝐨𝐫𝐦.
Today's Article will 𝐃𝐢𝐠 𝐝𝐞𝐞𝐩 with 𝐩𝐫𝐚𝐜𝐭𝐢𝐜𝐚𝐥 𝐬𝐭𝐞𝐩𝐬 of how to understand and use 𝐇𝐂𝐏.
What is HashiCorp Cloud Platform?
HashiCorp cloud platform “HCP“ is an online platform that allows you to store statefiles, create multiple remote workspaces instead of local, Integrate with Version control “GitHub,“ Manage plan and apply provisioning, and even integrate with version control allowing auto trigger for your deployment, more and more.
HCP Terraform builds on these features by managing Terraform runs in a consistent and reliable environment instead of on your local machine. It securely stores state and secret data, and can connect to version control systems so that you can develop your infrastructure using a workflow similar to application development. The HCP Terraform UI provides a detailed view into the resources managed by a Terraform project and gives enhanced visibility into each Terraform operation.
HCP Terraform also has a private registry for sharing your organization's Terraform modules and providers. Paid features include access controls for approving changes to infrastructure, detailed policy controls for governing the contents of Terraform configurations, cost estimates for runs, and more.
HCP Terraform helps you collaborate on each step of your infrastructure development process. For example, each time you plan a new change, your team can review and approve the plan before you apply it. It also automatically locks state during operations to prevent concurrent modifications that may corrupt the state file.
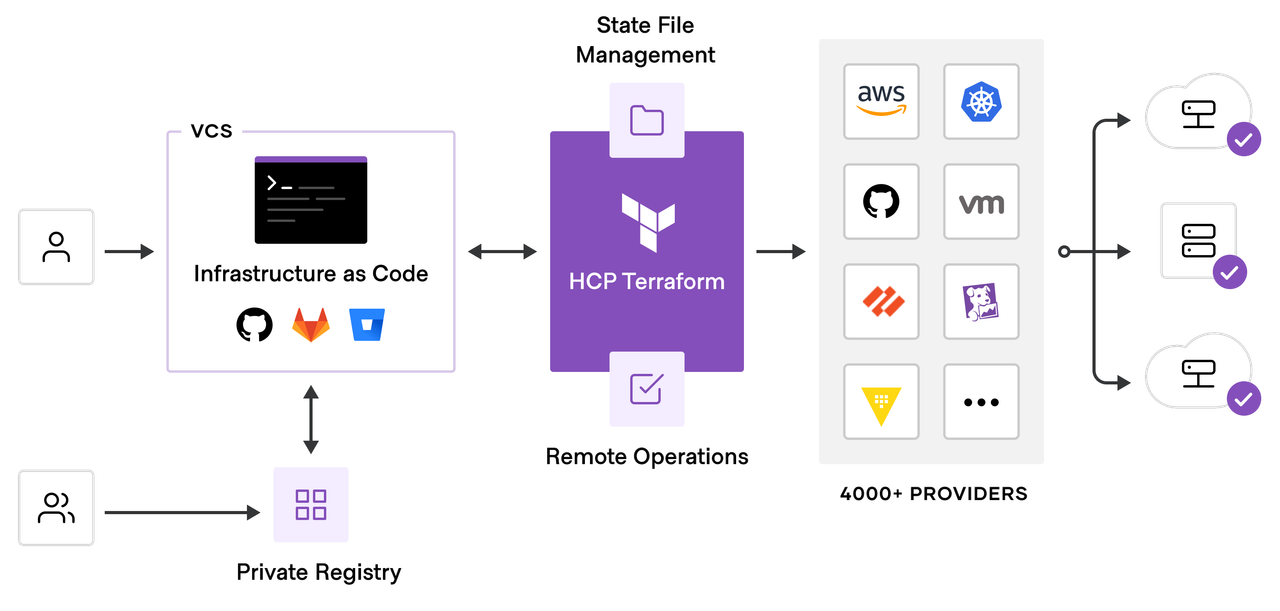
The below screenshot clears The HCP workflow. As you’re dealing with IaC code and pushing it to your repo and considering as well you’re using a private registry that includes your own modules. Then HCP manages your deployment starting from statefile to securely authenticate with the provider using secret variables.
Workflows - Workspaces
In HCP Terraform, your resources are organized by workspaces -i.e. similar to local workspaces- which contain your resource definitions, environment and input variables, and state files. A Terraform operation occurs within a workspace, and Terraform uses the configuration and state for that workspace to modify your infrastructure.
HCP Terraform supports three workflows for your Terraform runs:
The CLI-driven workflow, which uses Terraform's standard CLI tools to execute runs in HCP Terraform.
The UI/Version Control System(VCS)-driven workflow, in which changes pushed to version control repositories trigger runs in the associated workspace.
The API-driven workflow, which allows you to create tooling to interact with the HCP Terraform API programmatically.
The CLI-driven workflow
In the CLI-driven workflow, you initiate Terraform operations in your Terminal, and use HCP Terraform's ephemeral remote execution environments for your operations. HCP Terraform securely stores any input and environment variables needed by your configuration, as well as your current and previous state files. The CLI-driven workflow enables collaboration and allows you to leverage the stability, security, and enhanced visiblity of HCP Terraform while still using the same familiar Terraform workflow, with minimal additional configuration.
The VCS-driven workflow
For the VCS-driven workflow, you must configure VCS access and create your workspace, then associate it with a repository containing your Terraform configuration. You can then configure your workspace to create speculative plans for any Pull Requests, which allows your team to review how the changes would modify infrastructure. Any merges to your main branch then trigger Terraform runs to implement your changes.
CLI-Driven Practical learning
Create an HCP Organization
The Organization is your space of configurations, this space will include projects and the project will include workspaces, you can create multiple Organizations.
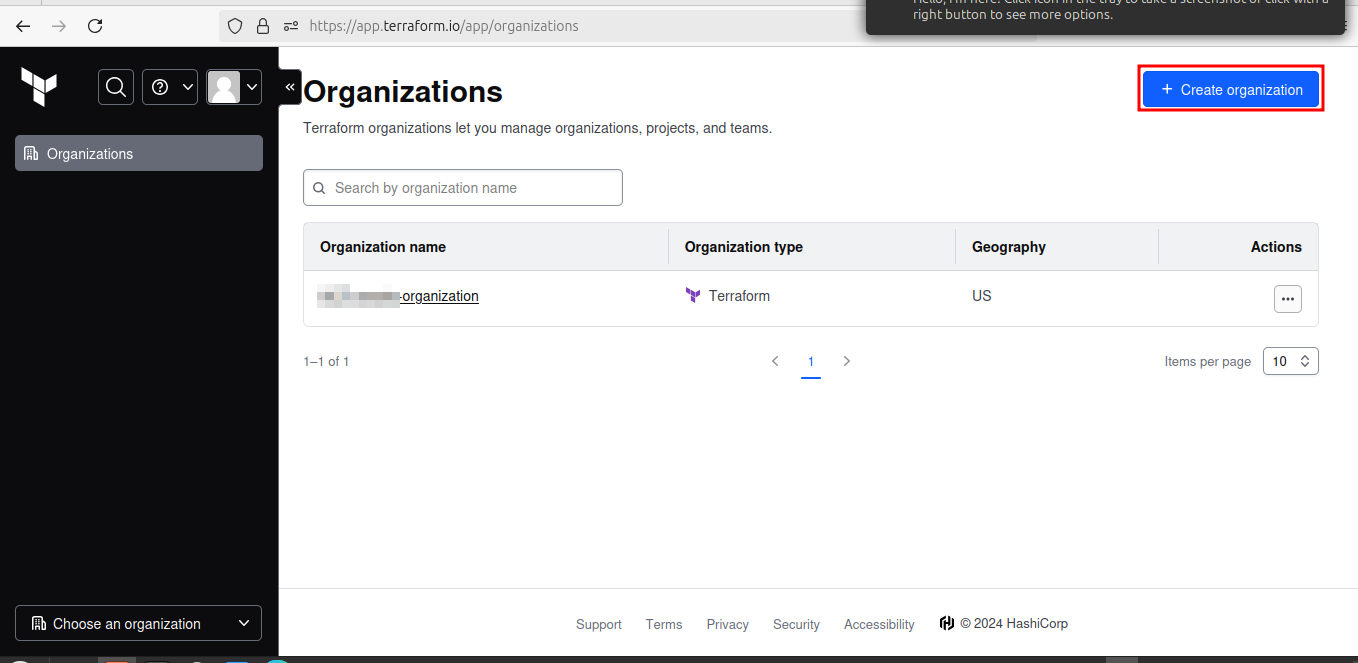
Once you log in to HCP, at the organization page, Create an organization.
The next screen will prompt you to create a new organization. Creating organizations of up to 5 users is free, and the members you add to the organization will be able to collaborate on your workspaces and share private modules and providers.
Enter an organization name and email address. You can use the same email address that you used for your account.
💡If you want to join an existing organization, give the organization's administrator the email address you used to create an account. They will be able to send you an invite.
Log in to HCP Terraform from the CLI
HCP Terraform runs Terraform operations and stores state remotely, so you can use Terraform without worrying about the stability of your local machine, or the security of your state file.
To use HCP Terraform from the command line, you must log in. Logging in allows you to trigger remote plans and runs, migrate state to the cloud, and perform other remote operations on configurations with HCP Terraform.
Start the login flow
In order to authenticate with HCP Terraform, run the terraform login subcommand. Respond yes to the prompt to confirm that you want to authenticate.
$ terraform login
Terraform will request an API token for app.terraform.io using your browser.

If login is successful, Terraform will store the token in plain text in
the following file for use by subsequent commands:
    /Users/redacted/.terraform.d/credentials.tfrc.json

Do you want to proceed?
  Only 'yes' will be accepted to confirm.

  Enter a value: yes
Generate a token
A browser window will automatically open to the HCP Terraform login screen. Enter a token name in the web UI, or leave the default name, terraform login.
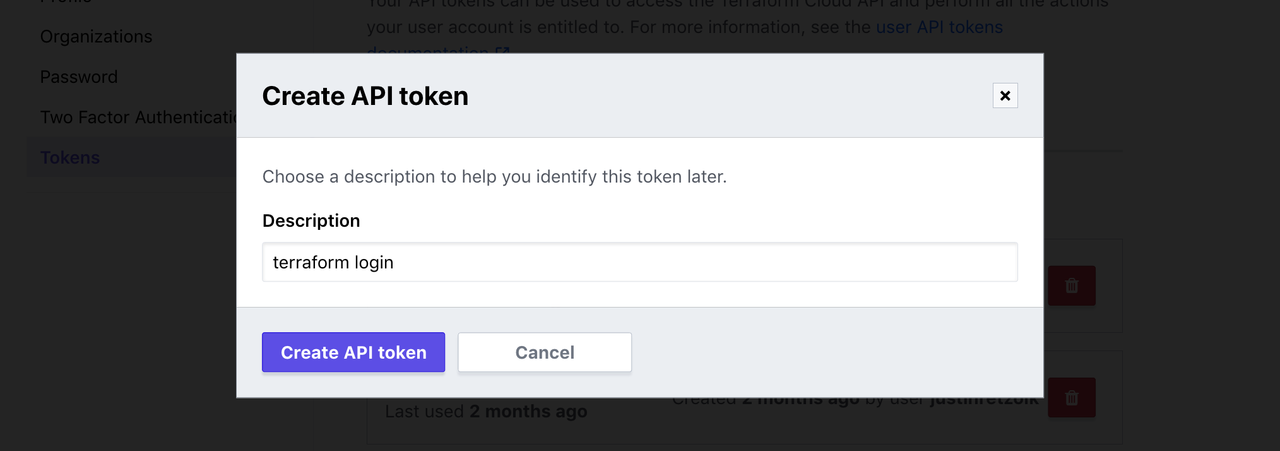
Click Create API token to generate the authentication token.
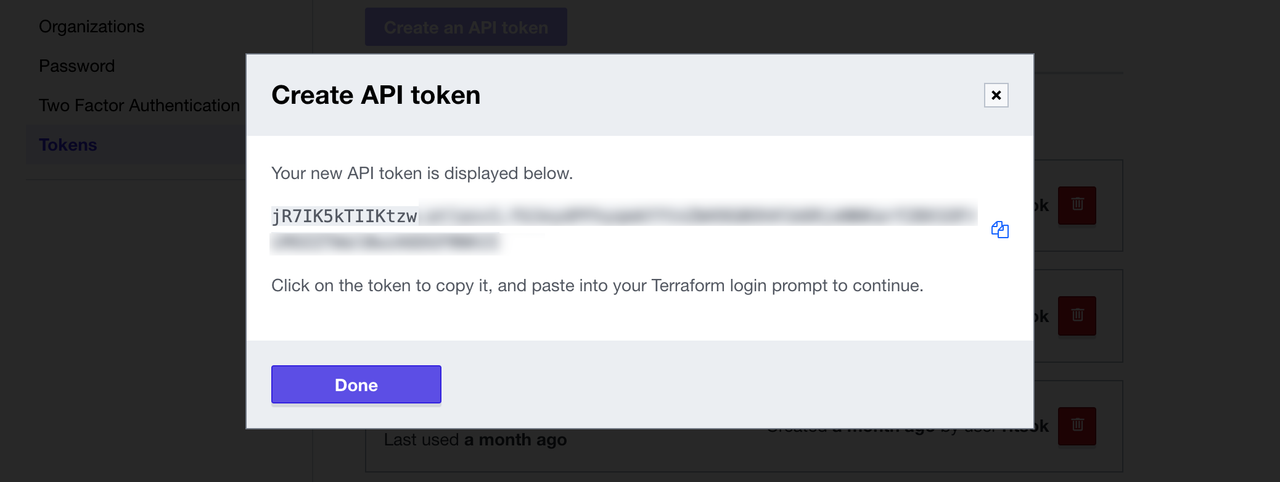
Save a copy of the token in a secure location. It provides access to your HCP Terraform organization. Terraform will also store your token locally at the file path specified in the command output.
Add the token to the CLI
When the Terraform CLI prompts you, paste the user token exactly once into your terminal. Terraform will hide the token for security when you paste it into your terminal. Press Enter to complete the authentication process.
Terraform must now open a web browser to the tokens page for app.terraform.io.

If a browser does not open this automatically, open the following URL to proceed:
    https://app.terraform.io/app/settings/tokens?source=terraform-login


---------------------------------------------------------------------------------

Generate a token using your browser, and copy-paste it into this prompt.

Terraform will store the token in plain text in the following file
for use by subsequent commands:
    /Users/redacted/.terraform.d/credentials.tfrc.json

Token for app.terraform.io:
  Enter a value:


Retrieved token for user redacted

Welcome to HCP Terraform!
Create a credentials variable set
HCP Terraform lets you define input and environment variables using either workspace-specific variables, or sets of variables that you can reuse in multiple workspaces. Variable sets allow you to avoid redefining the same variables across workspaces, so you can standardize common configurations throughout your organization. One common use case for variable sets is for provider credentials. By defining a variable set for your credentials, you can easily reuse the same variables across multiple workspaces and efficiently and securely rotate your credentials.
In this tutorial, you will create a variable set for your AWS credentials.
Create a variable set
You can define both input variables and environment variables in variable sets. Input variables define the values for variables you reference in your configuration, while environment variables typically store provider credentials or modify Terraform's behavior, such as logging verbosity.
To create a variable set, navigate to your organization's Settings, then to Variable sets.
Next, click Create variable set.

Name the variable set "AWS Credentials".
You can apply a variable set to all workspaces in your organization, or scope it to specific workspaces or projects. When using variable sets with credentials, reuse the variable set with care and avoid the global scope, since it does not follow least privilege best practices.
If you created an organization just for HashiCorp tutorials, select Apply globally as the variable set scope.

Next, define your AWS credentials as environment variables. Use an existing Access key ID and Secret access key or create a new pair in the IAM console.
Click +Add Variable. Select the Environment variable option. Set the key to AWS_ACCESS_KEY_ID and the value to your AWS Access Key ID. Mark it as Sensitive and click Add variable.
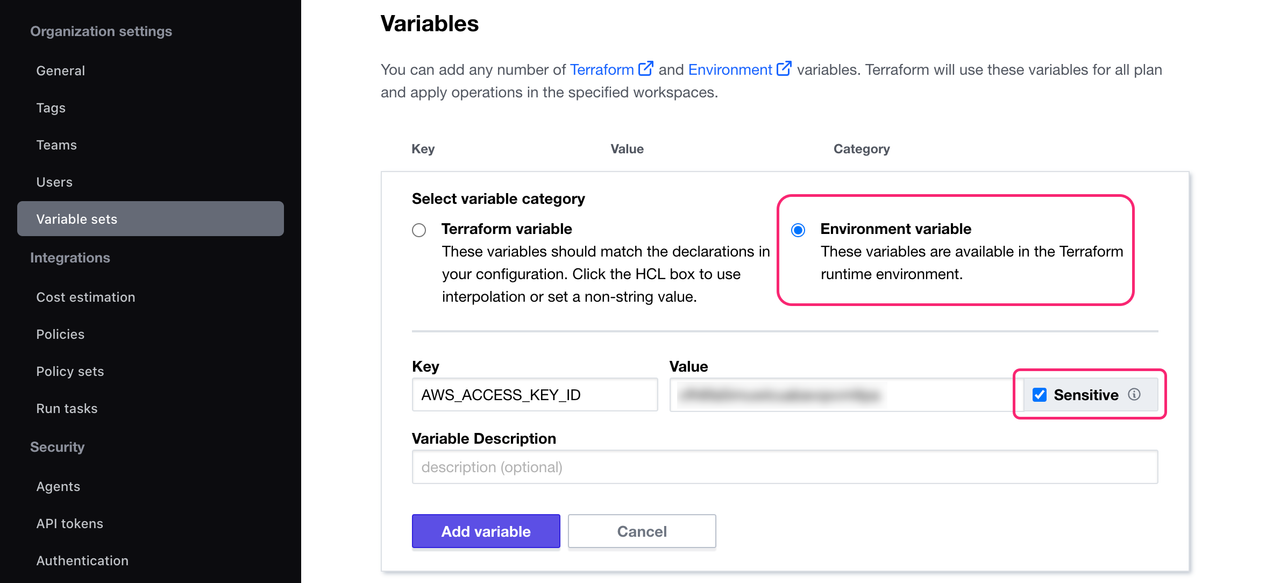
Marking a variable as sensitive prevents Terraform from displaying it in the HCP Terraform UI and makes the variable write-only.
Now, click + Add Variable again. Define another environment variable named AWS_SECRET_ACCESS_KEY and set it to your AWS Secret access key. Mark it as Sensitive and click Add variable.
Now click Create variable set.
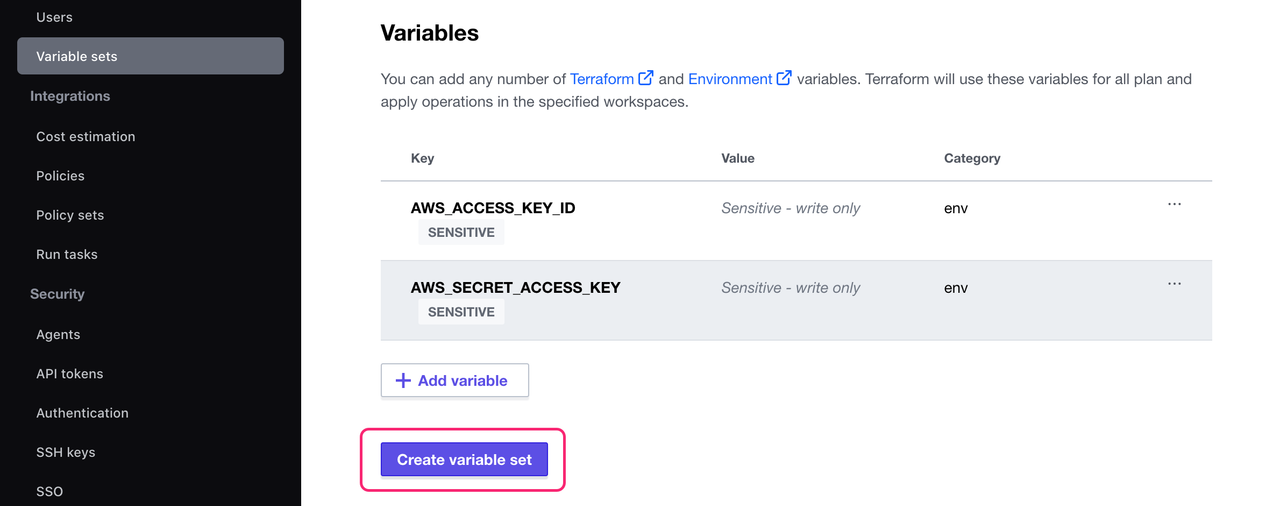
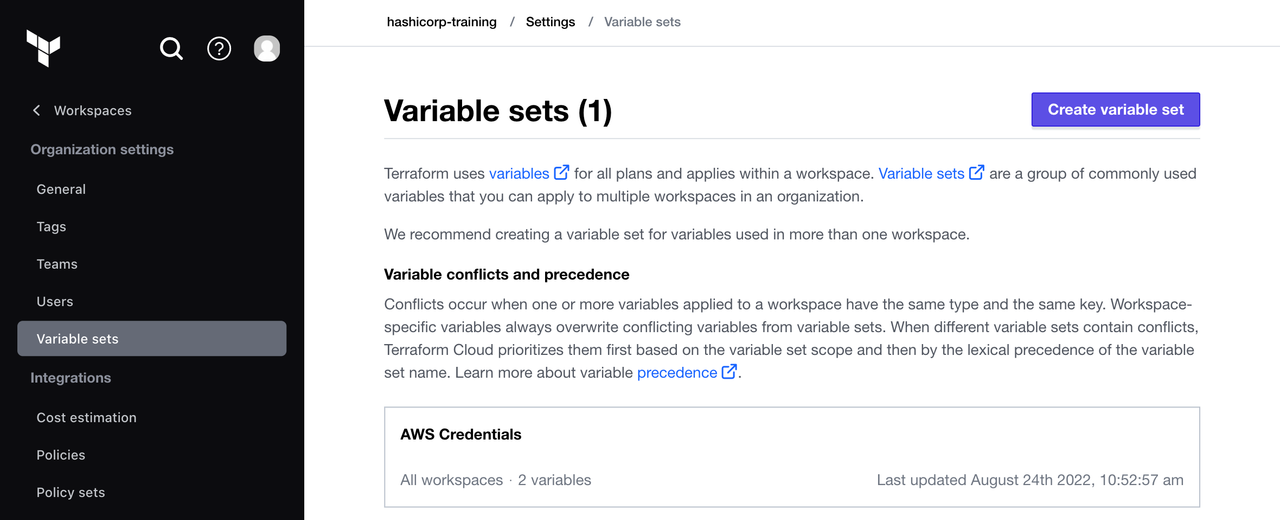
HCP Terraform now lists your new variable set on the Variable Sets page. It also shows the number of variables it contains and indicates that the set applies to all workspaces, since you selected the global scope.
Create a workspace
Once you have created an HCP Terraform account and created or joined an organization, you can start managing infrastructure with HCP Terraform. In this tutorial, you will create a CLI-driven workspace.
Clone a Github repository
Clone the example GitHub repository for this tutorial, which contains the Terraform configuration that defines an AWS EC2 instance and its attributes.
$ git clone https://github.com/hashicorp/learn-terraform.git
Change to the repository directory.
$ cd learn-terraform
Open the configuration in your code editor to review it. It contains Terraform configuration files, which define and expose information about your infrastructure:
main.tfspecifies the AWS provider, a provider plugin that Terraform will use to manage your AWS resources. The configuration defines an EC2 instance and uses a Terraform data source to access a machine image to use for the instance.variables.tfdefines the input variables that are referenced inmain.tf, which make the configuration customizable. You will define these variables in the HCP Terraform UI later on in this tutorial.outputs.tfdefines the information about your infrastructure that HCP Terraform will display to you when it makes changes.terraform.tfdefines version constraints for Terraform and the AWS provider and thecloudblock for the HCP Terraform integration.
Update configuration
Open the terraform.tf file and update the name of the organization in the cloud block to your own HCP Terraform organization. You can find your organization name in the breadcrumbs of the HCP Terraform UI.

terraform.tf
terraform {

  cloud {
    organization = "organization-name"

    workspaces {
      name = "learn-terraform"
    }
  }

  required_providers {
    aws = {
      source  = "hashicorp/aws"
      version = "~> 3.28.0"
    }
  }

  required_version = ">= 1.1.0"
}
another example
terraform {

  cloud {
    organization = "HCP-remote-organization"

    workspaces {
      name = "Dev_workspace"
      project = "Workspace_configs"
    }

    # how to specify a project name here?

  }


  required_providers {
    aws = {
      source  = "hashicorp/aws"
      version = "~> 5.31.0"
    }
  }

  required_version = "~> 1.2"

}

provider "aws" {
  region  = "us-east-1"
  profile = "eraki"
}
Create the workspace
This cloud block specifies which HCP Terraform organization and workspace to use for the operations in this working directory. When using the CLI-driven HCP Terraform workflow, running terraform init on configuration with a cloud block creates the HCP Terraform workspace specified in the block, if it does not already exist.
In your terminal, run terraform init to initialize the configuration and create your new HCP Terraform workspace.
terraform login command prior to running this step.$ terraform init
Initializing HCP Terraform...
Initializing provider plugins...
- Finding hashicorp/aws versions matching "~> 3.28.0"...
- Installing hashicorp/aws v3.28.0...
- Installed hashicorp/aws v3.28.0 (signed by HashiCorp)
Terraform has created a lock file .terraform.lock.hcl to record the provider
selections it made above. Include this file in your version control repository
so that Terraform can guarantee to make the same selections by default when
you run "terraform init" in the future.
HCP Terraform has been successfully initialized!
You may now begin working with HCP Terraform. Try running "terraform plan" to
see any changes that are required for your infrastructure.
If you ever set or change modules or Terraform Settings, run "terraform init"
again to reinitialize your working directory.
As part of the initialization process, Terraform created the new learn-terraform workspace in your HCP Terraform organization, configured for CLI-driven runs.
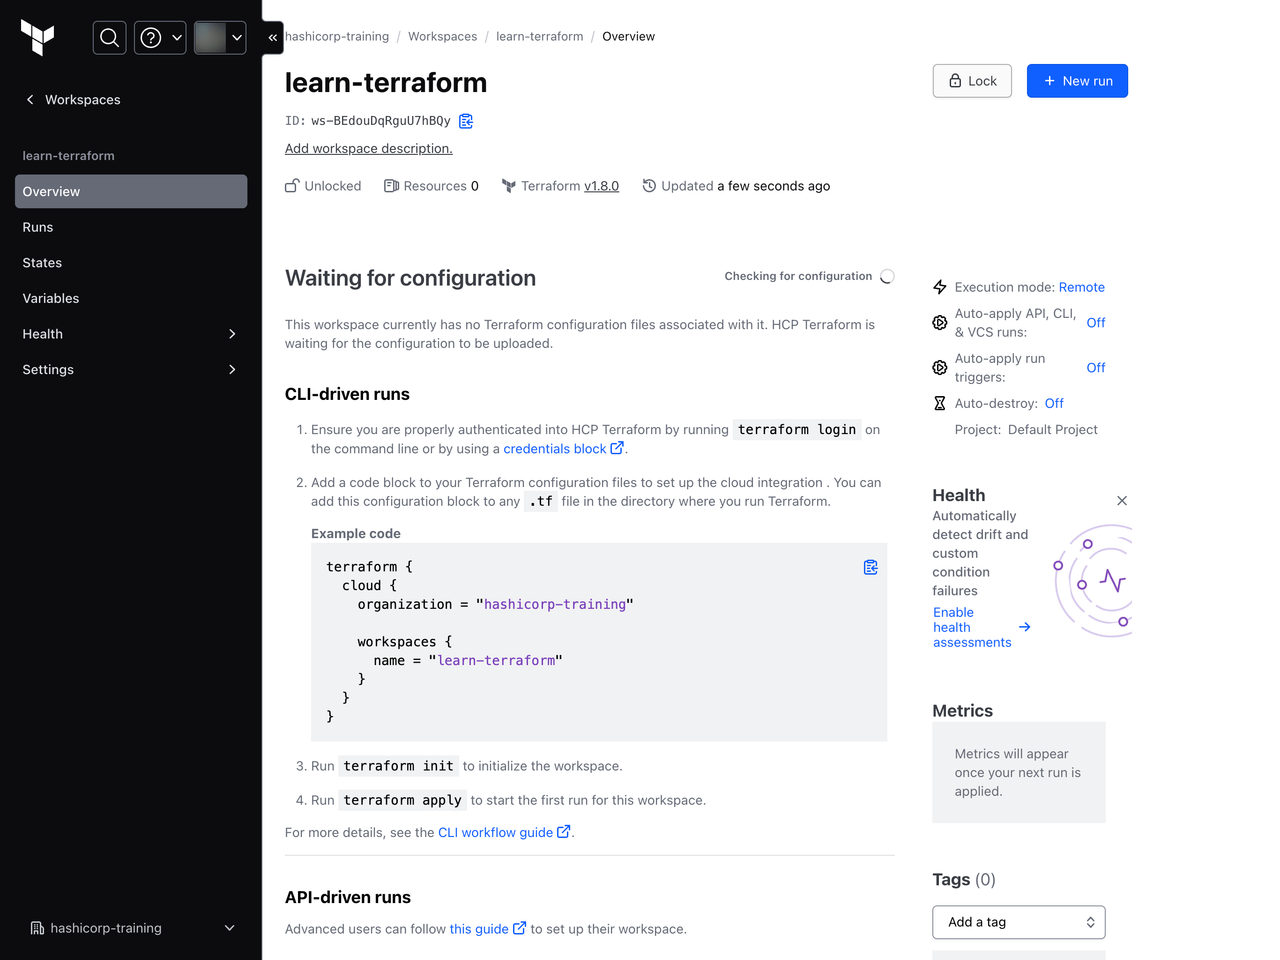
Every HCP Terraform workspace belongs to a project, which is a group of workspaces. When you create your workspace using this automated CLI workflow, HCP Terraform adds the workspace to your organization's Default project unless you set the project argument in your configuration's cloud block. Projects help you organize your workspaces into groups, making it easier to find workspaces in large HCP Terraform organizations.
Assign variable set to workspace
If you are not using a global variable set with your AWS credentials in your HCP Terraform organization, assign the variable set to your new workspace.
Navigate to your new learn-terraform workspace. Select Variables in the workspace's menu. Under Variable sets, click Apply variable set.

Select your AWS Credentials variable set, then click Apply variable set.

Your workspace can now use your AWS credentials. If you update the values of the variables in the variable set, those changes will propagate to this workspace and apply to all future runs.
Create infrastructure
Configure Terraform variables
Both workspace-specific variables and reusable variable sets support Terraform variables and environment variables. HCP Terraform will define Terraform Variables as input variables in Terraform's configuration language. You can use them to customize the infrastructure that Terraform creates from your configuration.
Return to the HCP Terraform UI and navigate to the Variables page for your learn-terraform workspace. Find the Workspace variables section to set two variables that Terraform will use to configure your instance. Then, click + Add variable.
First, define a Terraform variable by selecting the Terraform variable radio button. Set the key to instance_type and value to t2.micro.
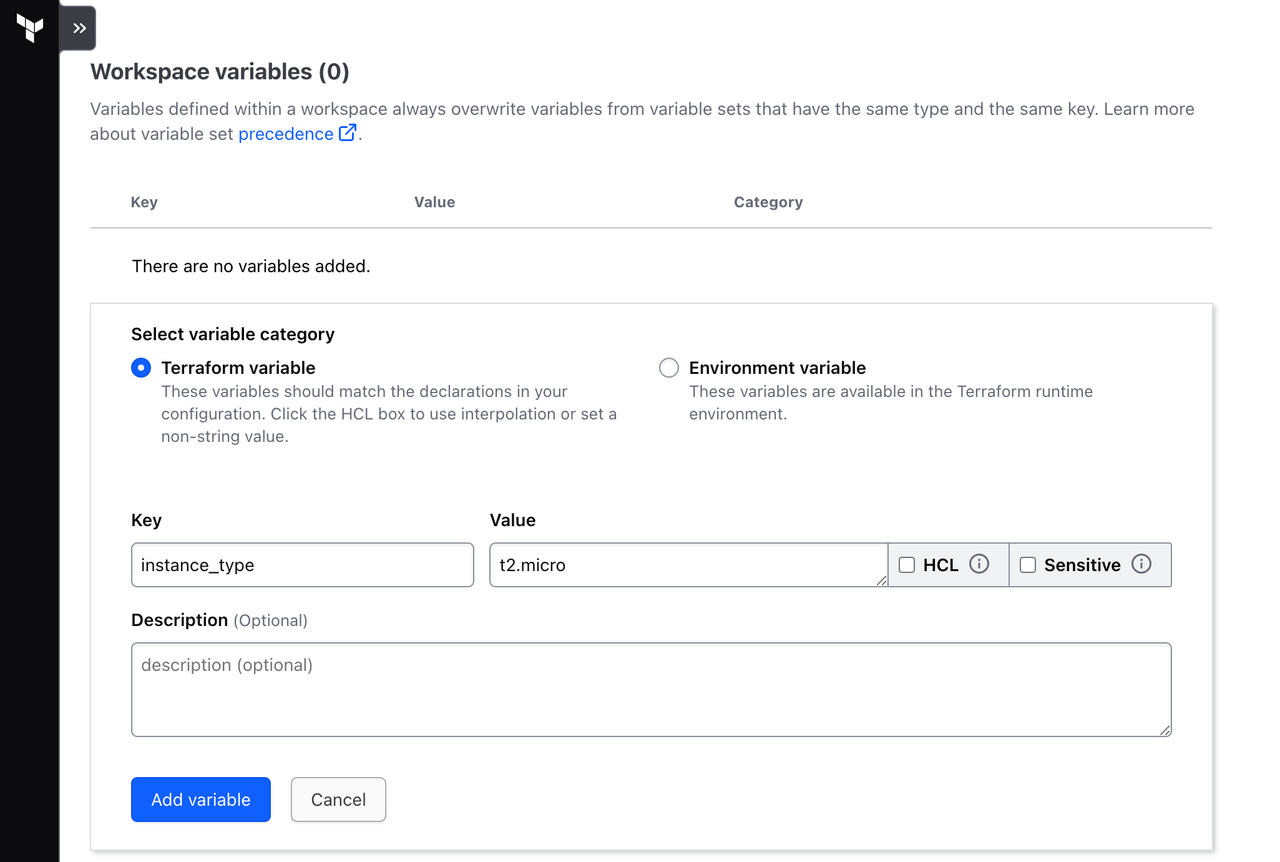
Click Add variable.
Then, click + Add variable again. Create another Terraform variable with the key instance_name and the value Provisioned by Terraform. Click Add variable.
Your workspace is now configured with 2 workspace-specific input variables and uses the AWS Credentials variable set as configured in the previous tutorial.
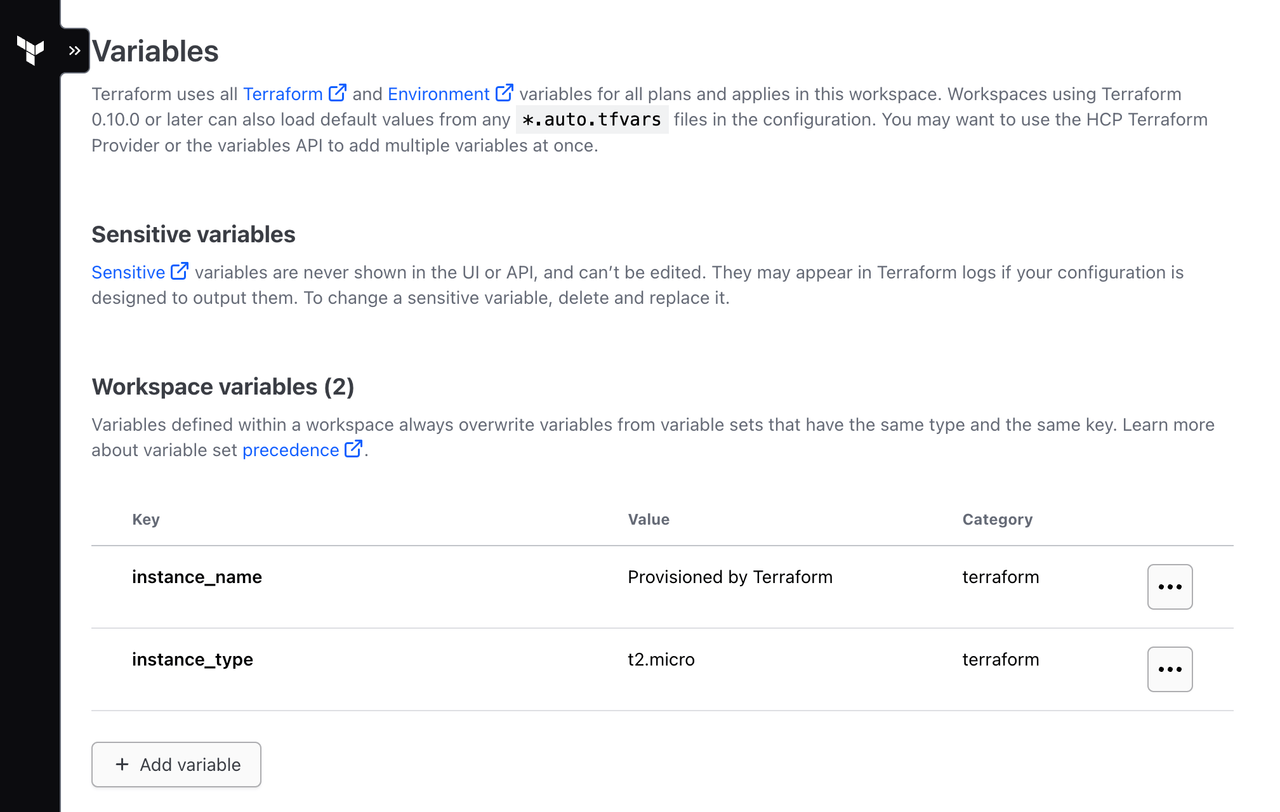
Apply planned changes
Now that you have defined your configuration's input variables in your HCP Terraform workspace, you can provision your infrastructure.
When using the CLI-driven workflow for HCP Terraform, you can manage your infrastructure using the same familiar workflow as with Terraform Community Edition.
Now, run terraform apply to create your EC2 instance.
$ terraform apply
Running apply in HCP Terraform. Output will stream here. Pressing Ctrl-C
will cancel the remote apply if it's still pending. If the apply started it
will stop streaming the logs, but will not stop the apply running remotely.

Preparing the remote apply...

To view this run in a browser, visit:
https://app.terraform.io/app/hashicorp-training/learn-terraform/runs/run-dzy...

##...
Terraform will trigger your run in HCP Terraform and stream the output to your terminal. Alternatively, you can follow and manage the run in the HCP Terraform UI.
Navigate to the run URL that Terraform displays in your command output.
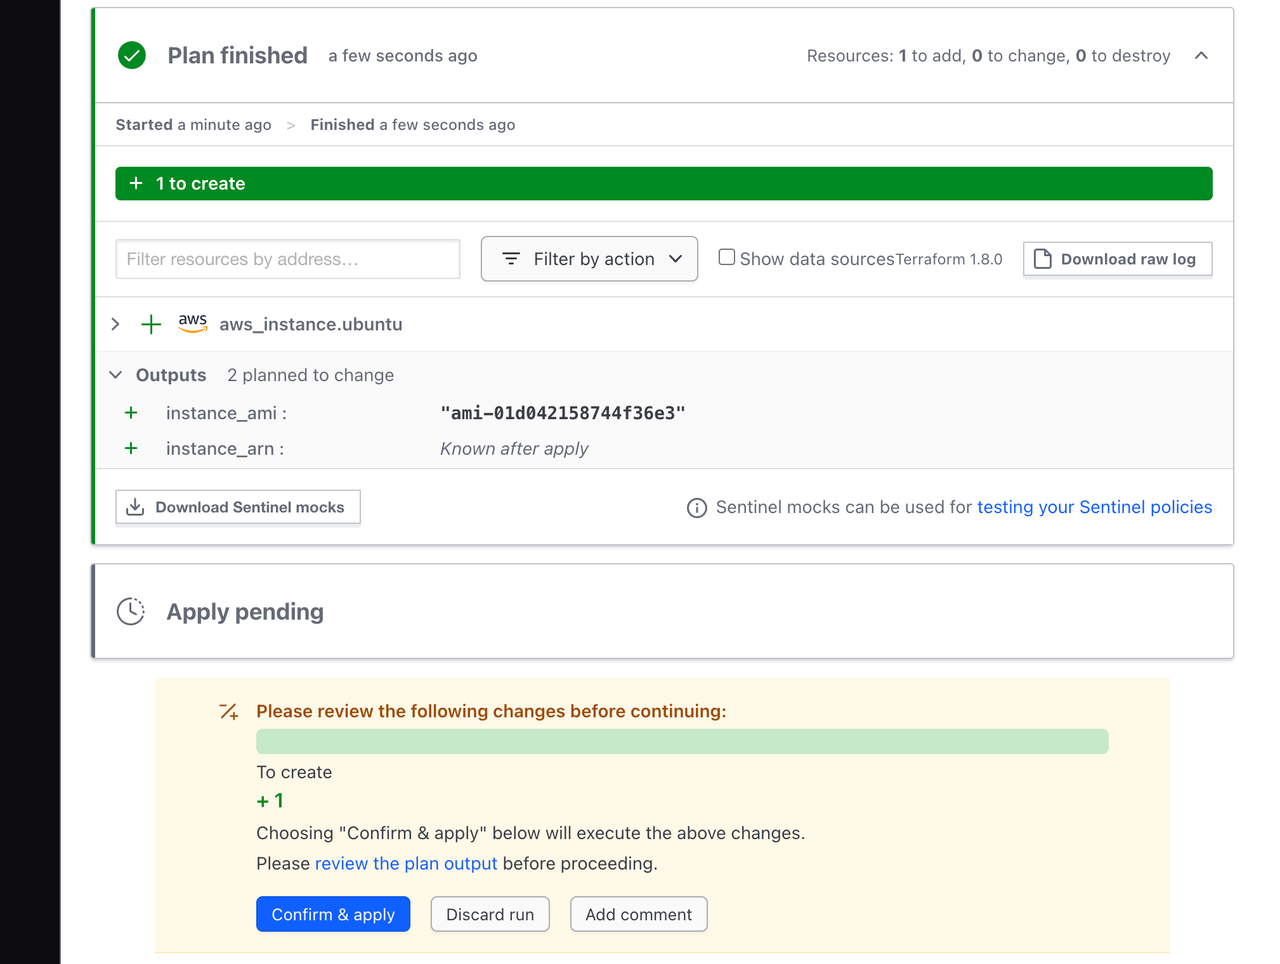
Under the planned changes, Terraform displays the count and type of updates. Terraform will not modify your infrastructure until you confirm and apply the plan. This checkpoint gives you and your team an opportunity to review the planned changes before they happen. For the CLI-driven workflow, you can approve the run either in the UI, or in your Terminal.
Once the plan is complete, click the Confirm & Apply button, followed by the Confirm Plan button to apply the change.
After a few minutes, your apply should complete. HCP Terraform will display a confirmation.
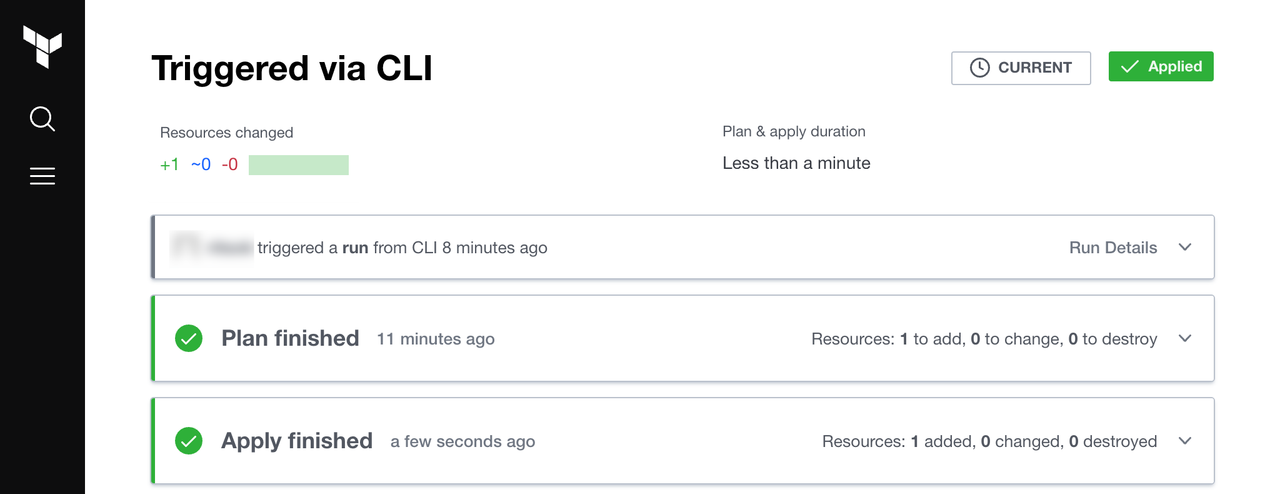
Now return to the workspace's Overview page. Under the details about your latest run, Terraform displays a table of the resources currently managed in the workspace.
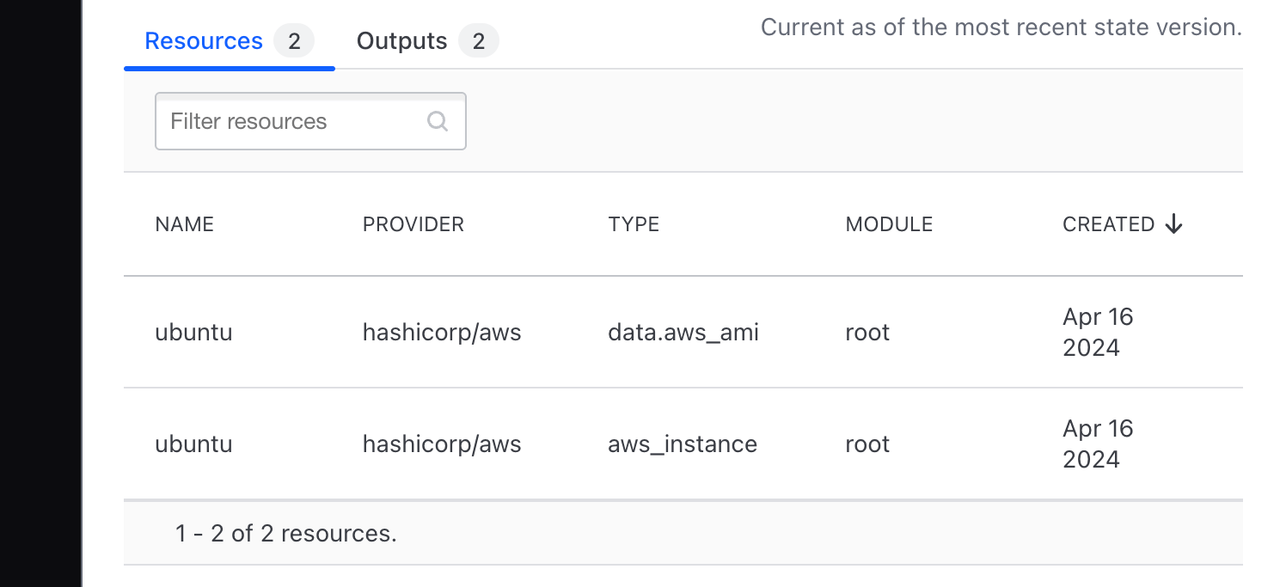
It also shows the workspace's outputs in the Outputs tab for easy access.

VCS-Driven Practical learning
In addition to the CLI-driven workflow, HCP Terraform offers a VCS-driven workflow that automatically triggers runs based on changes to your VCS repositories. The CLI-driven workflow allows you to quickly iterate on your configuration and work locally, while the VCS-driven workflow enables collaboration within teams by establishing your shared repositories as the source of truth for infrastructure configuration.
setup version control
open-up your workspace.
on the left bar Specify version control, Then Version control workflow.
Choose Github custom
Follow-up steps and specify the path of the trigger as below
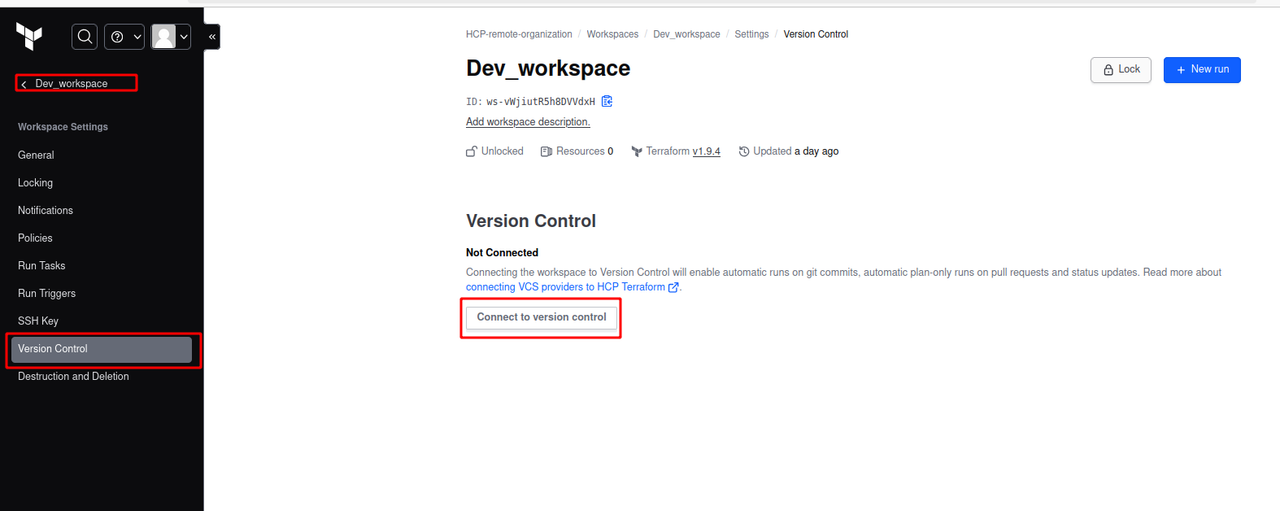
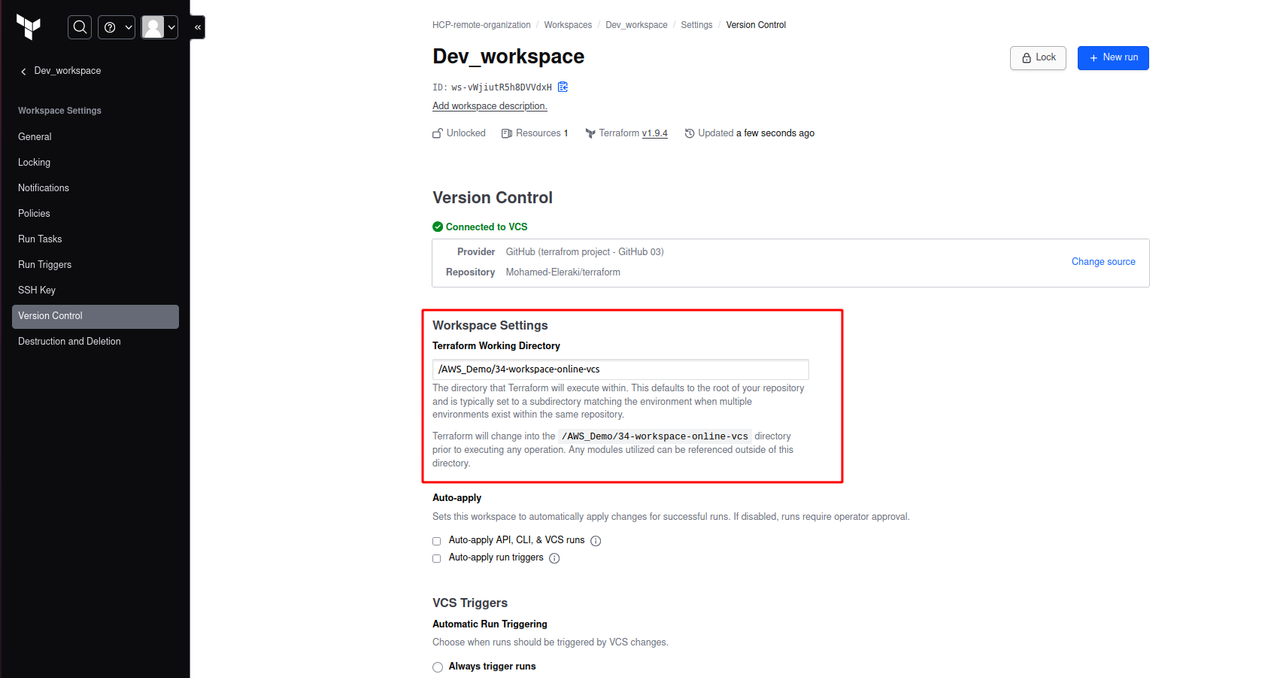
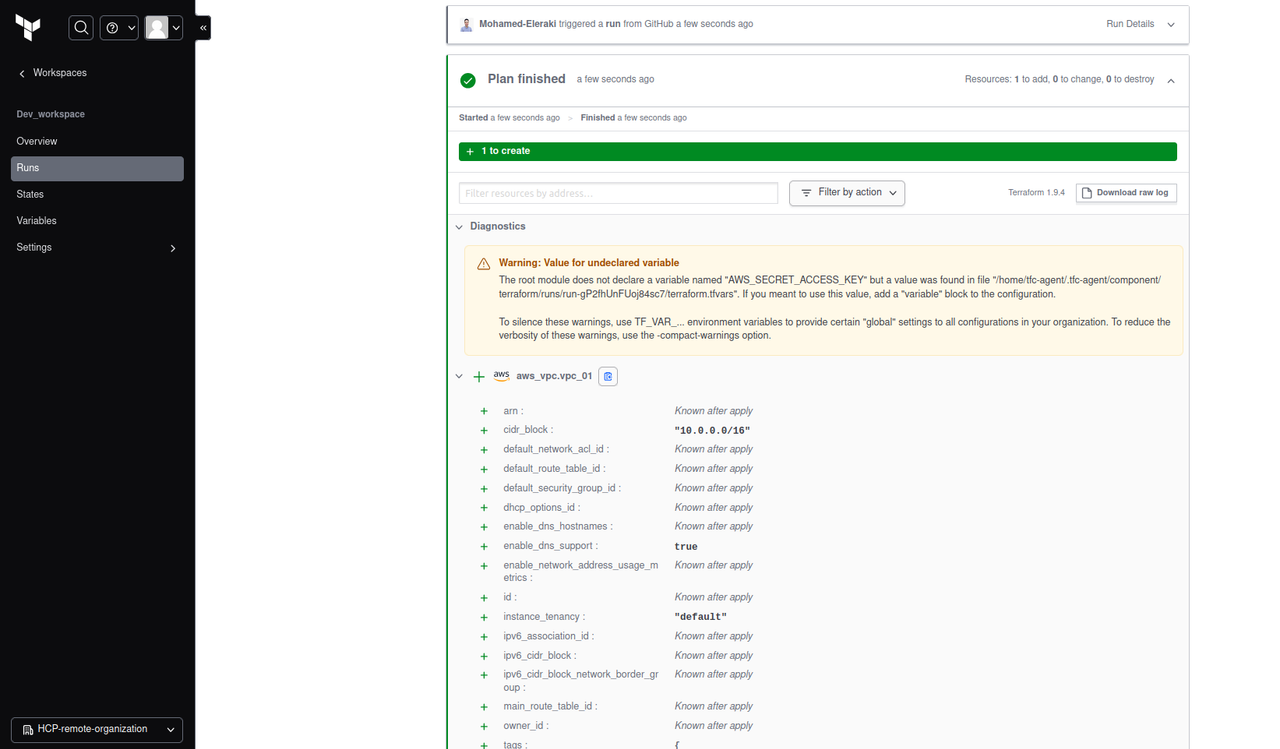
Commit any change and view the plan, It’ll fetch the AWS credentials from the global variable set that we already configured in previous steps
Resources
Code Samples
That's it, Very straightforward, very fast🚀. Hope this article inspired you and will appreciate your feedback. Thank you
Subscribe to my newsletter
Read articles from Mohamed El Eraki directly inside your inbox. Subscribe to the newsletter, and don't miss out.
Written by

Mohamed El Eraki
Mohamed El Eraki
Cloud & DevOps Engineer, Linux & Windows SysAdmin, PowerShell, Bash, Python Scriptwriter, Passionate about DevOps, Autonomous, and Self-Improvement, being DevOps Expert is my Aim.