My React Native Learning Journey: Getting Started
 Shanthan Abboju
Introduction
I'm excited to share my journey of learning React Native from scratch and building my first app! This adventure started with a curiosity about mobile app development and a desire to create something impactful. With a wealth of resources available, I set out to master React Native and share my experience with you all.
Why React Native?
I chose React Native for several reasons:
Cross-Platform Development: React Native allows me to develop apps for both iOS and Android using a single codebase.
Community Support: The robust community around React Native provides plenty of resources, tutorials, and forums to help beginners.
Performance: React Native offers near-native performance, which is crucial for creating smooth, responsive apps.
Starting with the Basics
I began my journey by diving into the official React Native documentation. The documentation provides a thorough overview of how to set up the environment and create your first app.
Setting Up the Environment
Step 1: Install Node.js
First, install the latest version of Node.js. The Node.js LTS version is recommended. To check if Node.js >= 18.8 or newer is installed on your computer, use the following command in the command prompt (works for both Windows and Linux):
node -v

Step 2: Install JDK (Java Development Kit)
React Native currently recommends version 17 of the Java SE Development Kit (JDK). You may encounter problems using higher JDK versions. You can download and install OpenJDK from AdoptOpenJDK or your system packager. To check the Java version, use the following command:
java -version

Step 3: Setup Android Development Environment
Configuring your development environment can be a bit challenging if you're new to Android development. Even if you have experience, there might still be some settings you'll need to adjust. Follow these steps closely to ensure everything is set up correctly.
Install Android Studio
Download and install Android Studio. During the installation process, ensure that all the checkboxes next to the following items are selected:
Android SDK
Android SDK Platform
Android Virtual Device
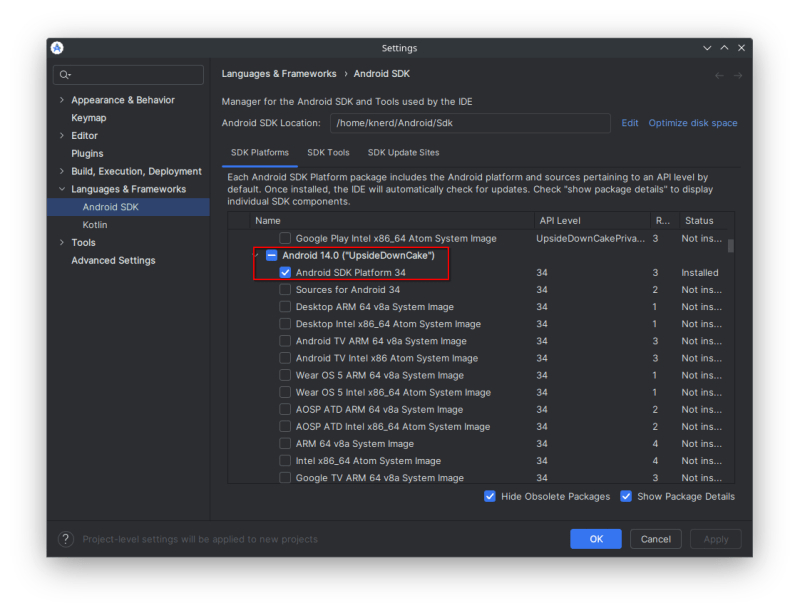
React Native requires Android 14 (UpsideDownCake) SDK to be installed. To check the SDK version, follow these steps:
Open Android Studio
Go to More Actions > SDK Manager > Android SDK > SDK Platforms
Make sure to select Android 14.0 (UpsideDownCake)

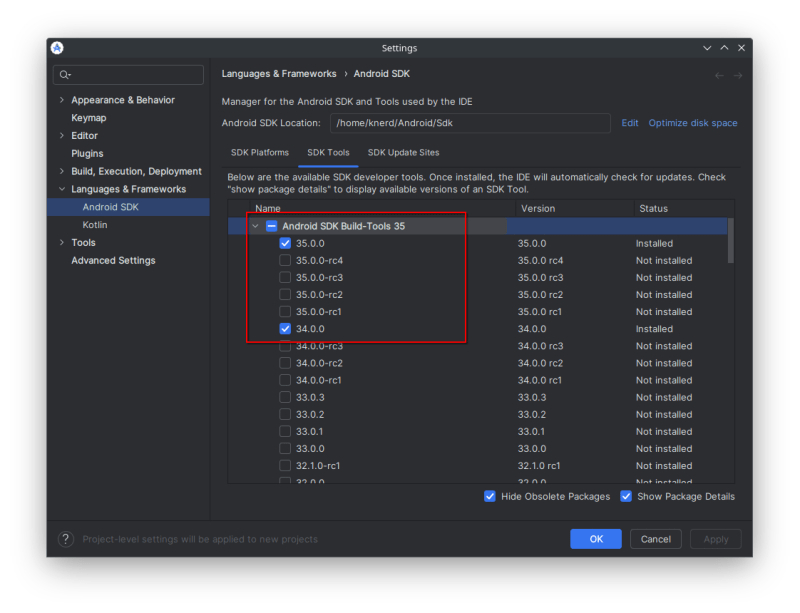
Then, move to the next tab:
SDK Tools > Android SDK Build-Tools 35
Make sure to select 34.0.0

Note for Linux Users: You have to select Android SDK Command Line tools (latest) under SDK Tools.
Configure the ANDROID_HOME Environment Variable
The React Native tools require some environment variables to be set up in order to build apps with native code.
Open the Windows Control Panel.
Click on User Accounts, then click User Accounts again.
Click on Change my environment variables.
Click on New... to create a new ANDROID_HOME user variable that points to the path to your Android SDK.

The SDK is installed, by default, at the following location:
%LOCALAPPDATA%\Android\Sdk
You can find the actual location of the SDK in the Android Studio "Settings" dialog, under Languages & Frameworks → Android SDK.
Add platform-tools to Path
Open the Windows Control Panel.
Click on User Accounts, then click User Accounts again.
Click on Change my environment variables.
Select the Path variable. Click Edit.
Click New and add the path to platform-tools to the list.
The default location for this folder is:
%LOCALAPPDATA%\Android\Sdk\platform-tools
Note for Linux Users: Add the following lines to your $HOME/.bash_profile or $HOME/.bashrc (if you are using zsh then ~/.zprofile or ~/.zshrc) config file:
export ANDROID_HOME=$HOME/Android/Sdk
export PATH=$PATH:$ANDROID_HOME/emulator
export PATH=$PATH:$ANDROID_HOME/platform-tools
Type source $HOME/.bash_profile for bash or source $HOME/.zprofile to load the config into your current shell. Verify that ANDROID_HOME has been set by running echo $ANDROID_HOME and the appropriate directories have been added to your path by running echo $PATH.
Step 4: Preparing the Android Device
You will need an Android device to run your React Native Android app. This can be either a physical Android device or an Android Virtual Device, which allows you to emulate an Android device on your computer.
Using a physical device
If you have a physical Android device, you can use it for development in place of an AVD by plugging it into your computer using a USB cable and following the instructions here.
Using a virtual device
If you have recently installed Android Studio, you will likely need to create a new AVD. Select "Create Virtual Device...", then pick any Phone from the list and click "Next", then select the UpsideDownCake API Level 34 image.
Click "Next" then "Finish" to create your AVD. At this point, you should be able to click on the green triangle button next to your AVD to launch it.
Step 5: Create Your First React Native Project with Expo
Why Expo?
Expo is a powerful toolchain built around React Native that helps you build native iOS and Android projects using JavaScript and React. Here are some reasons why I chose Expo:
Ease of Setup: Expo simplifies the setup process, allowing you to get started quickly without worrying about complex configurations.
Rich Set of APIs: Expo provides a wide range of APIs that cover most of the native functionalities you might need, such as camera access, location services, and push notifications.
Over-the-Air Updates: With Expo, you can push updates to your app without going through the app store review process, making it easier to fix bugs and add features.
Community and Documentation: Expo has a robust community and excellent documentation, making it easier to find help and resources.
To create a new Expo project, use the following command:
npx create-expo-app@latest --template blank
This command will create a new Expo project with a blank template, perfect for starting fresh!
Exploring the File Structure
Upon creating the project, I was greeted with a simple file structure:
App.js: This is the main entry point of the application. It contains the root component and serves as the starting point for rendering your app.
app.json: This configuration file is used by Expo to manage app settings, including the app name, version, and icon. It’s important to define how your app behaves and appears on devices.
assets/: This folder is where you store images, fonts, and other static assets that your app will use. Organizing your assets here helps keep your project tidy.
node_modules/: This directory contains all the dependencies required for the project. It’s automatically generated when you install packages via npm or yarn.
package.json: This file lists the project dependencies and scripts. It also includes metadata about the project, such as the name and version.
babel.config.js: This configuration file is used by Babel, which allows you to use the latest JavaScript features in your project by compiling them to a version compatible with older devices.
.gitignore: This file specifies which files and directories should be ignored by Git. Common entries include
node_modules/and.expo/, ensuring that unnecessary files are not tracked in version control..expo/: This directory contains configuration files for the Expo app. It helps manage settings specific to the Expo environment.
I learned that I could easily switch to TypeScript by renaming the App.js file to App.tsx, allowing me to leverage TypeScript's features.
Learning Resources
Throughout my learning journey, I utilized various resources that were instrumental in solidifying my understanding of React Native:
YouTube Tutorials: I followed Hitesh Choudhary's React Native playlist, which offered practical insights and hands-on coding sessions.
Documentation: The official React Native and Expo documentation became my go-to references for troubleshooting and exploring advanced features.
Conclusion
This is just the beginning of my React Native journey, and I’m excited about what lies ahead. I’ll be sharing more about my experiences, the challenges I faced, and the projects I undertake in future posts.
Stay tuned for updates, and feel free to share your own experiences or ask questions in the comments below!
Subscribe to my newsletter
Read articles from Shanthan Abboju directly inside your inbox. Subscribe to the newsletter, and don't miss out.
Written by
