What is Kubernetes? Let’s Run a Cluster and Find Out!
 Priya Srivastava
Introduction
Recently, I explored Kubernetes by using Minikube, a tool that sets up a local Kubernetes (K8s) environment on your machine. This hands-on experience helped me understand Kubernetes clusters, deployments, services, and the critical infrastructure behind it all. Here, I’ll walk through the steps I took, the questions I asked, and the lessons I learned.
Kubernetes
Kubernetes (K8s) is a powerful open-source platform designed to automate deploying, scaling, and managing containerized applications. In this guide, we'll explore key Kubernetes concepts like clusters, deployments, services, pods, and nodes, using kubectl commands to interact with and manage these components.
Setting Up Minikube and Kubernetes
The first step was to install Minikube and the Kubernetes command-line tool kubectl on my system:
brew install minikube
brew install kubectl
I also ensured Docker was configured to the default context so Kubernetes could interact with Docker for container management:
docker context use default
kubectl version --client
Next, I started the Minikube cluster:
minikube start
Once the cluster was running, I checked its status:
kubectl cluster-info
kubectl get nodes
What is a Kubernetes Cluster?
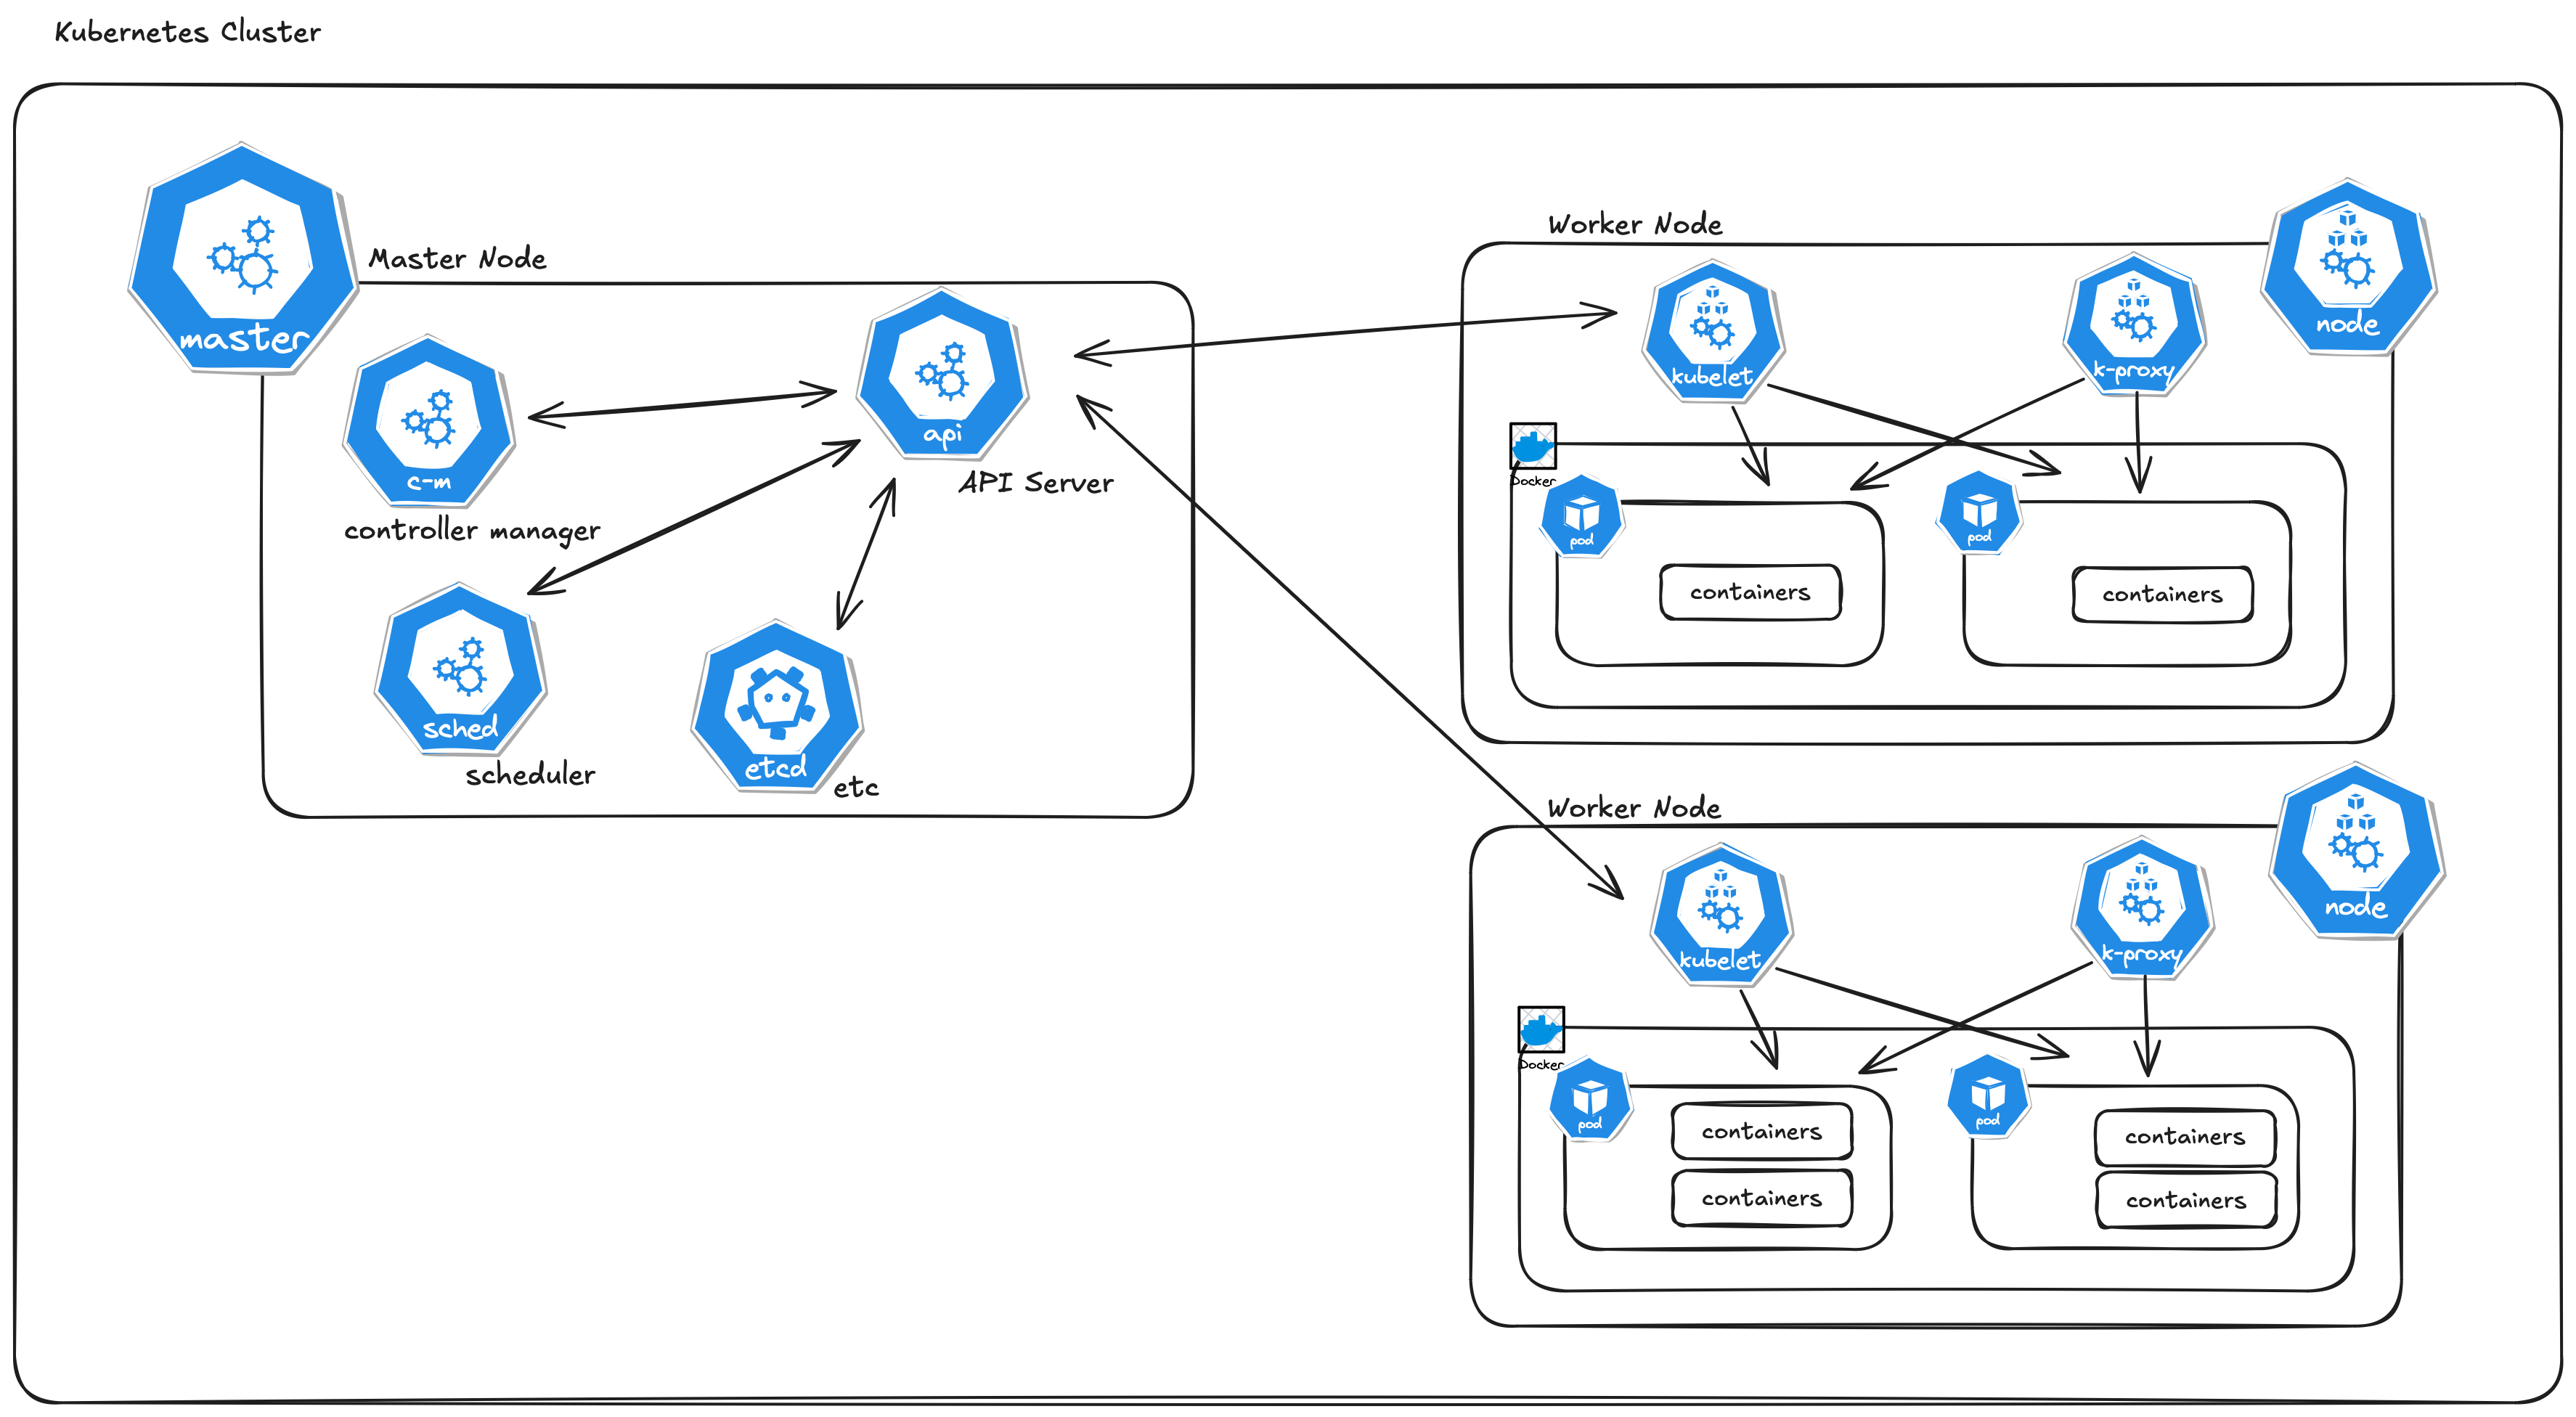
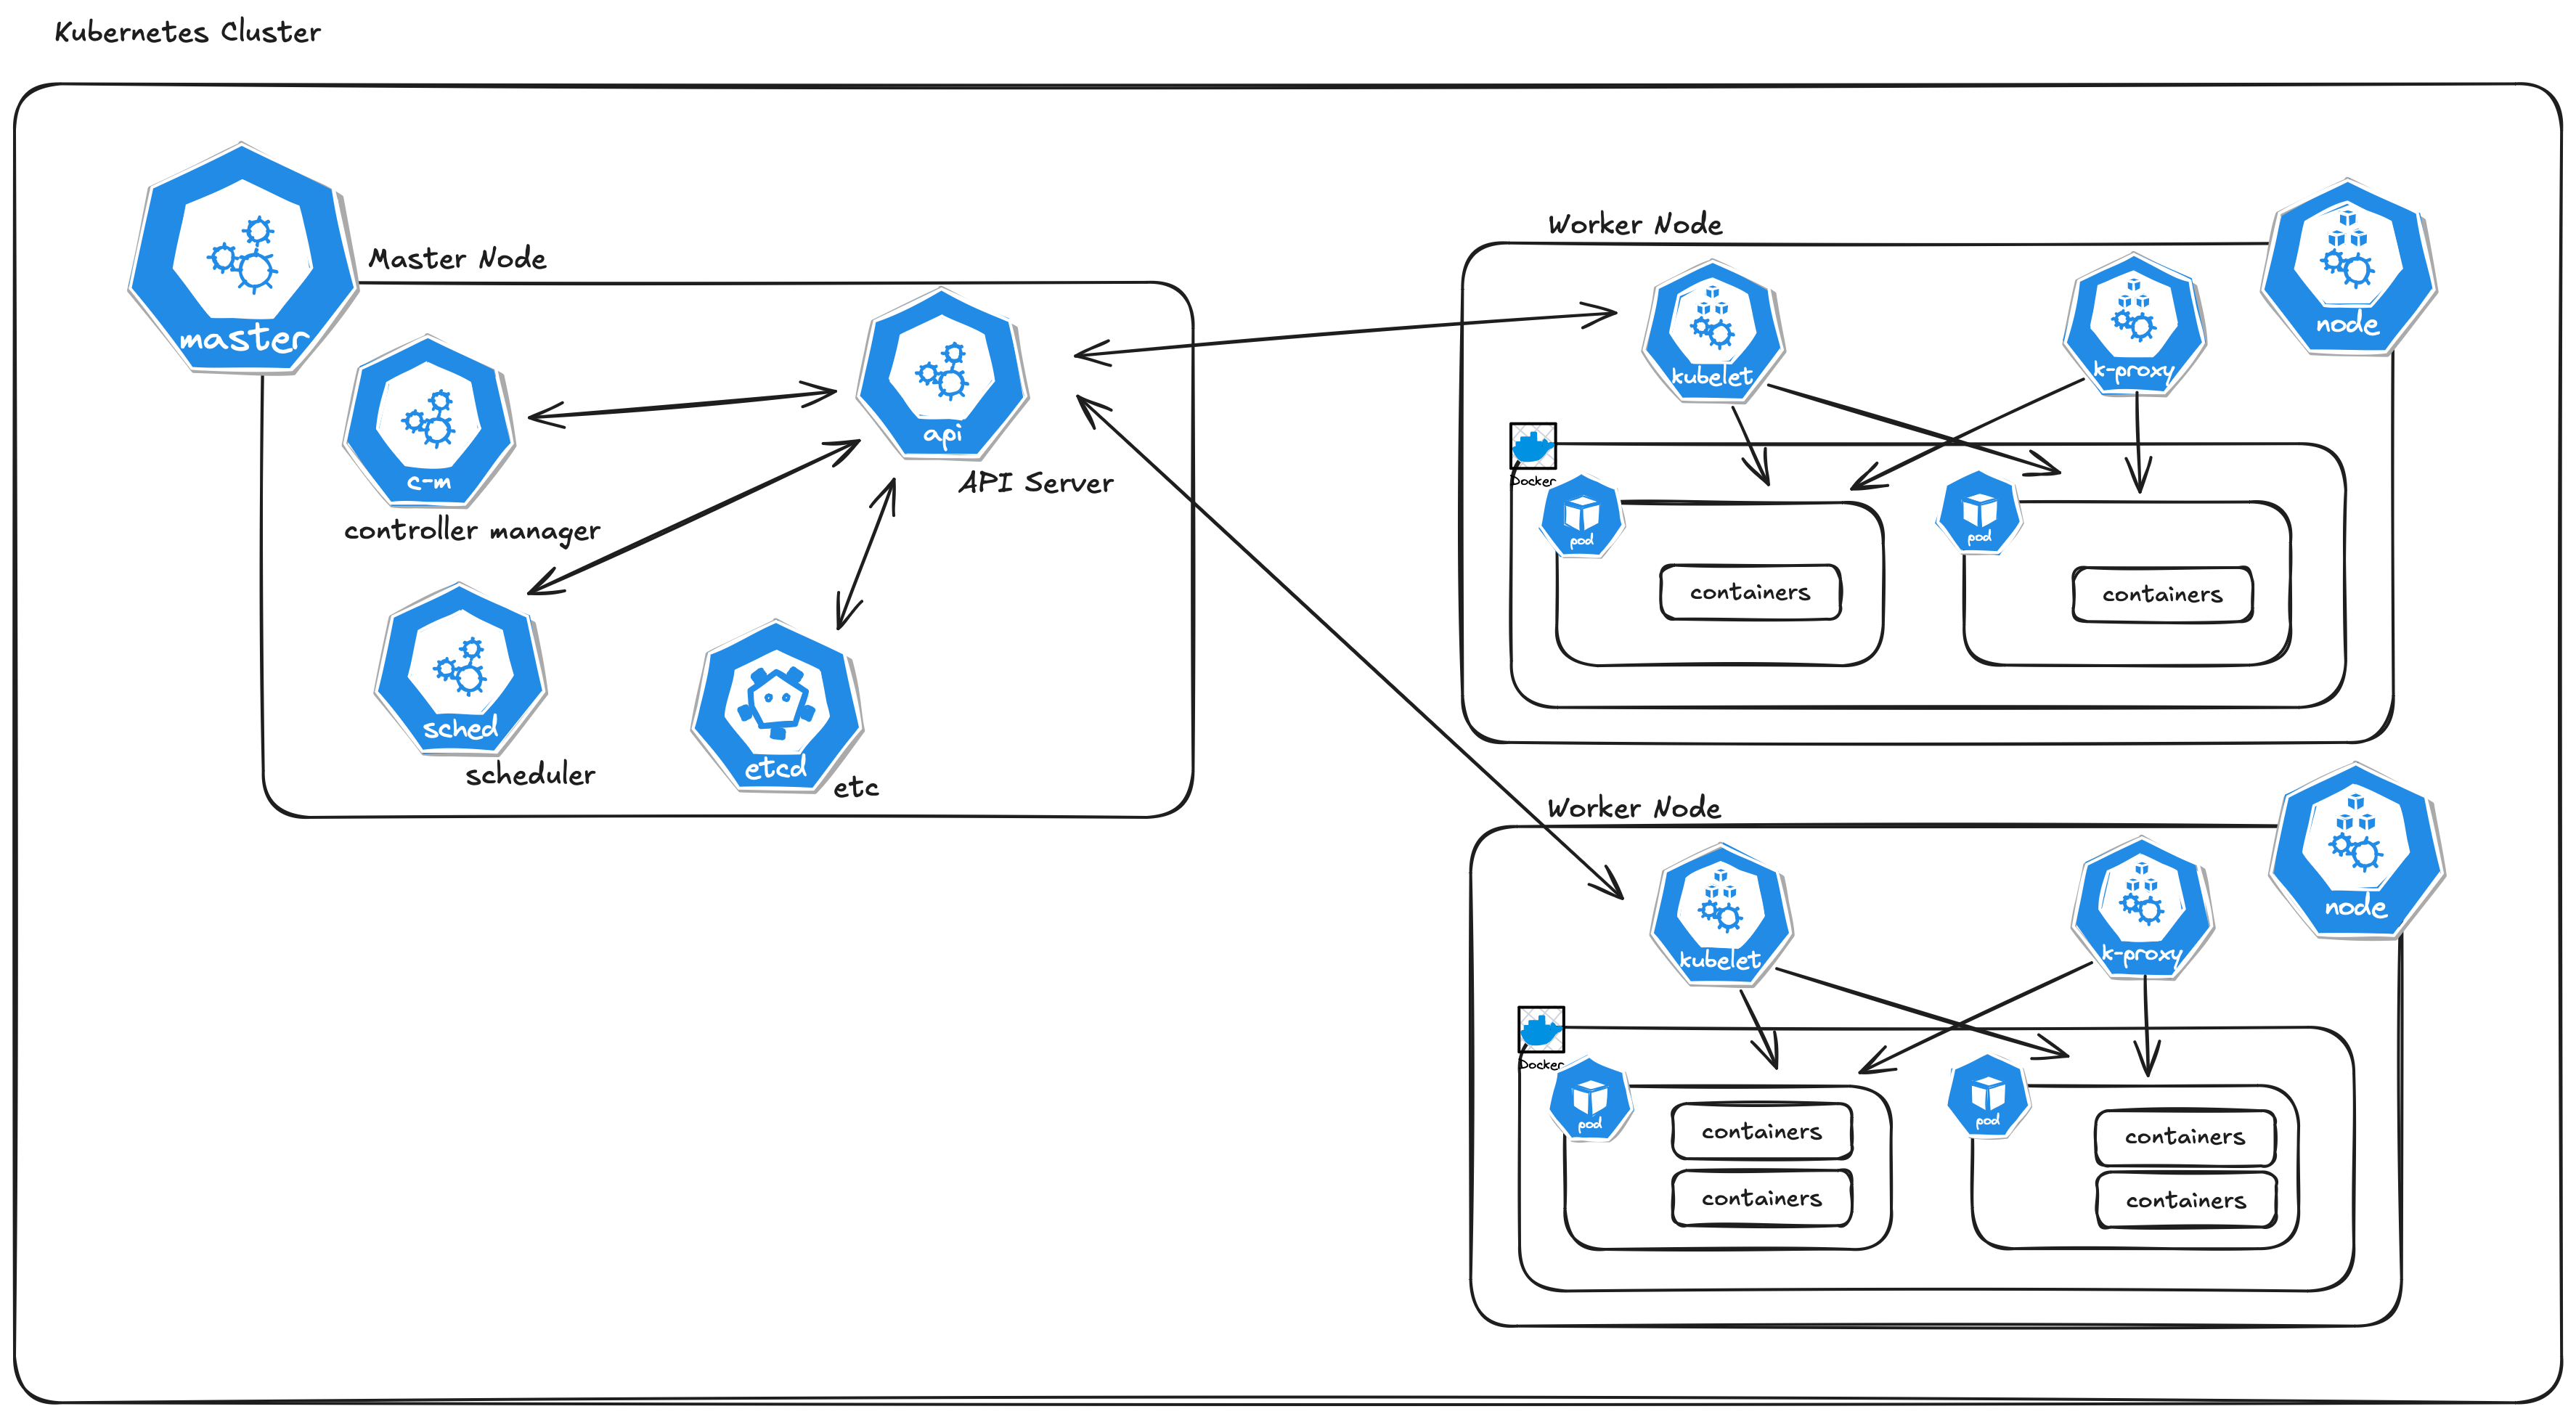
A Kubernetes cluster is a group of machines (nodes) that work together to run containerized applications and manage them in a highly scalable, resilient way. It's the backbone of how Kubernetes operates and orchestrates applications.

The key components of a Kubernetes cluster:
Master Node (Control Plane):
This is the brain of the Kubernetes cluster. It manages the entire cluster and is responsible for:
Scheduling: Deciding which node a new container (pod) should run on.
Monitoring: Tracking the state of all nodes and ensuring the system is running as expected.
Scaling: Automatically scaling up or down the number of pods depending on the load.
Self-healing: Restarting or replacing pods if they fail.
The master runs several key components, like:
API Server: Exposes the Kubernetes API to users and other components.
Scheduler: Assigns work (pods) to nodes.
Controller Manager: Manages the state of the system (e.g., ensuring the correct number of pods).
etcd: A distributed key-value store that holds the cluster state.
Worker Nodes:
These are the machines (nodes) where your actual applications (containers or pods) run.
Each worker node runs:
Kubelet: A small agent that communicates with the master and ensures that the pods are running as requested.
Container Runtime: Software (e.g., Docker, containerd) that runs the containers.
Kube-proxy: Helps with networking and routing traffic to the right pods.
In production, Kubernetes clusters can have multiple nodes, with several worker nodes all controlled by a master node (which can be replicated for high availability).
What Happens When You Run minikube start?
Running minikube start sets up a single-node Kubernetes cluster locally, where both the master node and worker node run on your machine. Essentially, it creates a lightweight version of a Kubernetes cluster on your computer, ideal for development and learning.
Here's how Minikube starts a node and creates a Kubernetes cluster
Minikube is perfect for local development. It allows you to experiment with Kubernetes features, deploy containerized applications, scale pods, and expose services without needing a cloud provider or multiple nodes.
When you run minikube start, Minikube creates:
A virtual machine on your computer. Minikube uses virtualization to create a virtual machine (VM) that acts as your Kubernetes node. This node is both the master and worker node in a small local setup.
Inside that VM, it sets up:
The Kubernetes Control Plane (API server, etc.)
The Worker Node (where containers are run).
Networking so that containers can communicate with each other.
Storage so that Kubernetes can persist data.
Exploring My Kubernetes Cluster
Step 1: Deploying Nginx
To explore how Kubernetes manages applications, I created an Nginx deployment:
kubectl create deployment nginx-deployment --image=nginx
This command created a deployment that manages Nginx pods (the smallest unit in Kubernetes that runs containers). The deployment ensures that the specified number of pods are always running.
Step 2: Scaling the Deployment
I scaled the deployment to three replicas (i.e., three Nginx pods):
kubectl scale deployment nginx-deployment --replicas=3
Kubernetes handled creating and managing three Nginx pods to match this desired state.
Step 3: Expose the Deployment (Service)
To access your application from outside the cluster (like a web browser), you need to expose it via a Service.

kubectl expose deployment nginx-deployment --type=NodePort --port=80
Find the URL of the service using Minikube:
minikube service nginx-deployment --url
Open this URL in your browser to see the Nginx web server.
Step 4: Update the Deployment
You can also update the Nginx image to a newer version. Let’s change the image version.
kubectl set image deployment/nginx-deployment nginx=nginx:latest
This command updates the Nginx deployment to use the latest image.
Step 5: Check Deployment Status
kubectl rollout status deployment/nginx-deployment
This command checks the rollout status of your deployment, letting you know when the update is complete.
Step 6: Rollback the Deployment
If something goes wrong with the update, you can roll back to a previous version.
kubectl rollout undo deployment/nginx-deployment
This command rolls back the deployment to the previous stable version.
Step 7: Delete the Deployment
If you want to clean up and remove the Nginx deployment, use the following command.
kubectl delete deployment nginx-deployment
Step 8: Delete the Service
Finally, if you’ve exposed a service, you can delete it as well.
kubectl delete service nginx-deployment
Understanding the Kubernetes Concepts
1. Pods
Pods are the smallest deployable units in Kubernetes. Each pod runs one or more containers (in my case, an Nginx container). Scaling up a deployment means creating more pods, and each pod is independent of the others.
To manage pods, you can use the following commands:
View All Pods:
kubectl get podsThis lists all running pods in the current namespace (by default, the
defaultnamespace).View Detailed Information About a Pod:
kubectl describe pod <pod-name>This command gives a detailed description of the pod, including its configuration, status, and events.
Delete a Pod:
kubectl delete pod <pod-name>This deletes a specific pod, though Kubernetes will automatically create a replacement if it's part of a deployment.
2. Deployments
Deployments manage the lifecycle of pods. They handle:
Creating the right number of pods (replicas).
Updating pods to a new version when necessary.
Self-healing by restarting failed pods.
When I created the nginx-deployment, Kubernetes automatically managed the Nginx pods.
Deployments help manage and scale pods easily. Here are key commands for managing deployments:
Create a Deployment:
kubectl create deployment <deployment-name> --image=<image-name>This creates a deployment running the specified image. For example, to create an Nginx deployment:
kubectl create deployment nginx-deployment --image=nginxView All Deployments:
kubectl get deploymentsLists all deployments in the cluster.
Scale a Deployment:
kubectl scale deployment <deployment-name> --replicas=<number-of-replicas>To scale the Nginx deployment to three replicas:
kubectl scale deployment nginx-deployment --replicas=3Update a Deployment:
kubectl set image deployment/<deployment-name> <container-name>=<new-image>For example, to update the Nginx image:
kubectl set image deployment/nginx-deployment nginx=nginx:1.19View Deployment Details:
kubectl describe deployment <deployment-name>This shows detailed information about a deployment, including its replica count and update status.
3. Nodes
View All Nodes:
kubectl get nodesThis shows a list of all worker nodes in your cluster.
View Node Details:
kubectl describe node <node-name>This gives detailed information about a specific node, including resource allocation, running pods, and events.
4. Namespaces
Namespaces allow you to isolate and organize resources within a Kubernetes cluster. By default, all resources are created in the default namespace unless specified otherwise. This helps keep applications organized, especially when running multiple projects or environments within the same cluster.
5. Services and Exposing Deployments
When you create a deployment, it’s only accessible within the Kubernetes cluster (like in a VPC). To expose it to the web, I used the following command:
kubectl expose deployment nginx-deployment --type=NodePort --port=80
This created a Kubernetes service, which acts as an entry point, allowing external traffic to access the Nginx pods.
Before Exposing: The deployment was only accessible internally within the cluster.
After Exposing: The service allowed external access, making the application available on a specific port.
The Setup
Here’s a breakdown of the resources I created and their relationships:
Cluster: Minikube (1 node, acting as both master and worker).
Namespace: default.
Deployment: nginx-deployment (manages Nginx pods).
Pods:
nginx-pod-1 (first instance of Nginx).
nginx-pod-2 (second instance after scaling).
nginx-pod-3 (third instance after scaling).
Service: Exposes the Nginx deployment to the web.
Kubernetes Cluster Summary
A Kubernetes cluster consists of:
Master Node (Control Plane): Manages the cluster and its resources.
Worker Nodes: Run the actual containerized applications inside pods.
When you run minikube start, you simulate a Kubernetes cluster on your local machine with a combined master and worker node. This setup lets you explore the full functionality of Kubernetes in a lightweight environment, perfect for learning and development.
Key Takeaways
Minikube makes it easy to create a local Kubernetes cluster, simulating a real-world environment.
Pods are the smallest units in Kubernetes, running one or more containers.
Deployments manage the lifecycle and scaling of pods.
Services allow you to expose internal resources (like Nginx pods) to external users.
Namespaces help organize and isolate resources within the cluster.
Kubernetes in Production
While Minikube is perfect for local development, production environments typically consist of multi-node clusters, managed via cloud providers like AWS, GCP, or Azure. In production:
Use multiple worker nodes for high availability.
Implement persistent storage for critical data.
Secure your cluster with RBAC (Role-Based Access Control) and other security measures.
Monitor applications using tools like Prometheus and Grafana.
This hands-on journey not only taught me the basics of Kubernetes but also helped me understand how containers are deployed and managed. With Minikube, I now have a lightweight and powerful environment for testing and learning Kubernetes!
Subscribe to my newsletter
Read articles from Priya Srivastava directly inside your inbox. Subscribe to the newsletter, and don't miss out.
Written by

Priya Srivastava
Priya Srivastava
👋🏻 Hey, I'm Priya I am software developer at HackerRank. I have been a Student Software Developer under Google Summer of Code for CHAOSS and have been an intern at Dineout (Times Internet). 💬 Reach me: twitter.com/shivikapriya