🚀(Day-04) Understanding Kubernetes Services 🌐
 Sandhya Babu
In this blog, we’ll explore how to set up and manage different types of services in Kubernetes: ClusterIP, NodePort, and LoadBalancer. Each service type has its specific use cases, and we’ll walk through the creation and verification processes step by step. Let's dive in! 🚀
What are Kubernetes Services?
A Service in Kubernetes ensures reliable communication between different parts of your app, even if the Pods' IP addresses change. It provides a fixed IP address and DNS name, so other components or users can reliably connect to the app through the Service, even if the underlying Pods are replaced or moved.
In essence, Pods come and go, but the Service remains the same.
Services act as a stable entry point (or "front door") to the Pods. Even if Pods are recreated or their IPs change, the Service will always maintain the same address, ensuring continuous access to the application.
Why Use Services? 🤔
Stable IP and DNS: Services provide a fixed IP or DNS name to access your Pods, even if the Pods are replaced or moved.
Load Balancing: Distributes traffic across multiple Pods, ensuring that no single Pod is overwhelmed.
Decoupling: Allows you to add, remove, or update Pods without affecting how users or other services connect to your app.
Types of Kubernetes Services 🛠️
Kubernetes provides four main types of services, each suited for different use cases:
1. ClusterIP (Default) 🔒
What it does: Makes your app accessible only within the Kubernetes cluster.
When to use: Use it for internal communication between services that don't need to be exposed externally.
Example: Backend services communicating with frontend services within the cluster.
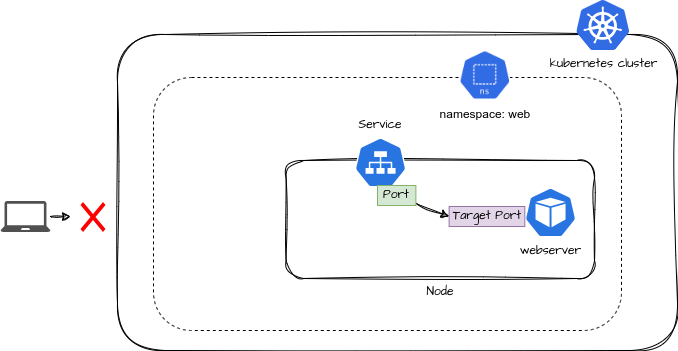
The flow of the diagram:
Users outside the Kubernetes cluster cannot directly communicate with the Pods. Inside the cluster, the Service (ClusterIP) acts as a stable entry point for the Pods running applications. It listens on port 80 and forwards traffic to the target port 80, where the web server application is running inside the Pod. This setup ensures reliable internal communication while isolating external access.
2.NodePort 🌍
What it does: Exposes your app to the external traffic by opening a specific port on each node (server) in your Kubernetes cluster.
When to use: Use this when external users need access to your app, but you don’t need an external load balancer.
Example: Direct access to a web application from outside the cluster.
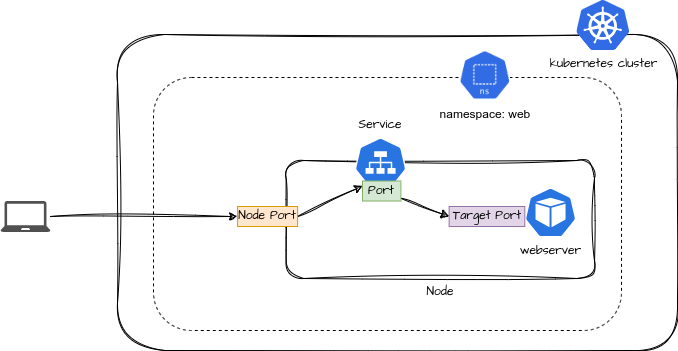
The flow of the diagram:
A user outside the Kubernetes cluster connects to the application through a NodePort. The NodePort opens a static port on each node's IP, allowing external traffic to access the service. Once the traffic reaches the NodePort, it is forwarded to the service's internal ClusterIP, which then directs it to the target port where the web server is running. This ensures external access to the application while routing the request internally within the cluster.
3. LoadBalancer ⚖️
What it does: Automatically creates an external load balancer (usually through a cloud provider) to route traffic to your app.
When to use: Use it when you need to expose your app to the internet with automatic load balancing.
Example: Public-facing website hosted in Kubernetes.
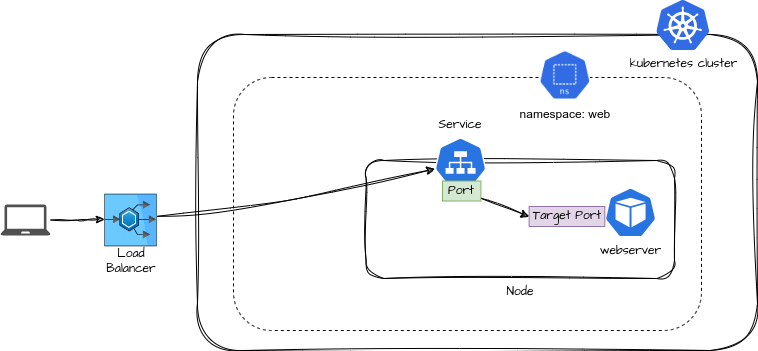
When a user makes a request through the LoadBalancer, it forwards the traffic to the NodePort or ClusterIP service. The service then routes the traffic to the appropriate Pods, forwarding it to the target port where the application (e.g., web server) is running.
4. ExternalName:
An ExternalName Service in Kubernetes lets your app inside the cluster connect to something outside, like an external database. Instead of dealing with IP addresses, it gives a simple name (DNS) that your app can use to reach the external service.
When to use: Use it when you need to connect your app to an external resource, such as a database outside your cluster.
Example: Connecting your app to a database hosted outside Kubernetes.
Kubernetes Service YAML and an explanation of the components:
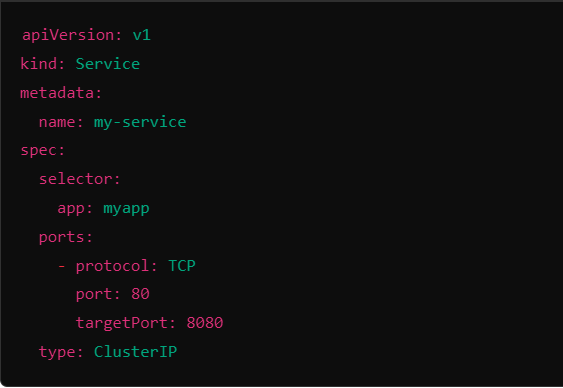
selector: This tells the Service which Pods to send traffic to. It looks for Pods with the label
app: myapp.port: This is the port the Service uses for incoming traffic. Here, it’s
80.targetPort: This is the port on the Pods where the traffic actually goes. In this case, it’s
8080.
Task 1: Create a Pod using the below yaml
- Define the Pod
Create a YAML file for your pod:
vi httpd-pod.yaml
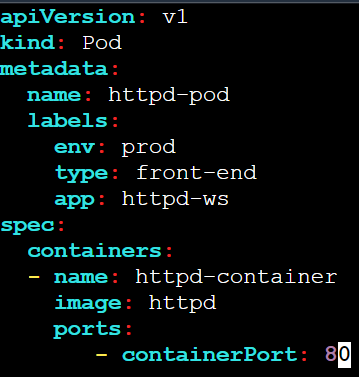
- Apply the pod definition, yaml
kubectl apply -f httpd-pod.yaml
- Verify the Pod Creation
Check the status of your newly created pod:
kubectl get pods

- Describe the Pod
To view detailed information about your pod, use:
kubectl get pods -o wide
kubectl describe pod httpd-pod
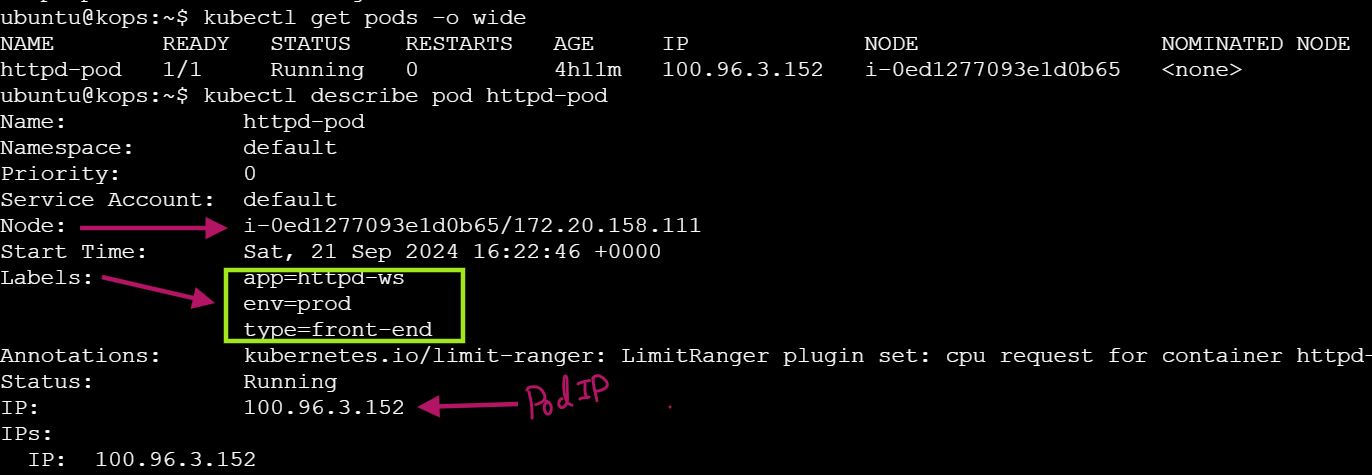
Task 2: Setup ClusterIP Service 🔒
- Create a ClusterIP service using below YAML
Define your service in a YAML file:
vi httpd-svc.yaml
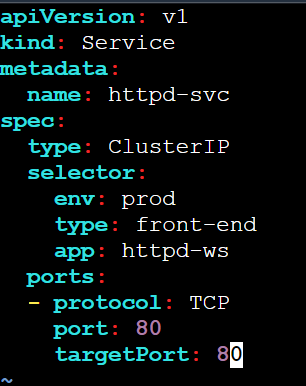
Apply the Service Definition
Create the ClusterIP service:
kubectl apply -f httpd-svc.yaml

Verify Service Creation
Check the status of your service:
kubectl get svc
kubectl get svc -o wide
kubectl describe svc httpd-svc


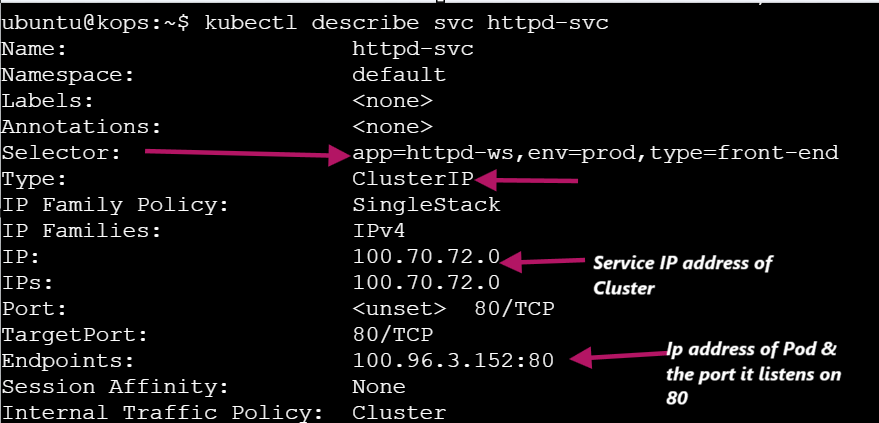
Get Endpoints
To verify the service endpoints, run:
kubectl get ep

External IPs of the Cluster Nodes
To retrieve external IPs of cluster nodes, you can use:
kubectl get nodes -o wide: Displays a detailed list of nodes, including their external IPs in the last column.kubectl get nodes -o wide | awk '{print $7}': Usesawkto filter and show only the external IPs from the detailed node list, simplifying the output.
Retrieve the external IPs of your cluster nodes:
kubectl get nodes -o wide | awk '{print $7}

kubectl get nodes -o wide

Verify Service Accessibility
SSH into the worker node and test service accessibility:
ssh -t ubuntu@<Node_IP> curl <Cluster_IP>:<Service_Port>

By using SSH to connect to the worker node (54.163.41.190) and running curl on the service IP (100.70.72.0:80), you confirmed that the service is functioning properly. The successful response indicates that the service is correctly routing requests to the pod within the Kubernetes cluster.
Accessing Pod Shell
To ensure the application is running via the service IP:
kubectl exec -it <pod name> -- /bin/bash

By accessing the shell of the httpd-pod and using curl on the service IP (100.70.72.0), you confirmed that the service is correctly routing traffic to the pod. The successful response verifies that the application is running and accessible through the service within the Kubernetes cluster.
Task 3: Setup NodePort Service 🔄
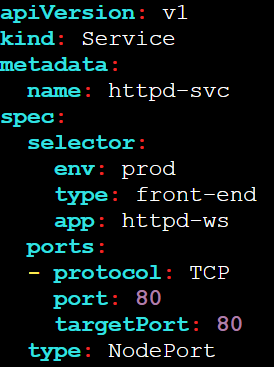
Modify Service for NodePort
Edit the service definition to set the service type to NodePort:
vi httpd-svc.yaml
Apply the Changes
Deploy the updated service:
kubectl apply -f httpd-svc.yaml

View Details of the Service
Check the details of your modified service:
kubectl get svc -o wide
kubectl describe svc httpd-svc

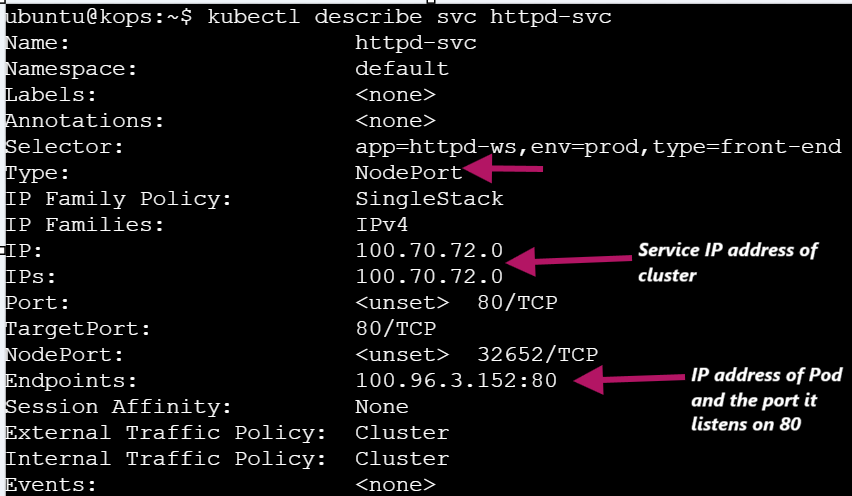
Get External IPs
Retrieve the external IPs again:
kubectl get nodes -o wide | awk '{print $7}'

To find the External IP, you can either use the above awk command or run kubectl get nodes -o wide.

Validate Connectivity
Test the connectivity using the NodePort:
Ensure the NodePort(32652) is open in your security group rules.
curl <EXTERNAL-IP>:NodePort

SSH and Verify
SSH into a machine and rerun the curl command:
ssh -t ubuntu@<Node_IP> curl <Cluster_IP>:<Service_Port>


Service ClusterIP (100.70.72.0): This is the internal IP of your
httpd-svcservice within the Kubernetes cluster.Port 80: This is the service port that forwards traffic to the application running in the pod (HTTP server).
Output (
<html><body><h1>It works!</h1></body></html>): This confirms that your HTTP server inside the pod is running properly, and it returns the default HTML content from the pod when accessed internally via the service's ClusterIP.
Task 4: Setup LoadBalancer Service ⚖️
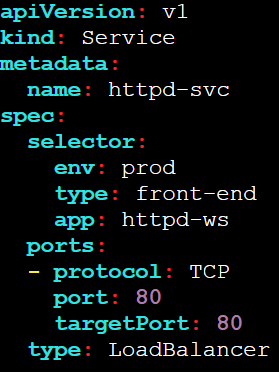
Modify Service to LoadBalancer
Modify the service created in the previous task to type LoadBalancer
vi httpd-svc.yaml
Apply the Changes
Deploy the LoadBalancer service:
kubectl apply -f httpd-svc.yaml

Verify LoadBalancer Creation
Check if the LoadBalancer service has been created:
kubectl get svc
kubectl describe svc httpd-svc

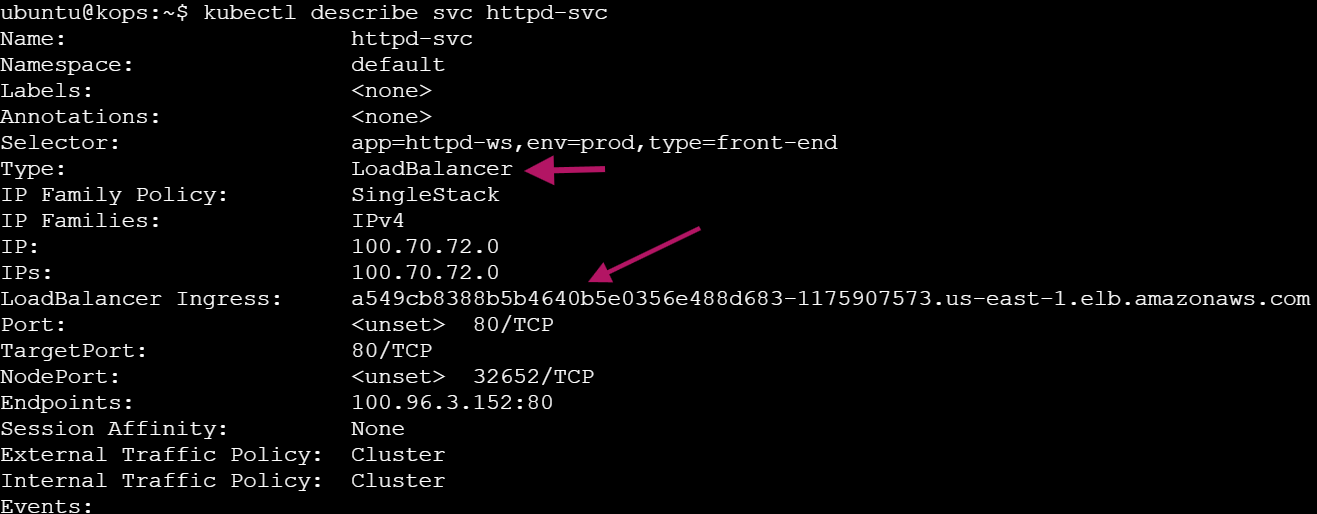
Access the LoadBalancer
Access the LoadBalancer using the DNS or via your browser:
curl <LoadBalancer_DNS>

Task 5: Delete and recreate httpd Pod
Delete the existing httpd-pod using below
kubectl delete -f httpd-pod.yaml

View the service details and notice that the Endpoints field is empty
kubectl describe svc httpd-svc
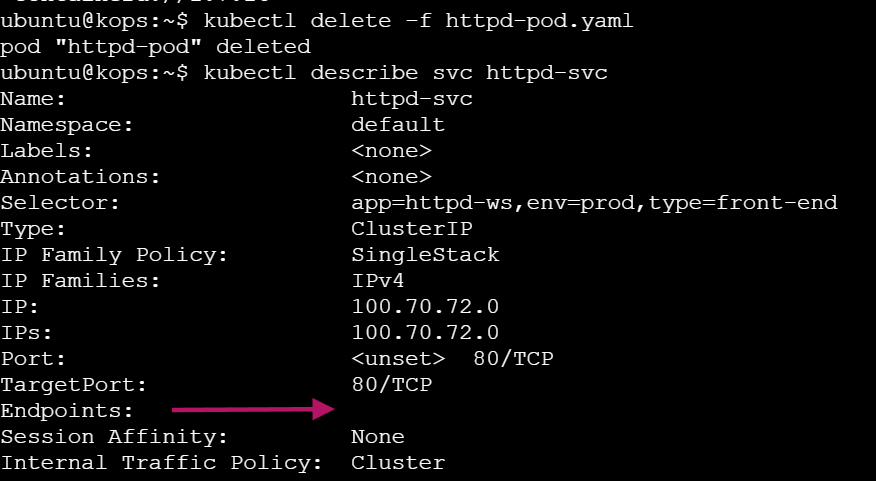
When you delete the httpd-pod, the Service (httpd-svc) no longer has a Pod to forward traffic to. The Service's Endpoints field becomes empty because there are no active Pods matching its selector, meaning there's no destination for the traffic.
Task 6: Cleanup the resources using the below command
kubectl delete -f httpd-pod.yaml

kubectl delete -f httpd-svc.yaml

Conclusion 🎯
Kubernetes services are crucial for ensuring stable, scalable, and reliable communication between your applications and their users. Whether you're exposing your app internally with ClusterIP, making it accessible to external users via NodePort or LoadBalancer, or connecting to external resources through ExternalName, Kubernetes services provide the flexibility needed to efficiently manage traffic in your applications.
In this blog, we've successfully set up ClusterIP, NodePort, and LoadBalancer services, demonstrating how each service type plays an essential role in handling internal and external traffic.
Stay tuned for more Kubernetes insights as we continue to explore advanced features and use cases! ⚡⭐
Subscribe to my newsletter
Read articles from Sandhya Babu directly inside your inbox. Subscribe to the newsletter, and don't miss out.
Written by

Sandhya Babu
Sandhya Babu
🌟 Aspiring DevOps Engineer | Cloud & DevOps Enthusiast🌟 Hello! I’m Sandhya Babu, deeply passionate about DevOps and cloud technologies. Currently in my exploring phase, I’m learning something new every day, from tools like Jenkins, Docker, and Kubernetes to the concepts that drive modern tech infrastructures. I have hands-on experience with several Proof of Concept (POC) projects, where I've applied my skills in real-world scenarios. I love writing blogs about what I've learned and sharing my experiences with others, hoping to inspire and connect with fellow learners. With certifications in Azure DevOps and AWS SAA-C03, I’m actively seeking opportunities to apply my knowledge, contribute to exciting projects, and continue growing in the tech industry. Let’s connect and explore the world of DevOps together!