Spring Boot to make CRUD operations: Challenges, Solutions, and Growth 🚀 PART-1
 Wasif Mujahid
Table of contents
- Explanation of Key Dependencies:
- Entity Relationship Diagram (ERD)
- Details for each Annotation used in the USER class
- Create a Repository
- Create a Service Layer
- Create a Controller
- Exception Handling (Global Exception Handler)
- Validation
- Common Bean Validation Annotations:
- Lets start testing
- Real Challenges started
- Next Challenge

🧑💻 I'm Wasif Mujahid, a software developer with 8+ years of expertise in Android native app development. I've built innovative, high-performing mobile solutions that enhance user experiences and drive business growth.
In the last two weeks, I embarked on a focused journey to learn Spring Boot. As a Java developer, I wanted to understand how Spring Boot simplifies building web apps and microservices while exploring real-world applications. Here's how it went, the challenges I faced, and what I learned along the way.
To begin, I installed the following tools:
Java JDK 17: The foundation for running Spring Boot apps.
IntelliJ IDEA (Community Edition): My go-to IDE for Java development.
Gradle: For dependency management and building my project.
Explanation of Key Dependencies:
spring-boot-starter-web:- Used to create RESTful web applications and expose HTTP endpoints.
spring-boot-starter-data-jpa:- Provides ORM functionality to interact with databases using Hibernate (JPA implementation).
com.h2database:h2:- In-memory database used for development and testing purposes. You can swap it with MySQL or PostgreSQL in production.
org.projectlombok:lombok:- Lombok reduces boilerplate code like getter/setter methods, constructors, and
toString()method. It must be used alongside the annotation processor.
- Lombok reduces boilerplate code like getter/setter methods, constructors, and
spring-boot-starter-test:- Provides Spring Boot testing capabilities with JUnit 5, Mockito, and more.
When i started adding these libraries and plugins i’m getting issues like mention below:

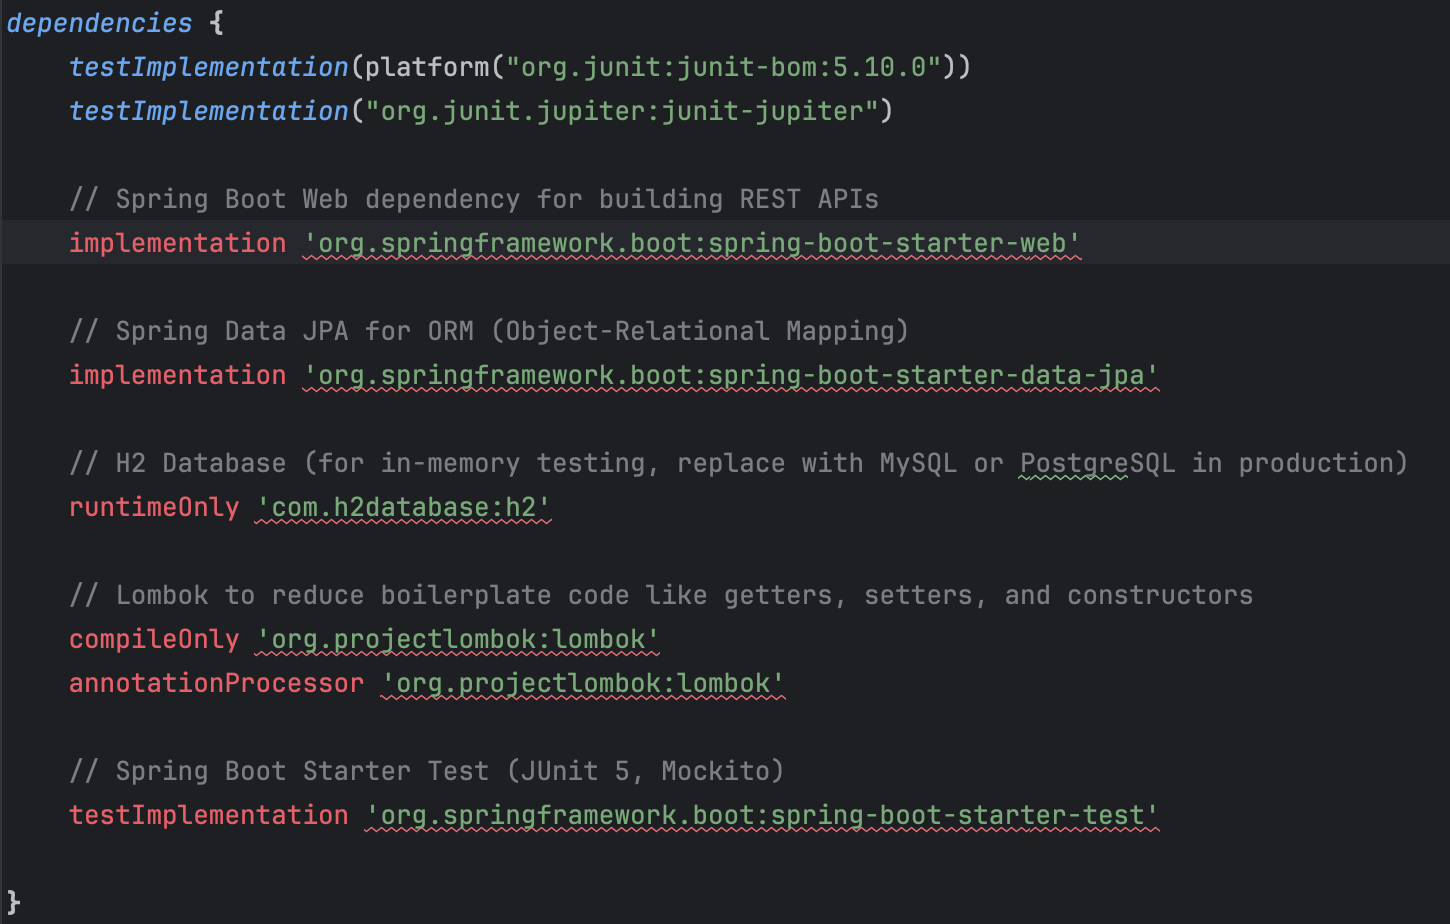
Im getting these errors because my gradle file extension is .kts which means its Kotlin file and i’m trying to add dependencies using Java syntax.
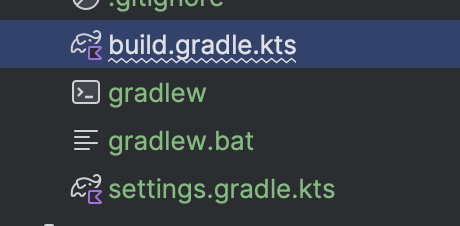
so while creating project may be i did some mistake or may be by default gradle support kotlin file, so lets try to convert both files to java.
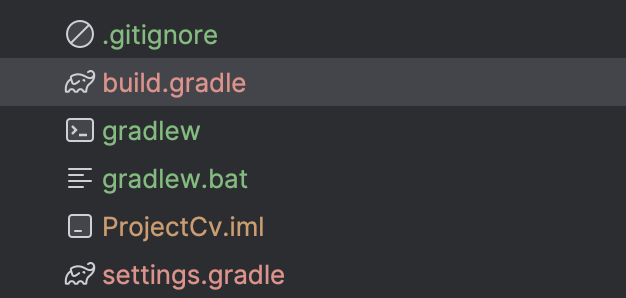
Successfully converted kotlin gradle files to java and the dependencies error are also resolved automatically.
plugins {
    id ("org.springframework.boot") version "3.1.2"
    id ("io.spring.dependency-management") version "1.1.2"
    id("java")
}

dependencies {
    testImplementation(platform("org.junit:junit-bom:5.10.0"))
    testImplementation("org.junit.jupiter:junit-jupiter")

    // Spring Boot Web dependency for building REST APIs
    implementation 'org.springframework.boot:spring-boot-starter-web'

    // Spring Data JPA for ORM (Object-Relational Mapping)
    implementation 'org.springframework.boot:spring-boot-starter-data-jpa'

    // H2 Database (for in-memory testing, replace with MySQL or PostgreSQL in production)
    runtimeOnly 'com.h2database:h2'

    // Lombok to reduce boilerplate code like getters, setters, and constructors
    compileOnly 'org.projectlombok:lombok'
    annotationProcessor 'org.projectlombok:lombok'

    // Spring Boot Starter Test (JUnit 5, Mockito)
    testImplementation 'org.springframework.boot:spring-boot-starter-test'
}
Now lets run the project to see if the gradle is successful or not.

✅ Working perfectly, it downloads all the required plugins and dependencies and the build is successfully 🏆
Now lets move to the next step, which is choose between MySQL or PostgreSQL. I want to work on PostgreSQL because i worked on MySQL before so i want to try a new thing. so lets begin with PostgreSQL.
To add PostgreSQL, configure the database connection in your application.properties
runtimeOnly='org.postgresql:postgresql'
Lets start with the Database Schema which will represent what will be our Entities attributes etc. Im planning to make a user Resume/Cv to make it dynamic and easy to update. Let me share the basic schema design for User CV to begin the implementation of our spring application.
Entity Relationship Diagram (ERD)
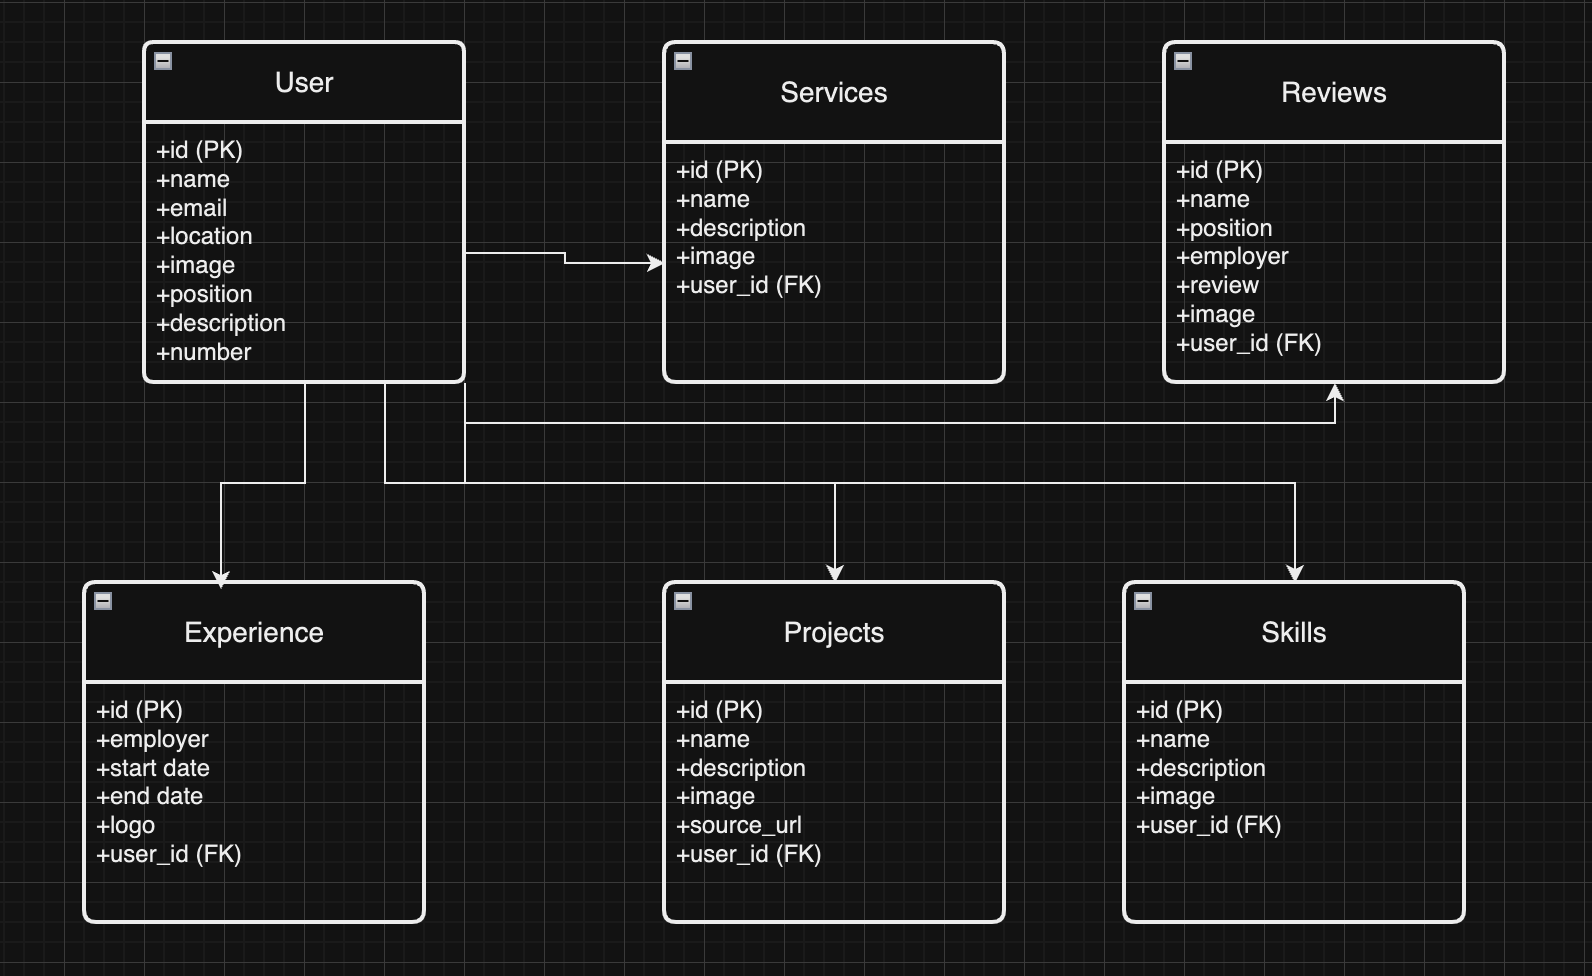
Note: Its just a basic schema to practice the whole process.
Lets start begin with the user Entity
@Entity
@Table(name = "users")
@Data // Lombok annotation to auto-generate getters and setters
@NoArgsConstructor
@AllArgsConstructor
public class User {

    @Id
    @GeneratedValue(strategy = GenerationType.IDENTITY)
    private Long id;

    @Column(nullable = false)
    private String name;

    @Column(nullable = false, unique = true)
    private String email;

    private String location;
    private String image;
    private String position;
    private String description;
    private String number;
}
Details for each Annotation used in the USER class
@Entity: Marks class as database entity.@Table(name = "users"):Defines table name in database.@Data:Auto-generates getters, setters, equals.@NoArgsConstructor:Creates no-argument constructor automatically.@AllArgsConstructor:Creates all-arguments constructor automatically.@Id:Specifies primary key for entity.@GeneratedValue(strategy = GenerationType.IDENTITY):Auto-generates primary key value incrementally.@Column(nullable = false):Field must not be null.@Column(nullable = false, unique = true):Non-null field with unique constraint.The field without annotation are optional (can be null)
Let me share one more Entity which is very important
@Entity
@Table(name = "experience")
@Data // Lombok annotation to auto-generate getters and setters
@NoArgsConstructor
@AllArgsConstructor
public class Experience {

    @Id
    @GeneratedValue(strategy = GenerationType.IDENTITY)
    private Long id;

    @Column(nullable = false)
    private String employer;

    @Column(nullable = false)
    private String start_date;

    @Column(nullable = false)
    private String end_date;

    private String logo;

    // Define foreign key to User entity
    @ManyToOne(fetch = FetchType.LAZY)
    @JoinColumn(name = "id", nullable = false)
    private User user;
}
So in Experience Entity if you notice there is very important information to know. which is Relationship between User and Experience. I used @ManyToOne annotation which means ONE USER HAVE MANY EXPERIENCE and @JoinColumn annotation is used to bind with user table id. In this way we can define Relationship between entities.
Now we have knowledge how to create entities and defining relationship between entities so we can make all other entities.
Create a Repository
The repository interface handles database operations. We'll extend JpaRepository to benefit from out-of-the-box CRUD methods.
import org.springframework.data.jpa.repository.JpaRepository;
import org.springframework.stereotype.Repository;

@Repository
public interface UserRepository extends JpaRepository<User, Long> {
    // Additional query methods can be defined here, if necessary
}
Create a Service Layer
The service layer contains the business logic. It's a good practice to separate business logic from the controller.
import org.springframework.beans.factory.annotation.Autowired;
import org.springframework.stereotype.Service;
import java.util.List;
import java.util.Optional;

@Service
public class UserService {

    @Autowired
    private UserRepository userRepository;

    // Create a new User
    public User createUser(User user) {
        return userRepository.save(user);
    }

    // Get all users
    public List<User> getAllUsers() {
        return userRepository.findAll();
    }

    // Get a user by ID
    public User getUserById(Long id) {
        Optional<User> user = userRepository.findById(id);
        if (user.isPresent()) {
            return user.get();
        } else {
            throw new RuntimeException("User not found with id: " + id);
        }
    }

    // Update an existing User
    public User updateUser(Long id, User updatedUser) {
        User user = getUserById(id); // Fetch the user first
        user.setName(updatedUser.getName());
        user.setEmail(updatedUser.getEmail());
        user.setPhoneNumber(updatedUser.getPhoneNumber());
        return userRepository.save(user); // Save the updated user
    }

    // Delete a User
    public void deleteUser(Long id) {
        userRepository.deleteById(id);
    }
}
Create a Controller
The controller handles HTTP requests and maps them to the corresponding service methods.
import org.springframework.beans.factory.annotation.Autowired;
import org.springframework.http.ResponseEntity;
import org.springframework.web.bind.annotation.*;

import java.util.List;

@RestController
@RequestMapping("/api/users")
public class UserController {

    @Autowired
    private UserService userService;

    // Create a new User
    @PostMapping
    public ResponseEntity<User> createUser(@RequestBody User user) {
        User createdUser = userService.createUser(user);
        return ResponseEntity.ok(createdUser);
    }

    // Get all Users
    @GetMapping
    public ResponseEntity<List<User>> getAllUsers() {
        List<User> users = userService.getAllUsers();
        return ResponseEntity.ok(users);
    }

    // Get a User by ID
    @GetMapping("/{id}")
    public ResponseEntity<User> getUserById(@PathVariable Long id) {
        User user = userService.getUserById(id);
        return ResponseEntity.ok(user);
    }

    // Update an existing User
    @PutMapping("/{id}")
    public ResponseEntity<User> updateUser(@PathVariable Long id, @RequestBody User updatedUser) {
        User user = userService.updateUser(id, updatedUser);
        return ResponseEntity.ok(user);
    }

    // Delete a User
    @DeleteMapping("/{id}")
    public ResponseEntity<Void> deleteUser(@PathVariable Long id) {
        userService.deleteUser(id);
        return ResponseEntity.noContent().build();
    }
}
Exception Handling (Global Exception Handler)
It's a good practice to use a global exception handler to manage errors like "User not found".
import org.springframework.http.HttpStatus;
import org.springframework.http.ResponseEntity;
import org.springframework.web.bind.annotation.ControllerAdvice;
import org.springframework.web.bind.annotation.ExceptionHandler;
import org.springframework.web.context.request.WebRequest;

@ControllerAdvice
public class GlobalExceptionHandler {

    @ExceptionHandler(RuntimeException.class)
    public ResponseEntity<?> handleRuntimeException(RuntimeException ex, WebRequest request) {
        return new ResponseEntity<>(ex.getMessage(), HttpStatus.NOT_FOUND);
    }

    // Add more handlers as needed
}
Validation
Use Bean Validation to validate user input. You can add validation constraints in the User entity.
import javax.validation.constraints.*;

@Data
@NoArgsConstructor
@AllArgsConstructor
public class User {

    @Id
    @GeneratedValue(strategy = GenerationType.IDENTITY)
    private Long id;

    @NotBlank(message = "Name is required")
    private String name;

    @Email(message = "Email should be valid")
    @NotBlank(message = "Email is required")
    private String email;

    private String phoneNumber;
}
For adding validation you need to add gradle dependency to import.
implementation 'org.springframework.boot:spring-boot-starter-validation'
Common Bean Validation Annotations:
@NotNull: Ensures the field is not null.@NotEmpty: Ensures the field is not empty (can still be whitespace).@NotBlank: Ensures the field is not blank (must have non-whitespace characters).@Size(min, max): Validates the size of a string, collection, map, or array.@Minand@Max: Ensure numerical values fall within the specified range.@Email: Validates that the string is a valid email address.@Pattern(regexp = "..."): Ensures that the string matches a regular expression pattern.
Lets start testing
import org.junit.jupiter.api.Test;
import org.springframework.beans.factory.annotation.Autowired;
import org.springframework.boot.test.context.SpringBootTest;
import static org.junit.jupiter.api.Assertions.*;

@SpringBootTest
public class UserServiceTests {

    @Autowired
    private UserService userService;

    @Test
    public void testCreateUser() {
        User user = new User("John Doe", "john.doe@example.com", "123456789");
        User createdUser = userService.createUser(user);
        assertNotNull(createdUser.getId());
        assertEquals("John Doe", createdUser.getName());
    }

    // Add more tests for other operations
}
Real Challenges started

No custom constructor find for User with these three arguments. If you remember we added constructor annotations @NoArgsConstructor and @AllArgsConstructor. So there will be no arguments constructor and all arguments constructor generate automatically. So if you want to make custom construct we can make it like this:
    public User(String name, String email, String number) {
        this.name = name;
        this.email = email;
        this.number = number;
    }
If not then we can pass all arguments values to User object to make it work like this:
User user = new User(0L,"John Doe", "john.doe@example.com", "123456789", "","","","");
It will call the auto generated constructor and the code will work.
Next Challenge

This error is resolved by adding classes like this:
@SpringBootTest(classes = {User.class, UserService.class})
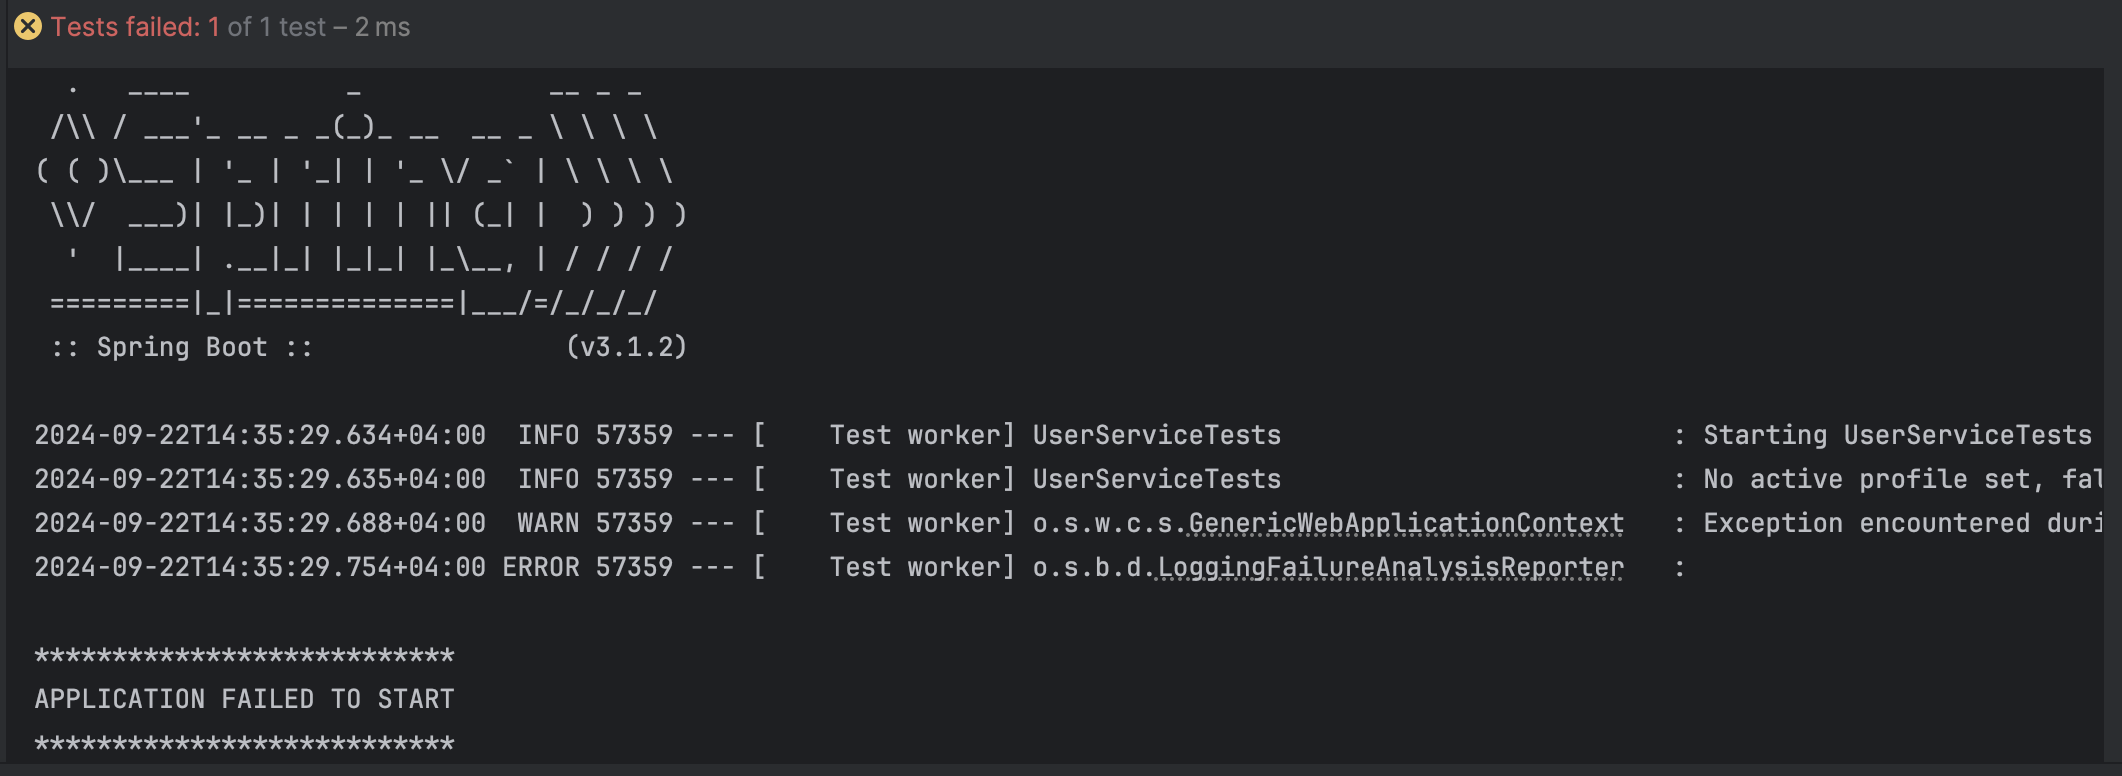
Now next issue comes up
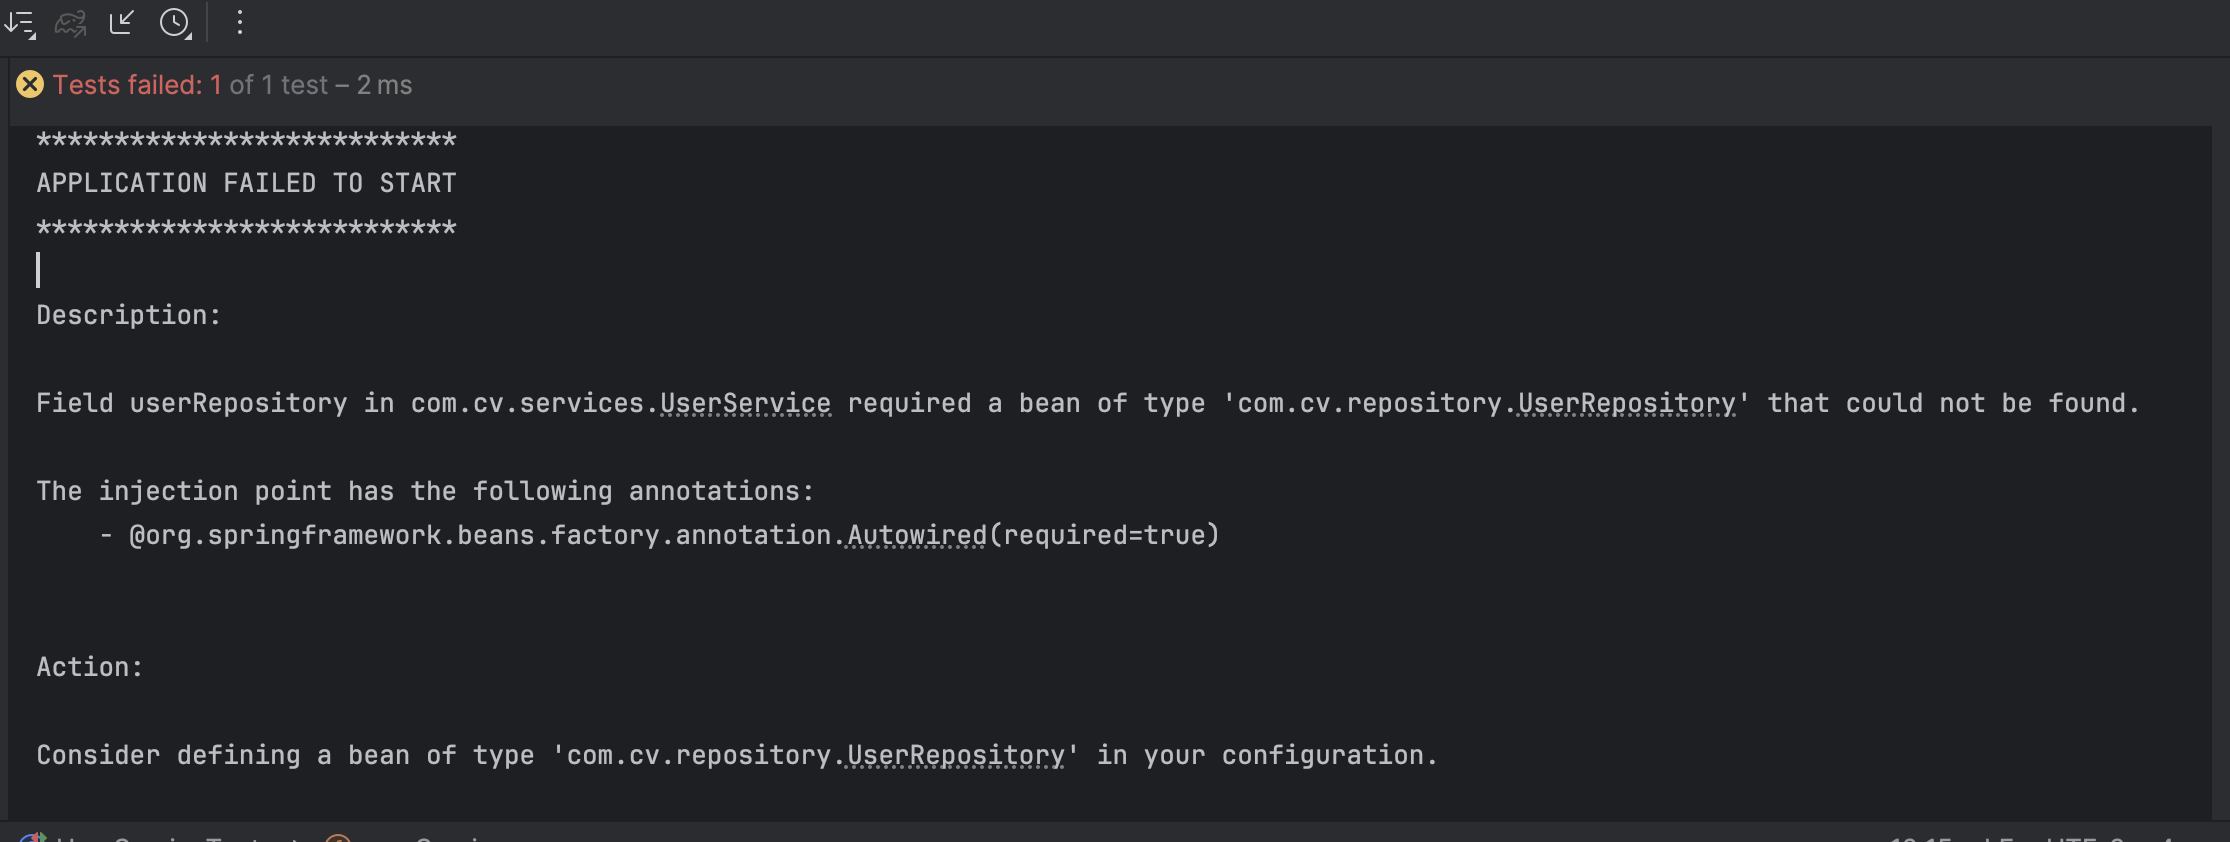
This is happening because some packaging issue, and forget to declare the main application class. let me share how i solved these issue and what are the next issues i faced after solving this.
import org.springframework.boot.SpringApplication;
import org.springframework.boot.autoconfigure.SpringBootApplication;

@SpringBootApplication
public class MainApplicationClass {
    public static void main(String[] args) {
        System.out.print("Hello and welcome!");
        SpringApplication.run(MainApplicationClass.class, args);
    }
}
By adding @SpringBootApplication annotation and by calling SpringApplication.run(MainApplicationClass.class, args); i solved the issue but face some other issues which is given below:
💥 I just tried to run the application and found that much issues 💥
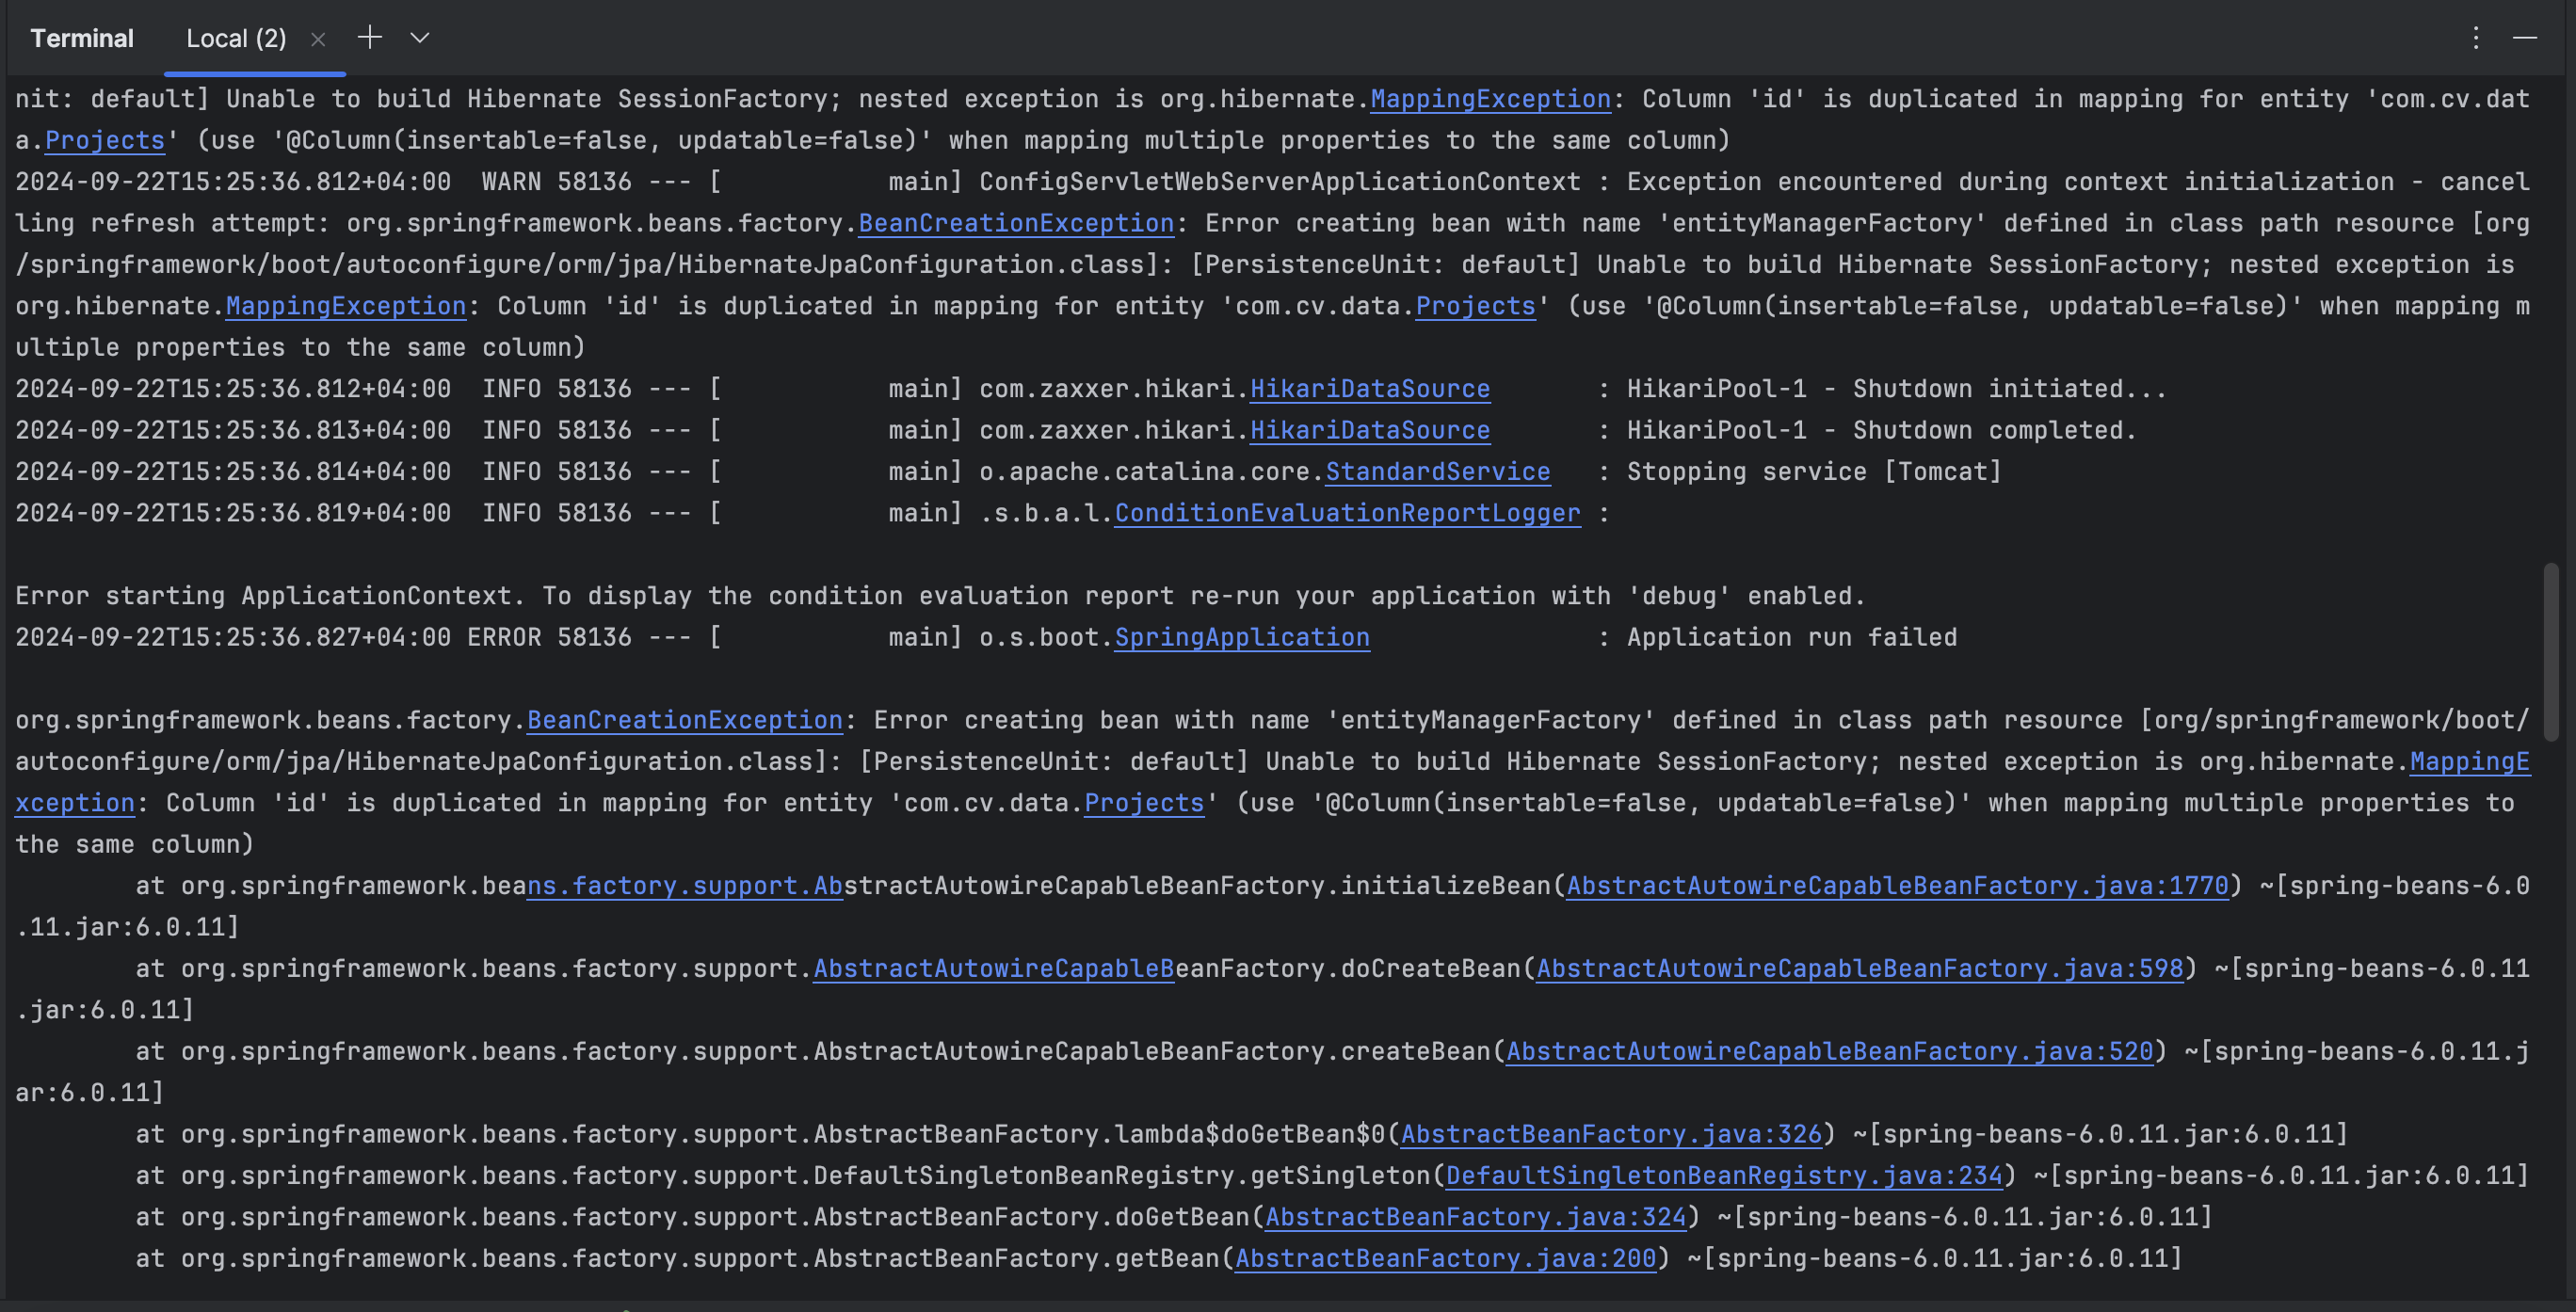
This is the only issue, column id was dublicated in the Projects Class

Now we need to setup PostgreSql database and server to start testing api. In next part we’ll do all these steps.
You can get this project on Github Repo : https://github.com/wasif1/ProjectCv.git
If you want to checkout PART-2 then you can get it here.
Let’s connect and create something impactful! Reach out on LinkedIn, explore my work on GitHub. Thank you 😎
Subscribe to my newsletter
Read articles from Wasif Mujahid directly inside your inbox. Subscribe to the newsletter, and don't miss out.
Written by

Wasif Mujahid
Wasif Mujahid
𝗘𝘅𝗽𝗲𝗿𝗶𝗲𝗻𝗰𝗲𝗱 𝗔𝗻𝗱𝗿𝗼𝗶𝗱 𝗗𝗲𝘃𝗲𝗹𝗼𝗽𝗲𝗿 | 8+ Years in Mobile App Development Passionate about crafting high-performance Android apps that delight users and drive business success.