Establish two Virtual Private Clouds (VPCs) and configure peering between them so they can ping each other using their IP addresses. 0.0.0.0
 RAKESH DUTTA
What is VPC !!
At a high level, a virtual private cloud (VPC) can be described as a subset of a larger public cloud designed specifically for private use. Users can perform similar operations like storing data, running code, and hosting websites, among others, as they do in their personal private cloud.
Network access control lists (ACLs) on a subnet-by-subnet basis. The ACLs specify who can access which resources and how they can connect to them.
User Control over Resources Users maintain control over their resources with in a VPC through AWS Identity and Access Management (IAM). This means they can determine who gets access to the VPC, as well as what rights those have once inside.
Monitoring : The VPC provides necessary tools for performance management via Amazon CloudWatch, which is an online application for monitoring performance of cloud applications.
Elasticity : A VPC gives you the ability to provision resources dynamically based on demand using AWS services such as AWS Auto Scaling and Elastic Load Balancing.
Interconnectivity : The region’s data centers are interconnected, which enables you to communicate with any of your resources within a single region very fast regardless of their physical location in that region.
Security : A VPC is more secure than traditional data centers because it provides logical separation of customer environments in terms of network traffic flow into and out of them.
What is VPC Peering !!
VPC peering refers to how two virtual private clouds (VPCs) are connected in such a way that information can pass between them using their private IP addresses. It is a definition of a fast transfer method that does not delay its operation too much and is an efficient way to distribute things like website servers and other online storage facilities.
How it works : Creating VPC peering creates a direct network route between two VPCs that avoids the need for Internet, VPN, or AWS Direct Connect.
How to set it up : When establishing a VPC peering connection, you request a peering connection from one VPC and it is accepted by the owner of another VPC.
What it’s used for : One of the main uses of VPC peering is to create multi-VPC architectures and share resources across organizational boundaries.
Common challenges : There are several challenges associated with VPC peering such as overlapping IP ranges, misconfigured route tables, security group issues, and non-transitive peering limitations.
Let’s Begin Here ,,,
Here we’ll be Create two VPC name Demo and Prodcution and other related resources resources to build a peering connection and ping eachother with their IP.
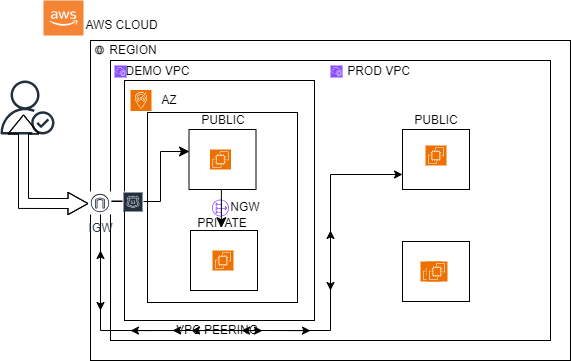
Prerequisites are :
Having an account on https://aws.amazon.com/ and a proper Internet Connection.
Step 1 : Log in to the console.
On the Navigation Search for VPC and hit Create VPC to create one. With a name and a valid CIDR block. Know more to the https://cidr.xyz/ here you can define how CIDR block distributed and get the limits of CIDR. Then hit on Create VPC.
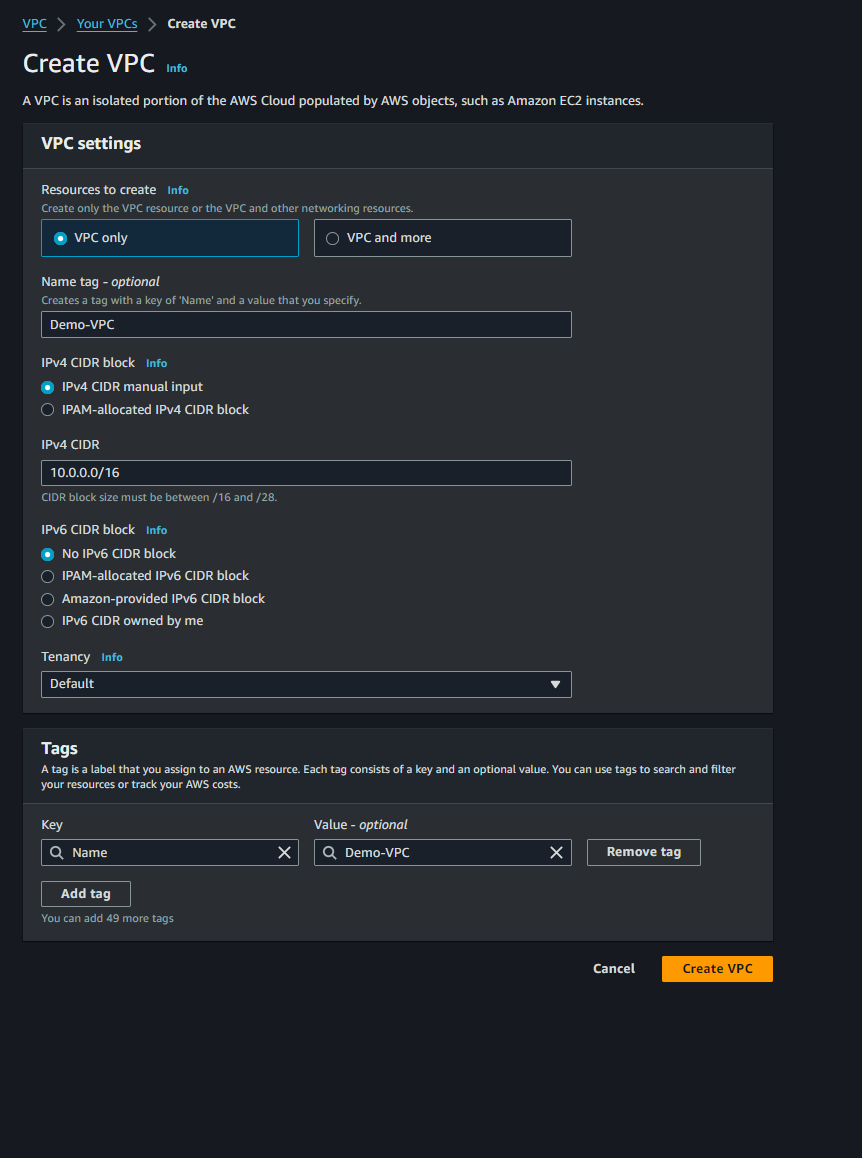
Step 2 : Here we can see our VPC created successfully with available status.

Step 3 : Here after creating a VPC we will create a Subnet. Here on the navigation below VPC click on Subnets and hit to create one. Just choose the VPC under which you are going to creating this Subnet and give a name to your Subnet. Give a proper valid CIDR block for Subnet remember that the Subnet CIDR shouldn’t be the same otherwise CIDR will overlap. So Choose a different bits with unique IP of your Subnet.
Step 4 : After successfully creating a Subnet. Here its time to create Internet-Gateway for your VPC. Just give a name to your Internet-Gateway and that’s all hit Ceate Internet-Gtaway.

Step 5 : Now it’s time to Attach the Internet-Gateway with your VPC. Just go the Action and click on Attach VPC then select your VPC then hit Attach Internet-Gateway.
Step 6 : Here we can see our Internet-Gateway successfully attach with our VPC.

Step 7 : After successfully created a VPC and Internet-Gateway and successfully attach with VPC. Now its time to create a Route table for route the traffic to the VPC. On navigation click on Route Tables then give a name to your Route Table and select your VPC and hit on Create a Route Table.

Step 8 : After successfully created a Route Table then select your route table then go to edit subnet association then add your subnet and save the association.

Step 9 : After saving subnet association. Now it’s time to edit the route and attach your Internet-Gateway with your route and save changes.

Step 10 : Now its time to create another VPC for our Peering. With a name and a valid CIDR block. Know more about CIDR go to the https://cidr.xyz/ where you can define how CIDR block distributed and fixed the limits of your given CIDR. Then hit on Create VPC.
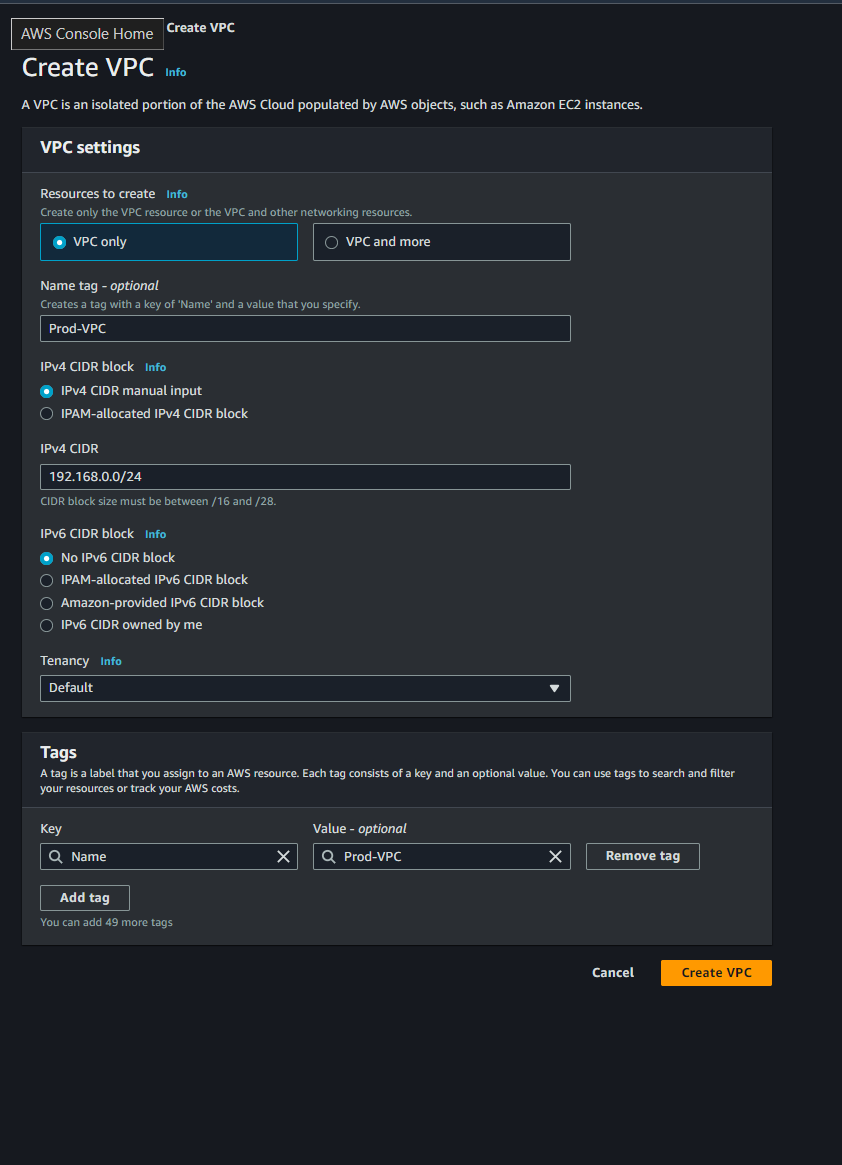
Step 11 : Here after creating a VPC we will create a Subnet. Here on the navigation below VPC click on Subnets and hit to create one. Just choose the VPC under which you are going to creating this Subnet and give a name to your Subnet. Give a proper valid CIDR block for Subnet remember that the Subnet CIDR shouldn’t be the same otherwise CIDR will overlap. So Choose a different bits with unique IP of your Subnet.

Step 12 : After successfully creating a Subnet. Here its time to create Internet-Gateway for your VPC. Just give a name to your Internet-Gateway and that’s all hit Ceate Internet-Gtaway.

Step 13 : Now it’s time to Attach the Internet-Gateway with your VPC. Just go the Action and click on Attach VPC then select your VPC then hit Attach Internet-Gateway.

Step 14 : After successfully created a VPC and Internet-Gateway and successfully attach with VPC. Now its time to create a Route table for route the traffic to the VPC. On navigation click on Route Tables then give a name to your Route Table and select your VPC and hit on Create a Route Table.

Step 15 : After successfully created a Route Table then select your route table then go to edit subnet association then add your subnet and save the association.

Step 16 : After saving subnet association. Now it’s time to edit the route and attach your Internet-Gateway with your route and save changes.

Step 17 : After Creating all that resources like VPC, Subnet Internet-Gateway, Route Table. Now it’s time to Create two different Instance one-by-one with editing networks when configuring the instance according VPC and subnet then hit Launch Instace.

Step 18 : Here we came on the main chapter of our AWS VPC Project. Here on the VPC portal on navigation, below we can find VPC Peering then hit on that to create one.
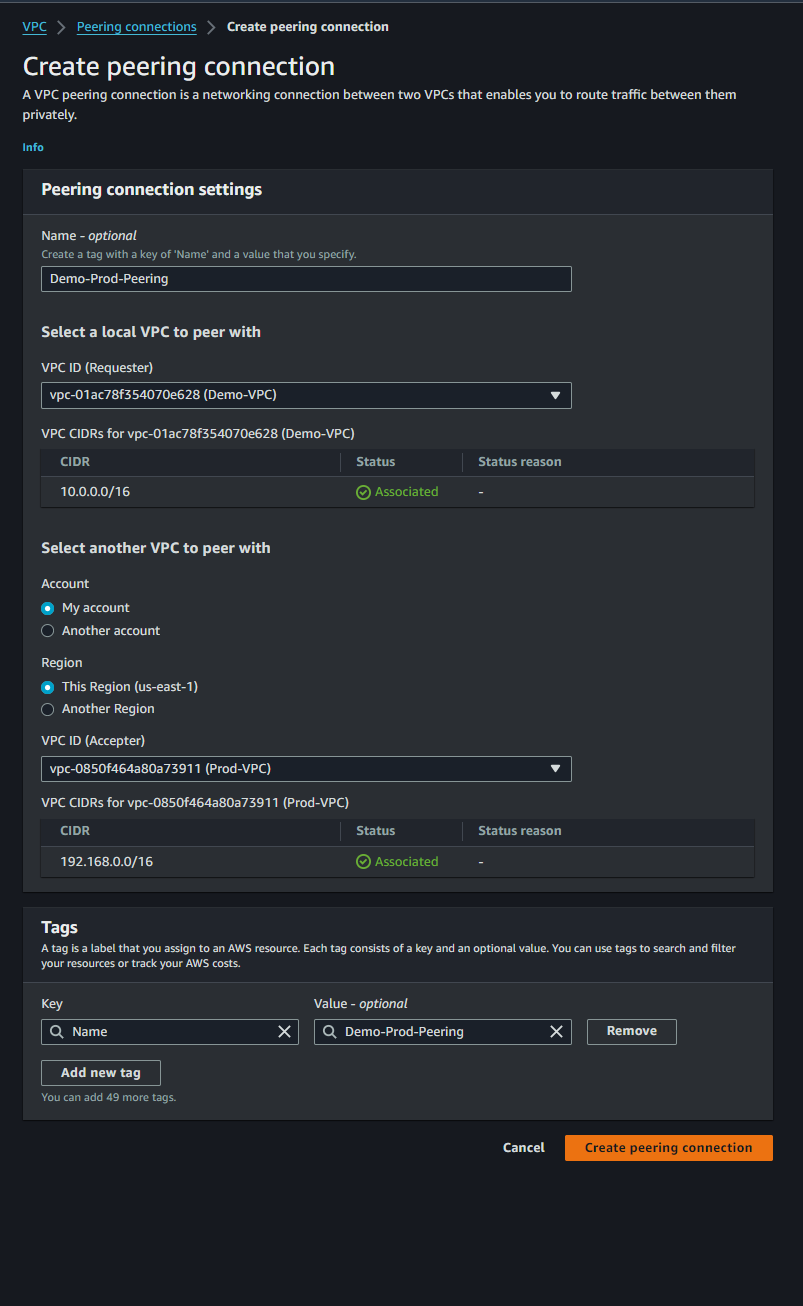
Step 19 : Just give a name to your Peering Connection, then select the requester VPC and define the account and define the region, then select the accepter VPC then hit the Create Peering Connection.
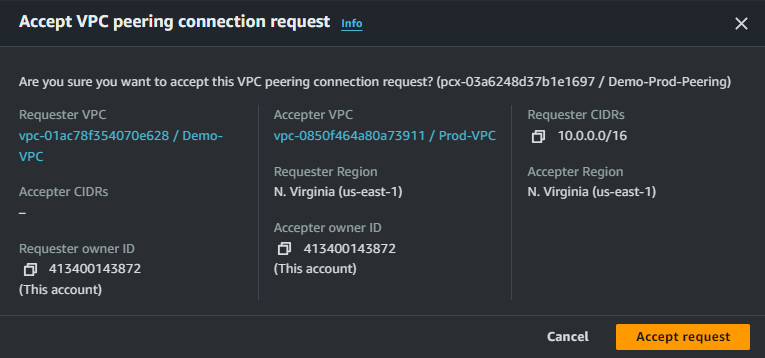
Step 20 : After successfully created the Peering Connection. Hit on Action and Accept the request of VPC Peering.

Step 21 : Here we can see the Peering Connection successfully eastablished between two VPC. Demo-VPC and Prod-VPC are connected Now.

Step 22 : After all that we simply go to the Demo Route then hit on edit route and add destination of Prod CIDR and select target peering connection.

Step 23 : Here we will do same things on Prod Route then hit on edit route and add destination of Demo CIDR and select target peering connection.

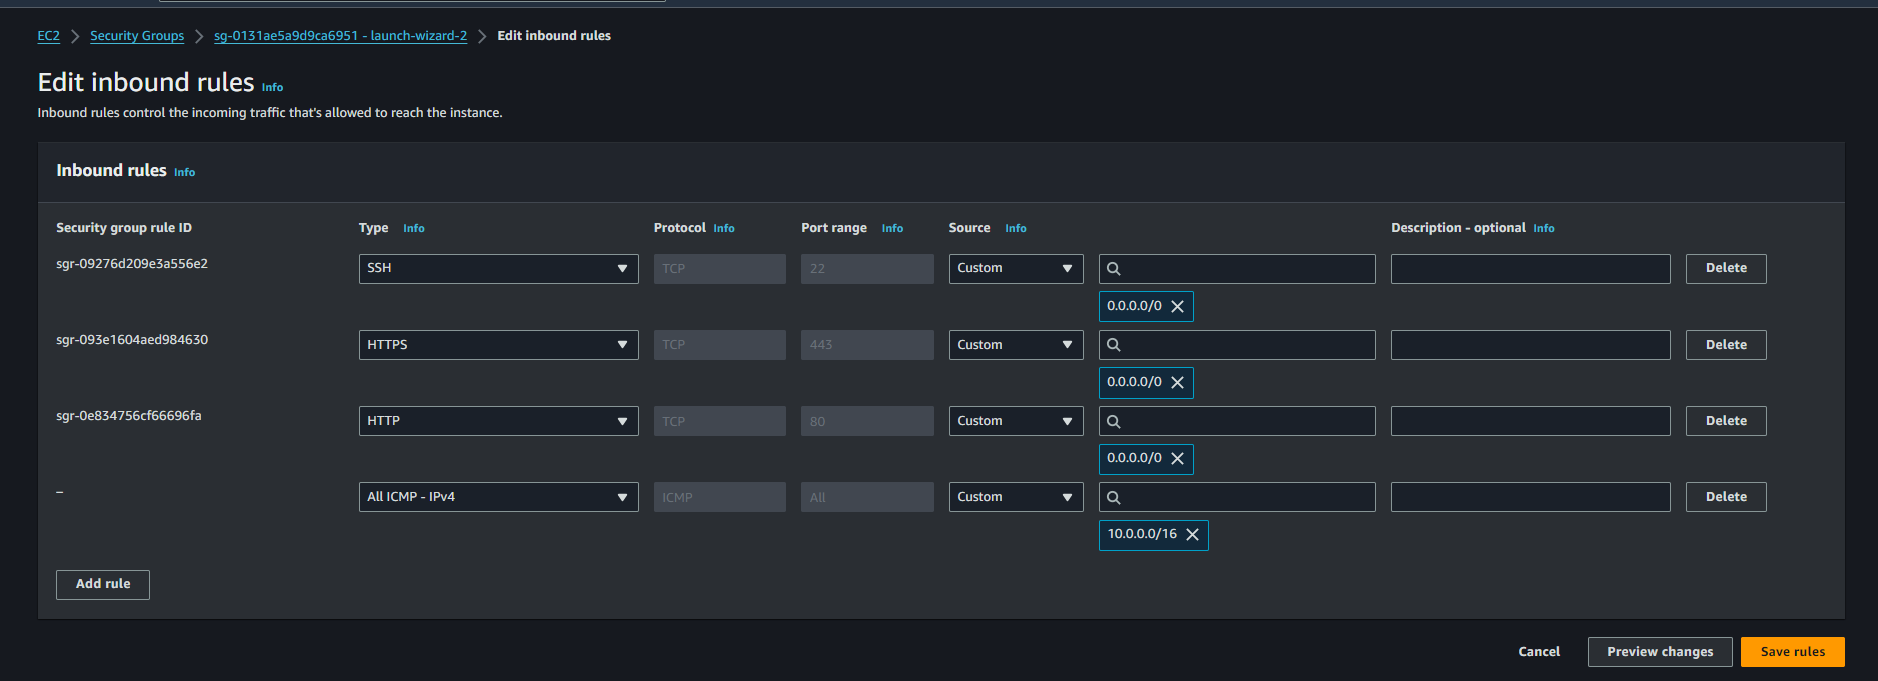
Step 24 : After all that edit the security groups Demo-Instance and allow All ICMP rule source will be Prod-VPC CIDR and save the changes.
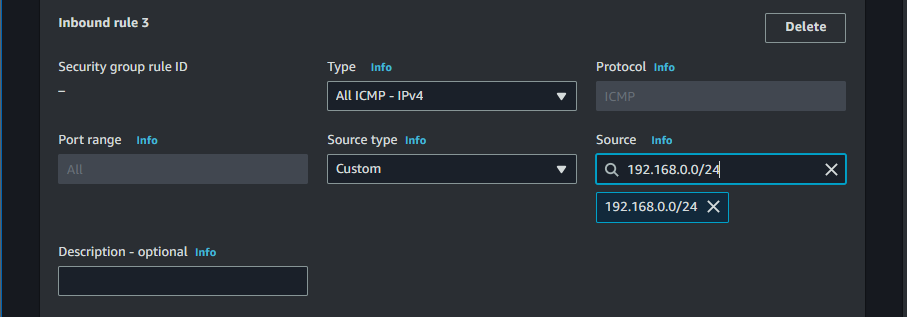
Step 25 : Here we will edit the sucurity group of Prod-Instance and allow All ICMP rule source will be Demo-VPC CIDR and save the changes.
Step 26 : Here we will ssh into both of our instance and ping each other with their IP and Lets see what happens next.


Step 27 : Here we all saw everything is working well. If they Ping with their IP they are getting Pong.
Overall, Setting up a pair of virtual private clouds (VPCs) and setting them up to peer allows for easy interaction. The ability to ping each other's IP addresses ensures that resources between two VPCs can effectively communicate with each other. This will help improve network flexibility and improve resource management in different environments.
Happy L = earning 😊
thank Yu !!
Subscribe to my newsletter
Read articles from RAKESH DUTTA directly inside your inbox. Subscribe to the newsletter, and don't miss out.
Written by
