Joining the Disjoint Tools: A Step-by-Step Guide to Integrate Jenkins and Slack
 Fedor Shchudlo
As engineers, we rely on various tools to support our work: IDEs, source control systems, task trackers, CI/CD pipelines, and observability platforms. While each of these tools is invaluable, together, they create a significant drawback: there are simply too many of them.
How many different tools do you need to roll out a change to production and verify that it was deployed successfully?
This abundance introduces context switching, which can seriously harm developer productivity. Some tools offer plugins to bridge the gaps, but these are often too generic and still require developers to hop between them to complete a meaningful task.
Fortunately, we can address this issue by building custom integrations tailored to our needs. But where should these integrations live?
For my team, Slack has become the perfect hub for these integrations. Unlike the IDE, where focus is key, Slack is where we naturally transition into collaborative or operational tasks. Additionally, it has robust API and SDK, making it an ideal platform to centralize workflows, automate tasks, and streamline processes without disrupting developers’ focus.
The Slack API has a learning curve, but adding new integrations becomes straightforward once you overcome it. This article aims to guide you through that initial learning curve with a comprehensive, step-by-step approach, helping you quickly reach a point where implementing the automation you need is easy. We’ll integrate Slack with Jenkins to manage pipeline executions entirely within Slack.
The complete source code for this project is available on GitHub. While I used TypeScript, Slack also provides Java and Python SDKs.
Below is a preview of a basic scenario: a user sends a Slack command, selects a pipeline, fills in parameters via a generated form, and triggers the pipeline—all without leaving Slack.
Preparing the Environment
Registering a new Slack application
To get started, we need to create a new Slack application. I recommend setting up a separate Slack workspace for testing and following the "Create an app" section in the Slack Bolt Getting Started guide.
To streamline the process, you can import a prepared manifest file during configuration. This file will automatically configure the necessary scopes, enable event handling, and register the required Slack command.
Once you've registered and installed the app in your Slack workspace, you’ll need to obtain two tokens:
App Token can be generated on the Basic Information page.
Bot Token can be obtained from the OAuth & Permissions page.
Bootstrapping an Application Repository
You can either clone my repository and follow the steps in README.md or continue with the Slack Bolt guide to bootstrap the app manually.
Start by installing the required npm dependencies:
npm install @slack/bolt axios dotenv ts-node typescript
Next, set up the Slack Bolt app in the app.ts file. Here’s an example setup:
import {App} from "@slack/bolt";
import {AppConfig} from "./app.config";

const app = new App({
    token: AppConfig.SLACK_BOT_TOKEN,
    appToken: AppConfig.SLACK_APP_TOKEN,
    socketMode: true
});

(async () => {
    await app.start(AppConfig.SLACK_BOT_PORT);
    console.log("⚡️ Jenkins-Slack connector is running!");
})();
The AppConfig is a simple wrapper for environment variables:
import "dotenv/config";

export const AppConfig = {
    SLACK_BOT_TOKEN: process.env.SLACK_BOT_TOKEN,
    SLACK_APP_TOKEN: process.env.SLACK_APP_TOKEN,
    SLACK_BOT_PORT: process.env.SLACK_BOT_PORT,
    JENKINS_URL: process.env.JENKINS_URL,
    JENKINS_CREDENTIALS: {
        username: process.env.JENKINS_API_USER,
        password: process.env.JENKINS_API_TOKEN
    }
};
You'll also need to export the Slack tokens from the previous step or place them in the .env file:
SLACK_APP_TOKEN(App token starts withxapp-)SLACK_BOT_TOKEN(Bot token starts withxoxb-)
Preparing Jenkins
Next, we need to configure Jenkins to allow API access. Follow these steps to get the required token:
Log in to Jenkins.
Click your profile name in the upper-right corner.
Navigate to Configure in the left-hand menu.
Click the Add New Token button to generate a new token.
Copy the token for later use.
Now, store the token and your Jenkins login information in environment variables:
JENKINS_API_TOKEN(your generated API token)JENKINS_API_USER(your Jenkins username)JENKINS_URL(base URL of your Jenkins instance)
Finally, to test your setup, you can add the following sample pipelines to Jenkins:
Finally, we need some pipelines to test. You can simply add these three sample pipelines to your Jenkins.
Now that everything is set up, we’re ready to dive into the code!
Creating the First Slack Command
The manifest file we used earlier adds a /run_jenkins_pipeline Slack command. Now, let’s write a handler for this command that will display a form allowing users to select and run a Jenkins pipeline.
app.command("/run_jenkins_pipeline", async ({ack, respond}) => {
    await ack();

    const blocks = [
        section("Please, choose pipeline to run"),
        divider(),
        pipelinesDropdown(),
        actionsBlock("submit", [
            button("Run", ActionKeys.RUN_JENKINS_PIPELINE),
            cancelButton()
        ])
    ];

    await respond({blocks: blocks});
});
divider(), button(), and cancelButton() to make the code more compact. If you're new to Block Kit, I recommend using the Slack Block Kit Builder to streamline form creation. Here is the preview of our form in pure Block Kit syntaxThe code snippet below registers a command handler for the /run_jenkins_pipeline command and performs the following steps:
Calls the
ack()to let Slack know that our app is processing the command.Builds a form with a header, a dropdown menu to select a Jenkins pipeline, and two buttons: Run and Cancel.
Sends form back to Slack by calling the
respond()function, allowing the user to interact with it.
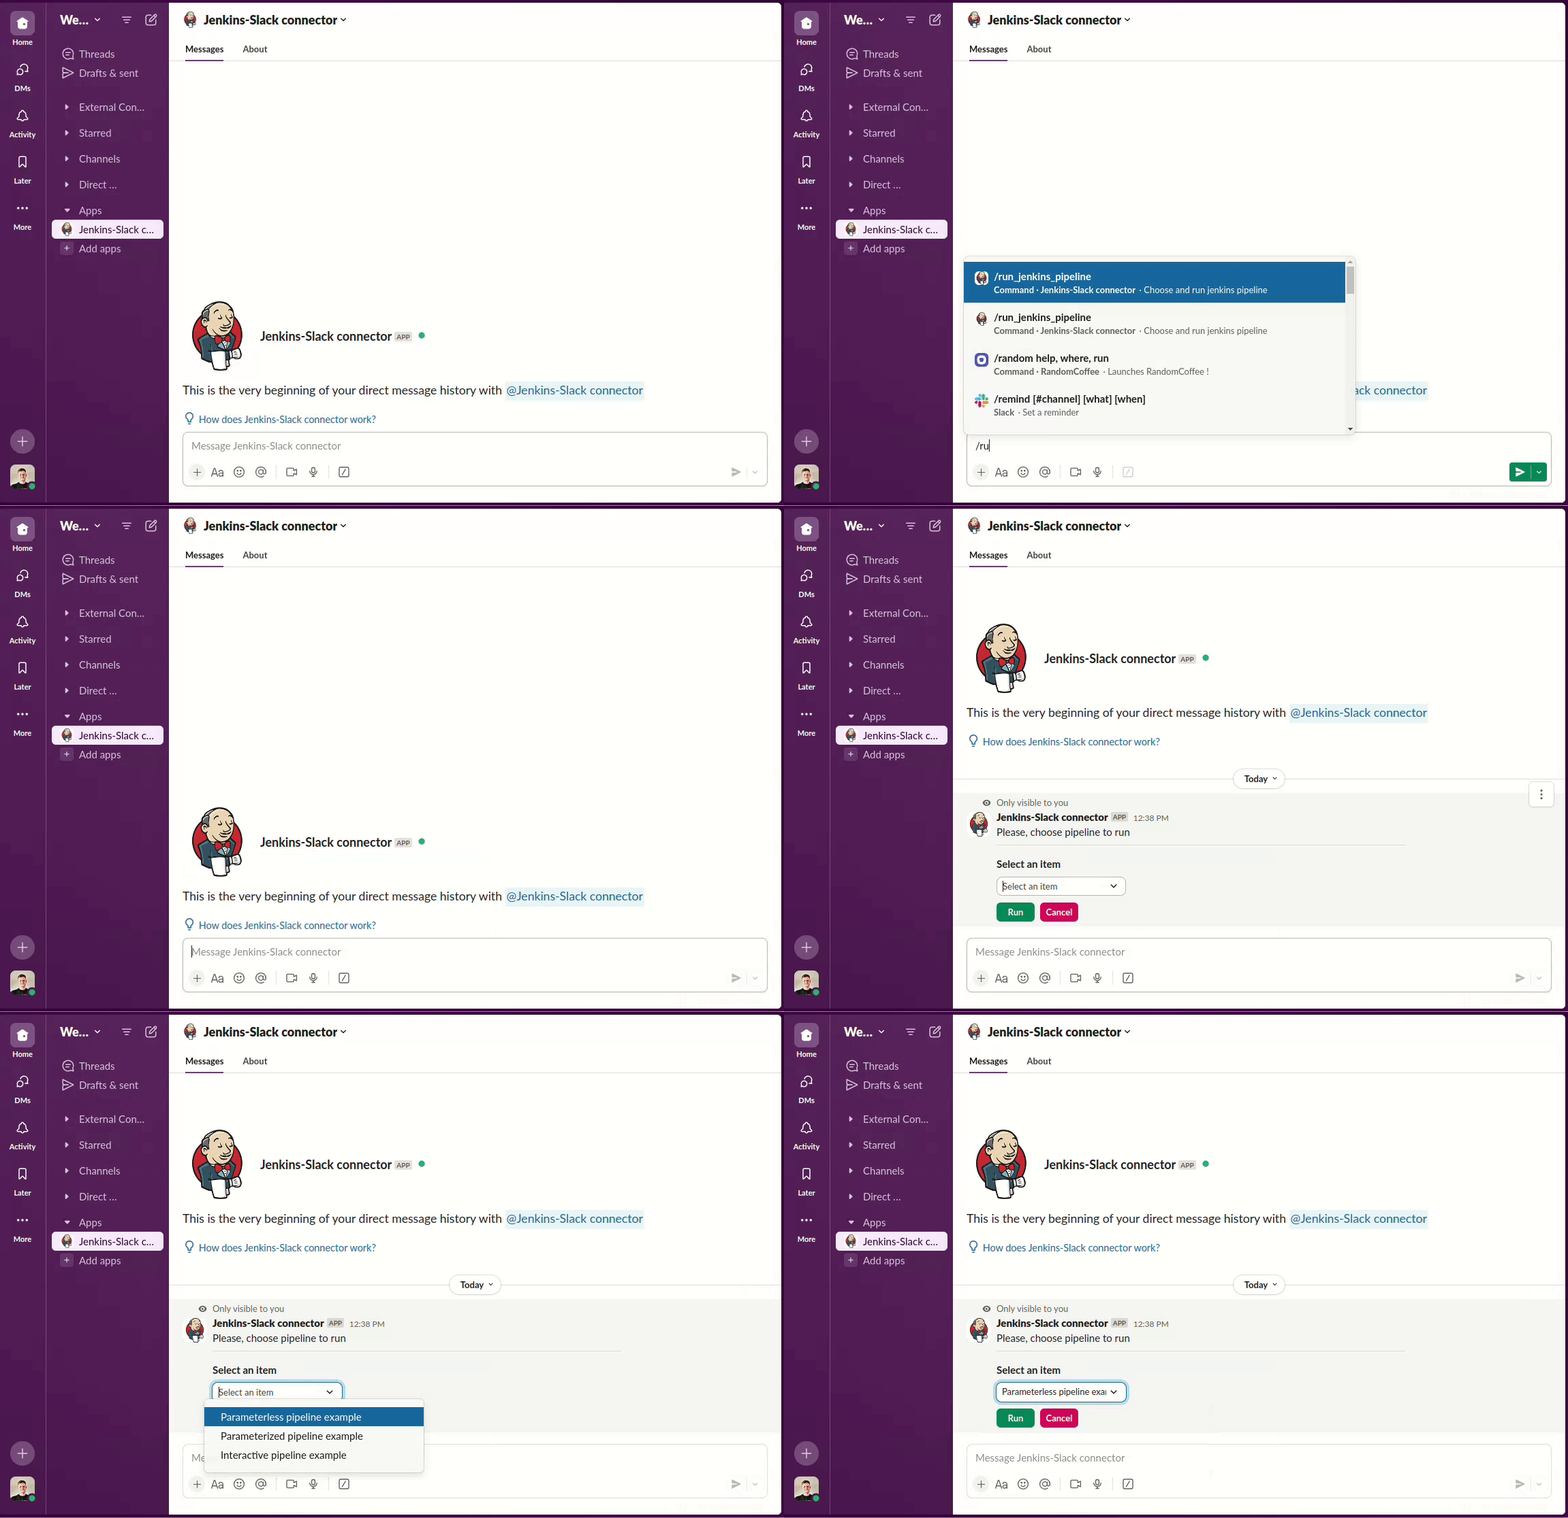
ack and respond functions. Look at the Listener function arguments to explore other options for more advanced interactions.Here’s what happens when you run the bot and type /run_jenkins_pipeline in Slack:
/api to any Jenkins page URL (e.g., http://jenkins-server/job-name/api).With the form now displaying in response to the Slack command, we can move to the next step: teaching the bot how to execute the Jenkins pipeline when the form is submitted.
Running a Parameterless Pipeline
We’ve added the Run and Cancel buttons to the form, but they aren’t functional yet. Let’s fix that by using action handlers to trigger the desired behavior when these buttons are clicked.
The Cancel button is straightforward to implement. Its handler simply responds with a message without taking further action. Here's how it works:
app.action(ActionKeys.DISPLAY_CANCELLATION_MESSAGE, async ({ack, respond}) => {
    await ack();
    await respond("Ok, I've canceled the operation. See you soon.");
});
The Run button is where the magic happens. When a user clicks Run, we need to do the following:
Call
ack()to notify Slack that we received the action.Extract the selected pipeline name from
body.state.values.Start the specified Jenkins Pipeline and return a link to the running job or an error if something goes wrong.
Here’s the handler for the Run button:
app.action(ActionKeys.RUN_JENKINS_PIPELINE, async ({context, body, ack, respond}: AllMiddlewareArgs & SlackActionMiddlewareArgs) => {
    await ack();
    const selectedPipelineOption = body.state.values.pipeline_name.pipeline_name.selected_option;

    try {
        const startedJobUrl = await context.jenkinsAPI.startJob(selectedPipelineOption.value);
        await respond(`:rocket: Here is the running ${link(pipelineDisplayName, startedJobUrl)} pipeline`);
    } catch (error) {
        await respond({blocks: errorMessage(`Unable to run \`${pipelineDisplayName}\` pipeline`, error)});
    }
});
The JenkinsAPI.startJob function is responsible for triggering the pipeline in Jenkins. It sends a POST request to the Jenkins /build API, which returns a queue URL for the job in the location header. After a brief delay, we send a request to the queue URL to retrieve the running job URL from the queuedJobInfo.executable.url property:
export class JenkinsAPI {
    private readonly auth: BasicAuthCredentials;
    private readonly jenkinsUrl: string;

    constructor(auth: BasicAuthCredentials, jenkinsUrl: string) {
        this.auth = auth;
        this.jenkinsUrl = jenkinsUrl;
    }

    async startJob(jobName: string, jobParams?: any): Promise<string> {
        const runJobUrl = `${this.jenkinsUrl}/${jobName}/build`;

        const queuedJobUrl = (await this.request(runJobUrl, "POST", jobParams)).headers.location;

        // give Jenkins time to start the job
        await new Promise(resolve => setTimeout(resolve, 300));

        const startedJob = (await this.request(`${queuedJobUrl}/api/json`, "GET")).data;

        if (startedJob.blocked) {
            return Promise.reject(startedJob.why);
        }
        return startedJob.executable.url;
    }
    private async request(url: string, method: Method = "GET", params?: any): Promise<AxiosResponse> {
        return axios.request({
            method,
            url,
            params,
            auth: this.auth,
            headers: {"accept": "application/json", "accept-encoding": "gzip, deflate, br"}
        });
    }
}
setTimeout is necessary to allow Jenkins time to move the job from the queue to execution. While it’s a bit of a hack caused by the temporal coupling, it’s unavoidable here due to how Jenkins handles job queuing.In some cases, Jenkins may be unable to start the job (e.g., no available build agent or concurrent job execution is disabled). When this happens, we return an error message to Slack. The queuedJobInfo.why property contains the reason for the failure and is displayed to the user.
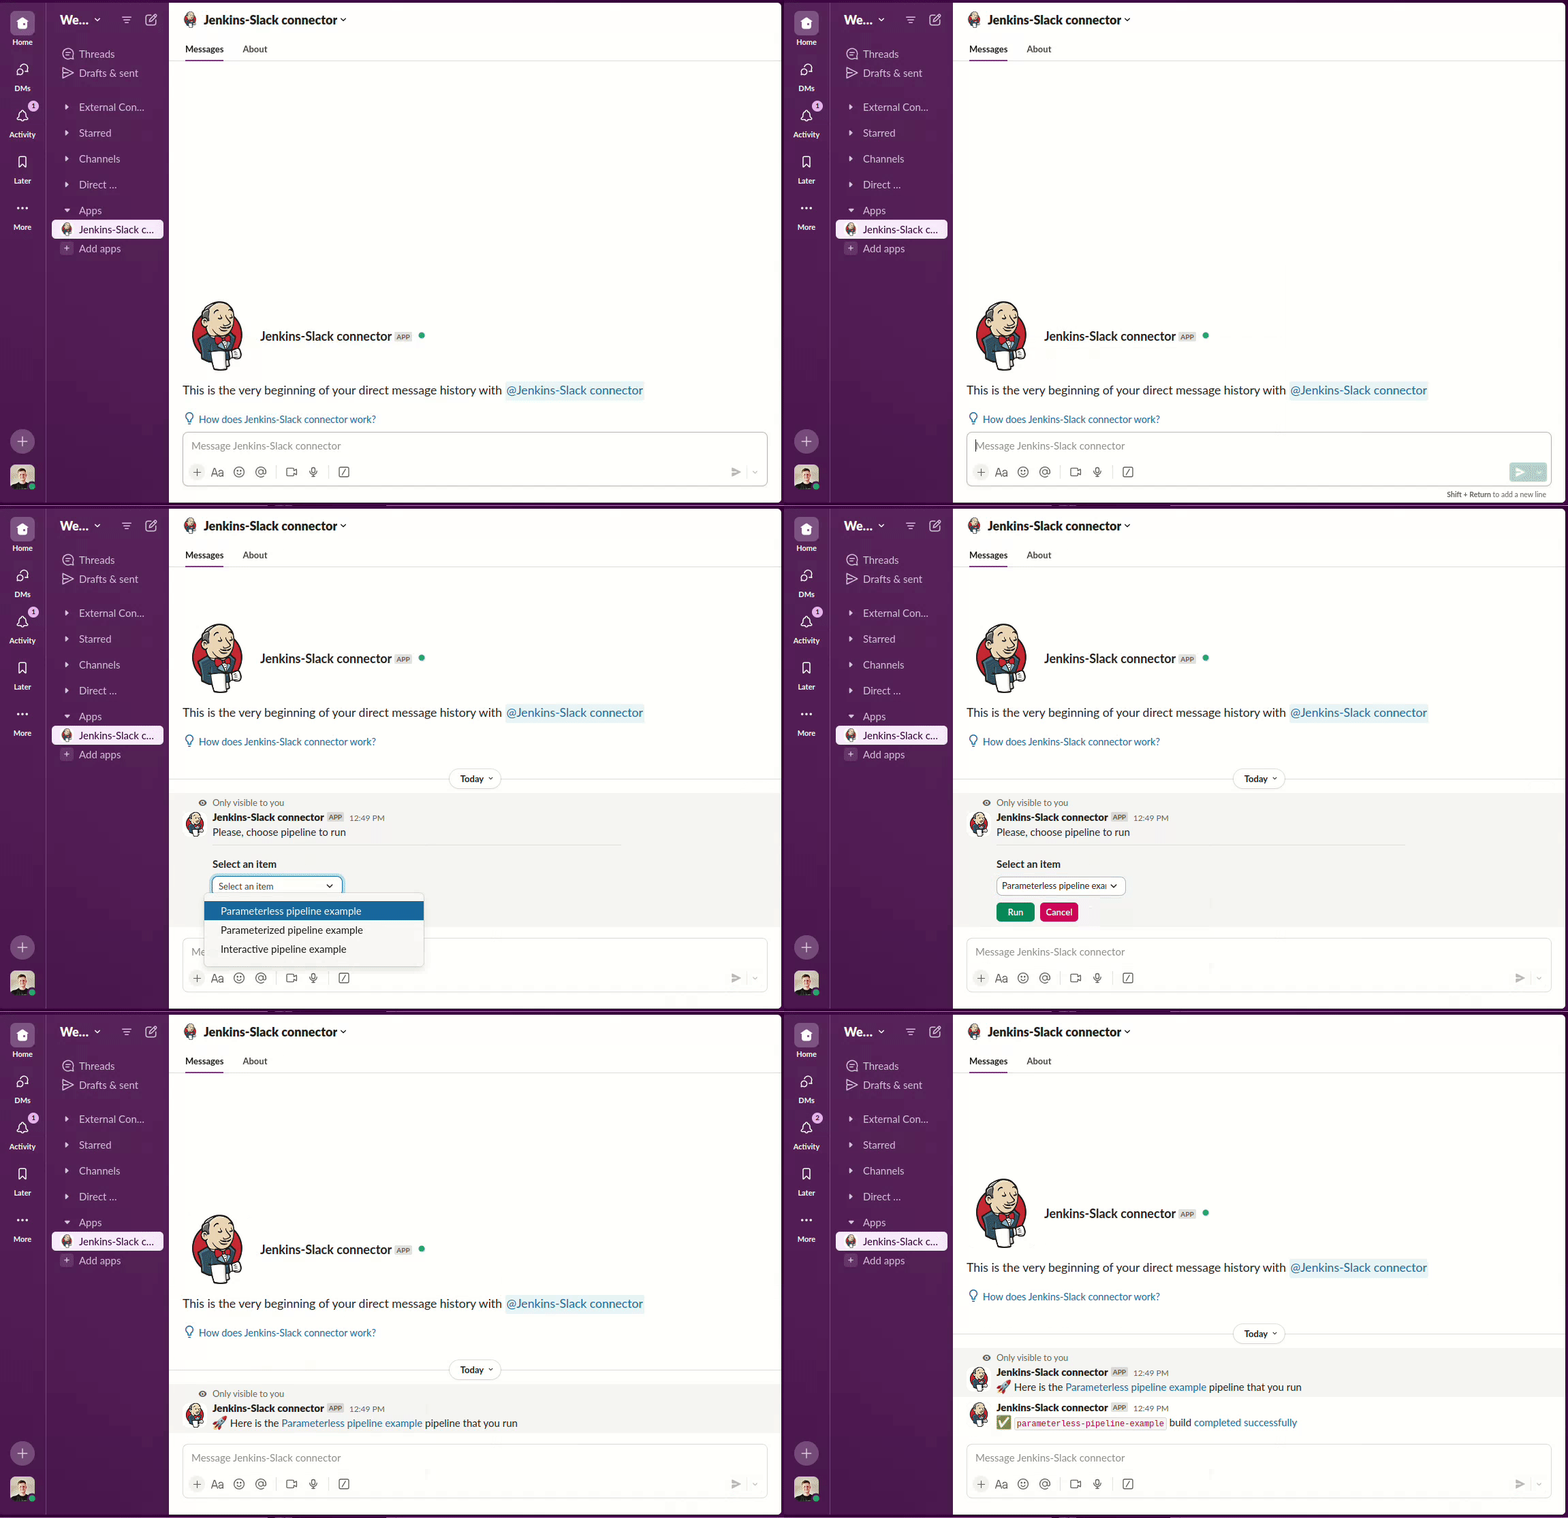
So, let's see how it looks in action:
The demo shows a user receives a notification when the pipeline is completed. This is achieved using the Jenkins Slack Notification plugin, which allows us to notify users directly in Slack when the job finishes.
The plugin allows to map the build starter’s email to their Slack user ID and send the notification:
  pipeline {
    ...
    post {
        always {
            script {
                def authorId = slackUserIdFromEmail(currentBuild.rawBuild.getCause(Cause.UserIdCause)?.getUserId())
                if (authorId) {
                    def message = currentBuild.result == 'SUCCESS' ? ":white_check_mark: `${env.JOB_BASE_NAME}` build <${env.BUILD_URL}|completed successfully>" : ":octagonal_sign: `${env.JOB_BASE_NAME}` build <${env.BUILD_URL}|had been failed>"
                    slackSend(message: message, sendAsText: true, channel: authorId, botUser: true, tokenCredentialId: 'jenkins-slack-connector-bot-token')
                }
            }
        }
    }
}
We also use the botUser and tokenCredentialId parameters to ensure the bot sends the message, creating a seamless experience where all messages appear in the same conversation.
/run_jenkins_pipeline command in any Slack channel or private message, and the bot will respond with ephemeral messages that only you can see, ensuring minimal disruption to others. Meanwhile, Jenkins notifications will be sent directly to you via the bot chat.Running Pipelines On Behalf Of the User
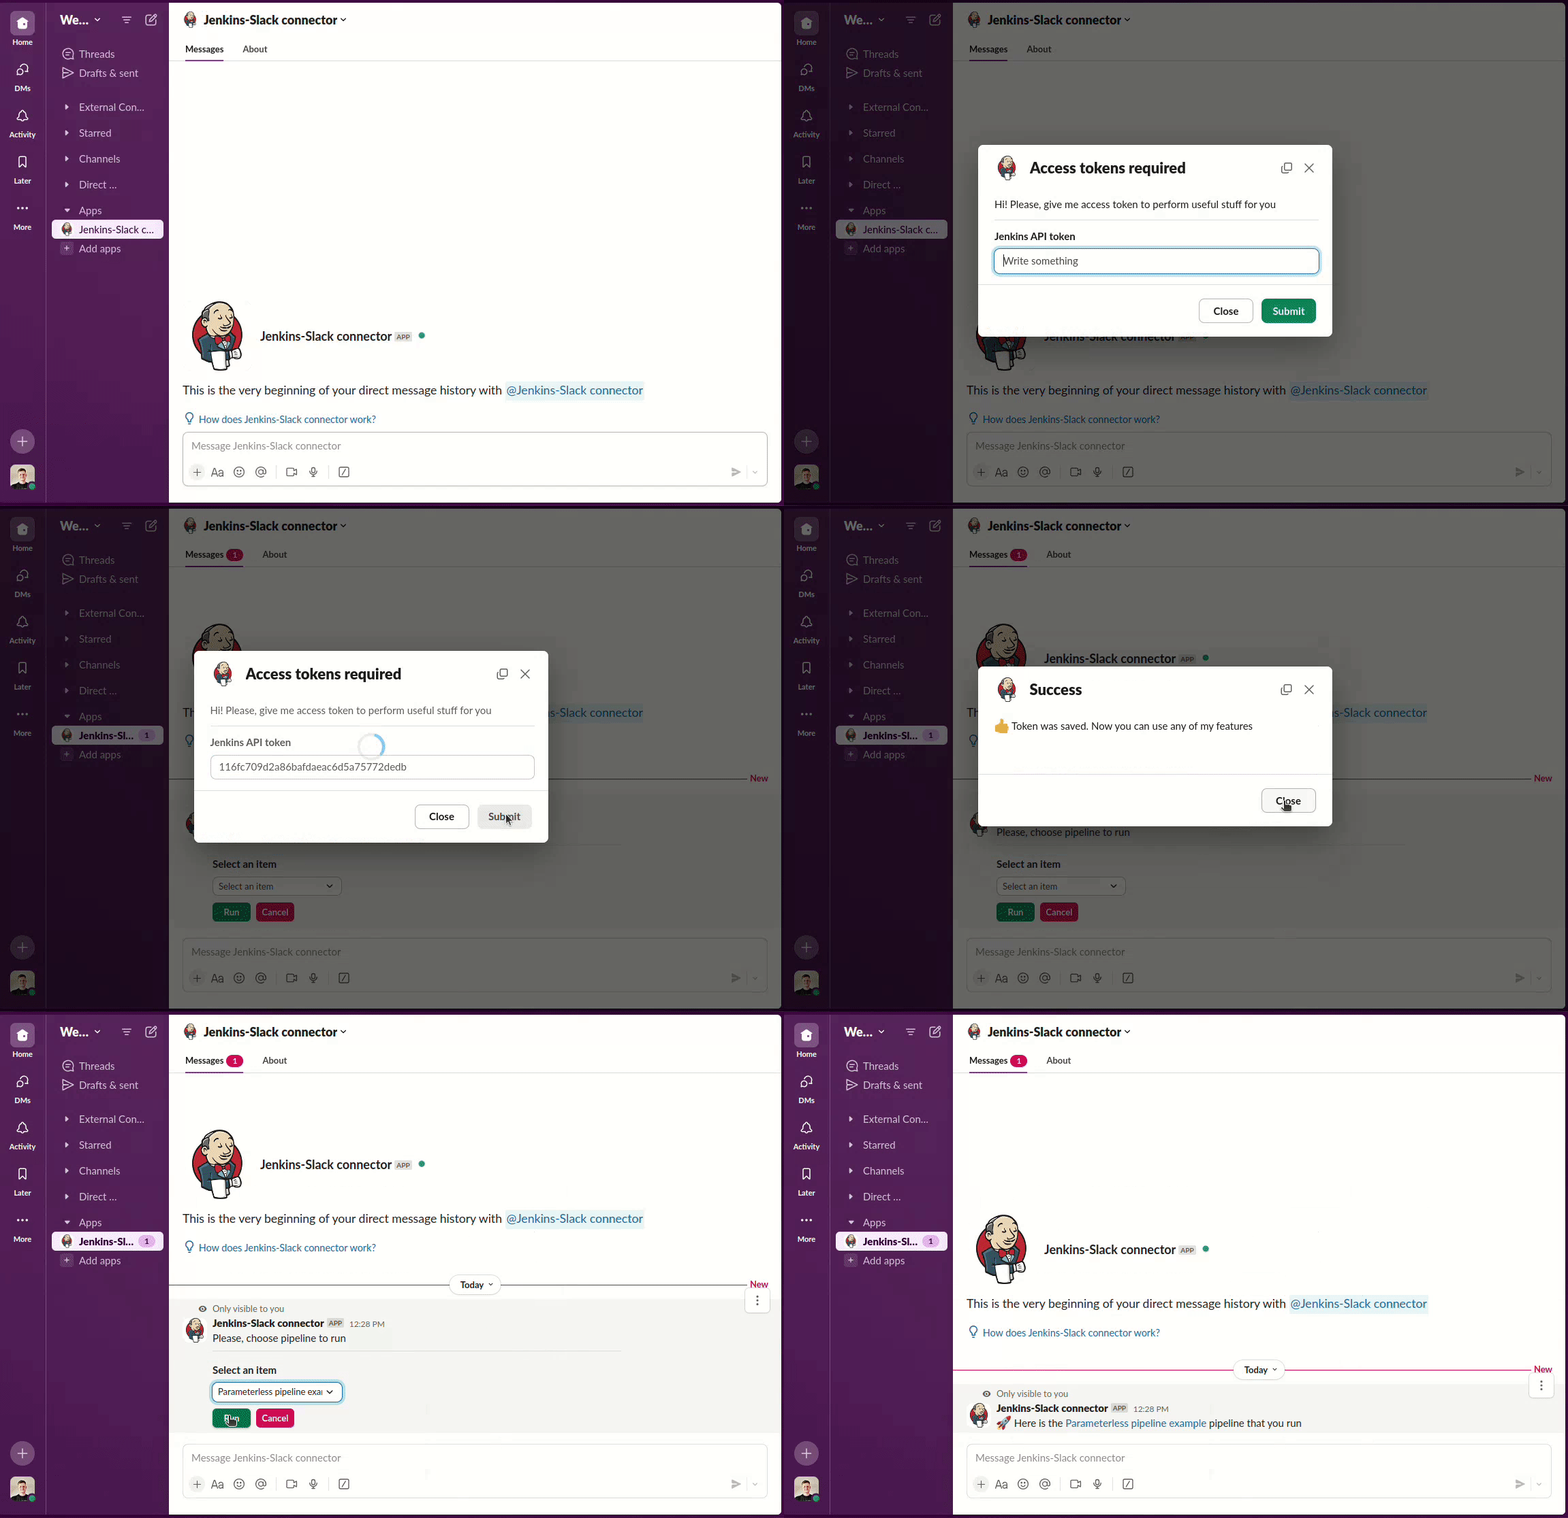
Currently, we use a single token to interact with the Jenkins API, which means that if our bot is shared with the entire team, all pipelines will be executed under the same user account. This creates a problem: notifications and messages about job statuses will only go to the user who provided the token rather than the individual who triggered the pipeline.
To resolve this, each user should provide their own Jenkins API token. This allows users to run pipelines under their accounts and receive personalized notifications. We can achieve this by using Slack middleware that will:
Checks for Saved Credentials: If the user has already provided their Jenkins credentials, we initialize the Jenkins API instance and attach it to the context.
Prompt for Credentials: If no credentials are found, we open a modal form that asks the user to input their Jenkins API token.
Below is the implementation of the middleware:
export async function constructJenkinsAPI({context, client, body, next}) {
    const credentials = CredentialsStore.getCredentials(context.userId);
    if (credentials) {
        context.jenkinsAPI = new JenkinsAPI(credentials, AppConfig.JENKINS_URL);
        await next();
        return;
    }
    await client.views.open({
        trigger_id: body.trigger_id,
        view: buildJenkinsTokenModalForm()
    });
    await next();
}

function buildJenkinsTokenModalForm(): ModalView {
    return {
        type: "modal",
        callback_id: ActionKeys.SAVE_ACCESS_TOKENS,
        title: {
            type: "plain_text",
            text: "Access tokens required"
        },
        submit: {
            type: "plain_text",
            text: "Submit",
            emoji: true
        },
        blocks: [
            section("Hi! Please, give me access token to perform useful stuff for you"),
            divider(),
            textbox("Jenkins API token", "jenkins_token")
        ]
    };
}
Also, we need to attach the middleware to all listeners that interact with Jenkins. Here’s how you register it with Slack commands and actions:
app.command("/run_jenkins_pipeline", constructJenkinsAPI, async ({ack, respond}) => {
...
});

app.action(ActionKeys.RUN_JENKINS_PIPELINE, constructJenkinsAPI, async ({context, body, ack, respond}) => {
...
});
The middleware will ensure every user has valid credentials before proceeding with the command or action.
The next piece is implementing the Slack view listener called when a user submits the token form. here, we need to save user credentials and confirm the process was successful:
app.view(ActionKeys.SAVE_ACCESS_TOKENS, constructUser, async ({ack, body, context})=> {
    const respond = async (title: string, ...blocks: any[]): Promise<void> => {
        await ack({
            response_action: "update",
            view: {
                type: "modal",
                title: {type: "plain_text", text: title},
                blocks: blocks
            }
        });
    };

    const payload: any = getSlackFormValues(body.view.state.values);
    const userInfo = (await client.users.info({user: context.userId})).user;

    CredentialsStore.saveCredentials(context.userId, {username: userInfo.profile.email, password: payload.jenkins_token});

    await respond("Success", section(":thumbsup: Token was saved. Now you can use any of my features"));
});
Let's also look to the CredentialsStore used above. It simply saves tokens in memory:
import {BasicAuthCredentials} from "./jenkins-api/BasicAuthCredentials";

const CREDENTIALS_STORE: Record<string, BasicAuthCredentials> = {}

export class CredentialsStore {
    static saveCredentials(userId: string, credentials: BasicAuthCredentials): void {
        CREDENTIALS_STORE[userId] = credentials;
    }

    static getCredentials(userId: string): BasicAuthCredentials | null {
        if (userId in CREDENTIALS_STORE) {
            return CREDENTIALS_STORE[userId];
        }
        return null;
    }
}
With this setup, each team member can now run Jenkins pipelines using their own credentials.
Running a Parameterized Pipeline
Now that we've handled simple, parameterless pipelines, let’s modify our bot to support running parameterized pipelines as well.
In the updated handler for the /run_jenkins_pipeline command, we first check whether the pipeline requires parameters. If it does, we present the user with a form to input those parameters. If not, we simply run the pipeline as before:
app.action(ActionKeys.RUN_JENKINS_PIPELINE, async ({body, ack, respond}: AllMiddlewareArgs & SlackActionMiddlewareArgs) => {
    ...
    const pipelineParameters = await jenkinsAPI.getJobParameters(pipelineId);

    if (pipelineParameters) {
        const parametersForm = buildPipelineParametersForm(pipelineParameters, pipelineDisplayName, pipelineId);
        await respond({blocks: parametersForm});
    } else {
        await runParameterlessPipeline(context.jenkinsAPI, pipelineId, pipelineDisplayName, respond);
    }
});
The key part here is calling the getJobParameters method from our Jenkins API class to retrieve the pipeline’s parameter definitions:
export class JenkinsAPI {
    ...
    async getJobParameters(jobPath: string): Promise<JenkinsParameterDefinition[] | null> {
        const url = `${this.jenkinsUrl}/${jobPath}/${JENKINS_API_POSTFIX}`;

        const jobInfo = (await this.request(url, "GET")).data;
        const parametersDefinition = jobInfo.property.find((item: object) => "parameterDefinitions" in item);

        return parametersDefinition?.parameterDefinitions || null;
    }
}
If no parameters are needed, we run the pipeline immediately by calling the runParameterlessPipeline function. It runs parameterless pipeline the same way we implemented previously:
async function runParameterlessPipeline(jenkinsAPI: JenkinsAPI, pipelineId: string, pipelineDisplayName: string, respond: RespondFn) {
    try {
        const startedJobUrl = await jenkinsAPI.startJob(pipelineId);
        await respond(`:rocket: Here is the ${link(pipelineDisplayName, startedJobUrl)} pipeline that you run`);
    } catch (error) {
        await respond({blocks: errorMessage("Unable to run pipeline", error)});
    }
}
For parameterized pipelines, we display a parameters form to the user. Here’s the buildPipelineParametersForm function that builds that form:
function buildPipelineParametersForm(pipelineParameters: JenkinsParameterDefinition[], pipelineDisplayName: string, pipelineId: string) {
    return [
        section("Please, specify parameters"),
        divider(),

        ...mapJenkinsParametersToSlackControls(pipelineParameters),

        actionsBlock(pipelineId, [
            button("Run", ActionKeys.RUN_PARAMETERIZED_JENKINS_PIPELINE, pipelineDisplayName),
            cancelButton()
        ])
    ];
}
The mapJenkinsParametersToSlackControls function maps each Jenkins parameter type to the appropriate Slack UI control. While the complete implementation is more complex, here’s a simplified version that handles common parameter types:
function mapJenkinsParametersToSlackControls(parametersDefinition) {
    return parametersDefinition.map(parameter => {
        const controlName = humanizeParameterName(parameter.name);

        switch (parameter.type) {
            case "StringParameterDefinition":
                return textbox(controlName, parameter.name, parameter.initialValue);
            case "TextParameterDefinition":
                return textarea(controlName, parameter.name, parameter.initialValue);
            case "ChoiceParameterDefinition":
                return staticSelect(parameter.name, getSelectOptions(parameter), parameter.name);
            case "BooleanParameterDefinition":
                const initialOption = {[parameter.name]: humanizeParameterName(parameter.name)};
                return checkboxGroup(" ", parameter.name, initialOption, parameter.initialValue ? initialOption : undefined);
            default:
                throw new Error(`Unknown control type ${parameter.type} of the field ${parameter.name}`);
        }
    });
}
The last step is implementing another action handler that triggers the pipeline with the provided parameters once the user submits the form. The submitted values are collected with the getSlackFormValues function and passed to the jenkinsAPI.startJob method:
app.action(ActionKeys.RUN_PARAMETERIZED_JENKINS_PIPELINE, async ({context, body, payload, ack, respond}) => {
    ack();

    const pipelineId = payload.block_id;
    const submittedValues = getSlackFormValues(body.state.values);

    try {
        const startedJobUrl = await context.jenkinsAPI.startJob(pipelineId, submittedValues);
        await respond(`:rocket: Here is the ${link(payload.value, startedJobUrl)} pipeline that you run`);
    } catch (error) {
        respond({blocks: errorMessage("Unable to run pipeline", error)});
    }
});
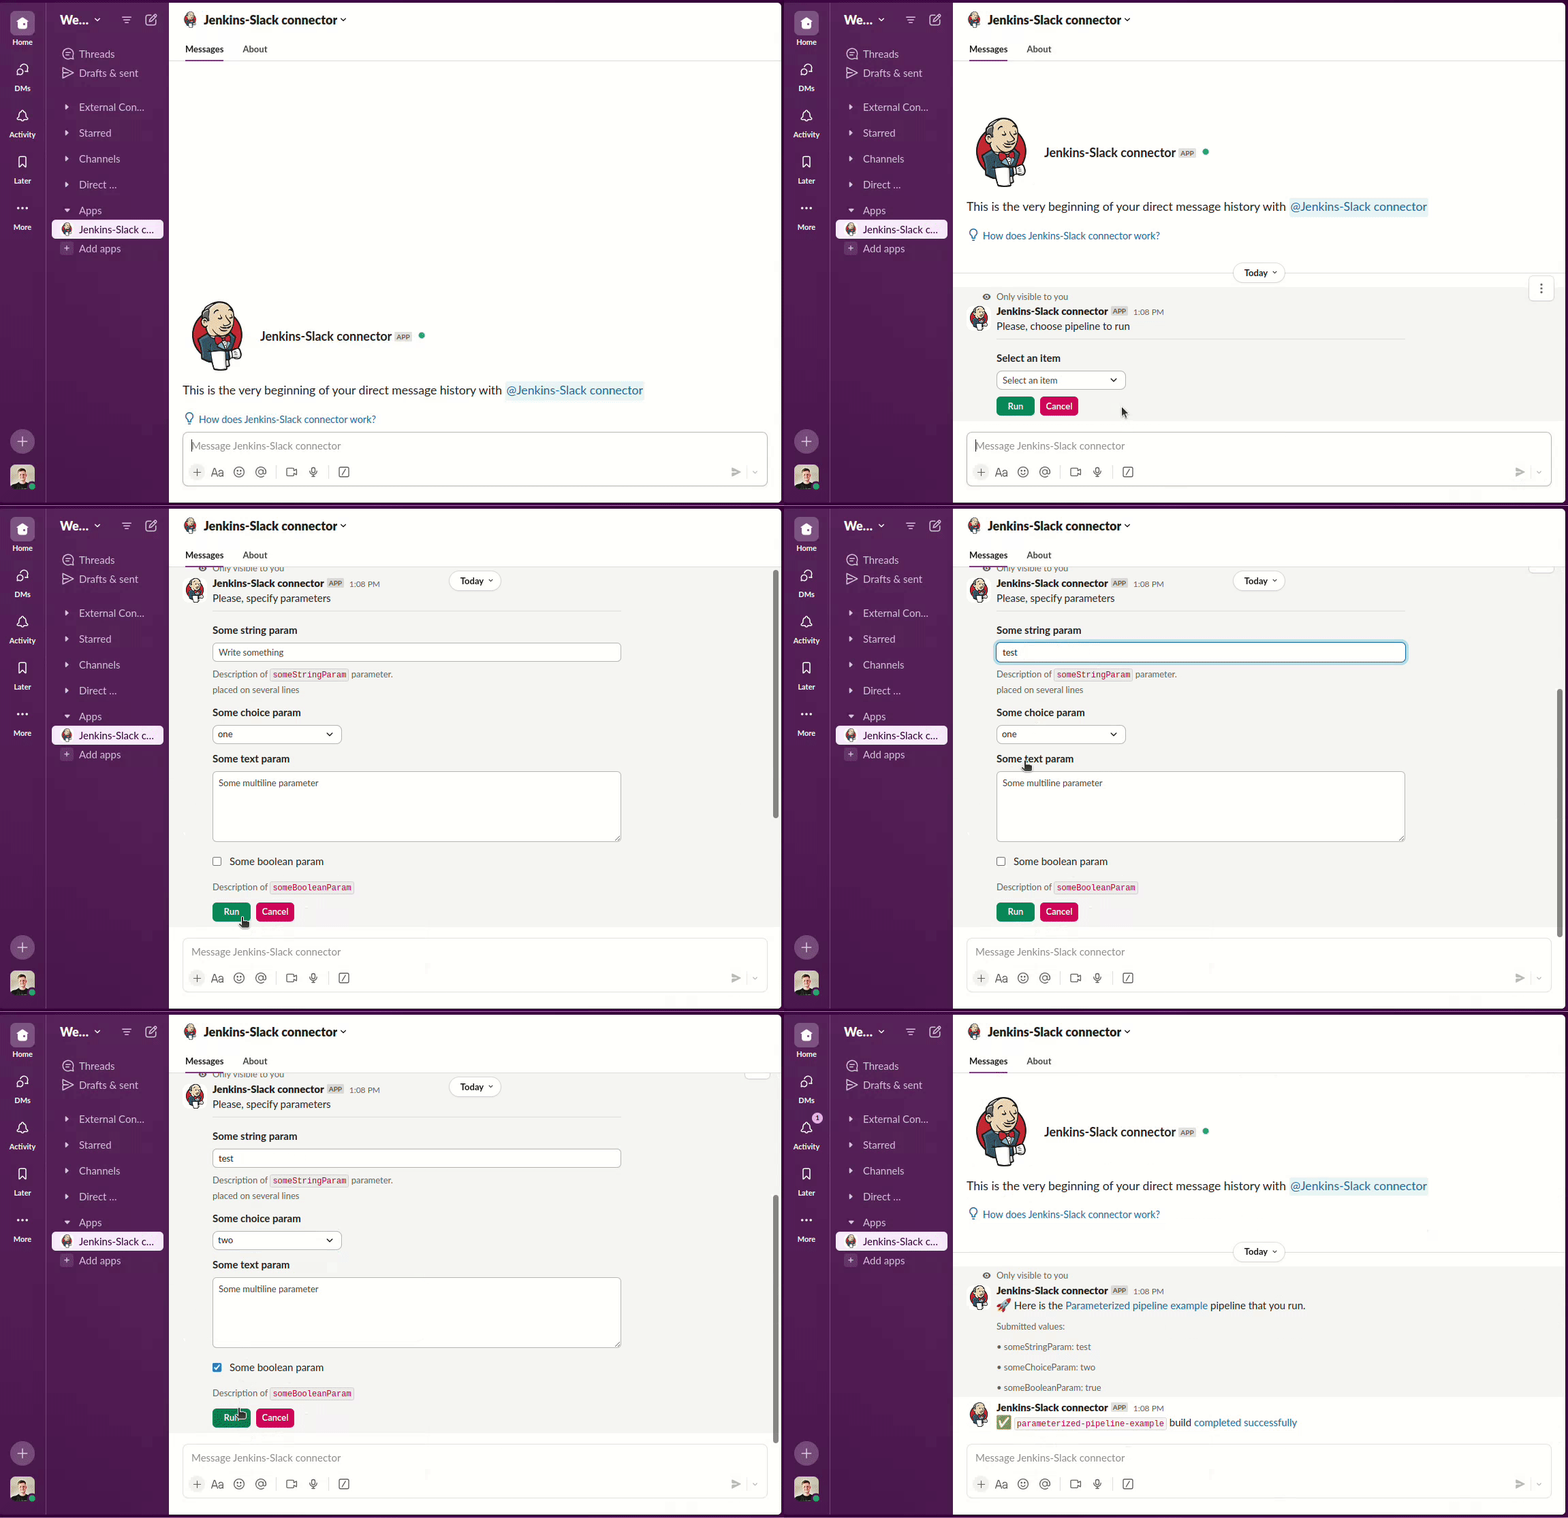
Let's look at the complete use case in action:
Now, with the parameterized pipeline support in place, we can:
Run simple, parameterless pipelines.
Receive Slack forms for parameterized pipelines, fill them out, and trigger the pipeline with their custom input.
Next, we’ll explore a more complex use case for handling interactive pipelines.
Adding Interactivity With Jenkins Input Step
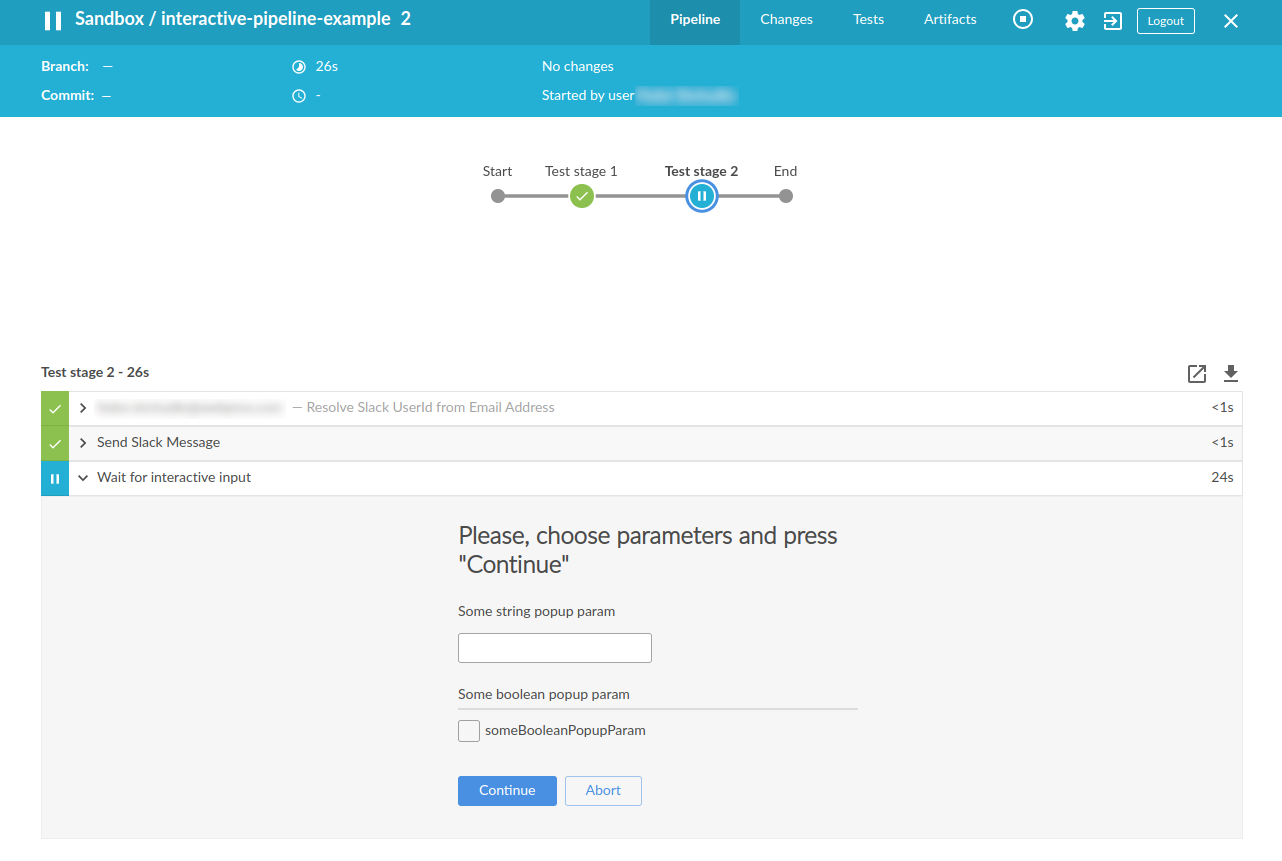
The Jenkins Input Step allows you to create interactive pipelines by asking for user input during pipeline execution. If you have never seen it in action, here is how it looks in Jenkins UI:
This can be highly useful for complex deployment processes, allowing teams to make decisions in real-time, such as determining which services to deploy or whether to roll back a deployment.
This feature was especially useful when developing a new delivery pipeline for my project. It allowed me to implement a complex deployment process, allowing the team to make real-time decisions on whether to send release notes and what Jira tasks to mention, what environments to update, which services to deploy, and whether to roll back to a previous version if the deployment was unsuccessful.
So, let's integrate this awesome feature into Slack, too!
1. Declaring Input Step in the Pipeline
First, let's see how the Input Step is defined in the Jenkins pipeline:
pipeline {
...
stage('Test stage 2') {
  steps {
      script {
         input(
            id: 'some-approval',
            message: 'Please, choose parameters and press "Continue"',
            parameters: [
                stringParam(name: 'someStringParam', defaultValue: '', description: 'Some string popup param'),
                booleanParam(name: 'someBooleanPopupParam', description: 'Some boolean popup param')
            ],
            ok: 'Continue')
    }
  }
}
...
}
Note that we explicitly pass the unique id parameter. If the pipeline has multiple input steps, this prevents submitting a form for the first input while the pipeline has already requested the second one.
2. Notifying Slack Bot About Input Request
We should somehow notify the Slack bot that the pipeline requested user input. We will do that by sending a Slack message. Even though we will intercept this message in the next step, I prefer to make it human-readable. This will work as a fallback, allowing the user to follow the link and provide input with Jenkins UI even if the bot fails to complete its task.
def sendInputRequestToTheSlack() {
    def authorId = slackUserIdFromEmail(currentBuild.rawBuild.getCause(Cause.UserIdCause)?.getUserId())
    if (authorId == null) {
        return
    }

    def message = ":keyboard: <${env.BUILD_URL}|${env.JOB_BASE_NAME}> requested some input. <${env.RUN_DISPLAY_URL}|Please, provide it here>"

    slackSend(message: message, sendAsText: true, channel: authorId, botUser: true, tokenCredentialId: 'jenkins-slack-connector-bot-token')
}
sendInputRequestToTheSlack function before calling the Input Step because Jenkins stops execution until the user gives input. Again, this causes a temporal coupling issue because the Slack listener might start the notification handling before Jenkins shows the input form. The solution is the same as before - use setTimeout on the listener side.Now, we need to configure the Slack bot to listen to messages.
First, we should disable the ignoreSelf option so the bot can listen to its own messages:
const app = new App({
    token: AppConfig.SLACK_BOT_TOKEN,
    appToken: AppConfig.SLACK_APP_TOKEN,
    socketMode: true,
    ignoreSelf: false
});
We have already enabled event listening with the manifest file. It’s disabled by default since Slack generates tons of events.
settings:
  event_subscriptions:
    bot_events:
      - message.im
message.im event works only for direct messages. If you want to broadcast Jennkins input requests to channels so any teammate can respond, add the message.channels event to that manifest section.3. Listen to the Notification in the Slack Bot
Now, we're ready to implement the message listener:
app.message(async ({context, message, client}) => {
    if (context.botId != message.bot_id && message.text.indexOf(":keyboard:")!==0) {
        return;
    }
    const [{url: buildUrl, text: buildName}, {url: buildDisplayUrl}] = message.blocks.flatMap(b => b.elements).flatMap(e => e.elements).filter(e => e.type == "link");

    // give Jenkins time to render the input
    await new Promise(resolve => setTimeout(resolve, 300));

    const jenkinsInputDefinition = await context.jenkinsAPI.getJobPendingInput(buildUrl);
    const formBlocks = jenkinsInputDefinition? await buildJenkinsPendingInputForm(buildUrl, jenkinsInputDefinition) : buildInputHandlingFailureForm(buildName, buildUrl);

    await client.chat.update({
        channel: message.channel,
        ts: message.ts,
        blocks: formBlocks,
    });
});
This code does the following:
It checks if the message is from the bot and starts with a ⌨️ emoticon. This way, it only handles messages about Jenkins Input Requests.
It extracts the running job's URL and name from the message blocks.
It fetches the pending input definition by calling the
jenkinsAPI.getJobPendingInput, which is very similar to already knownjenkinsAPI.getJobParameters.If the input definition is empty, someone has already submitted input, or a timeout was reached. In that case, it shows the error form by calling
buildInputHandlingFailureFormfunction.Otherwise, we show the parameters form by calling the
buildJenkinsPendingInputFormfunction. This maps Jenkins parameters to Slack controls, as we saw in the “Running Parameterized Pipeline” section.
4. Handling Input Form Submit
We're almost done. All that's left is to submit or cancel pending input depending on which button the user clicks on the rendered input form. Here is the submit handler:
app.action(ActionKeys.SUBMIT_PENDING_JENKINS_INPUT, async ({context, body, ack, respond}) =>{
    ack();

    const submitUrl = body.actions[0].value;
    const buildUrl = body.actions[0].block_id;

    const submittedValues = getSlackFormValues(body.state.values);

    try {
        await context.jenkinsAPI.submitJobPendingInput(buildUrl, submitUrl, submittedValues);

        await respond(`Input was submitted to the ${link("build", buildUrl)} by ${body.user_name}`);
    } catch (error) {
        await respond({blocks: errorMessage(`Unable to submit input for the ${link("build", buildUrl)}`, error)});
    }
});
As you can see, it is almost identical to the handler we implemented to run the parameterized pipeline. The only difference is that we call the jenkinsAPI.submitJobPendingInput instead of the jenkinsAPI.startJob.
Here is the listing of the jenkinsAPI.submitJobPendingInput method:
export class JenkinsAPI {
    ...
    async submitJobPendingInput(buildUrl: string, submitUrl: string, formValues: any): Promise<void> {
        const inputDefinition = await this.getJobPendingInput(buildUrl);

        if (!inputDefinition || !submitUrl.includes(`inputSubmit?inputId=${inputDefinition.id}`)) {
            throw new Error("Input was already submitted or timed out");
        }

        const convertedValues = Object.entries(formValues).map(([key, value]) => ({name: key, value}));
        await this.request(`${this.jenkinsUrl}${submitUrl}`, "POST", {json: JSON.stringify({parameter: convertedValues})});
    }
}
We request pending input from Jenkins again to ensure that the input is still expected and its ID matches the submitted input's ID. Then, we convert the submitted values to the Jenkins API format and post them.
5. Handling Input Request Abortion
The last step is to handle input abortion. Here is the code of the handler:
app.action(ActionKeys.ABORT_PENDING_JENKINS_INPUT, await ({ context, body, ack, respond }) => {
    await ack();

    const abortUrl = body.actions[0].value;

    try {
        await context.jenkinsAPI.abortJobPendingInput(abortUrl);
        await respond(`Input was aborted by ${body.user_name}`);
    } catch (error) {
        await respond({ blocks: errorMessage("Input abort failed", error) });
    }
};
Here, we simply call the jenkinsAPI.abortJobPendingInput method and notify the user about the abortion.
The code of the jenkinsAPI.abortJobPendingInput method is very straightforward:
 export class JenkinsAPI {
    async abortJobPendingInput(abortUrl: string): Promise<void> {
        await this.request(`${this.jenkinsUrl}/${abortUrl}`, "POST");
    }
}
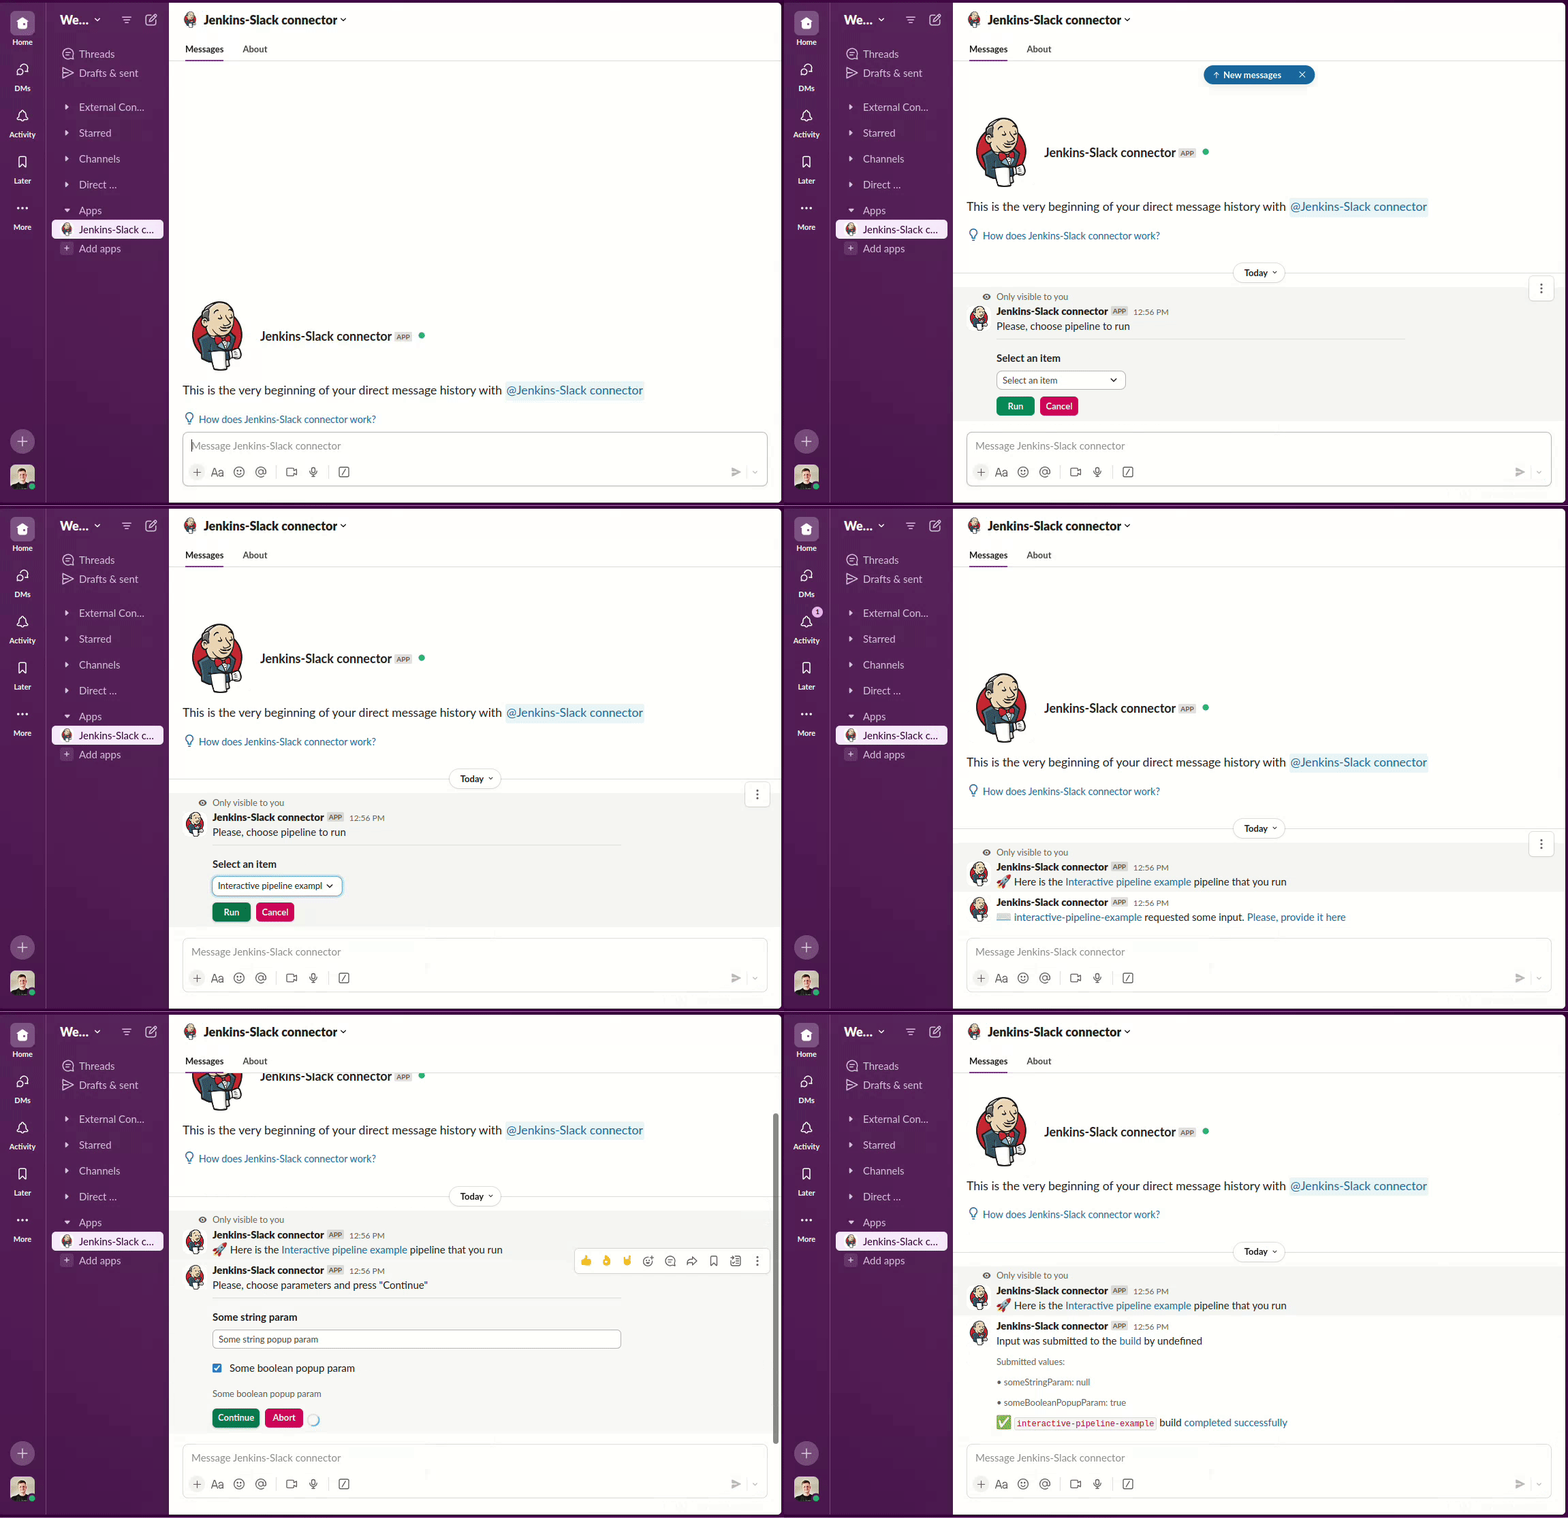
Well, we're finally done! Let's see the magic in action:
client.chat.update call to client.chat.postMessage({channel, blocks}). This way, messages will be sent one after another.Well, we implemented the latest use case!
Generally, we've covered many features of the Slack Bolt SDK and built a comprehensive automation. However, to keep the article easy to read, I skipped error handling, monitoring, logging, security, and testing (but you can check the source code for tests).
Wrapping Up
Integrating Slack with your development tools can elevate your workflow by enabling seamless communication, automation, and collaboration. The true power of such an integration is its ability to connect multiple systems and surface relevant information when needed. Imagine starting your workday with a Slack bot that does the following:
It lists tasks you've recently closed and suggests follow-up actions like updating documentation or notifying relevant stakeholders.
Displays pull requests you’ve participated in that are awaiting review or haven’t been merged yet, ensuring nothing slips through the cracks.
Shows your next task, along with its recent updates or comments, so you're always in sync with ongoing discussions.
Lists branches you've worked on that lack pull requests, helping you identify abandoned work or unfinished experiments.
Presents recent findings from automated security scans, ensuring security issues are addressed quickly.
Highlights unresolved threads from Slack channels that need your or your team's attention, streamlining internal communication.
If the number of unresolved support tickets spikes, the bot could offer you to help your on-call teammate.
By automating these workflows and integrating them into Slack, you can create a cohesive environment tailored to your team’s needs, improving productivity and collaboration.
I hope this guide has equipped you with the tools and knowledge to build your Slack-powered development environment, streamlining your daily operations and enhancing your team's effectiveness.
Life is so beautiful,
Fedor
Subscribe to my newsletter
Read articles from Fedor Shchudlo directly inside your inbox. Subscribe to the newsletter, and don't miss out.
Written by

Fedor Shchudlo
Fedor Shchudlo
Hi, I’m Fedor, an Engineering Manager at an ordinary tech company. Like many companies outside Big Tech, we face the daily grind of tight budgets, lean teams, and putting long-term goals on hold because of urgent issues. But here’s the thing: working with constraints doesn’t mean we can’t build great things. Ordinary companies are filled with extraordinary people who know WHAT to do. The key is figuring out HOW to navigate the limitations and deliver meaningful results we’re proud of. This blog is about sharing those strategies. I’ll write from an engineering manager’s perspective, but you’ll also find technical insights and practical code along the way. Do you have thoughts or feedback, or do you want to connect? Hit me up on LinkedIn — I’d love to hear from you.
