Best Way to Build Jenkins CI/CD Pipeline on Kubernetes in 2024
 Adya Prasad
Continuous Integration and Continuous Deployment (CICD) pipelines stand as pivotal frameworks in tech industry for automating the software delivery process and its performance.
This tutorial will teach you how to create an infrastructure for an automated and highly scalable Jenkins CI/CD pipeline on Kubernetes for your application's continuous deployment.
I will walk you through the complete steps for building an automated pipeline on local setup on Windows OS (although the steps will be similar for Linux as well). Working on localhost is ideal for beginners as it is hassle free After following this tutorial you will learn to create Jenkins CICD Pipeline.
Starting with Jenkins CICD Pipeline and Kubernetes
Jenkins is a popular open-source automation server, it allows developers to build, test, and deploy code effortlessly through CI/CD pipelines (groovy code).
Kubernetes (K8s) is an open-source system for automating the deployment, scaling, and management of containerized applications. A Kubernetes cluster adds a new automation layer to Jenkins.
Kubernetes makes sure that resources are used effectively and that your servers and underlying infrastructure are not overloaded. Kubernetes' ability to orchestrate container deployment ensures that Jenkins always has the right amount of resources available.
Some Prerequisites
Docker Desktop must be installed and set up on your local system.
Your active and logged-in account on Docker Hub.
Your system must have proper installed and setup of Kubernetes with Minikube (via Docker Desktop)
Installation, setup and activation of Jenkins on your local system.
Basic knowledge of Kubernetes, YAML Script, and Groovy Script (used in pipeline code).
Basic Kubernetes (Kubectl) commands.
Download some essential Jenkins Plugins and set up them:
CloudBees Docker Build and Publish plugin,Docker Pipeline,Docker plugin,Kubernetes,Kubernetes Credentials Plugin,Kubernetes Client API Plugin
Kubernetes in CI/CD Pipelines
In a typical CI/CD pipeline, the stages include code integration, building, testing, and deployment.
After the code is tested a Docker image is created and pushed to your Docker hub account.
Kubernetes plays a crucial role in the final deployment stage. Kubernetes functions as the deployment and operations layer.
Kubernetes is responsible for managing the application in a cluster of nodes, automating the entire lifecycle of your application, and ensuring faster, more reliable, and more scalable software releases.
Why CI/CD?
CI/CD helps developers:
Automate the process of integrating code changes from multiple contributors.
Deploy applications faster by automatically testing and releasing code.
Improve code quality through consistent testing. It confirms that the software is ready for production.
Continuous Integration (CI) ensures that code changes from multiple contributors are automatically merged, tested, and validated.
Continuous deployment extends continuous integration by ensuring that the software is always in a deployable state.
Let’s dive in, this guide is going to be the simplest and most detailed guide on the internet with included debugging steps below.
Start Building the Automated CICD Pipeline
I) Begin with starting your ‘Docker Desktop’ and make sure the engine is running.
II) Start your ‘Minikube (Kubernetes)’. You can start with the following command (You can use Windows Powershell, cmd or bash, based on your OS).
minikube start
You can check the status by opening the Minikube dashboard
minikube dashboard
III) Start your ‘Jenkins’ by default Jenkins runs on the local host port http://localhost:8080. You should be able to access the Jenkins panel.
Configuring Kubernetes to Integrate Jenkins
Since you have started MiniKube, Start the process using the kubectl commands.
First, You will create a namespace in Kubernetes to organize clusters for Jenkins. Use the following command, here I use the
Jenkinsname for the namespace, you can use any name but don’t forget to note itkubectl create namespace jenkinsLet's check whether the namespace is created or not. The command '‘kubectl get namespace’ will confirm the creation in Jenkins and will in the list with activation (activated)
kubectl get namespaceNow you have to create a service account for Jenkins, use the command ‘
kubectl create serviceaccount Jenkin-sa -n jenkins’. Here I give the name Jenkins-sa to the Jenkins’s service account.kubectl create serviceaccount Jenkins-sa -n jenkinsAfter creating a service account, you will create a token ( you need it later in Jenkins configuration) so use the command ‘
kubectl create token jenkins-sa -n jenkins --duration=999990h’ (Please save the token after generation).kubectl create token jenkins-sa -n jenkins --duration=999990hNow let’s create rolebinding with the command ‘kubectl create rolebinding jenkins-admin-binding --clusterrole=admin --serviceaccount=jenkins:jenkins-sa --namespace=jenkins’. If you are getting any errors in this step, check out the below debugging steps section.
kubectl create rolebinding jenkins-admin-binding --clusterrole=admin --serviceaccount=jenkins:jenkins-sa --namespace=jenkinsYou have mostly done with Kubernetes, at last, You need a Kubernetes server URL, using the command:
kubectl config view. In the output, you will get a server url something likehttps://127.0.0.1:1234Save it.kubectl config view
Configuring the Jenkins for Kubernetes Integration
To configure the Jenkins, I’m dividing the process into two sections, first, we create credentials and then we integrate them with the Kubernetes local cloud cluster
CREATING CREDENTIAL
Go to ‘Manage Jenkins’ and go to ‘Credentials.
Choose the (global) option in the ‘Stores scoped to Jenkins’ table
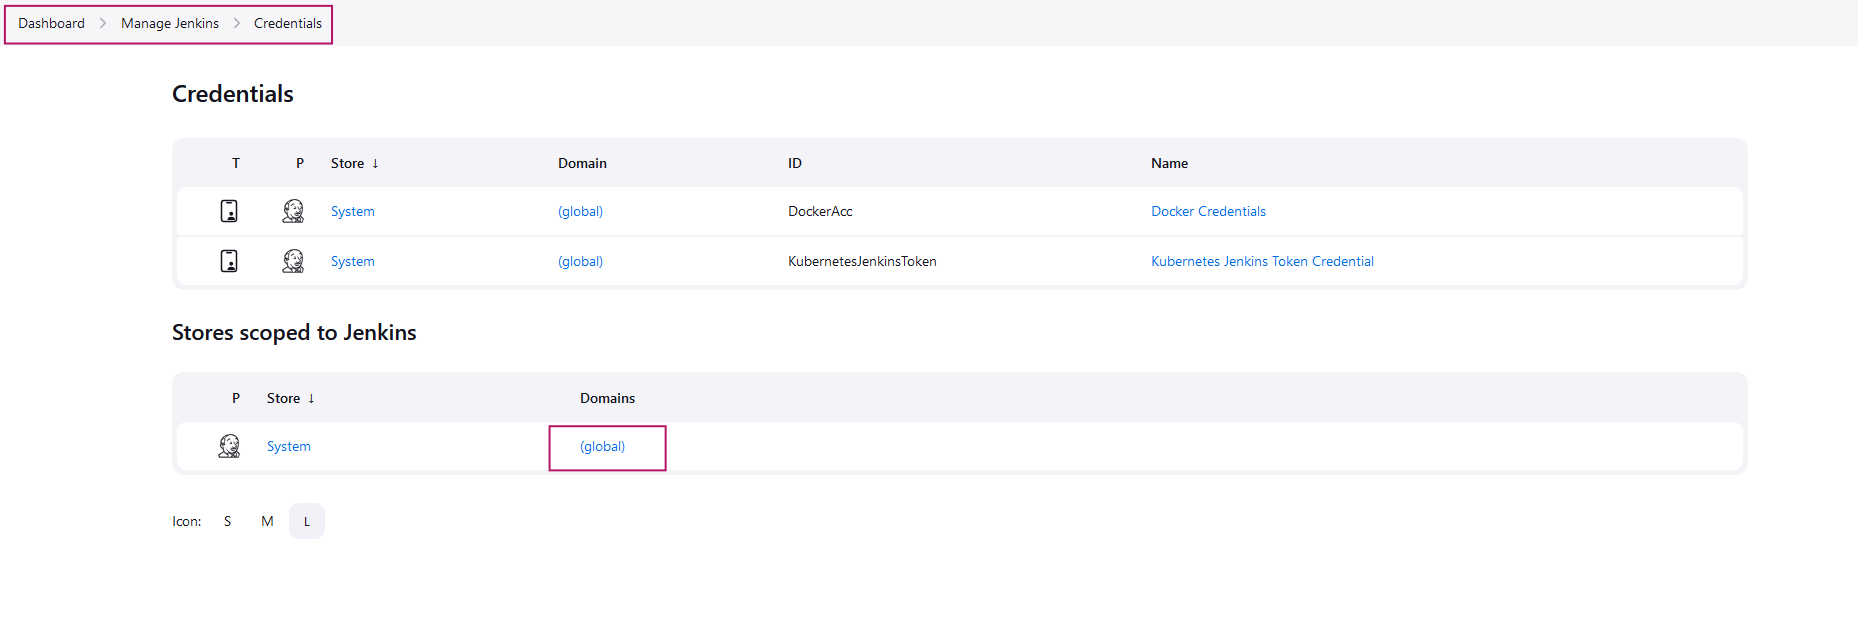
Now click h ‘+Add Credentials’ button
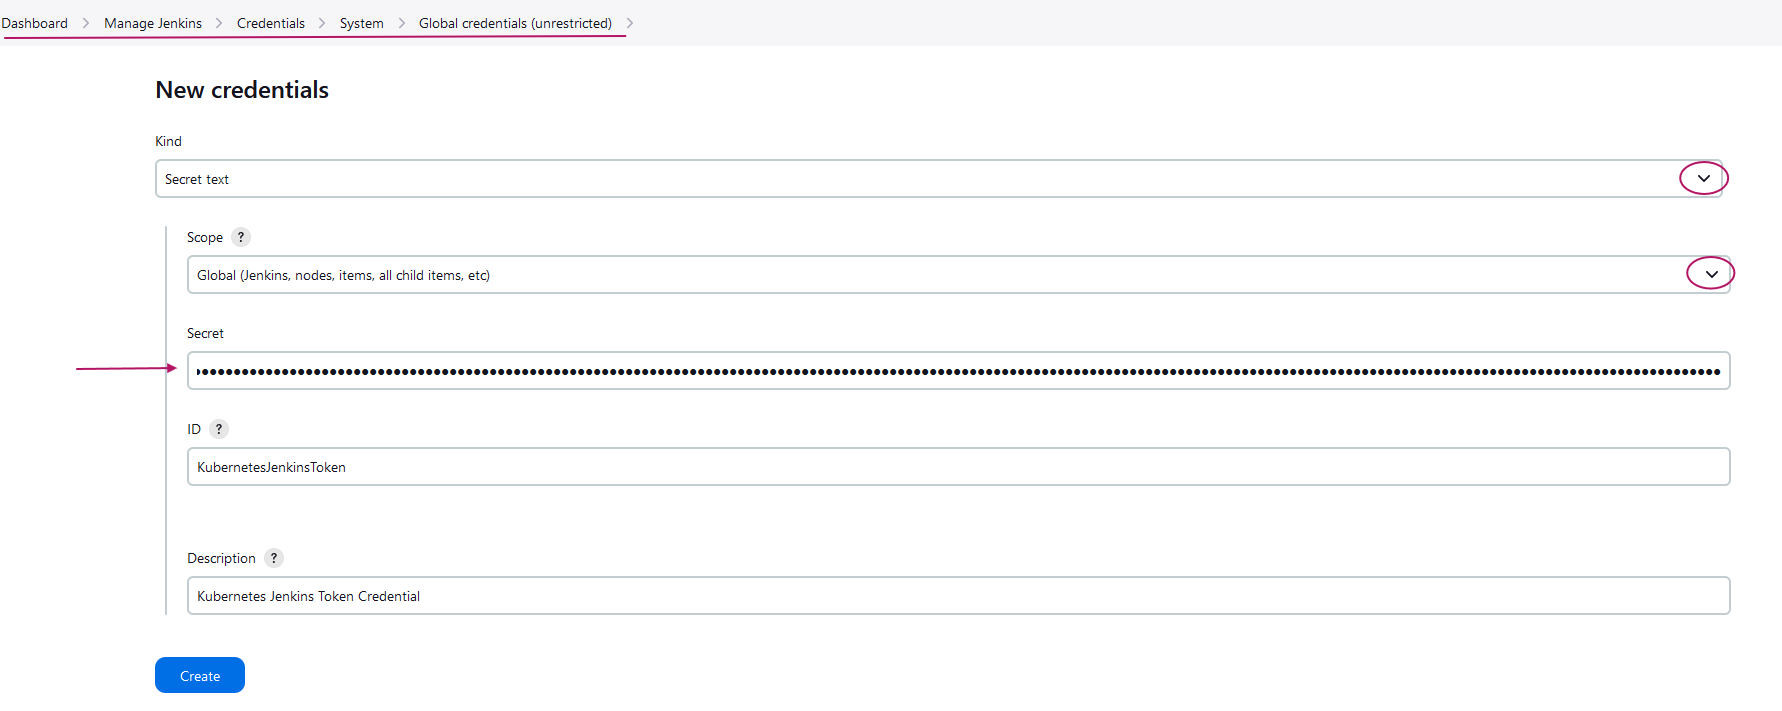
A form page will be open to enter credentials, carefully enter credentials as stated:
In the kind field choose the ‘Secret Text’ option from the drop-down.
Next, in the Scope subfield choose the ‘Global (Jenkins, nodes, item, all child item, etc)’ option.
Next, in the Secret subfield paste the token we generated during Kubernetes configuration.
Now, enter your ID and Description as you want and click save
INTEGRATING WITH KUBERNETES HOST
Again go to ‘Manage Jenkins’ and go to ‘Clouds’
Click ‘+ new cloud’ and a screen will open to enter the name, write the cloud name as you want choose the Kubernetes option and do ‘Create’.
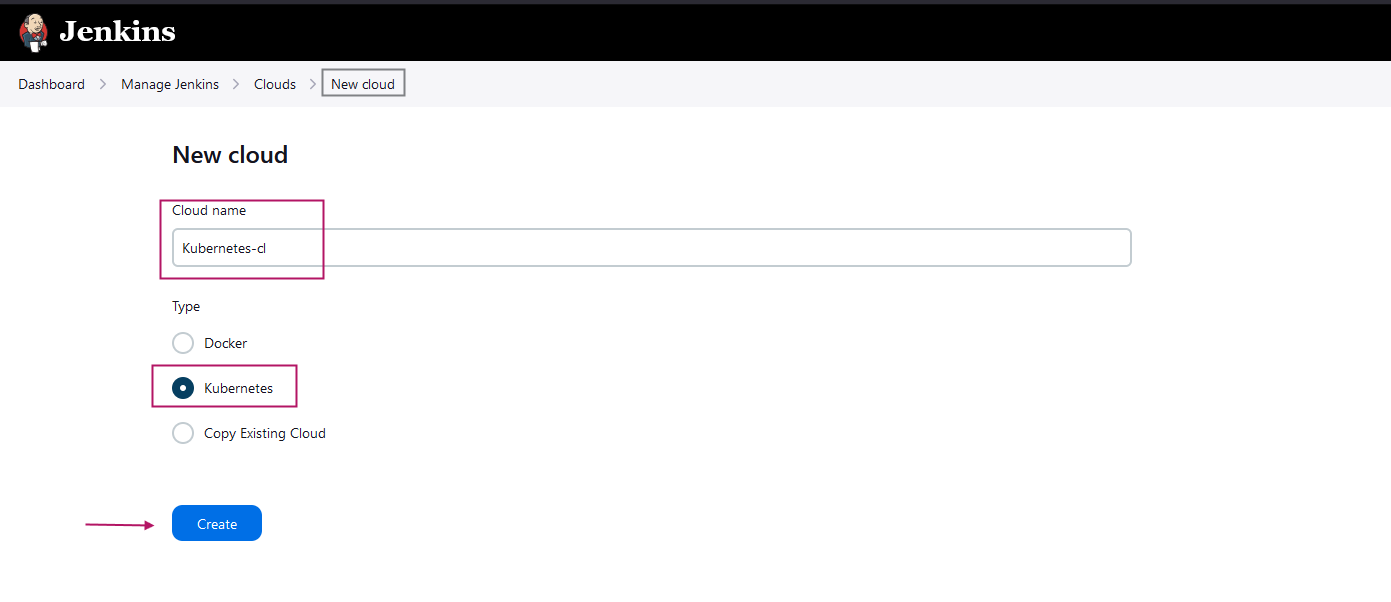
After creating you will be headed to the New Cloud page to enter credentials, This step is so crucial, perform steps carefully.
Start filling out the form as I guided below:
You already give the Cloud Name in the previous step, so start with the second field. In Kubernetes URL add the server URL you copied in Kubernetes configuration last step which looks like this:
https://127.0.0.1:1234Enter the Kubernetes Namespace you named for Jenkins during Kubernetes Namespace creation, in this guide I used
jenkinsso I am using that.Now, come to the Credential drop-down section, choose the credential (Global Credential Description) from the drop-down that we had set while creating the credential and then
Test Connection(if you see any error, I provided debug steps below too) and check if it shows success or is connected.Now, tick the WebSocket and it will show you a URL, copy that.
Just below in the Jenkins URL field paste the URL provided by the WebSocket.
Last, Save it and be done.
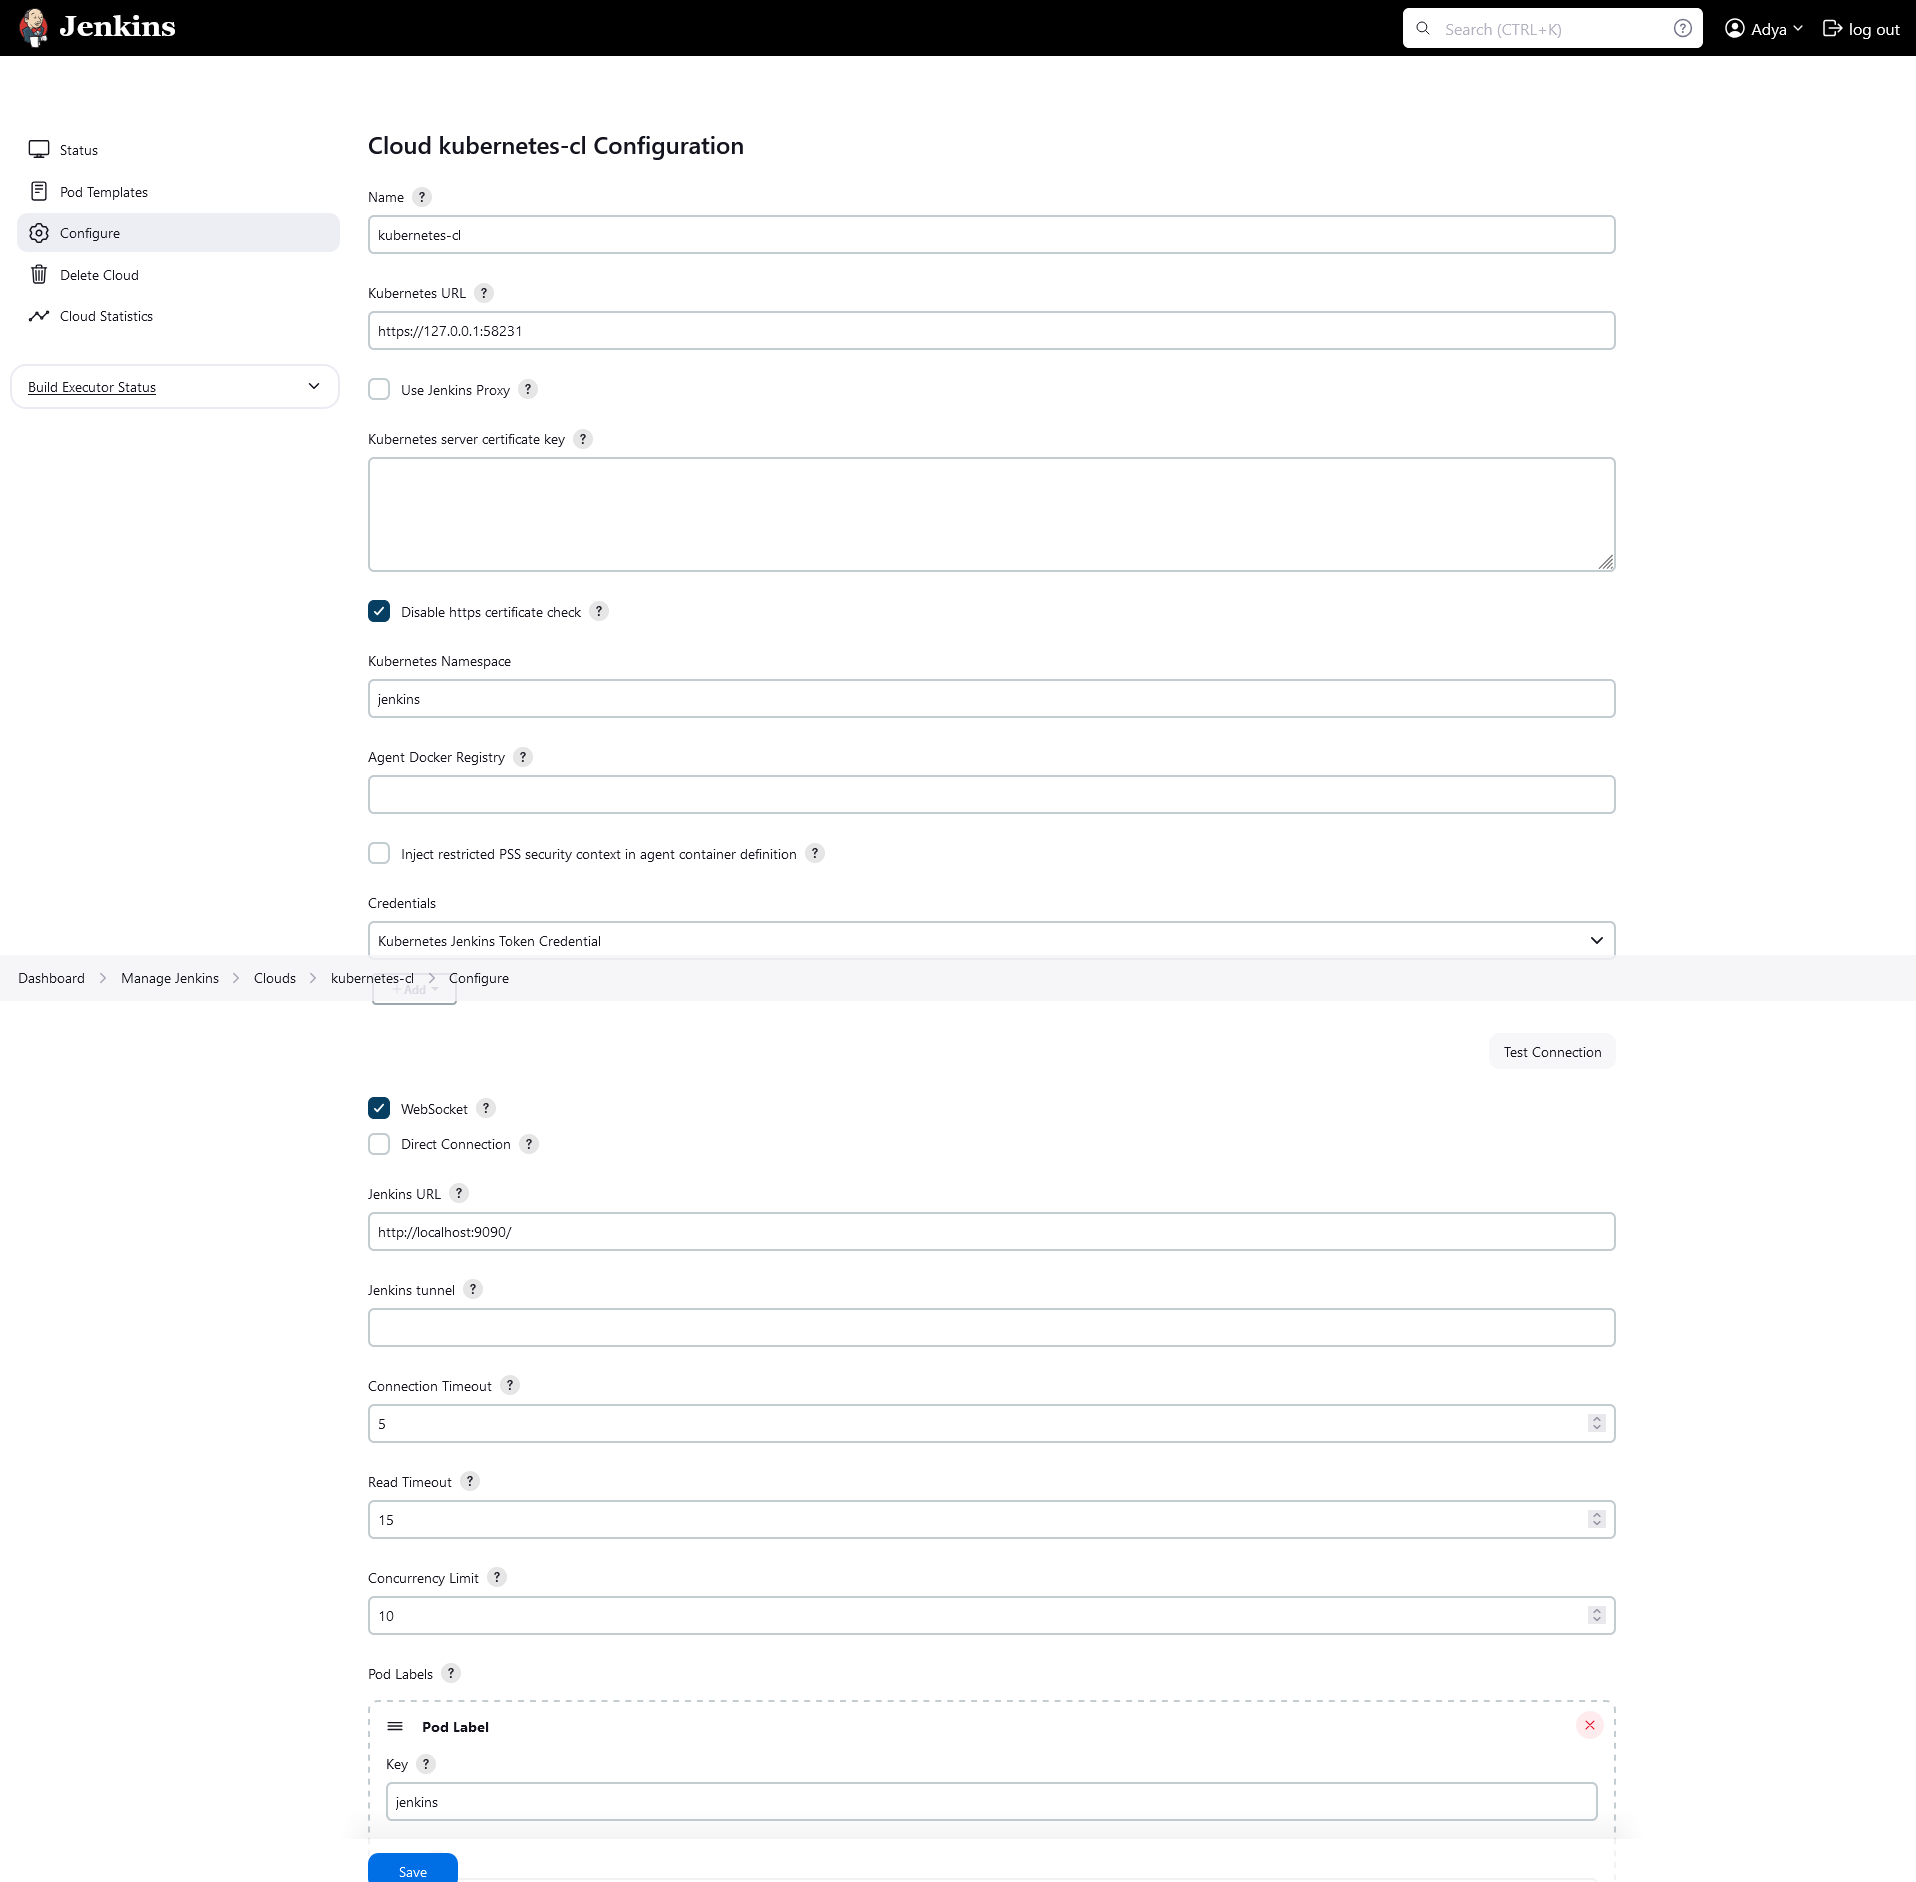
👍Now you have configured both Kubernetes and Jenkins, so next you will create a solid CICD pipeline.
Creating Jenkins Automated CICD Pipeline
Let’s start the main work and build Jenkins CI/CD Pipeline for Kubernetes in a very simple and quick way.
Go to Jenkins Dashboard and click + New Item
Enter an item name, select an item type: Pipeline and click OK
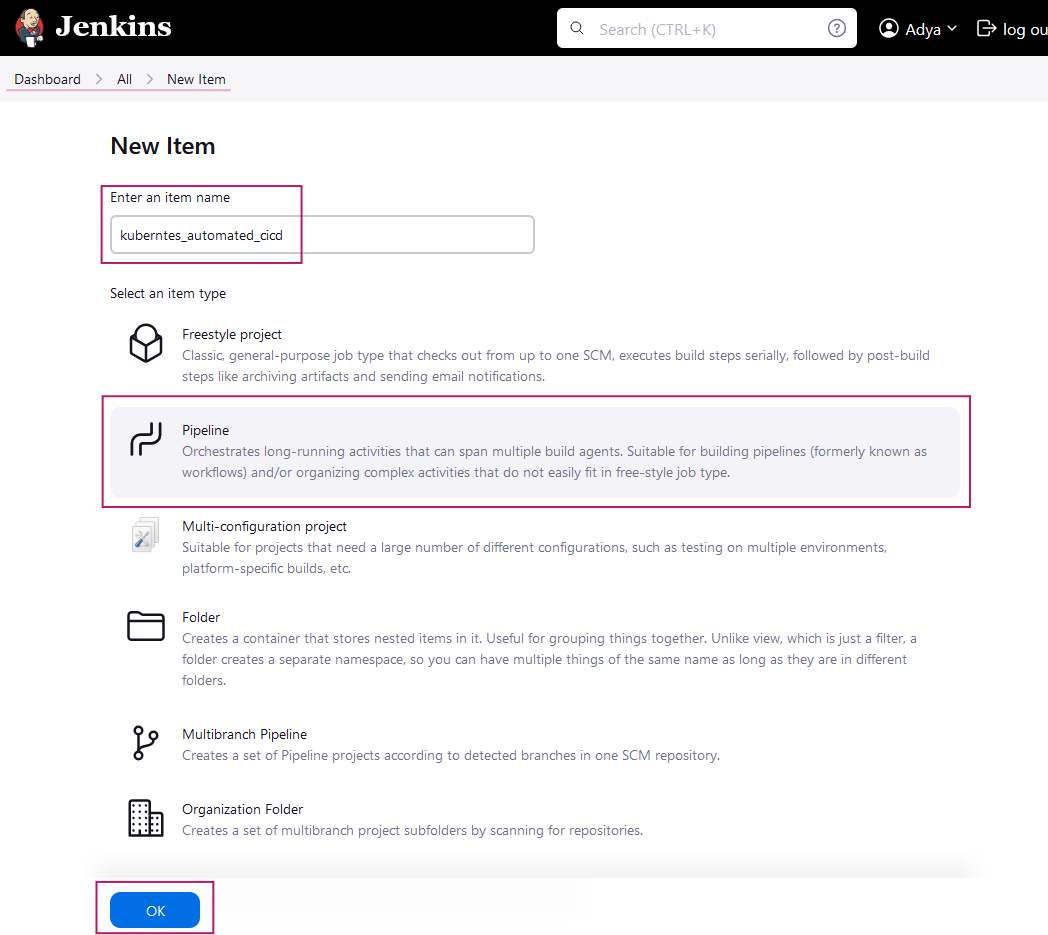
Now You will be headed to the main area where you will actually create the Pipeline.
In the Description write as you want, and scroll down to below and you will see a Pipeline Script area.
Now start creating the pipeline, if you have prior knowledge about creating Pipeline and Groovy Script. You can write your own Pipeline script, note that it should contain three stages: 1. Pulling GitHub Repe, 2. Building and Pushing Docker Image, and 3. Deploying to Kubernetes.
If you don’t know how to create a Pipeline, don’t worry, I am providing the Pipeline Script below, just copy-paste it.
| Please NOTE these Points before creating the Pipeline: |
| Please read, and understand all the comments I have written on every line and make changes according to that |
| In the first stage, I pull my Repository for the pipeline, you should create your repository and pull that (You can use my repo as a reference to create yours). |
In the second stage, add your docker hub user name like: {username}/2-jenkins-kubernetes-automated-cicd-pipeline:latest |
Also in Stage 2 withDockerRegistry(credentialsId: 'DockerAcc')” In this code, replace the docker credentialsId: 'DockerAcc' with your own Docker Credential Id |
pipeline {
    agent any

    stages {
        stage('Checkout GitHub repo') {
            steps {
                checkout scmGit(branches: [[name: '*/main']], extensions: [], userRemoteConfigs: [[url: 'https://github.com/Adya-Prasad/Jenkins-Kubernetes-Automated-Pipeline.git']])
            }
        }

        stage('Build and Push Docker Image') {
            steps {
                script {
                    // Use Docker credentials of your Jenkins and replace 'DockerAcc' with your Docker credentials ID.
                    withDockerRegistry(credentialsId: 'DockerAcc') {
                        // Build and tag Docker image with your username and project details.
                        bat "docker build -t {your_docker_username}/2-jenkins-kubernetes-automated-cicd-pipeline:latest ."
                        // Push the Docker image to your Docker Hub repository.
                        bat "docker push {your_docker_username}/2-jenkins-kubernetes-automated-cicd-pipeline:latest"
                    }
                }
            }
        }

        stage('Deploy to Kubernetes using kubectl') {
            steps {
                script {
                    // Use the correct path to your Kubernetes config file according your OS.
                    bat 'kubectl apply -f deployment-service.yaml --kubeconfig="C:/Users/Babu/.kube/config"'
                }
            }
        }
    }
}
After pasting this code, click Save (see image for reference)
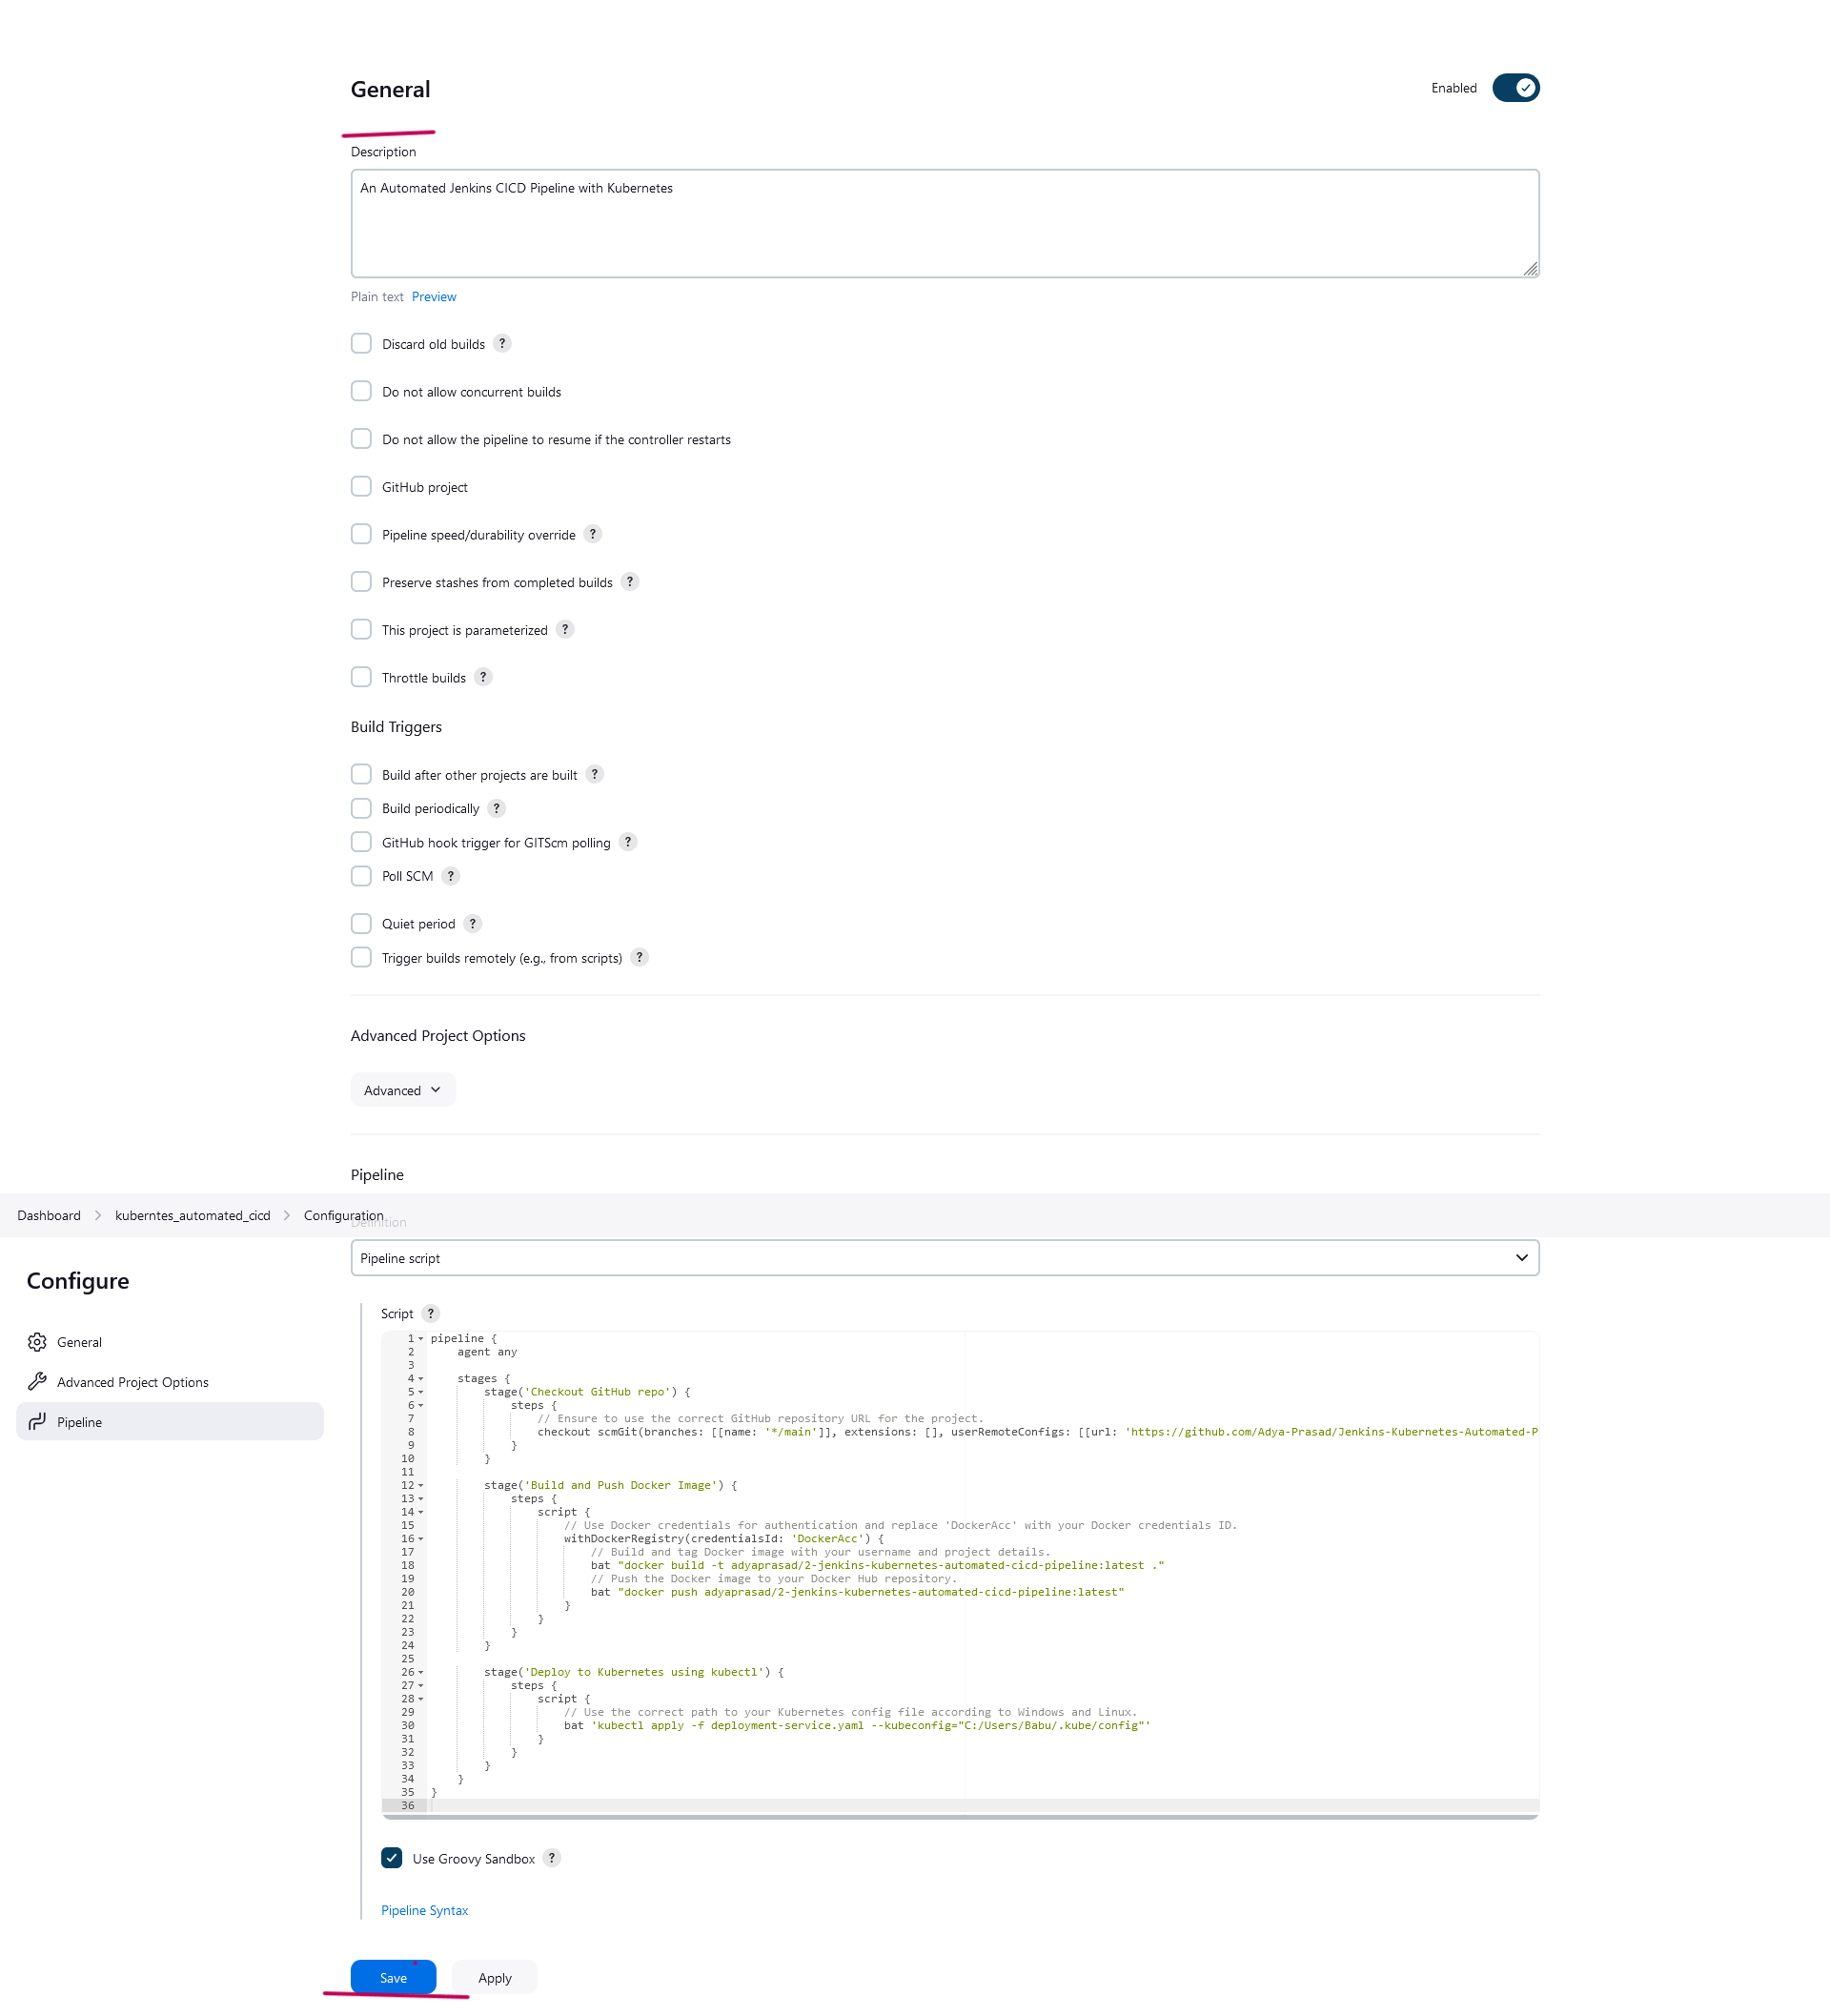
Just after saving you will be headed to the build area, click on Build Now and the building will be scheduled, after a while, in the Build History block you will see its result.
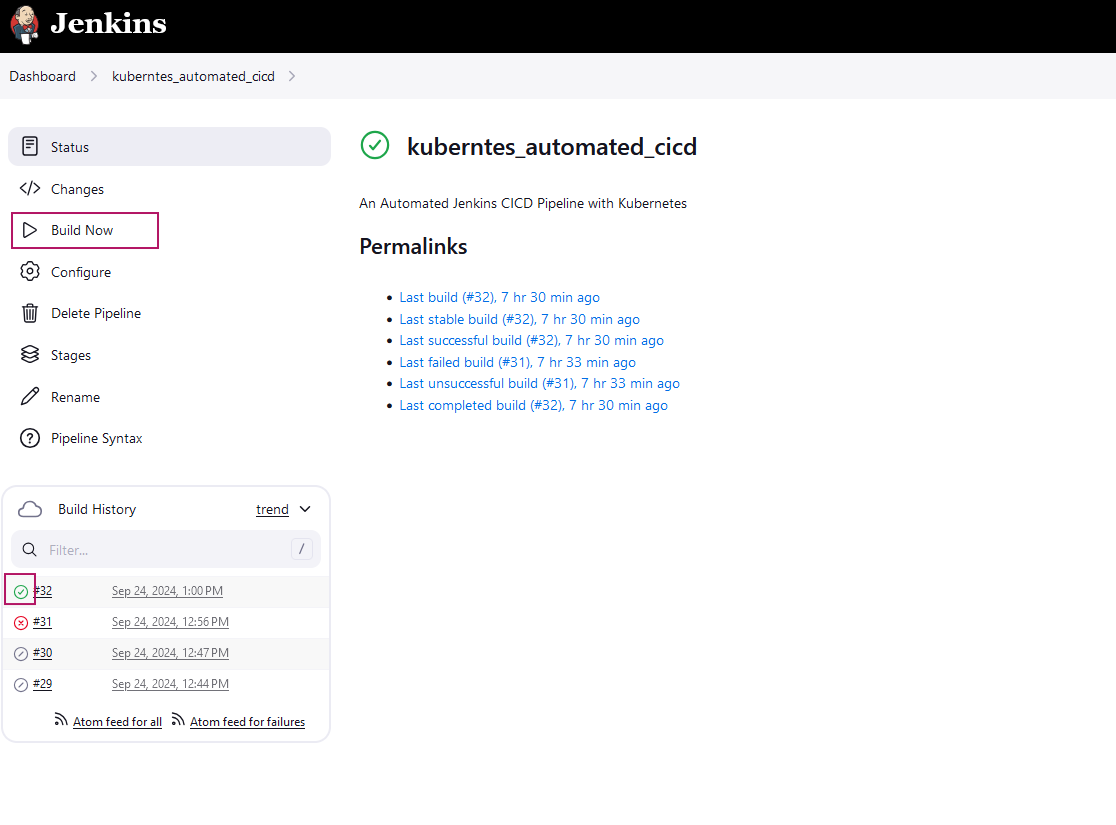
It should be green and the tick mark means the build is successful, click on the green tick mark and you will see its console output. Scroll down and you should see SUCCESS at the end.
However, if the building fails, don’t worry, go to the debugging section below.Now that you have successfully built the pipeline, it's time to execute it.
Go to your Minikube command area again and now use the command ‘
kubectl get services’ you should see the “jenkins-kubernetes-pipeline-service” in the output list and this confirms that you have completed all the steps successfully and built the Jenkins CI/CD Pipeline on Kubernetes.Let’s check the application.
If you have followed all the steps I have guided and used my repository, then as per thedeployment-service.yamlof that repo, I have hosted the cluster IP on port number 8080. If you have used any other repo then the app will run on that port accordingly.
Here is the step:Ensure that the
kubernetes_configin your Jenkins pipeline has the correct access to your Kubernetes cluster.
You can find the port using the below command. You should see something like this:
jenkins-kubernetes-pipeline-service ClusterIP 10.103.91.197 8080/TCP 0hkubectl get servicesThis will display the assigned Cluster, and you'll be able to access your application at:
  http://<clusterip>:<node-port>

  OR

  http://<clusterip>:<80>
If you are still unable to get the URL, here are the other easy steps to do in Docker Desktop.
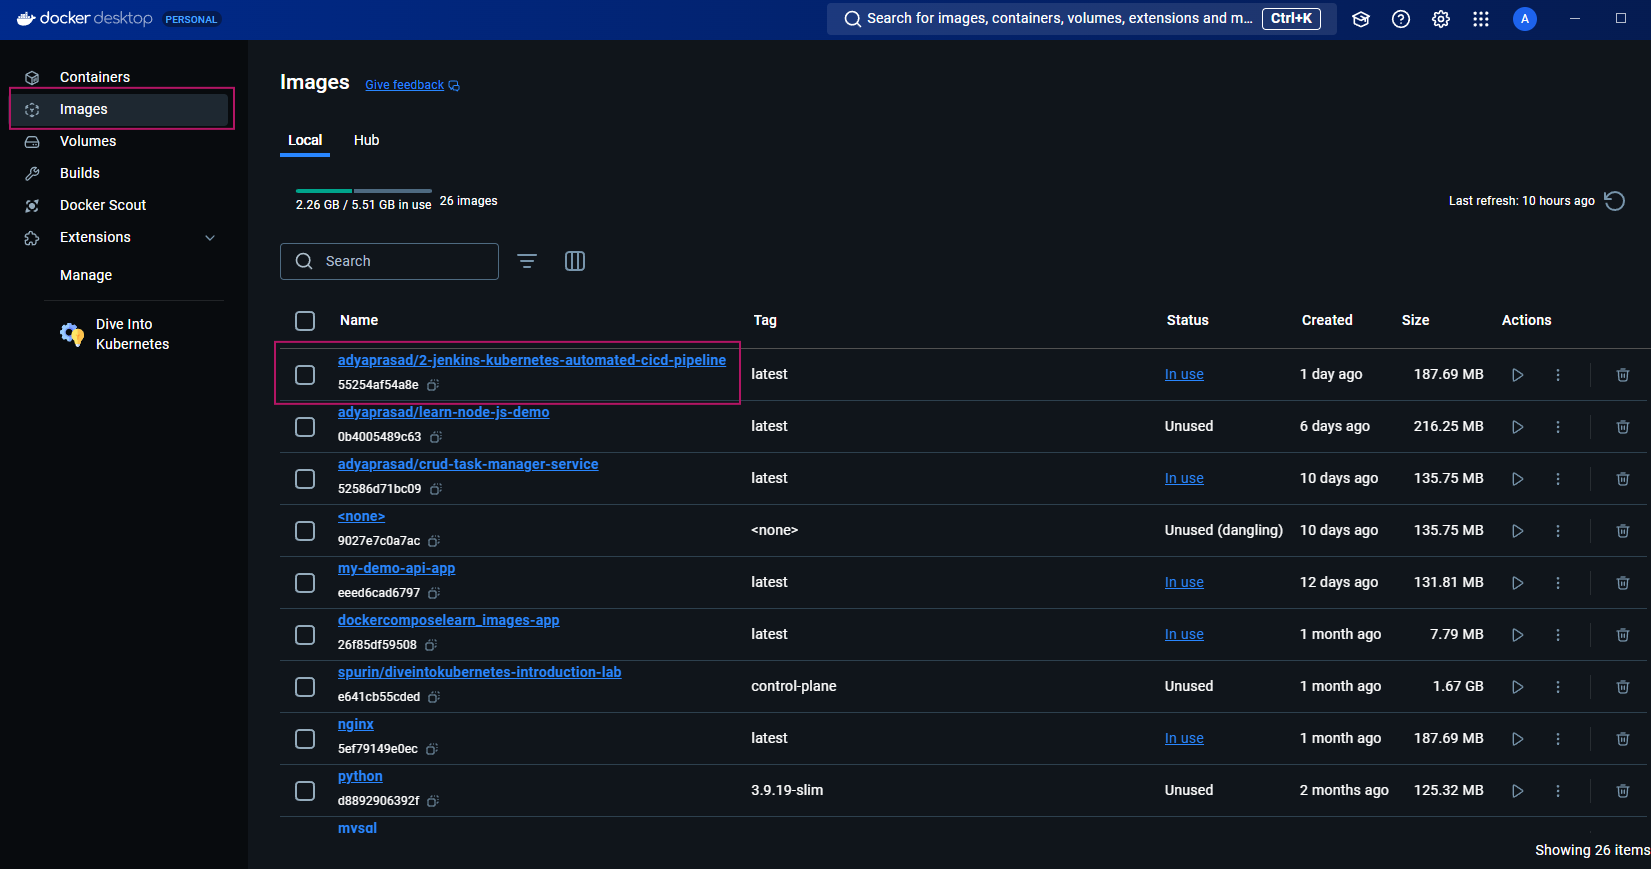
Go to your docker desktop > Images >
click the jenkins-kubernetes-automated-cicd-pipeline:latest> Run > Run a new container > Optional Setting > In the Ports field, add Host Port (8080) and Run. With host port 8080, your localhost URL may be: http://localhost:8080/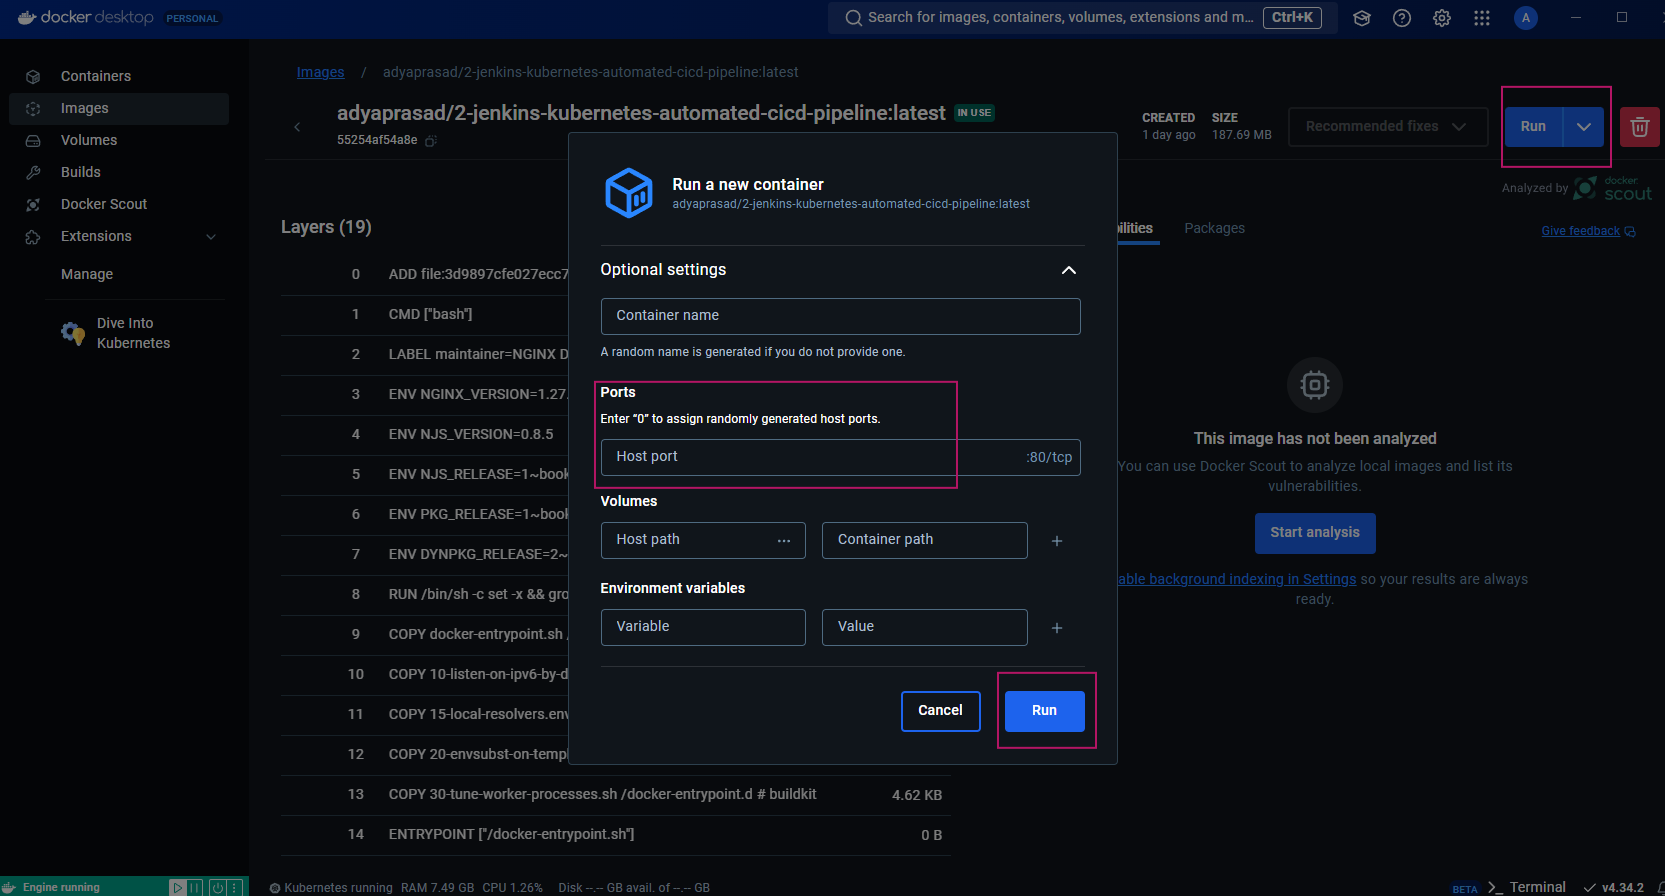
Now You should get the URL on which your newly built app will expose (run).
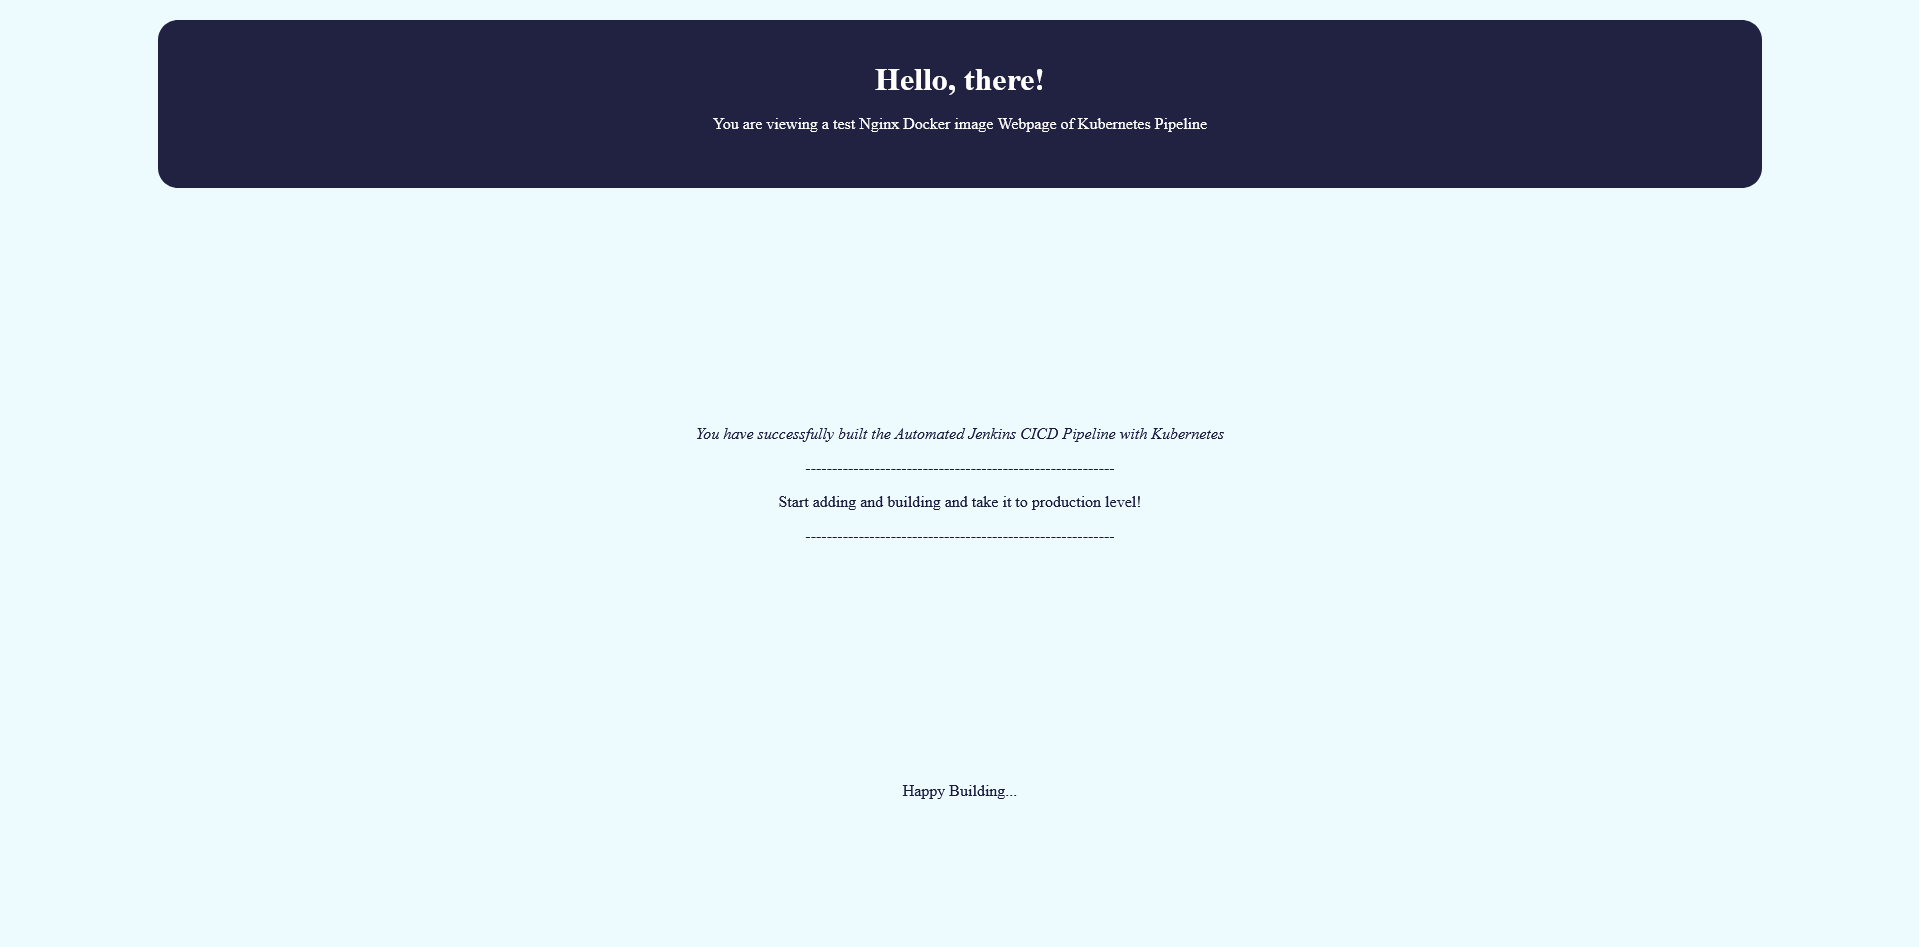
Open that URL in your browser and you will see the following webpage:
Conclusion
👏Congratulations! You’ve successfully built an Automated Jenkins CI/CD Pipeline on Kubernetes in your local environment. This setup will not only simplify code integration and deployment but also ensure that your applications are robust, scalable, and ready for production.
As you continue learning, feel free to explore more advanced features of Jenkins and Kubernetes. The world of CI/CD is vast, and there’s always something new to discover.
If you found this guide helpful, please share it with fellow! Your feedback is also welcome in the comments below.
Also read another essential post: How to Build and Deploy Microservices in Kubernetes with Ingress
Debugging Guide and Steps
First of all sorry to know that you get any error. Here are some steps to solve your errors. Please understand wisely.
Make sure your Docker and Kubernetes (Minikube) are running during the entire process
Also, pay attention to the fact that each command is correct and the operators are also matching. You can also confirm that the appropriate command is correct by searching online.
If you are unable to create rolebinding, then please check the command spelling and match the names with your previous steps. Again confirm the command correctness by matching it with an online search.
Make sure you have installed and configured the plugins I recommend in prerequisites by entering credentials & ID and that you are using the same ID in connection to Kubernetes & Jenkins and pipeline.
Test Connection is showing an error during add cloud (Kubernetes in Jenkins): Match and confirm the Kubernetes URL, and Kubernetes Namespace, and choose the correct credential.
Even after showing an error, tick the WebSocket and look for the Jenkins URL, if it provides the URL, it means it is working.Also: I highly recommend checking out Jenkins’s Official Documentation on connecting Kubernetes and Jenkins. If you get any error on any step while connecting Kubernetes and Jenkins.
Errors during building Pipeline: First open the console report and read very carefully. It shows you exactly what and where an error is created. (I recommend reading the report from bottom to top)
If you are getting errors in pipeline building, I recommend reading the points in my note that I have written just above the pipeline code. Read, follow, check and change all the points mentioned by me in it
If you are getting any error while finding your app localhost URL I recommend first confirming the services are created and using the Docker Desktop method to get your URL
After all, if you are still getting any other error or the error is not being solved even after your repeated attempts, then please comment, I will definitely try to provide a solution.
Remember, mastering DevOps and cloud technologies is a journey - each build and deployment brings you closer to becoming an expert. Keep pushing boundaries and happy building! 🚀
Subscribe to my newsletter
Read articles from Adya Prasad directly inside your inbox. Subscribe to the newsletter, and don't miss out.
Written by

Adya Prasad
Adya Prasad
Specializing in AI and Cybersecurity, Love to Write Guide and Tutorial. Harvard CS50x | Contact me to solve WordPress and SEO problem.