How I plan to improve my end-to-end testing strategy with KaneAI
 Mbaziira Ronald
Among the common types of testing is end-to-end testing. End-to-end testing ensures that an application works properly from beginning to end and meets its functional and non-functional requirements by simulating the end user's use cases and real-world scenarios.
We as developers know that testing is important, but performing end-to-end testing manually is realistically out of the question, given the complexity of today’s websites and apps and the tests to perform. This is why we opt for automated testing using testing frameworks like Selenium, Playwright, and in my case, Cypress.
We can write test scripts to give to these tools to execute. They execute the tests way faster than they would have been done manually.
For example, the below Cypress code verifies if the user is directed to the right URL/page when they click the view-more-details button from the overview page of a product.
describe('Check URL navigation', () => {
  it('should navigate to the correct URL', () => {
    cy.visit('https://example.com/product1/overview');
    cy.get('#view-more-details').click();

    cy.url().should('eq', 'https://...');
  });
});
Cypress navigates to the overview URL of the product, selects the view-more-details, and simulates a click on it. It then checks if the current URL is similar to the URL we have provided to check against.
I have been doing end-to-end testing with the Cypress testing framework for a while now, with an on-and-off relationship, only writing tests when I consider it necessary 😅
But even with automated testing, some developers feel less inclined to do testing and the reasons for it may be more or less the same. But let me share my perspective as a beginner.
It is time-consuming
The reason why testing feels as such is because of the processes involved. From planning the tests to perform to writing the test scripts. Doing all this sometimes feels like it’s taking forever to finish.
The steep learning curve of some testing frameworks
We use testing frameworks such as Selenium and Cypress to perform end-to-end automated tests. However, each of these frameworks has different learning curves, with some having quite steep ones, though the level of difficulty in learning the framework varies from person to person.
The same situation may also arise when you change from one team to another, which uses or prefers a different testing framework to the one you are currently familiar with.
Also, unless you work on a team where testing is enforced, you may only test software only when you believe it is essential. This means you may need you to somehow familiarize yourself with the process again. This is not to mention the debugging process if any issues arise.
The above are among some of the problems we developers face sometimes when carrying out testing, end-to-end testing in this case.
When it comes to social media, I primarily use Twitter. And it is here that I first saw a tweet or repost by LambdaTest on the KaneAI Testing Assistant.

I didn’t give it much attention to it initially. “The experts will reap from this massively.“ I said to myself deep inside, and continued scrolling 😄
It was when I opened LinkedIn and saw the below post, with the line “making testing authoring easy for beginners and faster for experts.“ that it caught my attention. From here, I decided to check out the AI end-to-end testing agent and what it can do to see if I can take advantage of it.
Overview of Kane AI and its features
KaneAI is an advanced AI-driven end-to-end testing assistant that aims to transform the software testing world by making complex testing procedures simpler for both seasoned QA professionals and beginner developers.
It was created by LambdaTest Inc. and released on September 16, 2024. LambdaTest is a continuous quality testing cloud platform that helps developers and testers ship code faster with approximately 2M+ users.

While checking out KaneAI and its features, I was thrilled to find out it can save me a lot of trouble with the challenges I face while performing end-to-end testing, including the ones we mentioned in the introduction.
I quickly explored many of its capabilities to see if they could also be helpful on my end. Thus, it would be no surprise that I was among the first people to quickly request access to test out the tool and I got it 😊. KaneAI was and still is in beta, by the time of publishing this blog.
With that being said, let me give you an overview of the AI testing agent and highlight for you its key features and capabilities.
Intelligent test planner and effortless test generation
KaneAI's Test Planner feature enables you to write tests faster by facilitating the process of planning them. This means that rather than writing steps manually, you can provide high-level objective(s) to KaneAI to transform into test steps to run.
The process includes providing a high-level objective and providing some more information to the test planner to get a clear picture of what you want to achieve.
The image below shows the Intelligent Test Planner interface with a sample objective and the fields to fill.
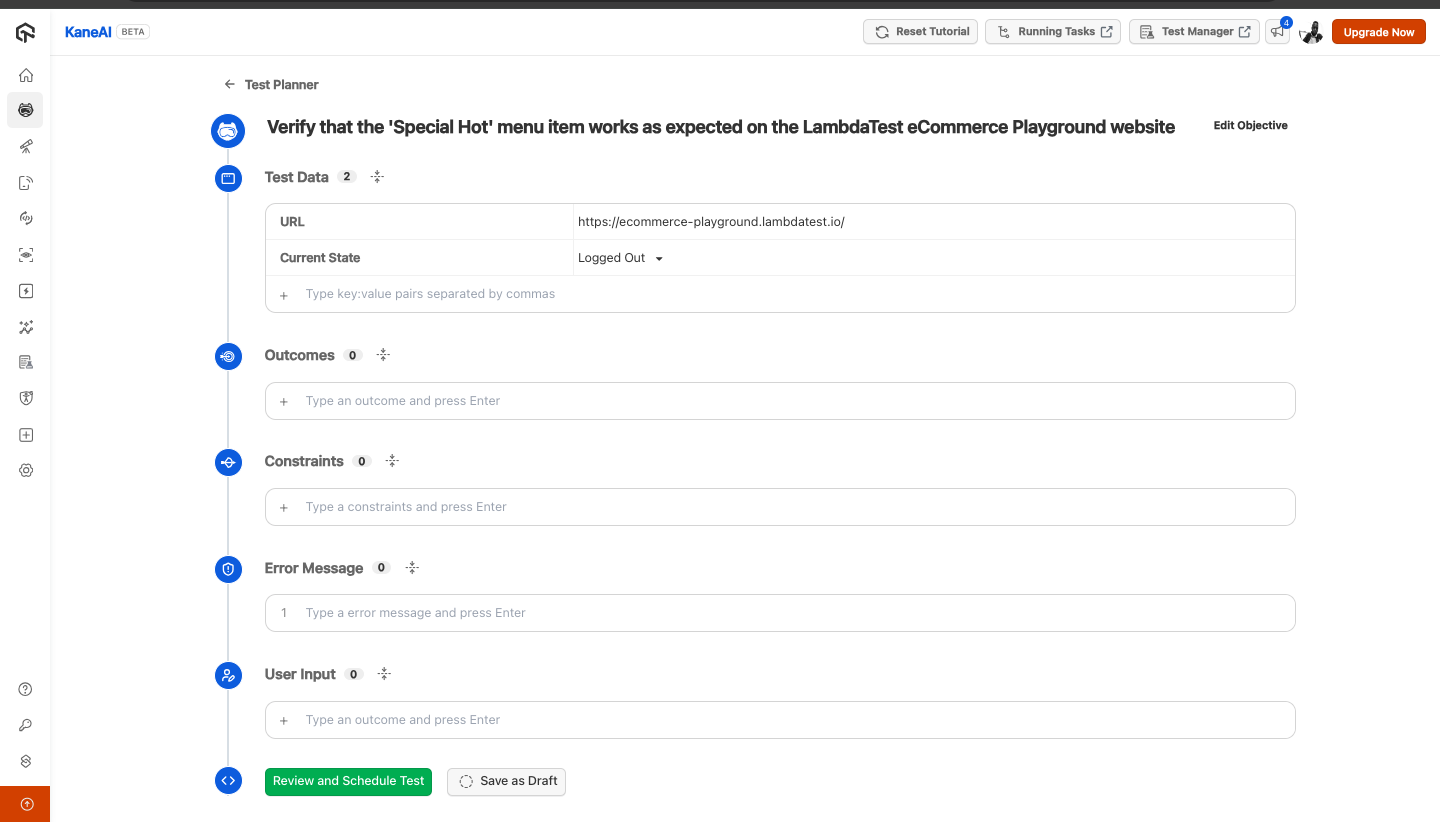
I have highlighted the sections to fill in the image below. Let’s look at what the fields of each section require.
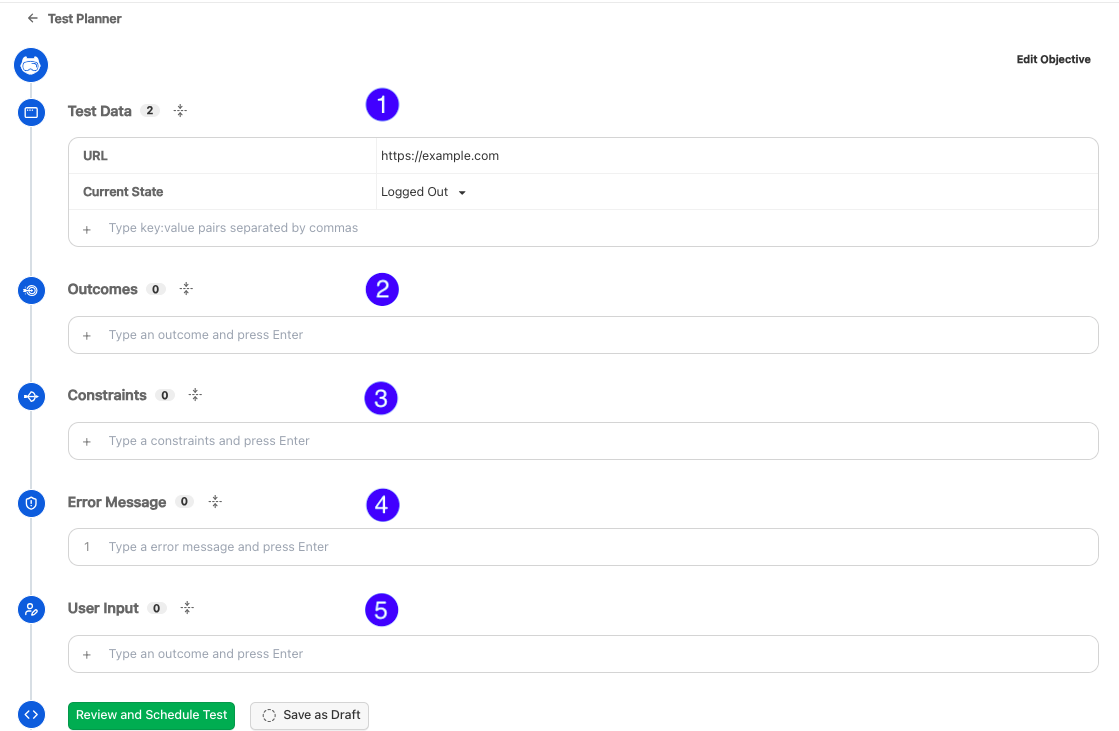
Section 1 - Test Data
This section has two required fields, URL and Current State.
The URL field requires the URL of the website on which to perform the tests.
The Current State field requires has two options to choose. Test the website when the user is Logged Out or Logged In.
Section 2 - Outcomes
You can provide the expected outcomes from the test in the fields of this section. For example, “The user should be able to view a dashboard with the title Welcome back.”

Section 3 - Constraints
You define the restrictions under which the test under to perform the test under this section.

Section 4 - Error Messages
You can specify error messages in this section if you expect the user to see any.

Section 5 - User Input
This section takes in any user input that the user may be required to enter on the website, for example, form emails.
For everything to flow smoothly, you have to define your intent clearly, as KaneAI will use it as the foundation to generate the test steps. It can be assessing the functionality of a signup button or the presence of a heading on the page.
You are advised to define your intent or objective clearly to get the most out of the Test Planner. Examples of clear objectives include Assess the functionality of the buy now button and assert the presence of the logo on the page.
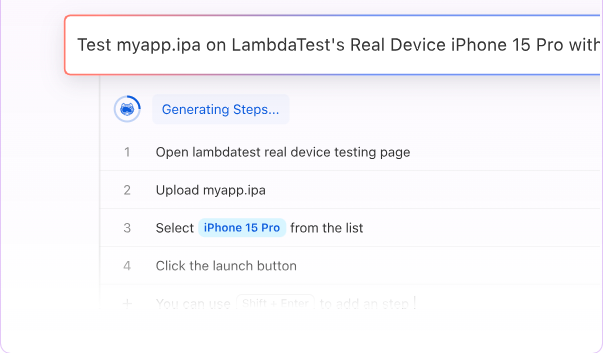
Once the steps above are done, the Intelligent Test Planner will go on to generate the steps. The image below gives you a visual of this stage.
Smart show-me mode
The Smart show-me mode allows you to manually interact with the test simulator. As you interact with it, KaneAI generates steps for the interactions you do. This provides a benefit in situations in which you do not fill like writing down the objectives or test commands but can show KaneAI what you want to achieve.
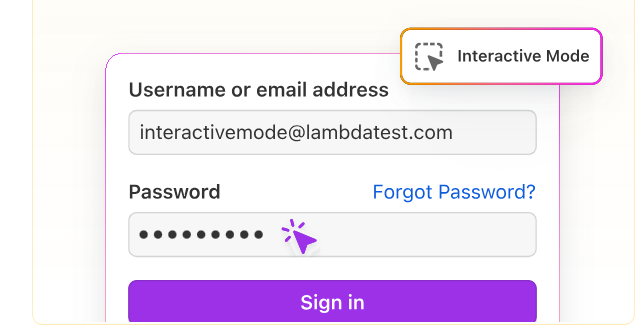
Web and App Testing
KaneAI allows you to perform both web and app testing. This means you test both your web and non-web apps.

Generate test scripts in multiple languages
You can generate test scripts for each of your test cases using different frameworks, such as Cypress and WebdriverIO as shown in the below image. This is followed by selecting the language in which the test script should be generated. You can then view and then download the scripts.

The image below shows an example of the code (test script) generated for a simple test case using the Cypress testing framework. You can view the code and see all if all good or there is anything to modify, then download and use it.

You can view a list of the code for each of your test cases and can click on a particular one to view more details.

More and more testing frameworks are expected to be added to KaneAI in the coming months as its development continues.
Schedule tests to run in the future
KaneAI also comes with a feature that enables to schedule tests to run in the future using HyperExecute.

Geolocation support
Kane AI's geolocation feature allows you to test your website's performance for users in different regions. Selecting a location in the advanced settings, you can proxy your web tests through that region. This simulates how users in that location would experience your site, enabling you to ensure it works as expected worldwide.

API Testing
KaneAI allows you to comprehensively test your APIs as part of your automated testing process, complementing its existing UI capabilities.
It provides a simple UI interface to add and validate your API. You can validate that the API is responding correctly and then incorporate it into your broader test suite.
To instantiate the interface, you type a / and among the options, you choose API as the image below shows.

To give you a clearer picture of how this works, I have shared the gif below illustrating the API test I performed, a GET request, using JSON Placeholder. Once validation is done, you can view the response status and request body.

Detailed text execution reports
You can also use KaneAI to analyze and generate reports for your test behaviors across different projects.

KaneAI now comes with many other features like the Variables and Parameters feature, but I wanted to highlight the above ones for you.
Moving forward, I will be showing you a step-by-step process of how to get started with KaneAI and also walk you through other features I checked out, which I intend to use once its out of beta and the tests I performed. Let’s dive in
Getting started with KaneAI
KaneAI has a command guide that consists of everyday words and phrases such as hover, scroll to the top, click on the signup button and refresh the page, which we can collectively refer to as prompts. These prompts assist KaneAI in performing precise tasks while executing your test cases. (I started referring to them as test prompts, as prompts and command prompts give me ChatGPT vibes 😅)
The two tables below show some of these commands and the category they fall under based on the web actions we test.
| Navigation | Tab management | Page interaction |
Go to "https://lambdatest.com" | Switch to 4th tab | Click on the signup button |
Refresh the page | Close the 1st tab | Type 4321 in the input |
Go back | Open a new KaneAI tab | Hover on the 3rd automation tool |
| Assertions & Queries | Conditionals |
Assert if selenium is present among the categories list | If gift card amount is greater than $800, then click buy. Else go back |
Query the current author’s name | If JavaScript and TypeScript are present in the tag list, choose JavaScript |
Assert if visual testing is absent from the functional testing column | If free trial is present, navigate back |
You are encouraged to utilize the format of these prompts to get the most out of KaneAI, but it’s entirely optional. They show you how to write robust, descriptive, and clear instructions for KaneAI.
But as we shall see, KaneAI is designed to analyze any commands you provide so long as they are in natural languages such as English.
We’ll be looking at the steps you need to follow to set up your KaneAI testing environment and also familiarize yourself with the UI along the process.
Setting up the testing environment
KaneAI is currently web-based, so you don’t have to install anything at the moment. To get started, follow the below steps:
Visit lambdatest.com/kane-ai and sign up to use KaneAI. It is currently in private beta. You will need to request for access.
Once you have gained access and signed in, you will land on its homepage which looks as below.
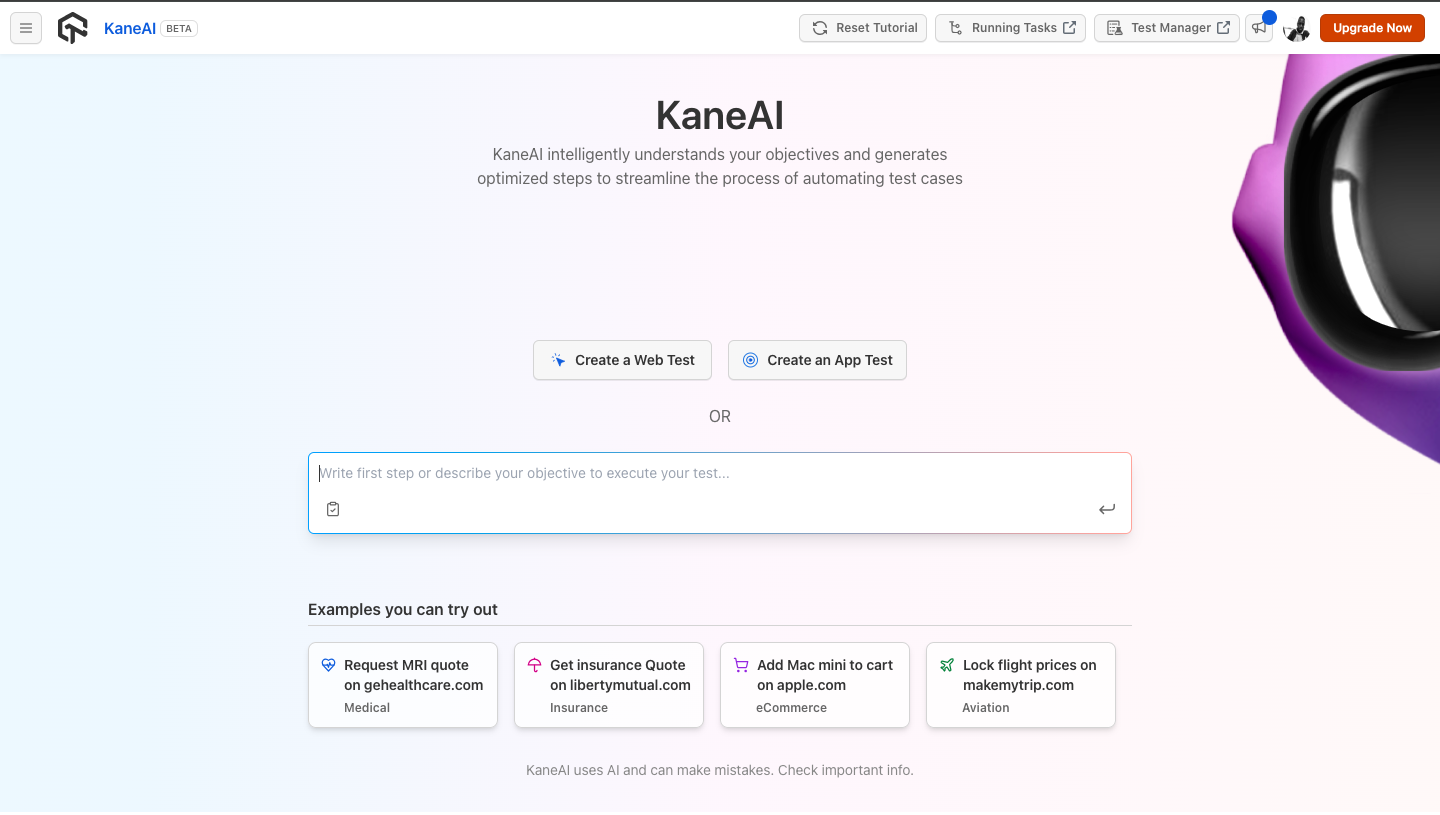
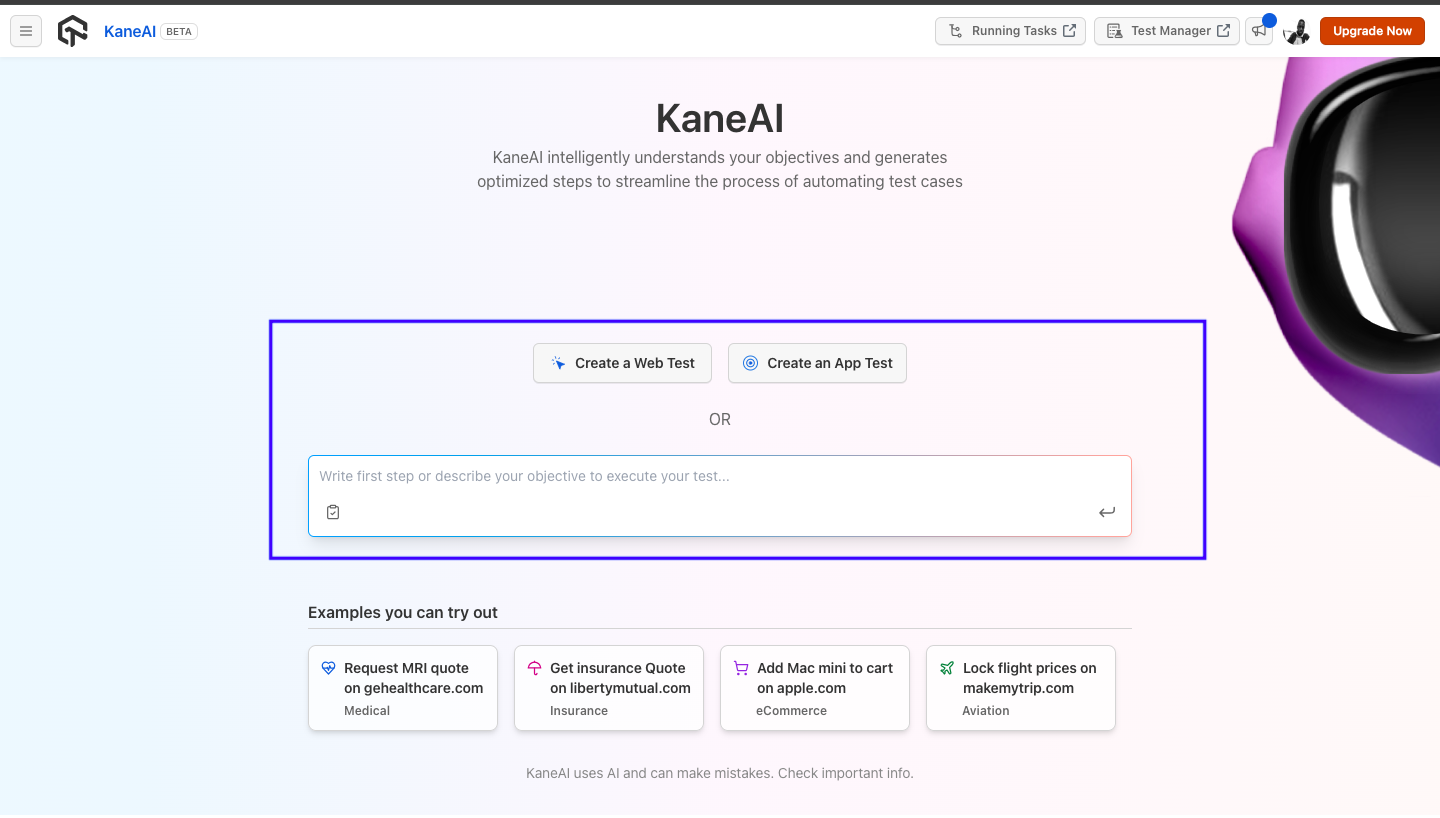
- Depending on the kind of test you want to perform, you can either choose Create a Web Test or Create an App Test. Similarly, you can make use of the Intelligent Test Planner and let it plan for you the test, by defining your objective in the input bar and pressing Enter.
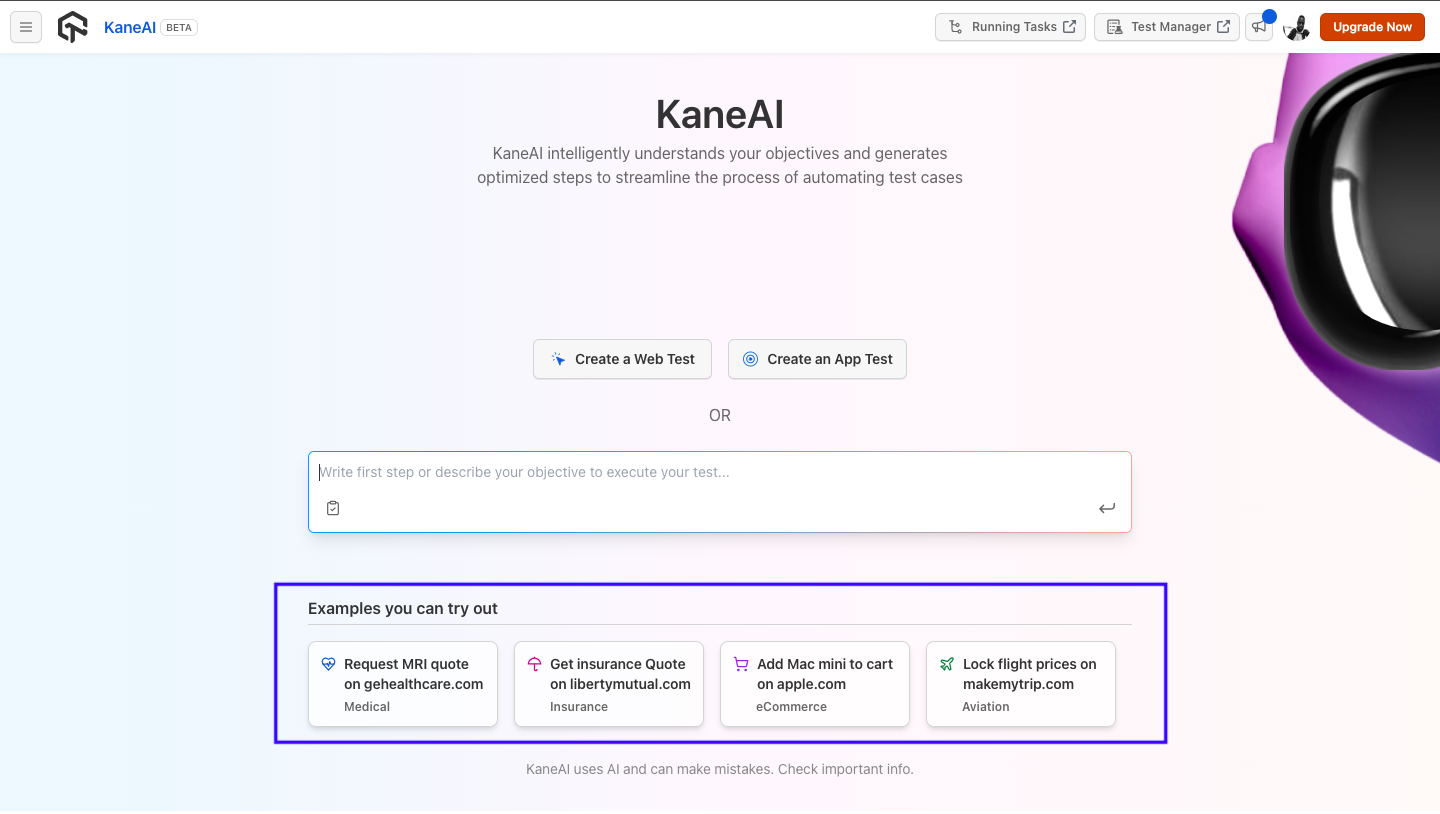
- Optionally, you can first try out the sample tests and see how it works.
As we’ll be performing a web test, we’ll choose Create a Web Test among the above options.
- Click on Create a Web Test. You should be able to see an interface resembling the one below. I have highlighted the major areas you need to familiarize yourself with.
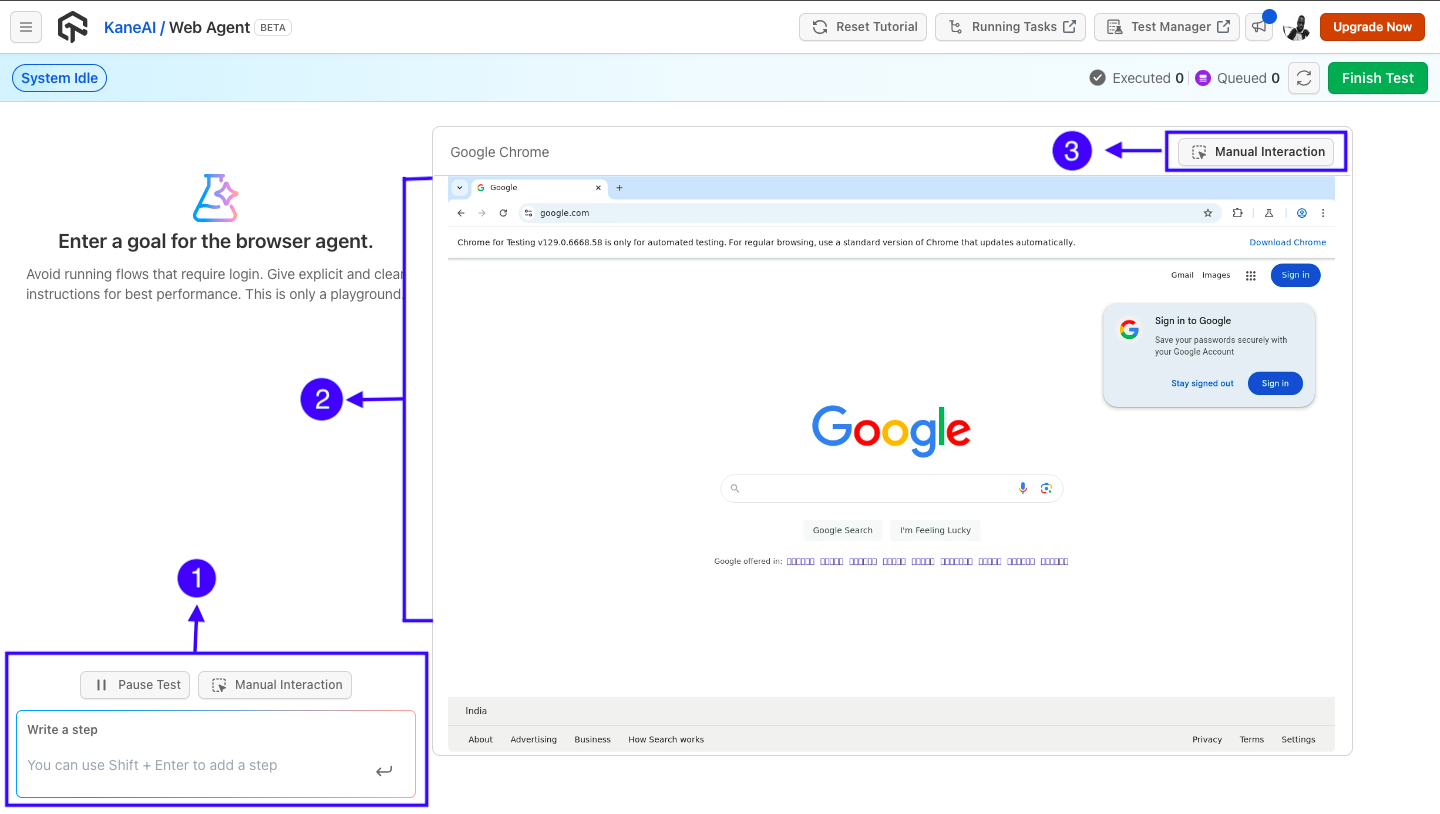
The areas as marked in the image above are:
Area 1: This area contains the input bar where you enter your command prompt and press Enter for KaneAI to run it. It also has the Pause Test button for pausing the test.
Area 2: This area shows a simulation of your test run in the browser.
Area 3: This button enables you to manually interact with the simulator. It is will come in handy when it comes to the smart show-me mode.
Now that you are familiar with KaneAI and its interface, let's see how you can perform your first test with it and what it can do by taking you through the tests I performed and the features I tested.
We will look at the sites on which to perform the tests and the end-to-end tests we are to perform on them.
Creating Test Scenarios
As end-to-end testing simulates a user’s interactions and how the app works under real-world conditions, the testing can include functional and non-functional testing. As such, I divided the tests into two, functional and non-functional tests while trying out KaneAI.
Functional testing is the type of testing that assesses the functional requirements of an application, feature, or system in alignment with the end-user’s expectations. Its primary objective is to ensure software works as required based on certain specifications, enabling developers to identify bugs, address them early, and improve user experience as a result.
Non-functional testing, on the other hand, analyses non-functional aspects. Depending on the type of the software, it can include cross-browser testing, responsive testing, performance testing, and load testing.
We’ll be testing KaneAI on the TechPeople Blog, a demo blog website created by Brad Traversy for his AstroJS YouTube tutorial. The blog looks as shown in the image below.

Functional tests to perform
An essential feature of a blog site is the search bar. It enables users to quickly and easily find specific content, articles, or topics by entering keywords and phrases. This being the case, I decided to perform a few tests on the search bar of TechPeople Blog and see how it handles the usual operations that users perform on search bars.
The scenarios I came up with to test can include:
The search functionality of the search bar
Verifying search results are related to the search query
Checking if the search is case-sensitive
Checking if the search can recognize partial matches
Non-functional tests to perform
Another feature that users utilize a great deal is the menu for navigation. Thus, I decided to check if the links lead to the correct URLs to enable users to find and access the information they need.
The above are some of the typical operations I identified users do regarding search bars. Let’s perform these tests with KaneAI and see the results.
Performing your first test with KaneAI
We will start by pretending not to have planned out our tests at hand and use the opportunity to explore what KaneAI's Intelligent Test Planner can do to help us out. We will also use the format of the prompts from the command guide to give the testing agent descriptive prompts.
We will begin by verifying the functionality of the search bar on the homepage - our first test scenario.
Step 1:
Once we provide the Intelligent Test Planner with what test we want to do, it will ask to fill the fields for sections of Outcomes, Constraints, Error Messages and User Input.
We do have to provide the website URL for which we are to perform the test on. But since we entered it in the input bar, the field is filled automatically. The below gifs provide a picture of how the test progressed step by step.
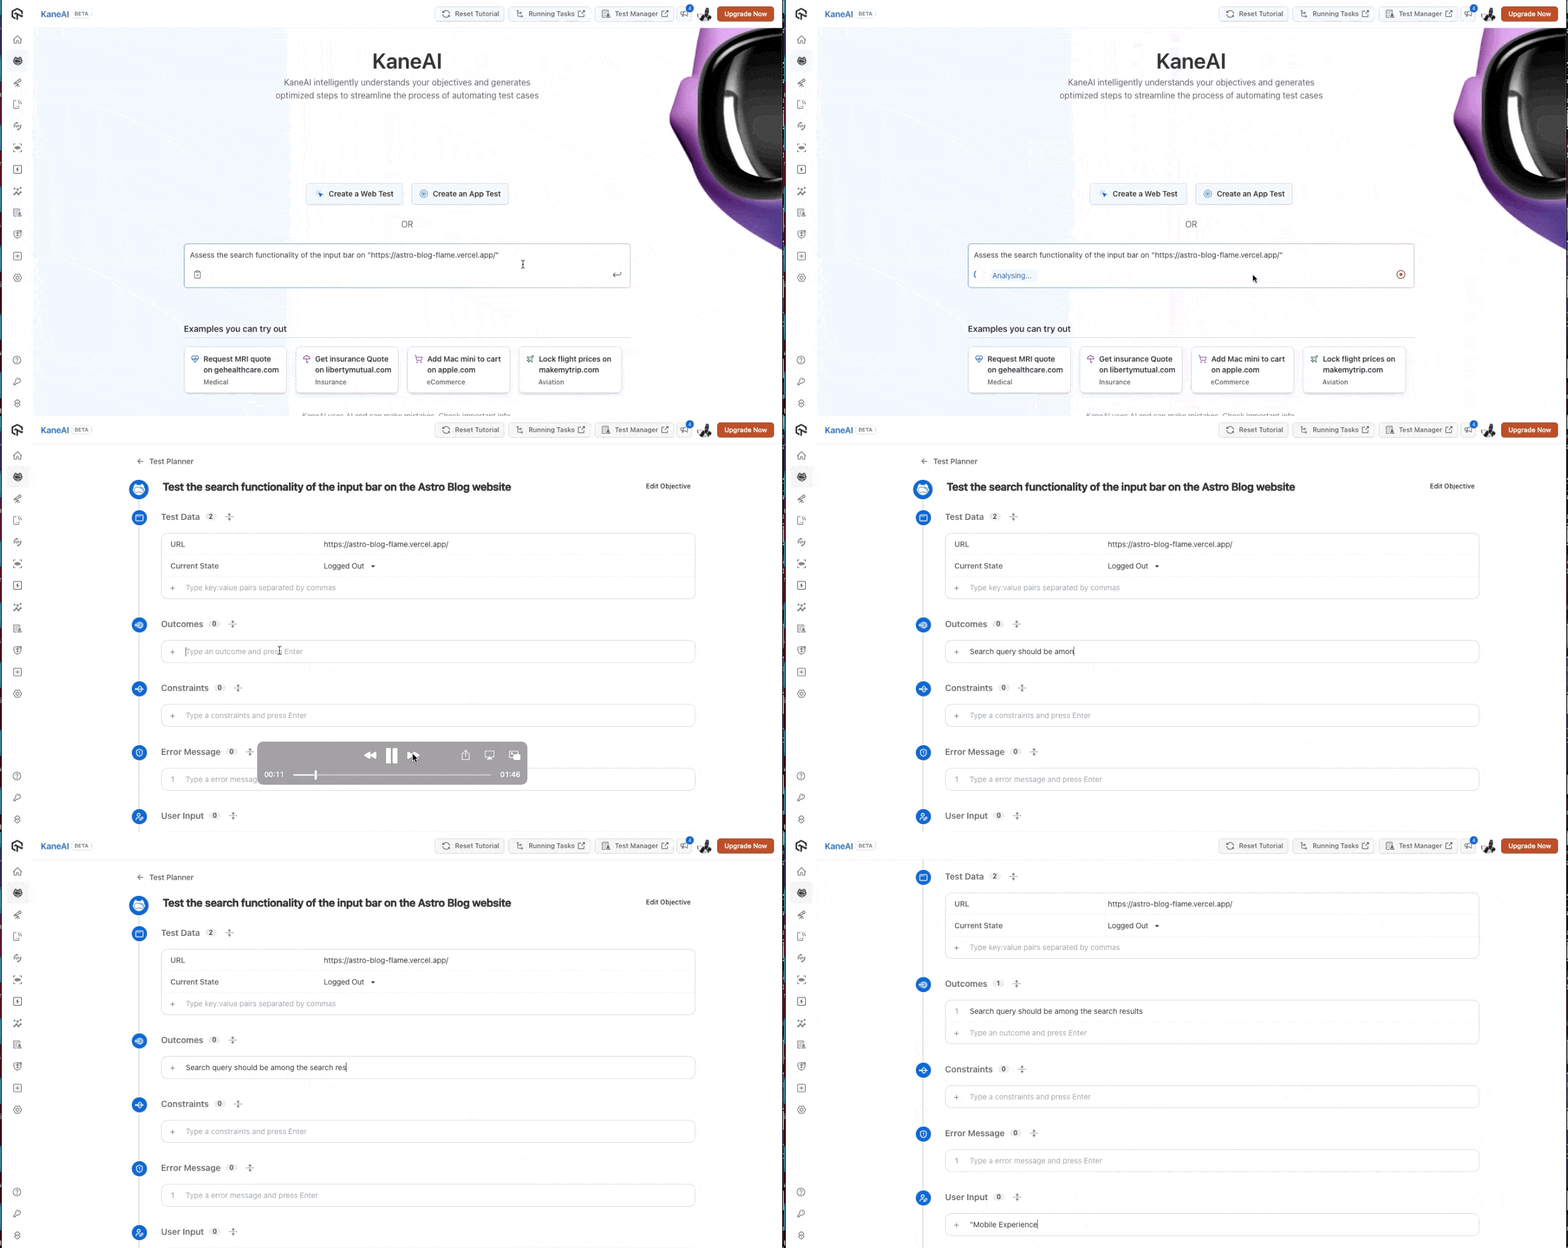
Step 2:
After filling in the fields the required fields, Click on the Review and Schedule Test button to open up a modal on which you review and save the test case in your preferred folder. Once this is done, Click on the Schedule Test button.
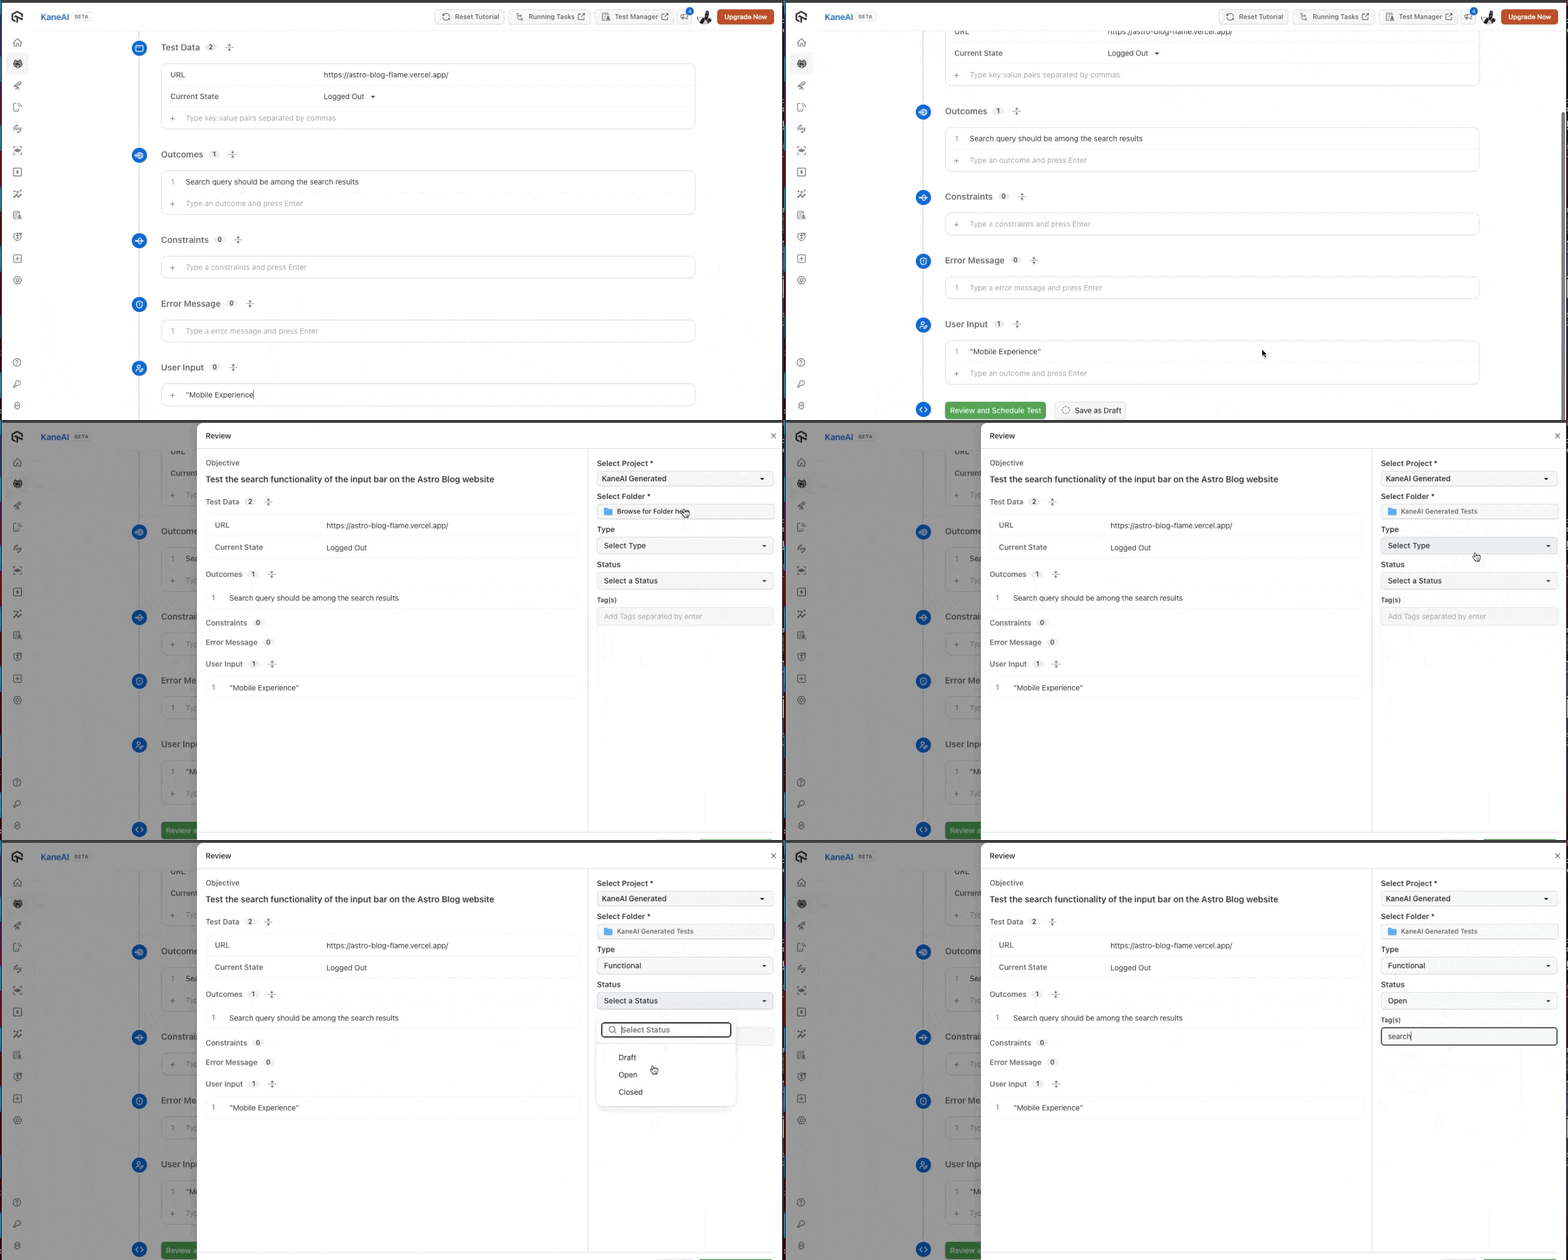
Step 3:
The test will run and you can check a live preview of it being executed by clicking on the Live Preview button.
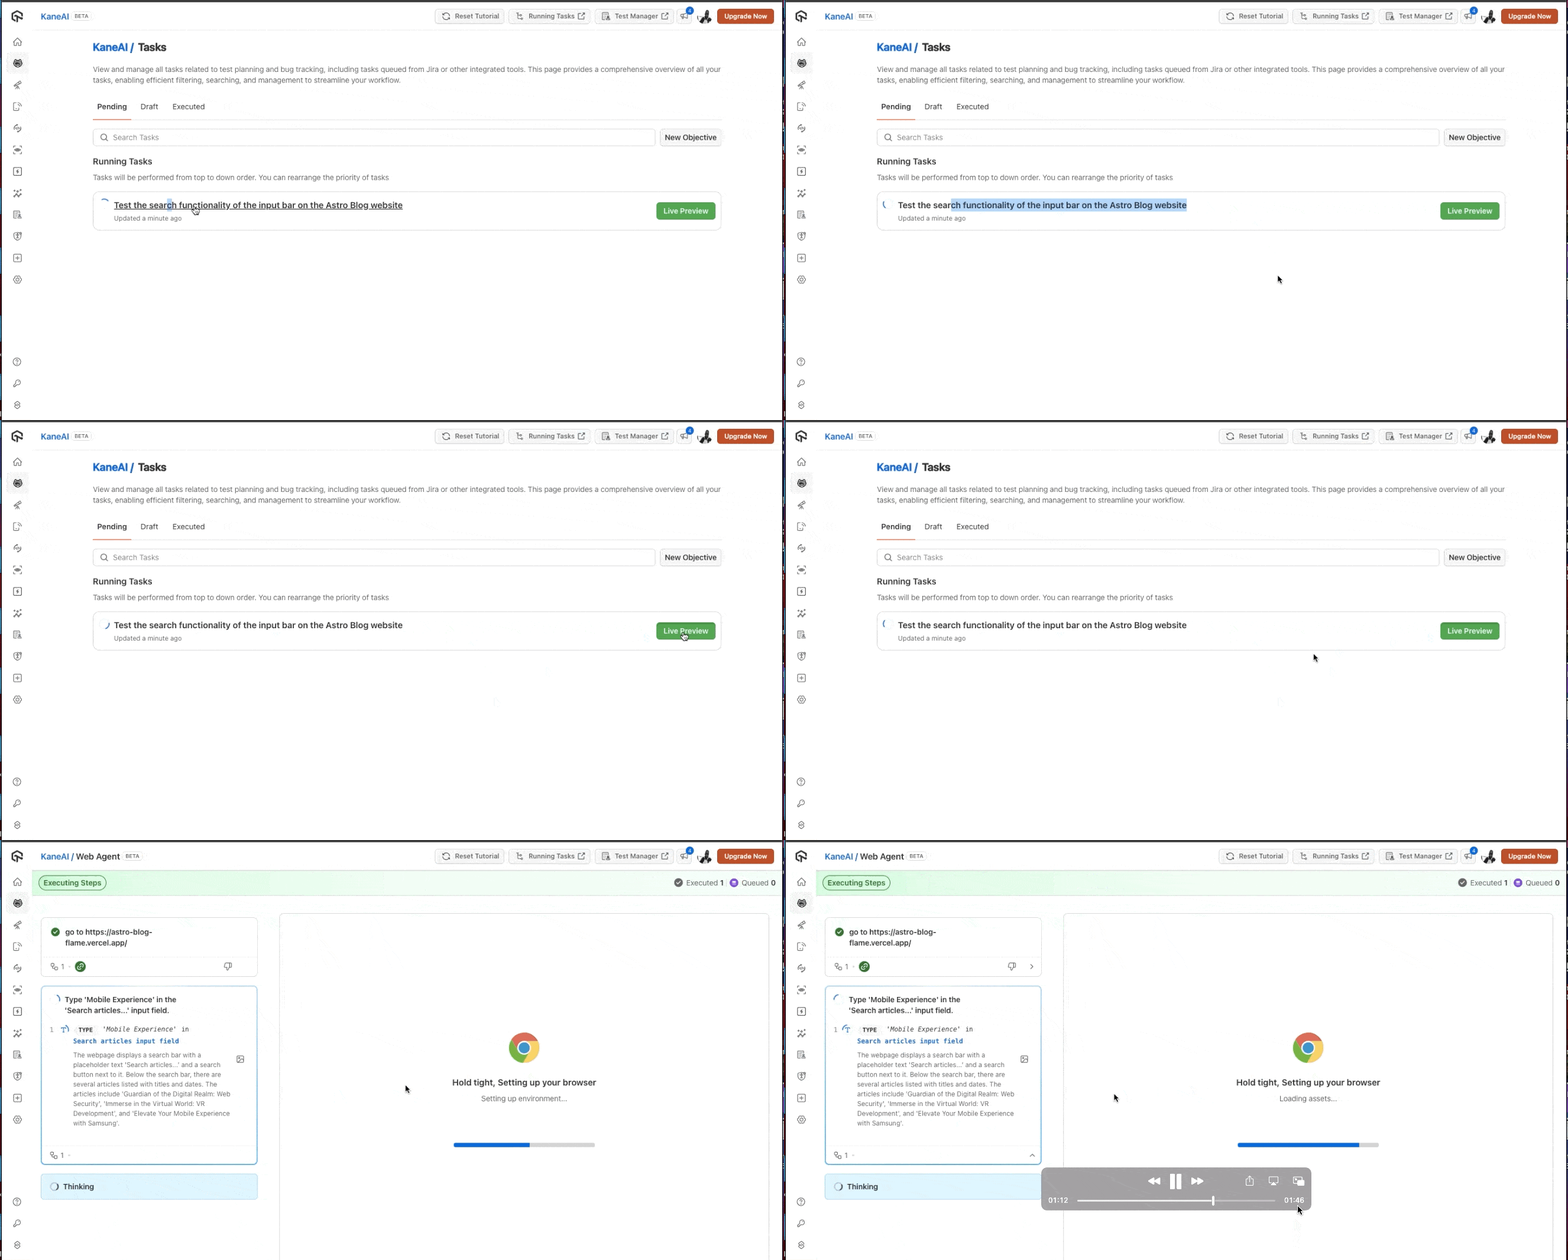
Step 4:
The preview shows you the test steps being generated in the panel on the left, with the browser simulation of the user’s actions on the right.
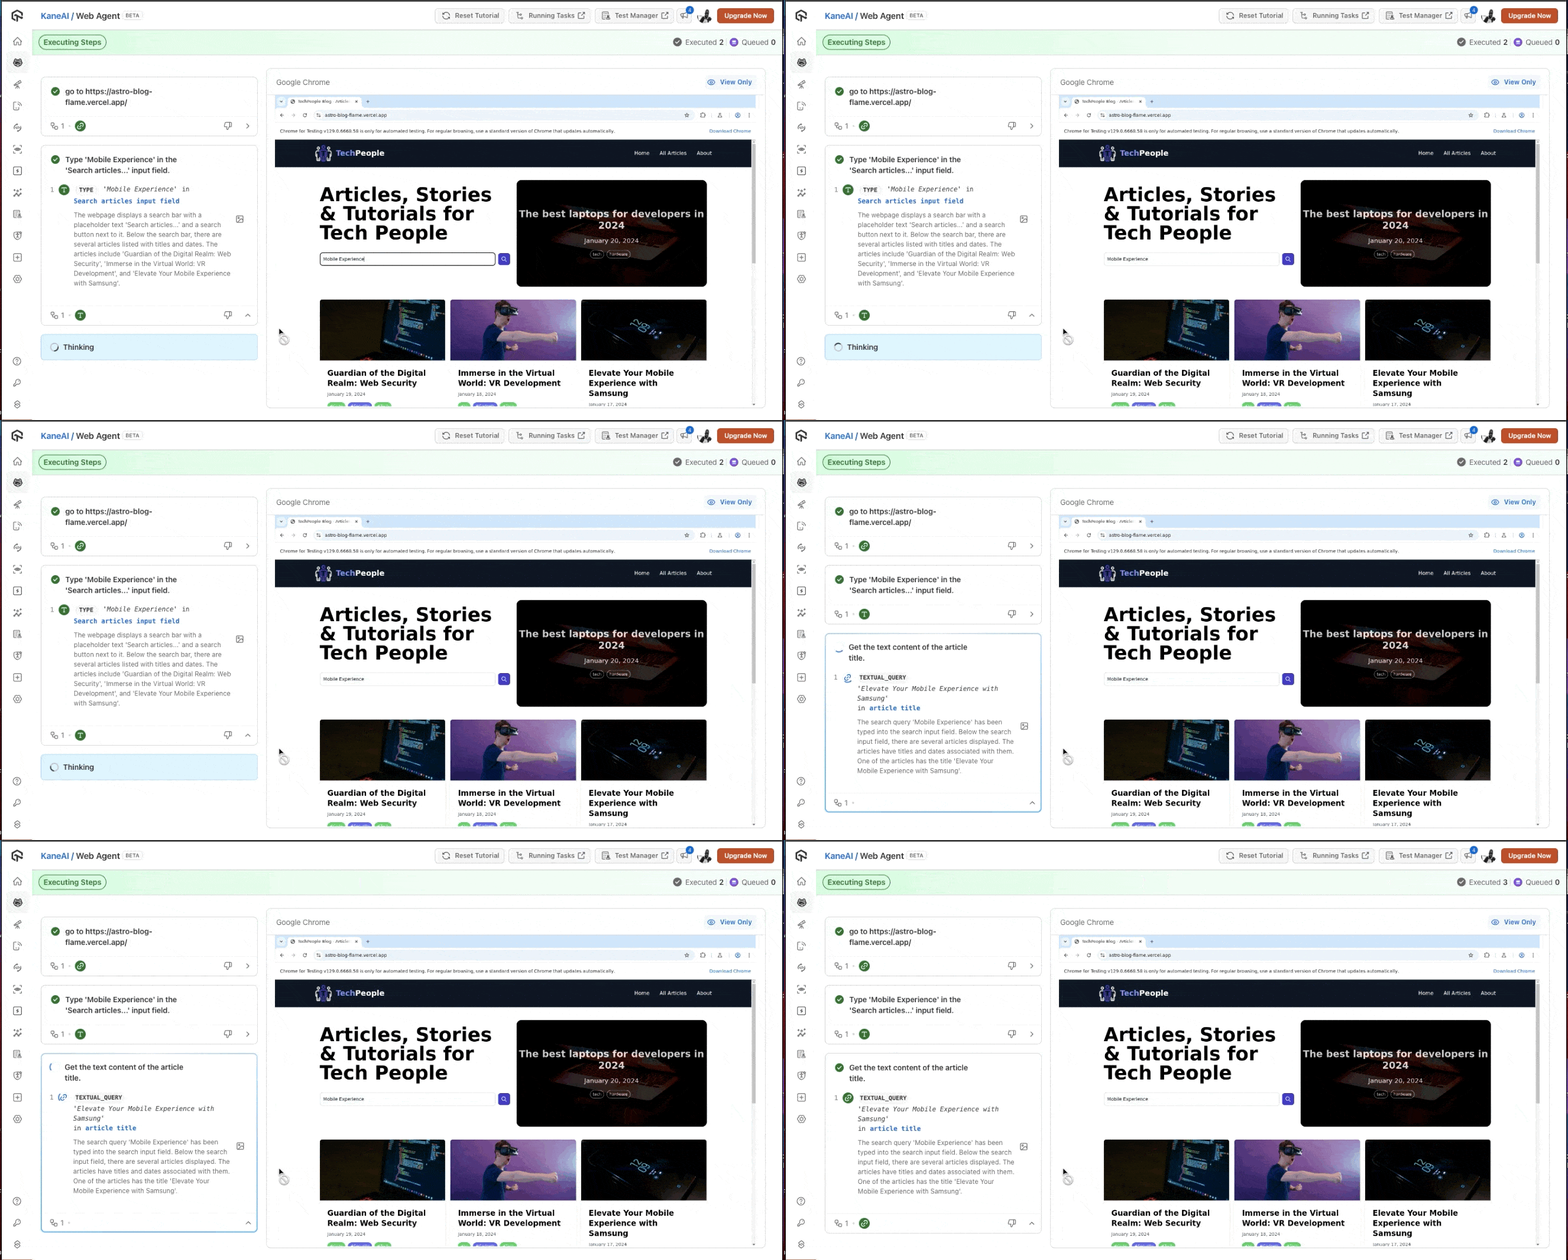
We are done with our first functional test for the scenarios to test out. Let’s now perform the non-functional test which is the URL test case scenario. Choose the Create a Web Test option this time.
Once again, we’ll follow the command guide for the prompt format to make it as descriptive as possible. The below gif shows a preview of our test run.
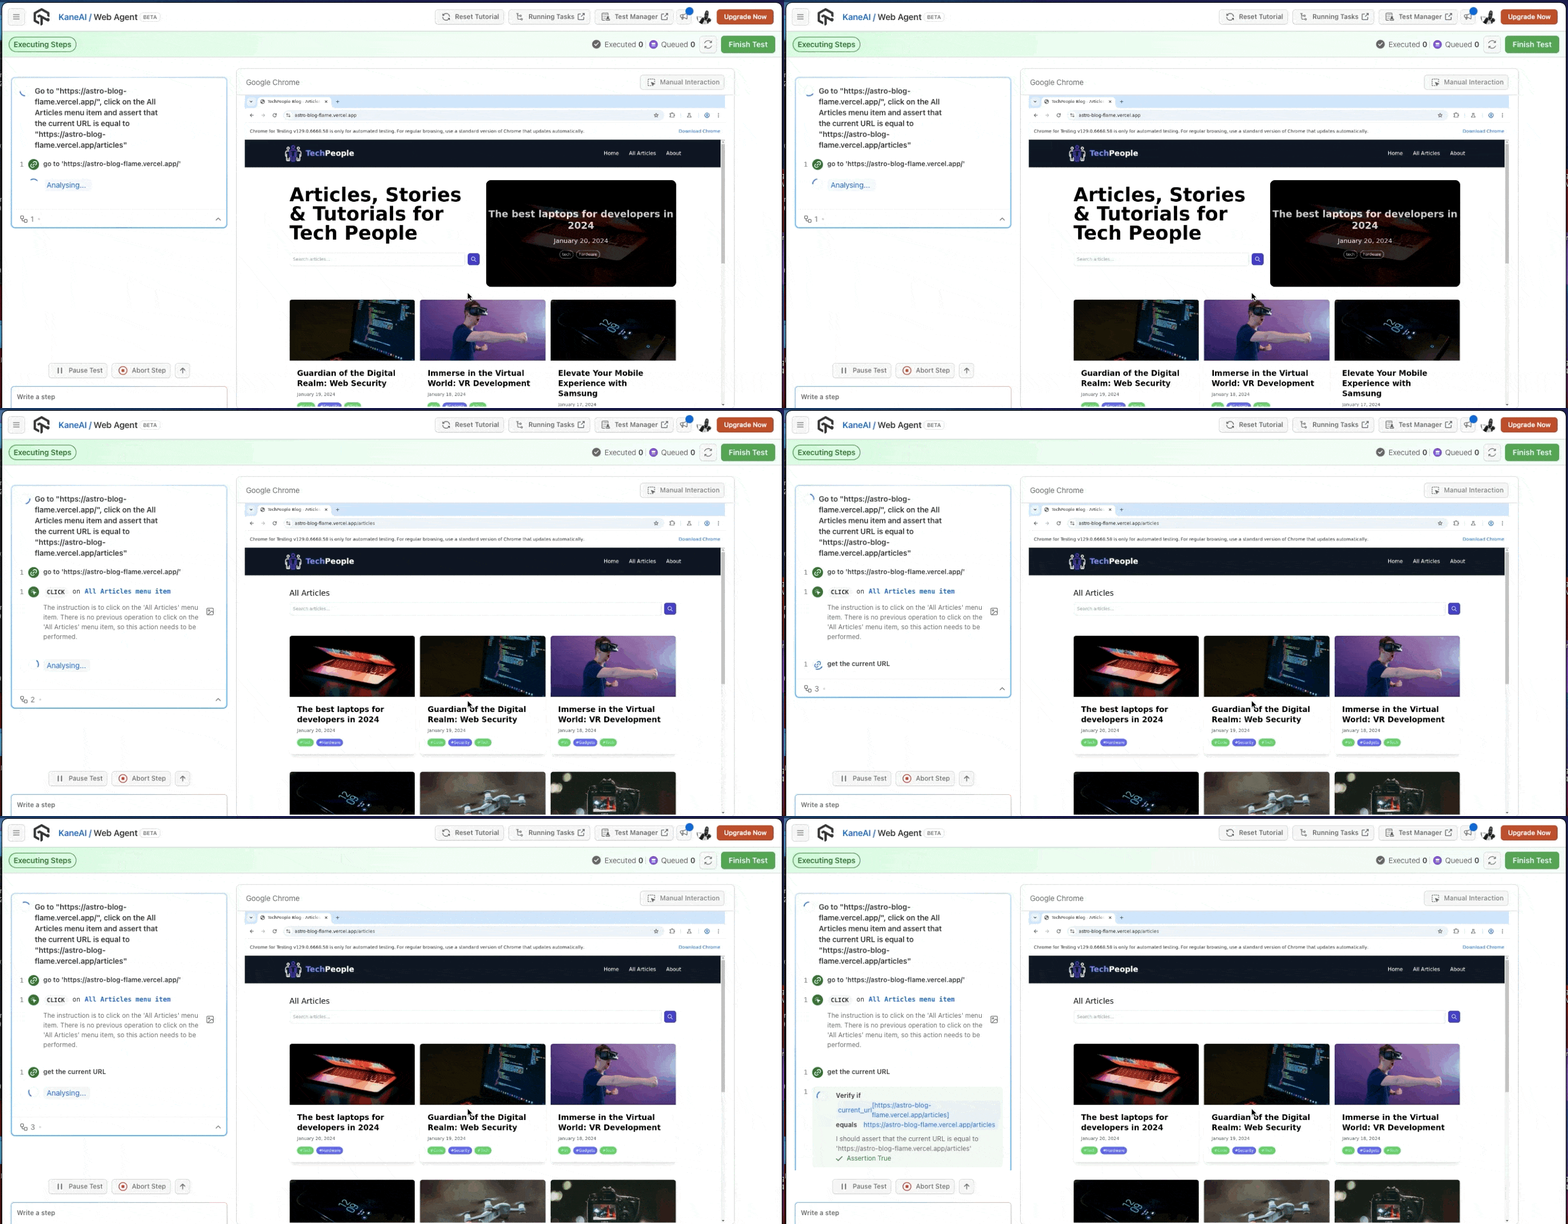
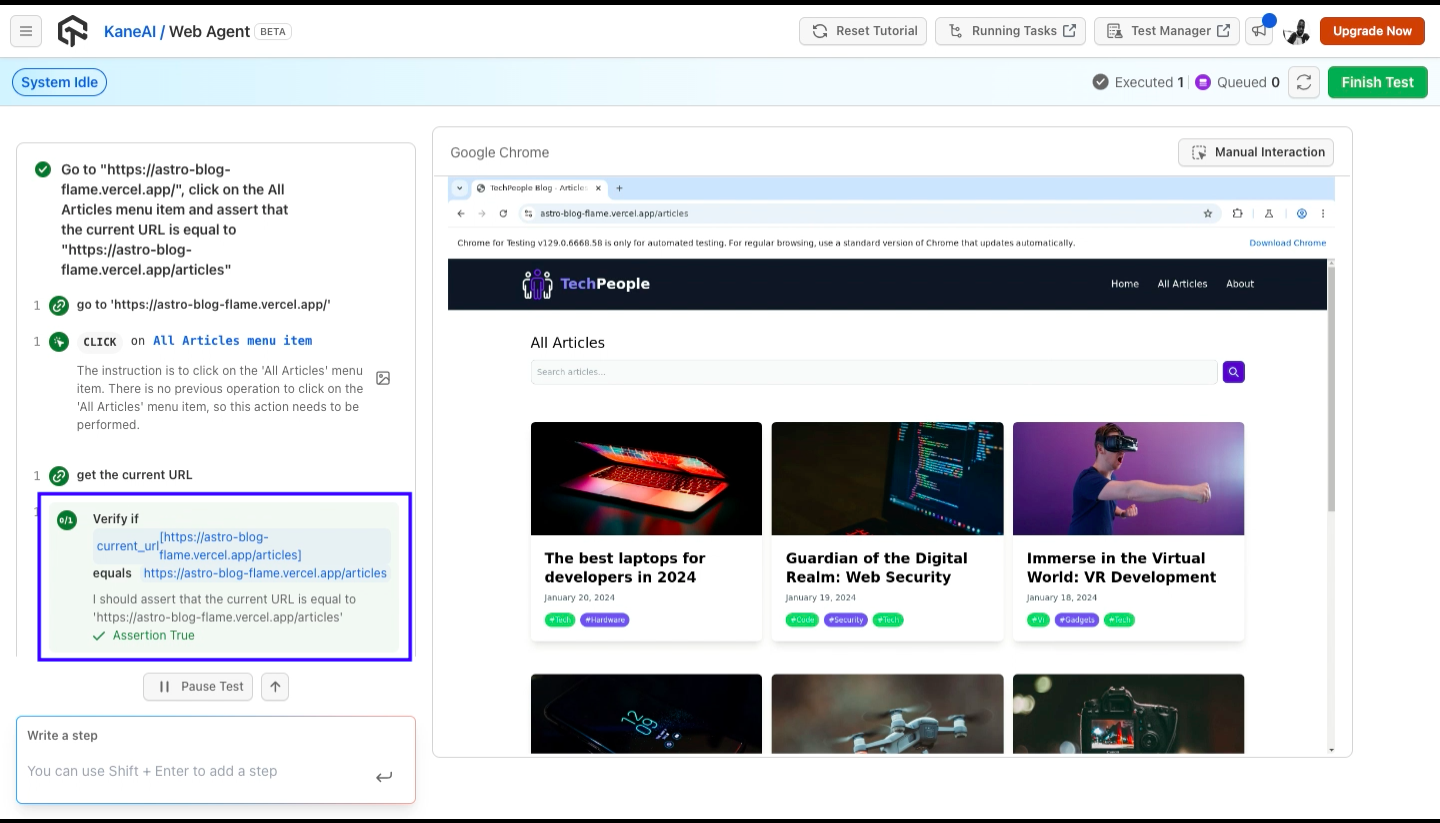
At the end, KaneAI was able to assert that the website navigates the user to the correct URL. The highlighted area in the image below shows this assertion.
Well done! You’ve performed your first test with KaneAI (two be exact 😊).
Exploring more features of KaneAI
In this section, we’ll continue with a few of the test scenarios while exploring more features of KaneAI.
Natural language processing
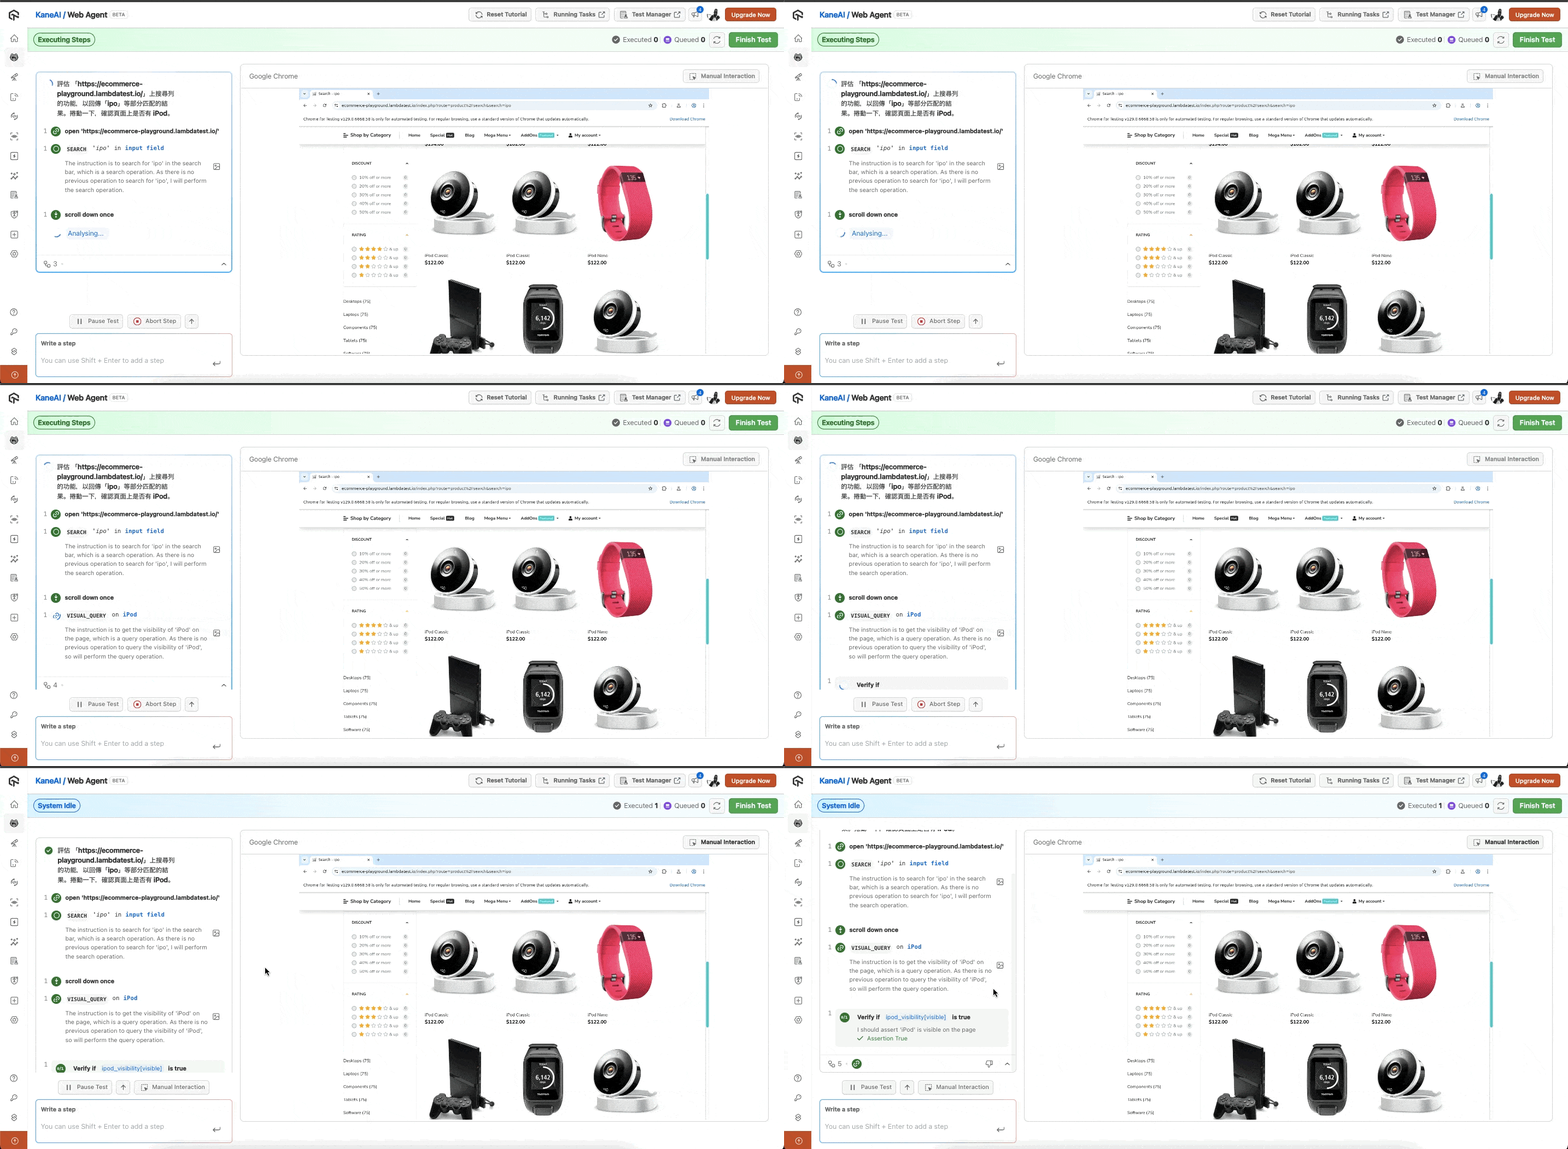
I was keen to know how well KaneAI processes natural language and its support for other languages. I had already seen how well it analyses English prompts, so I decided to give it the same prompt in another language, Chinese (traditional).
I do not know Chinese, so I used DeepL, a free online language translator. I then pasted the translation it gave into KaneAI.

The testing assistant was able to run the Chinese prompt the same way it ran the English prompt. Take a look
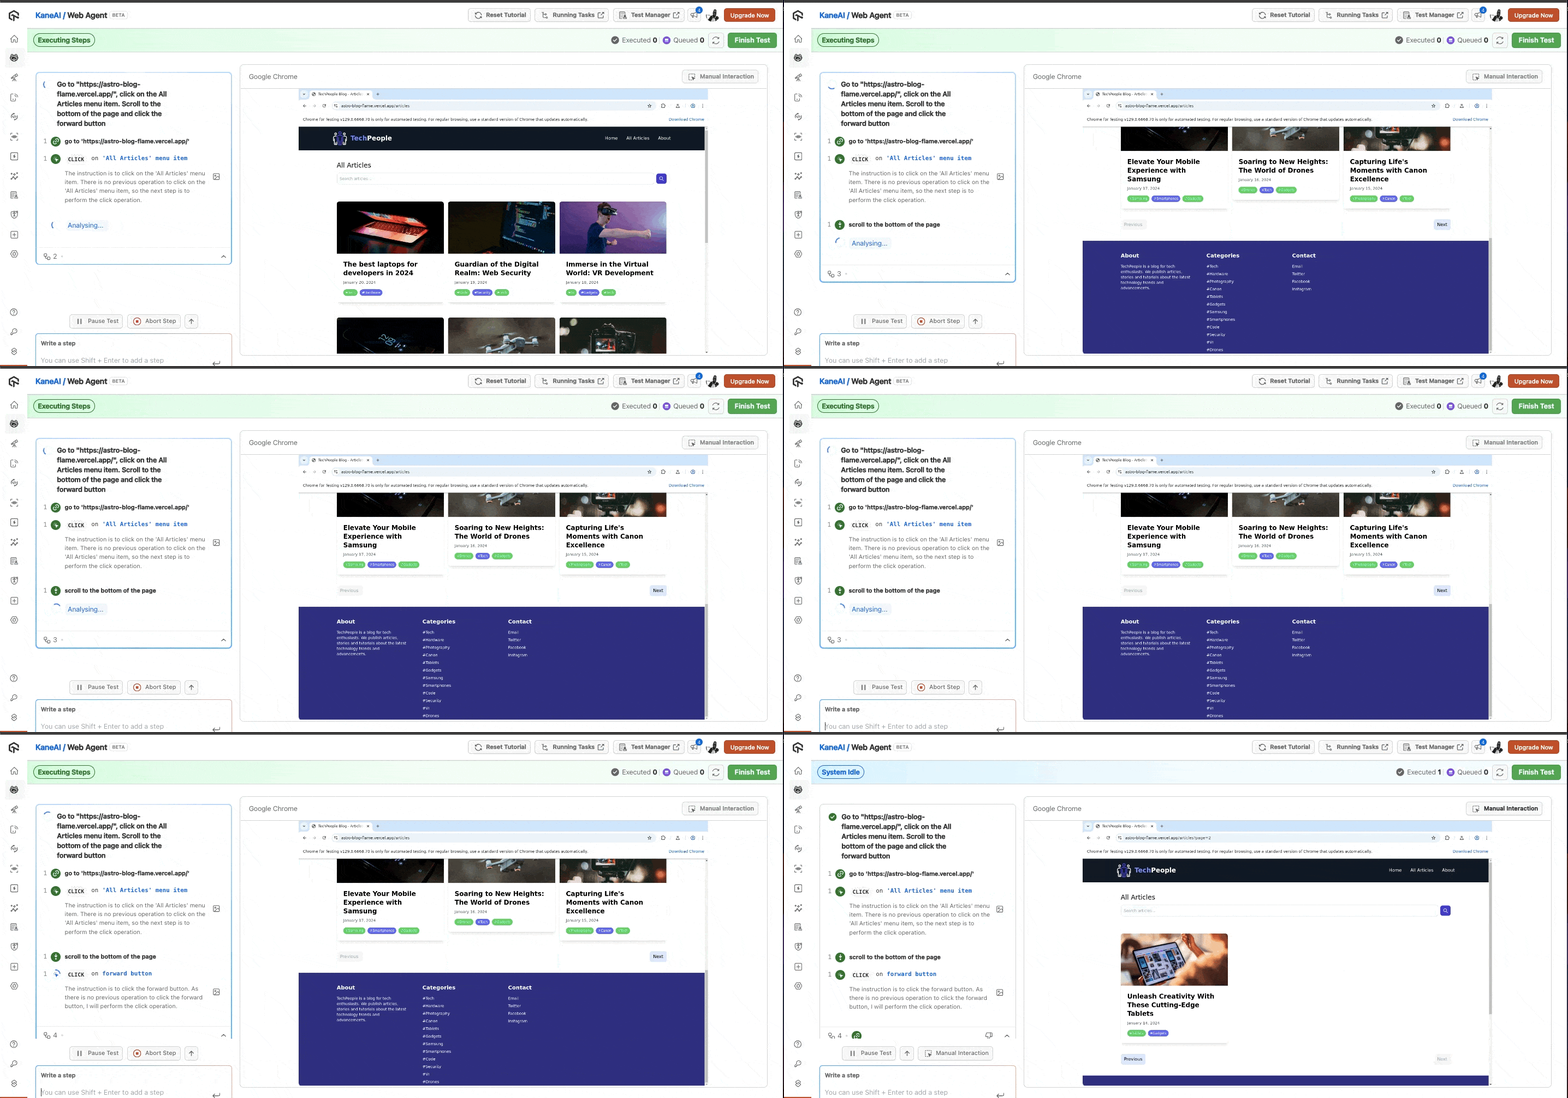
Auto-healing feature
This feature automatically resolves certain conditions. For example, when there is a next button and you tell it to click on the forward button, it will resolve this and continue with the test.
The gif preview below shows this in action.
I encourage you to check out KaneAI and perform the tests we’ve performed above on TechPeople Blog and more. I would love to hear your opinion of the testing assistant after you experience.
Let’s do one more test on a different site this time, an e-commerce one to be specific. For this, we’ll use the LambdaTest E-commerce Playground, a dummy website by LambdaTest Inc. for web automation testing.
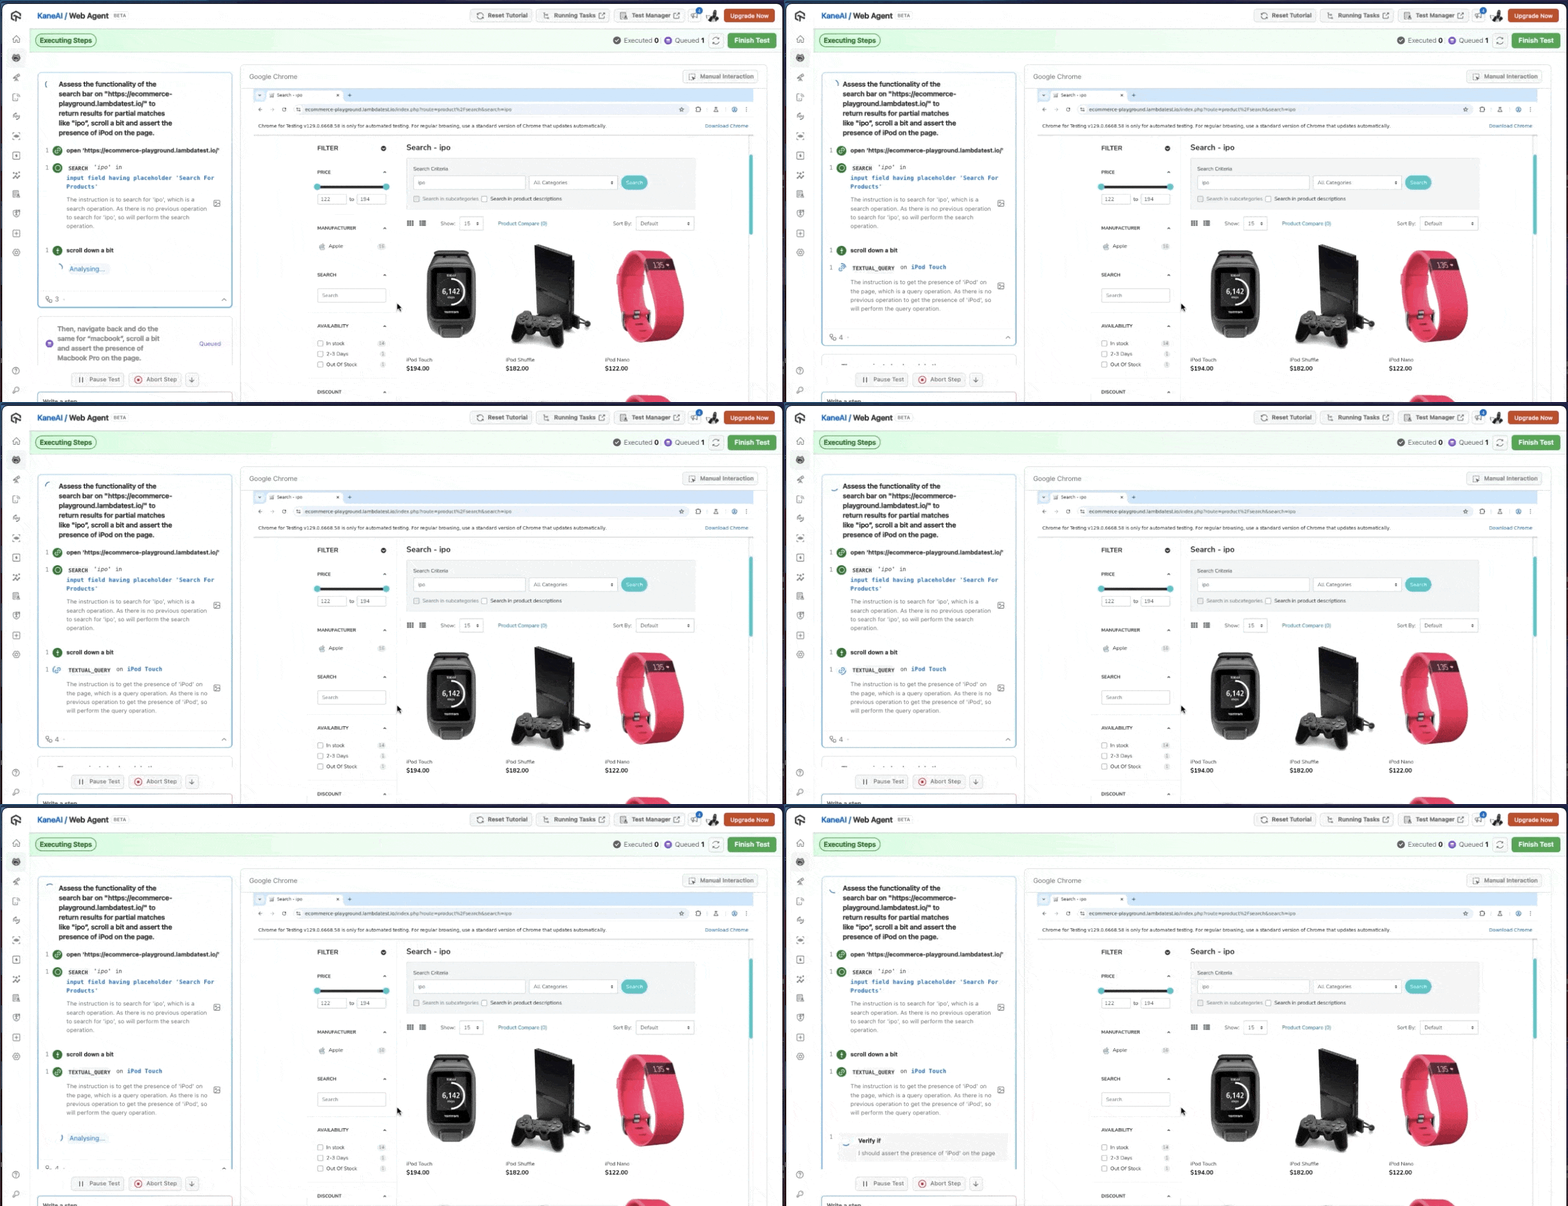
Since e-commerce sites also have a search bar, we can re-use one of our test scenarios. If the user enters a partial match in the search bar, it can return relevant results related to the search query. Its command prompt prompt includes some scrolling. The prompt is Assess the functionality of the search bar on “https://ecommerce-playground.lambdatest.io/” to return results for partial matches like “ipo”. Scroll a bit and assert the presence of iPod on the page.
The gif below shows a preview of the test run.
I have shared the video showcasing it in the LinkedIn post below, where you can watch it fully.
[LinkedIn post]
My Opinion on KaneAI After Experiencing It
Overall, this AI testing agent is here to make end-to-end testing easier for all involved in testing. It does have areas where improvement is needed, but there is much room for it, as it is the first of its kind, just like ChatGPT was when it first arrived and steadily improved as time passed.
I have observed the below while trying out KaneAI:
To get the most out of it, you should provide a descriptive objective of what you want to achieve.
It'‘s natural language processing capabilities are quite good.
The smart show-me mode does experience some lags, so it can use some improvement.
It takes a few minutes to run the tests, generate the test steps and test scripts. This seems faster to writing planning tests and writing test scripts manually.
To revert to the testing problems I mentioned at the start, writing test scripts is time-consuming and the steep learning nature of some testing frameworks. I intend to use the test scripts generator feature to speed up the process, and KaneAI’s natural language processing and easy-to-get-around interface.
Conclusion
First of all, thanks for reaching this far 🙌
To summarize, we’ve looked at what KaneAI is, explored its major features, and what it can do to enable us to perform end-to-end testing quicker, and with less effort.
Additionally, we’ve also noted some areas where it can improve to make the overall experience and performance better for the testers.
That’s all for today folks. See you in the next one!
Subscribe to my newsletter
Read articles from Mbaziira Ronald directly inside your inbox. Subscribe to the newsletter, and don't miss out.
Written by

Mbaziira Ronald
Mbaziira Ronald
I am a Software Developer. I love and write about Web Development, HTML/CSS, JavaScript, WordPress & Technical writing.