How to Back Up a PostgreSQL Database and Store it on Cloudflare R2
 Mohd Haider
Backing up your PostgreSQL database is a must for ensuring data safety and business continuity. In this guide, we’ll walk through how to back up your PostgreSQL database, package it as a .tar file, and upload it to Cloudflare R2, a cost-effective and scalable object storage solution.
Prerequisites
Before diving in, here’s what you’ll need:
A PostgreSQL database.
Docker installed on your machine.
A Cloudflare account with R2 storage access.
pg_dumputility (part of the PostgreSQL client).Cloudflare R2 credentials (Access Key, Secret Key, etc.).
Step 1: Set Up Your Express.js Project for Backups
You can setup typescript with express.js from the blog at digitalocean.
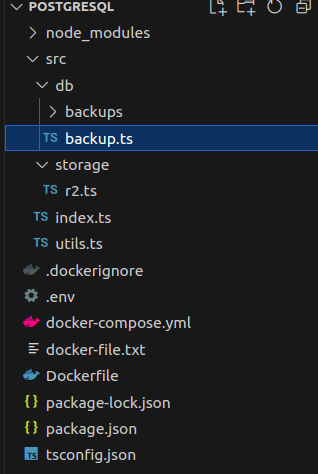
First, set up a TypeScript-based Express project. Inside the src/db folder, create a backup.ts file to manage your backup logic. Here’s how:
Create the
backup.tsfile: This script will executepg_dumpto create the backup and store it as a.tarfile.
 import { exec } from "child_process";
 import dotenv from "dotenv";
 import path from "path";
 import fs from "fs";

 dotenv.config();

 const DB_NAME = process.env.DB_NAME;
 const DB_USER = process.env.DB_USER;
 const DB_PASSWORD = process.env.DB_PASSWORD;
 const DB_HOST = process.env.DB_HOST;
 const DB_PORT = process.env.DB_PORT;

 // Ensure backups directory exists
 const backupDir = path.join(__dirname, "./backups");
 if (!fs.existsSync(backupDir)) {
   fs.mkdirSync(backupDir, { recursive: true });
 }

 const backupFile = path.join(backupDir, `backup_${Date.now()}.tar`);

 export const takeBackup = () => {
   console.log("Starting database backup...");

   const pgDumpCommand = `PGPASSWORD=${DB_PASSWORD} pg_dump -h ${DB_HOST} -p ${DB_PORT} -U ${DB_USER} -F t -f ${backupFile} ${DB_NAME}`;

   exec(pgDumpCommand, (error, stdout, stderr) => {
     if (error) {
       if (fs.existsSync(backupFile)) {
         fs.unlinkSync(backupFile);
       }
       console.error(`Error taking backup: ${error.message}`);
       return;
     }

     console.log("Backup completed successfully!");
   });
 };
Containerize the App (Optional): If you haven’t installed PostgreSQL locally, you can use Docker to run
pg_dump. Here's how you can install PostgreSQL in your Docker container:# Use the official Node.js image FROM node:18 # Install PostgreSQL client RUN apt-get update && apt-get install -y postgresql-client-16 WORKDIR /app COPY package*.json ./ RUN npm install COPY . . EXPOSE 3000 CMD ["npm", "run", "dev"]
Step 2: Upload Backup to Cloudflare R2
Once your backup is ready, the next step is to upload it to Cloudflare R2. To do this, you'll use the AWS SDK, which is compatible with Cloudflare's S3 API. you can also refer this blog https://ruanmartinelli.com/blog/cloudflare-r2-pre-signed-urls
Set Up Cloudflare R2: Create a new folder named
storageinside yoursrcdirectory, and within that, create anr2.tsfile for managing file uploads.import { S3Client, PutObjectCommand } from "@aws-sdk/client-s3"; import { getSignedUrl } from "@aws-sdk/s3-request-presigner"; class S3Service { async setConfig() { return new S3Client({ region: "auto", endpoint: process.env.R2_ENDPOINT!, credentials: { accessKeyId: process.env.R2_ACCESS_KEY_ID!, secretAccessKey: process.env.R2_SECRET_ACCESS_KEY!, }, }); } async create(data: { user_id: string }) { const config = await this.setConfig(); const objectKey = `${data.user_id}/backup_${Date.now()}.tar`; const signedUrl = await getSignedUrl( config, new PutObjectCommand({ Bucket: process.env.R2_BUCKET, Key: objectKey, }), { expiresIn: 3600 } ); return { put_url: signedUrl, get_url: `${process.env.R2_PUBLIC_URL}/${objectKey}`, }; } } export default new S3Service();Upload the Backup in
backup.ts: After generating the backup file, we upload it to R2 by using the signed URL:import axios from "axios"; import r2 from "../storage/r2"; export const takeBackup = async () => { // Backup logic here... // Upload to Cloudflare R2 const signedUrl = await r2.create({ user_id: "database-backup" }); const fileStream = fs.createReadStream(backupFile); const fileStats = fs.statSync(backupFile); try { await axios.put(signedUrl.put_url, fileStream, { headers: { "Content-Length": fileStats.size, "Content-Type": "application/octet-stream", }, }); console.log("Backup uploaded to Cloudflare R2!"); fs.unlinkSync(backupFile); // Clean up local backup after upload } catch (e) { console.error("Upload to R2 failed", e); } };
Subscribe to my newsletter
Read articles from Mohd Haider directly inside your inbox. Subscribe to the newsletter, and don't miss out.
Written by

Mohd Haider
Mohd Haider
Full-Stack developer with a passion for problem-solving and process optimization. Currently exploring new tools and technologies to enhance software solutions. Always eager to share knowledge and contribute to meaningful projects.