React Drag & Drop in 10 minutes
 Ruslan Coroliov
What is Drag and Drop in JavaScript?
Drag & Drop allows us to create interactive experiences where users can drag elements from one spot to another, making interfaces more intuitive and dynamic.
At its core, the drag-and-drop API involves a few key events: dragstart when the item is grabbed, dragover to specify where it can be dropped, and drop to place it. Check out the MDN docs for more details.
Why Use react-dnd Instead of Vanilla JavaScript?
react-dnd simplifies drag-and-drop functionality in React by using a Redux-like architecture to manage state centrally, unlike vanilla JavaScript's complex DOM-based approach. This makes it a superior choice for complex interactions and long-term support without manual work with DOM directly.
Installation steps
npm install react-dnd react-dnd-html5-backend
For React 16.x, you may need to add path aliases to your webpacksetup: (Details here)
resolve: {
    fallback: {
        'react/jsx-runtime': 'react/jsx-runtime.js',
        'react/jsx-dev-runtime': 'react/jsx-dev-runtime.js',
    },
},
Quick Overview
React DnD revolves around key concepts like Items and Types, which define what is being dragged. Drag Sources and Drop Targets handle the interaction between components during a drag operation. Monitors track the drag state, while Collectors pass this state as props to components. For more details, visit the Overview docs page.
Sample dragging from Left to Right + Live demo

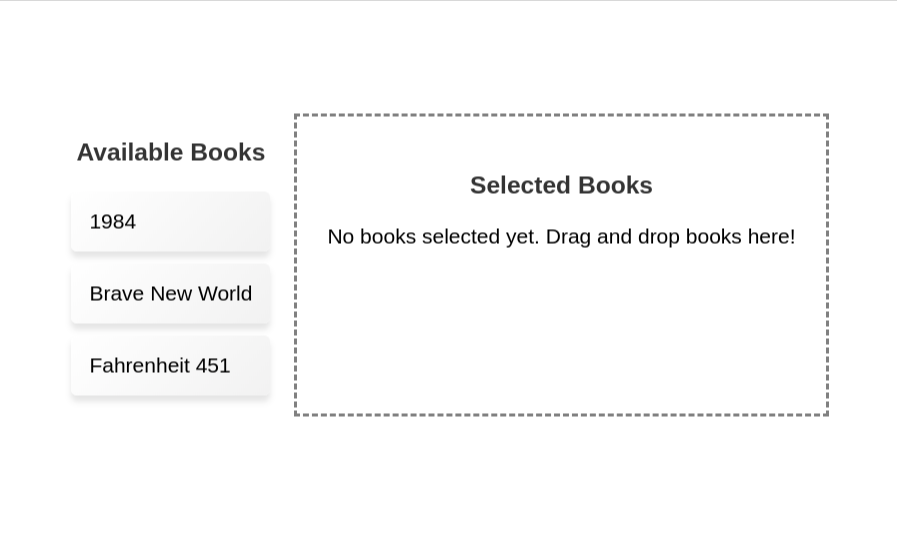
Let’s create two-panel components: one for dragging <Book> from the list and another for dropping them. The useDrag hook will allow us to drag the book, and the useDrop hook will handle adding the dragged book to a new list.
Main component
import { useState } from "react";
import { DndProvider } from "react-dnd";
import { LeftPanelBooks } from "./LeftPanelBooks";
import { RightPanelBooks } from "./RightPanelBooks";
import { HTML5Backend } from "react-dnd-html5-backend";

import "./styles.css";

const books = [
  { id: "1", title: "1984" },
  { id: "2", title: "Brave New World" },
  { id: "3", title: "Fahrenheit 451" },
];

export const App = () => {
  const [leftPanelIds, setLeftPanelIds] = useState(
    books.map((book) => book.id)
  );
  const [selectedBooksIds, setSelectedBooksIds] = useState([]);

  const handleDropBooks = (booksIds) => {
    setSelectedBooksIds((prevSelectedBooksIds) => {
      const newBooksIds = [...prevSelectedBooksIds, ...booksIds];
      setLeftPanelIds(
        books
          .map((book) => book.id)
          .filter((bookId) => !newBooksIds.includes(bookId))
      );
      return newBooksIds;
    });
  };

  const rightPanelBooks = books.filter((book) =>
    selectedBooksIds.includes(book.id)
  );

  const leftPanelBooks = books.filter((book) => leftPanelIds.includes(book.id));

  return (
    <DndProvider backend={HTML5Backend}>
      <div
        style={{ display: "flex", justifyContent: "space-around", gap: "16px" }}
      >
        <LeftPanelBooks books={leftPanelBooks} />
        <RightPanelBooks
          onDropBooks={handleDropBooks}
          droppedBooks={rightPanelBooks}
        />
      </div>
    </DndProvider>
  );
};
Left Panel Component (Draggable List)
import { useDrag } from "react-dnd";
import { Book } from "./App";

export const LeftPanelBooks = ({ books }) => {
  return (
    <div>
      <h3>Available Books</h3>
      <ul>
        {books.map((book) => (
          <BookRow key={book.id} book={book} />
        ))}
      </ul>
    </div>
  );
};

export const BookRow = ({ book }) => {
  const [{ isDragging }, dragRef] = useDrag(
    () => ({
      type: "Books",
      item: { bookIds: [book.id] },
      collect: (monitor) => ({
        isDragging: monitor.isDragging(),
      }),
    }),
    [book.id]
  );

  return (
    <li ref={dragRef} style={{ opacity: isDragging ? 0.5 : 1 }}>
      {book.title}
    </li>
  );
};
Right Panel Component (Droppable List)
import { useDrop } from "react-dnd";
import { Book } from "./App";

export const RightPanelBooks = ({ onDropBooks, droppedBooks }) => {
  const [{ isOver }, dropRef] = useDrop(
    () => ({
      accept: "Books",
      drop: (item) => {
        onDropBooks(item.bookIds);
      },
      collect: (monitor) => ({
        isOver: monitor.isOver(),
      }),
    }),
    []
  );

  return (
    <div
      ref={dropRef}
      style={{
        backgroundColor: isOver ? "lightgreen" : "white",
        padding: "20px",
        border: "2px dashed gray",
      }}
    >
      <h3>Selected Books</h3>
      {droppedBooks.length === 0 ? (
        <p>No books selected yet. Drag and drop books here!</p>
      ) : (
        <ul>
          {droppedBooks.map((book) => (
            <li key={book.id}>{book.title}</li>
          ))}
        </ul>
      )}
    </div>
  );
};
Explanation
isDraggingandisOver: Used for applying UI feedback during drag-and-dropdrophandler: Moves book from the left list to the right when dropped.
When books are dragged from the left panel and dropped into the right, they are transferred between the lists.
Advanced: Nested Drag and Drop and Custom Preview
To implement nested drag-and-drop, extend your logic by adding more useDrag and useDrop hooks for additional drag targets.
For example:
To move items into categories, attach
useDropto the category row component.To reorder items within categories, attach
useDropto the item row as well.
Highly recommend checking out these official live code samples on nested drag sources, and nested drop targets.
Key Tip: When dropping inside a nested category, avoid triggering the parent handler by using the shallow: false option in monitor.isOver():
drop: (controlIds: string[], monitor) => {
    if (!monitor.isOver({ shallow: false })) return;
};
Custom Preview Options:
1. DragPreviewImage: Use an image as the preview by passing it to <DragPreviewImage>. You can find the full docs here
2. useDragLayer: For full customization, the useDragLayer hook allows you to create a custom drag preview with more flexibility. This method requires more code to handle positioning and styling, but it's useful for scenarios like changing previews between nested lists. See a live sample of it here.
Conclusion
Using react-dnd in your React project simplifies the process of building powerful drag-and-drop functionality. From basic item movement to complex nested interactions with custom previews, it offers a scalable, efficient solution without manual DOM manipulation.
Thanks for reading!
Subscribe to my newsletter
Read articles from Ruslan Coroliov directly inside your inbox. Subscribe to the newsletter, and don't miss out.
Written by

Ruslan Coroliov
Ruslan Coroliov
Hi there! 👋 I'm Ruslan Coroliov, a passionate Software Engineer from Moldova. 🧑🌾 ( real, not AI 🤖 ) A full-stack web developer proficient in Ruby (Ruby on Rails) for the backend and Typescript/Javascript (React, Vue, Plain JS) for the front end. As a remote work enthusiast, I thrive on learning new tech while maintaining a healthy work-life balance, ensuring productivity and innovation go hand in hand in every daily task.