From Cloud to Code: Redis Integration and Visualization with Redis Insight.
 Raymond Umukoro
What is Redis?
Redis, which stands for Remote Dictionary Server, is an open-source, in-memory data structure store that serves multiple roles: it can function as a database, cache, and message broker. Its speed is one of its standout features, allowing for data retrieval in mere milliseconds thanks to its in-memory architecture. For applications that demand real-time data processing, Redis is an essential addition to your tech stack.
In this article, I will guide you through a specific use case of Redis: its caching capabilities. I’ll walk you through how to leverage Redis for user sign-ups with email verification, providing you with practical insights along the way.
Why is Redis Important?
Redis is crucial because of its speed and versatility. It supports multiple data structures such as strings, hashes, lists, sets, and more. It's often used for caching, storing session data, and managing real-time applications like leaderboards or live notifications. Redis ensures that your application can handle a large amount of data quickly and efficiently without slowing down. Whether you’re looking to optimize performance, reduce latency, or handle stateful operations, Redis is the right tool for the job.
Basic Redis Commands (A Quick Look)
Here are some basic Redis commands to get you started:
ECHO:
This command simply returns the input string. It’s useful for testing and debugging, as it helps you ensure that your connection to Redis is working.
ECHO "Hello, Redis!"
SET:
Used to store a key-value pair in Redis. If the key already exists, the value is overwritten.
SET user:name "Alice"
GET:
Retrieves the value of a specified key. If the key doesn't exist, it returns nil
GET user:name
EXISTS:
Checks if a key exists in Redis. Returns 1 if the key exists and 0 if it doesn’t
EXISTS user:name
DEL:
Deletes a key and its associated value from Redis. If the key doesn’t exist, it does nothing
DEL user:name
Redis commands are simple yet powerful, and these basic ones will get you started in no time.
SETEX:
The setEx command in Redis is used to set the value of a key with a specified expiration time. e.g SETEX key seconds value
key: The name of the key you want to set.seconds: The expiration time in seconds. This determines how long the key will remain in Redis before it is automatically deleted.value: The value to be stored in the key.
SETEX user:name 300 "Alice"
Redis Deployment Options: Local vs. Cloud
Redis can be used in different environments, depending on your needs:
Local Redis: You can run Redis on your machine or on a local server. It’s great for development and testing.
Redis on the Cloud: If you're looking for a managed Redis service that takes care of scaling, backups, and availability, Redis on the cloud is the way to go.
Why Choose Redis Cloud?
With Redis Cloud, you can take advantage of high availability, built-in security, and automatic scaling. You don’t have to worry about maintaining Redis infrastructure, and it integrates seamlessly into cloud environments like AWS, GCP, and Azure. For production-grade applications that require high performance and minimal downtime, Redis Cloud is a game-changer.
Let’s Get Hands-On: Connecting to Redis Cloud
Getting started.
Before getting started with Redis Cloud, you'll need to create an account at Redis Cloud. If you already have an account, you can skip this step. Once you're signed up, follow these steps:
Choose Your Use Case: Select the specific use case for which you want to utilize Redis. In my case, I opted for caching.
Select a Subscription Type: Choose the subscription that fits your needs. Options vary based on size, uptime, connections, etc. I selected the freemium plan.
Name Your Database: Provide a unique name for your database.
Select Your Cloud Vendor: In this instance, I chose AWS.
Choose a Region: The default region is usually sufficient. Select “Redis Stack” as the database type, and then proceed to create your database.
After setting everything up, you will receive your public endpoint, password, and username. The port number can be found in the endpoint string, following the colon. For example, in redis-16674.c**.us-east-1-4.ec2.redns.redis-cloud.com:16674, the port is 16674.
Code Implementation
Now, let’s dive into the fun part — connecting Redis to our application hosted on Redis Cloud. We’ll walk through setting up Redis and integrating it into our Express.js application.
Setting up your redis environment variables
First, ensure that you’ve created a Redis Cloud instance. You’ll receive details like the host, port, and password, which we’ll use in our .env file. We have done that already in the previous section.
REDIS_HOST=********************.redns.redis-cloud.com
REDIS_PORT=1*****
REDIS_PASSWORD=yOcdXz***************JRJ5cBlJ
REDIS_USER=de****
VERIFICATION_LINK=http://localhost:3000/verify-email
This .env file contains all the configuration you need to connect your app to Redis on the cloud.
Installing package.
Install the redis package.
install redis
Building the Express Application.
- We’ll begin by creating a simple Express application. However you've structured your application is perfectly fine; what matters most is your understanding of the concepts and workflow. For the sake of modularity, I’ve organized my code into two files:
app.tsandindex.ts.
//app.ts
import express, { Application } from "express";
import errorHandler from "./middleware/error-handler";
import path from "path";
import router from "./routes";

const app: Application = express();
app.use(express.json());
app.use(express.urlencoded({ extended: false }));
app.use(express.static(path.join(__dirname, "../public")));
app.use(router);
app.use(errorHandler);

export default app;
//index.ts
import app from "./app";
import Configuration from "./config";
import dotenv from 'dotenv';
import { initializeRedis } from "../src/config/redis.config";

dotenv.config();

const port = process.env.PORT || 4600;

app.listen(Configuration.serverPort, async () => {
    console.log(`App is up and running on Configured port ${port}`);

    // Initialize Redis when the app starts
    await initializeRedis();
});
Explanation:
The code imports necessary modules, including the Express application (
app), configuration settings, and thedotenvlibrary for loading environment variables from a.envfile.It also imports the
initializeRedisfunction to set up a connection to the Redis database, which is often used for caching and session management.The
dotenv.config()line loads the environment variables intoprocess.env, allowing for secure management of sensitive information.A
portconstant is defined to determine the server's listening port, defaulting to4600if noPORTenvironment variable is set.The application server starts by invoking
app.listen(), using theserverPortfrom theConfigurationobject to specify the port.A log message confirms that the application is running, displaying the configured port number for easy monitoring.
The
initializeRedisfunction is called to establish a Redis connection when the application starts, ensuring it's ready for use when needed.
- Setting Up Redis Connection.
//redis.config.ts
import { createClient } from 'redis';
import Configuration from './index';

let redisClient: any;

export async function initializeRedis() {
  if (!redisClient) {
    const { redis_host, redis_port, redis_password, redis_user } = Configuration.redis_setup;

    const url = `redis://${redis_user}:${encodeURIComponent(redis_password)}@${redis_host}:${redis_port}`;
    redisClient = createClient({ url });

    redisClient.on('error', (err: any) => console.log('Redis Client Error', err));

    try {
      await redisClient.connect();
      console.log('Redis client connected successfully');
    } catch (err) {
      console.error('Failed to connect to Redis:', err);
    }
  }
  return redisClient;
}

export { redisClient };
Explanation:
The code imports the
createClientfunction from theredispackage, which is used to create a Redis client, and theConfigurationobject which contains Redis connection details, that has already been saved in environment variables.The
initializeRedisfunction is defined as an asynchronous function that sets up the Redis client if it hasn't been created yet.Inside the function, Redis connection details (host, port, password, and user) are extracted from the
Configuration.redis_setupobject.A connection URL is constructed in the format
redis://user:password@host:port, usingencodeURIComponentto ensure the password is safely included in the URL.The function attempts to connect to Redis using
redisClient.connect(). If the connection is successful, a success message is logged; if it fails, an error message is printed.Finally, the initialized
redisClientis returned for use elsewhere in the application.
The redisClient is also exported for use in other modules, allowing access to the Redis client instance throughout the application.
- Handling Signup with Email Verification.
In the auth.controller.ts, Redis is used to temporarily store user details during the signup process. An email is sent with a url to your inbox, If the email verification is successful, the data is saved in the database.
//auth.controller.ts
import { Request, Response, NextFunction } from 'express';
import { initializeRedis, redisClient } from '../../config/redis.config';
import { v4 } from "uuid";
import bcrypt from 'bcryptjs';
import Configuration from '../../config';
import User from '../user/user.model';

const { saltFactor, verification_link } = Configuration;

class AuthController {
  signuphandler = async (req: Request, res: Response, next: NextFunction) => {
    try {
      const { email, password, first_name } = req.body;

      const tempUserkey = `onboarding:user:${email}`;

      if (!redisClient.isReady) {
        await initializeRedis();
      }

      const [isUser, isTempUser ] = await Promise.all([User.findOne({ email }), redisClient.get(tempUserkey)]);

      if (isUser || isTempUser) {
        return res.status(400).json({ message: "User already exists." });
      }

      const salt = await bcrypt.genSalt(saltFactor);
      const hashedPassword = await bcrypt.hash(password, salt);

      req.body.password = hashedPassword;
      req.body.is_verified = true;

      const reference = v4();

      await redisClient.setEx(reference, 60 * 2, JSON.stringify(req.body));
      await redisClient.setEx(tempUserkey, 60 * 5, "1");

      const url = `${verification_link}?reference=${reference}`;
      // Send email with "url" to user (Implementation would be skipped for now);
      res.status(200).json({
        message: "Verification email sent.",
        data: {
          url
        }
      });
    } catch (error: any) {
      next(error);
    }
  };
}

export default AuthController;
Explanation:
The code imports necessary modules and types from Express, Redis, UUID, bcrypt, and the user model. These modules provide functionality for handling HTTP requests, connecting to Redis, generating unique IDs, and securely hashing passwords.
The
saltFactorandverification_linkconstants are extracted from theConfigurationobject, which likely contains application settings.A temporary user key is constructed for storing data in Redis, formatted as
onboarding:user:${email}.The Redis client is initialized if it is not ready, ensuring a connection to Redis before proceeding.
A parallel query is made to check if a user already exists in the database (
User.findOne({ email })) and to retrieve any existing temporary user data from Redis usingredisClient.get(tempUserkey).A unique reference ID is generated using
v4()from the UUID library, which will be used for the verification link.The user's data (with the hashed password) is stored in Redis with an expiration time of 5 minutes (
60 * 5), usingredisClient.setEx(reference, 60 * 5, JSON.stringify(req.body)). A temporary user key is also set with an expiration of 5 minutes (60 * 5), indicating that a temporary user exists.In the email verification process:
This function is designed to be part of the
AuthControllerclass; however, for clarity and better explanation, I have chosen to isolate it here. You are welcome to integrate it back into the class in your implementation.verifyEmail = async (req: Request, res: Response, next: NextFunction) => { try { const reference = req.query.reference as string; if (!reference) { return res.status(400).json({ message: "Invalid Reference" }); } const isReference = await redisClient.get(reference) as string; if (!isReference) { return res.status(400).json({ message: "Link has expired" }); } const userData = JSON.parse(isReference); const temporaryUserKey = `onboarding:user:${email}`; await User.save(userData); await redisClient.del(temporaryUserKey); await redisClient.del(reference); res.status(200).json({ message: "User email successfully verified and details saved", data: {}, status: true }); } catch (error: any) { next(error); } };Explanation:
The
referenceis extracted from the query parameters of the incoming request. It is cast to a string to ensure the correct data type.A check is performed to see if the
referenceis provided. If not, a 400 Bad Request response is returned with a message indicating "Invalid Reference."The method attempts to retrieve the stored data associated with the
referencekey from Redis usingredisClient.get(reference). The retrieved data is cast to a string for further processing.If no data is found for the
reference, a 400 Bad Request response is sent back with the message "Link has expired," indicating that the verification link is no longer valid.If the data is found, it is parsed from JSON format to retrieve the user's details, and a temporary user key is constructed using the user's email, formatted as
onboarding:user:${email}.The method then saves the user data to the database using
User.save(userData), effectively registering the user.After successfully saving the user data, the temporary user key and the
referencekey are deleted from Redis usingredisClient.del(temporaryUserKey)andredisClient.del(reference), respectively. This cleans up the temporary data now that the user is verified.A successful response is sent back with a status of 200, indicating that the user's email has been successfully verified and their details saved. The response includes a message confirming the successful verification, along with an empty data object and a status flag set to true.
In case of any errors during the process, the error is passed to the next middleware function using
next(error), allowing for centralized error handling.
The
auth.routes.tswould look like this
import { Router } from 'express'
import authController from './auth.controller'

const {
    signuphandler,
    verifyEmail
} = authController;


const authRouter = Router()

authRouter.post("/sign-up", signuphandler);
authRouter.post("/verify-email", verifyEmail);

export default authRouter;
The steps outlined above summarize how to implement Redis caching for user sign-ups with email verification. This approach allows you to initiate the user onboarding process without immediately persisting their data in your database. Instead, you can send a time-sensitive link containing a unique reference code for verification. This not only optimizes your database but also ensures that you only store verified user data, enhancing both efficiency and security.
Visualization with RedisInsight
Redis Insight is a powerful GUI tool designed for developers to visualize and manage their Redis data more effectively. It provides a user-friendly interface that simplifies tasks like monitoring, debugging, and optimizing Redis databases. With Redis Insight, you can explore your data structures (like lists, sets, and hashes), run commands, and analyze performance metrics—all in real time. It's especially useful for tracking key expiration, identifying slow queries, and gaining deeper insights into how your Redis cache is being used, making your development process more efficient and streamlined.
How to connect to redis Insight
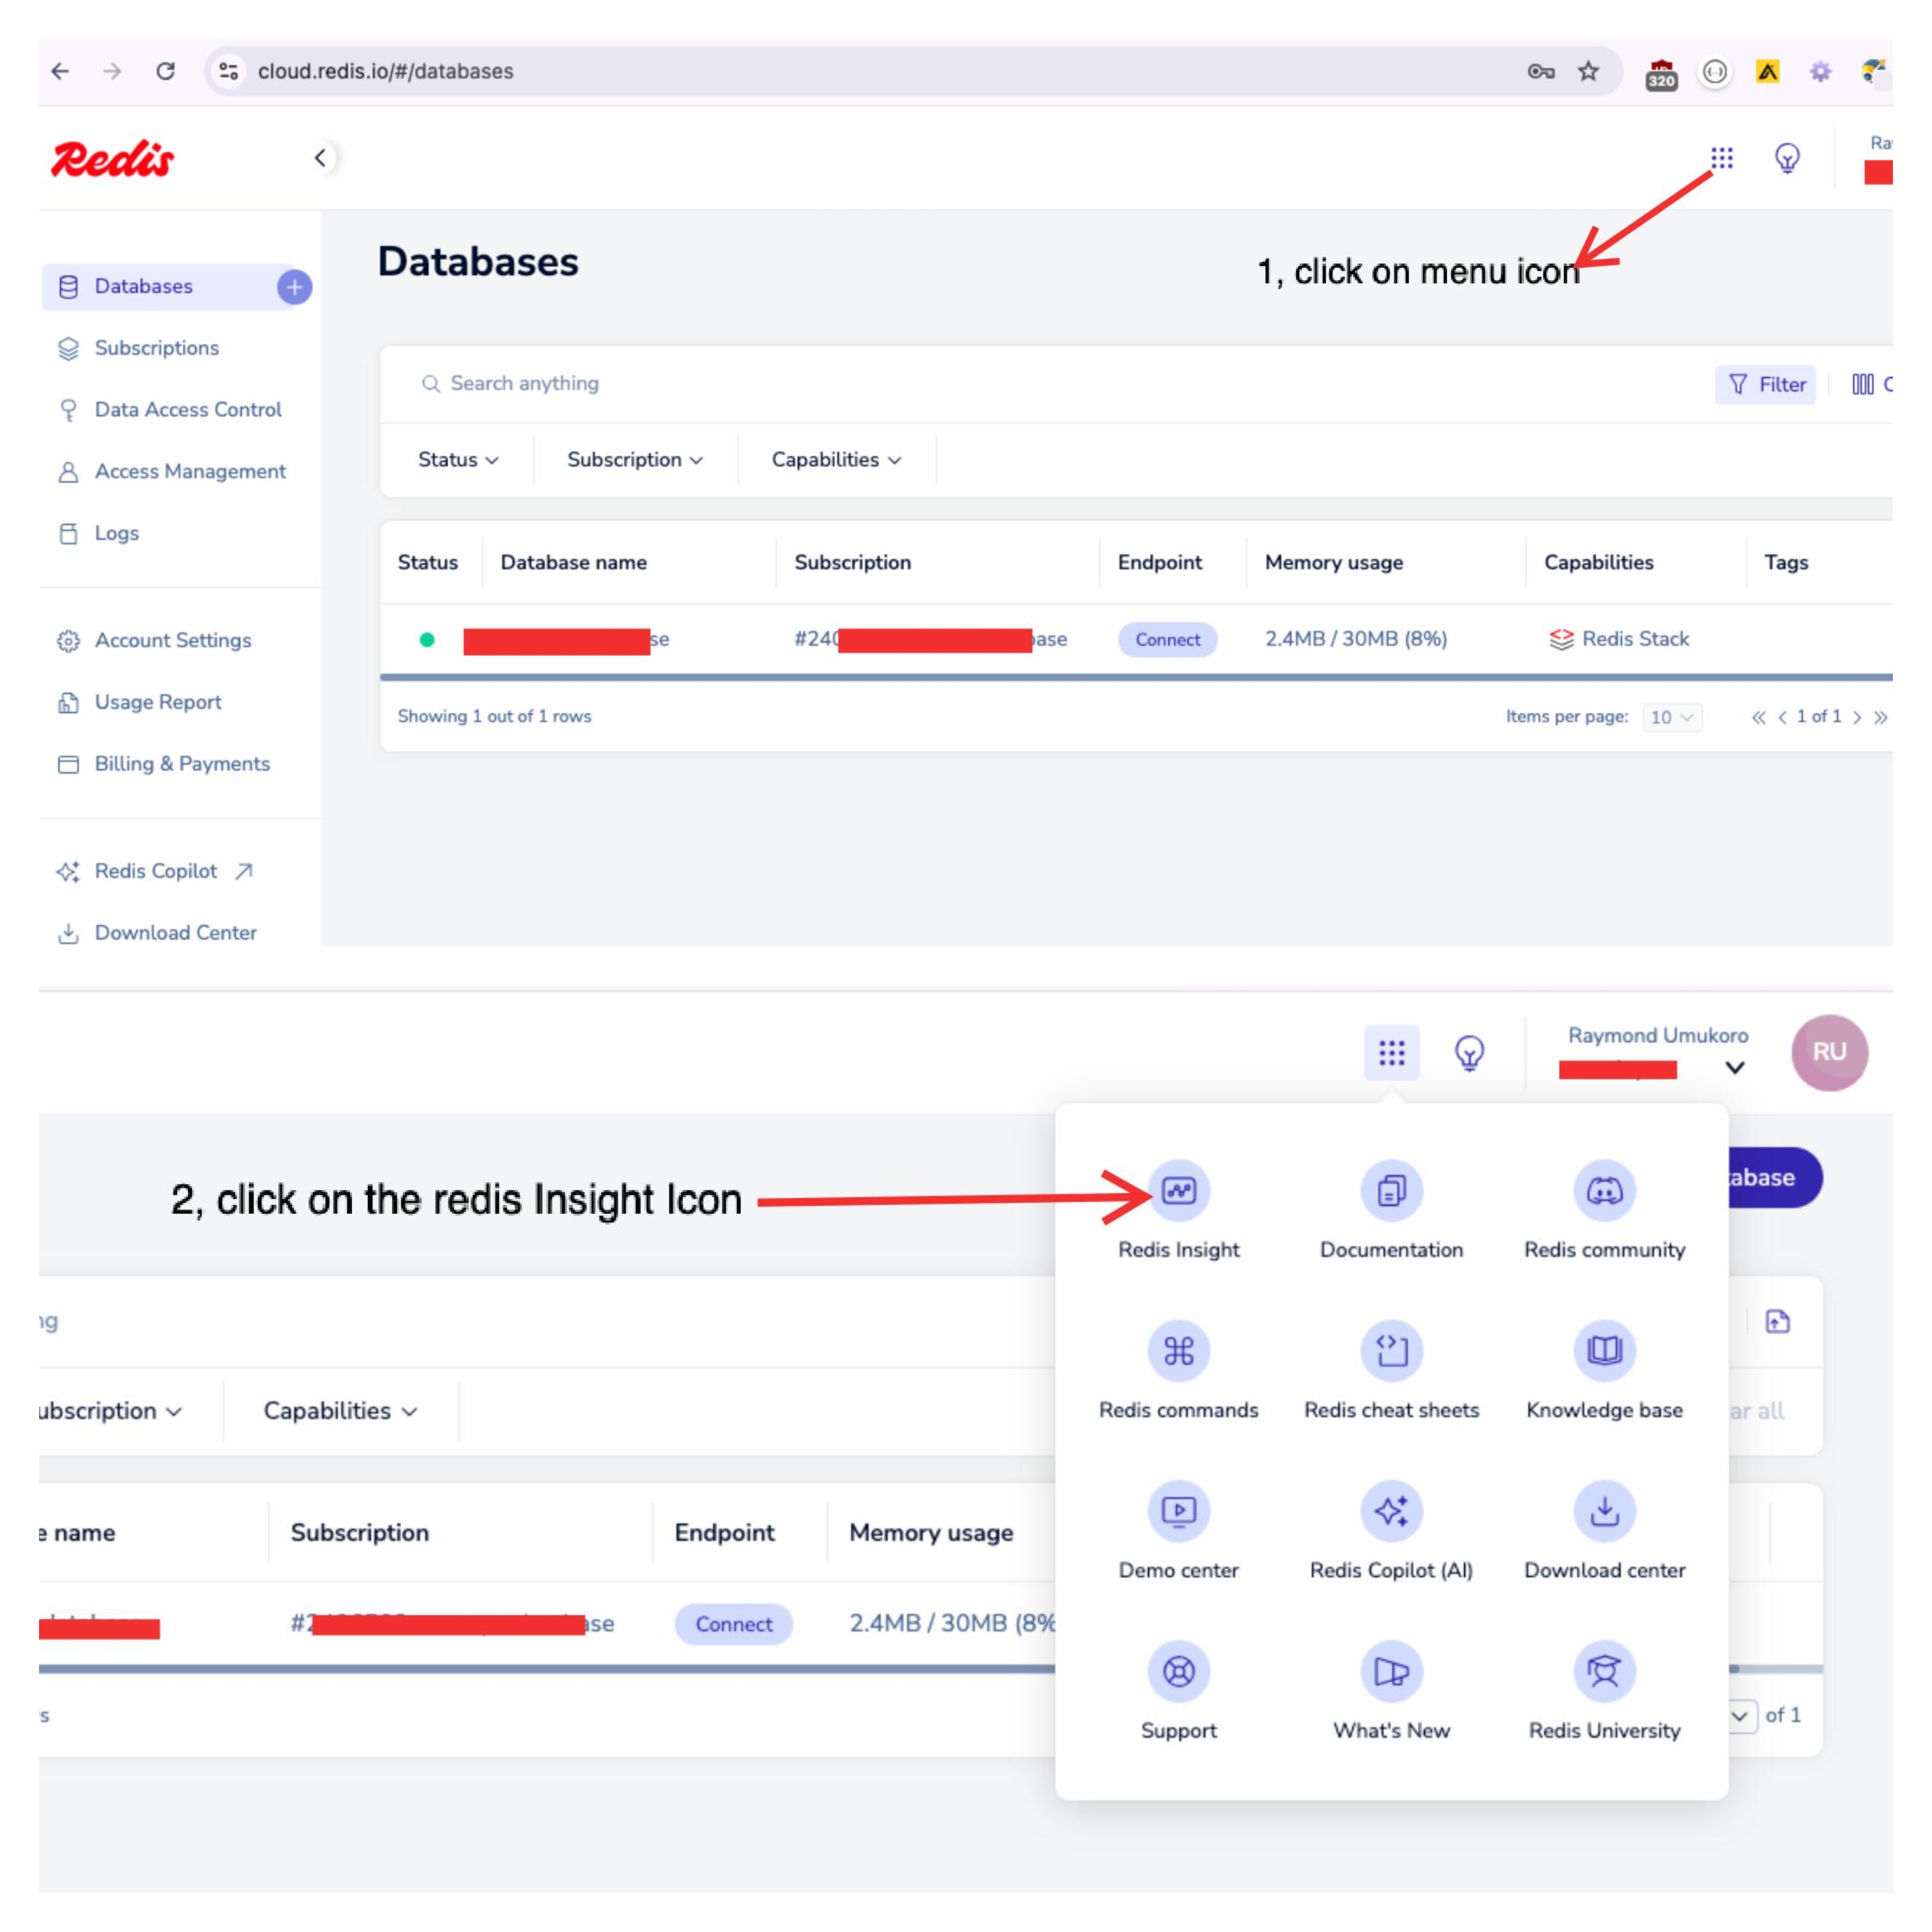
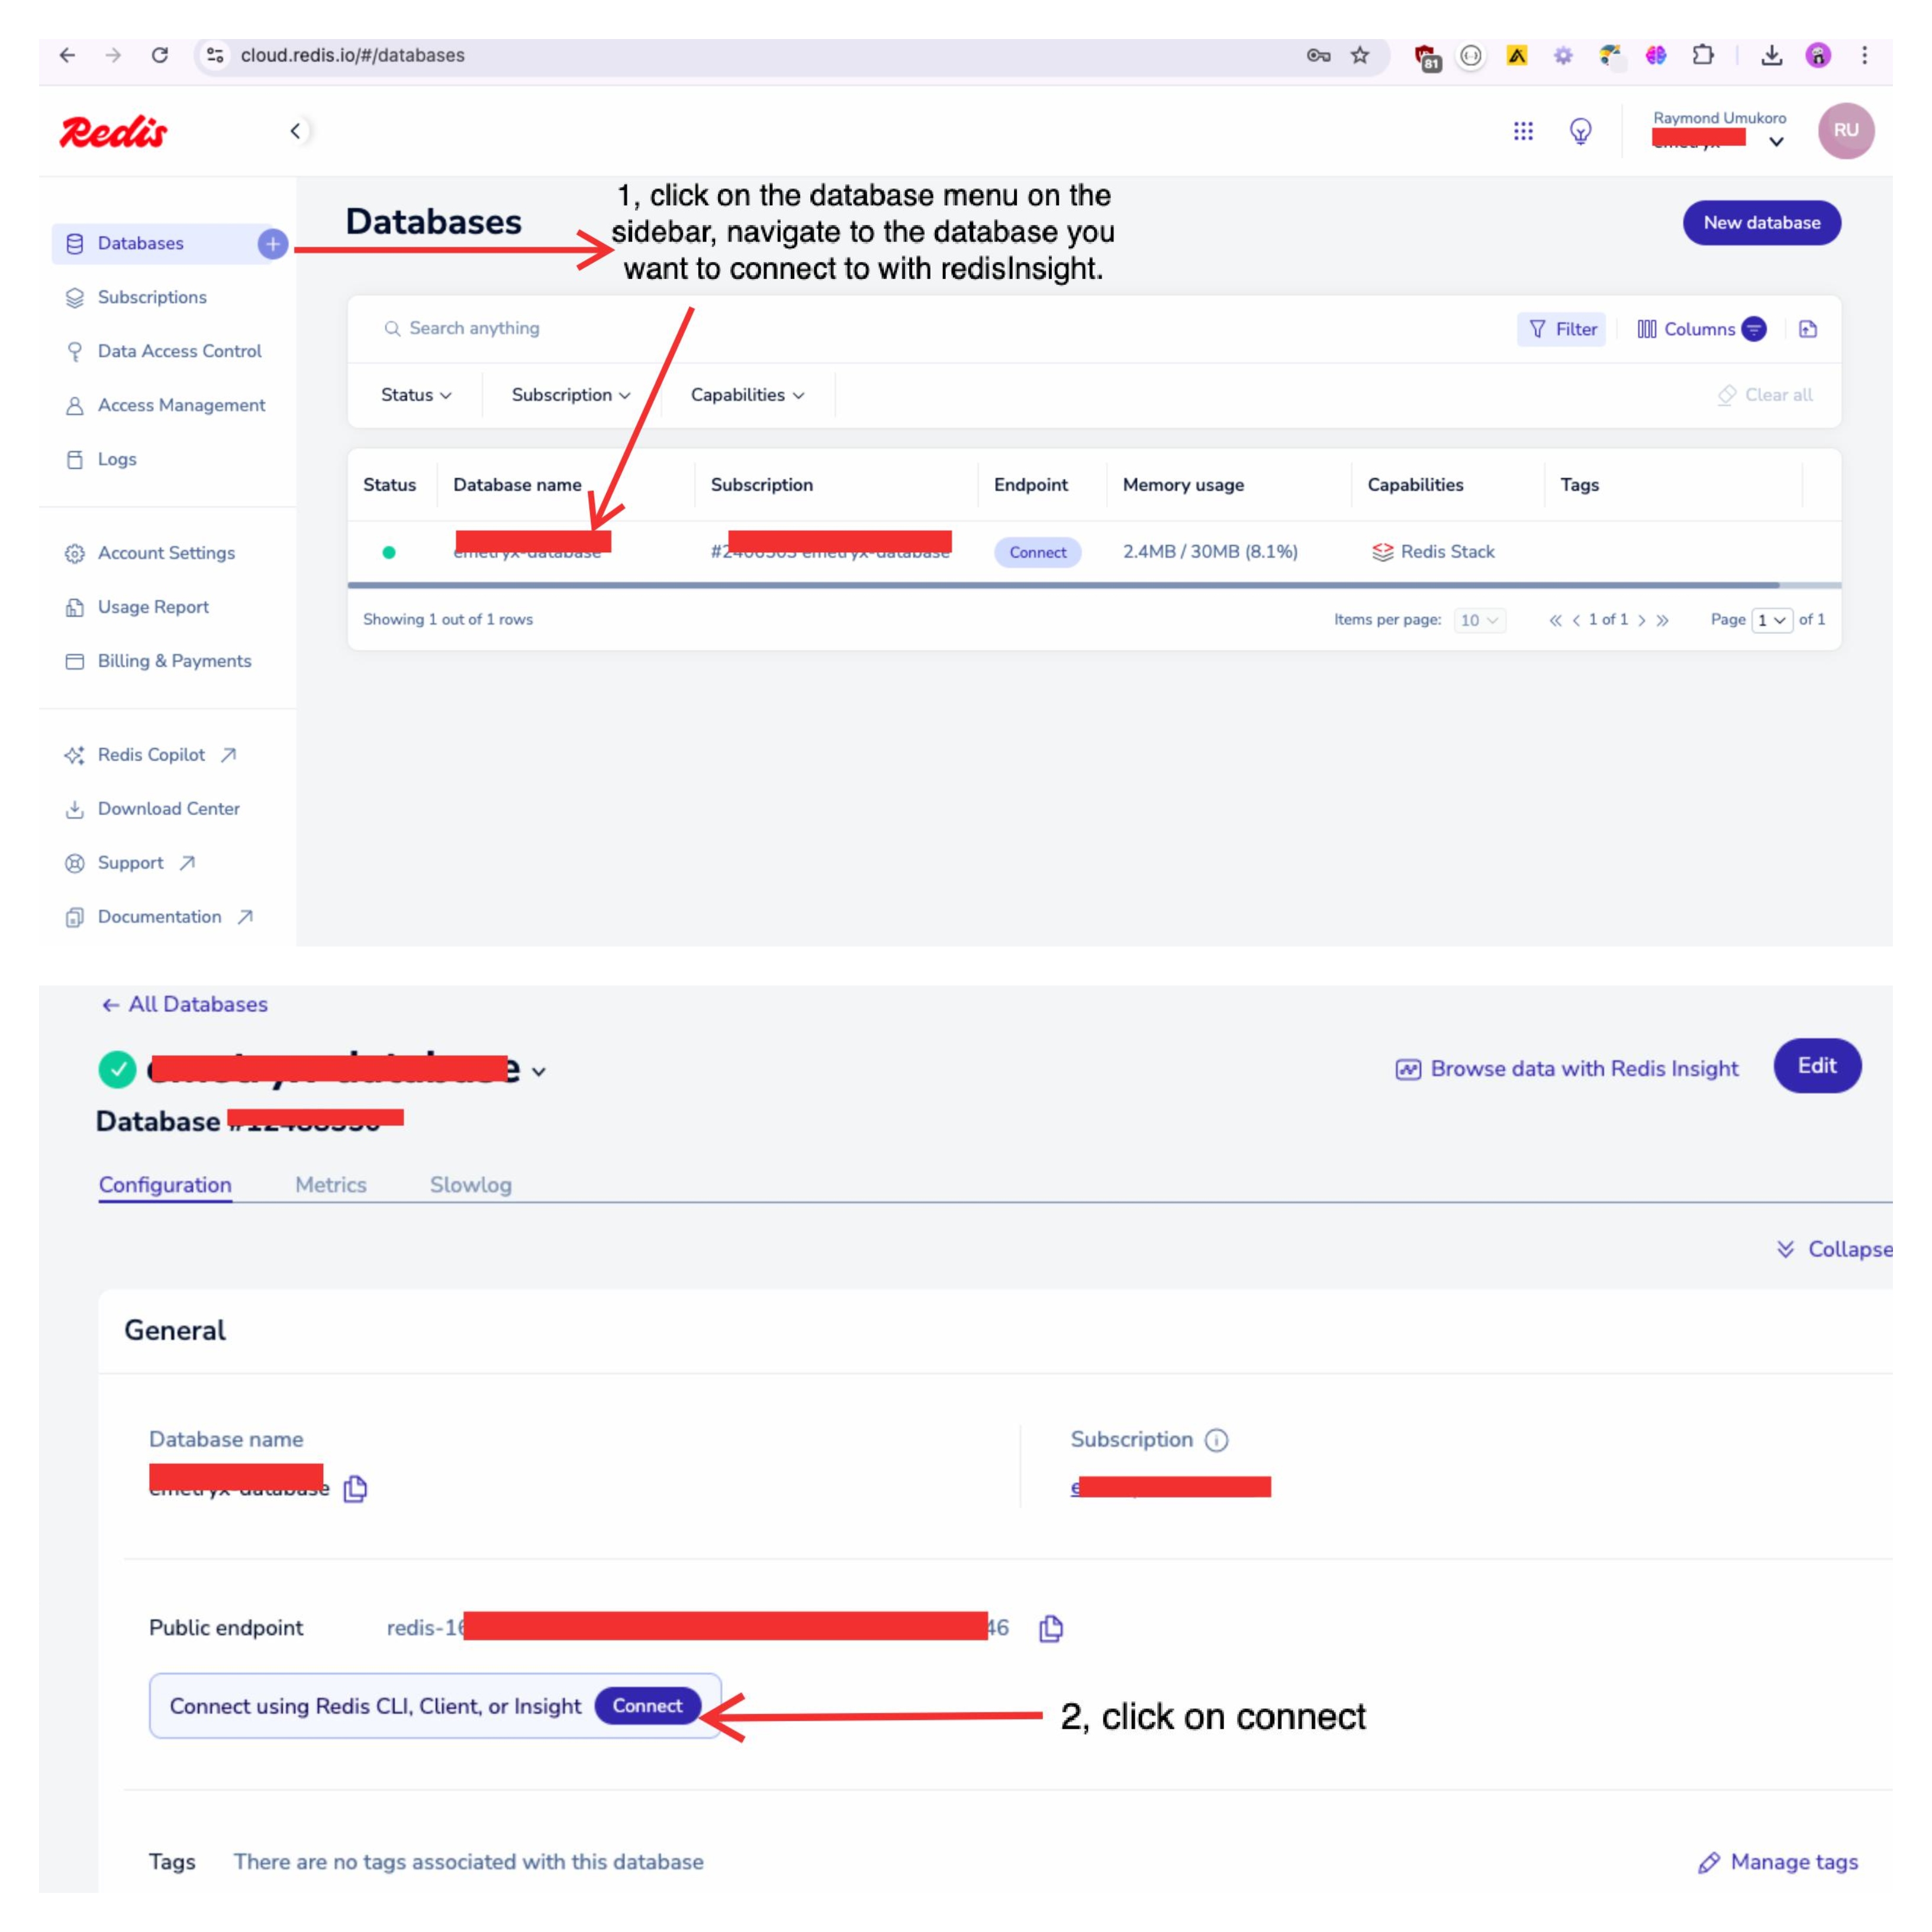
In the Redis console, you can easily access Redis Insight by either clicking on the menu in the top bar or navigating through the list of databases. Once you find the one you want to connect to, simply click the “Connect using Insight” button. If you already have Redis Insight installed, it will launch right away, connecting you to its sleek, visually appealing interface. If not, you’ll be prompted to download the tool and log in, making setup quick and straightforward.
- The image below demonstrates how to navigate to Redis Insight via the menu route.

The image below demonstrates how to navigate to Redis Insight via the database list route.

Redis Insight Overview
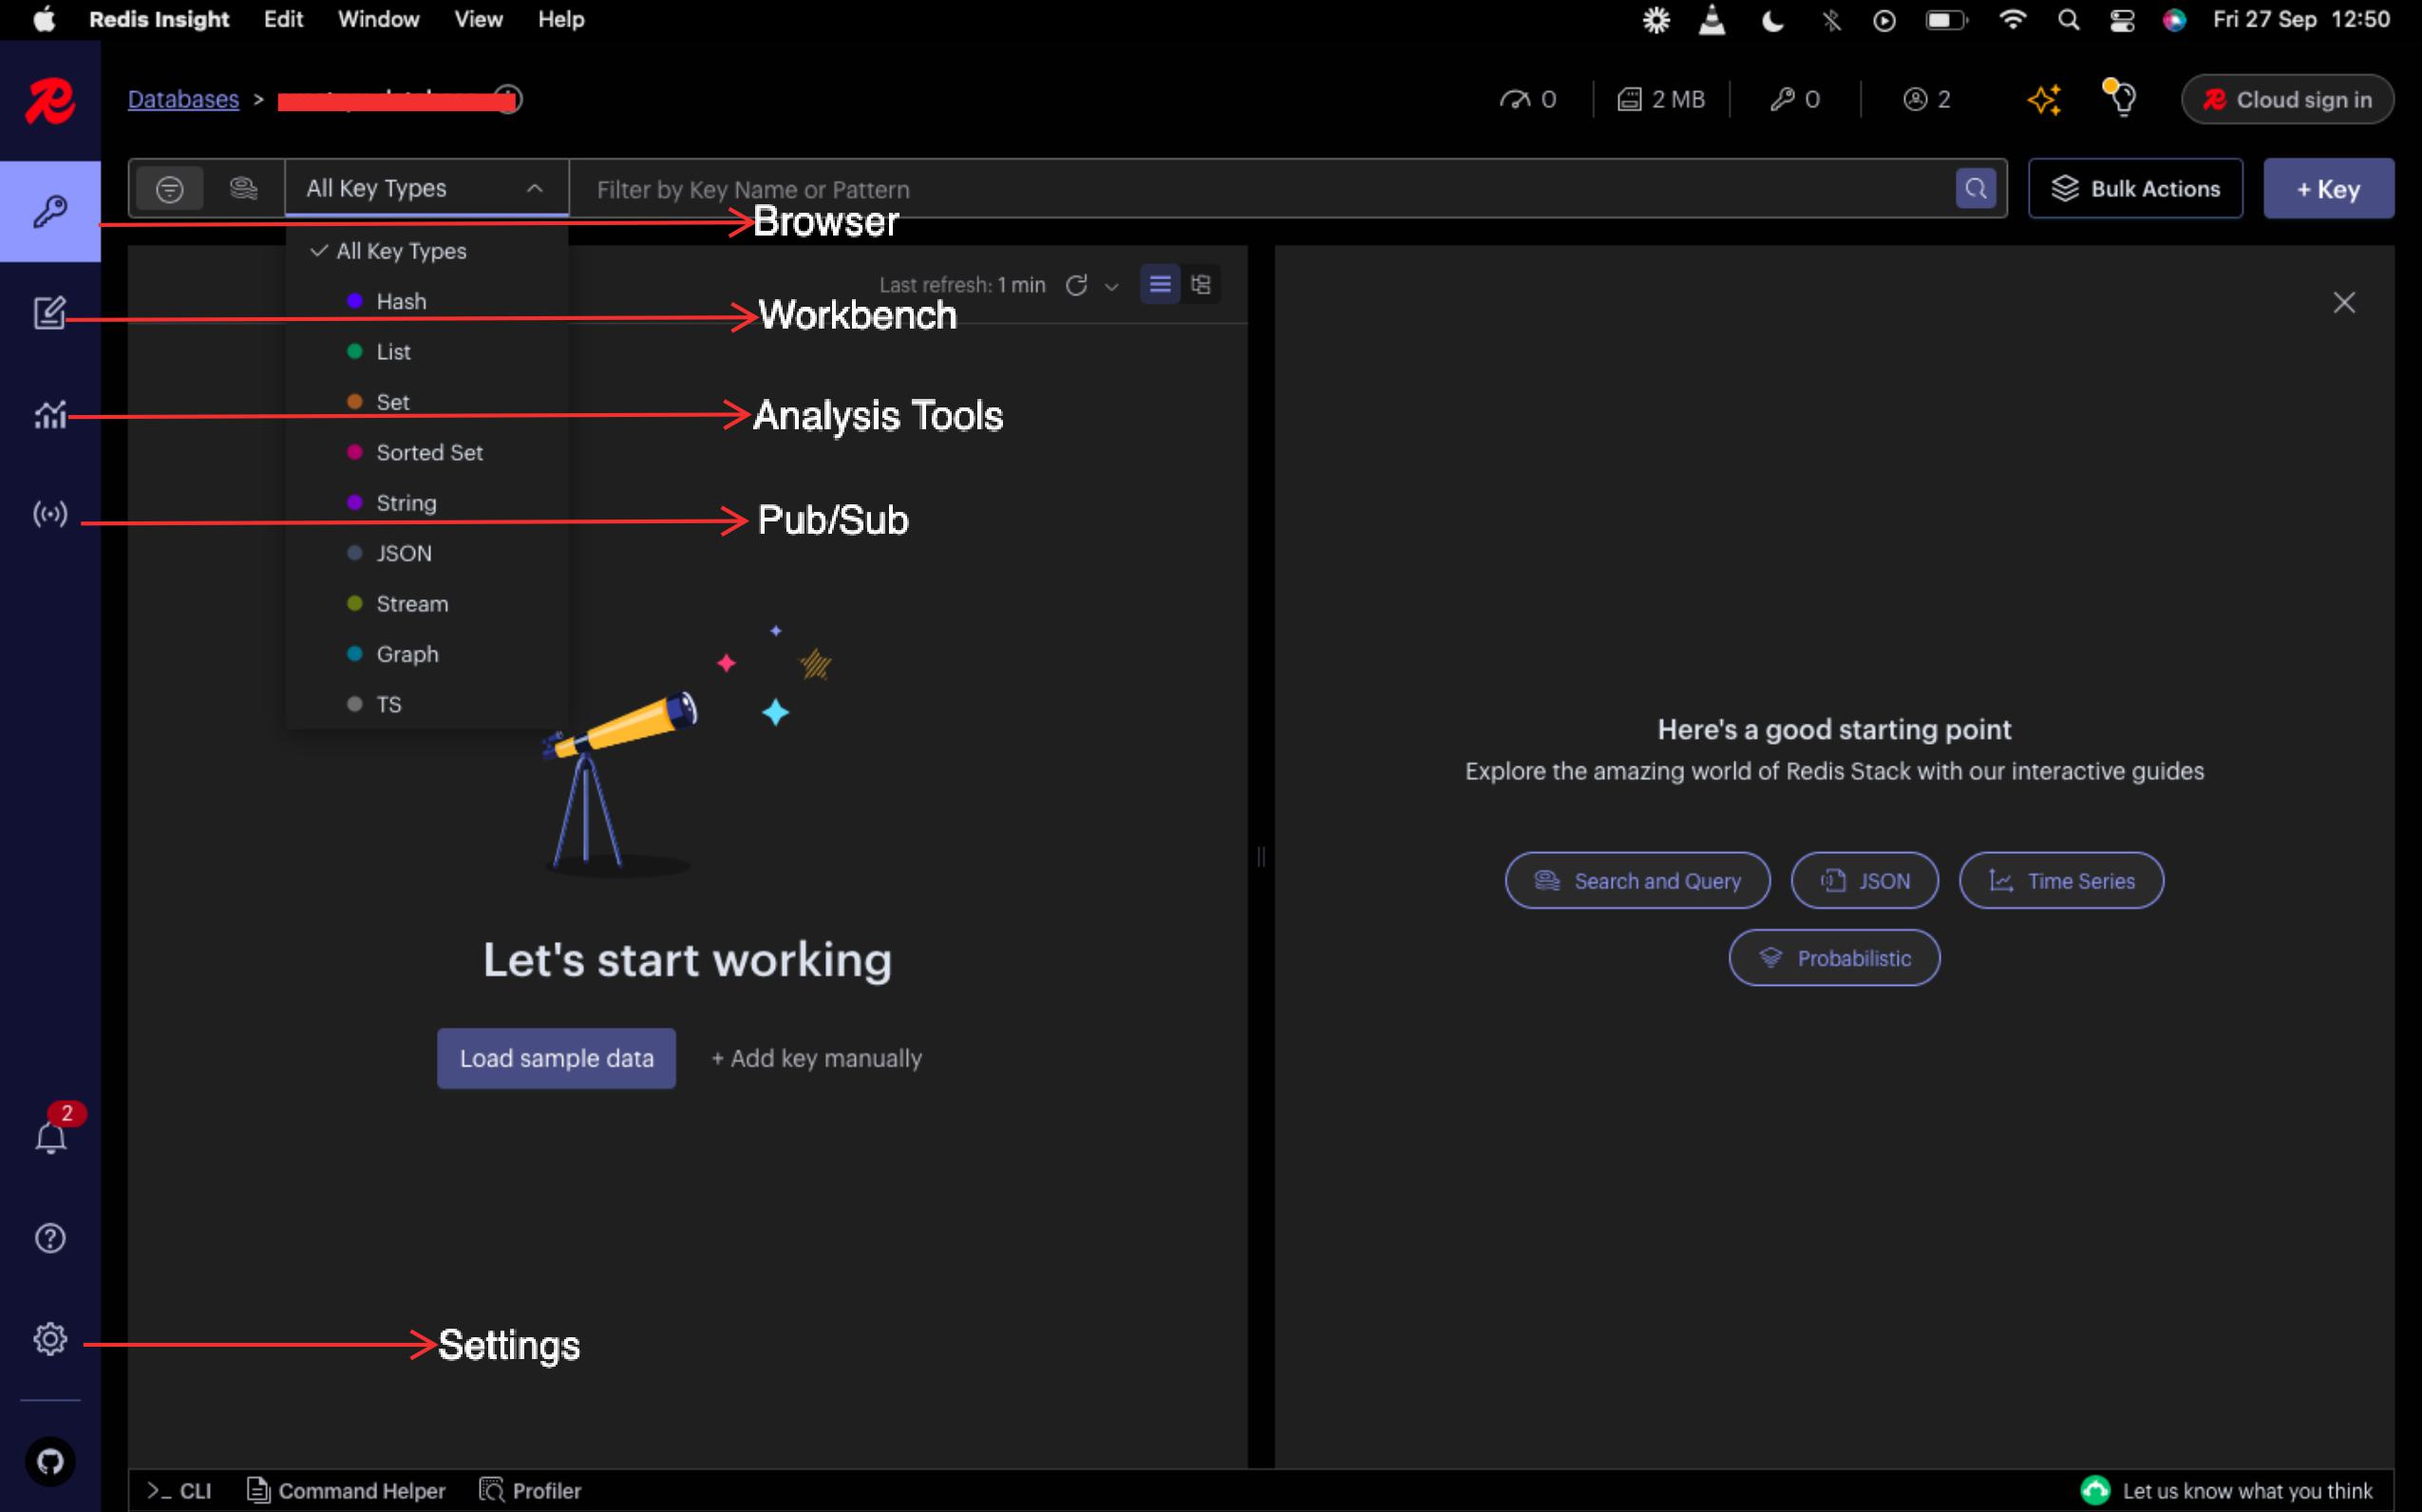
Redis Insight has several key sections designed to make managing your Redis databases smooth and intuitive:
Browser: This section lets you explore your data by navigating through keys, viewing data types like strings, lists, sets, and hashes, and even editing values directly.
Workbench: If you prefer the command line, Redis Insight provides a built-in CLI for running Redis commands, giving you the flexibility of the terminal within the GUI.
Analysis Tool: This section contains visualizations for both memory usage and slow logs. It allows you to monitor how your Redis instance is utilizing memory, helping you identify memory hotspots and optimize cache efficiency. Additionally, Redis Insight’s Slow Log feature provides detailed information about slow-running queries, making it easier to diagnose performance bottlenecks.
Pub/Sub: Subscribe to the Channel to see all the messages published to your database.
These sections help streamline your workflow, offering both high-level insights and granular control over your Redis instance.
- The image below shows the dashboard of Redis Insight.

The image above displays the RedisInsight dashboard. While we won't dive deep into its usage in this article, I can say it's quite intuitive and easy to navigate. I encourage you to explore it on your own—you'll find it pretty straightforward and useful! :)
Closing Remark
To wrap things up, Redis is a powerful tool that can significantly boost the performance of your application, whether you're using it for caching, real-time analytics, or session management. By integrating Redis Cloud, you not only simplify your setup but also scale effortlessly with the reliability of cloud infrastructure. Hopefully, this walkthrough has helped you get started on using Redis for user sign-up with email verification. Don’t forget, tools like Redis Insight provide valuable insights into what’s going on under the hood, so take advantage of it. Happy coding!
Additional Resources
Here are some great resources to support your Redis article:
Official Documentation:
Redis Official Documentation: Comprehensive guide to Redis commands, configurations, and advanced use cases.
RedisInsight: Tool to visualize and optimize your Redis data and performance with a user-friendly interface.
Tutorials and Guides:
Redis Getting Started Guide: A great way to get started with Redis basics, from installation to usage.
Redis Video tutorial: A great way to get started with Redis basics.
Subscribe to my newsletter
Read articles from Raymond Umukoro directly inside your inbox. Subscribe to the newsletter, and don't miss out.
Written by

Raymond Umukoro
Raymond Umukoro
Raymond is a dedicated full-stack web developer with 3+ years of experience crafting innovative web solutions. His core expertise lies in Node.js, PHP, JavaScript, TypeScript, and React, allowing him to build robust and scalable applications. Beyond coding, Raymond is passionate about writing, sharing his knowledge, and contributing to the developer community.