07 - Security in Kubernetes
 Rohit Pagote
Security Primitives
Secure Hosts
Let’s begin with the host that form the cluster itself.
All access to this hosts must be secured, route access disabled, password based authentication disabled and only SSH key based authentication to be made available.
Any other measures you need to take to secure your physical or virtual infrastructure that hosts Kubernetes.
Secure Kubernetes
The kube-apiserver is at the center of all operations within Kubernetes.
We interact with it through the kubectl utility or by accessing the API directly, and through that you can perform almost any operation on the cluster.
This is the first line of defense. Controlling access to the API server itself.
We need to make 2 type of decision:
Who can access the cluster? - Authentication
Files - Username and Passwords
Files - Username and Tokens
Certificates
External Authentication providers - LDAP
Service Accounts
What can they do? - Authorization
RBAC Authorization
ABAC Authorization
Node Authorization
Webhook Mode
All communication with the cluster between the various components such as the ETCD, Kube Scheduler, Kube Controller, etc. is secured using TLS encryption.
Communication between application within the cluster - by default, all pods can access all other pods within the cluster.
You can restrict the access between them using Network Policies.
Authentication
As we have seen already, the Kubernetes cluster consists of multiple nodes, physical or virtual, and various components that work together.
We have users like administrators that access the cluster to perform administrative tasks, the developers that access the cluster to test or deploy applications, we have end users who access the applications deployed on the cluster, and we have third party applications accessing the cluster for integration purposes.
So we talked about the different users that may be accessing the cluster. Security of end users, who access the applications deployed on the cluster is managed by the applications themselves, internally. So we will take them out of our discussion.
Our focus is on users' access to the Kubernetes cluster for administrative purposes. So we are left with two types of users, humans such as the administrators and developers, and robots such as other processes or services or applications that require access to the cluster.
Accounts
Kubernetes does not manage user accounts natively. It relies on an external source like a file with user details or certificates or a third party identity service, like LDAP to manage these users. And so you cannot create users in a Kubernetes cluster or view the list of users.
However, in case of service accounts, Kubernetes can manage them. You can create and manage service accounts using the Kubernetes API.
All user access is managed by the API server, whether you're accessing the cluster through kubectl tool or the API directly.
All of these requests go through the Kube API server. The Kube API server authenticates the request before processing it.
Auth Mechanisms
So how does the Kube API server authenticate? There are different authentication mechanisms that can be configured.
You can have a list of username and passwords in a static password file or usernames and tokens in a static token file or you can authenticate using certificates. And another option is to connect to third party authentication protocols like LDAP, Kerberos etcetera.
Auth Mechanisms - Basic (deprecated in 1.19)
Let's start with the simplest form of authentication. You can create a list of users and their passwords in a CSV file and use that as the source for user information.
The file has three columns, password, username, and user ID.
We then pass the file name as an option to the Kube API server.
—-basic-auth-file=user-details.csvIn the CSV file with the user details that we saw, we can optionally have a fourth column with the group details to assign users to specific groups.
Similarly, instead of a static password file, you can have a static token file.
Here instead of password, you specify a token. Pass the token file as an option, token auth file to the Kube API server.
—token-auth-file=token-details.csv
Note
This is not a recommended authentication mechanism.
Consider volume mount while providing the auth file in a kubeadm setup.
Setup Role Based Authorization for the new users.
TLS Certificates Basics (pre-req)
A certificate is used to guarantee trust between two parties during a transaction.
Ex: when a user tries to access a web server, TLS certificates ensures that the communication between the user and the server is encrypted and the server is who it says it is.
Symmetric Encryption: It is a secure way of encryption, but since it uses the same key to encrypt and decrypt the data, and since the key has to be exchanged between the sender and the receiver, there is a risk of a hacker gaining access to the key and decrypting the data,
Asymmetric Encryption: Instead of using a single key to encrypt and decrypt data, asymmetric encryption uses a pair of keys, a Private Key and a Public Key.
Create Public and Private key using ssh
ssh-keygenid_rsa id_rsa.pub
id_rsa: is a private key and id_rsa.pub: is a public key
the public key is usually resides in ~/.ssh/authorized_keys
Create Private and Public key using openssl
openssl genrsa -out mykey.key 1024mykey.key
openssl rsa -in mykey.key -pubout > my-key.pemmykey.key my-key.pem
With asymmetric encryption, we have successfully transferred the symmetric keys from the user to the server, and with symmetric encryption, we have secured all future communication between them.
Certificates:
A certificate is like an actual certificate but in a digital format.
It includes information about who the certificate is issued to, the public key of that server, the location of that server, etc.
You can get the output of a digital certificate using openssl command.
Every certificate has a name on it, the person or subject to whom the certificate is issued to, alternative names/domains, etc.
The most important part of the certificate is the signature.
If you generate a certificate then you’ll have to sign it by yourself (self-signed certificate).
Certificate Authority (CA) are well known organizations that can sign and validate your certificates for you (Symantec, DigiCert, Comodo, GlobalSign, etc.).
The way it works is: you generate a certificate signing request or CSR using the key you generated earlier and the domain name of your website.
openssl req -new -key my-key.key -out my-key.csr -subj "/C=US/ST=CA/O=MyOrg, Inc./CN=mydomain.com"This generates a my-key.csr file, which is the certificate signing request that should be sent to the CA for signing.
The CA verify your details and once it checks out, they sign the certificate and send it back to you.
You now have a certificate signed by a CA that the browsers trust.
The CAs use different techniques to make sure that you are the actual owner of the mentioned domain.
The whole infrastructure, including the CA, the servers, the people, and the process of generating, distributing and maintaining digital certificates is known as Public Key Infrastructure (PKI).
We have 3 types of certificates:
Server Certificates: configured on the servers
Root Certificates: configured on the CA servers
Client Certificates: configured on the clients
Note
The public key and private key are two related or paired keys.
You can encrypt the data with any one of them and only decrypt data with the other.
You cannot encrypt data with one and decrypt with the same.
If you encrypt your data with your private key, then remember anyone with your public key, will be able to decrypt and read your messages.
Usually certificates with public key are named .crt or .pem extension, so that’s server.crt or server.pem for server certificates and client.crt or client.pem for client certificates.
And private keys are usually with extension with .key or -key.pem. Ex: server.key or server-key.pem
So just remember, private keys have the word key in them usually, either as an extension or in the name of the certificate.
TLS in Kubernetes
A Kubernetes cluster consists of a set of master and worker nodes.
All communication between these nodes, need to be secured and must be encrypted. All interactions between all services and their clients need to be secure.
Below are the 3 server components in the Kubernetes cluster.
Kube-API Server:
As we know already, the API server exposes an HTTPS service that other components, as well as external users, use to manage the Kubernetes cluster.
So it is a server and it requires certificates to secure all communication with its clients.
So we generate a certificate and key pair. We call it apiserver.cert and apiserver.key.
ETCD Server:
The ETCD server stores all information about the cluster.
So it requires a pair of certificate and key for itself. We will call it etcdserver.crt and etcdserver.key.
Kubelet Server:
They also expose an HTTPS API endpoint that the kube-apiserver talks to
to interact with the worker nodes.
Again, that requires a certificate and key pair. We call it kubelet.cert and kubelet.key.
Below are the 7 client components in the Kubernetes cluster.
Admin:
Who are the clients who access these services?
The clients who access the kube-apiserver are us, the administrators through kubectl rest API.
The admin user requires a certificate and key pair to authenticate to the kube-API server. We will call it admin.crt, and admin.key.
Kube-Scheduler:
The scheduler talks to the kube-apiserver to look for pods that require scheduling and then get the API server to schedule the pods on the right worker nodes.
The scheduler is a client that accesses the kube-apiserver. As far as the kube-apiserver is concerned, the scheduler is just another client, like the admin user.
So the scheduler needs to validate its identity using a client TLS certificate.
So it needs its own pair of certificate and keys. We will call it scheduler.cert and scheduler.key.
Kube-Controller Manager:
The Kube Controller Manager is another client that accesses the kube-apiserver, so it also requires a certificate for authentication to the kube-apiserver.
So we create a certificate pair for it.We will call it controller-manager.cert and controller-manager.key.
Kube-Proxy
The kube-proxy requires a client certificate to authenticate to the kube-apiserver, and so it requires its own pair of certificate and keys.
We will call them kubeproxy.crt, and kubeproxy.key.
Kube-API Server
The servers communicate amongst them as well.
For example, the kube-apiserver communicates with the etcd server. In fact, of all the components, the kube-apiserver is the only server that talks to the etcd server.
So as far as the etcd server is concerned, the kube-apiserver is a client, so it needs to authenticate.
The kube-apiserver can use the same keys that it used earlier for serving its own API service. The apiserver.crt, and the apiserver.key files.
Or, you can generate a new pair of certificates specifically for the kube-apiserver to authenticate to the etcd server. apiserver-etcd-client.crt and apiserver-etcd-client.key.
The kube-apiserver also talks to the kubelet server on each of the individual nodes. That's how it monitors the worker nodes for this.
Again, it can use the original certificates, or generate new ones specifically for this purpose. apiserver-kubelet-client.crt and apiserver-kubelet-client.key.
View the classification of certificates in mobile phone.
TLS - Generate Certificates
To generate certificates, there are different tools available such as Easy-RSA,
OpenSSL, or CFSSL, et cetera, or many others.
CA Certificate:
We will start with the CA certificates.
First we create a private key using the OpenSSL command:
openssl genrsa -out ca.key 2048Then we use the OpenSSL Request command along with the key we just created to generate a certificate signing request.
openssl req -new -key ca.key -subj "/CN=Kubernetes-CA" -out ca.csrThe certificate signing request is like a certificate with all of your details, but with no signature.
In the certificate signing request we specify the name of the component the certificate is for in the Common Name, or CN field. In this case, since we are creating a certificate for the Kubernetes CA, we name it Kubernetes dash CA.
Finally, we sign the certificate using the OpenSSL x509 command, and by specifying the certificate signing request we generated in the previous command.
openssl x509 -req -in ca.csr -signkey ca.key -out ca.crtSince this is for the CA itself it is self-signed by the CA using its own private key that it generated in the first step.
Going forward for all other certificates we will use the CA key pair to sign them.
The CA now has its private key and route certificate file.
Client Certificates:
Admin:
We follow the same process where we create a private key for the admin user using the OpenSSL command.
openssl genrsa -out admin.key 2048We then generate a CSR and that is where we specify the name of the admin user, which is kube-admin.
openssl req -new -key admin.key -subj "/CN=kube-admin/O=system:masters" -out admin.csrA quick note about the name, it doesn't really have to be kube-admin. It could be anything, but remember, this is the name that Kube-Control client authenticates with when you run the kubectl command. So in the audit logs and elsewhere, this is the name that you will see. So provide a relevant name in this field.
Finally, generate a signed certificate using the OpenSSL x509 command. But this time you specify the CA certificate and the CA key. You're signing your certificate with the CA key pair. That makes this a valid certificate within your cluster.
The signed certificate is then output to admin.crt file.
That is the certificate that the admin user will use to authenticate to Kubernetes cluster.
If you look at it, this whole process of generating a key and a certificate pair
is similar to creating a user account for a new user. The certificate is the validated User ID and the key is like the password. It's just that it's much more secure than a simple username and password.
So this is for the admin user. How do you differentiate this user from any other users?
The user account needs to be identified as an admin user and not just another basic user.
You do that by adding the group details for the user in the certificate.
In this case, a group named System Masters exists on Kubernetes with administrative privileges.
We will discuss about groups later, but for now it's important to note that you must mention this information in your certificate signing request.
You can do this by adding group details with the O parameter
while generating a certificate signing request.
Once it's signed, we now have our certificate for the admin user with admin privileges.
We follow the same process to generate client certificates for all other components that access the Kube API server.
Kube-Scheduler / Kube-Controller Manager / Kube-Proxy:
The kube-scheduler is a system component, part of the Kubernetes control pane, so its name must be prefixed with the keyword system.
The same with kube-controller-manager. It is again a system component so its name must be prefixed with the keyword system.
And finally, kube-proxy also.
Note:
Now, what do you do with these certificates?
Take the admin certificate, for instance, to manage the cluster.
You can use this certificate instead of a username and password in a REST API call you make to the Kube API server.
You specify the key, the certificate, and the CA certificate as options.
curl https://kube-apiserver:6443/api/v1/pods --key admin.key --cert admin.crt --cacert ca.crtThe other way is to move all of these parameters into a configuration file called kubeconfig.
Within that, specify the API server endpoint details, the certificates to use, et cetera. That is what most of the Kubernetes clients use.
apiVersion: v1
clusters:
-cluster:
certificate-authority: ca.crt
server: https://kube-apiserver:6443
name: kubernetes
kind: Config
users:
-name: kubernetes-admin
user:
client-certificate: admin.crt
client-key: admin.key
Note:
In the prerequisite lecture we mentioned that for clients to validate the certificates sent by the server and vice versa, they all need a copy of the certificate authorities public certificate.
The one that we said is already installed within the user's browsers in case of a web application.
Similarly in Kubernetes for these various components to verify each other, they all need a copy of the CA's root certificate.
So whenever you configure a server or a client with certificates, you will need to specify the CA root certificate as well.
Server Certificates:
ETCD Server:
We follow the same procedure as before to generate a certificate for ETCD. We will name it ETCD-server.
ETCD server can be deployed as a cluster across multiple servers as in a high availability environment.
In that case, to secure communication between the different members in the cluster, we must generate additional peer certificates.
Once the certificates are generated specify them while starting the ETCD server.
There are key and cert file options where you specify the ETCD server keys. There are other options available for specifying the peer certificates.
And finally, as we discussed earlier, it requires the CA root certificate to verify that the clients connecting to the ETCD server are valid.
Kube API Server:
We generate a certificate for the API server like before. But wait, the API server is the most popular of all components within the cluster.
Everyone talks to the Kube API server. Every operation goes through the Kube API server. Anything moves within the cluster, the API server knows about it. You need information, you talk to the API server.
And so it goes by many names and aliases within the cluster.
It's real name is Kube-API server but some call it kubernetes because for a lot of people who don't really know what goes under the hoods of Kubernetes, the Kube API server is Kubernetes.
Others like to call it kubernetes.default. Some refer to it as kubernetes.default.svc and some like to call it by its full name
kubernetes.default.svc.cluster.local.
Finally, it is also referred to in some places simply by its IP address. The IP address of the host running the Kube API server or the pod running it.
So all of these names must be present in the certificate generated for the Kube API server. Only then those referring to the Kube API server by these names will be able to establish a valid connection.
So we use the same set of commands as earlier to generate a key.
openssl genrsa -out apiserver.key 2048But how do you specify all the alternate names? For that, you must create an OpenSSL config file.
Create an openssl.cnf file and specify the alternate names in the alt_name section of the file. Include all the DNS names the API server goes by as well as the IP address.
Pass this config file as an option while generating the certificate signing request.
openssl req -new -key apiserver.key -subj "/CN=kube-apiserver" -out apiserver. csr -config openssl.cnfFinally, sign the certificate using the CA certificate key.
openssl x509 -req -in apiserver.csr -CA ca.crt -CAkey ca.key -out apiserver.crtYou then have the Kube API server certificate.
Kubelet Server:
The kubelets server is an HTTPS API server that runs on each node, responsible for managing the node.
That's who the API server talks to to monitor the node as well as send information regarding what pods to schedule on this node.
As such, you need a key certificate pair for each node in the cluster.
Now, what do you name these certificates? Are they all going to be named kubelets? No. They will be named after their nodes. Node zero one, node zero two, and node zero three.
Once the certificates are created, use them in the kubelet config file.
As always, you specify the root CS certificate and then provide the kubelet node certificates. You must do this for each node in the cluster.
We also talked about a set of client certificates that will be used by the kubelet to communicate with the Kube API server. These are used by the kubelet to authenticate into the Kube API server. They need to be generated as well.
The API server needs to know which node is authenticating and give it the right set of permissions so it requires the nodes to have the right names in the right formats.
Since the nodes are system components like the kube-scheduler and the controller-manager we talked about earlier, the format starts with the system keyword, followed by node, and then the node name. In this case, node zero one to node zero three.
And how would the API server give it the right set
of permissions? Remember we specified a group name for the admin user
so the admin user gets administrative privileges? Similarly, the nodes must be added to a group named System Nodes.
Once the certificates are generated, they go into the kubeconfig files as we discussed earlier.
TLS - Certificates API
What have we done so far? As an administrator of the cluster, in the process of setting up the whole cluster, have set up a CA server and a bunch of certificates for various components.
We then started the services using the right certificates and is all up and working.
As a only administrator and the user of the cluster, I have my own admin certificate and key.
When a new admin comes into our team, we will need to get her a pair of certificate and key-pair for her to access the cluster.
She creates her own private key, generates a certificate signing request (CSR), and sends it to me.
Since I’m the only admin, I then take the CSR to my CA server, gets it signed by the CA server using the CA server’s private key and root certificate, thereby generating a certificate and then sends the certificate back to her.
She now has her own valid pair of certificate and key that she can use to access the cluster.
The certificate have a validity period. It ends after a period of time.
Every time it expires, we follow the same process of generating a new CSR and getting it signed by the CA, so we keep rotating the certificate files.
Now the question is what is the CA server and where it is located in Kubernetes setup?
The CA is really just a pair of key and certificate files we have generated. Whoever gains access to these pair of files can sign any certificate for the Kubernetes environment.
They can create as many users as they want with whatever privileges they want.
So these files need to be protected and stored in a safe environment. Say we save them on a server that is fully secure. Now that server becomes the CA server.
The certificate key file is stored safely in that server and only on that server.
Every time you want to sign a certificate, you can only do it by logging into that server.
For this course, we have certificates placed on the Kubernetes master node itself. So the master is also the CA server.
The kubeadm follow the same, it creates a CA pair of files and stores them on the master node itself.
So far, we have been signing requests manually, but as and when the users increase and team grows, we’ll need a better automated way to manage the CSR, as well as to rotate certificates when they expire.
Certificates API
Kubernetes has a built-in certificates API that can do this for us.
With the certificates API, you now send a CSR directly to Kubernetes through an API call.
This time when the administrator receives a CSR, instead of logging onto the master node and singing the certificate by himself, he creates a Kubernetes API object called CertificateSigningRequest.
Once the object is created, all the signing requests can be seen by administrators of the cluster.
The request can be reviewed and approved easily using kubectl commands.
This certificates can then be extracted and shared with the user.
Process
A user first creates a key
openssl genrsa -out rohit.key 2048Then generated a certificate signing request (CSR) and sends the request to the administrator
openssl req -new -key rohit.key -subj "/CN=rohit" -out rohit.csrThe administrator then takes the key and creates a CertificateSigningRequest object.
The CertificateSigningRequest is created like any other Kubernetes object, using a manifest file with the usual fields.
Once the object is created, all CSR can be seen by administrators by running
kubectl get csrcommand.Identify the new request and approve the request by running the
kubectl certificate approvecommand (kubectl certificate denyto deny the request).Kubernetes signs the certificate using the CA key-pairs and generates a certificate for the user.
This certificate can then be extracted and shared with the user.
View the certificate by viewing it in a YAML format:
kubectl get csr rohit -o yamlAll the certificate related operations are carried out by the controller manager.
It contains a controllers with named CSR-approving, CSR-signing, etc. They are responsible to carry out these specific tasks.
KubeConfig
So far, we have seen how to generate a certificate for a user.
You've seen how a client uses the certificate file and key to query the Kubernetes REST API for a list of pods using cURL.
curl https://my-kube-playground:6443/api/v1/pods --key admin.key --cert admin.crt --cacert ca.crtIn this case, the cluster is called my kube playground, so send a cURL request to the address of the kube-apiserver while passing in the bearer files, along with the CA certificate as options.
This is then validated by the API server to authenticate the user.
Now, how do you do that while using the kubectl command? You can specify the same information using the options server, client key, client certificate, and certificate authority with the kubectl utility.
kubectl get pods --server my-kube-playground:6443 --client-key admin.key --client-certificate admin.crt --certificate-authority ca.crtObviously, typing those in every time is a tedious task, so you move this information to a configuration file called as kubeconfig. And then specify this file
as the kubeconfig option in your command.
By default, the kubectl tool looks for a file named config under a directory.kube under the user's home directory. So if you put the kubeconfig file there, you don't have to specify the path to the file explicitly in the kubectl command.
Kubeconfig file format
The config file has three sections:
clusters
Clusters are the various Kubernetes clusters that you need access to.
Say you have multiple clusters for development environment or testing environment or prod or for different organizations or on different cloud providers, etc. All those go there.
users
Users are the user accounts with which you have access to these clusters.
For example, the admin user, a dev user, a prod user, et cetera.
These users may have different privileges on different clusters.
contexts
Finally, contexts marry these together.
Contexts define which user account will be used to access which cluster.
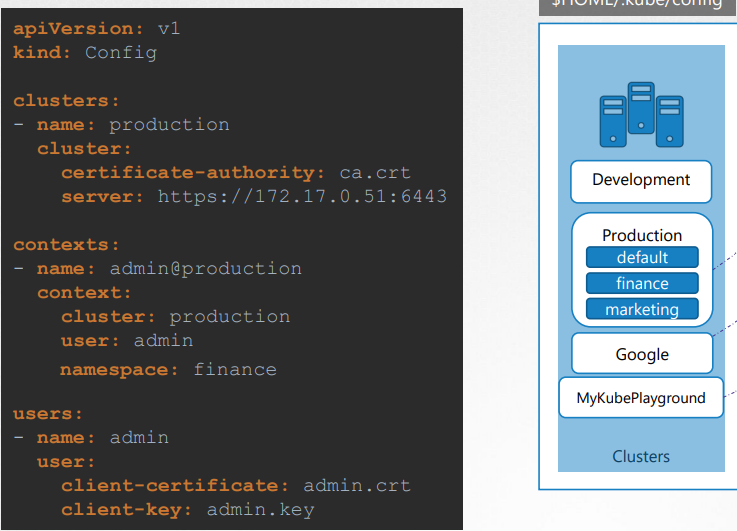
For example, you could create a context named admin@production that will use the admin account to access a production cluster. Or I may want to access the cluster I have set up on Google with the dev user's credentials to test deploying the application I built.
Remember, you're not creating any new users or configuring any kind of user access or authorization in the cluster with this process.
You're using existing users with their existing privileges and defining what user you're going to use to access what cluster.
That way you don't have to specify the user certificates and server address in each and every kubectl command you run.
KubeConfig file
Once the file is ready, you don’t have to create any object, like you usually do for other Kubernetes objects. The file is left as is and is read by kubectl command and the required values are used.
current-context in the kubeconfig file specifies the context to be used by kubectl command.
kubectl config view: To view the kubeconfig fileIf you do not specify which kubeconfig file to use, it ends up using the default file located in the folder .kube in the user’s home directory.
Alternatively, you can specify a kubeconfig file by passing the kubeconfig option in the command line
kubectl config view --kubeconfig=my-custom-configHow to update your current context?
kubectl config use-context prod-user@production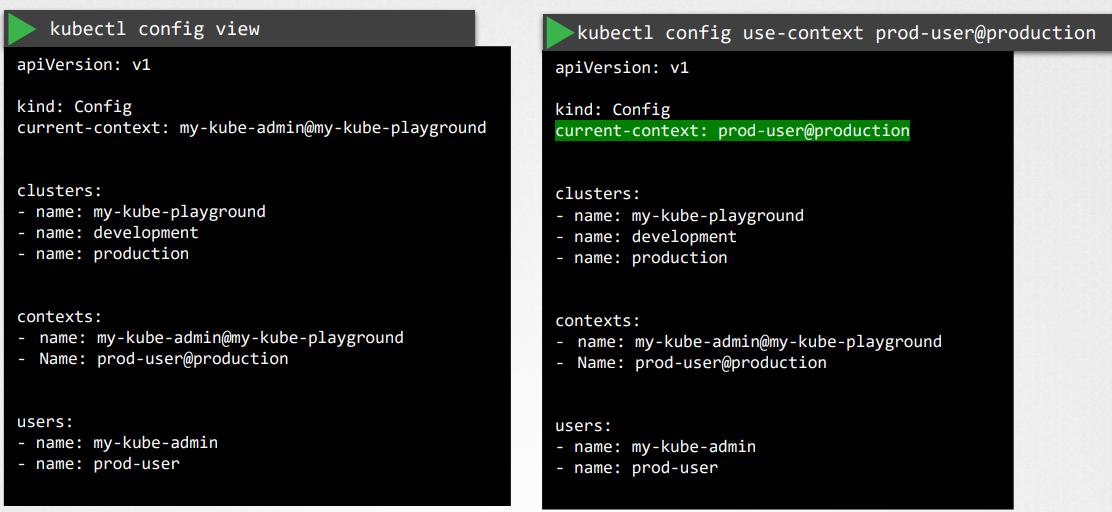
Namespaces: each cluster maybe configured with multiple namespaces within it. The context section in the kubeconfig file can take additional field called namespace where you can specify a particular namespace
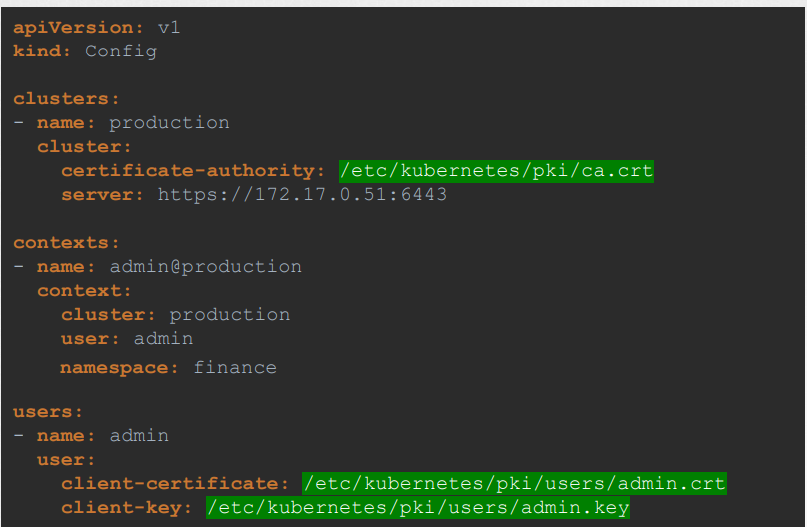
Certificates: It is always recommended to use the full path while giving the certificates info.
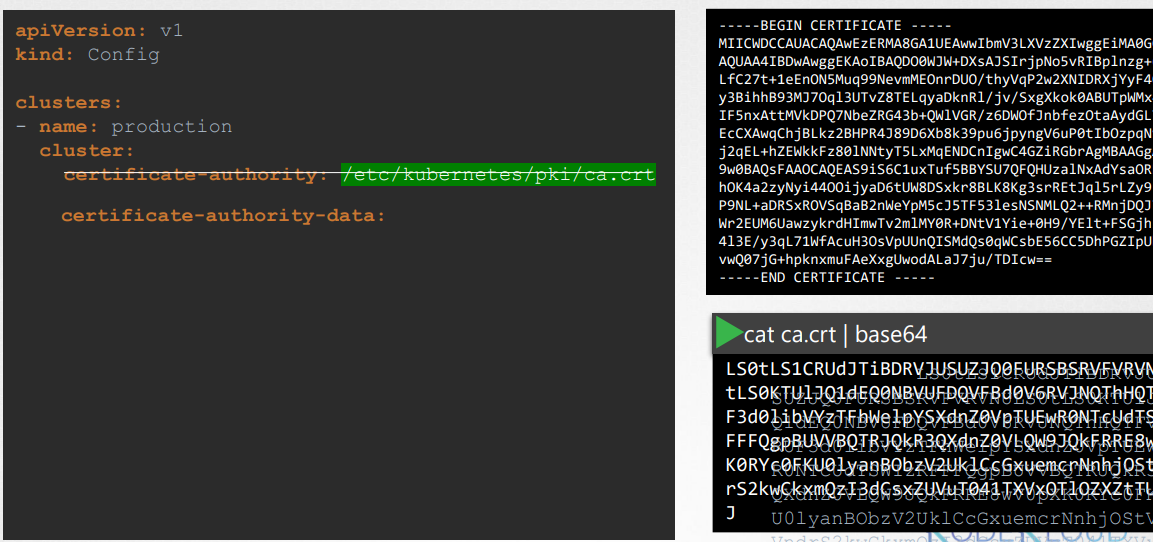
Another way:
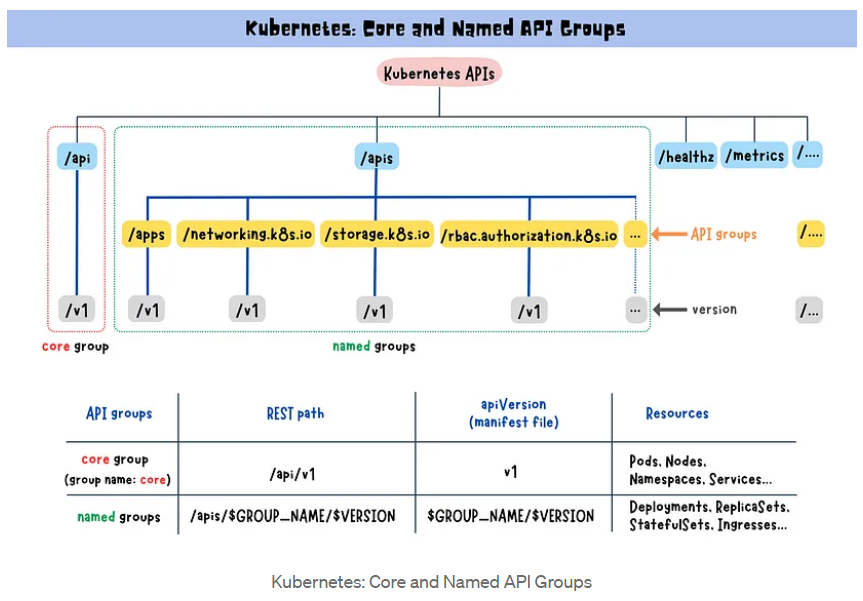
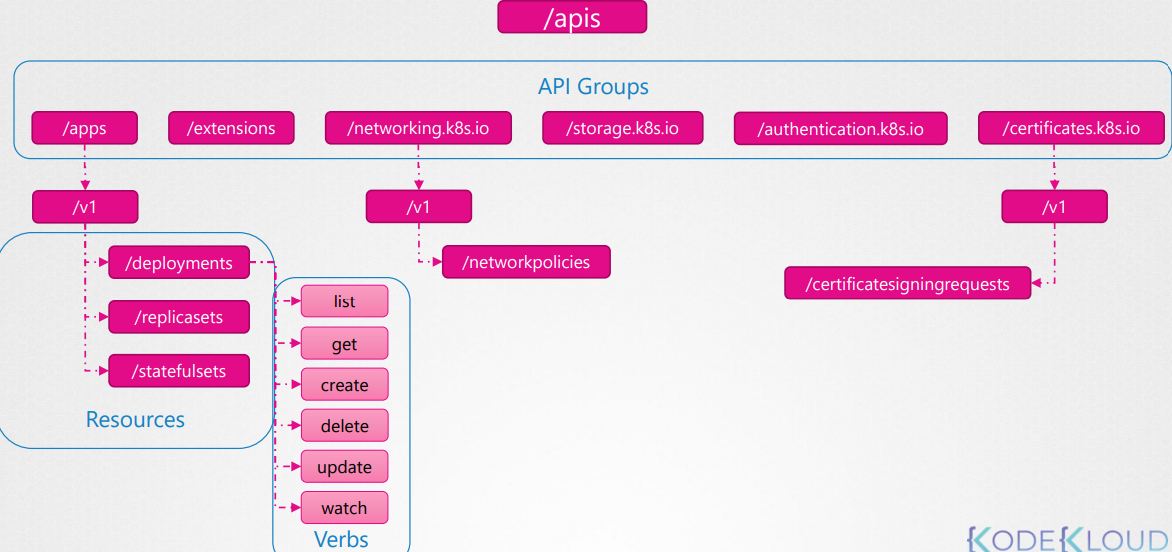
API Groups
Kubernetes has multiple API groups that organize resources based on their functionality.
The core group contains essential resources (pod, nodes, namespaces, etc.) that are integral to the Kubernetes operation. Its API endpoint is located at /api/v1.
On the other hand, the named groups allow you to extend Kubernetes functionality by introducing custom resources and controllers (deployments, replicasets, ingress, etc.). Its API endpoint is /apis/$GROUP_NAME/$VERSION.
Kube proxy ≠ Kubectl proxy:
Kube proxy is use to enable connectivity between pods and services across different nodes in the cluster.
Kubectl proxy is an HTTP proxy service created by kubectl utility to access the KubeAPI server.
Authorization
Types of Authorization:
Node Authorizer
ABAC (Attribute Based Access Control)
RBAC (Role Based Access Control)
Webhook
AlwaysAllow: AlwaysAllow allows all requests without performing any authorization checks.
AlwaysDeny: AlwaysDeny denies all requests.
Node Authorizer
We know that the Kube API server is accessed by users for management purposes as well as the kubelets on node within the cluster for management process within the cluster.
the kubelet accesses the API server to read information about services, endpoints, nodes and pods. The kubelet also reports to the Kube API server with information about the node, such as its status.
These requests are handled by a special authorizer know as Node Authorizer.
In the certificates, we know that the kubelets should be part of the system nodes group and have a name prefixed with system node.
So any request coming from a user with the name system node an part of the system nodes group is authorized by the node authorizer and are granted these privileges, the privileges required by the kubelet. So that’s the access within the cluster.
ABAC
In ABAC, you associate a user or a group of users with a set of permissions.
Here, we create a policy definition file for each user of a group of users.
Now, every time you need to add or make a change in the security, you must edit this file manually and restart the Kube API server.
Because of this, ABAC configurations are difficult to manage.
RBAC
RBAC make the task of ABAC easier.
With RBAC, instead of directly associating a user of a group with a set of permissions, we define a role.
We create a role with the set of permissions required for a user or group and then we associate all the users to that role.
Going forward, whenever changes need to made to the user’s access we simply modify the role and it reflects on all the users immediately.
Webhook
If you want to manage the authorization externally and not through the built-in mechanisms then webhooks comes into picture.
Open Policy Agent is a third-party tool that helps with admission control and authorization.
You can have Kubernetes make an API call to the Open Policy Agent with the information about the user and his access requirements, and have the Open Policy Agent decide if the user should be permitted or not.
Based on that response, the user is granted access.
Note
The modes are set using the
--authorization-mode=<any-option-from-above>option on the Kube API Server.By default, it is set to
AlwaysAllow.You can provide
,separated list of multiple modes that you wish to use.--authorization-mode=Node,RBACWhen you have multiple modes configured, you request is authorized using each one in the order it is specified.
RBAC
- RBAC consists of 2 things: Role and RoleBinding.
Role
We can create a role by creating a Kubernetes role object. We create a role definition file with the API version set to
rbac.authorization.k8s.io/v1and kind set toRole.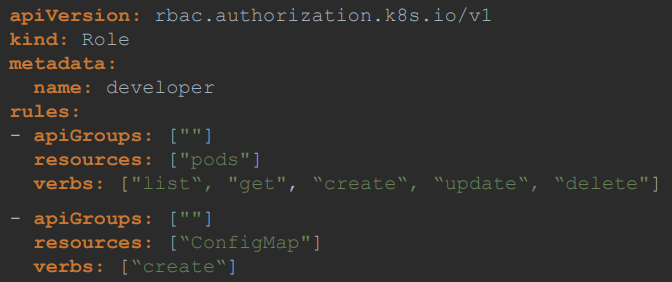
Note: For core group you can leave the apiGroups section as blank. For any other group, you specify the group name.
RoleBinding
The next setup is to link the user to that role.
For this, we create another object called as RoleBinding.
The RoleBinding object links a user object to a Role.
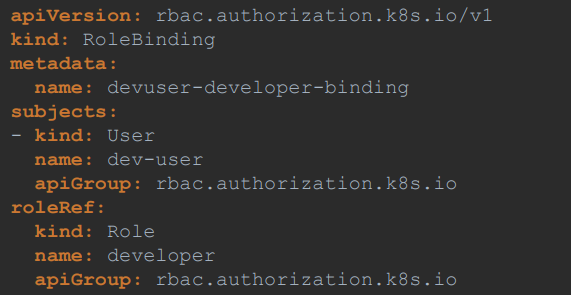
Note: Roles and RoleBindings fall under the scope of namespaces.
Commands
kubectl get roles: to view the roleskubectl get rolebindings: to view the rolebindingskubectl describe role developer: to get the details of rolekubectl describe rolebinding devuser-developer-binding: to get the details of rolebindingkubectl auth can-i create pods: to check whether i can create pods or notkubectl auth can-i create pods --as dev-user: to check whether a user (dev-user) can create pods or not (i need to have admin access to check other users access)
Resource Names
You can allow access to a specific resource alone in a namespace.
For ex: consider you have a 5 pods in a namespace. You wanna give access to a user to pods, but not all pods. You can restrict access by giving the name of a pod inside
resourceNamesfield.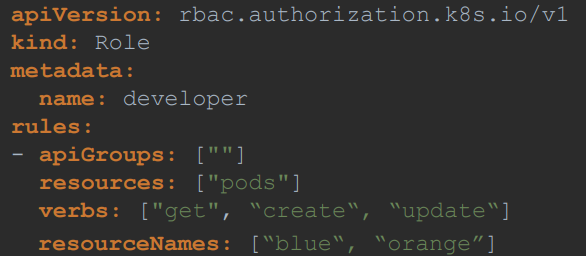
Cluster Roles and Cluster RoleBindings
Roles and RoleBindings are namespaced, meaning they are created within the namespaces.
If you don’t specify a namespace, they are created in a default namespace and control access within that namespace alone.
The resources are categorized into 2: namespace-scoped or cluster-scoped.
The cluster-scope resources are those where you don’t specify a namespace when you create them, like node, persistent volumes, clusterroles, clusterrolebindings, namespaces etc.
To view the full list of resources that are namespace-scoped or not:
kubectl api-resources --namespaced=true/falseTo authorize users to cluster-wide resources like nodes, PV we use clusterroles and clusterrolebindings.
ClusterRole
ClusterRoles are just like Roles, except they are for cluster-scoped resources.
For ex: a cluster admin role can be created to provide a cluster administrator permissions to view, create or delete nodes in a cluster.
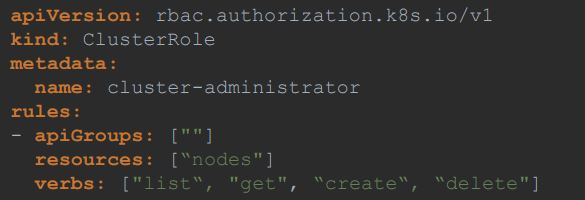
ClusterRoleBinding
- Next step is to link the user to the create cluster role.
For this, we create another object called as ClusterRoleBinding (similar to RoleBinding).
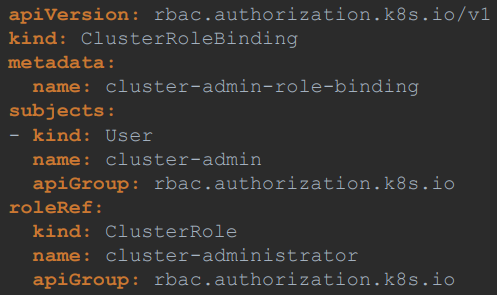
Note
ClusterRoles and ClusterRoleBindings are use for cluster-scoped resources, but this is not a hard rule.
You can create ClusterRoles for namespace resources as well.
When you do that, the user will have access to these resources across all namespaces.
With ClusterRoles, when you authorize a user to access the pods, the user gets access to all pods across the cluster.
Service Accounts
There are two types of accounts in Kubernetes, a user account and a service account.
The user account is used by humans, and service accounts are used by machines.
A service account could be an account used by an application to interact with the Kubernetes cluster.
Commands:
kubectl create serviceaccount <sa-name>: to create a service accountkubectl get serviceaccount: to list the service accounts
When a service account is created, it also creates a token automatically.
The service account token is what must be used by the external application while authenticating to the Kubernetes API.
The token is stored as a secret object.
So when a service account is created, it first create the service account object, and then generates a token for the service account. It then creates a secret object and stores that token inside the secret object. The secret object is then linked to the service account.
Commands:
kubectl describe secret <secret-name>: to view the token
This token then can be used as an authentication bearer token while making a REST call to the Kubernetes API.
Flow: You create a service account, assign the right permissions using RBAC mechanism, and export the service account tokens, and use it to configure the third party application to authenticate to the Kubernetes API.
If the third-party application is hosted on the Kubernetes cluster itself, in that case, the whole process of exporting the service account token, and configuring the third party application to use it can be made simple by automatically mounting the service token secret as a volume inside a pod, hosting the third party application.
That way, the token to access the Kubernetes API is already placed inside the pod and can be easily read by the application. You don't have to provide it manually.
For every namespace in Kubernetes, a service account named default is automatically created. Each namespace has its own default service account.
Whenever a pod is created, the default service account and its token are automatically mounted to that pod as a volume mount.
If you'd like to use a different service account, modify the pod definition file to include a
serviceAccountNamefield and specify the name of the new service account.You cannot edit the service account of an existing pod. You must delete and recreate the pod.
Kubernetes automatically mounts the default service account if you haven't explicitly specified any.
You may choose not to mount a service account automatically by setting the
automountServiceAccountTokenfield to false in the pod spec section.
v1.22 changes
In version 1.22, the token request API was introduced that aimed to introduce a mechanism for provisioning Kubernetes service account tokens that are more secure and scalable via an API.
Tokens generated by the token request API are audience bound. They're time bound, and object bound, and hence are more secure.
Now, since version 1.22, when a new pod is created, it no longer relies on the service account, a secret token. Instead, a token with a defined lifetime is generated through the token request API by the service account admission controller when the pod is created. And this token is then mount
as a projected volume onto the pod.
v1.24 changes
So in the past when a service account was created, it automatically created a secret with a token that has no expiry and is not bound to any audience.
This was then automatically mount as a volume to any pod that uses that service account.
But in version 1.22 that was changed, the automatic mounting of the secret object to the pod was changed, and instead it then moved to the token request API.
So with version 1.24, a change was made where when you create a service account, it no longer automatically creates a secret or a token access secret.
So you must run the command
kubectl create token <sa-name>to create token, to generate a token for that service account.
Note
Post version 1.24, if you would still like to create secrets the old way with non expiring token, then you could still do that by creating a secret object with the type set to
kubernetes.io/service-account-tokenand the name of the service account specified within annotations in the metadata section.So when you do this, just make sure that you have the service account created first, and then create a secret object. Otherwise the secret object will not be created.
Image Security
When we use the image from a public repository (docker.io), we do not need to pass any creds to use it. Anyone can download and access the images hosted on a public repository.
But if we have an image hosted on a private repository (docker.io, AWS, Azure, GCP, etc.), at that time we have to pass the full path while mentioning the image as well as authentication (login creds) information.
For that, we first create a secret object with the credentials in it.
The secret is of type docker-registry. It is a built in secret type that was built for storing Docker credentials.
kubectl create secret docker-registry regcred--docker-server=private-registroy.io--docker-username=regitry-user--docker-password=registroy-password--docker-email=registroy-user@org.com
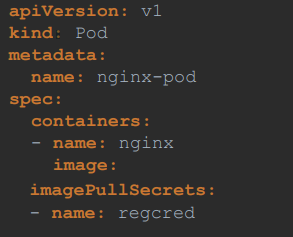
Security Contexts
Docker Security
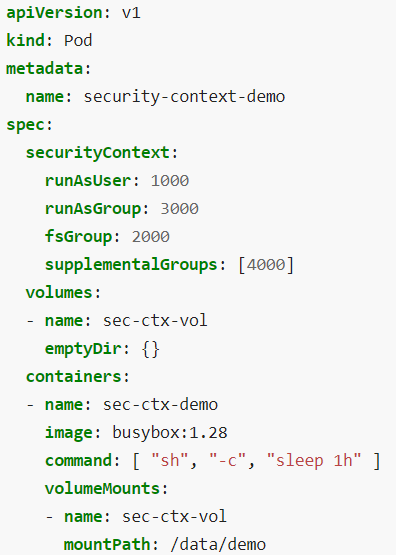
When you run a Docker container, you have the option to define a set of security standards, such as the ID of the user used to run the container, the Linux capabilities that can be added or removed from the container, etc.
docker run --user=1001 ubuntu sleep 3600docker run --cap-add MAC_ADMIN ubuntudocker run --cap-drop MAC_ADMIN ubuntuMore can be understand on Udemy lecture.
Kubernetes Security Context
In Kubernetes, containers are encapsulated in Pods.
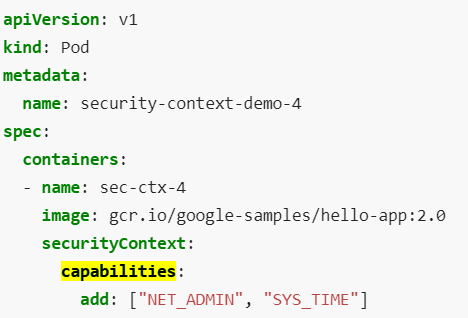
You may choose to configure the security settings at a container level or at a Pod level.
If you configure it at a Pod level, the settings will carry over to all the containers within the Pod.
If you configure it at both the Pod and the container, the settings on the container will override the settings on the Pod.
capabilities can be set at the container level and not at the pod level.
Network Policy
We have a cluster with a set of nodes hosting a set of pods and services. Each node has an IP address and so does each pod as well as service.
One of the prerequisite for networking in Kubernetes is whatever solution you implement, the pods should be able to communicate with each other without having to configure any additional settings like routes.
Kubernetes is configured by default with an AllAllow rule that allows traffic from any pod to any other pod or services within the cluster.
Ex: Let’s say we have 3pods: Application pod, API pod, and DB pod. In normal scenario, Application pod should not be able to access the DB pod but as Kubernetes have AllAllow rule, Application pod will also be able to access/communicate with DB pod. We can prevent this by creating a network policy.
A network policy is another object in the Kubernetes namespace just like pods, replica sets or services.
You link a network policy to one or more pods.
You can define rules within the network policy.
Let’s say for DB pod we have to only allow ingress traffic from the API pod on port 3306. Once this policy is created, it blocks all other traffic to the pod and only allows traffic that matches the specified rule.
We use the same technique to apply/link a network policy to a pod that was used before to link replica sets or services to pod: labels and selectors.
We label the pod and use the same labels on the port selector field in the network policy and then we build our rule.
Under policy types, specify whether the rule is to allow ingress or egress traffic or both and specify the ingress/egress rule.
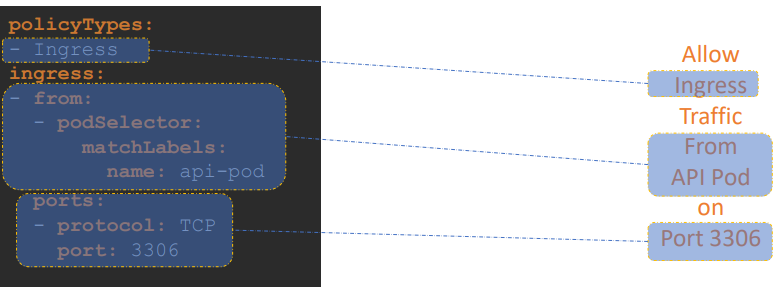
Note: ingress or egress isolation only comes into effect if you have ingress or egress in the policy types. For an egress or ingress isolation to take place, note that you have to add them under the policy types as seen here. Otherwise, there is no isolation.
Detailed
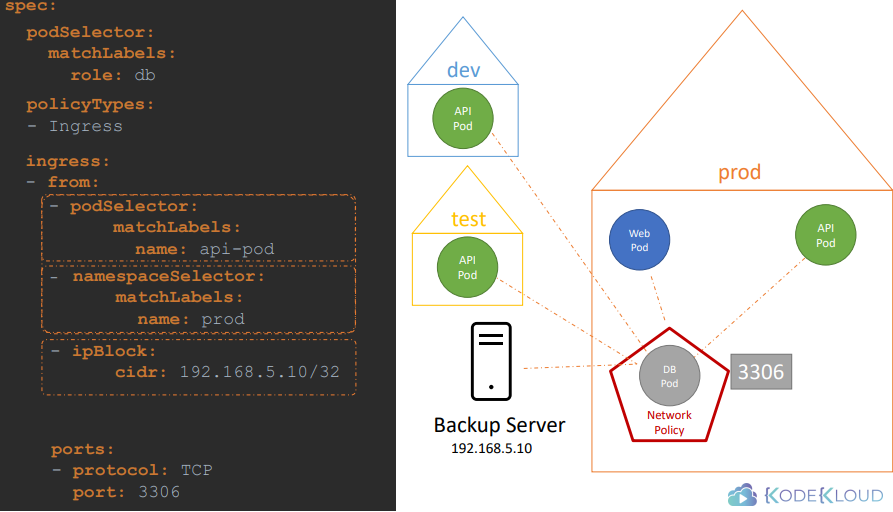
podSelector: to select pods by labels
namespaceSelector: to select namespaces by labels
ipBlock: to select IP address ranges (outside of Kubernetes)
The above rules (in image) will work as OR operation as we have use different/multiple (-) to specify them.
If we put all the from rules inside a single (-), then it works as a AND operation.
Extra Tools
Kubectx
With this tool, you don't have to make use of lengthy “kubectl config” commands to switch between contexts. This tool is particularly useful to switch context between clusters in a multi-cluster environment.
Installation:
  sudo git clone https://github.com/ahmetb/kubectx /opt/kubectx
  sudo ln -s /opt/kubectx/kubectx /usr/local/bin/kubectx
To list all contexts:
kubectxTo switch to a new context:
kubectx <context_name>To switch back to previous context:
kubectx -To see current context:
kubectx -c
Kubens
This tool allows users to switch between namespaces quickly with a simple command.
Installation:
  sudo git clone https://github.com/ahmetb/kubectx /opt/kubectx
  sudo ln -s /opt/kubectx/kubens /usr/local/bin/kubens
To switch to a new namespace:
kubens <new_namespace>To switch back to previous namespace:
kubens -
Subscribe to my newsletter
Read articles from Rohit Pagote directly inside your inbox. Subscribe to the newsletter, and don't miss out.
Written by

Rohit Pagote
Rohit Pagote
I am an aspiring DevOps Engineer proficient with containers and container orchestration tools like Docker, Kubernetes along with experienced in Infrastructure as code tools and Configuration as code tools, Terraform, Ansible. Well-versed in CICD tool - Jenkins. Have hands-on experience with various AWS and Azure services. I really enjoy learning new things and connecting with people across a range of industries, so don't hesitate to reach out if you'd like to get in touch.