How We've Built Our Serverless CloudWatch Book Video Platform with SST, Next.js, ConvertKit, LemonSqueezy and Vimeo
 Tobias Schmidt
We released our first educational book about AWS at the beginning of 2023. It’s called AWS Fundamentals 📙 and includes many visuals to make learning easier. What it does not include: actual code you can deploy in your AWS account and walk-through video hands-on tutorials.
For our second book, The CloudWatch Book 📕, which focuses on observability on AWS, we wanted to take it to the next level. We've moved from “just an e-book” to an e-book that includes a real-world hands-on application 👾 you can deploy in any AWS account. Additionally, we offer a video platform where you can watch and follow along as we explore CloudWatch features 🎥 and show how we've integrated them into the application.
For the video platform, we wanted something that our customers could easily access, fully customizable to our needs, and restricted to our domain only, preventing the videos from being embedded elsewhere.
We decided that building the platform ourselves with the technologies we love would be the best approach. We chose a Serverless Lambda and Next.js-powered setup, deployed with SST. The videos are hosted on Vimeo, allowing us to embed them on our own domain.
In this post, you'll learn all the details about how we created this platform and how you can build it yourself.
Why Custom & Why Serverless?
We didn't choose a third-party solution to avoid extra restrictions. We wanted full control over the platform and the ability to easily integrate it with ConvertKit, which we use for our email communication, and LemonSqueezy, our payment provider.
Also, we didn't want to be locked into another subscription-based platform that we might never be able to leave.
Choosing a Serverless approach was an obvious decision for us: we love Lambda and have been using it for over six years in many production applications. It's easy to use, requires almost no maintenance, and costs us nearly nothing per month.
Overview of Technologies
We’re using one of the most common and most aspiring tech stacks right now. Let’s dive into each major part.
SST as the Infrastructure-As-Code Tool
SST v3 (Serverless Stack) is a framework for building serverless applications on AWS. It offers an excellent developer experience with features like live Lambda debugging, local development, and a focus on infrastructure as code using CDK-like constructs.
With SST v3, the platform moved from using CloudFormation to Pulumi for management, making deployments faster and less error-prone.
SST simplifies the process of building serverless applications. It helps you get started quickly by handling many of the complexities for you.
Sadly, we’re still using the old SST with CloudFormation as the foundation since we started working on this while v3 was still in beta. However, we plan to move to v3 as soon as possible.
Next.js for Our Frontend
We’re very confident with Next.js because we have used it in both our current and past projects. It’s a React framework that enables us to build fast, user-friendly web applications. It comes with a lot of built-in features that make development easier and more efficient, such as server-side rendering, static site generation, and API routes.
Next.js is natively supported by SST, allowing us to deploy it easily to AWS without any restrictions on what we can use. Server-side rendering is handled by Lambda functions that are created and managed by SST.
Architecture Overview
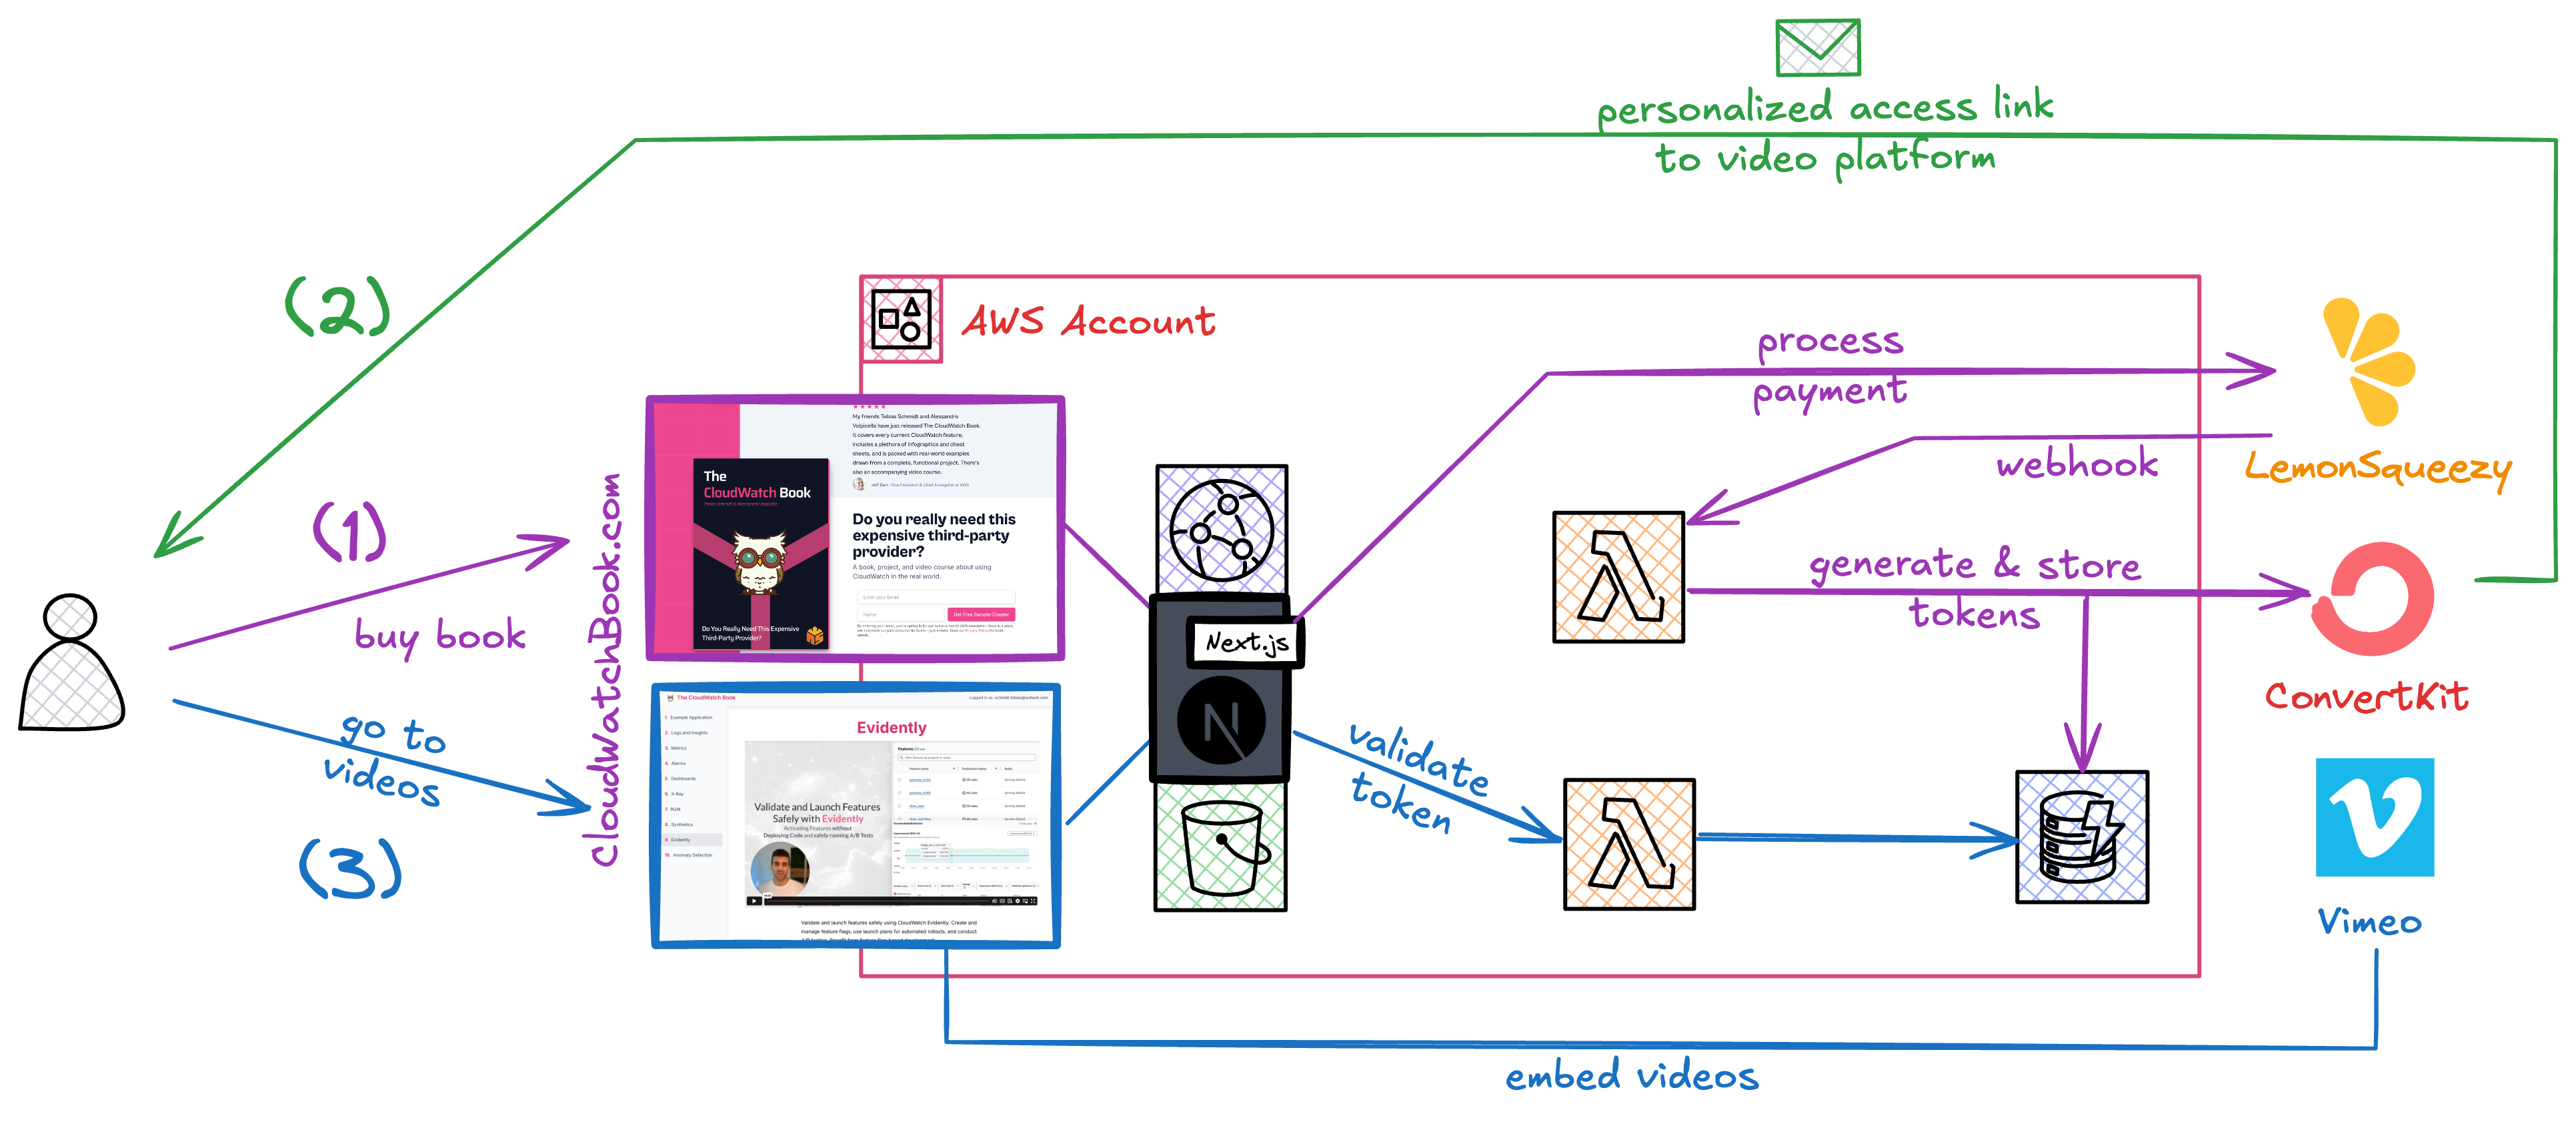
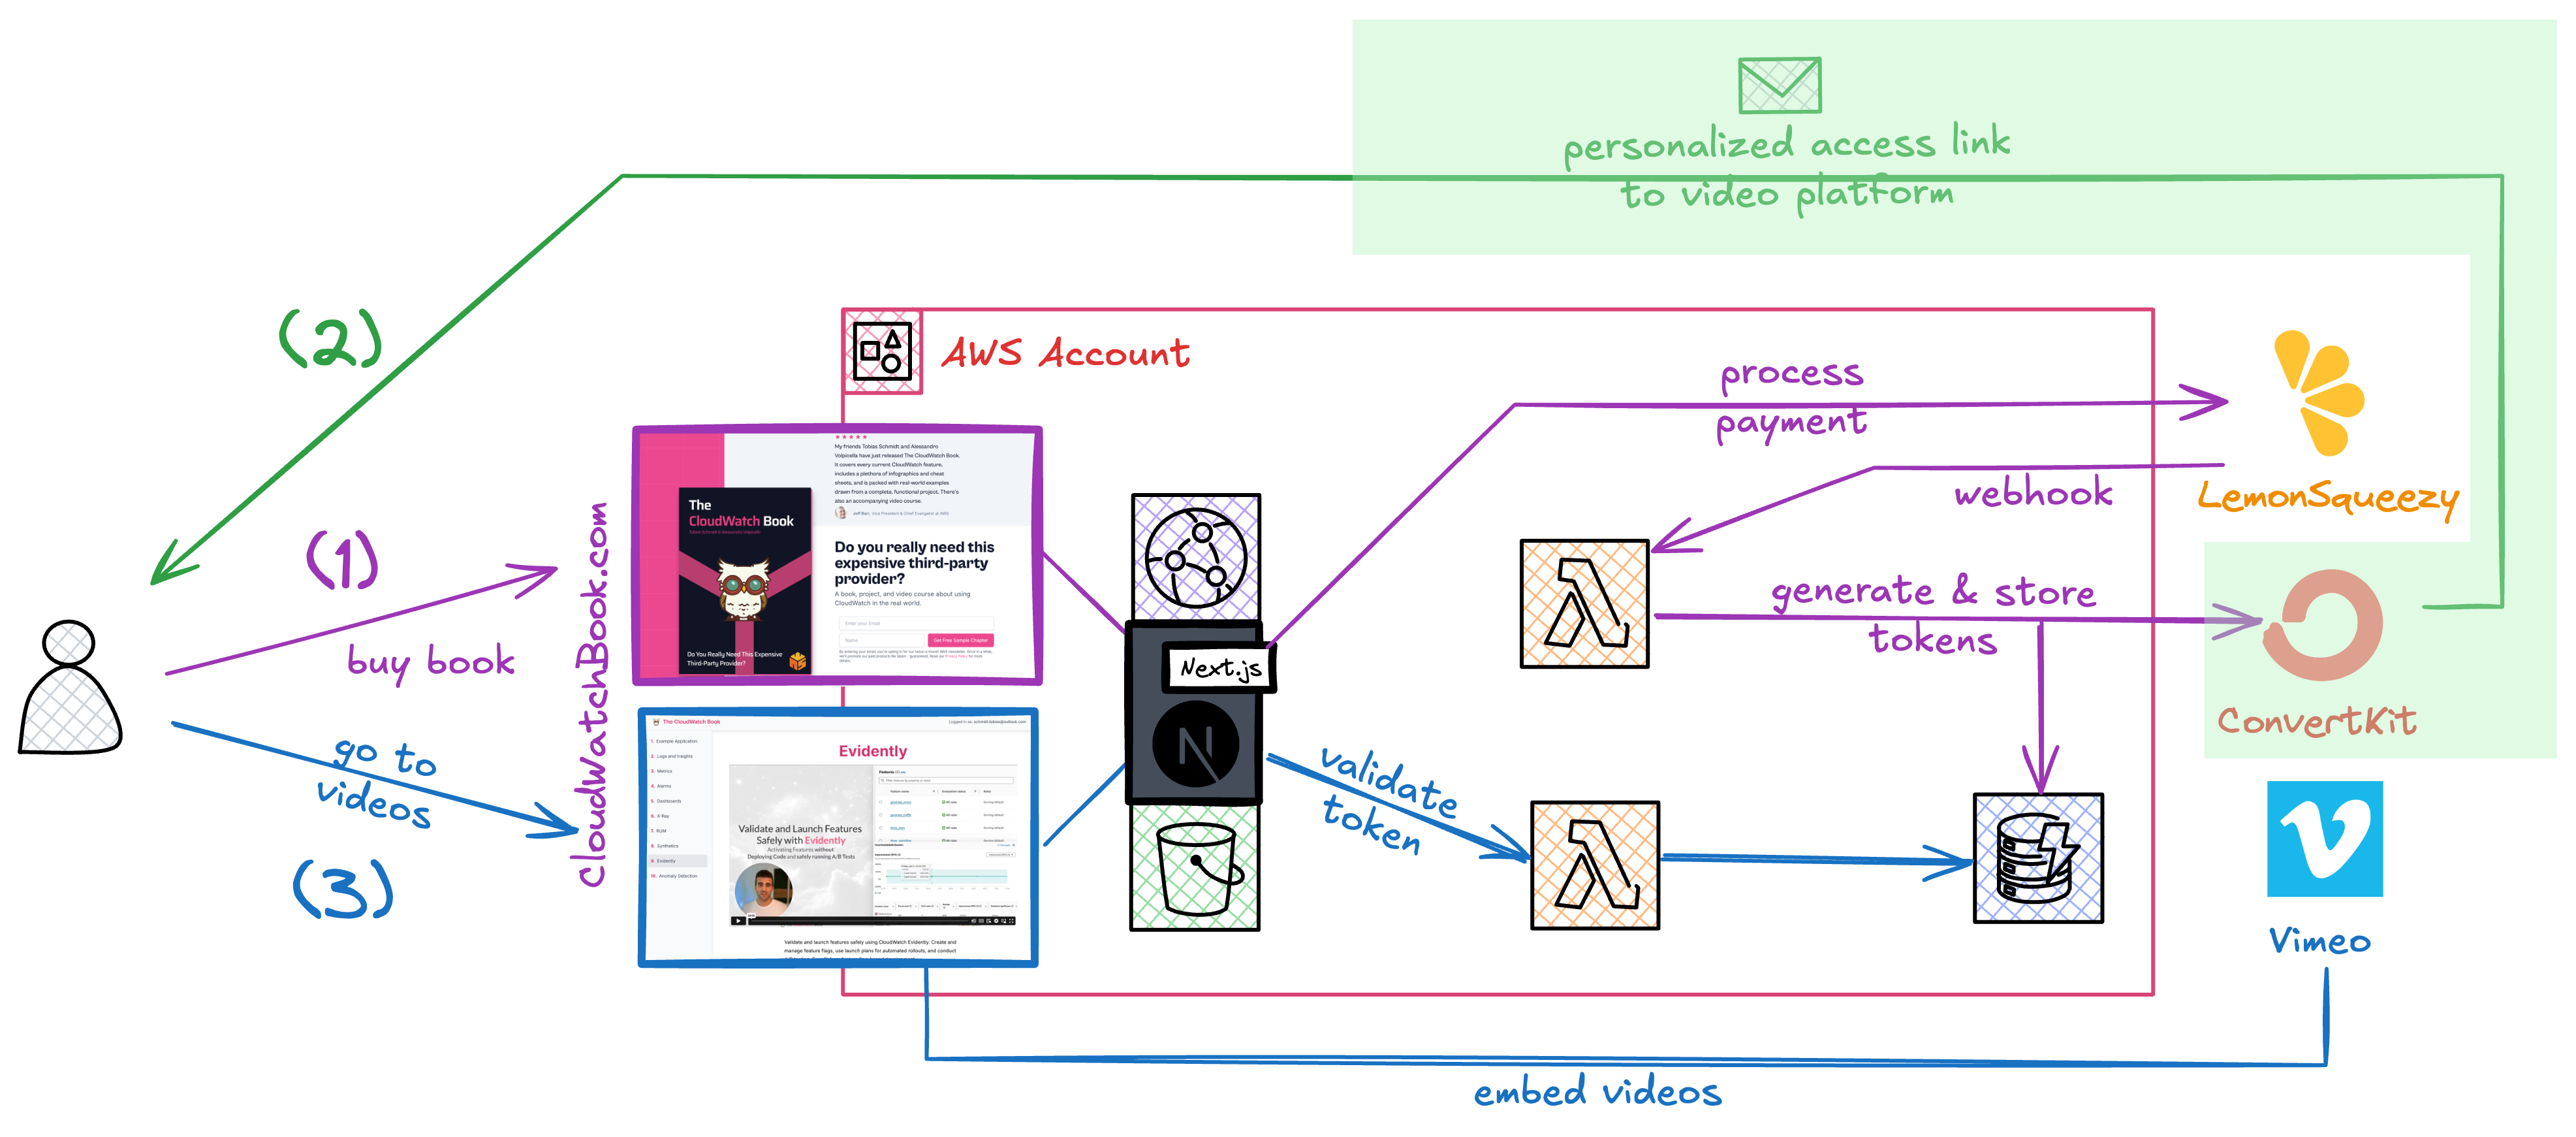
Our architecture consists of three main processes:
Customer Purchase Flow: This process starts when a user visits our landing page at cloudwatchbook.com and decides to buy the full package, which includes the videos. After the payment is successfully processed, a webhook from LemonSqueezy triggers a Lambda function that generates a personalized access token. We store both the user's details and the token in a DynamoDB table and in ConvertKit.
Personalized Video Access Link Notification: This token is stored securely and linked to the user's purchase, allowing unique access to the video content. We send this link to the user through an automated sequence triggered after the user's tags are updated in the first step.
Video Platform Access and Content Delivery: Once the access token is generated and the user receives the email, they can access the video platform. The token will be validated by our Lambda function. If the validation is successful, the actual embedded links to Vimeo are loaded into the application.
Even though it’s a pretty simple architecture, it has a lot of moving wheels that need to work together.
Since we are only using managed services with pay-per-use pricing, we haven't spent a single dollar on AWS. Our main costs are just the subscription for Vimeo. 🙃
Building the Platform
Let's dive into the three main components we mentioned earlier.
Customer Purchase Flow
Let’s have a look how we set up an internal document in DynamoDB and corresponding tags in ConvertKit for the user after he has purchased our book. These two things are necessary to authenticate and authorize the user and inform him about how he can actually access the videos.
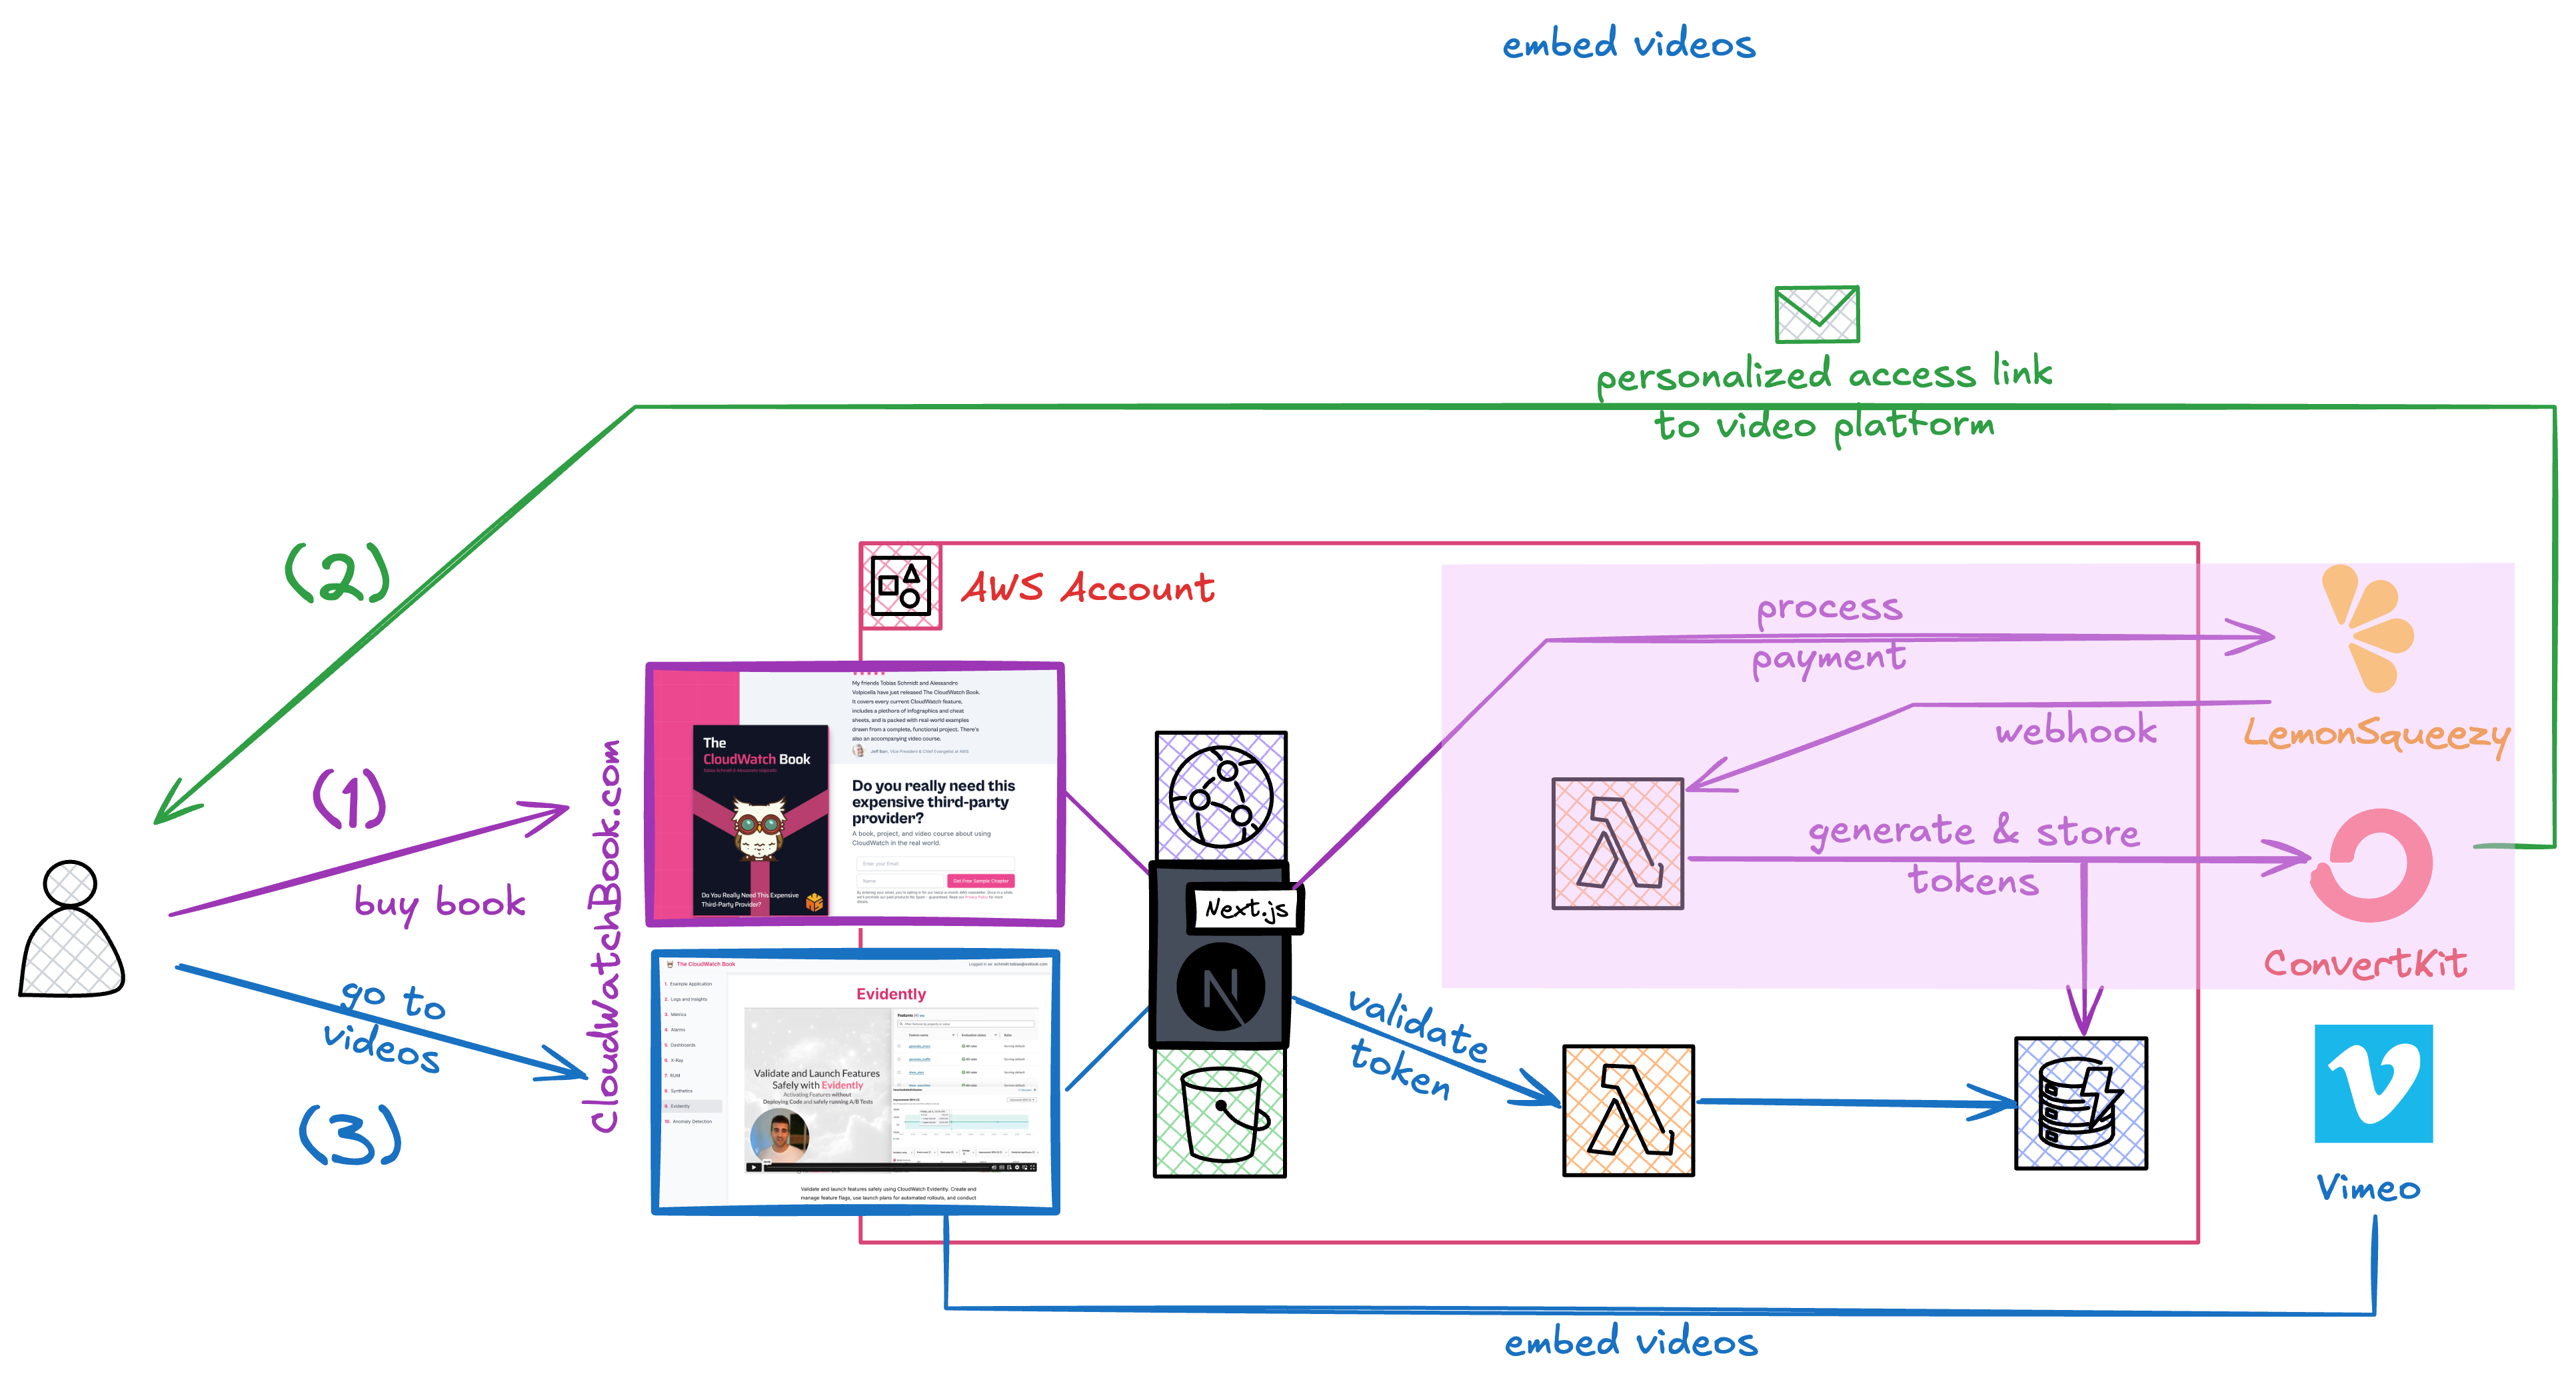
Let’s talk about the prerequisites first: we need our ConvertKit API Key and API Secret: You can find these in the Developer section under the settings tab.
After that, we can already set up the infrastructure:
The Lambda function that will receive the webhook from LemonSqueezy.
The DynamoDB table that will store the personalized token for the user access.
That’s all we need. With SST, setting this up is very simple.
import { Config, Function } from 'sst/constructs';

const CONVERTKIT_API_KEY = new Config.Secret(stack, 'CONVERTKIT_API_KEY');
const CONVERTKIT_API_SECRET = new Config.Secret(stack, 'CONVERTKIT_API_SECRET');

// [...]

const ordersTable = new Table(stack, 'orders', {
    primaryIndex: { partitionKey: 'id' },
    fields: {
      id: 'string',
      email: 'string',
      videoToken: 'string',
      videoTokenLastUsedAt: 'string',
      // [...]
    },
    globalIndexes: {
      byVideoToken: {
        partitionKey: 'videoToken',
        sortKey: 'createdAt',
      },
      // [...]
    },
  });

const hookFunction = new Function(stack, 'lemon-hook', {
    handler: 'packages/services/functions/webhooks/lemon.handler',
    url: {
      authorizer: 'none',
      cors: {
        allowMethods: ['POST'],
        allowOrigins: ['*'],
      },
    },
    bind: [CONVERTKIT_API_KEY, CONVERTKIT_API_SECRET, ordersTable],
    environment: {
      ENVIRONMENT: stack.stage,
    },
  });
We’re also using the secrets feature of SST, which is very convenient. Make sure to set them for your stages:
npx sst secrets set $SECRET_NAME $SECRET_VALUE --stage $STAGE
The secrets and the table are passed to the function using the bind property. This way, SST will automatically add the necessary IAM permissions for our function to access the DynamoDB table and will inject the secret into the function.
We’ve got our function. The next step is to create the webhook at LemonSqueezy so that our function is invoked after a successful purchase. You can find the webhooks at Settings > Webhooks.

We’ll filter for the order_created event. Every time an order is successfully completed, our function will be invoked.
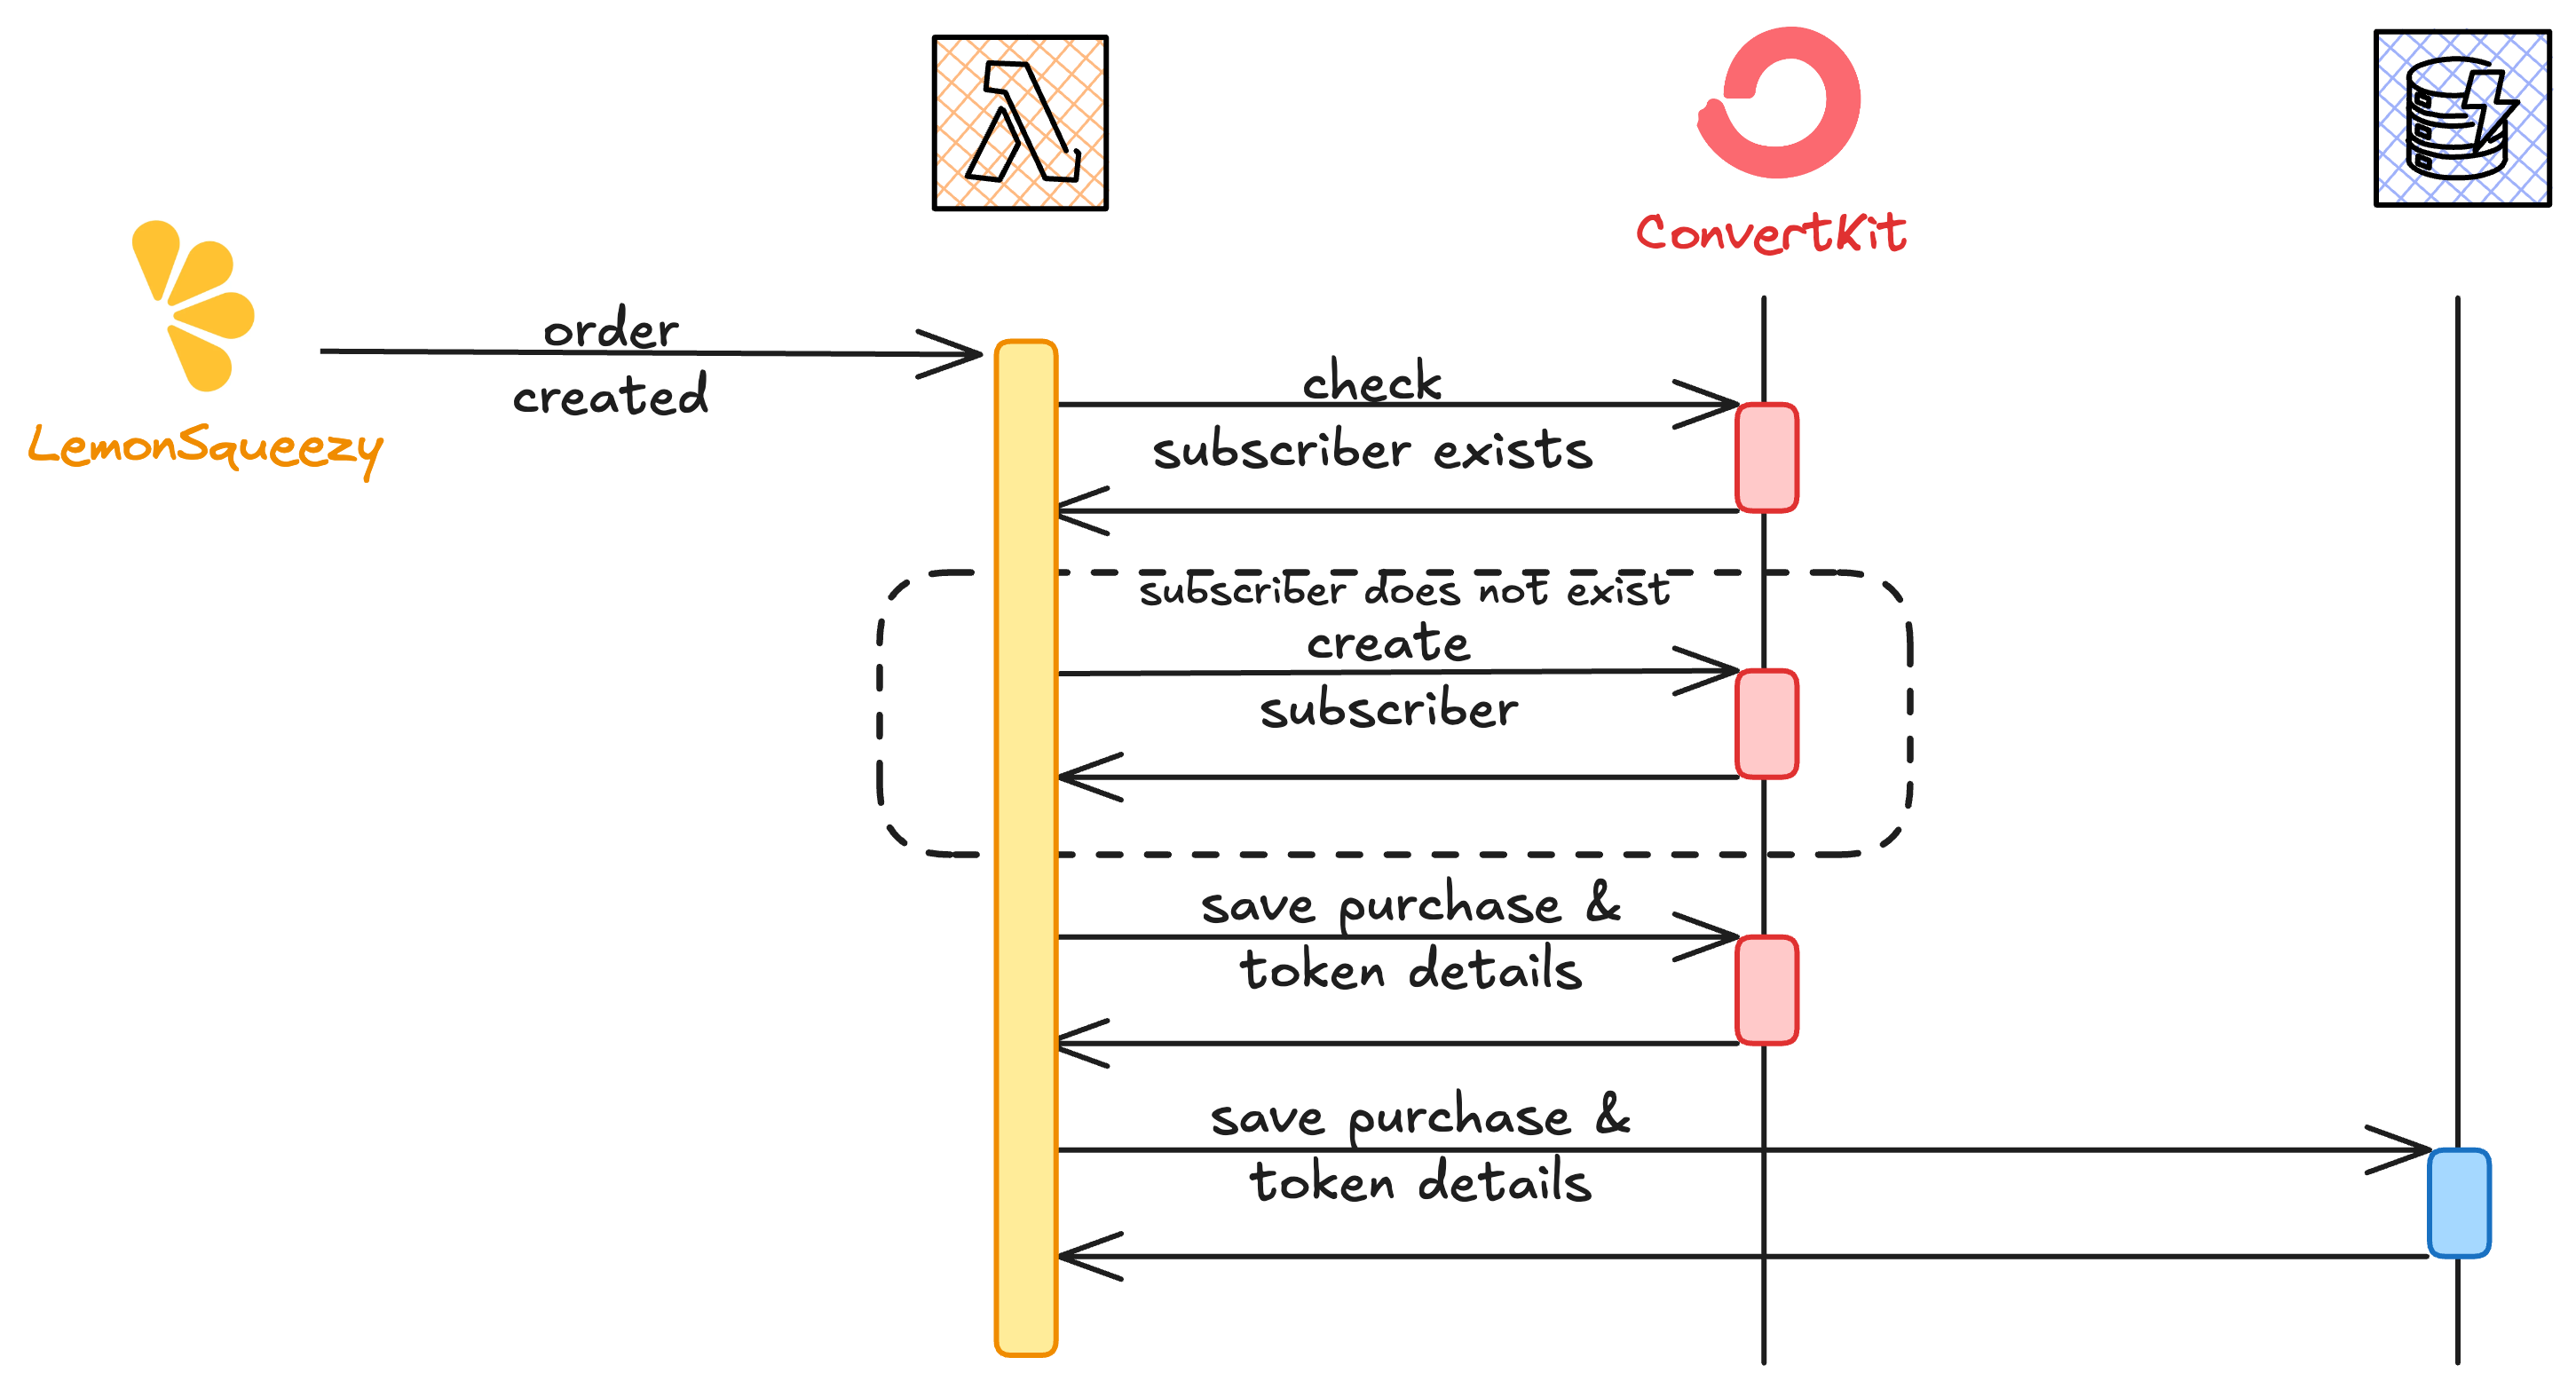
In our function itself, we need to do three main things:
Create a new unique video token.
Add the video token as a custom field to the ConvertKit subscriber. If the user is not yet known in ConvertKit, we’ll add them as a subscriber first.
Add the video token with the email address to our DynamoDB table.
For DynamoDB, we can use the AWS SDK, and for ConvertKit, we can directly use their API.
Personalized Video Access Link Notification
We’ve successfully stored all the necessary information in both our internal DynamoDB table and ConvertKit.
The only thing we need now is to send an email to the user with their personalized link so they can access the platform.
With ConvertKit, this is pretty simple. We’ll create a Visual Automation based on the custom fields and tags we provided to ConvertKit in the previous step.
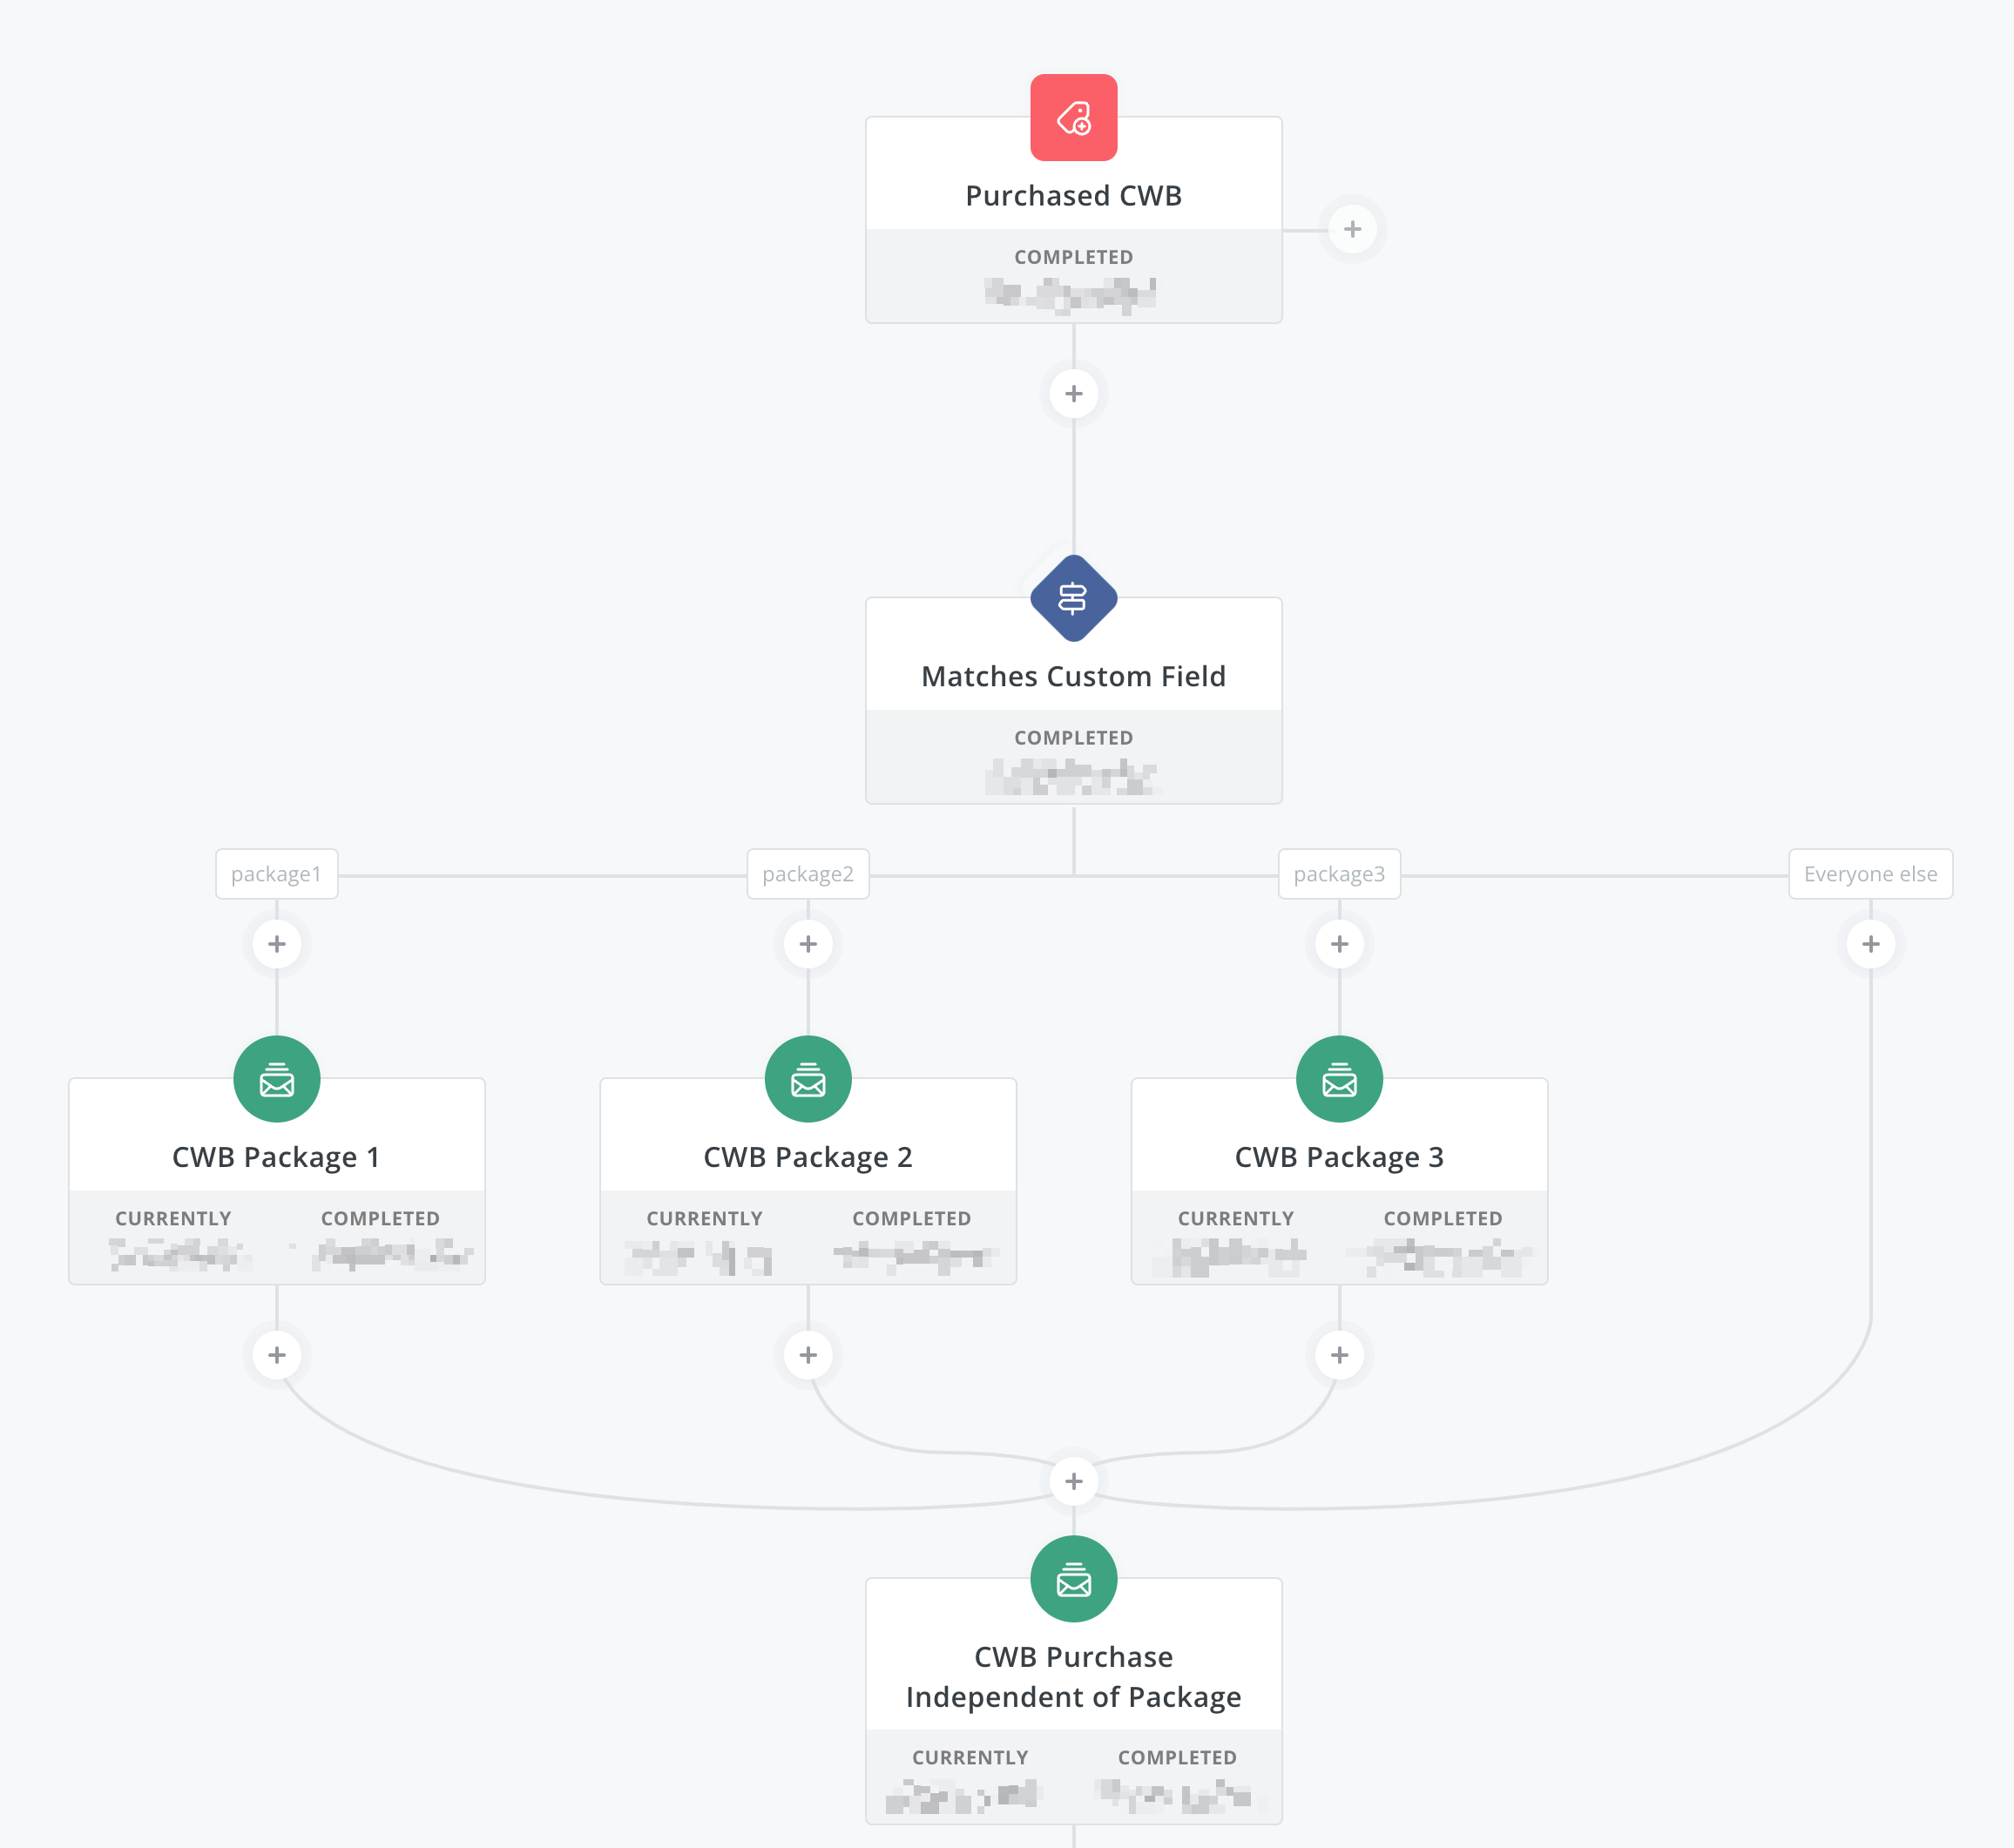
The subscriber will join the sequence after we add our custom tag for their purchase. Based on the package they ordered, they will proceed through the sequence in the corresponding step of either CWB Package 1 (only the e-book), CWB Package 2 (e-book and code), or CWB Package 3 (e-book, code, and videos).
For the last step, we'll send an email with the link to the video platform, which includes the personalized token. We can reference this token in our template using {{ subscriber.cwb_video_token }}. And that's all the magic involved in this part of the process.
Video Platform Access and Content Delivery
So, our customer is now recorded in our DynamoDB table and has received an email with the personalized link containing the access token.
Last but not least, our dedicated video page needs to make use of the personalized links:
Extract it from the URL.
Check its validity.
Display the available videos using an embedded player.
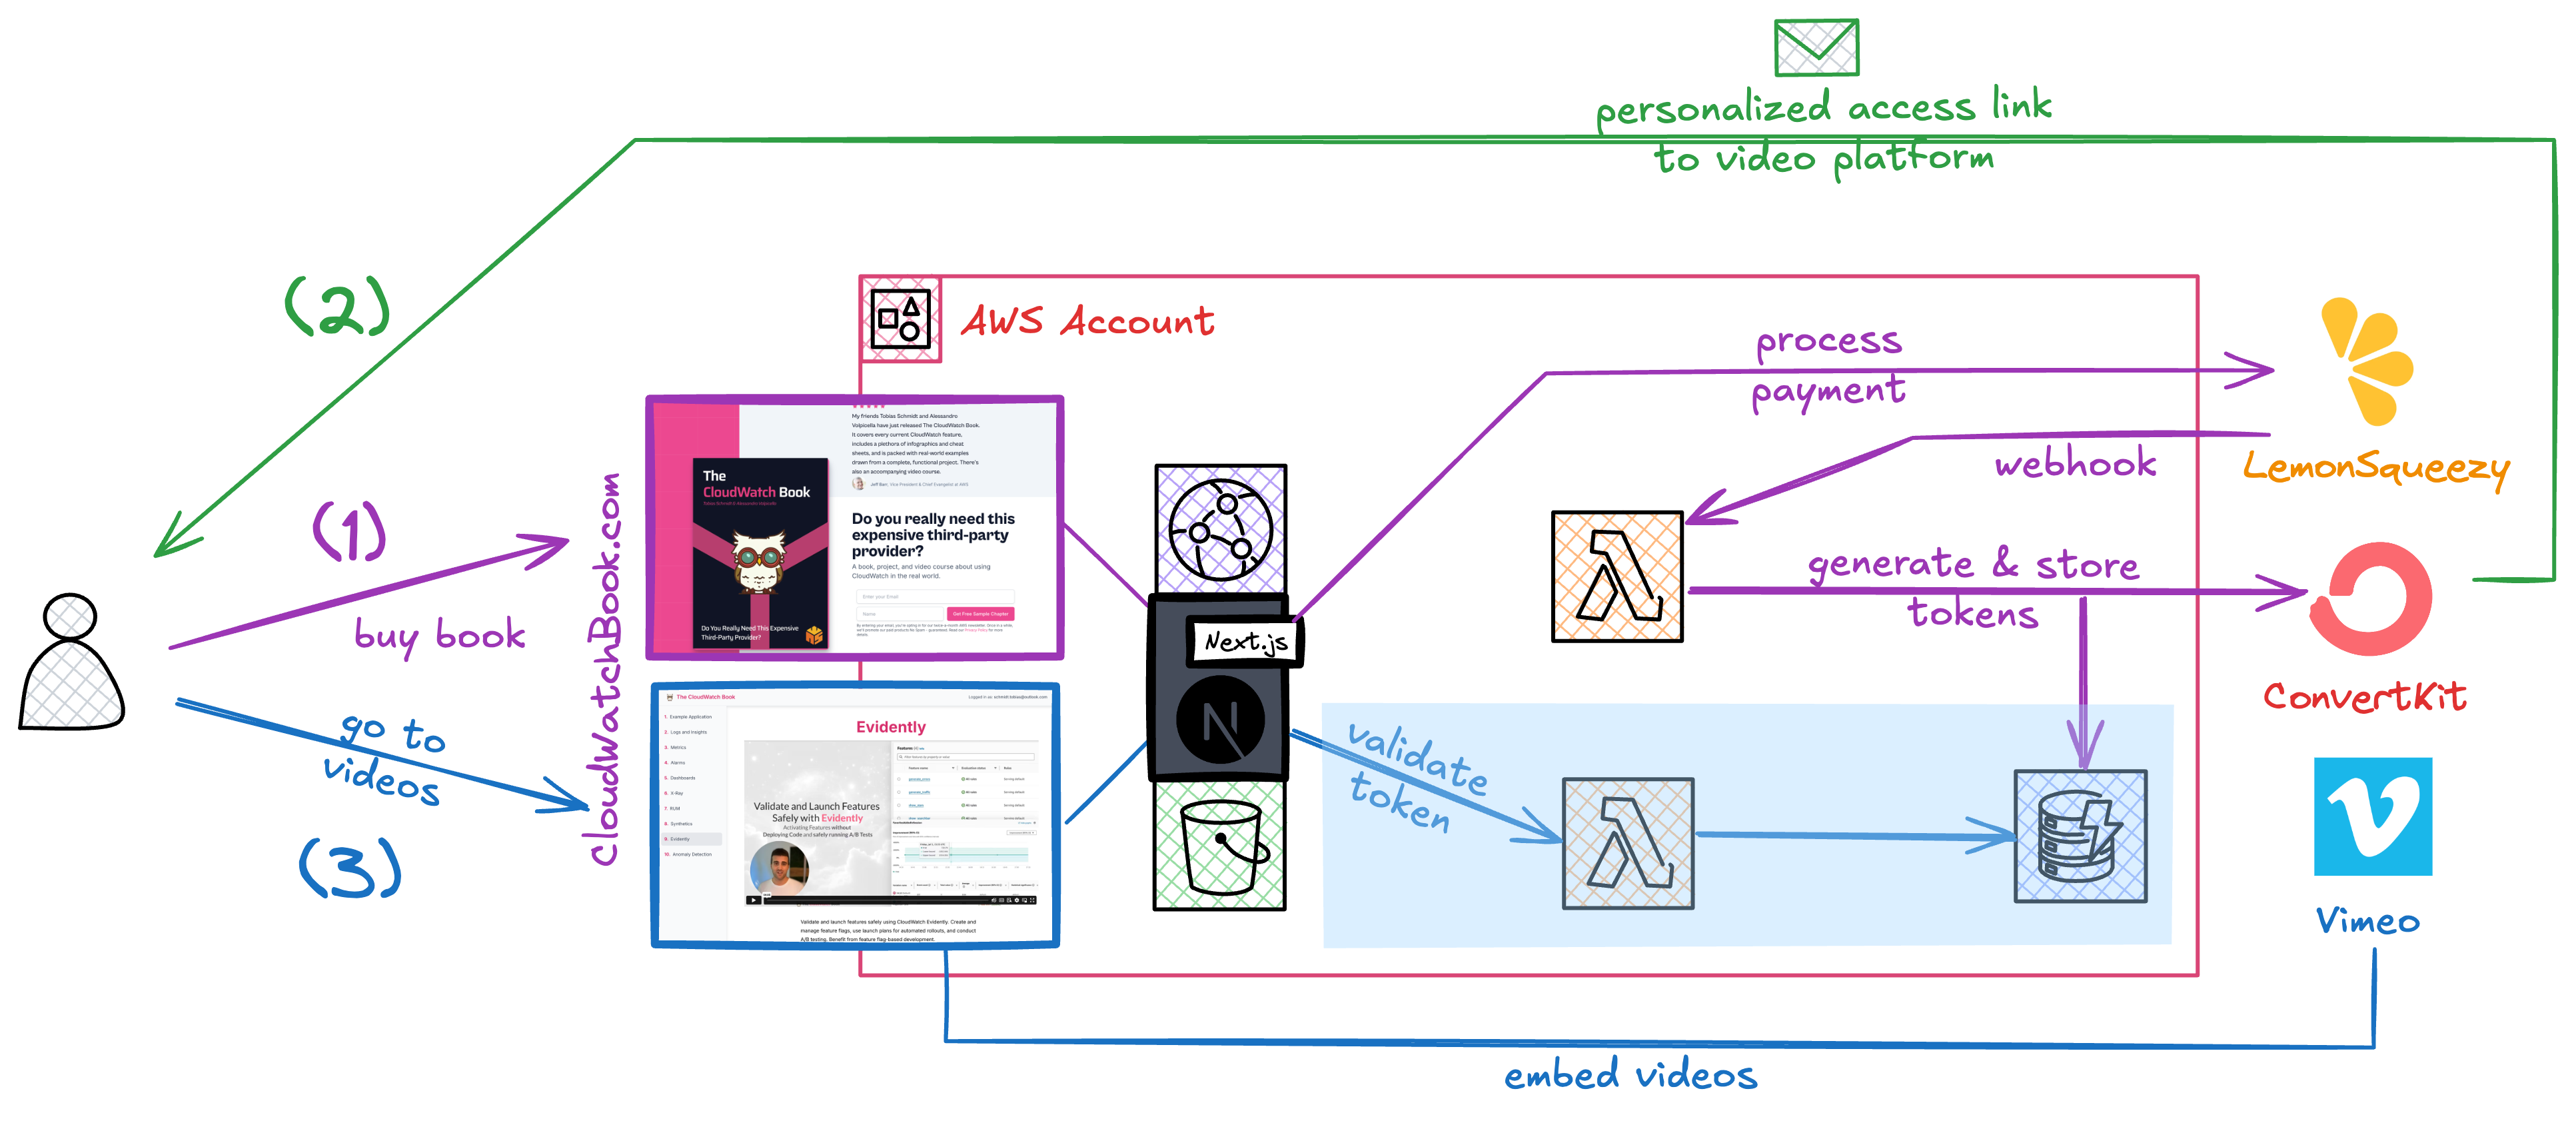
For this, we’ll create another simple Lambda function that will check the token by querying our orders DynamoDB table. If the token is valid, we’ll return the links to the videos stored on Vimeo.
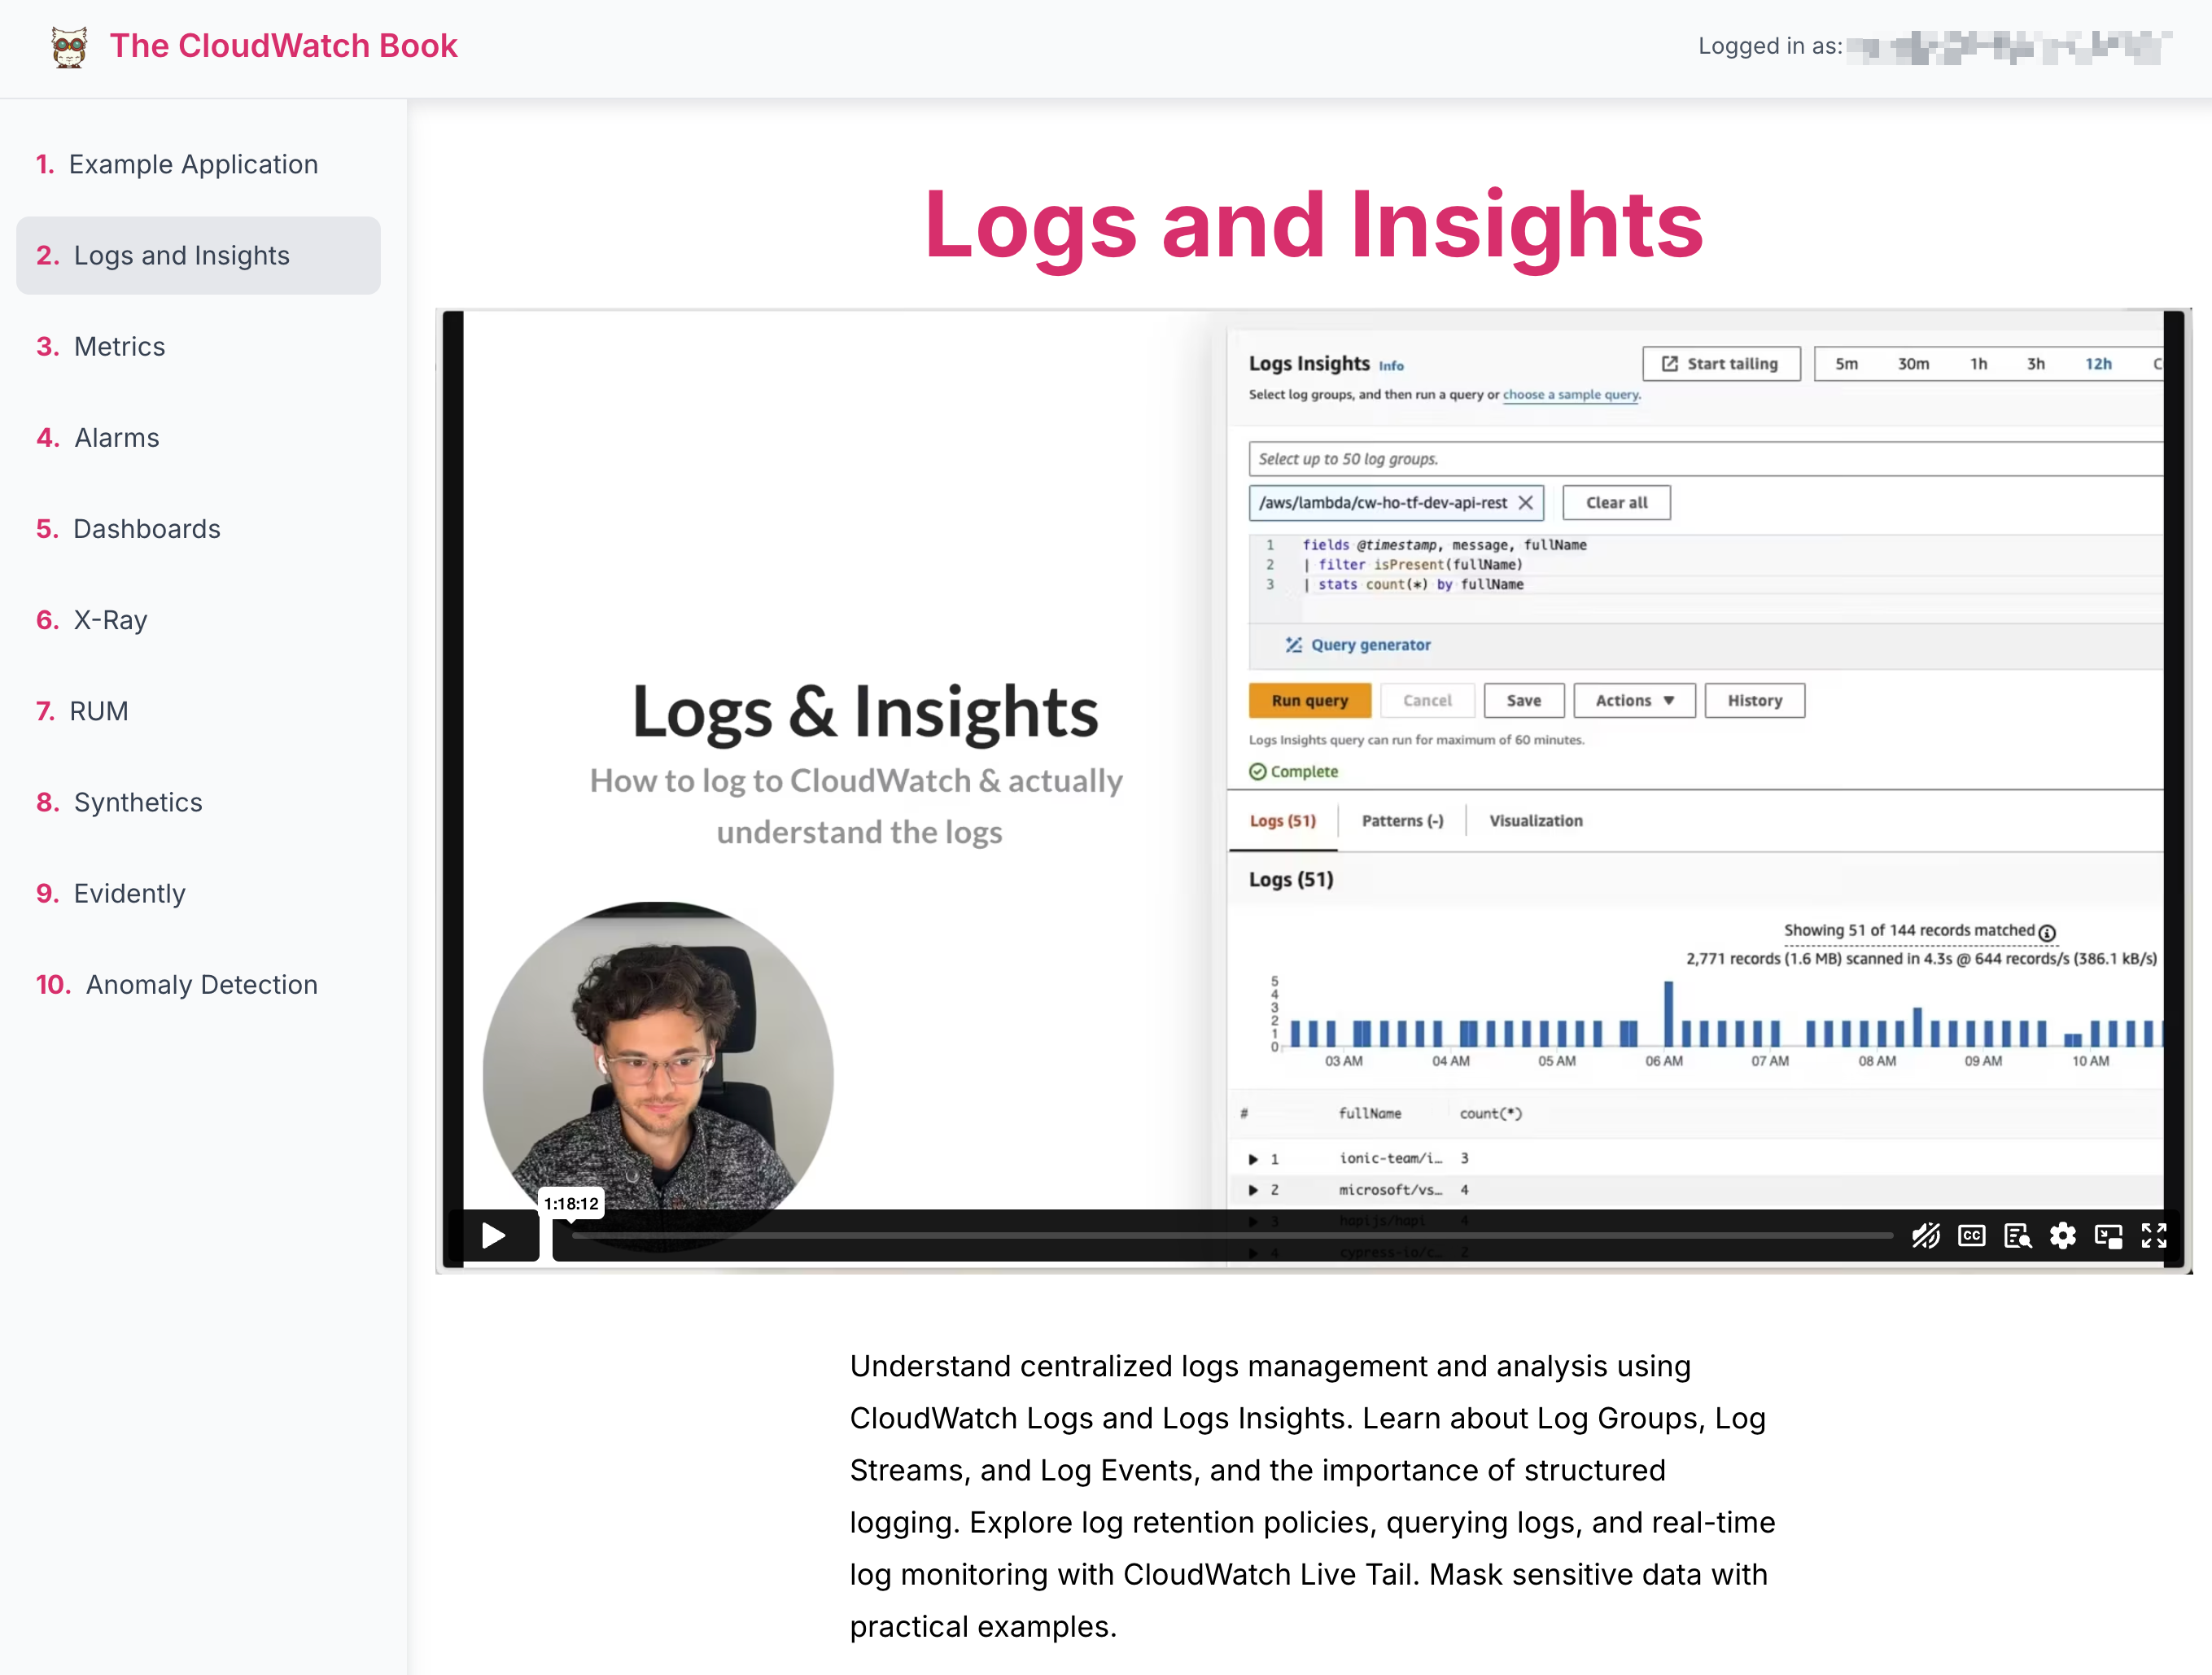
We’ll also track the number of views. If we notice that the customer hasn't accessed any videos within the first 30 days, we’ll send them an email to check if they had any issues with the platform or the content.

If the platform is accessed with a missing or invalid token, we’ll display our contact details.
Where to Go from Here
We’re very happy with our decision because it’s working perfectly. As mentioned earlier, except for the Vimeo subscription, we don’t have any additional costs. We’re also not tied to any other platform.
We can now implement any idea we come up with. Here are a few possibilities:
Displaying motivating animations for finishing one, several, or all videos.
Issuing a custom “completion badge” that customers can display anywhere they want.
Adding a small feedback form so they can report issues about the platform or content without leaving the page.
There’s nothing we can’t do. 😊
Conclusion
In this article, we shared how we created a serverless video platform for our CloudWatch Book using SST, Next.js, ConvertKit, LemonSqueezy, and Vimeo. We discussed our choice to go custom and serverless, outlined the technologies we used, and explained the architecture and key processes: customer purchase flow, sending personalized video access links, and delivering video content.
Building our own platform has given us control and flexibility, allowing for seamless integration with our existing tools and avoiding extra subscription costs. The serverless approach has been cost-effective and easy to manage, utilizing AWS managed services for the heavy lifting. 💪
We encourage you to consider building your own serverless platforms. ✌️
Subscribe to my newsletter
Read articles from Tobias Schmidt directly inside your inbox. Subscribe to the newsletter, and don't miss out.
Written by

Tobias Schmidt
Tobias Schmidt
Helping aspiring engineers master the cloud.