Generating Delays Using TIMERS on STM32F411 Discovery Board (using HAL - Hardware Abstraction Layer)
 Jagberry Vision
Hello Creators!!
In this article, we'll learn how to use TIMERS to generate delays through the Hardware Abstraction Layer (HAL). In the next article, we'll explore programming TIMER peripherals from scratch, using bare-metal programming.
For this section, we will be using:
→ STM32F411XE Discovery Board
→ STM32CubeIDE
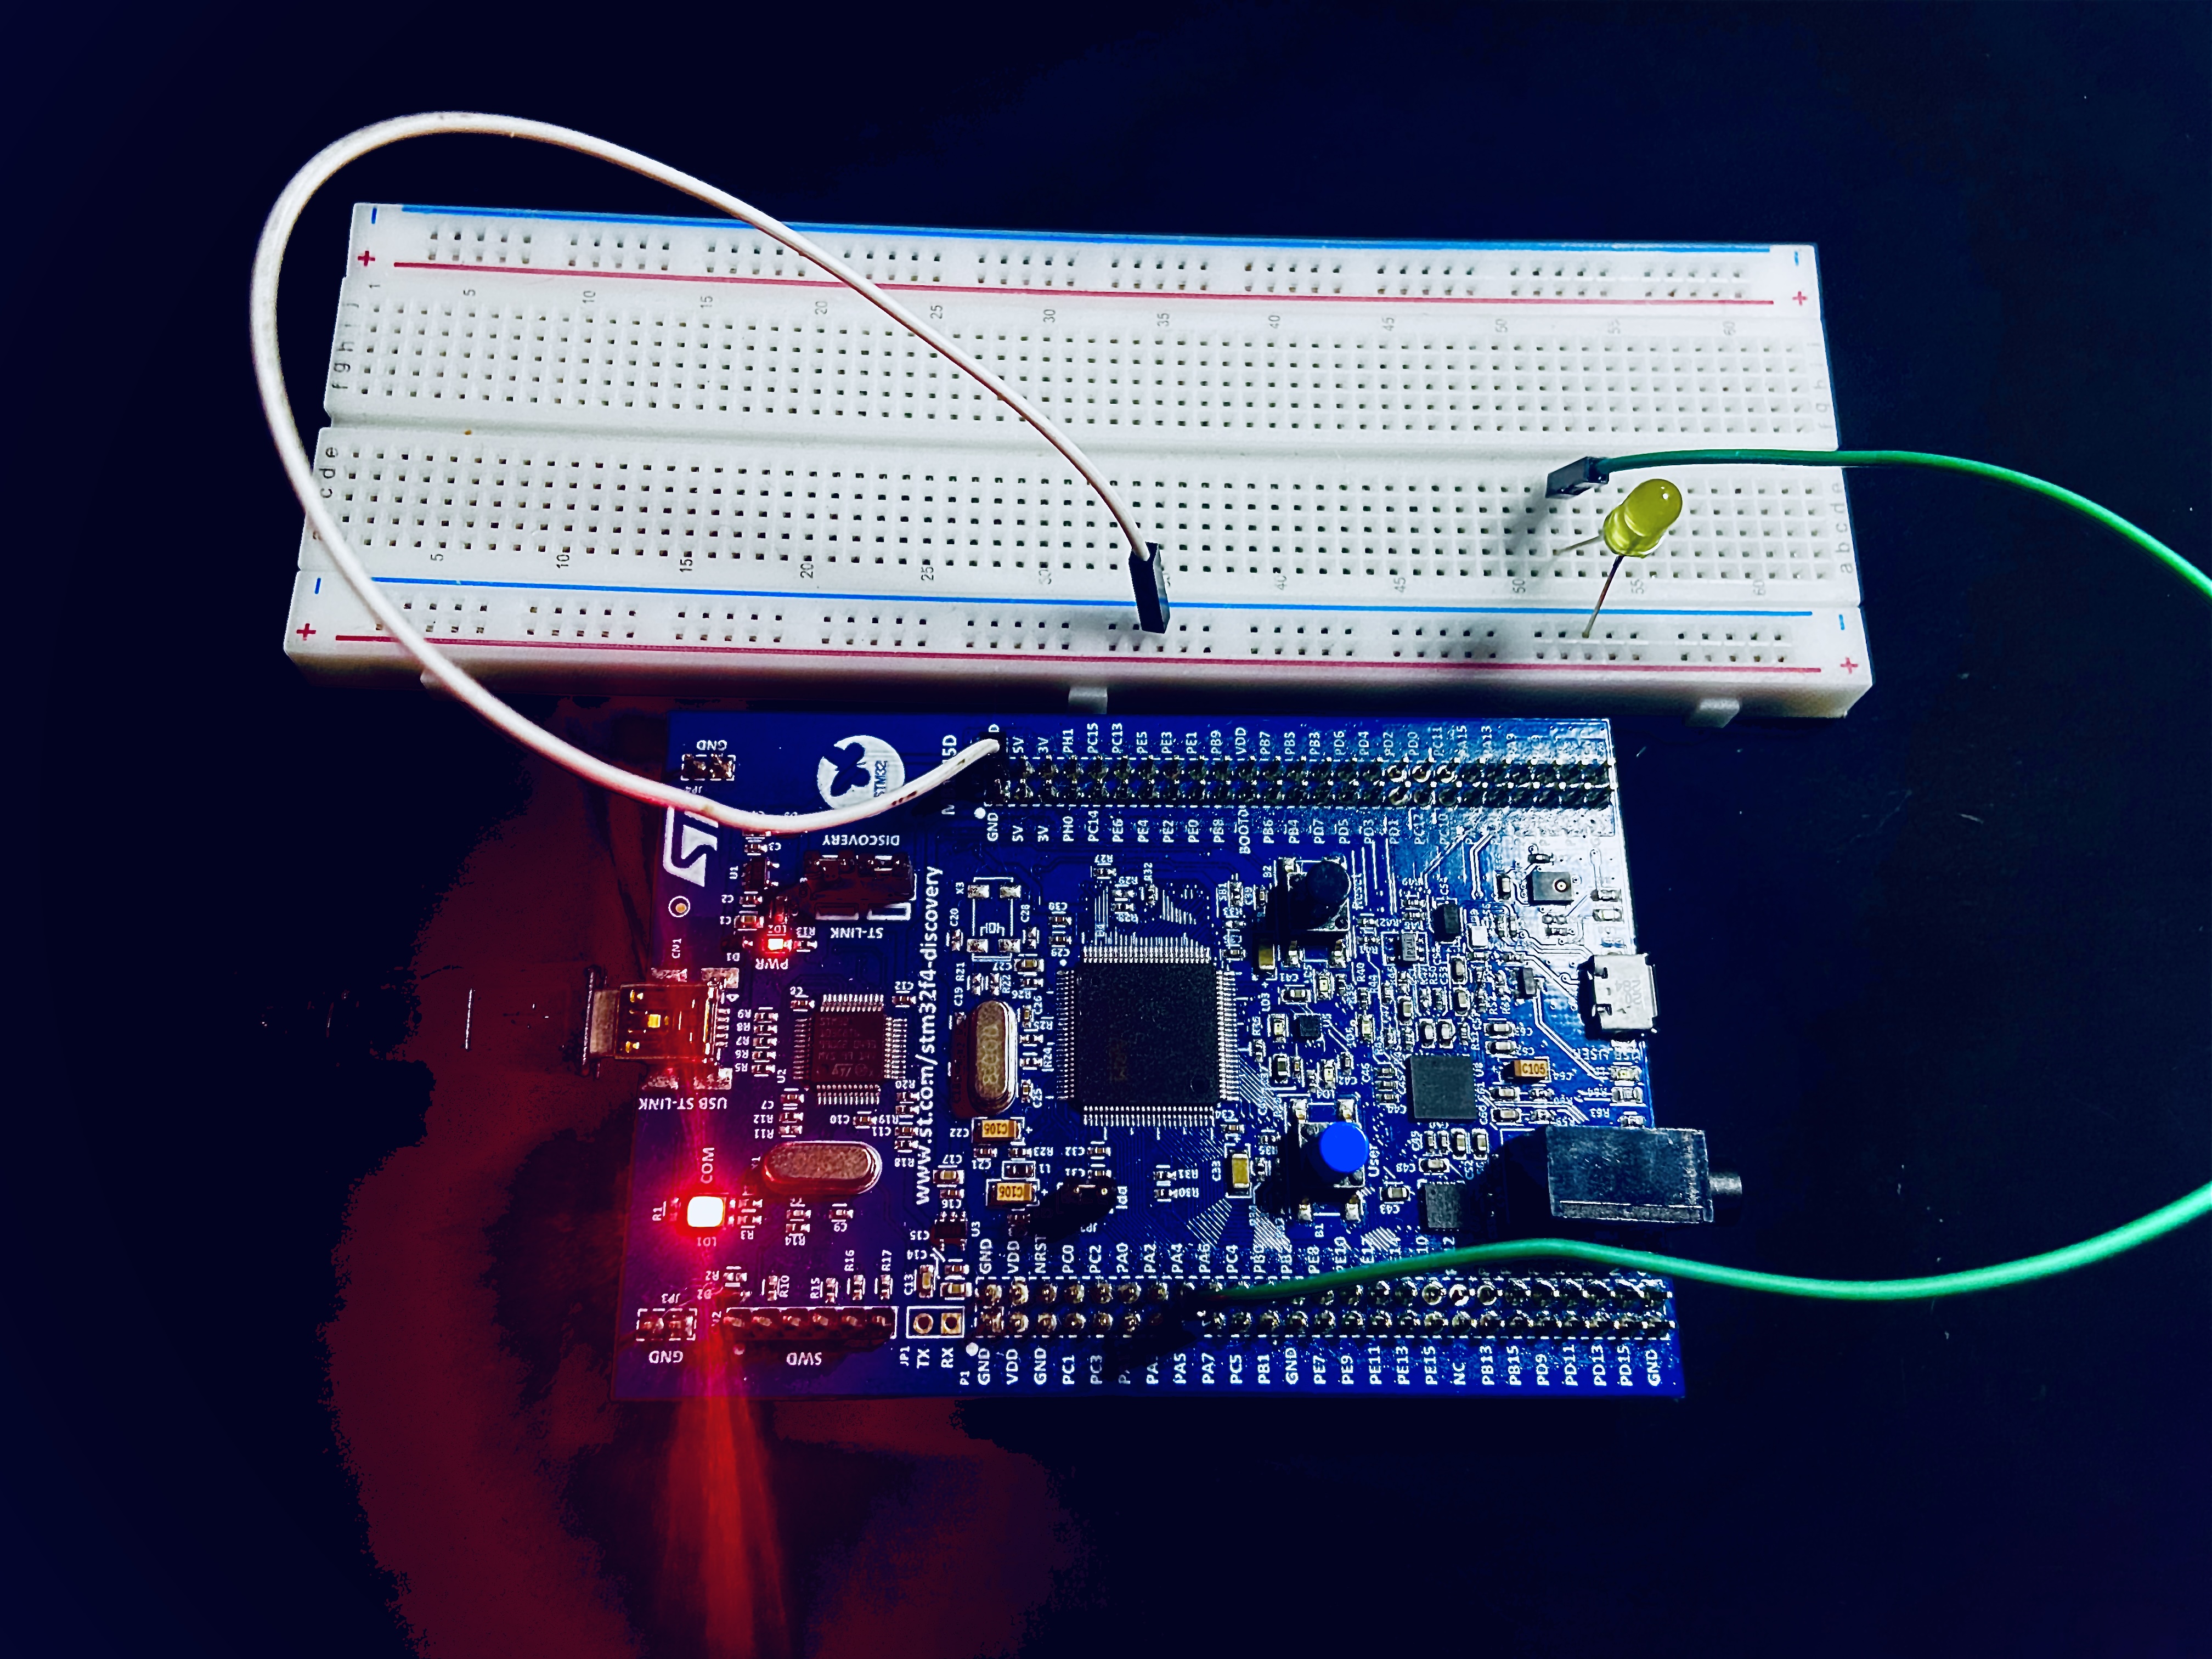
→ 1 external LED and 2 jumper wires.
Before we start with the program, I want to first cover with clock configuration basics, because clock configuration is the critical element for not just our programming but also this information comes very handy when you are dealing with TIMERS for complex tasks like PWM.
Clock Configuration Basics
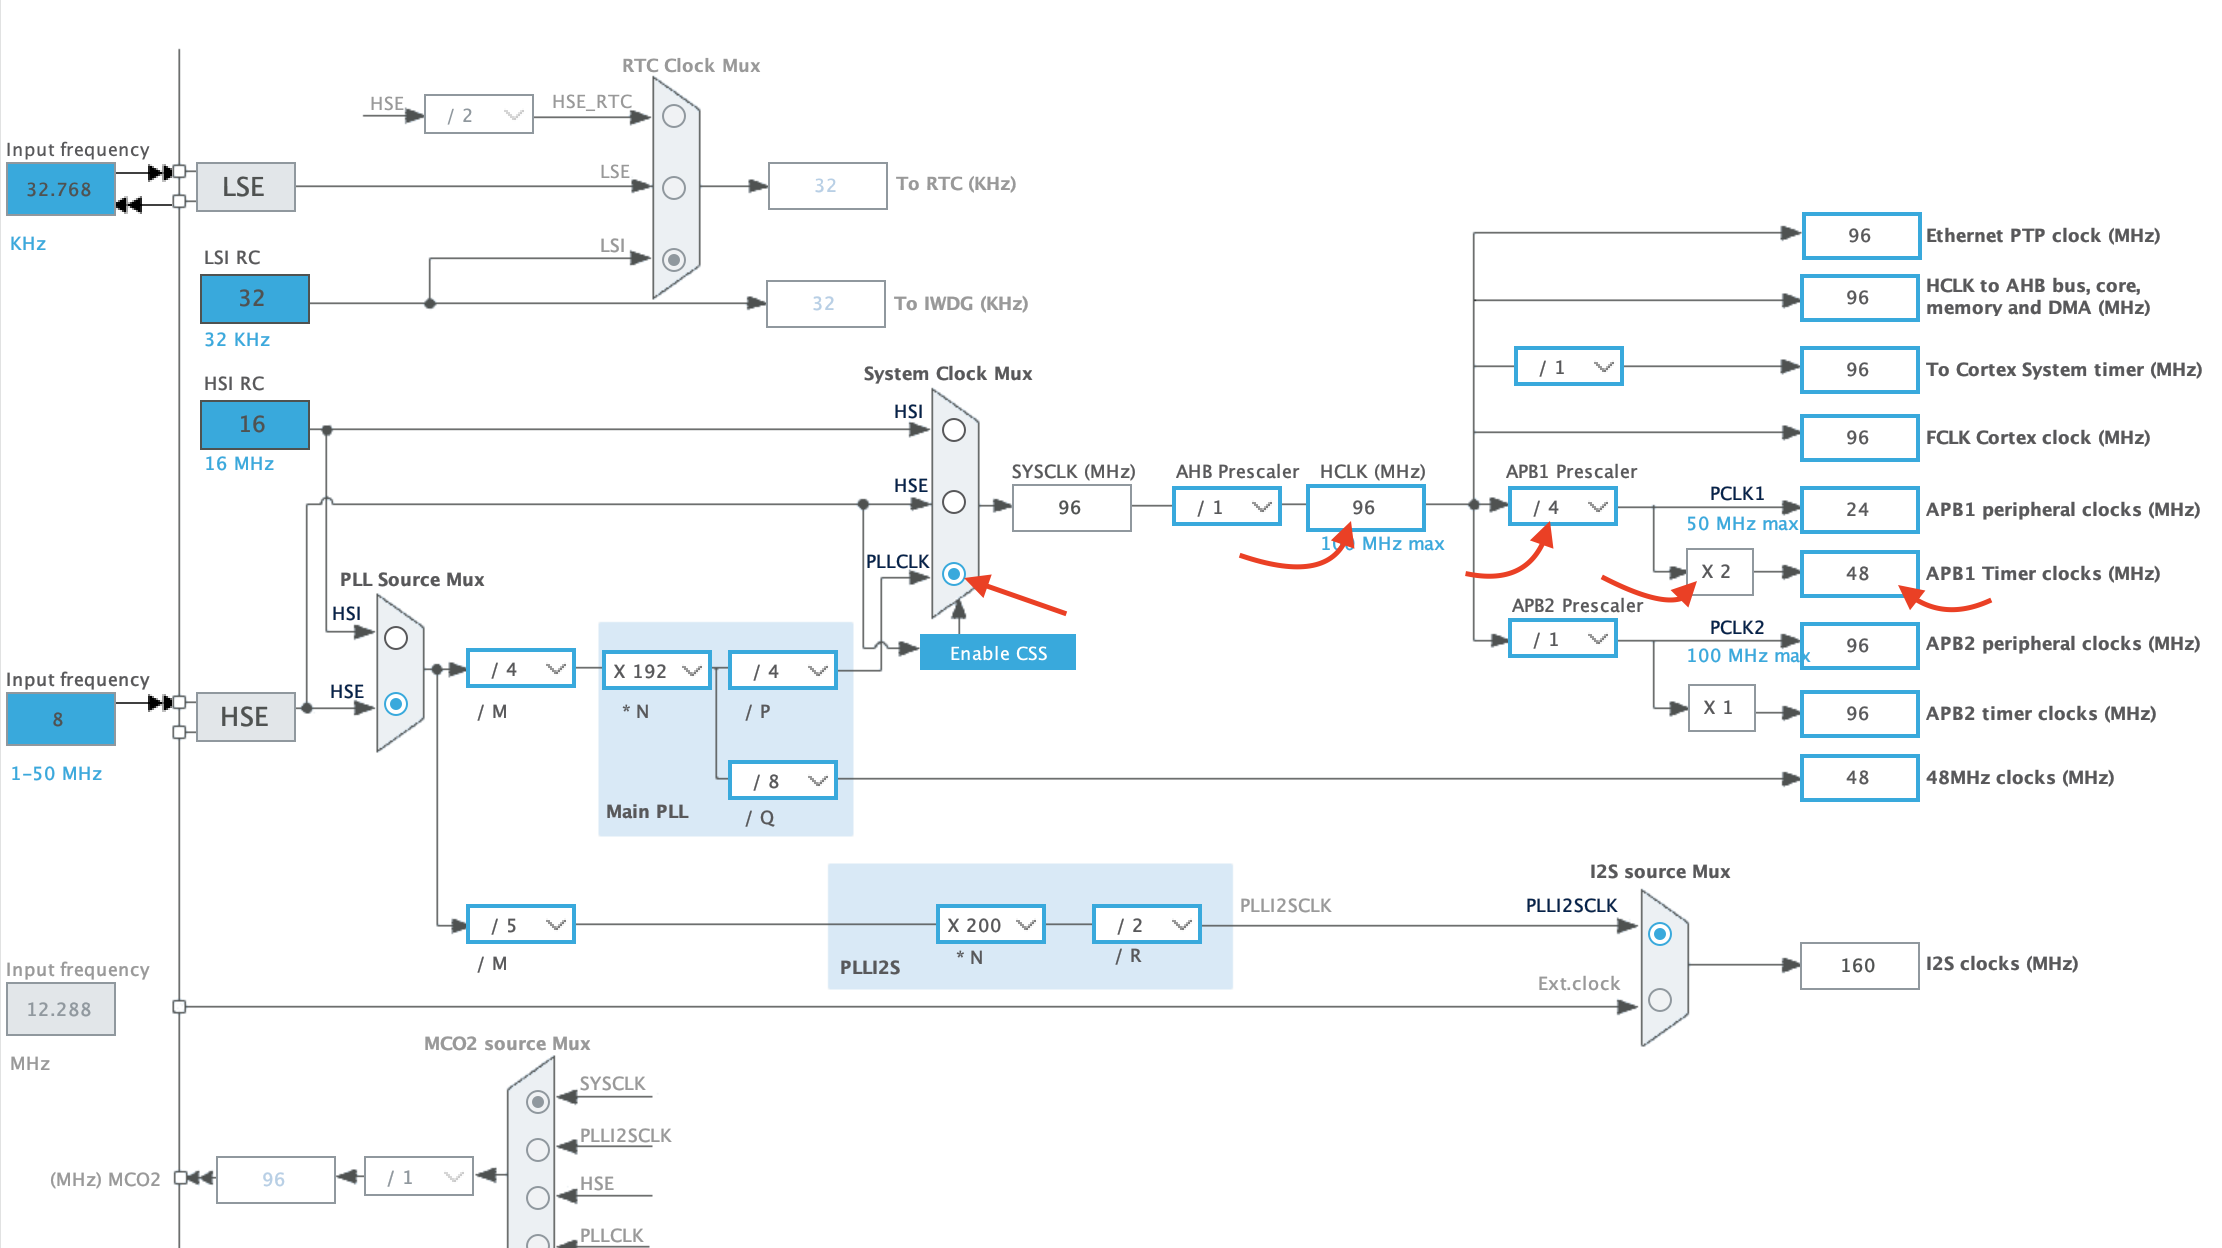
For STM32 Discovery board, all the MCU components needs clocks signals to work, thus STM32 provides main clock called as System clock(SYSCLK). if you look at the diagram provided you will notice SYSCLK is sourced with MUX which provides either HSE/ HSI/ PLL these are SYSCLK sources which provides clock signal with different frequencies.
HSE → High Speed External Crystal Oscillator
HSI → High Speed Internal Oscillator (default selected in STM32)
PLL → Phase Locked Loop

In the STM32F411XE, the HSI (High-Speed Internal Oscillator) is the default SYSCLK source, providing a clock signal at 16 MHz. You'll notice that the SYSCLK is passed through a pre-scaler, which lowers the clock frequency by dividing it by a factor (such as 1, 2, 4, etc.). The output is then sent to the HCLK.
What is HCLK?
STM32 uses two primary buses for data transmission: the AHB (Advanced High-performance Bus) and the APB (Advanced Peripheral Bus), which is further divided into APB1 and APB2. The AHB bus operates at a higher speed compared to the APB buses, making it ideal for controlling high-speed peripherals, the CPU clock, and other critical components. On the other hand, APB buses are typically used for peripherals like timers, which operate at lower transmission speeds.
Since every component within the microcontroller requires a clock signal to function, the HCLK (AHB Clock) is responsible for handling the clock cycles for components controlled via the AHB bus. For the APB buses, STM32 uses a separate clock signal called PCLK.
Just like the AHB pre-scaler reduces the clock speed from SYSCLK for HCLK, STM32 also provides an APB pre-scaler to reduce the frequency from HCLK for the APB buses. Since HCLK operates at a much higher speed than PCLK, the pre-scaler helps control the clock speed for peripherals connected to the APB buses.
APB1 and APB2: Separate Clocks
The APB bus is divided into APB1 and APB2, each controlling different sets of peripherals. As a result, there are two separate clock signals:
PCLK1 for peripherals on APB1
PCLK2 for peripherals on APB2
Each APB bus has a PCLK derived from the HCLK, which is further modified by the APB pre-scaler. Based on this pre-scaler, you get a multiplier (either 1 or 2) that affects the clock frequency used by TIMERS attached to the respective APB bus.
Illustration: Timer Example
For instance, if you're using TIMER2, which is located on the APB1 bus, the clock frequency of TIMER2 will be the clock frequency of PCLK1 multiplied by the multiplier derived from the APB1 pre-scaler.
Now as we have successfully formed our foundation on CLOCK CONFIGURATION we are good to go with our coding!!!
MCU Programming:
Remark:
In our code w’ll use -
TIMER → TIM3
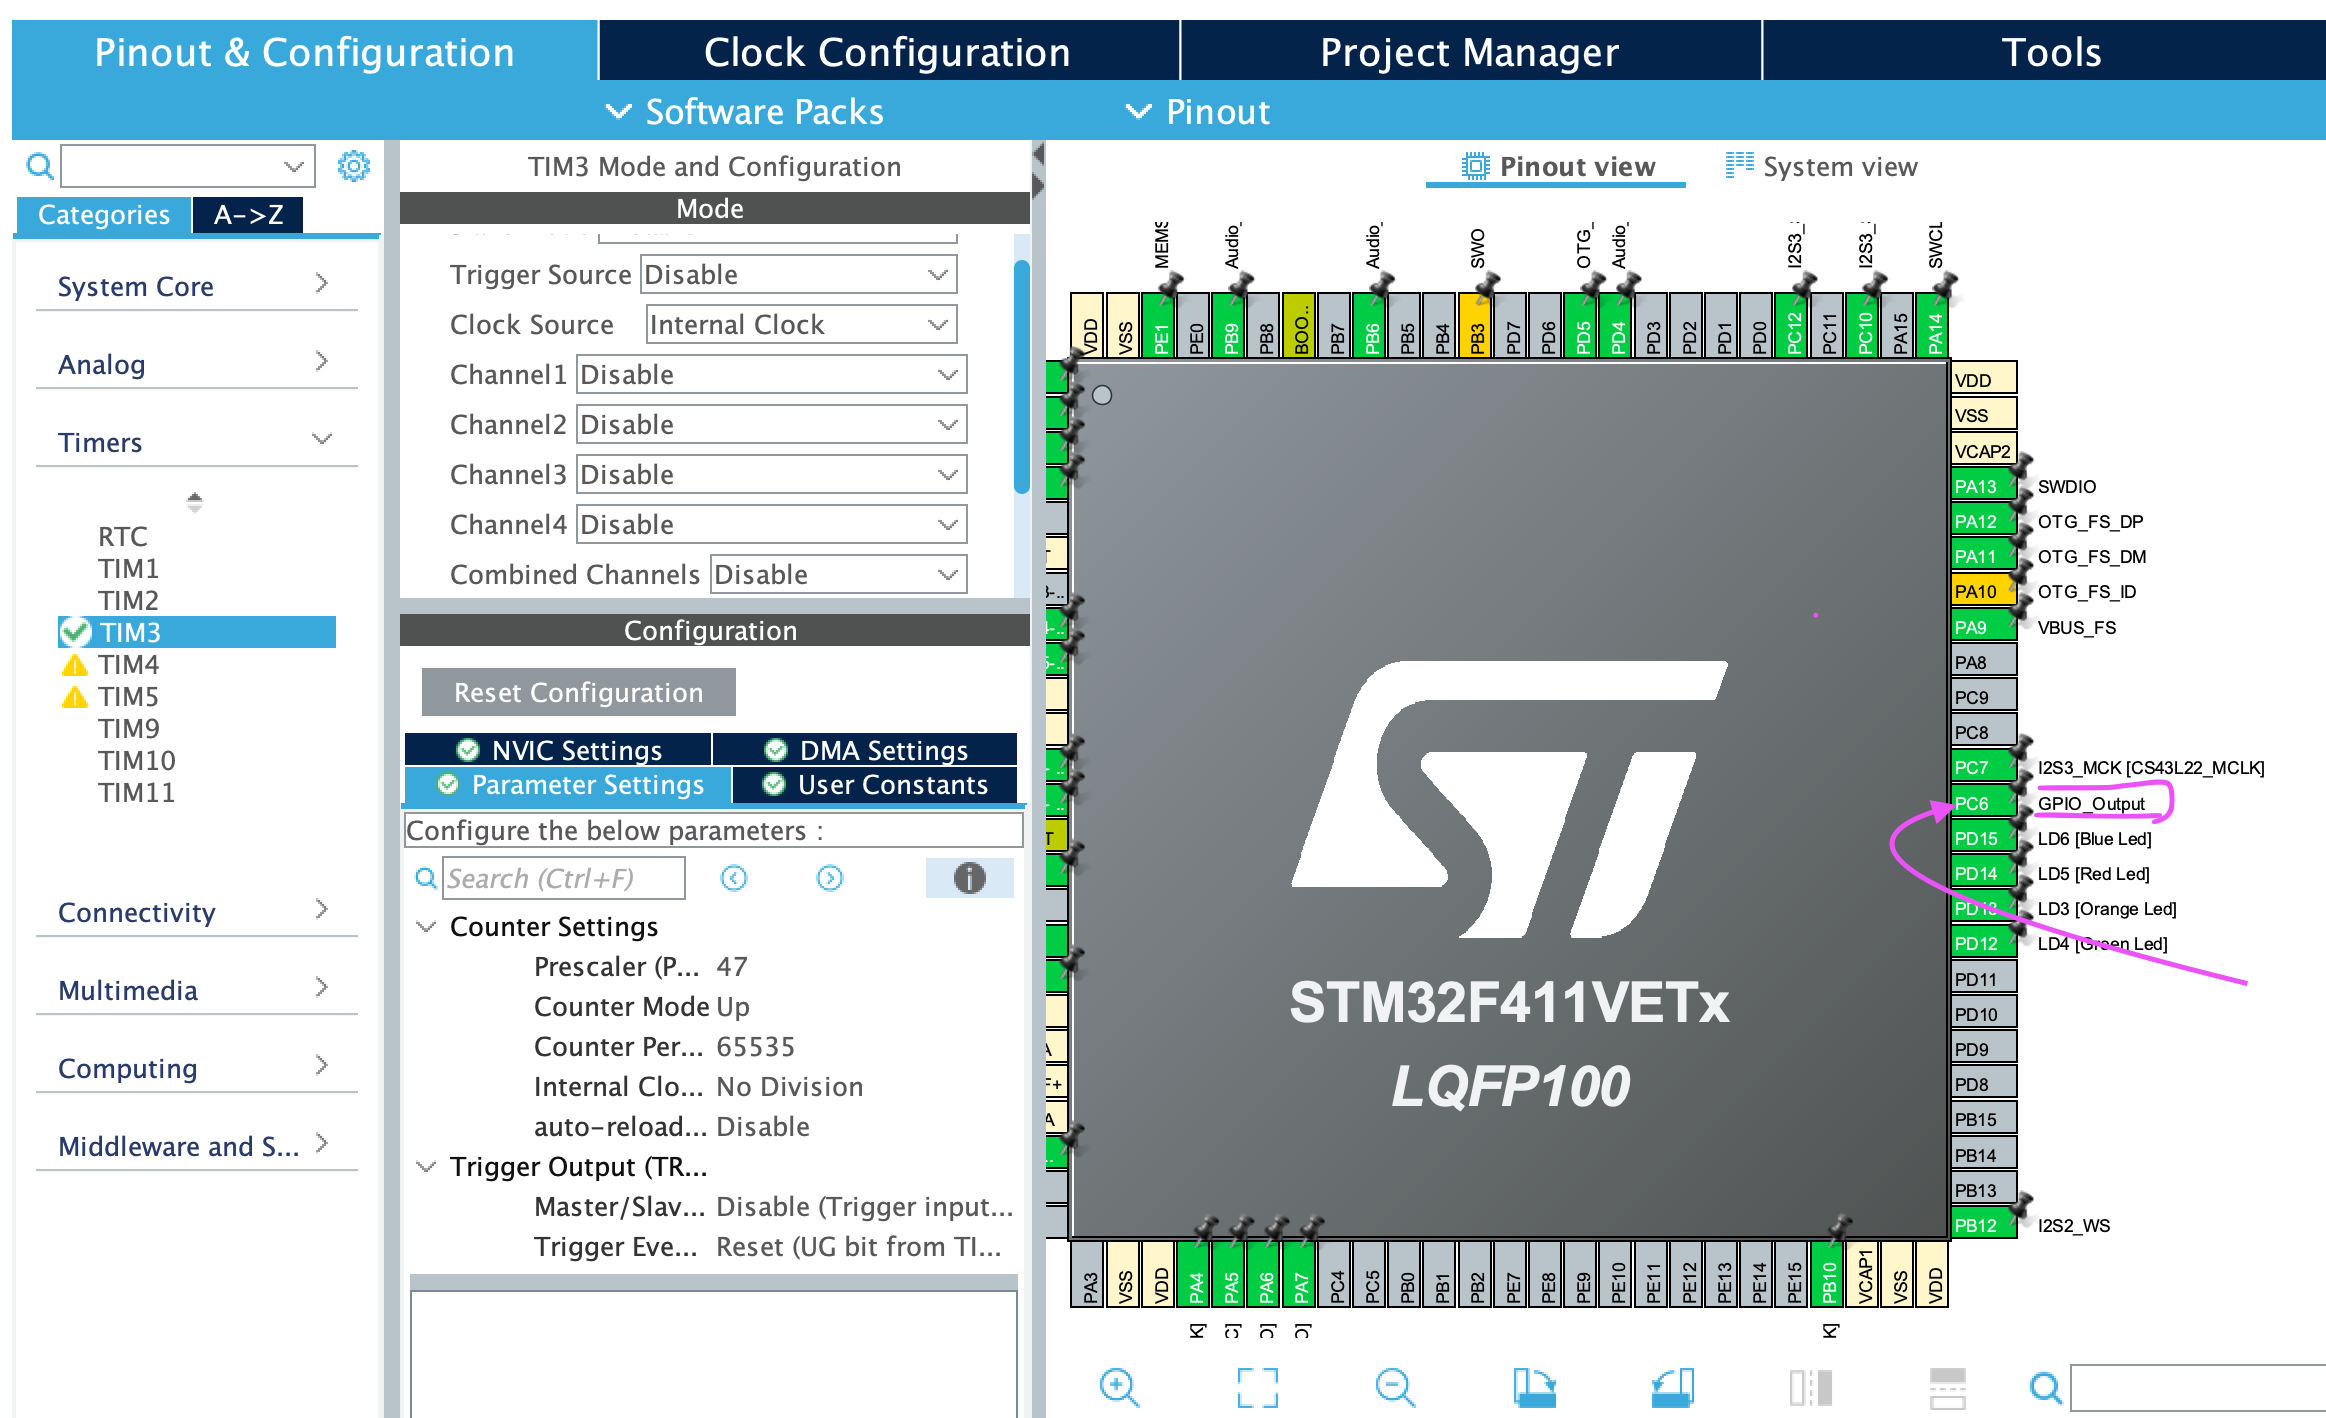
GPIO → PC6 for toggling LED
μs [or] us → signifies micro seconds.
Please perform these configuration on .ioc UI and then generate the code.
- Clock Configuration:
- GPIO Configuration:
We will be using GPIO PC5 pin for LED output.
- Timer Configuration:
We will be using 16-bit (General purpose timer) TIM3.
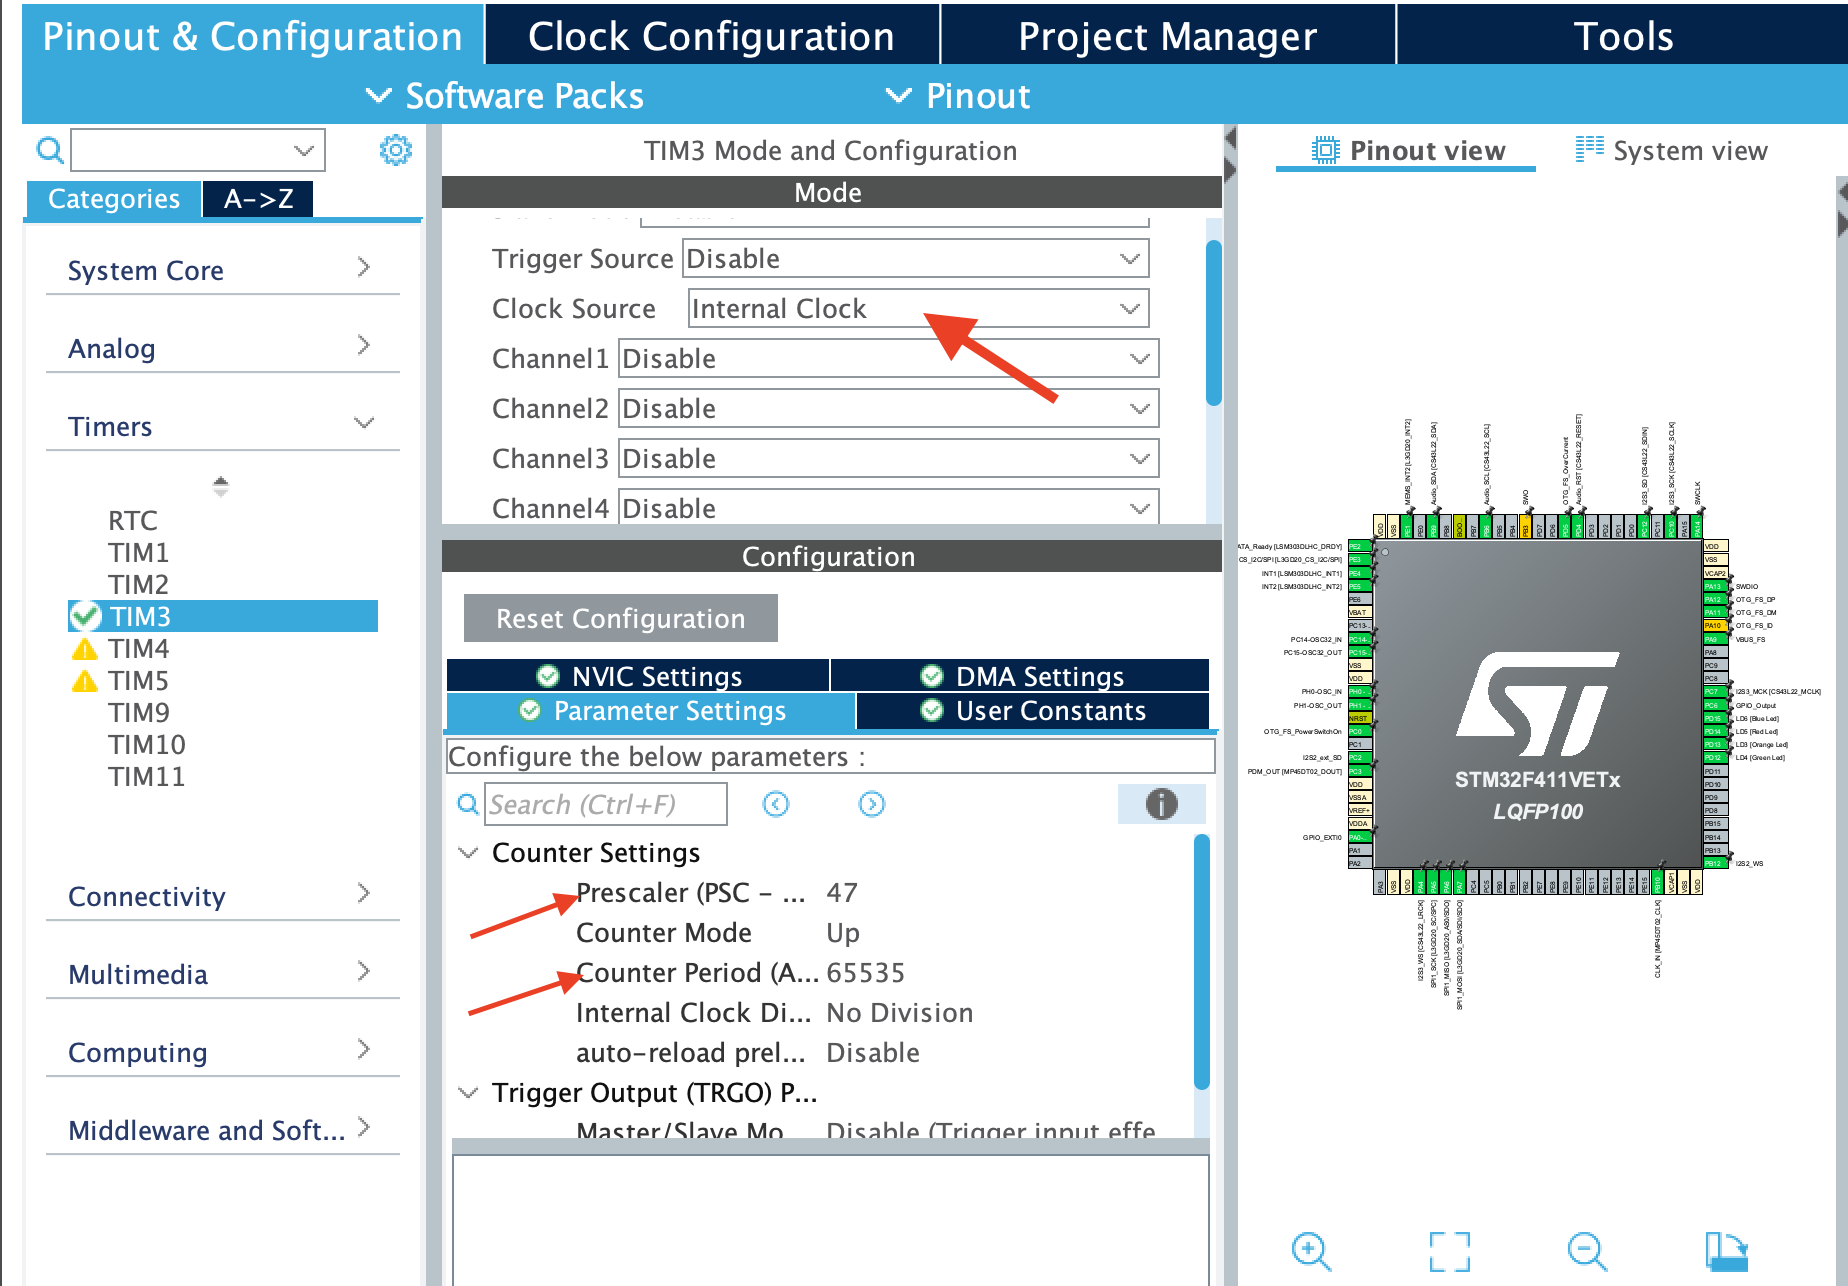
In TIMER Configuration, it is very important to understand few terms(PSC, ARR) and why are we setting them.
But before that, what is the clock frequency of TIMER-3?
Through the MCU specific reference manual you will get, TIMER-3 is connected to the APB1 bus.
The clock frequency for peripherals on the APB1 bus is PCLK1.
The APB1 pre-scaler affects the clock signal. If the pre-scaler results in a multiplier of 2 for timers, the final clock frequency for TIMER-3 will be
PCLK1 × 2
- If PCLK1 is 24 MHz, applying the multiplier gives:
TIMER-3 clock frequency = 24 MHz × 2 = 48 MHz
This clock frequency is what will drive TIMER-3 for its operations.

[Continuing] with TIMER Configuration
1. Pre-scaler:
Is used to divide the clock frequency. In this case, we want to create a delay using TIMER-3, which runs at 48 MHz. The time period of this clock (1/frequency) is:
T = 1 / 48MHz= 0.020μs
To simplify calculations and achieve more precise control, we'll reduce the clock frequency from 48 MHz to 1 MHz.
Why 48 MHz to 1 MHz?
At 1 MHz, the time period becomes:T = 1 / 1MHz =1μs
This 1 µs time unit is commonly used because it's a small time reference (1 second = 10^6 micro second (µs)), giving the programmer fine-grained control over peripherals, such as servo motors, where precise timing is critical.
To achieve this, we use a pre-scaler value of 48-1 (which the hardware adds 1 to internally), dividing the clock frequency:
48MHz / 48 = 1MHz
Now, instead of each tick incrementing the counter every 0.020 µs, it increments every 1 µs, making it easier to calculate delays and control peripheral operations with better precision.
2. Auto reload register (ARR)/Period:
ARR is the register which tells the counter up till what value it has to count or better say after at what value event overflow occurs, in our case it will be the delay value which user inserts.
For initialising I will set ARR as max value = 65536.
NOTE: for 16-bit TIMER, ARR value must not exceed to 2^16 = 65536 and similarly for 32-bits TIMER ARR value must not exceed to 2³32 = 4294967296.
In main.c
Function Prototypes

GPIO init function, PC6 configured as output mode to toggle LED.

TIM3 Initialisation

Delay function

__HAL_TIM_SET_COUNTER(&htim3, 0)→ it first initialise counter value as zero, whenever delay is called.__HAL_TIM_GET_COUNTER(&htim3) < us→ This macro checks whether the counter has reached the user-defined delay in microseconds (µs). It continuously compares the current counter value against the delay you’ve specified in microseconds.
But why do we compare the counter value directly with the microseconds (µs)?
Explanation:
In the earlier steps, we reduced the timer clock frequency from 48 MHz to 1 MHz using a pre-scaler. This means that now, every tick or increment of the counter corresponds to 1 µs. So, if the counter starts at 0 and you want a delay of 5 µs, the counter needs to increment 5 times. Since each increment represents 1 µs, the total delay will be 5 µs.
- Example:
The counter is initialized to 0 using
__HAL_TIM_SET_COUNTER(&htim3, 0).You request a delay of 5 µs.
The code checks:
while (__HAL_TIM_GET_COUNTER(&htim3) < 5).As the counter increments every 1 µs, the program remains in the
whileloop until the counter reaches 5 (i.e., 5 µs have passed).
Thus, this while loop acts as the delay mechanism. The program stays in the loop until the condition is satisfied, effectively creating the desired delay.
So this how we use time (micro second) to relate with (counter increment) in order to produce a phenomena of delay.
Finally, main function
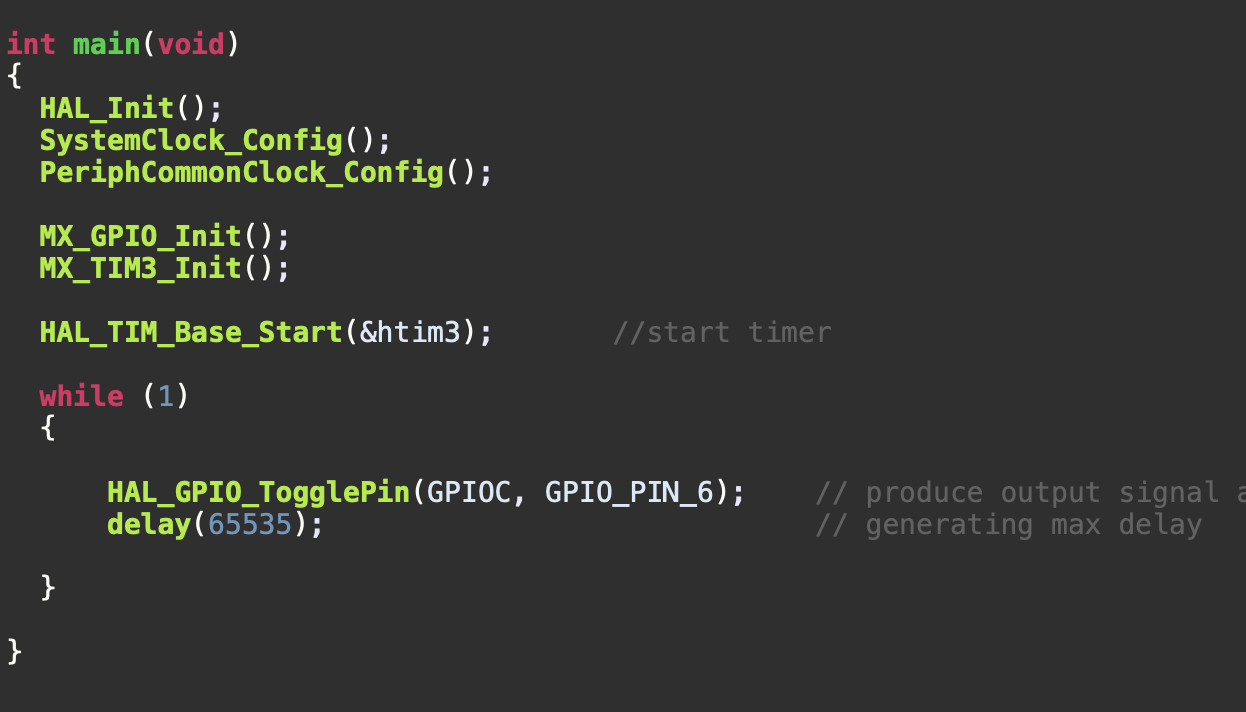
HAL_Init(), SystemClock_Config(), PeriphCommonClock_Config(), MX_GPIO_Init(), MX_TIM3_Init() are all auto generated codes which needs to be initialised in this order.
HAL_TIM_Base_Start(&htim3) → HAL_TIM_Base_Start starts the timer which you specifies as parameter (in our case htim3).
HAL_GPIO_TogglePin(GPIOC, GPIO_PIN_6) → HAL_GPIO_TogglePin starts the GPIO pin toggling.
delay(65535) → we passes 65535, which is the max limit for 16-bit ARR register, which basically means for each ticks counter can go max at 65535.
Note: you can give any delay within the range of 0 to 65535.
Well that’s it for this article!! In the next article, we'll explore programming TIMER peripheral from scratch, using bare-metal programming.
Subscribe to my newsletter
Read articles from Jagberry Vision directly inside your inbox. Subscribe to the newsletter, and don't miss out.
Written by

Jagberry Vision
Jagberry Vision
Hey!! At Jagberry Vision, we are dedicated to pushing the boundaries of technology through innovative projects in the fields of Embedded Systems and Artificial Intelligence. Our mission is to provide cutting-edge insights, practical tutorials, and in-depth explorations into the world of embedded solutions and AI integration. Whether you're an industry professional, a student, or an enthusiast, we aim to empower our community with the knowledge and tools needed to bring smart, efficient solutions to life.