Understanding Taints and Tolerations in Kubernetes
 Kaleem Mirza
In Kubernetes, taints and tolerations are used to control which nodes can accept which pods, helping you to schedule workloads more efficiently.
Taints:
Taints are applied to nodes.They mark a node so that it won’t accept any pods unless those pods have a matching toleration. Taints prevent pods from being scheduled onto nodes unless the pod “tolerates” the taint. Think of a taint like a “No Entry” sign for pods unless they have special permission to enter (which is given through a toleration).
The effect can be one of the following below:
NoSchedule: Pods will not be scheduled on the node unless they have a matching toleration.
PreferNoSchedule: Kubernetes tries to avoid scheduling pods on the node, but it's not guaranteed.
NoExecute: Existing pods on the node will be evicted if they don't have a matching toleration.
Example:
kubectl taint node node01 key=value:NoSchedule
This will taint node1, that means no pod can be scheduled on node1 unless it has a matching toleration.
Tolerations:
Tolerations are applied to pods. They allow the pod to be scheduled on nodes with matching taints. Think of tolerations as the pod’s “special permission” to enter nodes that have a taint.
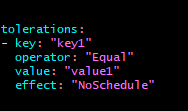
Example of a toleration in a pod YAML:

This toleration allows the pod to be scheduled on nodes that have the key1=value1:NoSchedule taint.
Best practices:
Use taints and tolerations to manage node affinity and pod scheduling.
Document taints and tolerations in your cluster for better understanding.
Monitor node conditions and adjust taints accordingly.
Subscribe to my newsletter
Read articles from Kaleem Mirza directly inside your inbox. Subscribe to the newsletter, and don't miss out.
Written by

Kaleem Mirza
Kaleem Mirza
Devops and cloud learning enthusiast with a determination to learn more and share my knowledge so that it benefits the Open Source community