Docker Storage Demystified: Mastering Bind Mounts and Volumes on Linux
 Rabiatu Mohammed
If you’ve worked with Docker before, you probably know the frustration of losing data when a container stops. By default, Docker containers are ephemeral, meaning any data you store inside them disappears once the container is gone. But what if you need your data to stick around? That’s where Docker storage comes in.
Docker offers two main ways to handle storage: bind mounts and volumes. Both have their place, but knowing when to use each can make a huge difference in your workflow. Whether you’re developing an app or running a production setup, understanding how to manage persistent data in Docker is a game-changer.
Understanding /var/lib/docker: Where Docker Stores Its Data
When you’re working with Docker on a Linux system, it’s important to understand where Docker keeps its data. By default, Docker stores most of its essential files in the /var/lib/docker directory. Navigating to this directory allows you to directly access files related to containers, images, volumes, and networks.

Creating a Docker Volume
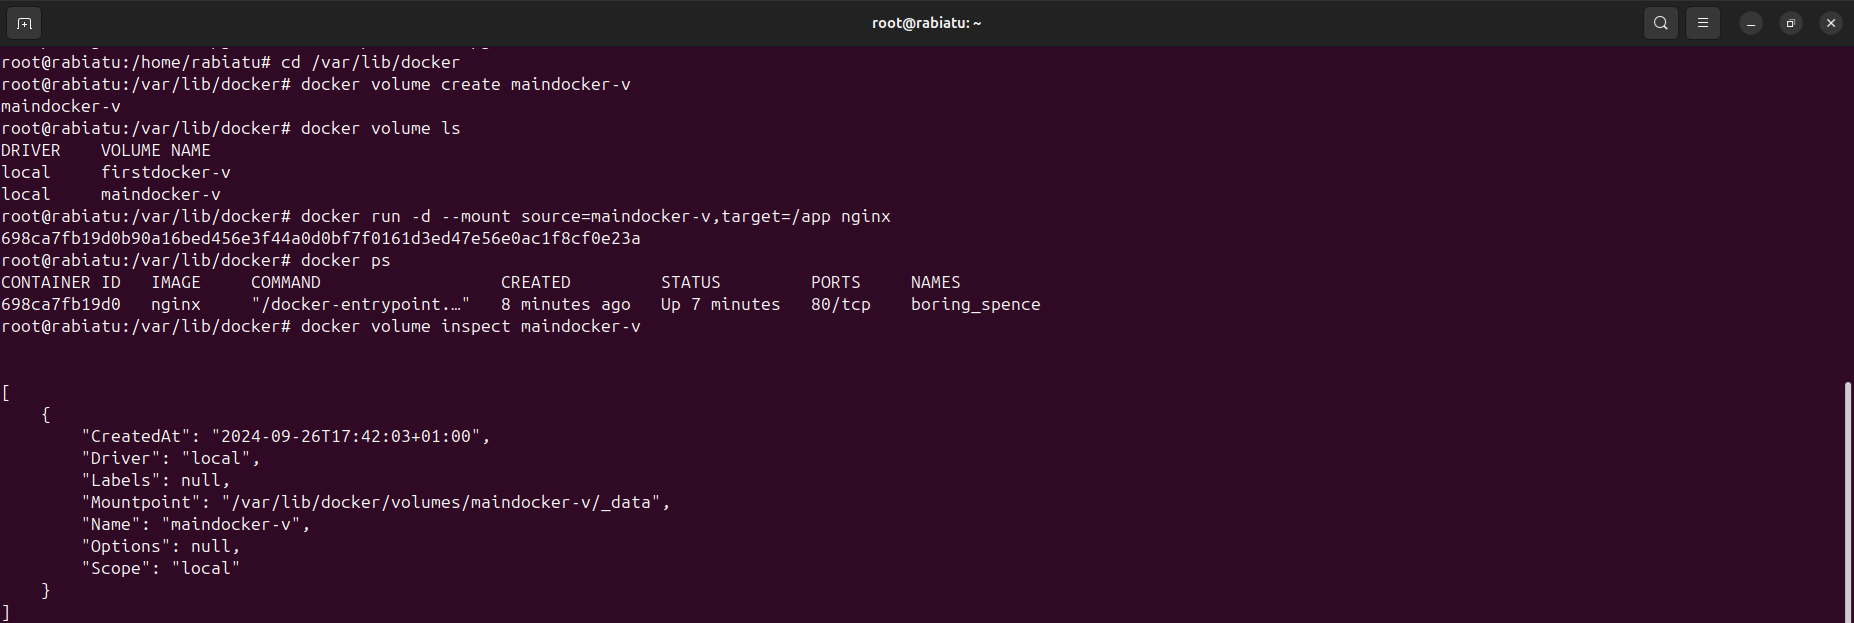
We will create a Docker volume named maindocker-v. Volumes are an essential part of Docker's storage system, allowing you to persist data beyond the lifecycle of a container.

Listing Docker Volumes
After creating a volume, it’s always a good idea to verify that it has been successfully created. You can do this by using the docker volume ls command, which lists all existing volumes on your Docker host.

Mounting the Volume to a Container
Now that the maindocker-v volume is created and listed, let’s use it in a running container. We’ll mount this volume to an NGINX container so that data stored in the volume is persistent even after the container stops.

-d: Runs the container in detached mode, meaning it runs in the background.--mount source=maindocker-v,target=/app: This tells Docker to mount themaindocker-vvolume (source) to the/appdirectory (target) inside the container.nginx: Specifies the image we’re using, which is the latest version of the NGINX web server.
Verifying the Running Container
After running the container with the mounted volume, it's always a good idea to check if the container is running correctly. we use the docker ps command, which lists all running containers on your system.

Container ID: A unique identifier for the running container.
Image: The image used (in this case,
nginx).Command: The command being executed in the container (NGINX’s entrypoint).
Status: This confirms the container has been running for a few minutes.
Ports: The container is exposing port 80, which is typical for web servers.
Name: Docker automatically assigns a random name if none is provided. Here, the container was named
boring_spence.
Inspecting the Volume
Once the container is running, it’s useful to inspect the volume and check its details. This allows you to see exactly where the volume is mounted on the host system and view other key information.

CreatedAt: The timestamp of when the volume was created.
Driver: This is
local, meaning the volume is managed by Docker on the local filesystem.Mountpoint: This shows where the volume data is stored on the host, in this case at
/var/lib/docker/volumes/maindocker-v/_data.Name: The name of the volume, which in this case is
maindocker-v.Options and Scope: These are null and local, respectively, indicating that the volume is being managed locally on this Docker host.
Working with Files in the Mounted Volume
Now that we’ve successfully mounted the maindocker-v volume to our container, let’s create a directory and a text file inside the volume. This file will persist even after the container stops, demonstrating the advantage of using Docker volumes.

Troubleshooting: Common Bind Mount Issues
When working with Docker bind mounts, it's common to encounter some issues. In this section, I'll walk you through a common error I encountered and how I resolved it.
This error occurred because the directory I was trying to bind from the host did not exist. Docker requires the source directory to be present on the host machine before it can mount it inside the container.

Solution: Creating the Missing Directory
To resolve the issue, I created the missing directory using the following command: mkdir -p /root/dockerlessonmain/

Re-running the Container
After creating the directory, I ran the following command to successfully start the container with the bind mount: docker run -d --mount type=bind,source=/root/dockerlessonmain/,target=/app/data nginx:latest
The container started without any issues, as confirmed by the output of the docker ps command:

Accessing the Running Container
you want to interact with it directly to check if everything is working as expected, particularly if your bind mount is set up correctly.
To access the container, use the docker exec command. This allows you to open a shell session inside the running container.

docker execis used to run commands in a running container.-itallows you to open an interactive terminal session.fc808fa8d0c5is the container ID for the NGINX container (replace this with your own container ID)./bin/shopens a shell session inside the container.
Stopping, Removing, and Restarting the Container
It’s important to see how Docker handles data persistence when containers are stopped, removed, and then restarted.
First, I stopped the running container using the following command: docker stop fc808fa8d0c5
After stopping it, I removed the container to clean up: docker rm fc808fa8d0c5
Next, I reran the NGINX container with the same bind mount: docker run -d --mount type=bind,source=/root/dockerlessonmain/,target=/app/data nginx:latest

Verifying Data Persistence
After restarting the container, we want to verify that the data stored in the bind mount persists. Using the docker exec command, I accessed the container's shell to check the contents of the /app/data directory, where the bind mount is located.

This confirms that the bind mount is working correctly, and any data stored in the mounted directory on the host remains intact across container restarts and removals.
Subscribe to my newsletter
Read articles from Rabiatu Mohammed directly inside your inbox. Subscribe to the newsletter, and don't miss out.
Written by

Rabiatu Mohammed
Rabiatu Mohammed
I work on securing, automating, and improving cloud environments. Always exploring better ways to build reliable, secure infrastructure.