A Step-by-Step Guide to Setting Up Kubecost on EKS Cluster
 NaveenKumar VR
Before diving into the installation steps, let’s take a moment for a quick refresher on Kubecost. While you’re probably already familiar with it, a brief introduction will set the stage perfectly and ensure we’re all on the same page for a smooth start!
What is KubeCost:
In simple terms, Kubecost is a tool that helps you understand and manage the costs of running applications on Kubernetes.
It shows you how much you're spending on things like CPU, memory, and storage, so you can see where your money is going and make sure you're not wasting resources. It's like a budget tracker for your cloud infrastructure specifically for Kubernetes clusters, helping you optimize and save money.
How much does it cost to use Kubecost?
The basic version of Kubecost is free and covers most of our essential needs. However, there is also an Enterprise version that offers additional features. You can view the differences by clicking here.
Additionally, Kubecost offers a Cloud version and a fully open-source version called OpenCost. I don't want to overwhelm you with the details here, as this blog focuses on installing Kubecost on an EKS cluster. If you're interested in learning more about the differences, please click here.
Lets see how to install Kubecost on Amazon EKS Cluster:
Pre-Requisites:
Before we begin, please ensure you have access to a computer that can connect to AWS. Additionally, you’ll need the following permissions:
The ability to create IAM roles in AWS.
Necessary access to create, delete, and modify resources within your AWS account.
Let’s get started!
-
What is EKSCTL?
eksctlis a simple command-line tool for creating and managing Amazon EKS (Elastic Kubernetes Service) clusters. It automates tasks like setting up node groups and IAM roles, making it easier to deploy Kubernetes on AWS.Installing EKSCTL
    # for ARM systems, set ARCH to: `arm64`, `armv6` or `armv7`
    ARCH=amd64
    PLATFORM=$(uname -s)_$ARCH
    curl -sLO "https://github.com/eksctl-io/eksctl/releases/latest/download/eksctl_$PLATFORM.tar.gz"
    # (Optional) Verify checksum
    curl -sL "https://github.com/eksctl-io/eksctl/releases/latest/download/eksctl_checksums.txt" | grep $PLATFORM | sha256sum --check

    tar -xzf eksctl_$PLATFORM.tar.gz -C /tmp && rm eksctl_$PLATFORM.tar.gz
    sudo mv /tmp/eksctl /usr/local/bin
    # To check the installation and version
    eksctl version #This will display the installed version of EKSCTL
Install AWSCLI (Optional)
- If you don’t have awscli use the link to install it.. Please make sure you select the right architecture for installation.
Establishing Connection to AWS Cloud via awscli
Note: When you create a user, an access key and secret access key ID will be generated. If you're using a corporate account, you can find these details on your AWS Console login page. For corporate accounts, make sure to select AWS Programmatic Access to view your access key and secret key.
I don't want you to navigate through multiple pages, so I've provided the command right here. However, you can also find these commands further down on this page.
    aws configure
    #On the following questions add fill the details
    AWS Access Key ID [None]: <Your Access key>
    AWS Secret Access Key [None]: <Your Secret access key id>
    Default region name [None]: <region-code>
    Default output format [None]: json

    ############## Optional ################
    #If you are connecting throuh Session based access use below command
    aws sts get-session-token --duration-seconds 3600 #Optional
    # You will be getting this output
    {
     "Credentials": {
                    "AccessKeyId": "<Accesskey>",
                    "SecretAccessKey": "<SecretKEY>",
                    "SessionToken": "<Session Token>",
                    "Expiration": "2023-02-17T03:14:24+00:00"
                }
    }
    ############## Optional ################

    #Finally to verify the identity
    aws sts get-caller-identity
Installing EKS Cluster (Optional)
- Assuming you already have an Amazon EKS cluster deployed and running on AWS, you can proceed. If you haven't set up your cluster yet, please follow the detailed steps provided in this link.
Installing Kubectl
- If you haven't installed
kubectlyet, don't worry! You can easily follow the steps provided in this link to get it set up on your machine.
- If you haven't installed
Installing Helm
    curl -fsSL -o get_helm.sh https://raw.githubusercontent.com/helm/helm/main/scripts/get-helm-3
    chmod 700 get_helm.sh
    ./get_helm.sh
Update KubeConfig:
To access your Amazon EKS cluster using
kubectl, you need to update your KubeConfig. Here’s how to do it:export CLUSTER_NAME="<YOUR CLUSTER NAME>" #Update KubeConfig aws eks update-kubeconfig --name ${CLUSTER_NAME} --region ${AWS_REGION} #Check whether you can able to connect to cluster kubectl get pods
Configuring EBS CSI Driver on EKS Cluster
Why it is needed ? The Amazon EBS CSI driver is required for EKS clusters on version 1.23 and above because Kubernetes has deprecated in-tree storage drivers. The CSI driver provides a standardised, cloud-independent way to manage storage, ensuring EKS can handle EBS volumes for persistent storage after the in-tree drivers are removed. It allows for better flexibility, security, and maintenance.
So Lets configure EBS CSI Driver
Create IAM Role and Service Account:
EKS uses this service account to perform all the operation in EBS via EBS CSI Driver. So we are creating a Service account on EKS and attaching it with the IAM policy “AmazonEBSCSIDriverPolicy”
    # Get the cluster name
    export CLUSTER_NAME="<YOUR CLUSTER NAME>"

    # Create IAM and attach to service account
    eksctl create iamserviceaccount \
        --name ebs-csi-controller-sa \
        --namespace kube-system \
        --cluster ${CLUSTER_NAME} \
        --attach-policy-arn arn:aws:iam::aws:policy/service-role/AmazonEBSCSIDriverPolicy \
        --override-existing-serviceaccounts \
        --approve \
        --role-only \
        --role-name AmazonEKS_EBS_CSI_DriverRole

    # Get the newly created service account ARN
    export SERVICE_ACCOUNT_ROLE_ARN=$(aws iam get-role --role-name AmazonEKS_EBS_CSI_DriverRole | jq -r '.Role.Arn')

    # Installing EBS CSI Driver add-on on our EKS Cluster
    eksctl create addon --name aws-ebs-csi-driver --cluster $CLUSTER_NAME \
        --service-account-role-arn $SERVICE_ACCOUNT_ROLE_ARN --force
Check whether the service account is attached with the IAM role.
Find the Role ARN for
AmazonEBSCSIDriverPolicy:Open the AWS Console and search for IAM.
In the IAM dashboard, click on Roles from the left-side menu.
Search for the role named AmazonEKS_EBS_CSI_DriverRole.
Open the role and copy the ARN, then save it in a notepad for easy reference.
Check the Service Account:
The service account
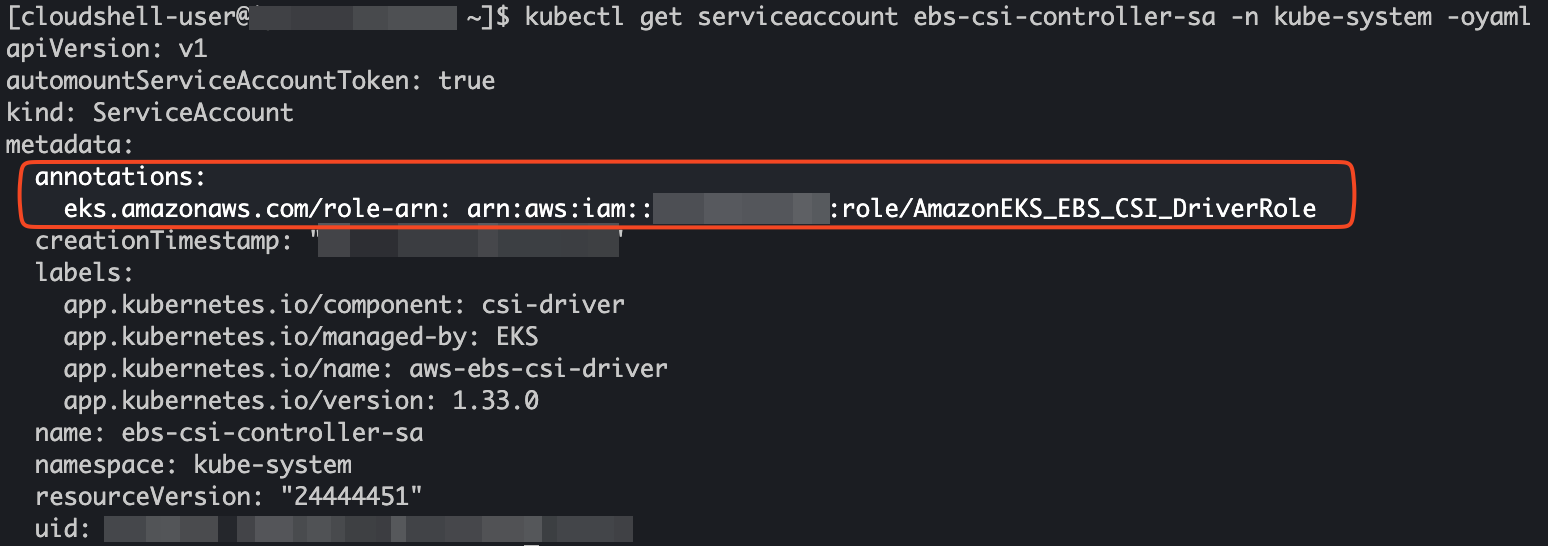
ebs-csi-controller-sais created under thekube-systemnamespace.Use the following command to verify whether the service account is attached to the Role ARN:
kubectl get serviceaccount ebs-csi-controller-sa -n kube-system -oyaml
In the output, look for the
roleorroleARNsection, which should contain the ARN you copied earlier. It should look something like this:If you do not see the expected output, you may need to edit the service account to include the necessary annotations. Follow these steps:
Use the following commands to open the service account configuration for editing and locate the annotations section (or create it if it doesn't exist) and add the following entry:
    kubectl edit serviceaccount ebs-csi-controller-sa -n kube-system -oyaml

    #Add the below line. Refer the screenshot above
    # MAKE SURE INDENTATION ARE POSITION ARE CORRECT
    annotations:
        eks.amazonaws.com/role-arn: <YOUR ROLE ARN>
    # Save the file
    # Run the below command to confirm the ARN is added
    kubectl get serviceaccount ebs-csi-controller-sa -n kube-system -oyaml
Installing KubeCost:
To install Kubecost v2.4.1 using the Helm Chart, simply follow the instructions below:
Check the Latest Version:
- You can always verify the latest version of Kubecost by visiting the official Kubecost releases page. Make sure to update the version number in the installation command accordingly.
Install Kubecost:
Once you’ve confirmed the latest version, proceed with the installation using the following command:
    helm upgrade -i kubecost oci://public.ecr.aws/kubecost/cost-analyzer --version v2.4.1 \
        --namespace kubecost --create-namespace \
        -f https://raw.githubusercontent.com/kubecost/cost-analyzer-helm-chart/develop/cost-analyzer/values-eks-cost-monitoring.yaml
Confirming Your Kubecost Installation:
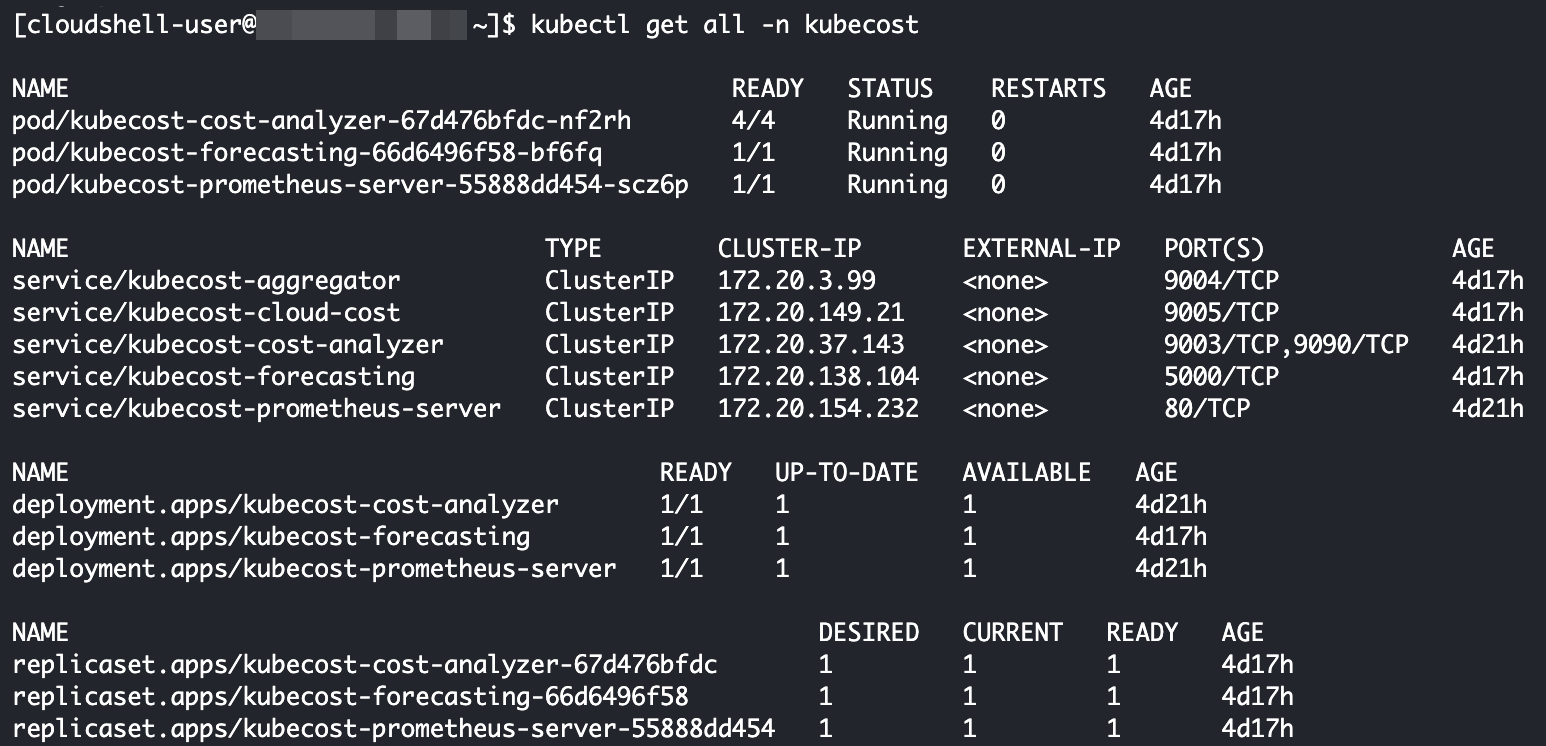
To ensure that Kubecost has been installed successfully, you can verify all components with one command. Simply run the following:
  # Run below command to see the status of the installation
  kubectl get all -n kubecost
The above command will provide you with a comprehensive view of all resources in the
kubecostnamespace, including:Pods: Check if all necessary pods are running.
Services: Verify the status of the Kubecost services, including their external or cluster IPs.
Deployments: Ensure that the deployments are correctly set up.

Great ! We've successfully installed Kubecost on our EKS cluster. However, there's a small catch: to access the Dashboard and see the output, you'll need to configure the Deployment to expose it to the public network. Let's get that sorted so you can start exploring!
Expose Kubecost Dashboard to Public Network:
When it comes to exposing your Kubecost dashboard, there are two primary methods you can use:
Directly Configuring LoadBalancer for the Kubecost “KubeAnalyzer” Service
This approach is straightforward and user-friendly—just set up a LoadBalancer for your service!
However, while it’s simple, it does come with a couple of drawbacks. You’ll incur costs for a dedicated LoadBalancer for this specific service, and more importantly, your service will be directly exposed to the public network, which isn’t the best practice from a security standpoint.
Using Kubernetes Ingress (NGINX Ingress)
Alternatively, you can leverage Kubernetes Ingress. Here, we’ll set up an Ingress controller, which acts as a proxy server, routing all your deployment traffic efficiently.
With this method, you only need one LoadBalancer for the Ingress controller, while all your deployment services remain behind Cluster IPs (private IPs). The Ingress controller will manage public traffic and intelligently route it to the appropriate services based on your configuration.
Alright! We’ve covered quite a bit so far, and to keep things clear and manageable, I’ve written a separate blog dedicated to exposing Kubecost to a public network. This way, you can follow the detailed steps without feeling overwhelmed in a single post. Want to dive deeper into the process and access your Kubecost dashboard seamlessly? Head over to my in-depth guide by clicking here!
Credits:
I would like to express my gratitude to the following sources that provided invaluable insights and references in the creation of this blog:
Feedback & Clarifications
I hope you found this guide helpful! If you have any questions, need further clarification, or spot any corrections, feel free to leave a comment below. I’d love to hear your feedback and will be happy to assist with any concerns or improvements! 😊
Subscribe to my newsletter
Read articles from NaveenKumar VR directly inside your inbox. Subscribe to the newsletter, and don't miss out.
Written by

