Building Secure Three-Tier Applications: DevSecOps on AWS with Kubernetes, GitOps, and ArgoCD
 Shubham Taware
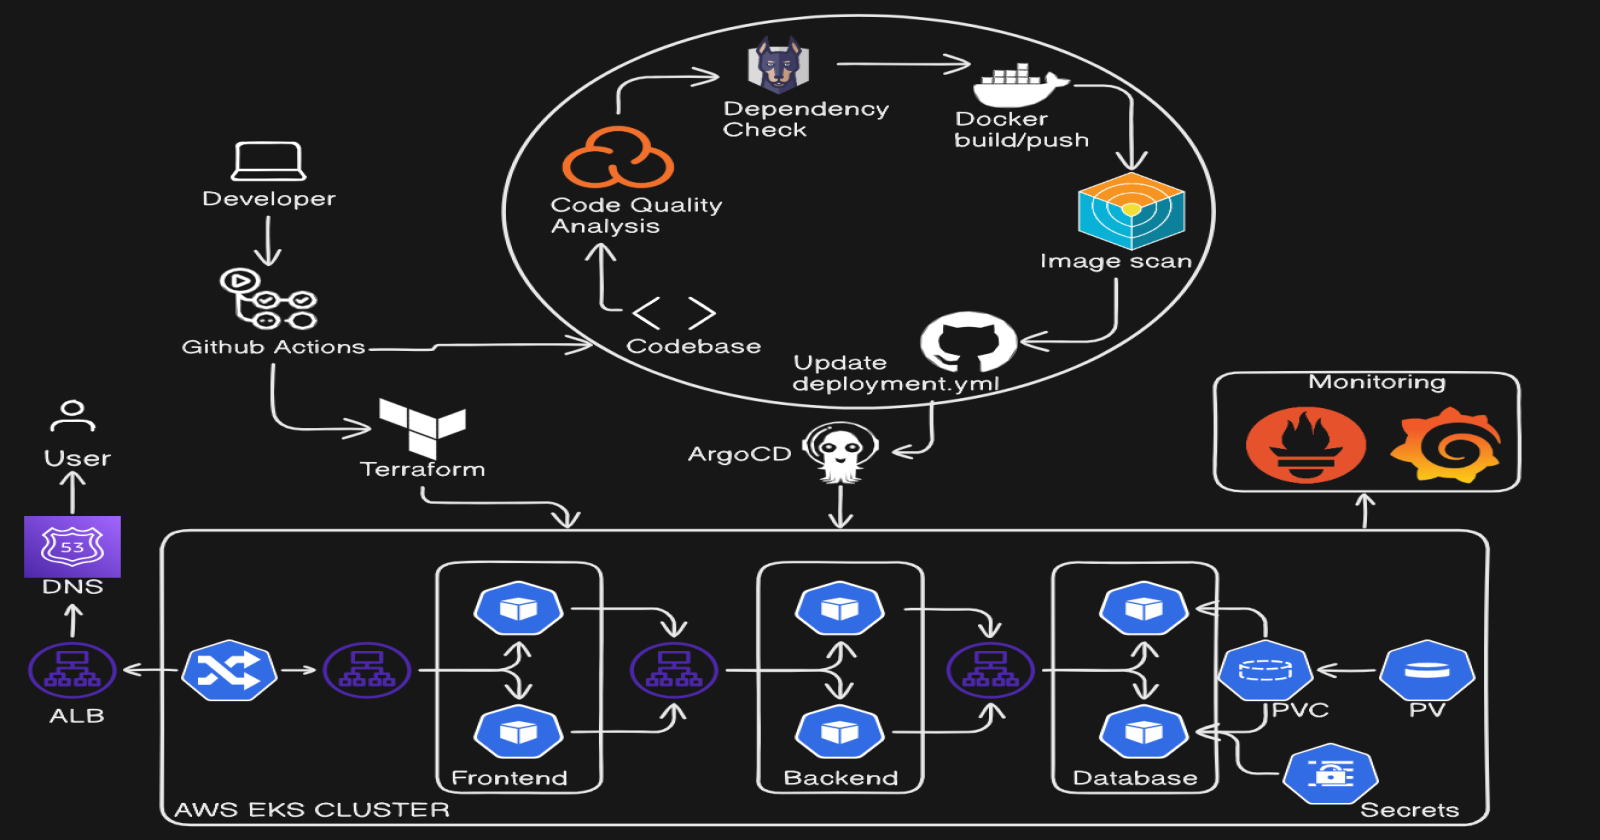
In this blog, we will walk through the process of deploying a three-tier quiz application using Terraform, GitHub Actions, and Amazon EKS (Elastic Kubernetes Service). The application is built with React for the frontend, Node.js for the backend, and MongoDB as the database, representing a modern stack for web application development.
We’ll explore how to automate infrastructure provisioning on AWS with Terraform, set up continuous integration (CI) and continuous delivery (CD) pipelines using GitHub Actions, and deploy the application to a scalable Kubernetes cluster. Along the way, we'll integrate essential security and monitoring tools like SonarCloud, Snyk, Trivy, Prometheus, and Grafana to ensure code quality, security, and performance visibility.
1. Prerequisites
AWS Account, Github Account
AWS User: Create aws user with administrator access(for practice purpose).
AWS S3 bucket for terraform backend.
IAC git repository: https://github.com/shubzz-t/IAC_VPC_with_Jumphost.git
Source Code Git repository: https://github.com/shubzz-t/React_3Tier_Quiz_App.git
2. Infra by Terraform via Github Actions Setup
Fork the repository for the terraform code.
Go to repository > Settings > Secrets and variables > Add AWS_SECRET_ACCESS_KEY and AWS_ACCESS_KEY_ID.
Creating and adding the bucket name as secret BUCKET_TF_STATE.
Pushing the code to the github will trigger the github workflow and terraform will provision the infrastructure on AWS.
3. CI setup:
Fork the source code repository.
Source code contains code for frontend, backend, CI workflow and kubernetes manifests.
Configure Github Token:
- Copy the github login token and add it to the github secrets.
Configure Sonar Cloud:
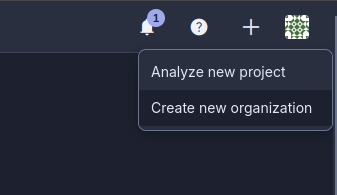
Login to sonar cloud and create new organization.
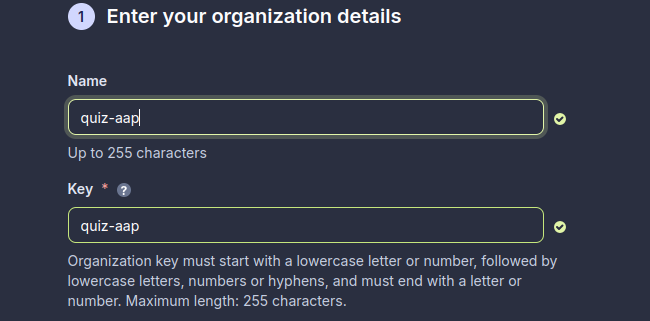
Enter the details for the organization.
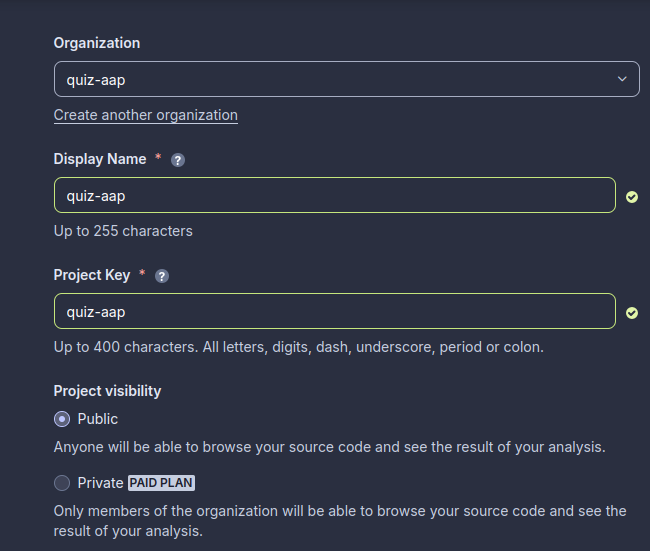
Click on analyze app and fill the details.
Click Next. Then select previous version and create.
Next in github create secrets for:
SONAR_ORGANIZATION= quiz-aap
SONAR_PROJECT_KEY= quiz-aap
SONAR_URL= https://sonarcloud.io/
SONAR_TOKEN= <your_generated_token>
Can create token by going to account > settings > security > Generate token.
Configure Snyc:
Snyk integrates into all stages of development - IDEs, source code managers, CI/CD pipelines, and repositories, to detect high-risk code, open source packages, containers, and cloud configurations, and give developers the precise information they need to fix each issue - or even to automate the fix, where desired.
Login to Snyc.
Go to Account Settings > Copy token.

Add the token in github secrets for:
SNYK_TOKEN= <your_generated_token>
Configure Docker:
Docker is a software platform that helps developers build, test, and deploy applications quickly and efficiently
Login to docker.
Create token by clicking account settings.
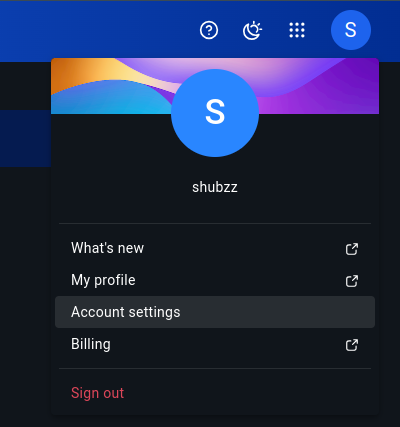
Click on personal access tokens > Create token > Copy token.
Create a secret in github for:
DOCKER_USERNAME= shubzz
DOCKER_PASSWORD= <your_generated_token>
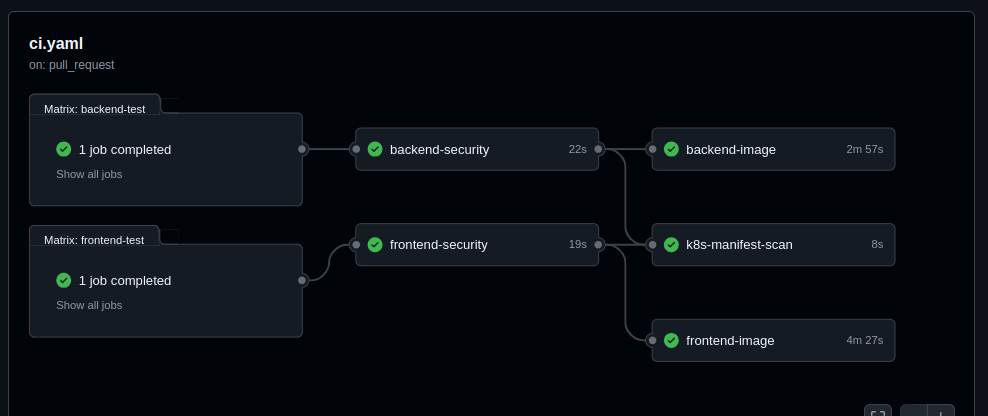
The github workflow for the CI includes installing, scanning the code.
Triggers:
The workflow is triggered on a pull request to the main branch.
Jobs:
Frontend Testing (frontend-test):
Uses Node.js (version 20.x) on an Ubuntu environment.
Installs dependencies, runs linting, prettier, and unit tests for the frontend.
Analyzes the code quality using SonarQube and SonarCloud.
Backend Testing (backend-test):
Similar to frontend, but applied to the backend.
Runs linting, formatting, and testing.
Conducts a SonarQube code analysis.
Frontend Security (frontend-security):
Depends on successful frontend testing.
Uses Snyk to scan for security vulnerabilities in the frontend codebase.
Backend Security (backend-security):
Depends on backend testing.
Uses Snyk to check for vulnerabilities in the backend code.
Frontend Docker Image (frontend-image):
Builds a Docker image for the frontend after passing security checks.
Pushes the image to Docker Hub and uses Trivy and Snyk to scan for vulnerabilities in the Docker image.
Backend Docker Image (backend-image):
Builds and pushes a Docker image for the backend.
Similar to frontend, scans the backend Docker image with Trivy and Snyk.
Kubernetes Manifest Scan (k8s-manifest-scan):
After backend and frontend security scans, runs Snyk to check Kubernetes manifest files for any security issues.
After pushing the changes to the main branch the CI workflow will start running.
4. CD Setup:
Login to the Jump server provisioned using the terraform.
SSH into the server using:
ssh -i mykey.pem ubuntu@<public_ip_jump_server>Create EKS cluster:-
Create EKS cluster with 2 nodes to deploy the application to create EKS cluster use command:
eksctl create cluster --name my-eks-cluster --region ap-south-1 --node-type t2.medium --nodes 3Install Load Balancer Controller:
Create OIDC provider and Service account attach policy to service account and create Load Balancer Controller.
Create OpenID Connect (OIDC):
 eksctl utils associate-iam-oidc-provider \
     --region ap-south-1 \
     --cluster my-eks-cluster \
     --approve
Create Policy:
 #Download policy using
 curl -o iam-policy.json https://raw.githubusercontent.com/kubernetes-sigs/aws-load-balancer-controller/v2.2.1/docs/install/iam_policy.json

 #Create policy
 aws iam create-policy \
     --policy-name AWSLoadBalancerControllerIAMPolicy \
     --policy-document file://iam-policy.json
Create a IAM role and Service Account for the AWS Load Balancer controller:
 eksctl create iamserviceaccount \
 --cluster=my-eks-cluster \
 --namespace=kube-system \
 --name=aws-load-balancer-controller \
 --attach-policy-arn=arn:aws:iam::<AWS_ACCOUNT_ID>:policy/AWSLoadBalancerControllerIAMPolicy \
 --override-existing-serviceaccounts \
 --approve
Install Helm:
sudo snap install helm --classicAdd eks chart repo to helm:
 helm repo add eks https://aws.github.io/eks-charts

 #Helm repo update
 helm repo update eks
Install Load Balancer Controller:
 helm install aws-load-balancer-controller eks/aws-load-balancer-controller -n kube-system --set clusterName=<cluster-name> --set serviceAccount.create=false --set serviceAccount.name=aws-load-balancer-controller

 #Can verify using command
 kubectl get deployment -n kube-system aws-load-balancer-controller
Install Argo CD:
Apply the manifest:
 kubectl apply -n argocd -f
 https://raw.githubusercontent.com/argoproj/argo-cd/master/manifests/install.yaml
Change NodePort:
kubectl patch svc argocd-server -n argocd -p '{"spec": {"type": "LoadBalancer"}}'Get ArgoCD password:
kubectl -n argocd get secret argocd-initial-admin-secret -o jsonpath="{.data.password}" | base64 -dAccess the argoCD on load balancer dns name you will get the argo CD login page.
Username= admin
Password= <output of above command>
Add Monitoring Tools:
Add Repository:
 #Create Namespace for monitoring
 kubectl create namespace monitoring

 #Adding repo
 helm repo add prometheus-community https://prometheus-community.github.io/helm-charts

 #Update Helm repo
 helm repo update
Install Prometheus and Grafana:
helm install monitoring prometheus-community/kube-prometheus-stackEdit prometheus and grafana service from Cluster IP to Load Balancer:
kubectl edit svc <service_name> -n <namespace>Access the prometheus on <LoadBalancerIP>:9090 and Grafana on <LoadBalancerIP> using username=admin and password you can get using command:
kubectl get secret --namespace monitoring <secret name> -o jsonpath="{.data.admin-password}" | base64 --decode ; echoConfigure Prometheus as Datasource in Grafana > Datasource and provide prometheus access url.
Next create Dashboard go to Dashboard > Click new > Import > Enter 15757 as dashboard code and click load and Import.
Configure ArgoCD:
Click on create application.
Give application name, project name as default, sync policy as automatic.
Source as git repo url
Path as kubernetes-manifest i.e the path where manifest are stored.

Cluster url default and namespace as quiz.
Click create.

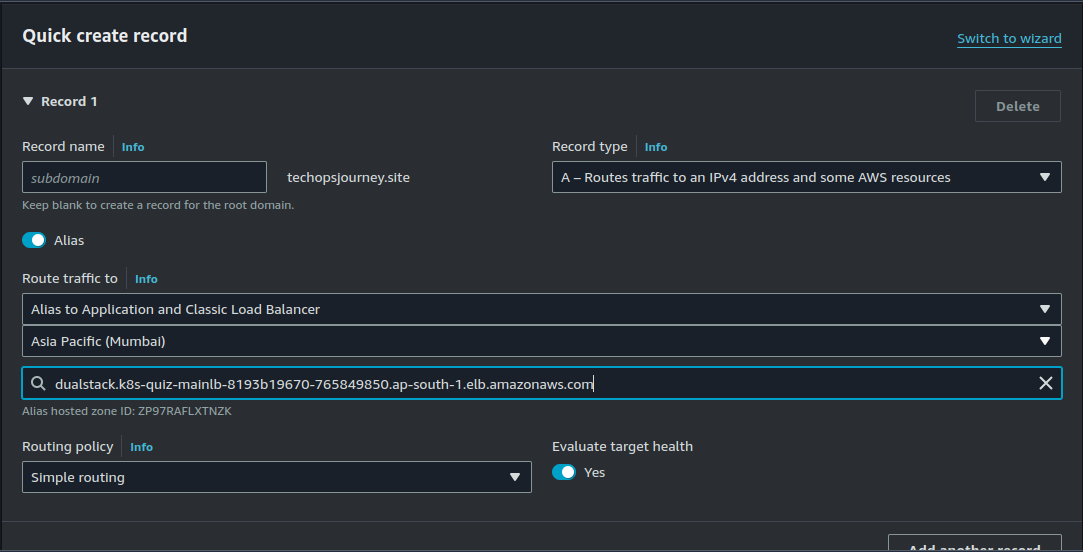
Configure Route 53:
Create A record in route 53 pointing to the Load Balancer of the Frontend application. Create record.
Now you will be able to access your website on the configured domain name.
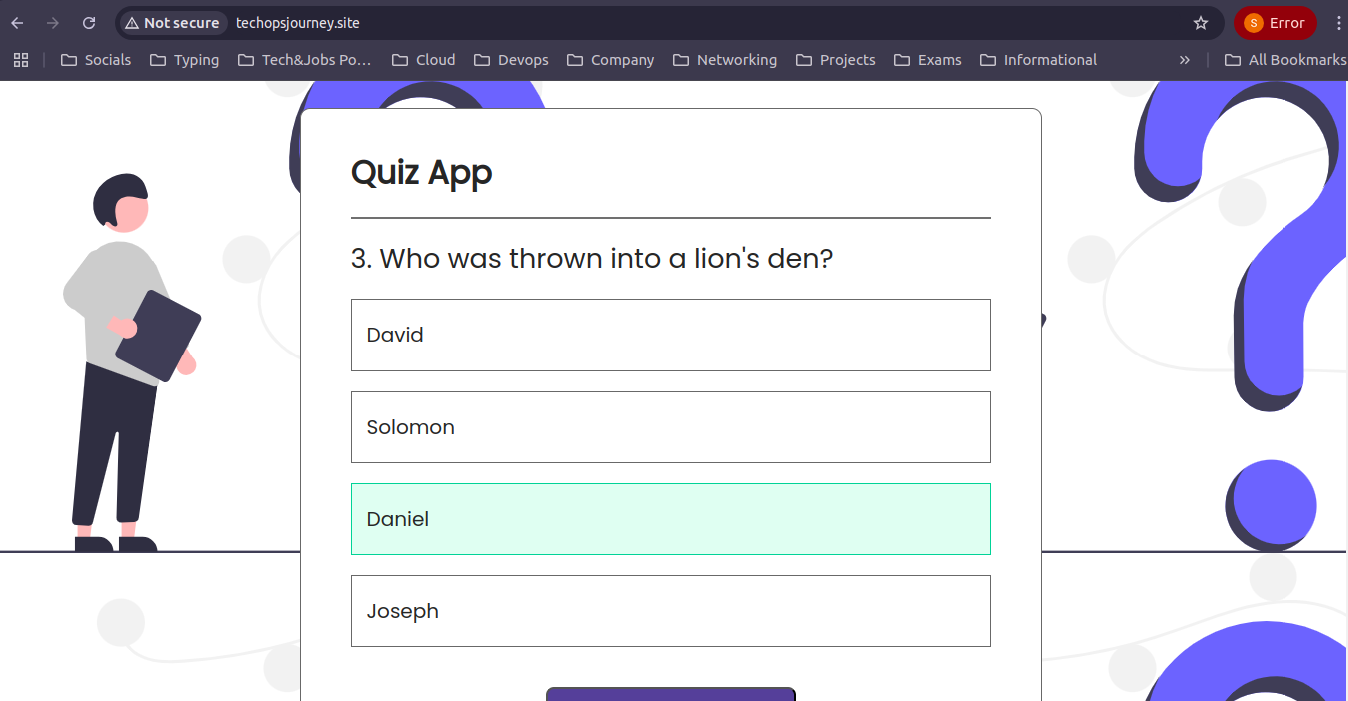
Note: The website is no longer available on the mentioned domain as all resources were deleted after the project's completion to avoid ongoing costs.
Conclusion
By following this guide, you’ve deployed a three-tier quiz application using React, Node.js, and MongoDB on Amazon EKS, with automated infrastructure via Terraform and CI/CD pipelines using GitHub Actions. Integrating tools like SonarCloud, Snyk, Trivy, Prometheus, and Grafana ensures your app is secure, monitored, and scalable.
This setup streamlines deployment, boosts security, and enhances performance monitoring, providing a solid foundation for handling production workloads efficiently.
For more insightful content on technology, AWS, and DevOps, make sure to follow me for the latest updates and tips. If you have any questions or need further assistance, feel free to reach out—I’m here to help!
Streamline, Deploy, Succeed-- Devops Made Simple!☺️
Subscribe to my newsletter
Read articles from Shubham Taware directly inside your inbox. Subscribe to the newsletter, and don't miss out.
Written by

Shubham Taware
Shubham Taware
👨💻 Hi, I'm Shubham Taware, a Systems Engineer at Cognizant with a passion for all things DevOps. While my current role involves managing systems, I'm on an exciting journey to transition into a career in DevOps by honing my skills and expertise in this dynamic field. 🚀 I believe in the power of DevOps to streamline software development and operations, making the deployment process faster, more reliable, and efficient. Through my blog, I'm here to share my hands-on experiences, insights, and best practices in the DevOps realm as I work towards my career transition. 🔧 In my day-to-day work, I'm actively involved in implementing DevOps solutions, tackling real-world challenges, and automating processes to enhance software delivery. Whether it's CI/CD pipelines, containerization, infrastructure as code, or any other DevOps topic, I'm here to break it down, step by step. 📚 As a student, I'm continuously learning and experimenting, and I'm excited to document my progress and share the valuable lessons I gather along the way. I hope to inspire others who, like me, are looking to transition into the DevOps field and build a successful career in this exciting domain. 🌟 Join me on this journey as we explore the world of DevOps, one blog post at a time. Together, we can build a stronger foundation for successful software delivery and propel our careers forward in the exciting world of DevOps. 📧 If you have any questions, feedback, or topics you'd like me to cover, feel free to get in touch at shubhamtaware15@gmail.com. Let's learn, grow, and DevOps together!