Design Patterns Handbook - Part IV
 Tuan Tran Van
Let's explore the remaining 5 Behavioral Design Patterns.
The Observer Pattern

Observer is a behavioral design pattern that lets you define a subscription machanism to notify multiple objects about any events that happen to the object they are observing.
Problem
Imagine you have two types of objects: a Customer and a Store. The customer is very interested in a particular brand of product(say, it’s a new model of the iPhone) which should become available in the store very soon.
The customer could visit the store every day and check product availability. But while the product is still en route, most of these trips would be pointless.
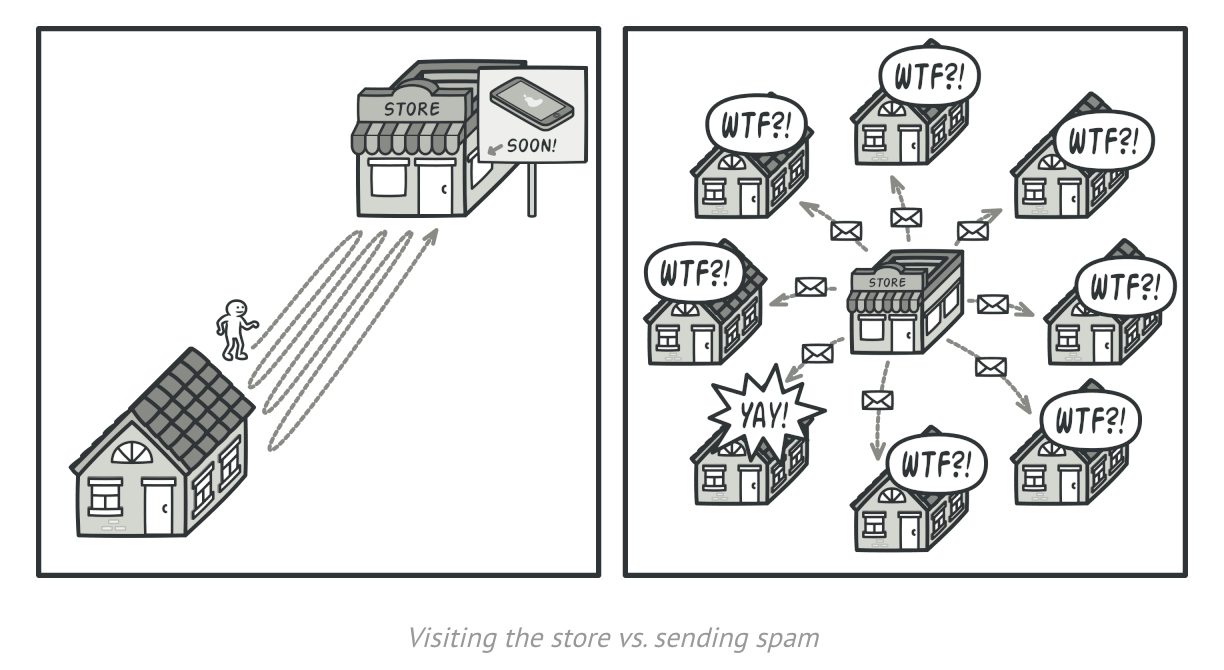
On the other hand, the store could send tons of emails (which might be considered spam) to all customers each time a new product becomes available. This would save some customers from endless trips to the store. At the same time, it would upset other customers who aren’t interested in new products.
It looks like we have got a conflict. Either the customer wastes time checking product availability or the store wastes resources notifying the wrong customers.
Solution
The object that has some interesting state is often called the subject, but since it’s also going to notify other objects about the changes to its state, we will call it the publisher. All other objects that want to track changes to the publisher’s state are called subscribers.
The Observer pattern suggests that you add a subscription mechanism to the publisher class so individual subjects can subscribe to or unsubscribe from a stream of events coming from that publisher. Fear not! Everything isn’t as complicated as it sounds. In reality, this mechanism consists of 1 ) an array field for storing a list of references to subscriber objects and 2) several public methods that allow adding subscribers to and removing them from that list.
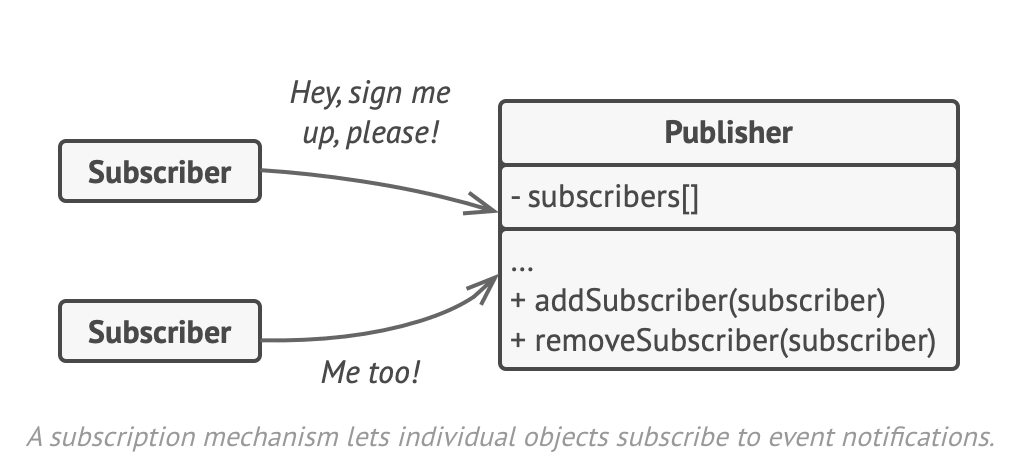
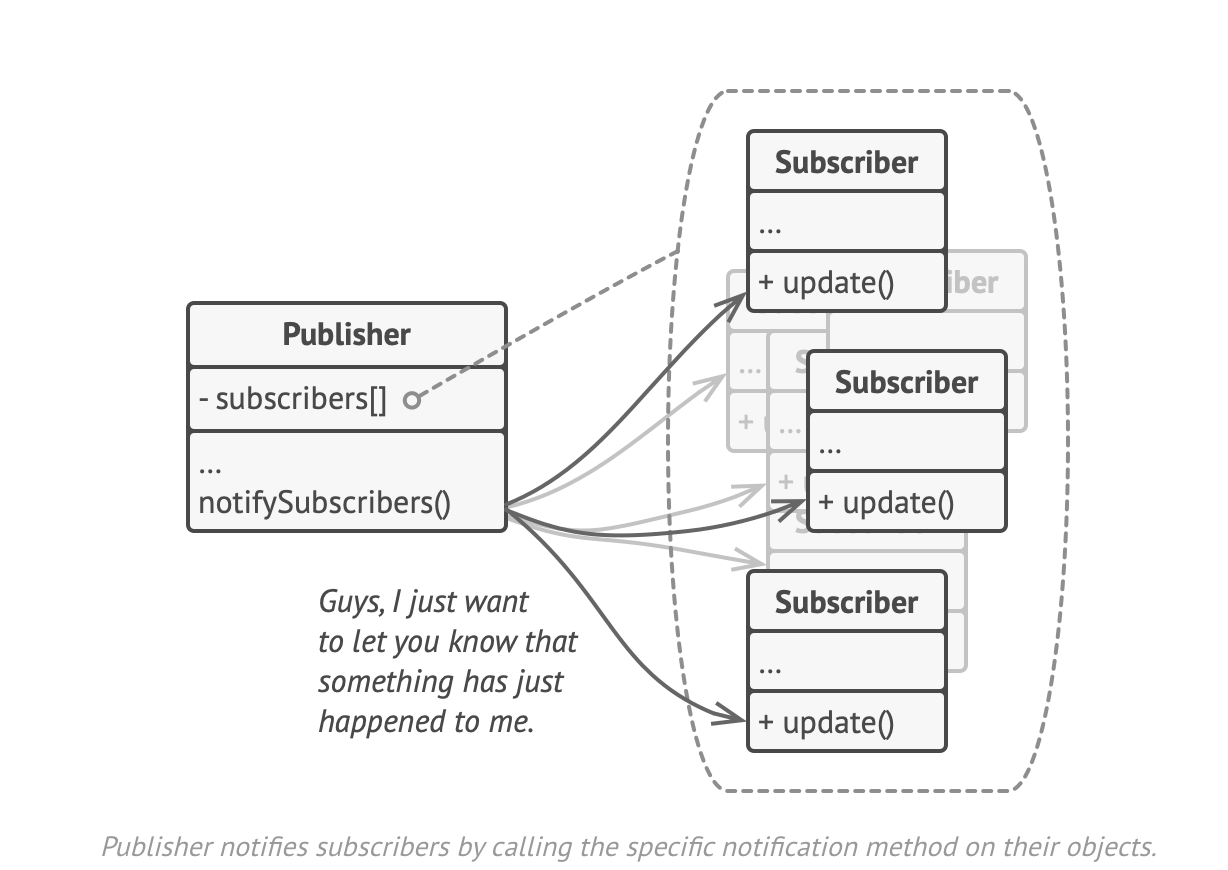
Now, whenever an important event happens to the publisher, it goes over its subscribers and calls the specific notification method on their objects.
Real apps might have dozens of different subscriber classes that are interested in tracking events on the same publisher class. You wouldn’t want to couple the publisher to all of those classes. Besides, you might not even know about some of them beforehand if your publisher class is supposed to be used by other people.
That’s why it’s crucial that all subscribers implement the same interface and that the publisher communicates with them only via that interface. This interface should declare the notification method along with a set of parameters that the publisher can use to pass some contextual data along with the notification.
if your app has several different types of publishers and you want to make your subscribers compatible with all of them, you can go even further and make all publishers follow the same interface. This interface would only need to describe a few subscription methods. The interface would allow subscribers to observe publishers’ states without coupling them to their concrete classes.
Real-World Analogy

if you subscribe to a newspaper or magazine, you no longer need to go to the store to check if the next issue is available. Instead, the publisher sends new issues to your mailbox right after publication or even in advance.
The publisher maintains a list of subscribers and knows which magazines they are interested in. Subscribers can leave the list at any time when they wish to stop the publisher from sending them new magazine issues.
Example
In this first example, we are going to translate the theoretical UML diagram into Typescript to test the potential of this pattern. This is the diagram to be implemented:
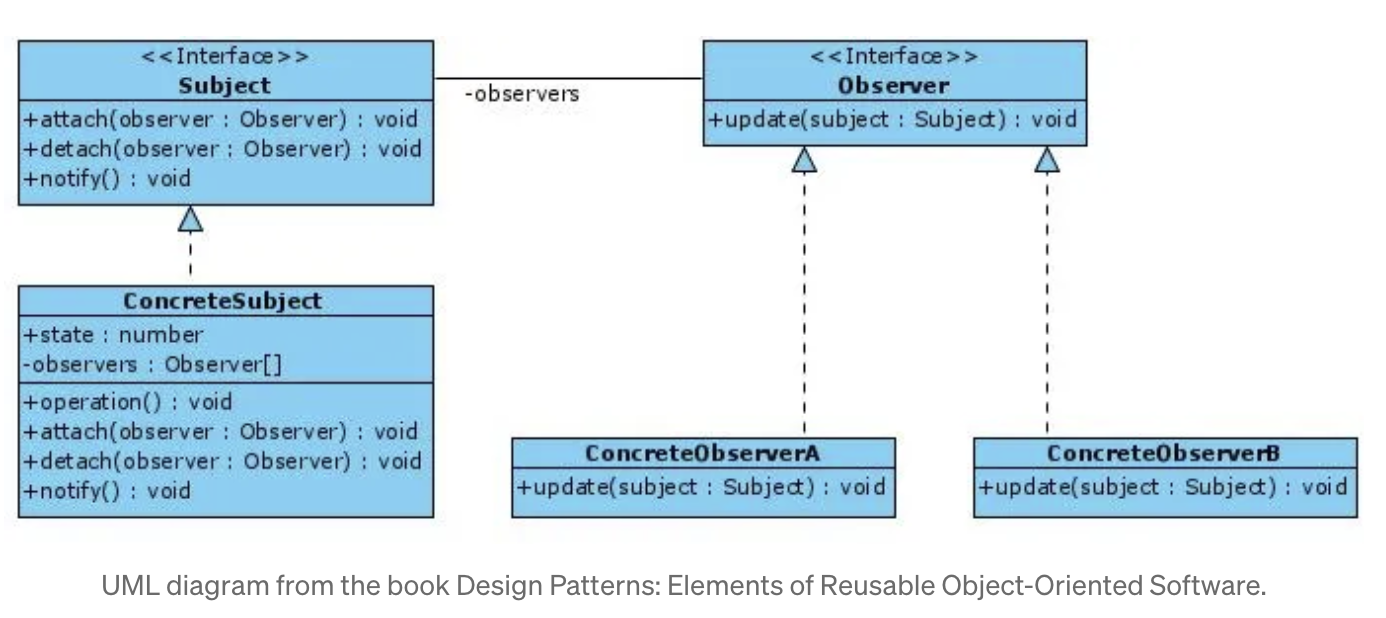
First, we are going to define the interface (Subject) of our problem. Being an interface, all the methods that must be implemented in all the specific Subject are defined. In our case, there is only one: ConcreteSubject. The Subject interface defines the three methods necessary to comply with this pattern: attach, detach, and notify. The attach and detach methods receive the observer as a parameter that will be added or removed in the Subject data structure.
import { Observer } from "./observer.interface";

export interface Subject {
  attach(observer: Observer): void;
  detach(observer: Observer): void;
  notify(): void;
}
There can be as many ConcreteSubjects as we need in our problem. As this problem is the basic scheme of the Observer pattern, we only need a single ConcreteSubject. In this first problem, the state that is observed is the state attribute, which is of type number. On the other hand, all observers are stored in an array called observer. The attach and detach methods check whether or not the observer is previously in the data structure to add or remove it from it. Finally, the notify method is in charge of invoking the update method of all those observers who are observing the Subject.
Objects of the ConcreteSubject the class performs some tasks related to the specific business logic of each problem. In this example, there is a method called operation that is in charge of modifying the state and invoking the notify method.
import { Observer } from "./observer.interface";
import { Subject } from "./subject.interface";

export class ConcreteSubject implements Subject {
  public state: number;
  private observers: Observer[] = [];

  public attach(observer: Observer): void {
    const isAttached = this.observers.includes(observer);
    if (isAttached) {
      return console.log("Subject: Observer has been attached already");
    }

    console.log("Subject: Attached an observer.");
    this.observers.push(observer);
  }

  public detach(observer: Observer): void {
    const observerIndex = this.observers.indexOf(observer);
    if (observerIndex === -1) {
      return console.log("Subject: Nonexistent observer");
    }

    this.observers.splice(observerIndex, 1);
    console.log("Subject: Detached an observer");
  }

  public notify(): void {
    console.log("Subject: Notifying observers...");
    for (const observer of this.observers) {
      observer.update(this);
    }
  }

  public operation(): void {
    console.log("Subject: Business Logic.");
    this.state = Math.floor(Math.random() * (10 + 1));

    console.log(`Subject: The state has just changed to: ${this.state}`);
    this.notify();
  }
}
The other piece of this design pattern is the observer. Therefore, let’s start by defining the Observer interface, which only needs to define the update method that is in charge of executing every time an observer is notified that a change has occurred.
import { Subject } from "./subject.interface";

export interface Observer {
  update(subject: Subject): void;
}
Each class that implements this interface must include its business logic in the update method. In this example, two ConcreteObservers have been defined. They will perform actions according to the Subject’s state. The following code shows two concrete implementations for two different types of observers: ConcreteObserverA and ConcreteObserverB.
import { ConcreteSubject } from "./concrete-subject";
import { Observer } from "./observer.interface";
import { Subject } from "./subject.interface";

export class ConcreteObserverA implements Observer {
  public update(subject: Subject): void {
    if (subject instanceof ConcreteSubject && subject.state < 3) {
      console.log("ConcreteObserverA: Reacted to the event.");
    }
  }
}
import { ConcreteSubject } from "./concrete-subject";
import { Observer } from "./observer.interface";
import { Subject } from "./subject.interface";

export class ConcreteObserverB implements Observer {
  public update(subject: Subject): void {
    if (
      subject instanceof ConcreteSubject &&
      (subject.state === 0 || subject.state >= 2)
    ) {
      console.log("ConcreteObserverB: Reacted to the event.");
    }
  }
}
Finally, we define our Client or Context the class that makes use of this pattern. In the following code, the necessary classes to simulate the use of Subject and Observer are implemented:
import { ConcreteObserverA } from "./concrete-observerA";
import { ConcreteObserverB } from "./concrete-observerB";
import { ConcreteSubject } from "./concrete-subject";

const subject = new ConcreteSubject();

const observer1 = new ConcreteObserverA();
subject.attach(observer1);

const observer2 = new ConcreteObserverB();
subject.attach(observer2);

subject.operation();
subject.operation();

subject.detach(observer2);

subject.operation();
The State Pattern

State is a behavioral design pattern that lets an object alter its behavior when its internal state changes. It appears as if the object changed its class.
Problem
The State pattern is closely related to the concept of a Finite-State Machine.
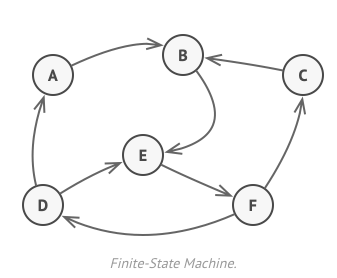
The main idea is that, at any given moment, there is a finite number of states in which a program can be implemented. Within any unique update, the program behaves differently, and the program can be switched from one state to another instantaneously. However, depending on the current state, the program may or may not switch to certain other states. These switching rules, called transitions, are also finite and predetermined.
You can also apply this approach to objects. Imagine that we have a Document class. A document can be in one of three states: Draft, Moderation, and Published. The publish method of the document works a bit differently in each state.
In
Draft, it moves the document to moderation.In
Moderation, it makes the document public, but only the current user is an administrator.In
Published, it doesn't do anything at all.
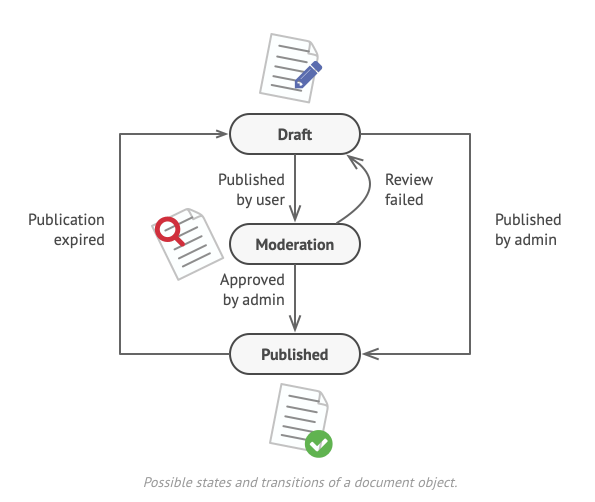
State machines are usually implemented with lots of conditional statements(if or switch) that select the appropriate behavior depending on the current state of the object. Usually, this “state“ is just a set of values of the object’s fields. Even if you have never heard about finite-state machines before, you have probably implemented a state at least once. Does the following code structure ring a bell?
class Document is
    field state: string
    // ...
    method publish() is
        switch (state)
            "draft":
                state = "moderation"
                break
            "moderation":
                if (currentUser.role == "admin")
                    state = "published"
                break
            "published":
                // Do nothing.
                break
    // ...
The biggest weakness of a state machine based on conditionals reveals itself once we start adding more and more states and state-dependent behaviors to the Document class. Most methods will contain monstrous conditionals that pick the proper behavior of a method according to the current state. Code like this is very difficult to maintain because any change to the transition logic may require changing state conditionals in every method.
The project tends to get bigger as a project evolves. It’s quite difficult to predict all possible states or transitions that the design state. Hence, a lean state machine built with a limited set of conditionals can grow into a bloated mess over time.
Solution
The State pattern suggests that you create new classes for all possible states of an object and extract all state-specific behaviors into these classes.
Instead of implementing all behaviors on its own, the original object called context, stores a reference to one of the state objects that represents its current state and delegates all state-related work to that project.
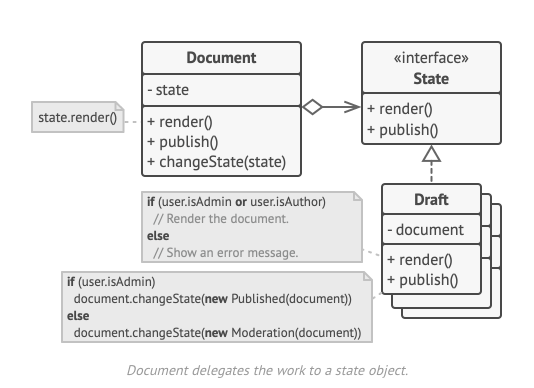
To transition the context into another state, replace the active state object with another object that represents that new state. This is possible only if all state classes follow the same interface and the context itself works with these objects through that interface.
This structure may look similar to the Strategy pattern, but there is one key difference. In the State pattern, the particular states may be aware of each other and initiate transitions from one state to another, whereas strategies almost never know about each other.
Real-World Analogy
The buttons and switches in your smartphone behave differently depending on the current state of the device.
When the iPhone is unlocked, pressing buttons leads to executing various functions.
When the iPhone is locked, pressing any button leads to the unlock screen.
When the iPhone’s charge is low, pressing any button shows the charging screen.
Example
First of all, we can see the UML class diagram of what the implementation would be like without using the State design pattern and the problems that it tries to solve.
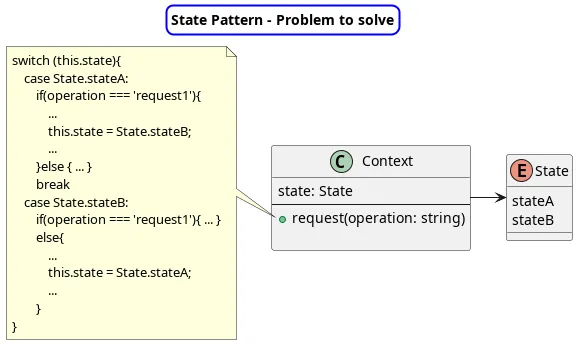
In this diagram, we can see that we have a Context class, which corresponds to the object that has different behaviors depending on the state it is in. These states can be modeled through an Enum class where we would have different possible states, as an example we would have two different states: StateA and StateB.
The request method of the Context class is where the open-closed principle is breaking since this method implements functionality based on the state the Context object is in. In addition to this, this method receives as a parameter a type of operation that adds conditional complexity to our problem. Even if we were to extract the behaviors of each state to external functions, we would still break this principle since every time we wanted to include a new state we would have to access this method and modify it.
Let’s see the implementation of this code to see it materialized in a programming language.
import { State } from  "./state.enum";

export class Context {

    private state = State.stateA;

    request(operation: string) {
        switch (this.state){
            case State.stateA:
                if(operation === 'request1'){
                    console.log('ConcreteStateA handles request1.'); //request1()
                    console.log('ConcreteStateA wants to change the state of the context.');
                    this.state = State.stateB; // Transition to another state
                    console.log(`Context: Transition to concrete-state-B.`);
                }else {
                    console.log('ConcreteStateA handles request2.'); // request2()
                }
                break
            case State.stateB:
                if(operation === 'request1'){
                    console.log('ConcreteStateB handles request1.'); //request1()
                }else{
                    console.log('ConcreteStateB handles request2.'); //request2()
                    console.log('ConcreteStateB wants to change the state of the context.');
                    this.state = State.stateA; // Transition to another state
                    console.log(`Context: Transition to concrete-state-A.`);
                }
            default: // Do nothing.
                break
        }
    }
}
In this code, we can see in the request method how the switch control structure is implemented, which couples the code to the Context states. Observe that the state change is done in this method itself, when we change the state we are changing the future behavior of this method since the code corresponding to the new state will be accessed.
The client code that would make use of this code is to implement the following.
import { Context } from "./context";

const context = new Context();
context.request('request1');
context.request('request2');t
You can see that we simply instantiate an object of type Context and call the request method with different parameters. Obviously, although the result of this code is what we expect, we have all the design problems that we have mentioned above.
Now we are going to focus on solving this problem by applying the State pattern. Let’s start by looking at the class diagram.
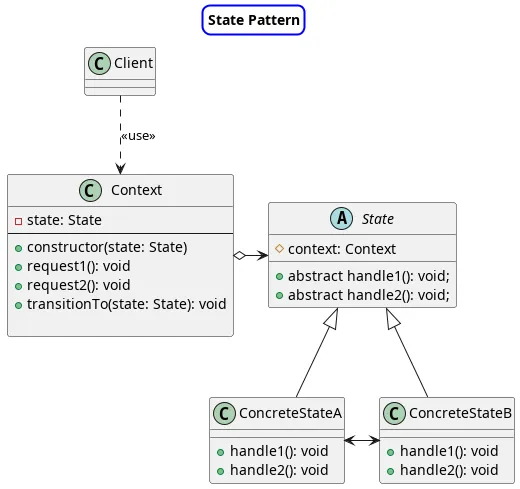
The Context class is now related by composition to a new object that is the State of the context. The Context will still have methods associated with the functionality it performed previously, such as request1 and request2. Also, a new method called transitionTo is added that will transition between the different states. That is, the change from one state to another will be done through a method that encapsulates this logic.
The Context class is related to an abstract class called State, which defines the contract that all possible states of our context must fulfill. In this specific case, two abstract methods handle1 and handle2 are defined, which will be specified in the concrete implementations of each of the states. That is, we are delegating the responsibility of implementing the behavior of each state to a specific subclass of said state.
On the other hand, the state class incorporates a reference to the context to be able to communicate with it to indicate that it must change its state. This reference in many implementations of the pattern does not exist, since the context reference is sent as a parameter to the methods defined in the state. We have preferred this implementation, which still respects the concept of composition and will greatly simplify the code we are showing.
Once we have seen the UML class diagram, we are going to see what the implementation of this design pattern would look like.
import { State } from "./state";

export class Context {
    private state: State;

    constructor(state: State) {
        this.transitionTo(state);
    }

    public transitionTo(state: State): void {
        console.log(`Context: Transition to ${state.constructor.name}.`);
        this.state = state;
        this.state.setContext(this);
    }

    public request1(): void {
        this.state.handle1();
    }

    public request2(): void {
        this.state.handle2();
    }
}
We start by looking at the Context class, and the first thing we can notice is that the state attribute is an object of the State class, rather than an Enumclass. This State class is abstract so that responsibility can be delegated to concrete states. If we look at the request1 and request2 methods we see that they are making use of the state object and delegating responsibility to this class.
On the other hand, we have the implementation of the transitionTo method which we are going to use simply to change the state in which the Context is, and as we have already said to make it easier for us not to propagate the context through the handles of the state object, we are going to call the setContext method to assign the context to the state, making the communication between state and context permanent rather than through references between the methods.
The next step is to define the part corresponding to the states. First, we see that the State abstract class simply defines the abstract methods that the concrete states will implement and a reference to the context.
import { Context } from "./context";

export abstract class State {
    protected context: Context;

    public abstract handle1(): void;
    public abstract handle2(): void;
}
The concrete states are those that encapsulate the business logic corresponding to each of the states when the context object is in them. If we see the code associated with these classes, we can see how the ConcreteStateA and ConcreteStateB classes implement the handle1 and handle2 methods corresponding to the State interface, and how in our specific case we are transitioning from StateA to StateB when handle1 is executed when the context is in the StateA . Whereas, we transition from StateB to StateA when handle2 is executed when the contextis in the StateB.
In any case, this is just an example of transitions between states, but it is important that you note that the states know each other, and that is a differentiating element of this design pattern compared to others such as the strategy pattern, in which the strategies do not know each other.
import { ConcreteStateB } from "./concrete-state-B";
import { State } from "./state";

export class ConcreteStateA extends State {
    public handle1(): void {
        console.log('ConcreteStateA handles request1.');
        console.log('ConcreteStateA wants to change the state of the context.');
        this.context.transitionTo(new ConcreteStateB());
    }

    public handle2(): void {
        console.log('ConcreteStateA handles request2.');
    }
}

/*****/
import { ConcreteStateA } from "./concrete-state-A";
import { State } from "./state";

export class ConcreteStateB extends State {
    public handle1(): void {
        console.log('ConcreteStateB handles request1.');
    }

    public handle2(): void {
        console.log('ConcreteStateB handles request2.');
        console.log('ConcreteStateB wants to change the state of the context.');
        this.context.transitionTo(new ConcreteStateA());
    }
}
To conclude, we see the client class that makes use of the design pattern.
The code is almost the same as the one we had without applying the pattern except that now we are creating an initial state with which the context will be initialized.
import { ConcreteStateA } from "./concrete-state-A";
import { Context } from "./context";

const context = new Context(new ConcreteStateA()); // Initial State
context.request1();
context.request2();
https://maxim-gorin.medium.com/stop-writing-if-else-trees-use-the-state-pattern-instead-1fe9ff39a39c
The Strategy Pattern

Strategy is a behavioral design pattern that lets you define a family of algorithms, put each of them into a seperate class, and make their objects interchangeable.
Problem
One day you decided to create a navigation app for casual travelers. The app was centered around a beautiful map which helped users quickly orient themselves in the city.
One of the most important features of the app was automatic route planning. A user should be able to enter an address and see the fastest route to that destination displayed on the map.
The first version of the app could only build the routes over roads. People who traveled by car were bursting with joy. But apparently, not everybody likes to drive on their vacation. So with the next update, you add an option to build walking routes. Right after that, you added another option to let people use public transport on their routes.
However, that was only the beginning. Later you planned to add route building for cyclists. Or even later, another option for building routes through all of a city’s tourist attractions.
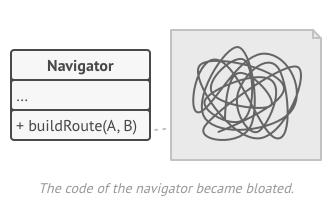
While the app was successful from a business perspective, the technical part caused you headaches. Each time you add a new route algorithm, the main class of navigator doubles in size. At some point, the beast became too hard to maintain.
Any change to one of the algorithms, whether it was a simple bug fix or a slight adjustment of the street score, affected the whole class, increasing the chance of creating an error in the already working code.
In addition, teamwork became inefficient. Your teammates, who had been hired right after the successful release, complain that they spend too much time resolving merge conflicts. Implementing a new feature requires you to change the same huge class, conflicting with the code produced by other people.
Solution
The Strategy pattern suggests that you take a class that does something specific in a lot of different ways and extract all of these algorithms into separate classes called strategies.
The original class, called context, must have a field for storing a reference to one of the strategies. The context delegates the work to a link strategy object instead of executing it on its own.
The context isn’t responsible for selecting an appropriate algorithm for the job. Instead, the client passes the desired strategy to the context. In fact, the context doesn't know much about strategies. It works with all strategies through the same generic interface, which only exposes a single method for triggering the algorithm encapsulated within the selected strategy.
This way the context becomes independent of concrete strategies, so you can add new algorithms or modify existing ones without changing the code of the context or other strategies.
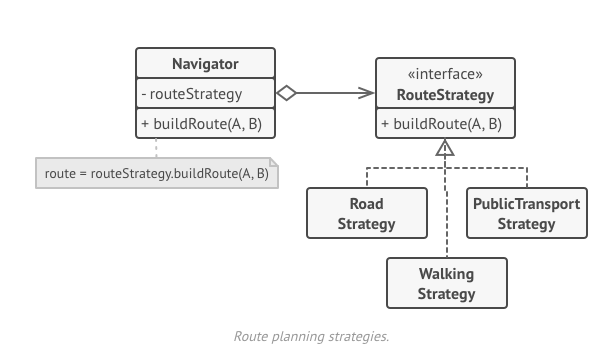
In our navigation app, each routing algorithm can be extracted to its own class with a single buildRoute method. The method accepts an origin and destination and returns a collection of the route’s checkpoints.
Even though given the same arguments, each routing class might build a different route, the main navigator doesn't really care which algorithm is selected since its primary job is to render a set of checkpoints on the map. The class has a method for switching the active routing strategy, so its client, such as the buttons in the user interface, can replace the currently selected routing behavior with another one.
Real-World Analogy
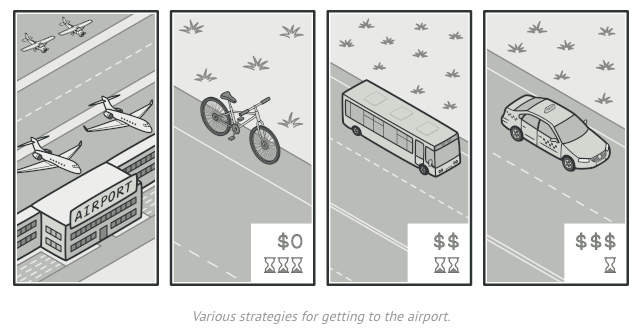
Imagine you have to get to the airport. You can catch a bus, order a cab, or get on your bicycle. These are your transportation strategies. You can pick one of the strategies depending on factors such as budget or time constraints.
Example
Let’s say we have an app, that we want to secure ie add authentication to it. We have different auth schemes and strategies:
Basic
Digest
OpenID
OAuth
We might try to implement something like this:
class BasicAuth {}
class DigestAuth {}
class OpenIDAuth {}
class OAuth {}
class AuthProgram {
    runProgram(authStrategy:any, ...) {
        this.authenticate(authStrategy)
        // ...
    }
    authenticate(authStrategy:any) {
        switch(authStrategy) {
            if(authStrategy == "basic")
                useBasic()
            if(authStrategy == "digest")
                useDigest()
            if(authStrategy == "openid")
                useOpenID()
            if(authStrategy == "oauth")
                useOAuth()
        }
    }
}
The same old long chain of conditionals. Also, if we want to auth for a particular route in our program, we will find ourselves with the same thing.
class AuthProgram {
    route(path:string, authStyle: any) {
        this.authenticate(authStyle)
        // ...
    }
}
if we apply the strategy design pattern here, we will create an interface that all auth strategies must implement:
interface AuthStrategy {
    auth(): void;
}
class Auth0 implements AuthStrategy {
    auth() {
        log('Authenticating using Auth0 Strategy')
    }
}
class Basic implements AuthStrategy {
    auth() {
        log('Authenticating using Basic Strategy')
    }
}
class OpenID implements AuthStrategy {
    auth() {
        log('Authenticating using OpenID Strategy')
    }
}
The AuthStrategy defines the template on which all strategies must be built. Any concrete authentication strategy must implement the authentication method to provide us with its own style. We have the Auth0, Basic, and OpenID concrete strategies.
Next, we need to touch our AuthProgram class:
// ...
class AuthProgram {
    private _strategy: AuthStrategy
    use(strategy: AuthStrategy) {
        this._strategy = strategy
        return this
    }
    authenticate() {
        if(this._strategy == null) {
            log("No Authentication Strategy set.")
        }
        this._strategy.auth()
    }
    route(path: string, strategy: AuthStrategy) {
        this._strategy = strategy
        this.authenticate()
        return this
    }
}
You see now, the authenticate method doesn’t carry the long switch case. The use method sets the authentication strategy to use and the authenticate method just calls the auth method. It could care less about how the AuthStrategy implements its authentication.
log(new AuthProgram().use(new OpenID()).authenticate())
// Authenticating using OpenID Strategy
The Template Method Pattern

Template Method is a behavioral design pattern that defines the skeleton of an algorithm in the superclass but lets subclasses override specific steps of the algorithm without changing its structure.
Problem
Imagine you are creating a data mining application that analyzes corporate documents. Users feed the app documents in various formats (PDF, DOC, CSV), and it tries to extract meaningful data from these docs in a uniform format.
The first version of the app could work only with DOC files. In the following version, it was able to support CSV files. A month later, you “taught” it to extract data from PDF files.
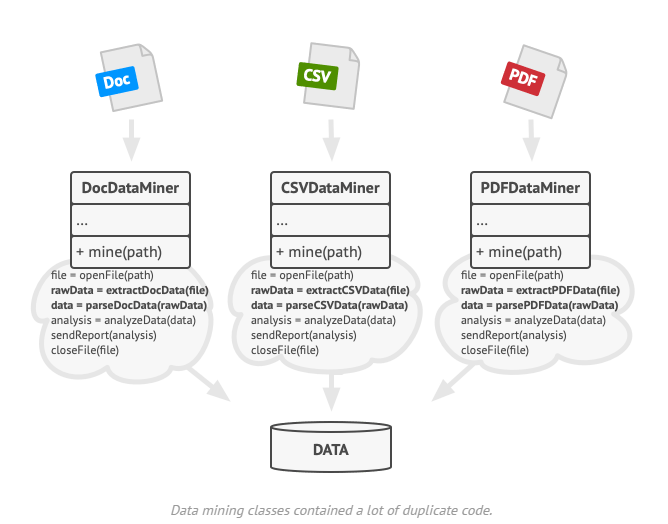
At some point, you noticed that all three classes have a lot of similar code. While the code for dealing with various data formats was entirely different in all classes, the code for data processing and analysis is almost identical. Wouldn’t it be great to get rid of the code duplication, leaving the algorithm structure intact?
There was another problem related to the client code that used these classes. It had lots of conditionals that picked a proper course of action depending on the class of the processing object. If all three processing classes had a common interface or a base class, you would be able to eliminate the conditionals in the client code and use polymorphism when calling methods on a processing object.
Solution
The Template Method pattern suggests that you break down an algorithm into a series of steps, turn these steps into methods, and put a series of calls to these methods inside a single template method. The steps may either be abstract , or have some default implementation. To use the algorithm, the client is supposed to provide its own subclasses, implement all abstract steps, and override some of the optional ones if needed (but not the template method itself).
Let’s see how this will play out in our data mining app. We can create a base class for all three parsing algorithms. This class defines a template method consisting of a series of calls to various document-processing steps.
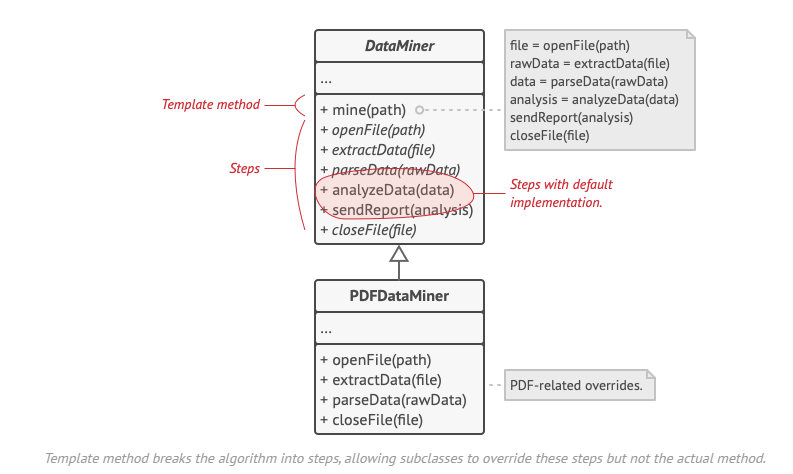
First, we can declare all the steps abstract , forcing the subclasses to provide their own implementations for these methods. In our case, subclasses already have all the necessary implementations, so the only thing we might need to do is adjust the signatures of the methods to math the method of the subclass.
Now, let’s see what we can to do get rid of the duplication code. It looks like the code for opening/closing files and extracting/parsing data is different for various data formats, so there is no point in touching these methods. However, the implementation of other steps, such as analyzing the raw data and composing reports, is very similar, so it can be pulled up into the base class, where subclasses can share that code.
As you can see, we have two types of steps:
abstract steps must be implemented by every subclass
optional steps already have some default implementation but can still be overridden if needed.
Real-World Analogy
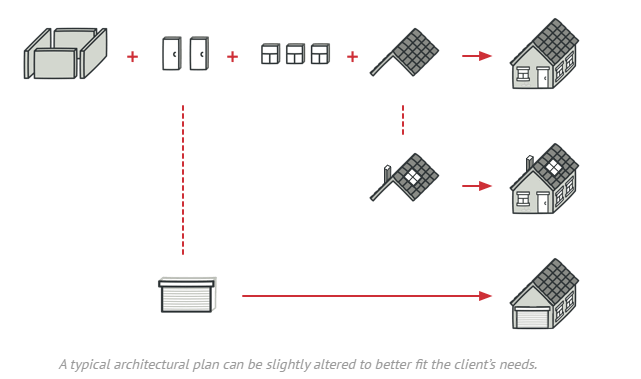
The template method approach can be used in mass housing construction. The architectural plan for building a standard house may contain several extension points that would let a potential owner adjust some details of the resulting house.
Each building step, such as laying the foundation, framing, building walls, installing plumbing and wiring for water and electricity, etc, can be slightly changed to make the resulting house a little bit different from others.
Example
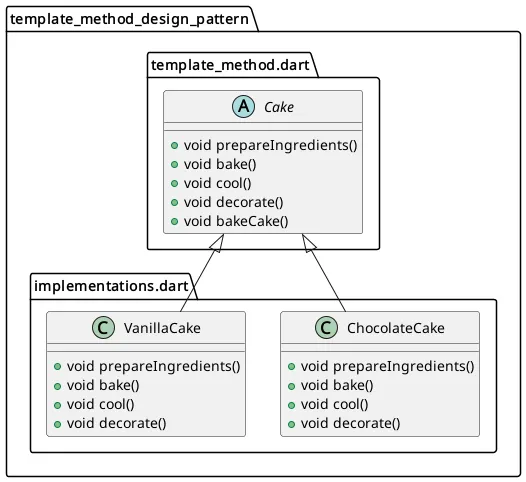
In this example, we will explore how the Template method pattern can be applied to baking cakes, with different types of cake (e.g., Chocolate cake and Vanilla Cake) following a common baking process. We will see how this pattern promotes code reuse and flexibility by adhering to a consistent template.
Implementation
Define the Abstract class: Create an abstract class that outlines the template method, which defines the sequence of steps. In our case,
Cakeis an abstract class with abakeCake()the method that defines the steps to bake a cake.abstract class Cake { void prepareIngredients(); void bake(); void cool(); void decorate(); // Template method void bakeCake() { prepareIngredients(); bake(); cool(); decorate(); } }Implement Concrete Subclasses: Create concrete subclasses that implement the specific steps defined in the abstract class. Each subclass customizes the process for a particular type of cake, such as
ChocolateCakeandVanillaCake.class ChocolateCake extends Cake { @override void prepareIngredients() { print("Preparing chocolate cake ingredients..."); } @override void bake() { print("Baking chocolate cake..."); } @override void cool() { print("Cooling chocolate cake..."); } @override void decorate() { print("Decorating chocolate cake..."); } } class VanillaCake extends Cake { @override void prepareIngredients() { print("Preparing vanilla cake ingredients..."); } @override void bake() { print("Baking vanilla cake..."); } @override void cool() { print("Cooling vanilla cake..."); } @override void decorate() { print("Decorating vanilla cake..."); } }
Usage
Instantiate Concrete Cake Classes: Create instances of the
ChocolateCakeandVanillaCakeclasses, each following the template defined in the abstractCakeclass.Execute the Template Method: Call the
bakeCake()method on each cake instance. This method executes the entire baking process in a predefined sequence, with custom implementations for each cake.Observe the Steps: The steps of preparing ingredients, mixing, baking, cooling, and optionally adding toppings are executed in the order defined by the template method. Each step is customized based on the type of cake being baked.
  void main() {
    var chocolateCake = ChocolateCake();
    var vanillaCake = VanillaCake();

    // Bake a chocolate cake
    print("\nBaking a Chocolate Cake:");
    chocolateCake.bakeCake();

    // Bake a vanilla cake
    print("\nBaking a Vanilla Cake:");
    vanillaCake.bakeCake();
  }
The Visitor Pattern

Visitor is a behavioral design pattern that lets separate algorithms from the objects on which they operate
Problem
Imagine that your team develops an app that works with geographic information structured as one colossal graph. Each node of the graph may represent a complex entity such as a city, but also more granular things like industries, sightseeing areas, etc. The nodes are connected with others if there is a road between the real objects that they represent. Under the hood, each node type is represented by its own class, while each specific node is an object.
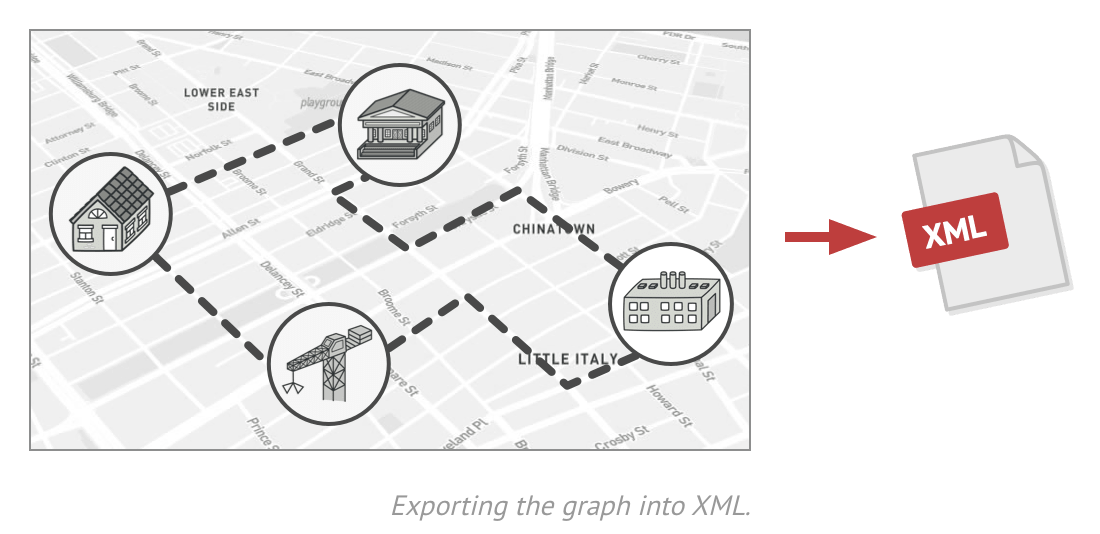
At some point, you have a task to implement exporting the graph into XML format. At first, the job seemed pretty straightforward. You planned to add an export method to each node class and the leverage recursion to go over each node of the graph, executing the export method. The solution was simple and elegant: thanks to polymorphism, you weren’t coupling the code that called the export method to concrete classes of nodes.
Unfortunately, the system architect refused to allow you to alter existing node classes. He said that the code was already in production and he didn’t want to risk breaking it because of potential bugs in your changes.
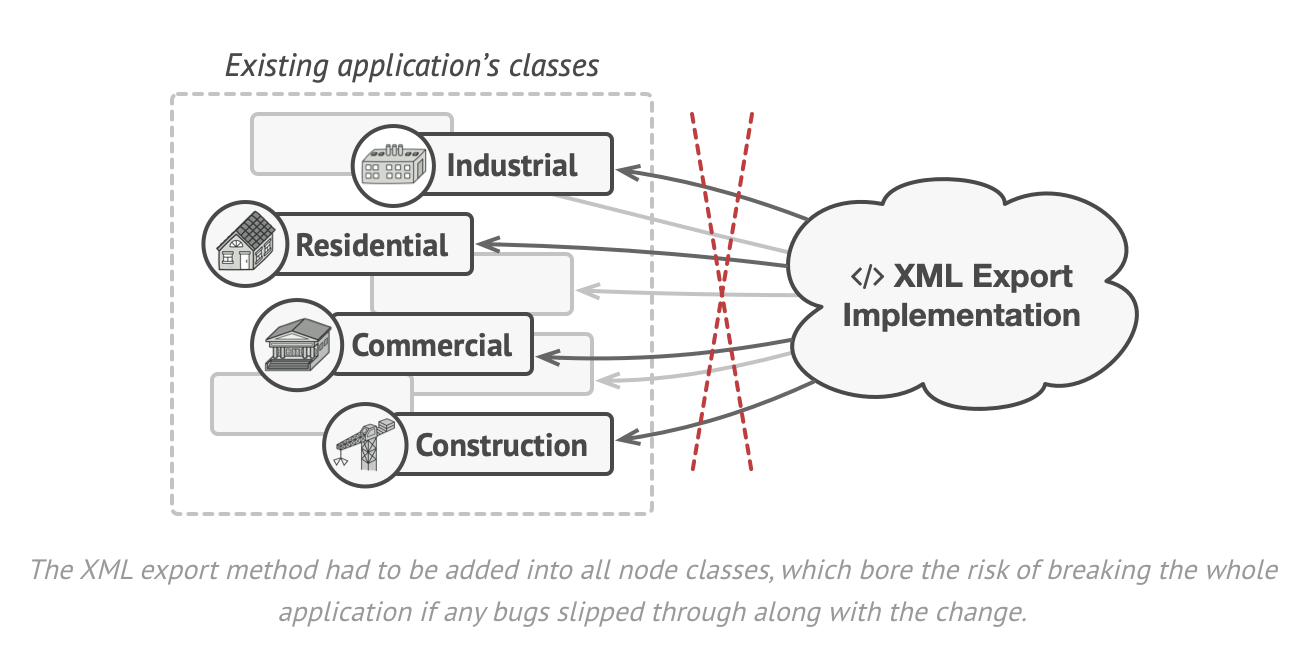
Besides, he questioned whether it makes sense to have the XML export code within the node classes. The primary of these classes was to work with geodata. The XML export behavior would look alien there.
There was another reason for the refusal. It was highly likely that after this feature was implemented, someone from the marketing department would ask you to provide the ability to export into a different format or request some other weird stuff. This would force you to change those precious and fragile classes again.
Solution
The Visitor pattern suggests that you place a new behavior into a separate class called visitor, instead of trying to integrate it into existing classes. The original object that had to perform the behavior is now passed to one of the visitor’s methods as an argument, providing the method access to all necessary data contained within the object.
Now, what if that behavior can be executed over objects of different classes? For example, in our case with XML export, the actual implementation would probably be a little bit different across node classes. Thus, the visitor class may define not one, but a set of methods, each of which could take arguments of different types, like this:
class ExportVisitor implements Visitor is
    method doForCity(City c) { ... }
    method doForIndustry(Industry f) { ... }
    method doForSightSeeing(SightSeeing ss) { ... }
    // ...
But how exactly would we call these methods, especially when dealing with the whole graph? These methods have different signatures, so we can’t use polymorphism. To pick a proper visitor method that is able to process a given object, we would need to check its class. Doesn’t this sound like a nightmare?
foreach (Node node in graph)
    if (node instanceof City)
        exportVisitor.doForCity((City) node)
    if (node instanceof Industry)
        exportVisitor.doForIndustry((Industry) node)
    // ...
}
You might ask, why don’t we use method overloading? That is when you give all methods the same name, even if they support different sets of parameters. Unfortunately, even assuming that our programming language supports it at all (as Java and C# do) won’t help us since the exact class of the node object is known in advance, the overloading mechanism won’t be able to determine a method to execute. It will default to the method that takes an object of the base Node class.
However, the Visitor pattern addresses this problem. It uses a technique called Double Dispatch, which helps to execute the proper method on an object without cumbersome conditionals. Instead of letting the client select the proper version of the method to call, how about we delegate this choice to objects we are passing to the visitor as an argument? Since the object knows its own classes, it will be able to pick a proper method for the visitor less awkwardly. They “accept“ a visitor and tell it what visiting method should be executed.
// Client code
foreach (Node node in graph)
    node.accept(exportVisitor)

// City
class City is
    method accept(Visitor v) is
        v.doForCity(this)
    // ...

// Industry
class Industry is
    method accept(Visitor v) is
        v.doForIndustry(this)
    // ...
I confess. We had to change to node classes after all. But at least the change is trivial and it lets us add further behaviors without altering the code once again.
Now, if we extract a common interface for all visitors, all existing nodes can work with any visitor you introduce to the app. If you find yourself introducing a new behavior related to nodes, all you have to do is implement a new visitor class.
Real-World Analogy

Imagine a seasoned insurance agent who is eager to get new customers. He can visit any building in a neighborhood, trying to sell insurance to everyone he meets. Depending on the type of organization that occupies the building, he can offer specialized insurance policies:
If it’s a residential building, he sells medical insurance.
if it’s a bank, he sells theft insurance.
if it’s a coffee shop, he sells fire and flood insurance.
Example
Let’s try to describe a simple real-life example (you can play with it - see this Github repo written using Typescript) where we have a list of Employee and Clerk objects on which we need to perform two actions (and maybe others in the future):
increase income: increase the income of the Employee/Clerk by 30% and 10% respectively.
increase vacation days: increase the vacation by 3 days for the
Employeeand by 1 day for theClerk
First, we declare the IVisitor interface that exposes the visit method: This method will be suitably defined by the two visitor implementations regarding the actions above, ie. IncomeVisitor and VacationVisitor.
interface IVisitor {
    visit(item: Employee);
}

class IncomeVisitor implements IVisitor {
    visit(item: Employee) {
        if (item instanceof Clerk) {
            item.income *= 1.1;
        } else {
            item.income *= 1.3;
        }
    }
}

class VacationVisitor implements IVisitor {
    visit(item: Employee) {
        if (item instanceof Clerk) {
            item.vactionDays += 1;
        } else {
            item.vactionDays += 3;
        }
    }
}
In this case, we distinguish the type Clerk from the type Employee with a simple if(item instanceof MyType) doing the operations according to the above specifications: notice this is a simplified variation of the visitor pattern that can (or should) provide separate methods for different types, see a second implementation here.
Let’s proceed by adding the second part of the pattern:
interface IVisitable {
    accept(v: IVisitor);
}

class Employee implements IVisitable {
    constructor(
        public name: string,
        public income: number = 10000,
        public vactionDays: number = 30,
    ) { }

    public accept(v: IVisitor) {
        v.visit(this);
    }
}

class Clerk extends Employee {
    constructor(name: string) {
        super(name);
    }
}

class Employees implements IVisitable {
    constructor(
        public employees: Employee[] = []
    ) { }

    public accept(v: IVisitor) {
        this.employees.forEach(e => e.accept(v));
    }
}
We declare a new interface IVisitable that exposes the accept method: This method allows us to “receive“ a visitor instance and perform the action appropriately on the interested item.
This allows us to specify a different behavior for different types of objects/structures: In this case, if we specify that in the case of an Employee list, the accept method must be executed on each component on the list.
Here is a simple example that includes all the code seen so far:
interface IVisitor {
    visit(item: Employee);
}

class IncomeVisitor implements IVisitor {
    visit(item: Employee) {
        if (item instanceof Clerk) {
            item.income *= 1.1;
        } else {
            item.income *= 1.3;
        }
    }
}

class VacationVisitor implements IVisitor {
    visit(item: Employee) {
        if (item instanceof Clerk) {
            item.vactionDays += 1;
        } else {
            item.vactionDays += 3;
        }
    }
}

interface IVisitable {
    accept(v: IVisitor);
}

class Employee implements IVisitable {
    constructor(
        public name: string,
        public income: number = 10000,
        public vactionDays: number = 30,
    ) { }

    public accept(v: IVisitor) {
        v.visit(this);
    }
}

class Clerk extends Employee {
    constructor(name: string) {
        super(name);
    }
}

class Employees implements IVisitable {
    constructor(
        public employees: Employee[] = []
    ) { }

    public accept(v: IVisitor) {
        this.employees.forEach(e => e.accept(v));
    }
}

export class VisitorPattern {
    public run(): void {
        const list = new Employees([new Clerk('Alan'), new Employee('Tim'), new Employee('Zoe')]);

        list.accept(new IncomeVisitor());
        list.accept(new VacationVisitor());
    }
}
Summary
We have together explored 22 design patterns. So by now, we should have a clear understanding of what design pattern really is and what are the benefits of it. So in general, you won’t be able to copy the whole pattern code like the way you copy code from Stackoverflow because the design pattern is a general concept. The pattern is not a specific piece of code, but the general concept for solving a particular problem. You can follow design patterns and implement a solution that suits the reality of a real program.
So guys, we have already reached the end of this article, thank you for taking the time to read the whole series! I hope you found the information helpful and gained some valuable insights into this topic.
happy coding !!!!!!!!
References
https://betterprogramming.pub/understanding-the-observer-design-pattern-f621b1d0b6c9
https://blog.bitsrc.io/understanding-the-state-design-pattern-7f40f6b5e29e
https://blog.bitsrc.io/keep-it-simple-with-the-strategy-design-pattern-c36a14c985e9
https://levelup.gitconnected.com/template-method-design-pattern-explained-e16c6e5e20f8
https://medium.com/factory-mind/visitor-design-pattern-demystified-940bd3903d56
Subscribe to my newsletter
Read articles from Tuan Tran Van directly inside your inbox. Subscribe to the newsletter, and don't miss out.
Written by

Tuan Tran Van
Tuan Tran Van
I am a developer creating open-source projects and writing about web development, side projects, and productivity.