Building a Google Meet Clone with Next.js and TailwindCSS — Part One
 Oluwabusayo Jacobs
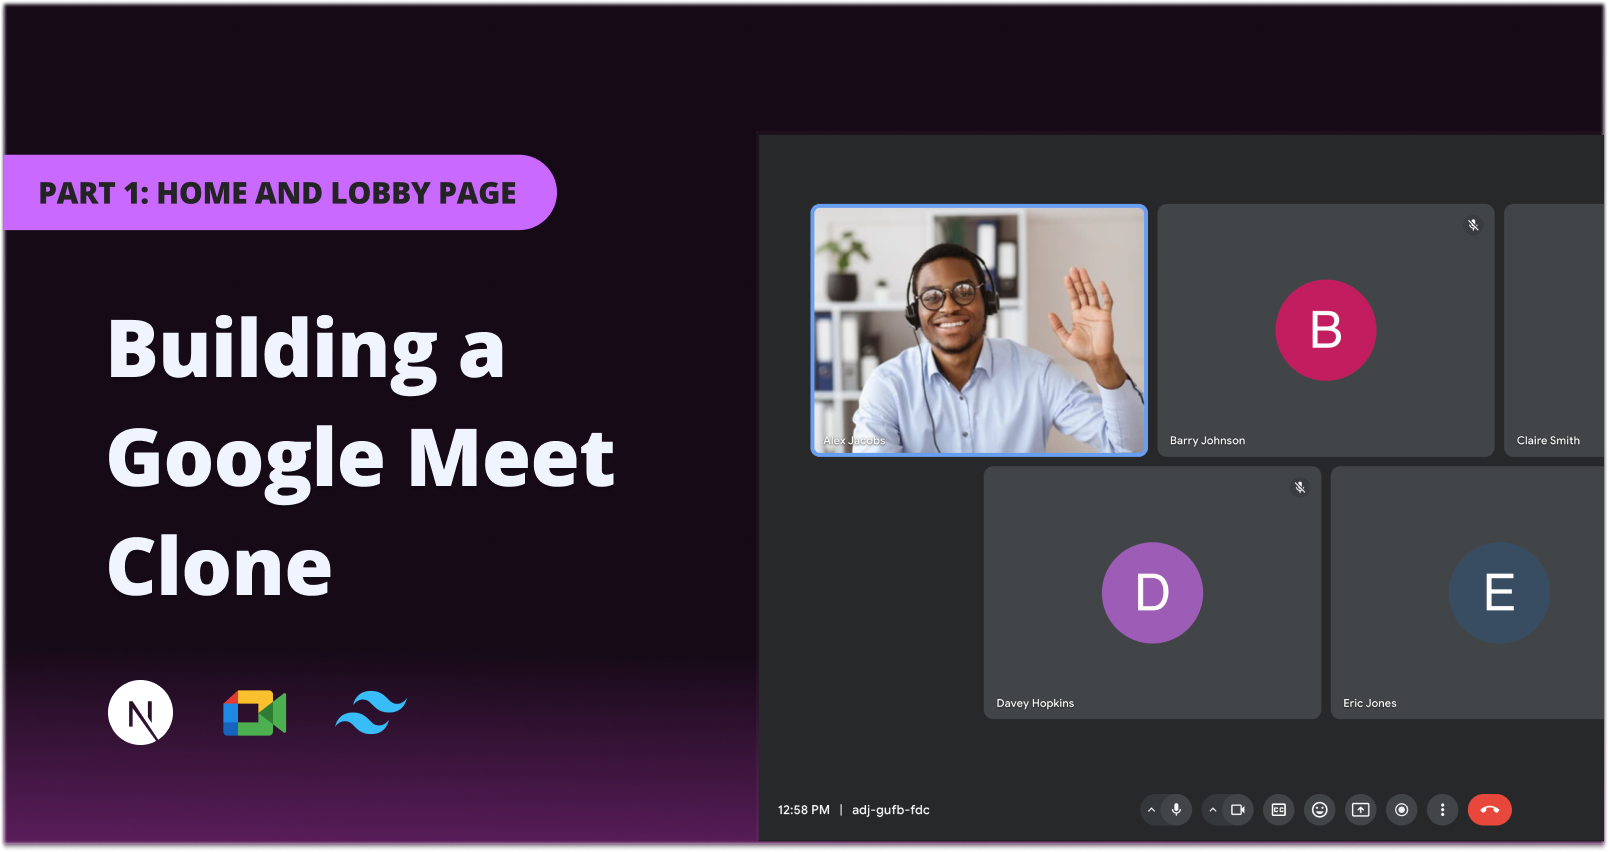
Creating a video conferencing application might seem intimidating at first glance, but it can become an exciting endeavor with the right approach and tools.
In this two-part series, we'll explore how to build a Google Meet clone using Next.js, TailwindCSS, and Stream. Starting from scratch, we'll build out the interface of our application using TailwindCSS, set up authentication, and then integrate Stream Video and Audio SDK to enable video meetings. In addition, we'll also add chat functionality to the app using the Stream Chat SDK.
By the end of this series, you'll have developed a fully functional video-calling app that captures the essential features of Google Meet.
In this first part, we'll set up our project, build the home page, and then the meeting lobby. The next part will focus on building the video meeting page and adding features like screen sharing, recording, and chat integration.
Here's a sneak peek of our final product:
You can check out the live demo and find the complete source code on GitHub.
Prerequisites
Before we begin, ensure you have the following prerequisites:
Basic understanding of React
Node.js and npm (Node Package Manager) installed on your machine
Familiarity with TypeScript, Next.js, and TailwindCSS basics
Setting up the Next.js Project
To get started, let's set up our Next.js project by using a starter template. This template comes bootstrapped with all the base assets, components, and Tailwind configuration we'll need to get started with our app.
Run the following commands to get the template:
git clone https://github.com/TropicolX/google-meet-clone.git
cd google-meet-clone
git checkout starter
npm install
The project structure should look like the following:
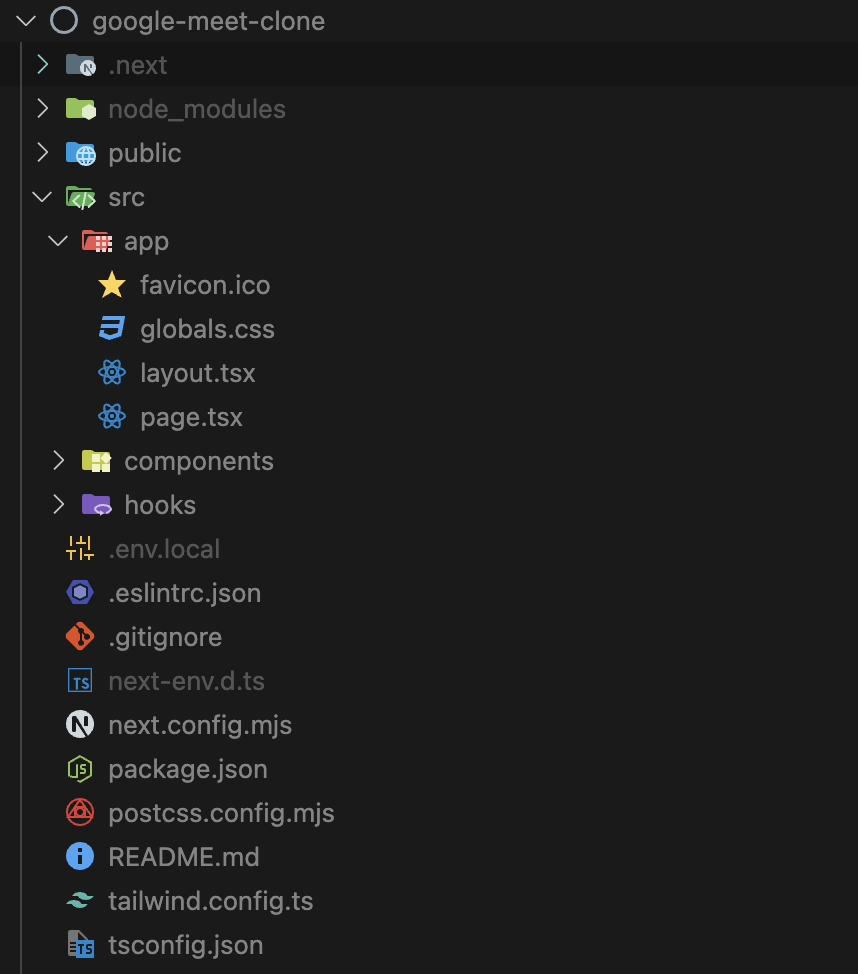
This structure organizes our project into different modules for our pages, components, and hooks:
The
componentsdirectory contains all the icons and base components we’ll use to start building our app.Similarly, the
hooksfolder includes React hooks likeuseClickOutsideanduseLocalStoragethat we’ll use for specific functions in our app.
Now that we've set up our codebase, let's jump into building our Google Meet clone.
Building the Home Page
The first screen we'll be working on is our home page. This page will serve as the starting point of our application. Users will also be able to perform the following key actions on this page:
Sign in/Sign up
Create a new meeting
Join an existing meeting through a code or link
Adding our App Provider
Before developing our UI components, let's add a provider for our app. This provider will manage the global state of our application.
In the src directory, create a new contexts folder with an AppProvider.tsx file and add the following code:
'use client';
import { createContext, ReactNode, useState } from 'react';

export const MEETING_ID_REGEX = /^[a-z]{3}-[a-z]{4}-[a-z]{3}$/;

type AppContextType = {
  newMeeting: boolean;
  setNewMeeting: (newMeeting: boolean) => void;
};

type AppProviderProps = {
  children: ReactNode;
};

const initialContext: AppContextType = {
  newMeeting: false,
  setNewMeeting: () => null,
};

export const AppContext = createContext<AppContextType>(initialContext);

const AppProvider = ({ children }: AppProviderProps) => {
  const [newMeeting, setNewMeeting] = useState(false);

  return (
    <AppContext.Provider
      value={{
        newMeeting,
        setNewMeeting,
      }}
    >
      {children}
    </AppContext.Provider>
  );
};

export default AppProvider;
In the code above:
We defined and exported a regular expression
MEETING_ID_REGEX. We'll use this regex to validate that any meeting ID queried has the required pattern (abc-defg-hij).We created an
AppContextusing React'screateContextto hold the global state.We defined a
newMeetingstate to track when a user creates a new meeting.We then passed the
newMeetingstate and its updater function to theAppProviderso any component can access them.
Next, let's update our root layout to include the provider. Open app/layout.tsx and modify it as follows:
import type { Metadata } from 'next';

import AppProvider from '../contexts/AppProvider';

...

export default function RootLayout({
  children,
}: Readonly<{
  children: React.ReactNode;
}>) {
  return (
    <AppProvider>
      <html lang="en">
        <body>{children}</body>
      </html>
    </AppProvider>
  );
}
Building the Header
Next, let's create the header for our app. This component will appear at the top of the home page and contain the app logo, navigation items, and user information.
Navigate to the components directory and create a Header.tsx file with the following code:
import Apps from './icons/Apps';
import Avatar from './Avatar';
import Feedback from './icons/Feedback';
import Help from './icons/Help';
import IconButton from './IconButton';
import PlainButton from './PlainButton';
import Videocam from './icons/Videocam';
import Settings from './icons/Settings';
import useTime from '../hooks/useTime';

interface HeaderProps {
  navItems?: boolean;
}

const AVATAR_SIZE = 36;

const Header = ({ navItems = true }: HeaderProps) => {
  const isSignedIn = true;
  const email = 'johndoe@gmail.com';
  const { currentDateTime } = useTime();

  return (
    <header className="w-full px-4 pt-4 flex items-center justify-between bg-white">
      <div className="w-60 max-w-full">
        <a href="/#" className="flex items-center gap-2 w-full">
          <Videocam width={40} height={40} color="var(--primary)" />
          <div className="font-product-sans text-2xl leading-6 text-meet-gray select-none">
            <span className="font-medium">Moogle </span>
            <span>Meet</span>
          </div>
        </a>
      </div>
      <div className= "flex items-center cursor-default">
        {navItems && (
          <>
            <div className="hidden md:block mr-2 text-lg leading-4.5 text-meet-gray select-none">
              {currentDateTime}
            </div>
            <div className="hidden sm:contents [&>button]:mx-2.5">
              <IconButton title="Support" icon={<Help />} />
              <IconButton title="Report a problem" icon={<Feedback />} />
              <IconButton title="Settings" icon={<Settings />} />
            </div>
          </>
        )}
        <div className="ml-2 flex items-center justify-end w-[6.5625rem] lg:ml-5">
          {navItems && (
            <div className="hidden sm:block">
              <IconButton title="Moogle apps" icon={<Apps />} />
            </div>
          )}
          <div className="w-[3.04rem] grow flex items-center justify-end [&_img]:w-9 [&_span]:w-9 [&_img]:h-9 [&_span]:h-9">
            {isSignedIn ? (
              <>
                {!navItems && (
                  <div className="hidden sm:block mr-3 font-roboto leading-4 text-right text-meet-black">
                    <div className="text-sm leading-4">{email}</div>
                    <div className="text-sm hover:text-meet-blue cursor-pointer">
                      Switch account
                    </div>
                  </div>
                )}
                <div className="relative h-9">
                  <Avatar
                    participant={{
                      name: 'John Doe',
                    }}
                    width={AVATAR_SIZE}
                  />
                </div>
              </>
            ) : (
              <PlainButton size="sm">Sign In</PlainButton>
            )}
          </div>
        </div>
      </div>
    </header>
  );
};

export default Header;
From the code above:
We set
AVATAR_SIZEto define the size of the user avatar.We use a custom
useTimehook to get the current date and time.We defined a
navItemsprop which, iftrue, shows the current time and navigation buttons.We use
isSignedInto:Display the user's avatar and details when
true.Render a sign-in button when
false.
Both isSignedIn and email are hardcoded for now, but we will work on this later in the article.
Building the Main Section
With our header in place, we can now work on the main UI for our home page. Head over to page.tsx and add the following code:
'use client';
import { useState } from 'react';
import Image from 'next/image';

import Button from '@/components/Button';
import ButtonWithIcon from '@/components/ButtonWithIcon';
import Header from '@/components/Header';
import KeyboardFilled from '@/components/icons/KeyboardFilled';
import PlainButton from '@/components/PlainButton';
import TextField from '@/components/TextField';
import Videocall from '@/components/icons/Videocall';

const IMAGE_SIZE = 248;

const Home = () => {
  const isSignedIn = true;
  const [code, setCode] = useState('');

  const handleNewMeeting = () => {
    console.log('New meeting');
  };

  const handleCode = () => {
    console.log('Joining with code', code);
  };

  return (
    <div>
      <Header />
      <main className="flex flex-col items-center justify-center px-6">
        <div className="w-full max-w-2xl p-4 pt-7 text-center inline-flex flex-col items-center basis-auto shrink-0">
          <h1 className="text-5xl tracking-normal text-black pb-2">
            Video calls and meetings for everyone
          </h1>
          <p className="text-1x text-gray pb-8">
            Connect, collaborate, and celebrate from anywhere with Moogle Meet
          </p>
        </div>
        <div className="w-full max-w-xl flex justify-center">
          <div className="flex flex-col items-start sm:flex-row gap-6 sm:gap-2 sm:items-center justify-center">
            {isSignedIn && (
              <ButtonWithIcon onClick={handleNewMeeting} icon={<Videocall />}>
                New meeting
              </ButtonWithIcon>
            )}
            {!isSignedIn && <Button size="md">Sign in</Button>}
            <div className="flex items-center gap-2 sm:ml-4">
              <TextField
                label= "Code or link"
                name= "code"
                placeholder= "Enter a code or link"
                value={code}
                onChange={(e) => setCode(e.target.value)}
                icon={<KeyboardFilled />}
              />
              <PlainButton onClick={handleCode} disabled={!code}>
                Join
              </PlainButton>
            </div>
          </div>
        </div>
        <div className="w-full max-w-xl mx-auto border-b border-b-border-gray self-stretch mt-8 mb-20" />
        <div className="flex flex-col items-center justify-center gap-8">
          <Image
            src="https://www.gstatic.com/meet/user_edu_get_a_link_light_90698cd7b4ca04d3005c962a3756c42d.svg"
            alt= "Get a link you can share"
            width={IMAGE_SIZE}
            height={IMAGE_SIZE}
          />
          <div className="flex flex-col gap-2 text-center max-w-sm">
            <h2 className="text-2xl tracking-normal text-black">
              Get a link you can share
            </h2>
            <p className="font-roboto text-sm text-black pb-8 grow">
              Click <span className="font-bold">New meeting</span> to get a link
              you can send to people you want to meet with
            </p>
          </div>
        </div>
        <footer className="w-full max-w-xl mt-20 pb-4 text-start">
          <div className= "text-xs text-gray tracking-wider">
            <span className="cursor-pointer">
              <a className="text-meet-blue hover:underline" href="#">
                Learn more
              </a>{' '}
              about Moogle Meet
            </span>
          </div>
        </footer>
      </main>
    </div>
  );
};

export default Home;
In the code above:
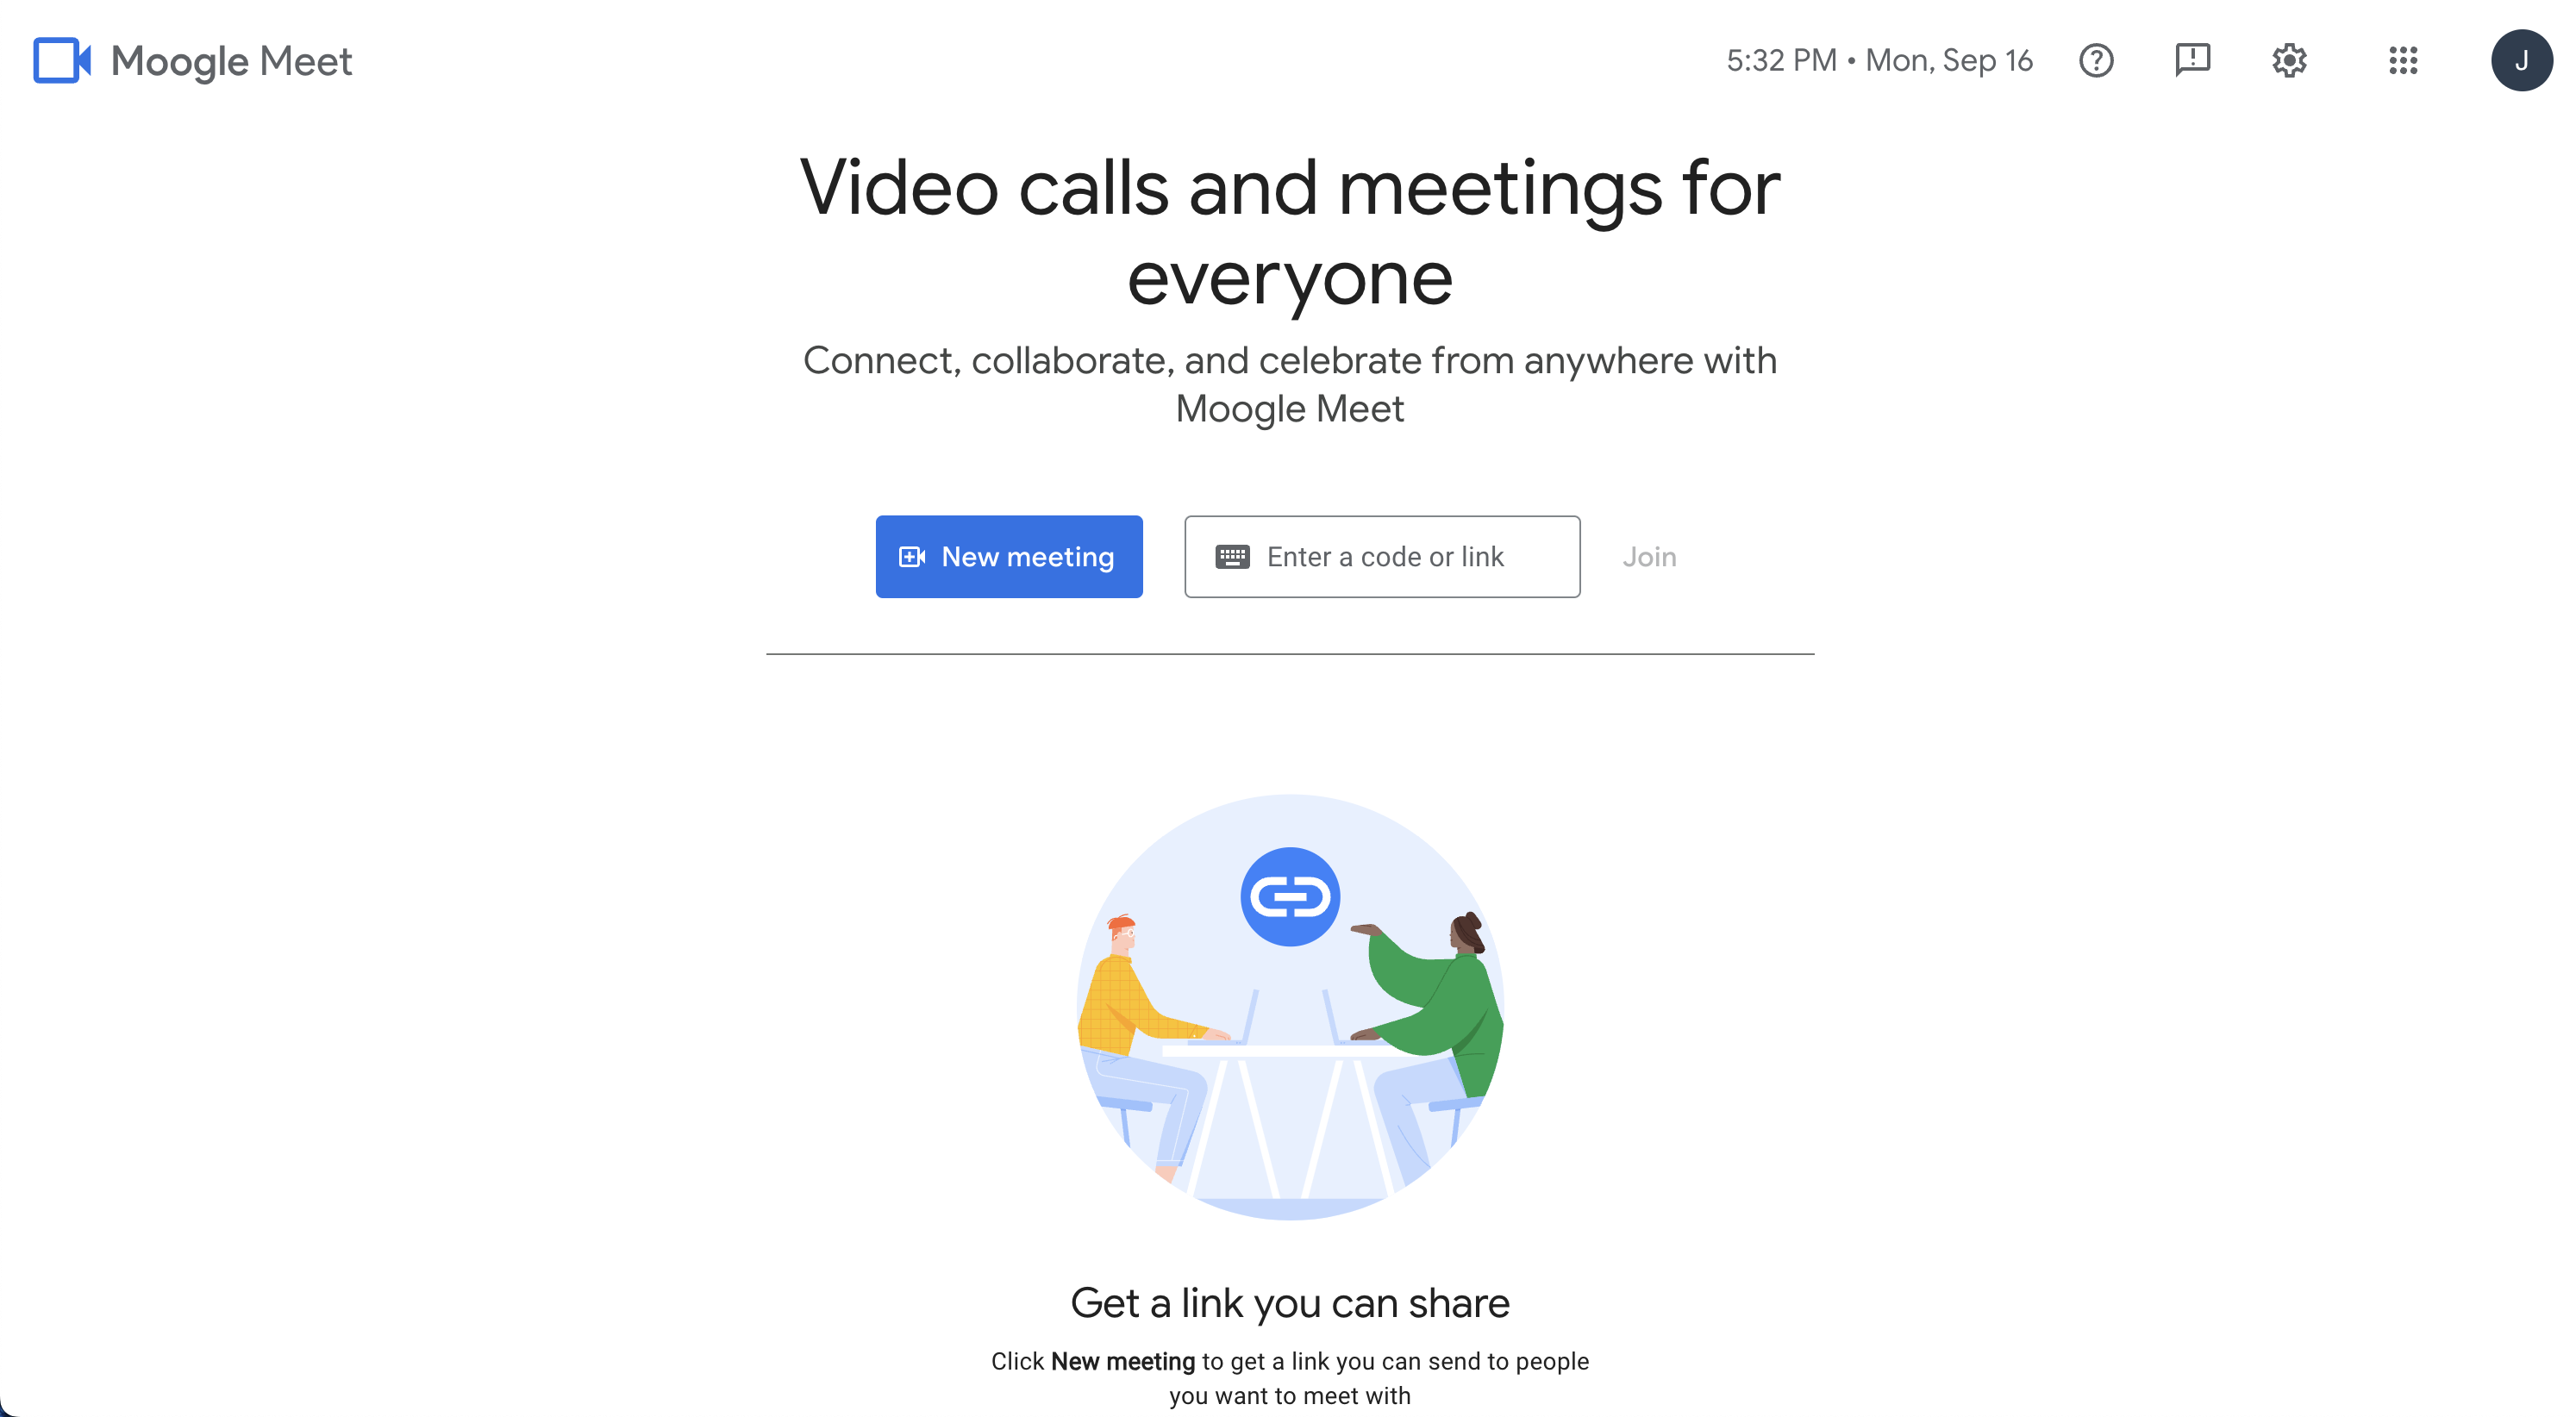
We set up the main UI of our home page.
Like our header, we're currently using a hard-coded
isSignedInvalue.We add a
codestate to hold the meeting code entered by a user.We display either a “New meeting” or “Sign in” button based on
isSignedIn.
And with that, your home page should look something like this:
Generating a Meeting ID
When a user clicks the "New meeting" button, we want to generate a unique meeting ID. We can use the Nano ID library to achieve this.
Run the following command to install Nano ID into your project:
npm install nanoid
Next, update your page.tsx file to include the following code:
'use client';
import { useState, useContext } from 'react';
import { useRouter } from 'next/navigation';
import { customAlphabet } from 'nanoid';
import Image from 'next/image';

import { AppContext } from '@/contexts/AppProvider';
...

const generateMeetingId = () => {
  const alphabet = 'abcdefghijklmnopqrstuvwxyz';
  const nanoid = customAlphabet(alphabet, 4);
  return `${nanoid(3)}-${nanoid(4)}-${nanoid(3)}`;
};

const Home = () => {
  const isSignedIn = true;
  const { setNewMeeting } = useContext(AppContext);
  const [code, setCode] = useState('');
  const router = useRouter();

  const handleNewMeeting = () => {
    setNewMeeting(true);
    router.push(`/${generateMeetingId()}`);
  };

  // ...
};

export default Home;
Here, we create a new function generateMeetingId. This function uses customAlphabet from nanoid to generate unique IDs in the format abc-defg-hij.
We also modify the handleNewMeeting function to update the newMeeting state to true and redirect the user to another page. This page will be our lobby page, which will use meeting IDs as its dynamic route.
Implementing Authentication with Clerk
What is Clerk?
Clerk is a user management platform that provides various tools for authentication and user profiles. These tools include pre-built UI components, flexible APIs, and admin dashboards. Clerk makes it easy to integrate authentication features into your application without spending time building them from scratch.
We'll use Clerk to implement authentication in our app and separate guests from sign-in users.
Creating Your Clerk Account
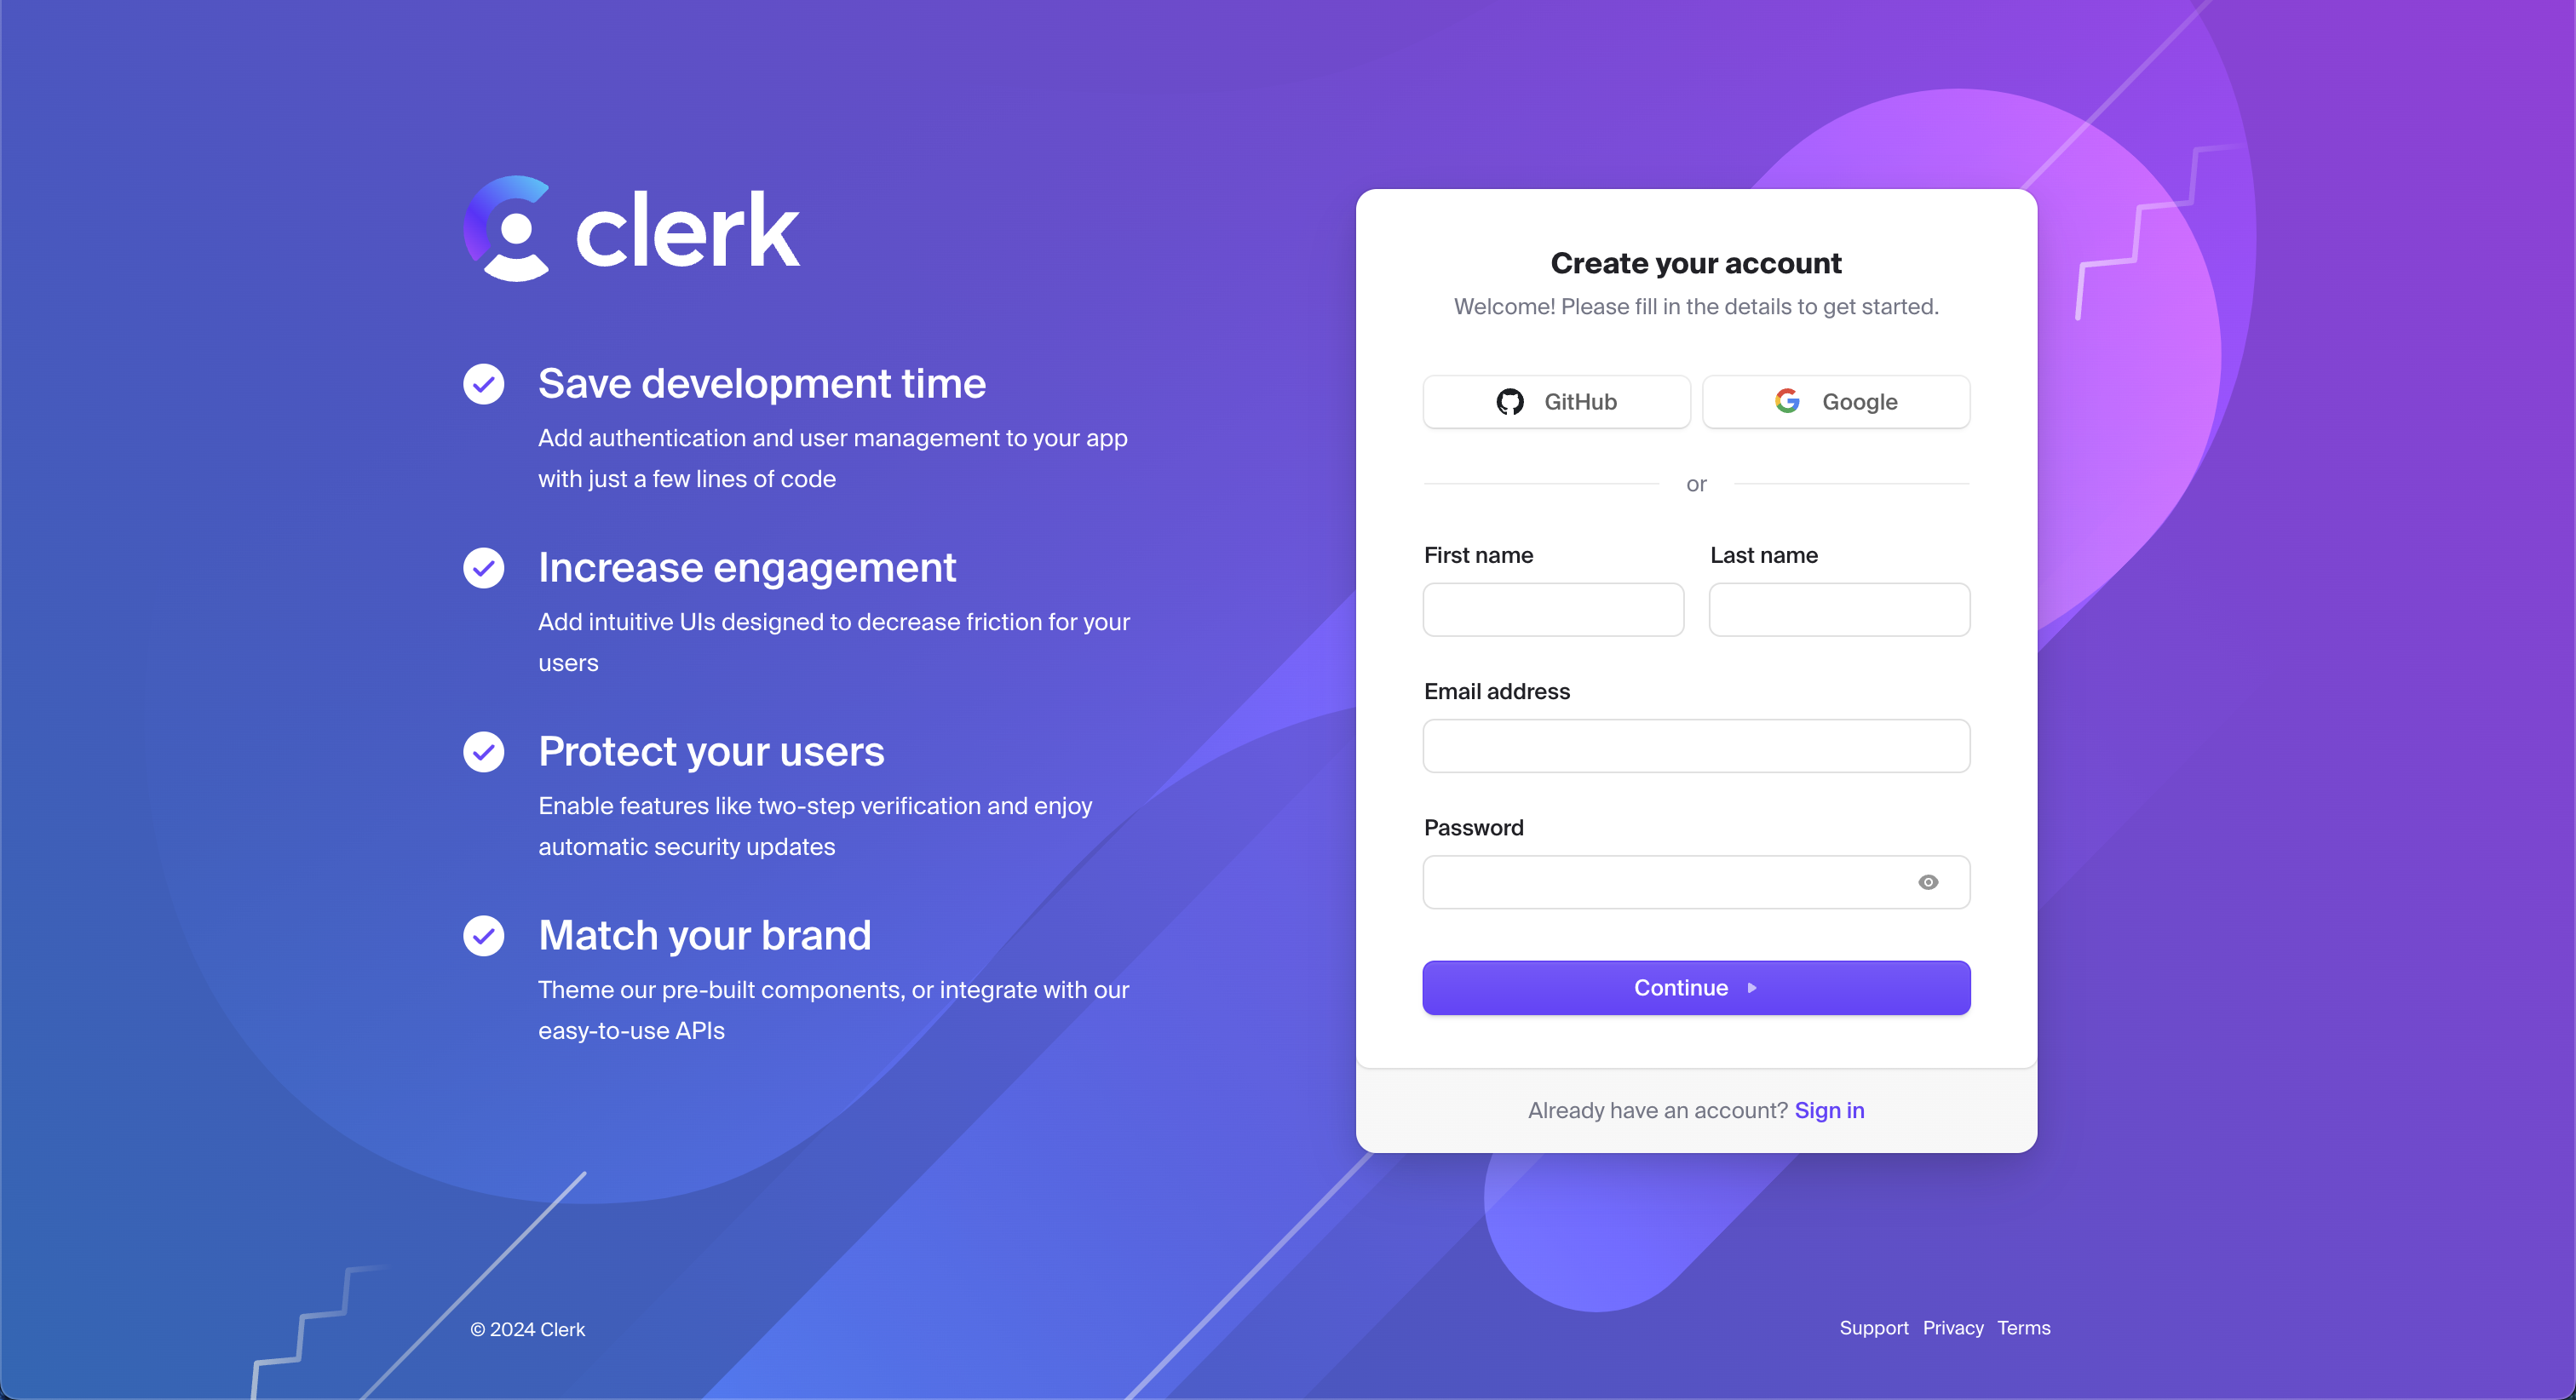
Let's begin by creating a free Clerk account. Visit the Clerk sign-up page and create a new account using your email or a social login option.
Creating a New Clerk Project
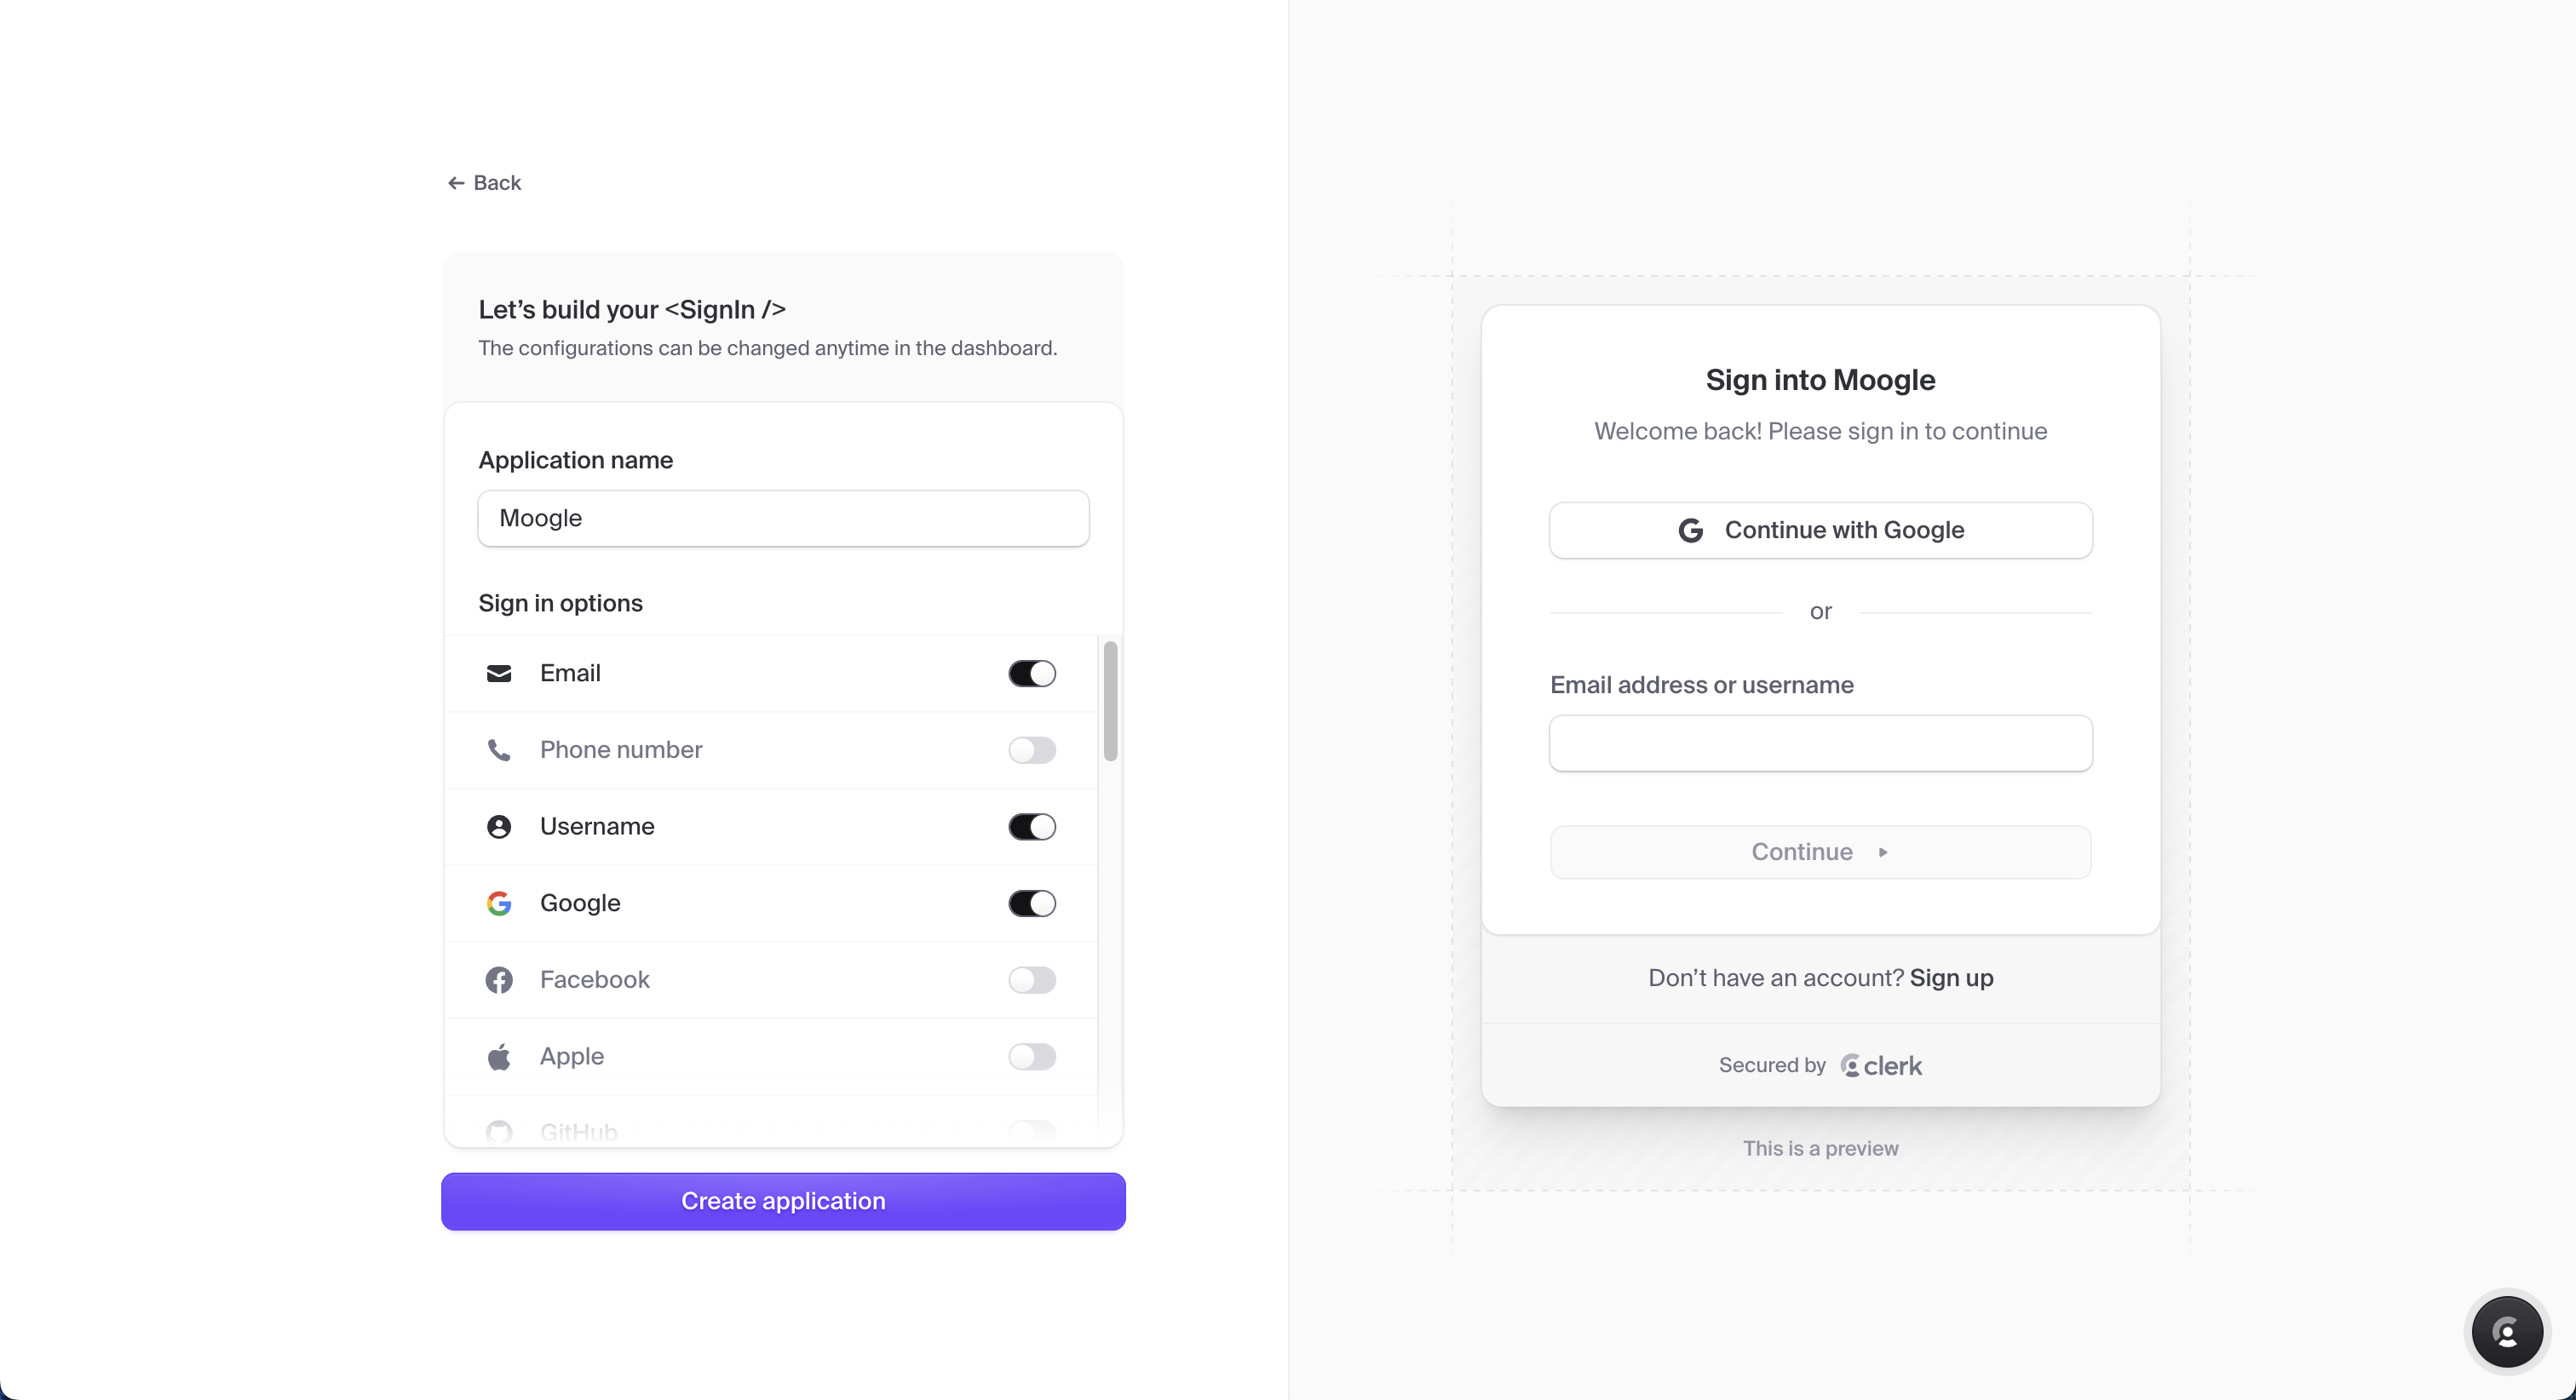
Once you've signed in, you can proceed by creating a new Clerk project for your app:
Navigate to the dashboard and click on the "Create application" button.
Enter “Moogle” as your application name.
Under “Sign in options,” select Email, Username, and Google to allow users multiple ways to sign in.
Finally, click the "Create application" button to proceed.

After following the steps above, you'll be redirected to your application's overview page. Here, you can find your Publishable Key and Secret Key, which we'll use later.
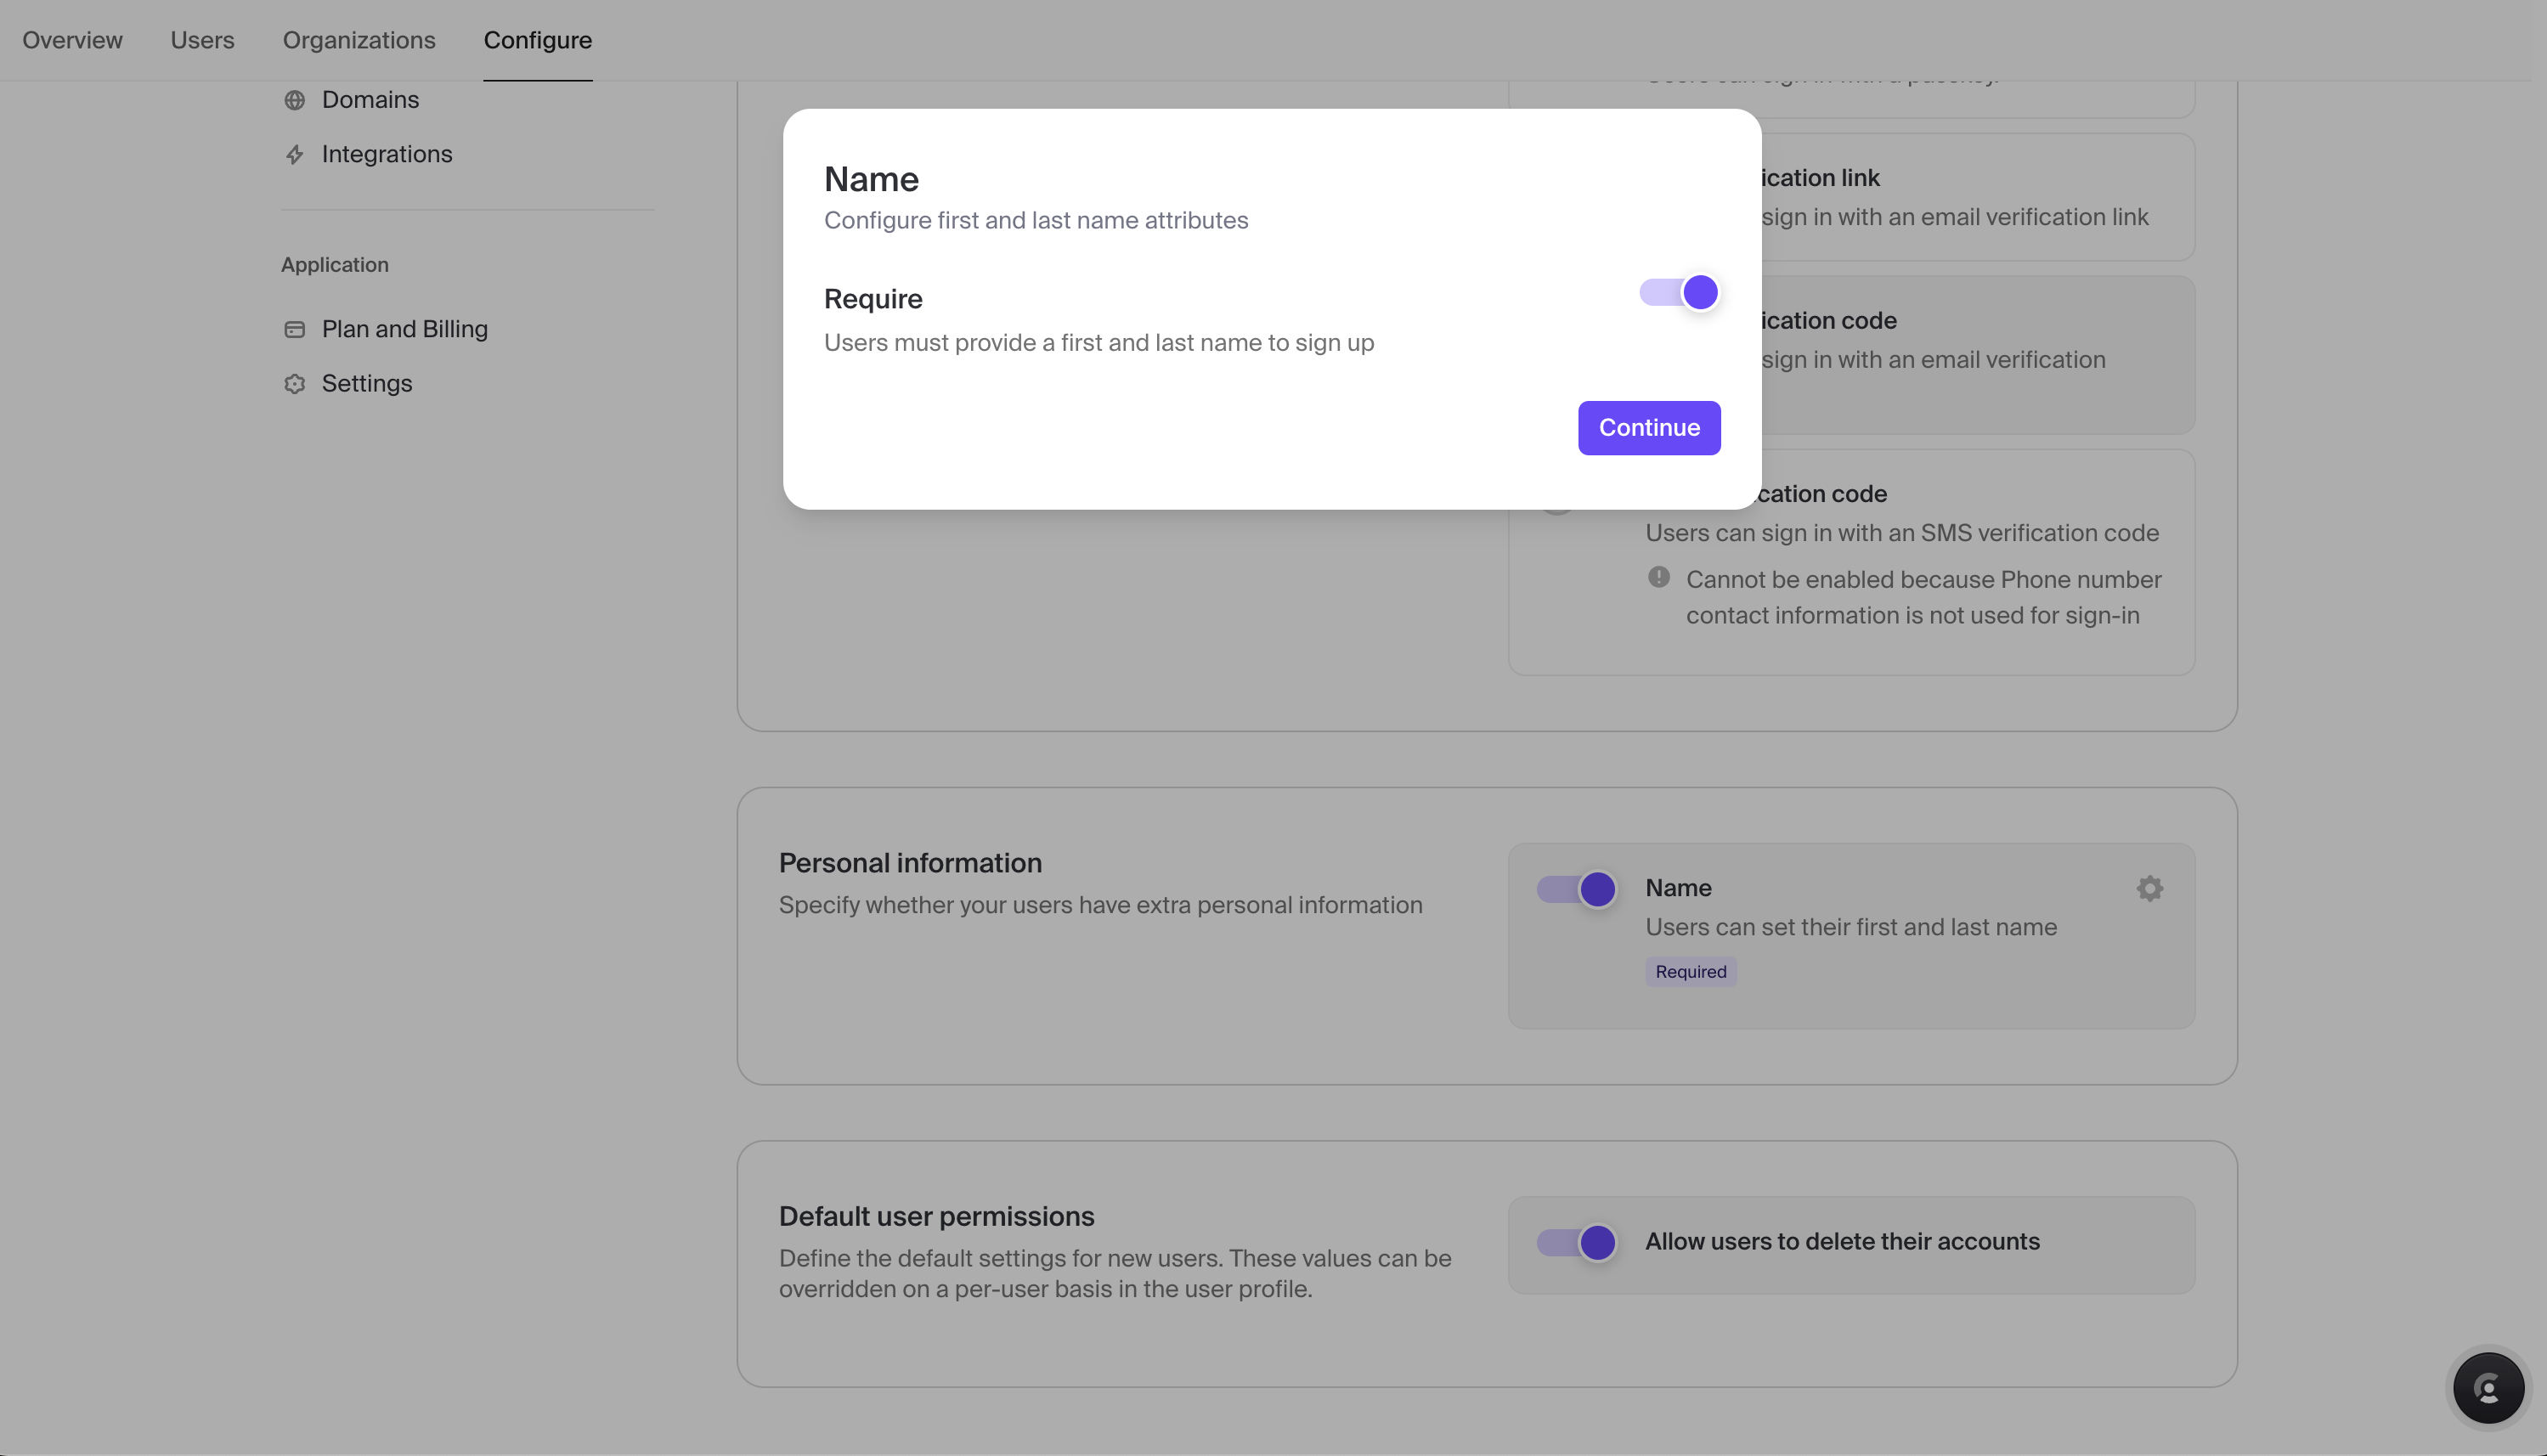
Next, let’s add first and last names as required attributes during the sign-up process. To make these fields required:
Navigate to the "Configure" tab in your Clerk dashboard.
Under "User & Authentication", select "Email, Phone, Username".
In the "Personal Information" section, find the "Name" option and toggle it on.
Click the settings icon (gear icon) next to "Name" to access additional settings.
Enable the "Require" option and click “Continue” to save your changes.
Installing Clerk in Your Project
Now, let's install Clerk into our Next.js project:
Install the Clerk package by running the command below:
npm install @clerk/nextjsCreate a
.env.localfile in the root of your project and add the following variables:NEXT_PUBLIC_CLERK_PUBLISHABLE_KEY=your_clerk_publishable_key CLERK_SECRET_KEY=your_clerk_secret_keyReplace
your_clerk_publishable_keyandyour_clerk_secret_keywith the actual keys from your Clerk application's overview page.Next, we need to wrap our application with the
ClerkProviderto make authentication available throughout the app. Update yourapp/layout.tsxfile as follows:import type { Metadata } from 'next'; import { ClerkProvider } from '@clerk/nextjs'; ... export default function RootLayout({ children, }: Readonly<{ children: React.ReactNode; }>) { return ( <AppProvider> <ClerkProvider> <html lang="en"> <body>{children}</body> </html> </ClerkProvider> </AppProvider> ); }
After following the above steps, you can now use Clerk in your application.
Adding Sign-Up and Sign-In Pages
Next, we'll create sign-up and sign-in pages using Clerk's <SignUp /> and <SignIn /> components. These components will handle all the UI and logic for user authentication.
Follow the steps below to add the pages to your app:
Configure Your Authentication URLs: Clerk's
<SignUp />and<SignIn />components need to know the routes where they are mounted. We can provide these paths via environment variables. In your.env.localfile, add the following:NEXT_PUBLIC_CLERK_SIGN_IN_URL=/sign-in NEXT_PUBLIC_CLERK_SIGN_UP_URL=/sign-upAdd Your Sign-Up Page: Create a new file at
app/sign-up/[[...sign-up]]/page.tsxwith the following code:import { SignUp } from '@clerk/nextjs'; export default function Page() { return ( <div className= "w-svw h-svh flex items-center justify-center"> <SignUp /> </div> ); }Add Your Sign-In Page: Similarly, create a sign-in page at
app/sign-in/[[...sign-in]]/page.tsxwith the code below:import { SignIn } from '@clerk/nextjs'; export default function Page() { return ( <div className= "w-svw h-svh flex items-center justify-center"> <SignIn /> </div> ); }
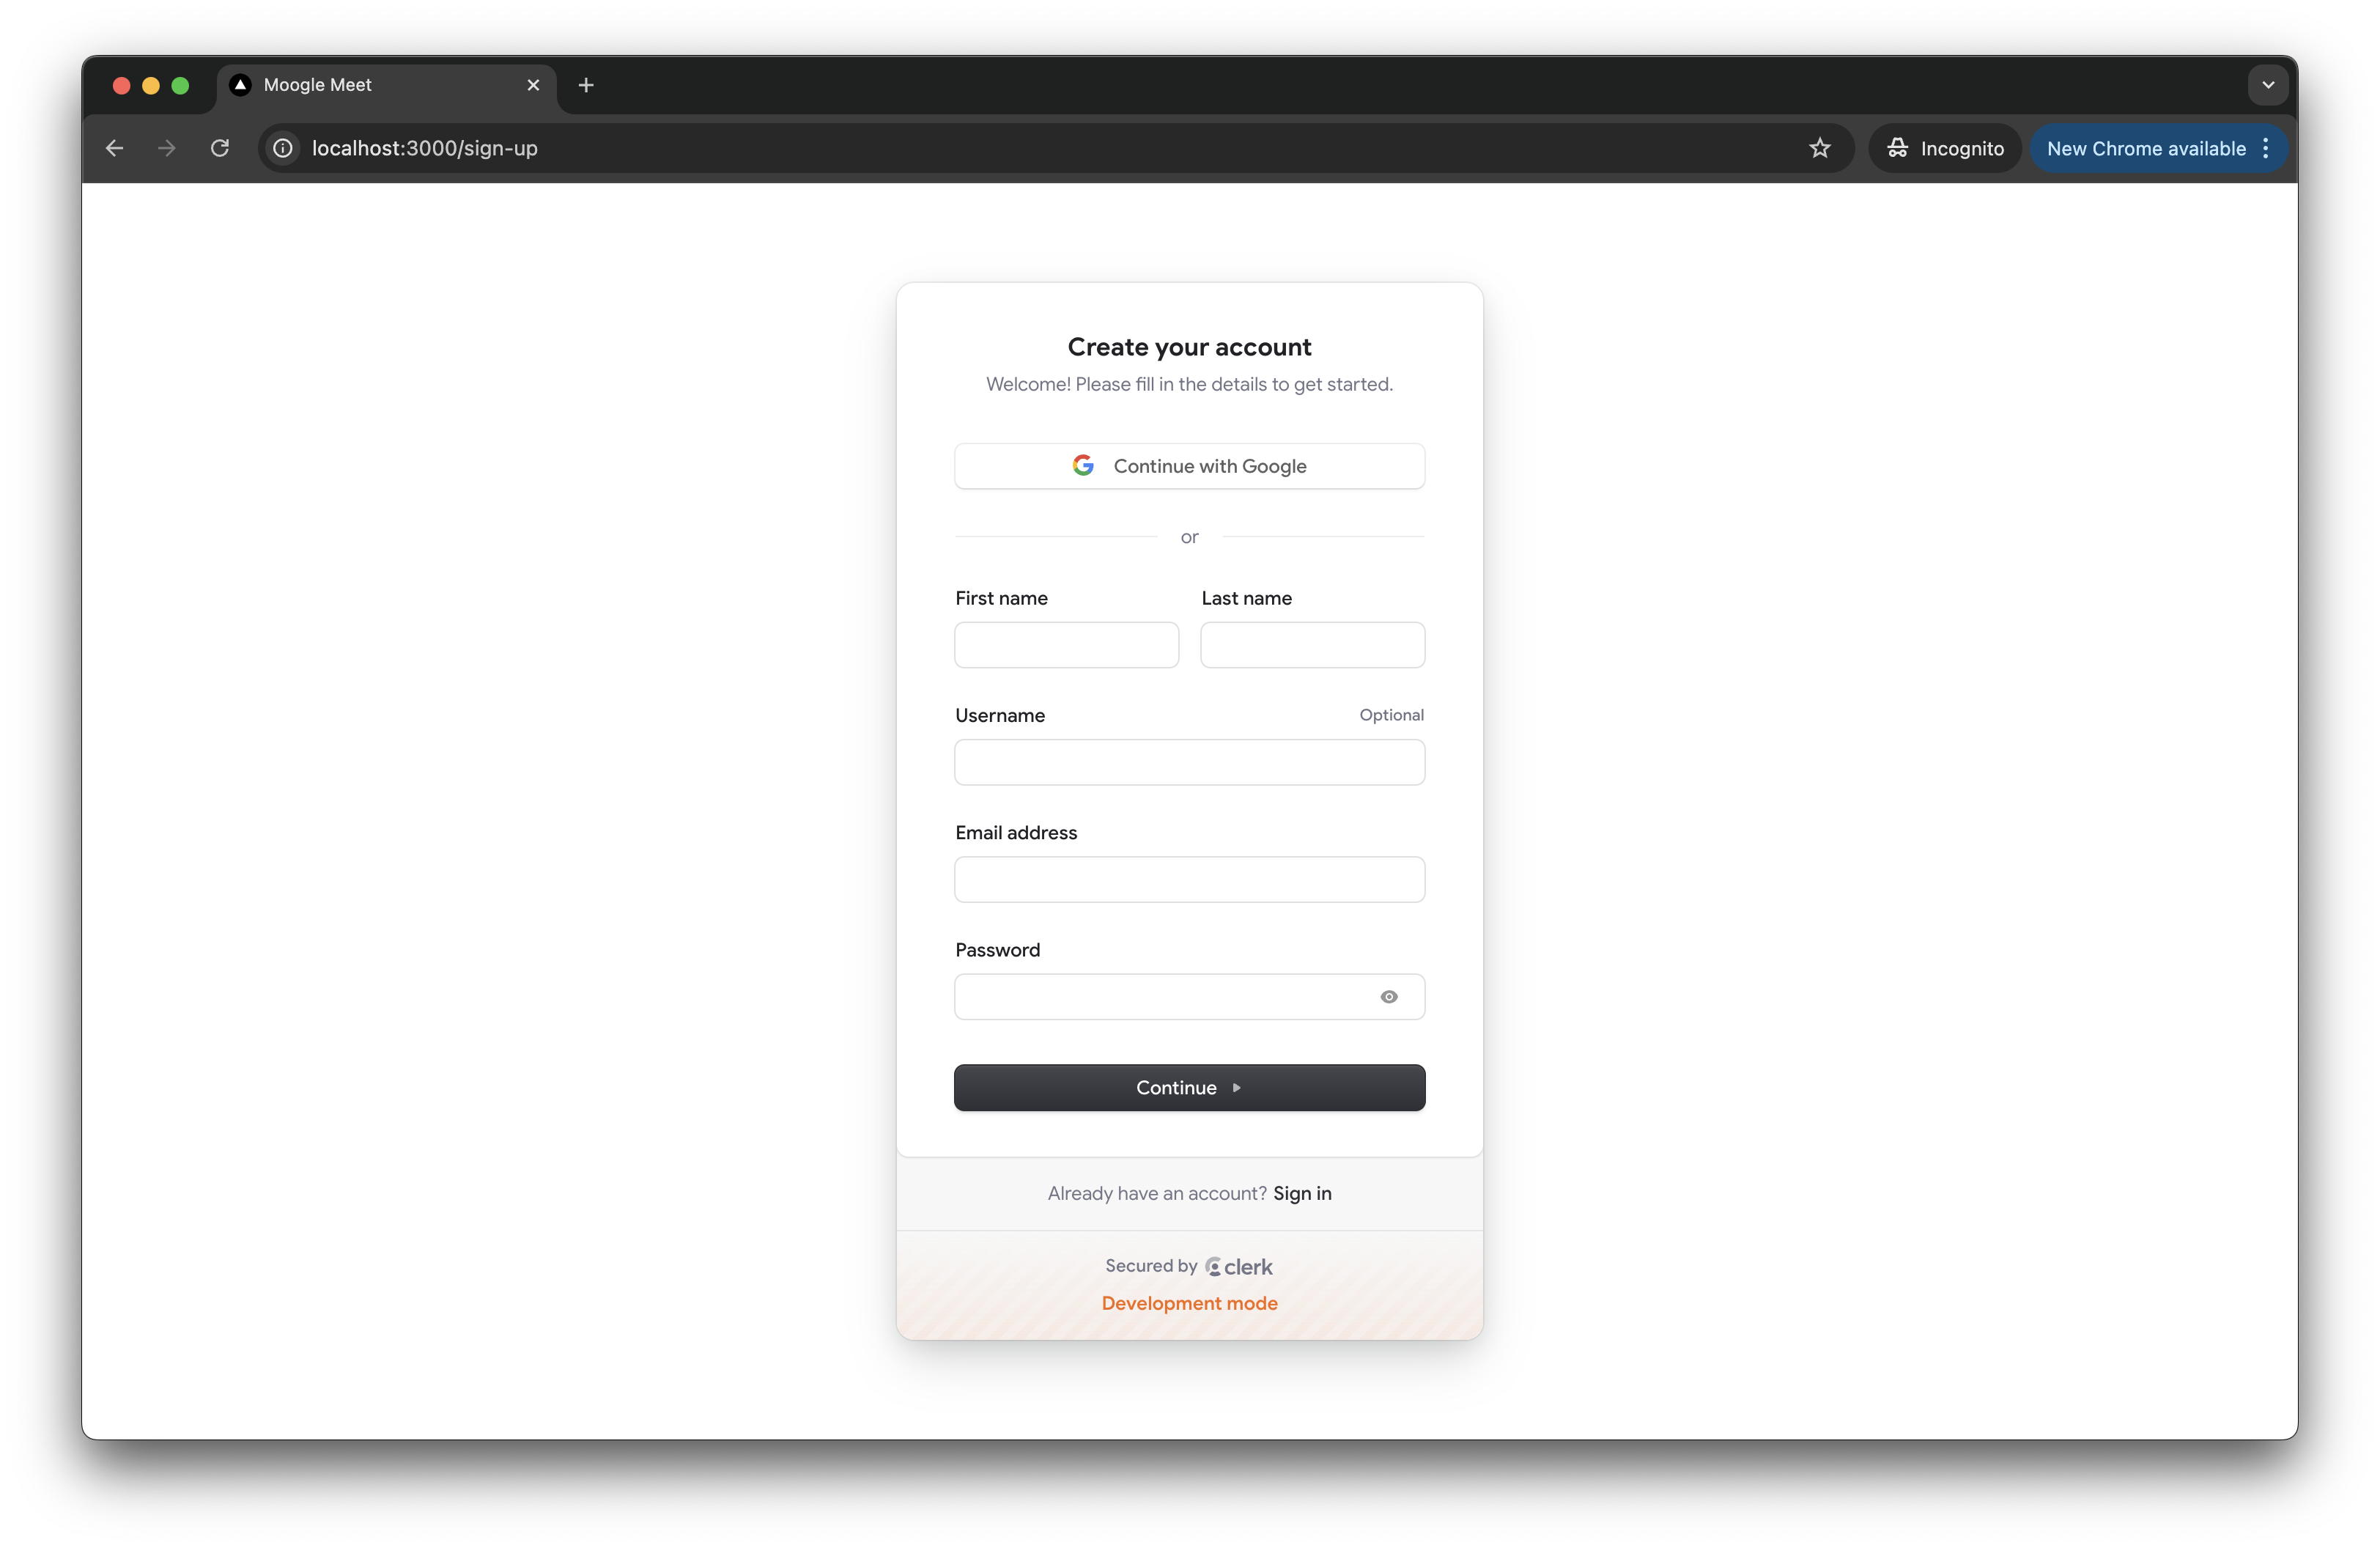
And with that, you should have fully functional sign-in and sign-up pages.
Next, let's replace the hard-coded values in our app and add more functionality.
Updating the Home Page
We'll start by modifying our home page. Update the page.tsx file with the following code:
'use client';
...
import clsx from 'clsx';
import { SignInButton, useUser } from '@clerk/nextjs';
...

const Home = () => {
  const { setNewMeeting } = useContext(AppContext);
  const { isLoaded, isSignedIn } = useUser();
  ...

  const handleNewMeeting = () => {
    ...
  };

  const handleCode = async () => {
    ...
  };

  return (
    <div>
      ...
      <main
        className={clsx(
          'flex flex-col items-center justify-center px-6',
          isLoaded ? 'animate-fade-in' : 'opacity-0'
        )}
      >
        ...
        <div className="w-full max-w-xl flex justify-center">
          <div className="flex flex-col items-start sm:flex-row gap-6 sm:gap-2 sm:items-center justify-center">
            ...
            {!isSignedIn && (
              <SignInButton>
                <Button size="md">Sign in</Button>
              </SignInButton>
            )}
            ...
          </div>
        </div>
        ...
      </main>
    </div>
  );
};

export default Home;
In the code above:
We import
SignInButtonanduseUserfrom@clerk/nextjsto manage the user authentication state.The
useUserhook providesisLoadedandisSignedInproperties to check if the user data has loaded and whether the user is signed in respectively.The
<main>element'sclassNameuses theclsxutility to apply a fade-in animation once the user data is loaded.We wrap the “Sign In” button with Clerk’s
<SignInButton />component. When clicked, the component redirects the user to the sign-in page.
Updating the Header Component
Finally, we'll update our Header component to reflect the user's authentication status. Update the Header.tsx file with the following code:
import { SignInButton, UserButton, useUser } from '@clerk/nextjs';
import clsx from 'clsx';

...

const Header = ({ navItems = true }: HeaderProps) => {
  const { isLoaded, isSignedIn, user } = useUser();
  const { currentDateTime } = useTime();
  const email = user?.primaryEmailAddress?.emailAddress;

  return (
      ...
          <div
            className={clsx(
              'w-[3.04rem] grow flex items-center justify-end [&_img]:w-9 [&_span]:w-9 [&_img]:h-9 [&_span]:h-9',
              isLoaded ? 'animate-fade-in' : 'opacity-0'
            )}
          >
            {isSignedIn ? (
              <>
                {!navItems && (
                  <div className="hidden sm:block mr-3 font-roboto leading-4 text-right text-meet-black">
                    <div className="text-sm leading-4">{email}</div>
                    <div className="text-sm hover:text-meet-blue cursor-pointer">
                      Switch account
                    </div>
                  </div>
                )}
                <div className="relative h-9">
                  <UserButton />
                  <div className="absolute left-0 top-0 flex items-center justify-center pointer-events-none">
                    <Avatar
                      participant={{
                        name: user?.fullName!,
                        image: user.hasImage ? user.imageUrl : undefined,
                      }}
                      width={AVATAR_SIZE}
                    />
                  </div>
                </div>
              </>
            ) : (
              <SignInButton>
                <PlainButton size="sm">Sign In</PlainButton>
              </SignInButton>
            )}
          </div>
      ...
  );
};

export default Header;
In the code above:
We import
SignInButton,UserButton, anduseUserfrom@clerk/nextjs.The
<UserButton />component displays the user's avatar and provides a menu with account options.We wrap Clerk’s
<SignInButton />around<PlainButton />to redirect the user when clicked.
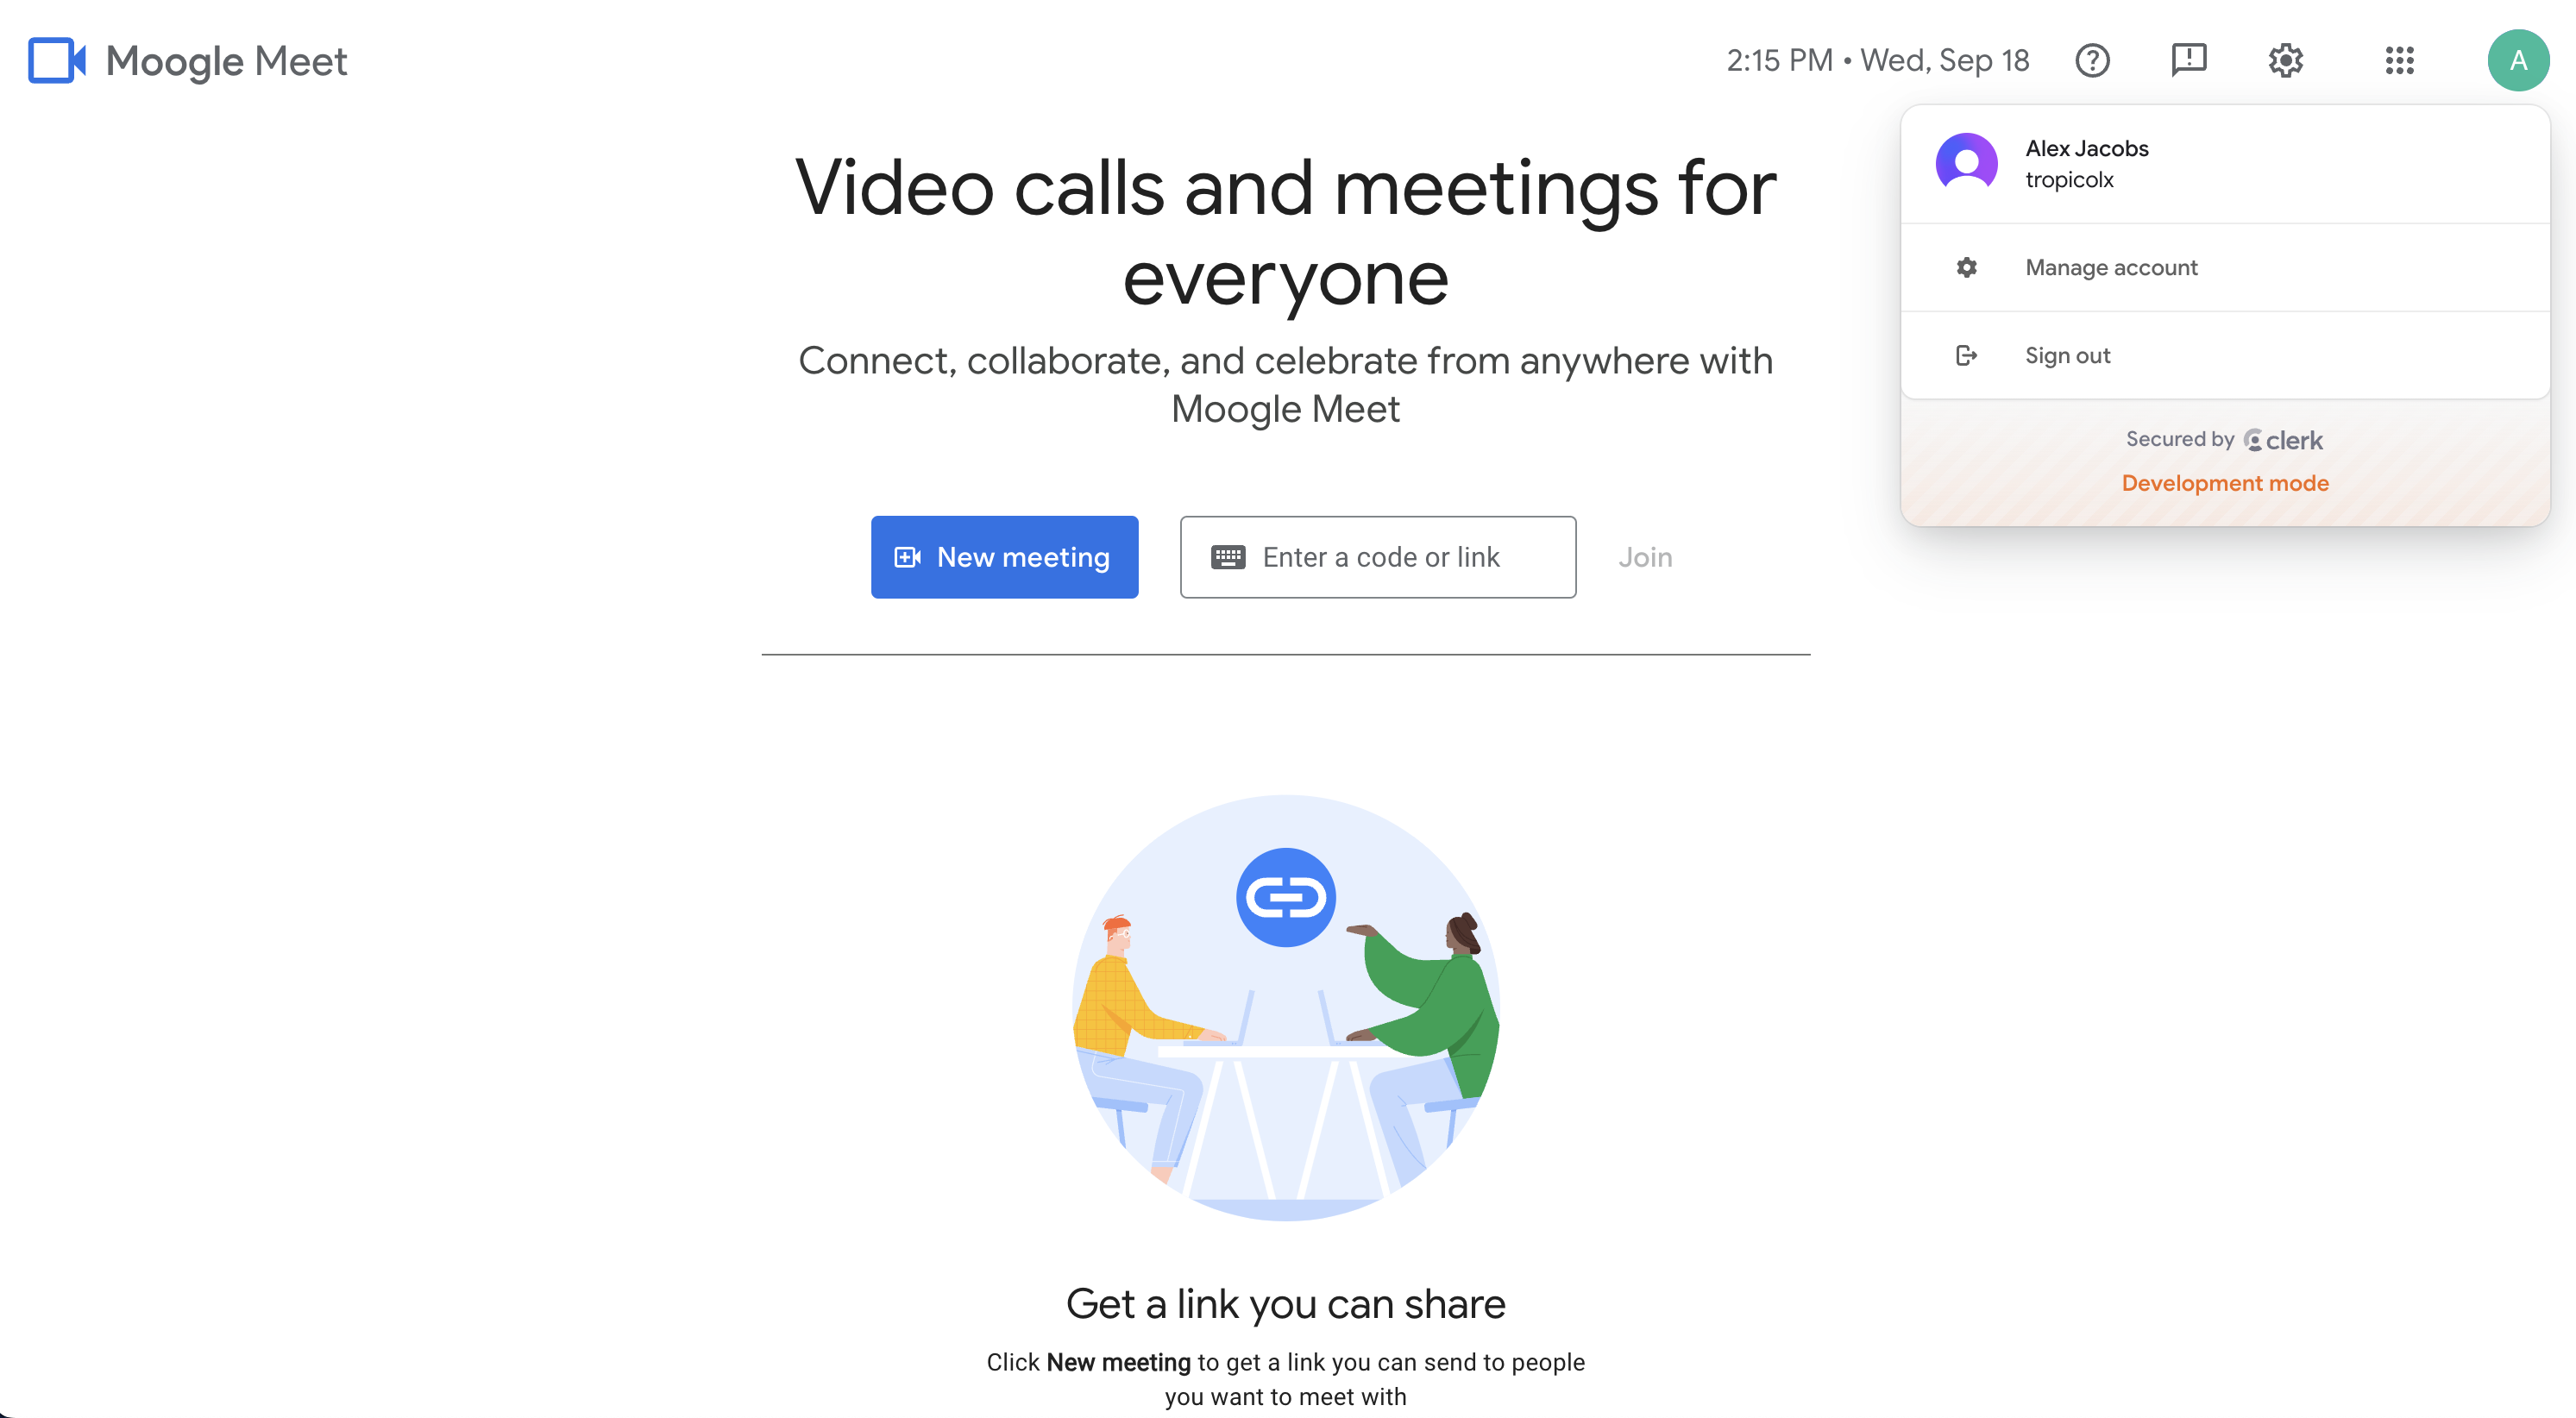
And with that, we have authentication set up in our app.
Integrating Stream into Your Application
What is Stream?
Stream is a developer-friendly platform that offers various APIs and SDKs to quickly build scalable and feature-rich chat and video experiences within your application. With Stream, you can add these features reliably without the complexity of building them from scratch.
We will use Stream's React SDK for Video and their React Chat SDK to add real-time video and chat capabilities to our Google Meet clone.
Creating your Stream Account
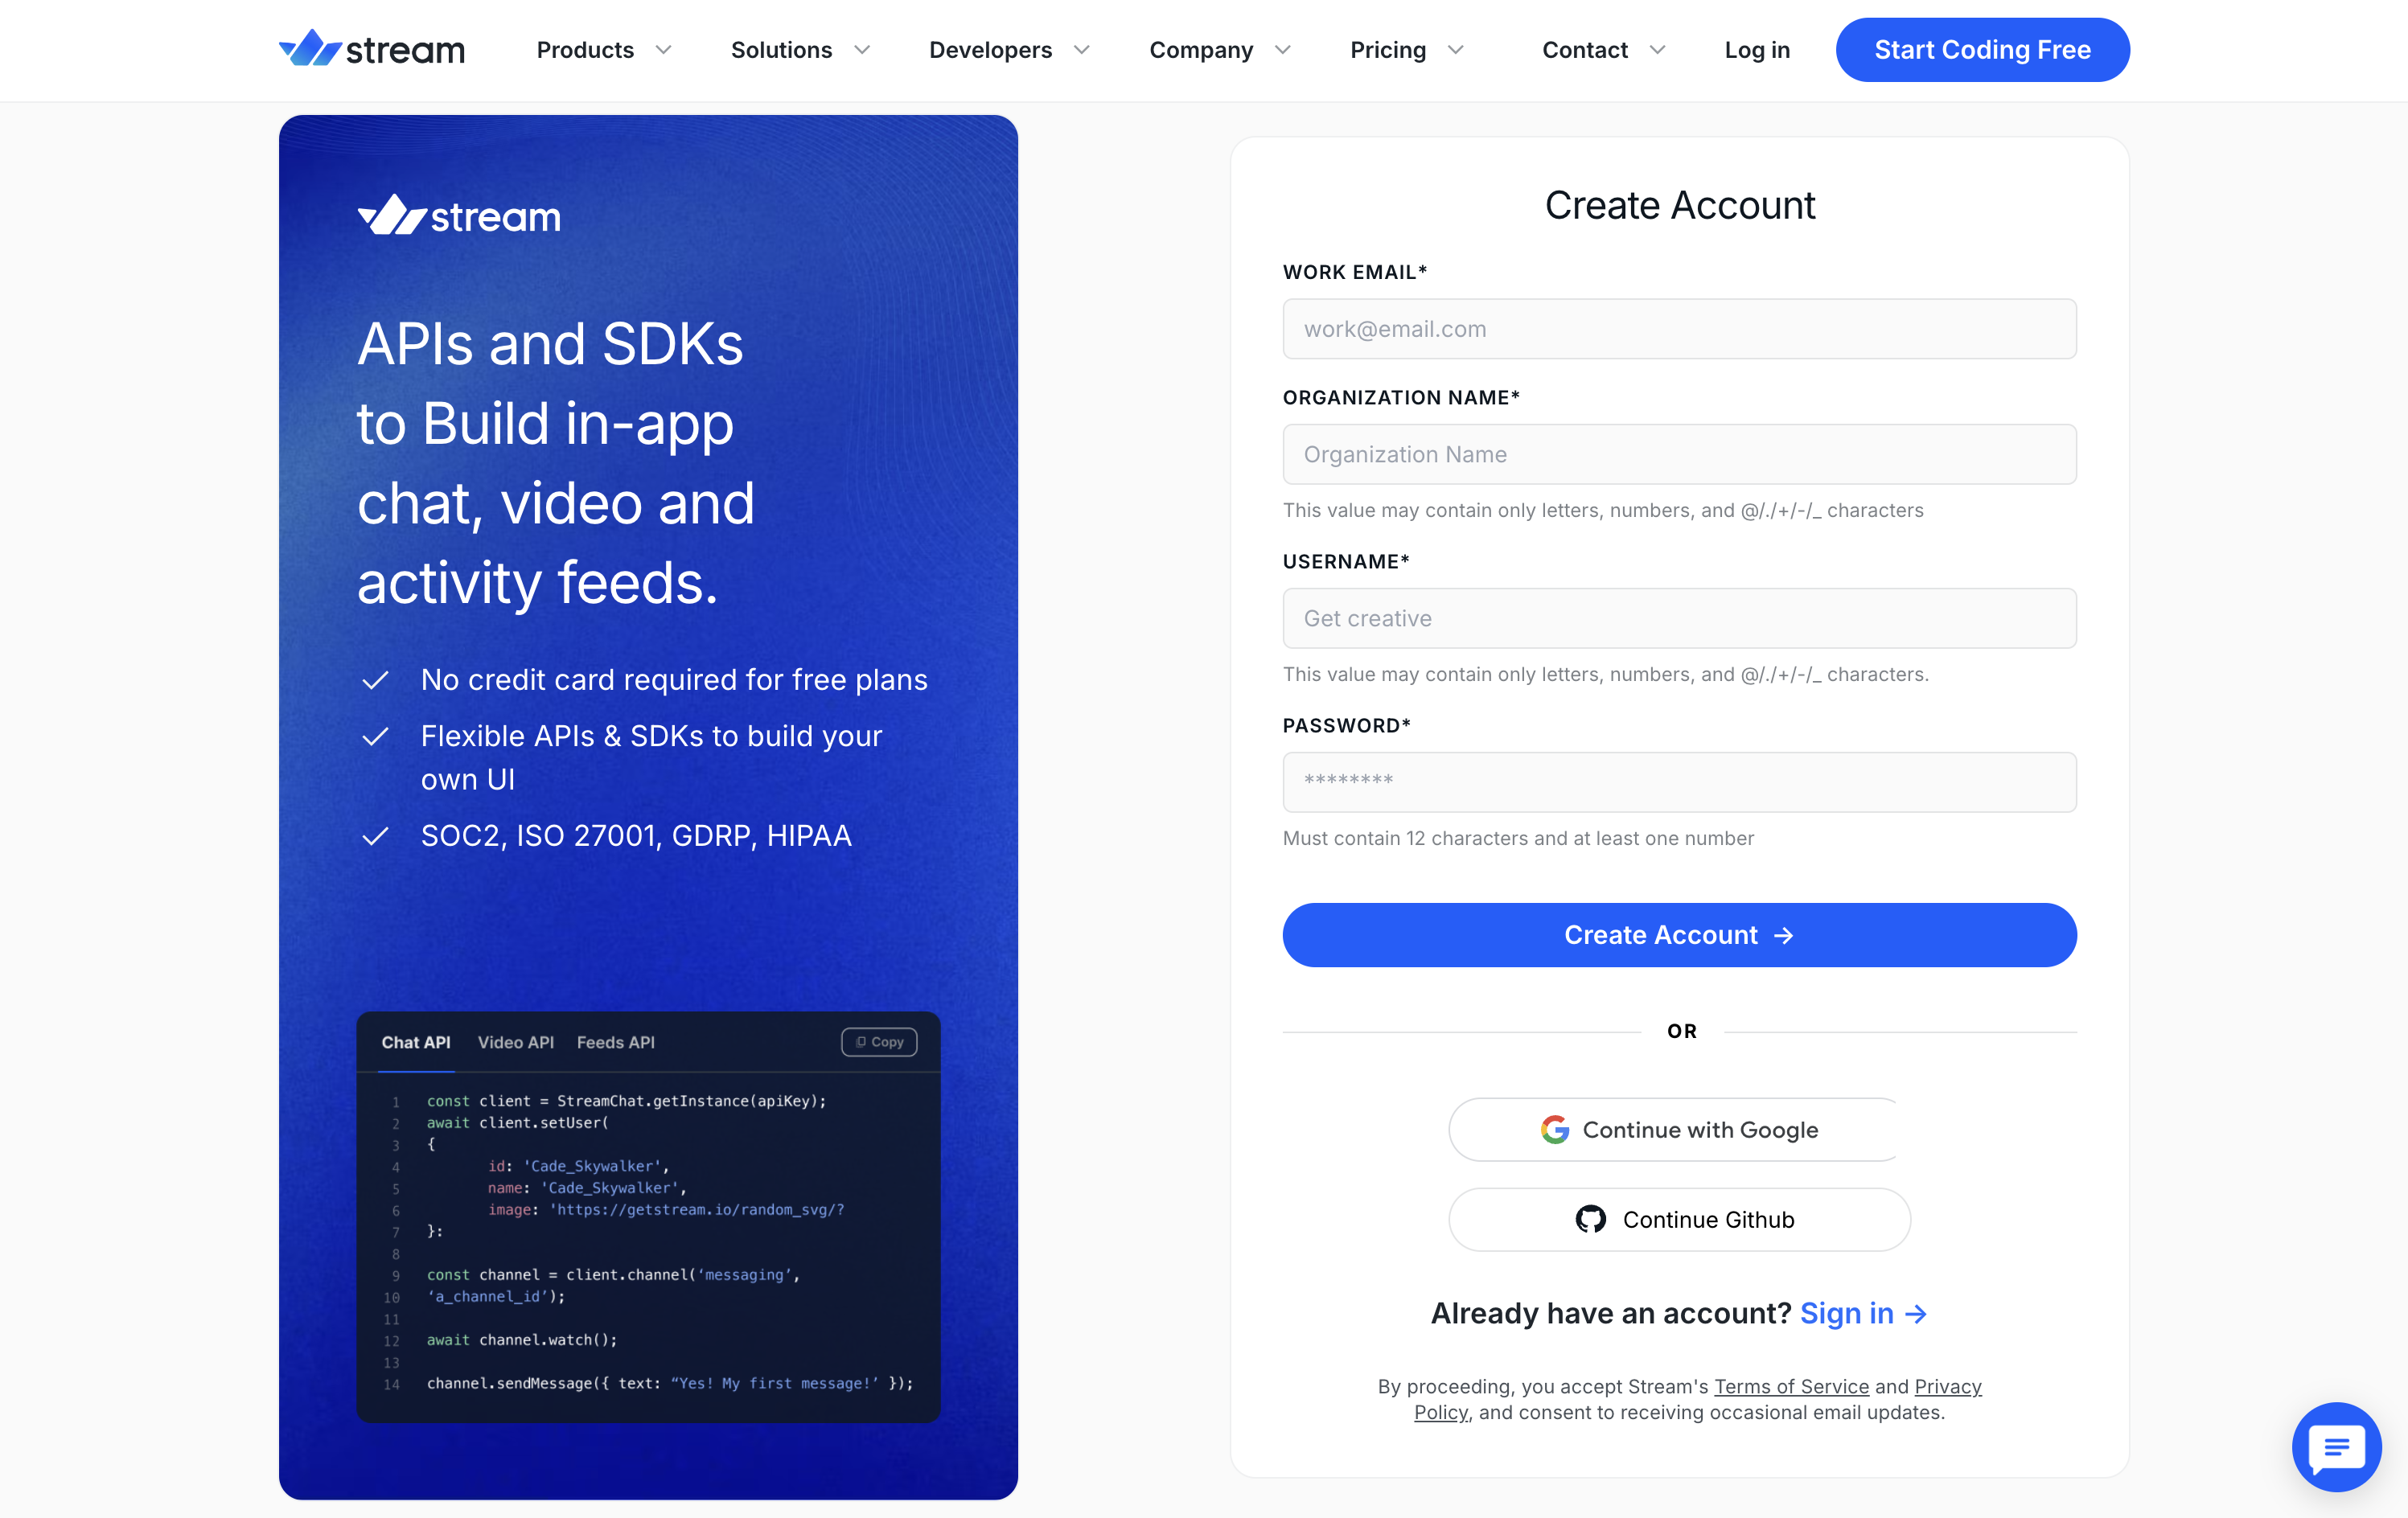
Let's get started by setting up a Stream account:
Sign Up: Visit the Stream sign-up page and create a new account using your email or social login.
Complete Your Profile:
After signing up, you'll be prompted to provide additional details like your role and industry.
Select the "Chat Messaging" and "Video and Audio" options to tailor your experience.
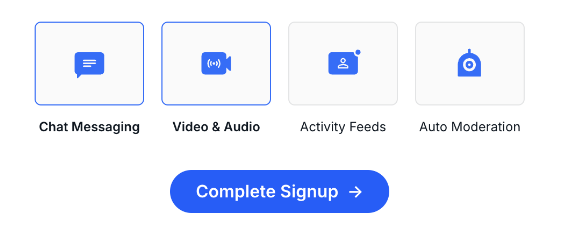
Finally, click "Complete Signup" to proceed.
You should now be redirected to your Stream dashboard.
Creating a New Stream Project
After setting up your Stream account, you need to create an app for your project.
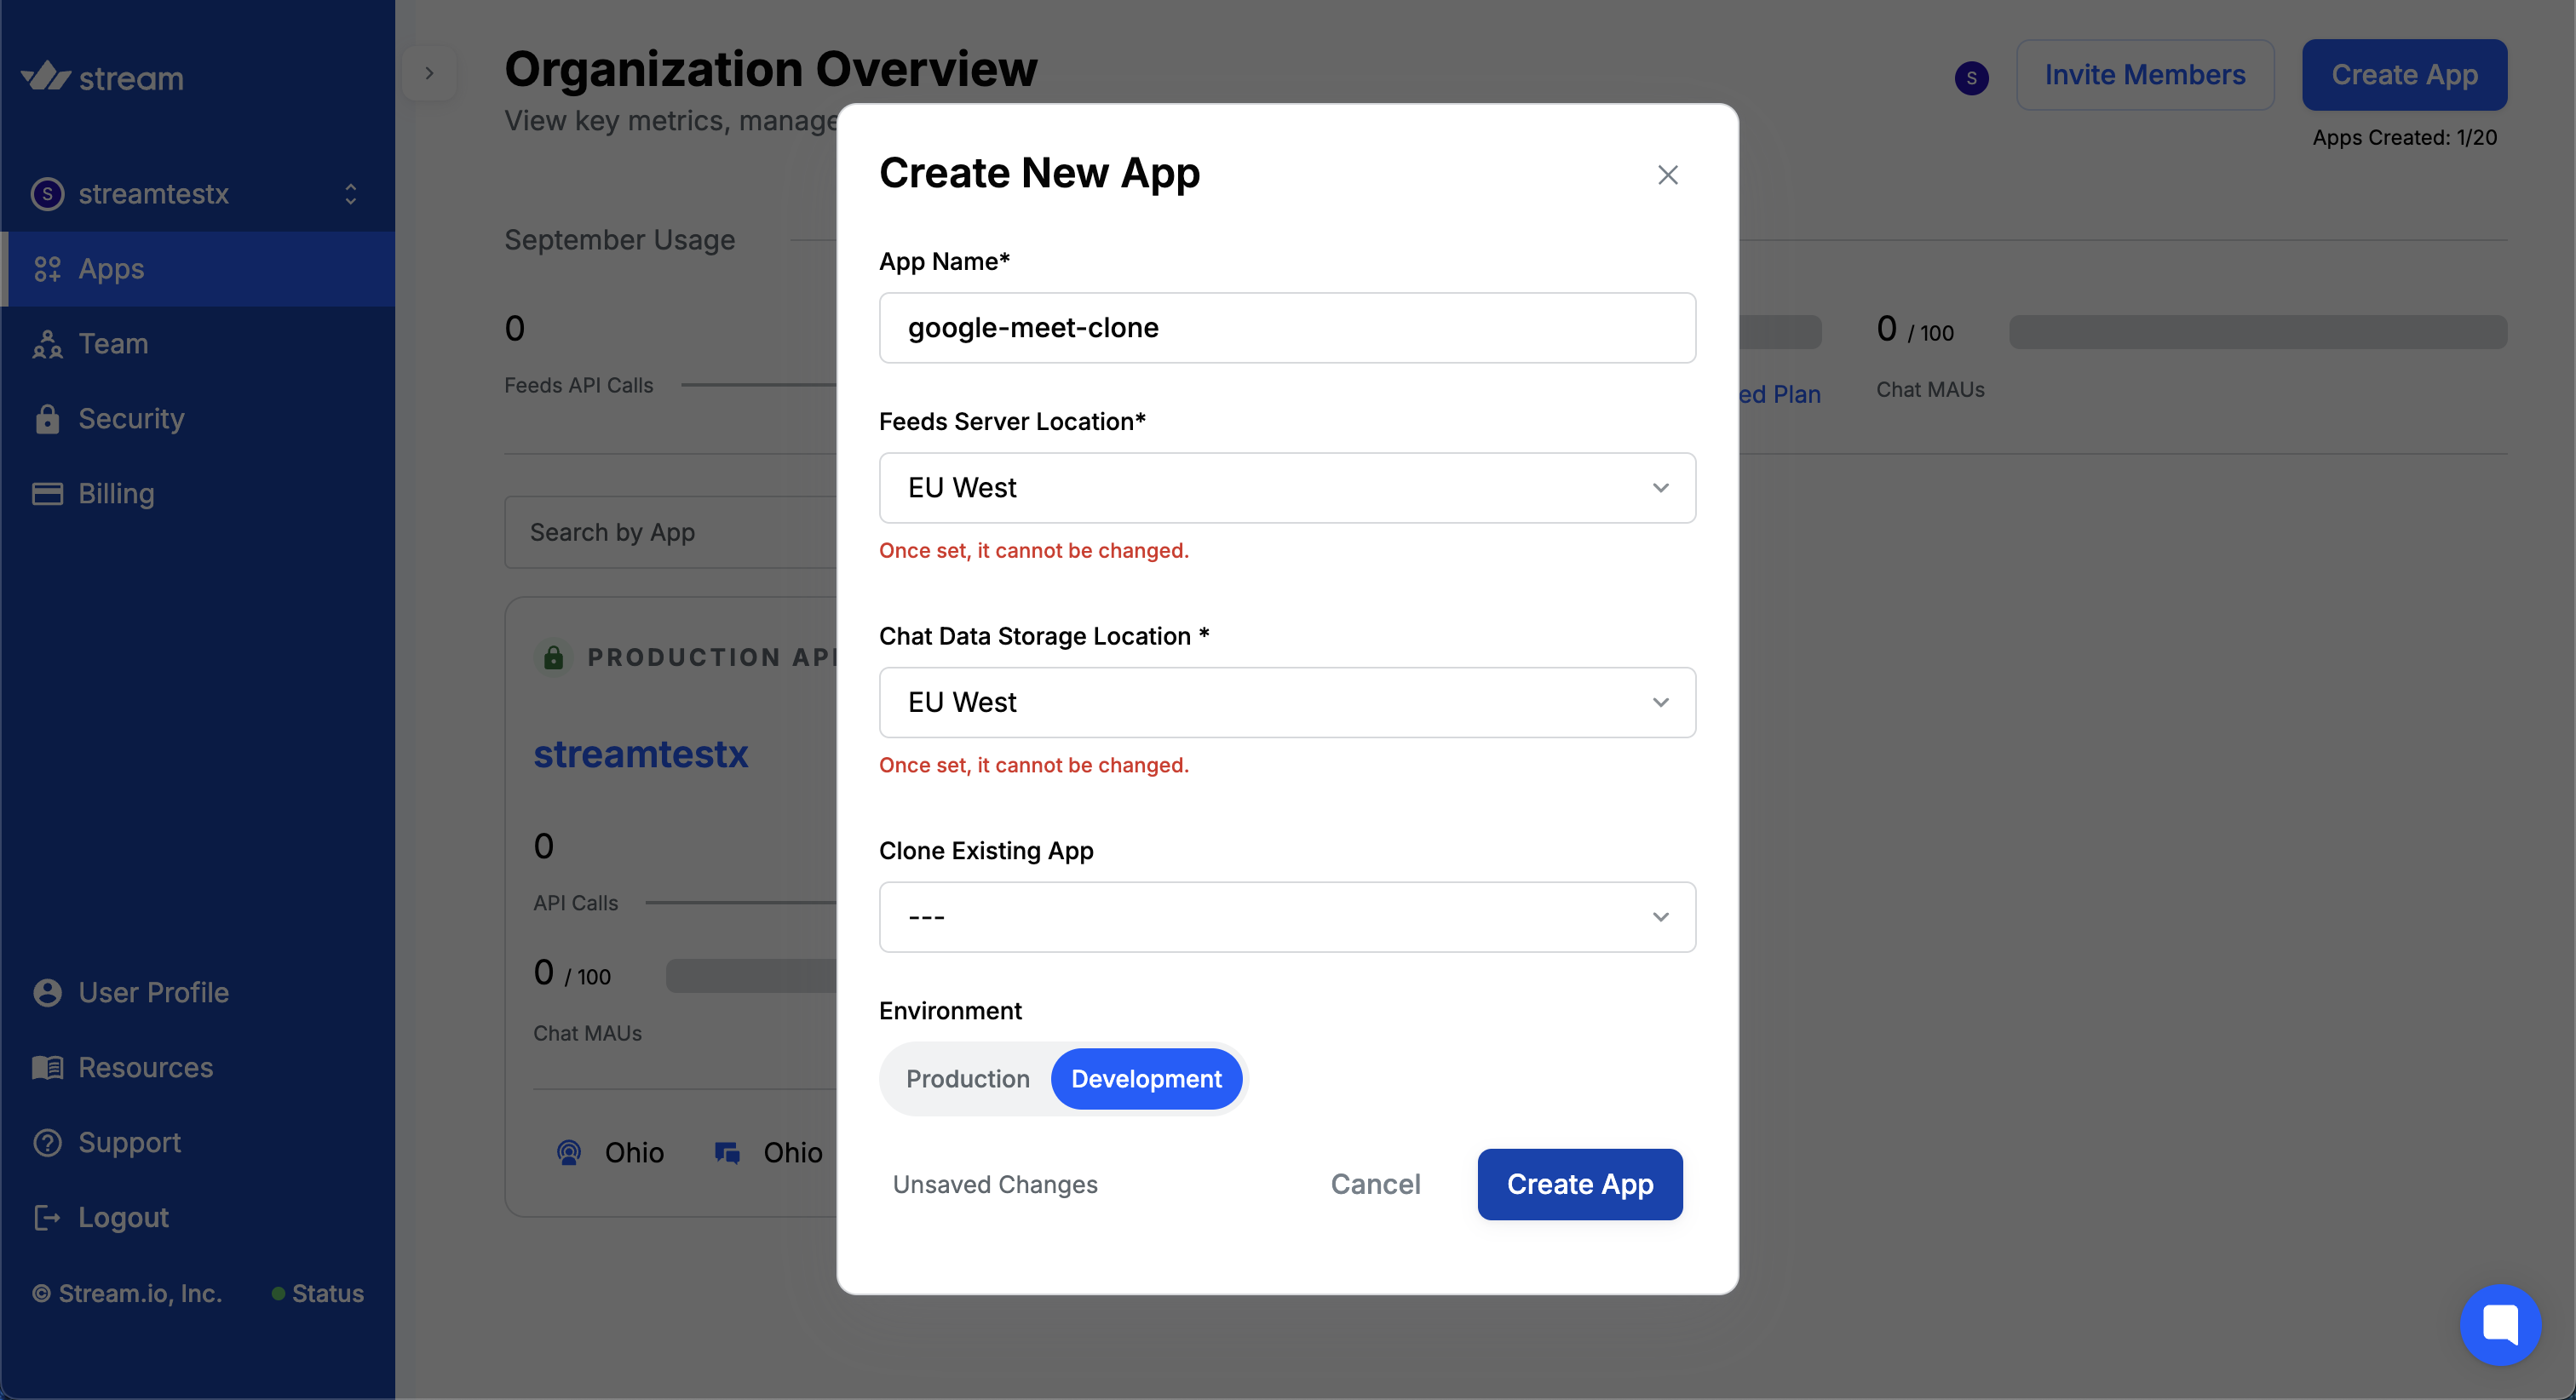
Follow the steps below to set up a Stream project:
Create a New App: In your Stream dashboard, click the "Create App" button.
Configure Your App:
App Name: Enter "google-meet-clone" or a name of your choice.
Region: Select the region closest to you for optimal performance.
Environment: Leave it set to "Development" for now.
Click the "Create App" button to submit the form.
Retrieve API Keys: After creating your app, you'll be redirected to the app's dashboard. Locate the "App Access Keys" section. We'll use these keys to integrate Stream into our project.

Installing Stream SDKs
Now, let's add Stream's SDKs to our Next.js project:
Install Stream SDKs: Run the following command to install the necessary packages:
npm install @stream-io/node-sdk @stream-io/video-react-sdk stream-chat-react stream-chatUpdate Environment Variables: Add your Stream API keys to your
.env.localfile:NEXT_PUBLIC_STREAM_API_KEY=your_stream_api_key STREAM_API_SECRET=your_stream_api_secretReplace
your_stream_api_keyandyour_stream_api_secretwith your Stream app's dashboard keys.Import the Stylesheets: The
@stream-io/video-react-sdkandstream-chat-reactpackages include a CSS stylesheet with a pre-built theme for their components. Let's import them into ourapp/layout.tsxfile:// app/layout.tsx // ... import '@stream-io/video-react-sdk/dist/css/styles.css'; import 'stream-chat-react/dist/css/v2/index.css'; import './globals.css'; // ...
Creating the MeetProvider
Next, we'll create a provider to manage our Stream video and chat clients.
Create a new MeetProvider.tsx file in the contexts directory with the following code:
import { useEffect, useState } from 'react';
import { useUser } from '@clerk/nextjs';
import { nanoid } from 'nanoid';
import {
  Call,
  StreamCall,
  StreamVideo,
  StreamVideoClient,
  User,
} from '@stream-io/video-react-sdk';
import { User as ChatUser, StreamChat } from 'stream-chat';
import { Chat } from 'stream-chat-react';

import LoadingOverlay from '../components/LoadingOverlay';

type MeetProviderProps = {
  meetingId: string;
  children: React.ReactNode;
};

export const CALL_TYPE = 'default';
export const API_KEY = process.env.NEXT_PUBLIC_STREAM_API_KEY as string;
export const GUEST_ID = `guest_${nanoid(15)}`;

export const tokenProvider = async (userId: string = '') => {
  const response = await fetch('/api/token', {
    method: 'POST',
    headers: {
      'Content-Type': 'application/json',
    },
    body: JSON.stringify({ userId: userId || GUEST_ID }),
  });
  const data = await response.json();
  return data.token;
};

const MeetProvider = ({ meetingId, children }: MeetProviderProps) => {
  const { user: clerkUser, isSignedIn, isLoaded } = useUser();
  const [loading, setLoading] = useState(true);
  const [chatClient, setChatClient] = useState<StreamChat>();
  const [videoClient, setVideoClient] = useState<StreamVideoClient>();
  const [call, setCall] = useState<Call>();

  useEffect(() => {
    if (!isLoaded) return;

    const customProvider = async () => {
      const token = await tokenProvider(clerkUser?.id);
      return token;
    };

    const setUpChat = async (user: ChatUser) => {
      await _chatClient.connectUser(user, customProvider);
      setChatClient(_chatClient);
      setLoading(false);
    };

    let user: User | ChatUser;
    if (isSignedIn) {
      user = {
        id: clerkUser.id,
        name: clerkUser.fullName!,
        image: clerkUser.hasImage ? clerkUser.imageUrl : undefined,
        custom: {
          username: clerkUser?.username,
        },
      };
    } else {
      user = {
        id: GUEST_ID,
        type: 'guest',
        name: 'Guest',
      };
    }

    const _chatClient = StreamChat.getInstance(API_KEY);
    const _videoClient = new StreamVideoClient({
      apiKey: API_KEY,
      user,
      tokenProvider: customProvider,
    });
    const call = _videoClient.call(CALL_TYPE, meetingId);

    setVideoClient(_videoClient);
    setCall(call);
    setUpChat(user);

    return () => {
      _videoClient.disconnectUser();
      _chatClient.disconnectUser();
    };
  }, [clerkUser, isLoaded, isSignedIn, loading, meetingId]);

  if (loading) return <LoadingOverlay />;

  return (
    <Chat client={chatClient!}>
      <StreamVideo client={videoClient!}>
        <StreamCall call={call}>{children}</StreamCall>
      </StreamVideo>
    </Chat>
  );
};

export default MeetProvider;
There's a lot going on here, so let's break things down:
The
MeetProvidercomponent sets up the video meeting and chat functionalities using Stream's SDKs.We define a
tokenProviderfunction that fetches an authentication token from the/api/tokenendpoint.Inside the
useEffect:We terminate the function if the user is not loaded yet.
We create a user object using Clerk's user data if signed in or generate a guest user otherwise.
We initialize the Stream Chat client (
StreamChat) and the Stream Video client (StreamVideoClient) with theAPI_KEY, user information, and a custom token provider.We set up a call instance using
_videoClient.callwith the specified call type andmeetingId.We also display a
LoadingOverlaywhile setting up using theloadingstate.
Once ready, the component renders the
Chat,StreamVideo, andStreamCallcomponents to provide chat and video call capabilities to its children components.
Creating the Token API Route
In the previous section, we added a token provider that sends a request to /api/token to generate Stream user tokens. Let's create the API route for this functionality. Create a new file at app/api/token/route.ts with the following code:
import { StreamClient } from '@stream-io/node-sdk';

const API_KEY = process.env.NEXT_PUBLIC_STREAM_API_KEY!;
const SECRET = process.env.STREAM_API_SECRET!;

export async function POST(request: Request) {
  const client = new StreamClient(API_KEY, SECRET);

  const body = await request.json();

  const userId = body?.userId;

  if (!userId) {
    return Response.error();
  }

  const token = client.generateUserToken({ user_id: userId });

  const response = {
    userId: userId,
    token: token,
  };

  return Response.json(response);
}
Here, we create a Stream client from Stream's Node SDK. We then use the client to generate and return a user token for a given userId.
With this route in place, our token provider should now work correctly.
Syncing Clerk with Your Stream App
Like Clerk, our Stream app also accepts users. It keeps track of their information during video or chat sessions, such as name, role, permissions, etc.
So whenever we create or update a user using Clerk, we must also reflect this change in our Stream app. To do this, we'll set up a webhook that listens for user updates and syncs the information.
To create the webhook, follow the steps below:
Set Up ngrok: Since webhooks require a publicly accessible URL, we'll use ngrok to expose our local server. Follow the steps below to set up an ngrok tunnel for your app:
Install ngrok:
Visit the ngrok website and sign up for a free account.
Download and install ngrok following their installation guide.
Start ngrok: Start a tunnel pointing to your local server (assuming it's running on port 3000):
ngrok http 3000 --domain=YOUR_DOMAINReplace
YOUR_DOMAINwith your generated domain (e.g.,your-subdomain.ngrok.io) from ngrok.
Create a Webhook Endpoint in the Clerk Dashboard:
Navigate to Webhooks: Click the “Configure” tab in your Clerk dashboard and select "Webhooks.”
Add a New Endpoint:
Click on "Add Endpoint".
Paste your ngrok URL followed by
/api/webhooks(e.g.,https://your-subdomain.ngrok.io/api/webhooks).Under the “Subscribe to events” field, select "user.created" and "user.updated".
Click the "Create" button.
Retrieve the Signing Secret: After creating the endpoint, copy the Signing Secret provided. We'll use this to verify webhook requests.
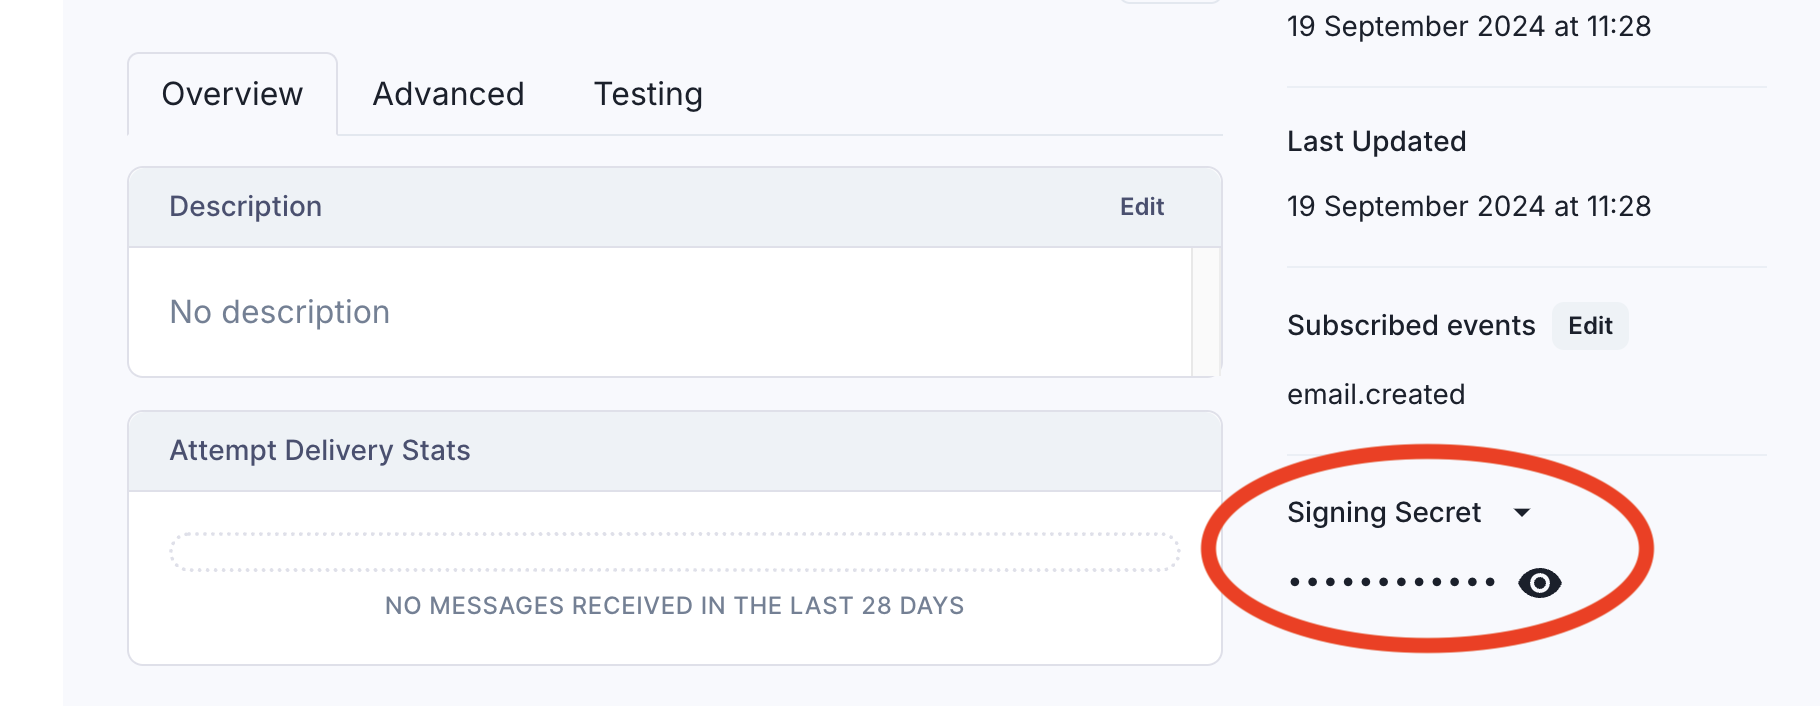
Add Your Signing Secret to Your
.env.localFile: Update your.env.localfile with the following:WEBHOOK_SECRET=your_clerk_webhook_signing_secretReplace
your_clerk_webhook_signing_secretwith the signing secret from your endpoint.Install Svix: We need Svix to verify and handle incoming webhook requests. Run the following command to install it:
npm install svixCreate the Endpoint in Your Application: Next, need to create a route handler to receive the webhook's payload. Create a new file at
app/api/webhooks/route.tswith the following code:import { Webhook } from 'svix'; import { headers } from 'next/headers'; import { WebhookEvent } from '@clerk/nextjs/server'; import { StreamClient } from '@stream-io/node-sdk'; const API_KEY = process.env.NEXT_PUBLIC_STREAM_API_KEY!; const SECRET = process.env.STREAM_API_SECRET!; const WEBHOOK_SECRET = process.env.WEBHOOK_SECRET; export async function POST(req: Request) { const client = new StreamClient(API_KEY, SECRET); if (!WEBHOOK_SECRET) { throw new Error( 'Please add WEBHOOK_SECRET from Clerk Dashboard to .env or .env.local' ); } // Get the headers const headerPayload = headers(); const svix_id = headerPayload.get('svix-id'); const svix_timestamp = headerPayload.get('svix-timestamp'); const svix_signature = headerPayload.get('svix-signature'); // If there are no headers, error out if (!svix_id || !svix_timestamp || !svix_signature) { return new Response('Error occured -- no svix headers', { status: 400, }); } // Get the body const payload = await req.json(); const body = JSON.stringify(payload); // Create a new Svix instance with your secret. const wh = new Webhook(WEBHOOK_SECRET); let evt: WebhookEvent; // Verify the payload with the headers try { evt = wh.verify(body, { 'svix-id': svix_id, 'svix-timestamp': svix_timestamp, 'svix-signature': svix_signature, }) as WebhookEvent; } catch (err) { console.error('Error verifying webhook:', err); return new Response('Error occured', { status: 400, }); } const eventType = evt.type; switch (eventType) { case 'user.created': case 'user.updated': const newUser = evt.data; await client.upsertUsers([ { id: newUser.id, role: 'user', name: `${newUser.first_name} ${newUser.last_name}`, custom: { username: newUser.username, email: newUser.email_addresses[0].email_address, }, image: newUser.has_image ? newUser.image_url : undefined, }, ]); break; default: break; } return new Response('Webhook processed', { status: 200 }); }In the code above:
We use Svix's
Webhookclass to verify incoming requests using the signing secret. If verification fails, we return an error response.For
user.createdanduser.updatedevents, we sync the user data with Stream usingupsertUsers.
Joining a Meeting
Now that we've fully set up Stream in our app, let's update our home page to handle joining meetings.
Update your page.tsx file with the following code:
'use client';
import { useState, useContext, useEffect } from 'react';
...
import {
  ErrorFromResponse,
  GetCallResponse,
  StreamVideoClient,
  User,
} from '@stream-io/video-react-sdk';

...

import { API_KEY, CALL_TYPE } from '@/contexts/MeetProvider';
import { AppContext, MEETING_ID_REGEX } from '@/contexts/AppProvider';
...

const GUEST_USER: User = { id: 'guest', type: 'guest'};

const Home = () => {
  const { setNewMeeting } = useContext(AppContext);
  const { isLoaded, isSignedIn } = useUser();
  const [code, setCode] = useState('');
  const [checkingCode, setCheckingCode] = useState(false);
  const [error, setError] = useState('');
  const router = useRouter();

  useEffect(() => {
    let timeout: NodeJS.Timeout;
    if (error) {
      timeout = setTimeout(() => {
        setError('');
      }, 3000);
    }
    return () => {
      clearTimeout(timeout);
    };
  }, [error]);

  const handleNewMeeting = () => {
    ...
  };

  const handleCode = async () => {
    if (!MEETING_ID_REGEX.test(code)) return;
    setCheckingCode(true);

    const client = new StreamVideoClient({
      apiKey: API_KEY,
      user: GUEST_USER,
    });
    const call = client.call(CALL_TYPE, code);

    try {
      const response: GetCallResponse = await call.get();
      if (response.call) {
        router.push(`/${code}`);
        return;
      }
    } catch (e: unknown) {
      let err = e as ErrorFromResponse<GetCallResponse>;
      console.error(err.message);
      if (err.status === 404) {
        setError("Couldn't find the meeting you're trying to join.");
      }
    }

    setCheckingCode(false);
  };

  return (
    <div>
      <Header />
      <main
        ...
      >
        ...
        <div className="flex flex-col items-center justify-center gap-8">
          ...
        </div>
        {checkingCode && (
          <div className="z-50 fixed top-0 left-0 w-full h-full flex items-center justify-center text-white text-3xl bg-[#000] animate-transition-overlay-fade-in">
            Joining...
          </div>
        )}
        {error && (
          <div className="z-50 fixed bottom-0 left-0 pointer-events-none m-6 flex items-center justify-start">
            <div className="rounded p-4 font-roboto text-white text-sm bg-dark-gray shadow-[0_3px_5px_-1px_rgba(0,0,0,.2),0_6px_10px_0_rgba(0,0,0,.14),0_1px_18px_0_rgba(0,0,0,.12)]">
              {error}
            </div>
          </div>
        )}
        <footer className="w-full max-w-xl mt-20 pb-4 text-start">
          ...
        </footer>
      </main>
    </div>
  );
};

export default Home;
In the code above:
State Management:
checkingCode: Indicates if we're currently validating the meeting code.error: Stores any error messages to display to the user.
handleCodefunction:Validates the meeting code format using
MEETING_ID_REGEX.Initializes a Stream Video client with a guest (temporary) user.
Attempts to retrieve the call information.
If successful, it navigates to the meeting.
If the meeting doesn't exist, it displays an error.
Handles any exceptions and updates the UI accordingly.
UI Updates:
We display a loading overlay when checking the code.
We show error messages from the
errorstate at the bottom of the screen.
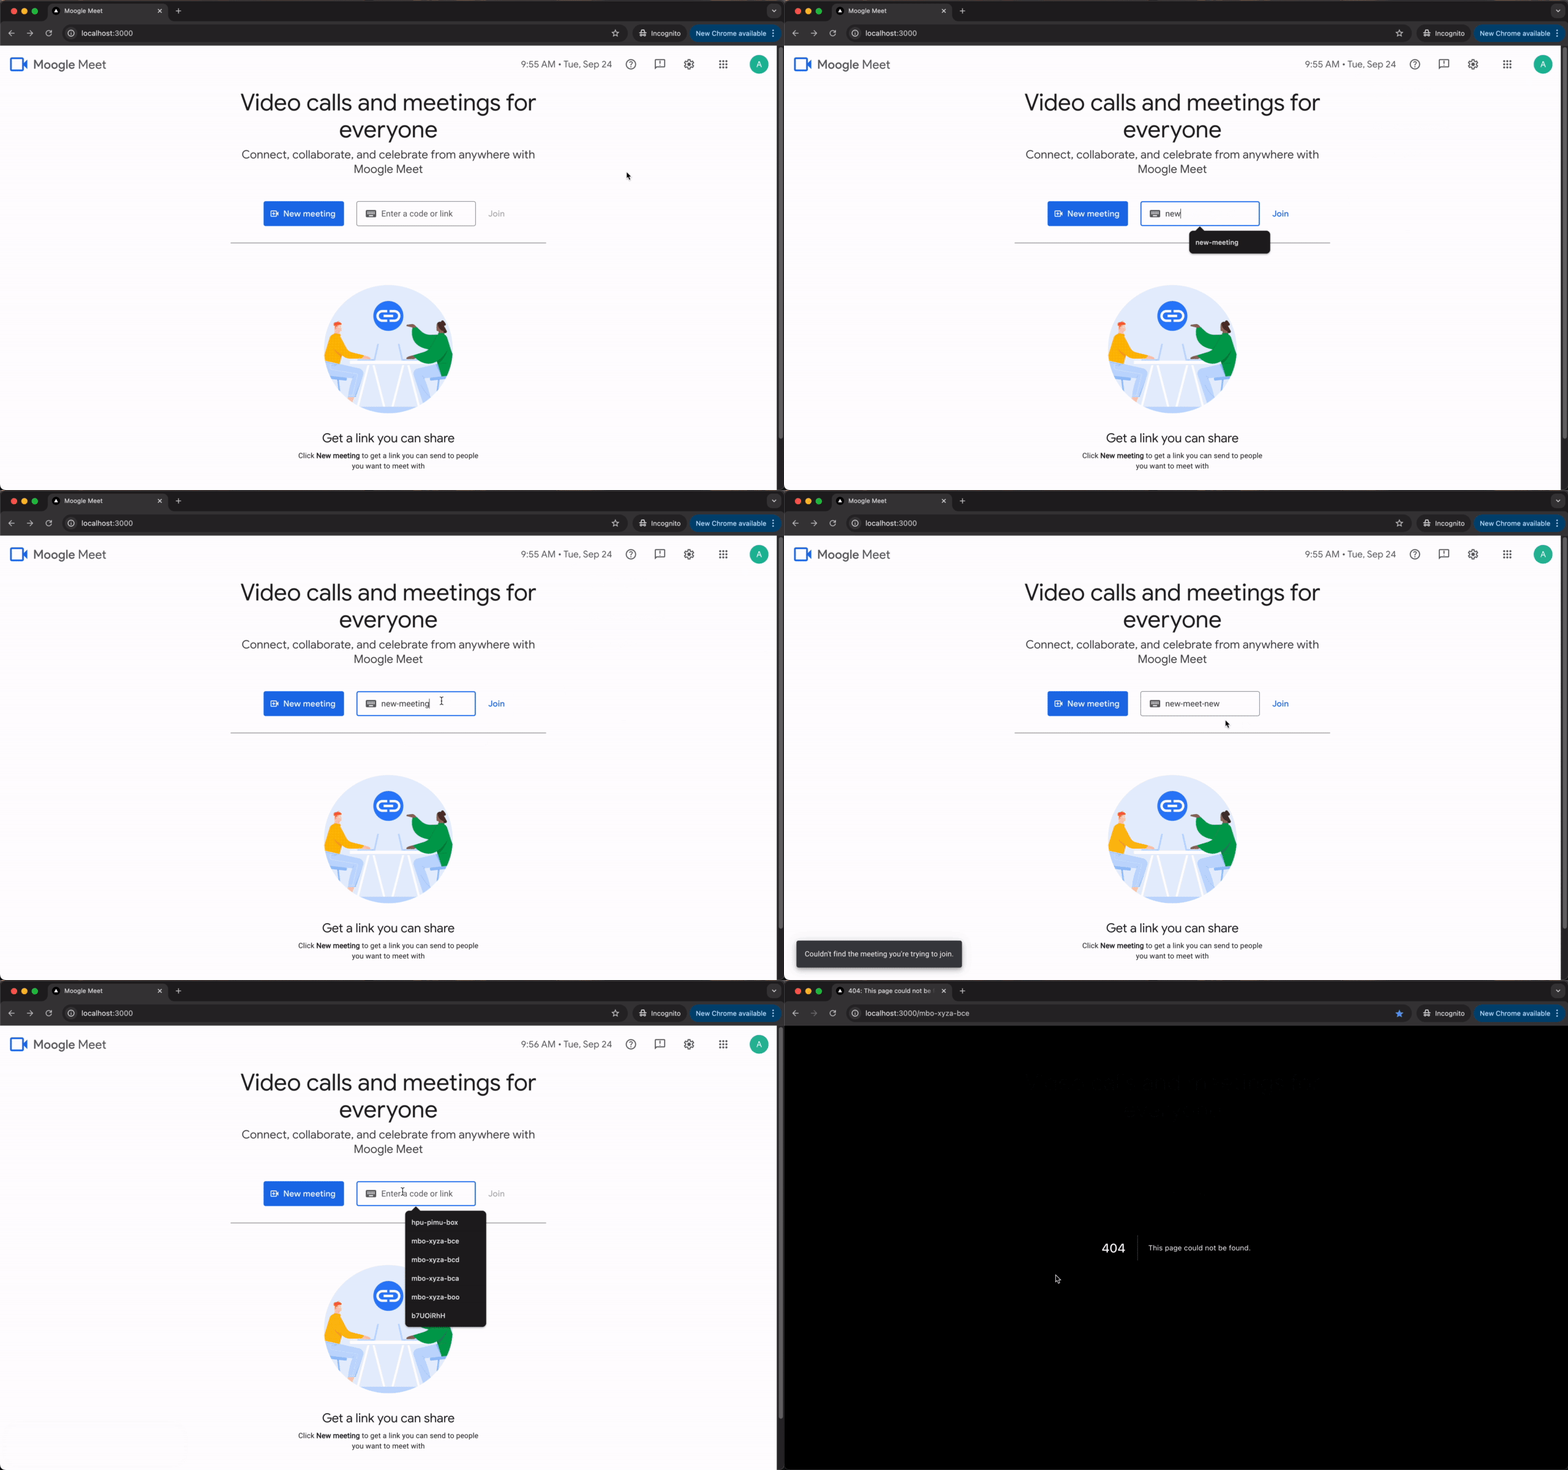
And with that, our home page should now be fully functional!
Note: The newly created route is redirecting to a 404 page because we haven't created a page for it yet.
Building the Lobby Page
In this section, we'll create a lobby page for our app. This page will allow users to preview and configure their video and audio before joining a call. The lobby page features include:
Selecting input/output devices
Toggling the microphone and camera
Displaying a video preview
Displaying the current participants in the call
Prompting guests to enter their names before joining
Creating the Layout
Let's start by creating a layout for our page. This layout will contain the MeetProvider component we created earlier.
Create a [meetingId] folder in the app directory, and then add a layout.tsx file with the following code:
'use client';
import { ReactNode } from 'react';

import MeetProvider from '@/contexts/MeetProvider';

type LayoutProps = {
  children: ReactNode;
  params: {
    meetingId: string;
  };
};

export default function Layout({ children, params }: LayoutProps) {
  return <MeetProvider meetingId={params.meetingId}>{children}</MeetProvider>;
}
With the code above, any page created under the [meetingId] segment will have access to the current Stream video and client data.
Building the Meeting Preview
Next, let's work on the core component of our page: the meeting preview. This component will give the user a preview of their video and audio and provide tools for adjusting them.
First, let's create a speech indicator component to indicate when the user speaks visually. In the components directory, create a SpeechIndicator.tsx file with the following code:
import clsx from 'clsx';

interface SpeechIndicatorProps {
  isSpeaking: boolean;
  isDominantSpeaker?: boolean;
}

const SpeechIndicator = ({
  isSpeaking,
  isDominantSpeaker = true,
}: SpeechIndicatorProps) => {
  return (
    <span
      className={clsx(
        'str-video__speech-indicator',
        isDominantSpeaker && 'str-video__speech-indicator--dominant',
        isSpeaking && 'str-video__speech-indicator--speaking'
      )}
    >
      <span className="str-video__speech-indicator__bar" />
      <span className="str-video__speech-indicator__bar" />
      <span className="str-video__speech-indicator__bar" />
    </span>
  );
};

export default SpeechIndicator;
The component accepts isSpeaking to indicate if the user is speaking and isDominantSpeaker to highlight the main speaker. We also use conditional class names from Stream's default theme to animate the bars when the user speaks.
Next, let's modify the default styling to resemble Google Meet's speech indicator. In your globals.css file, add the following code:
...
@layer components {
  .root-theme .str-video__speech-indicator {
    gap: 1.5px;
  }

  .str-video__speech-indicator__bar,
  .root-theme .str-video__speech-indicator.str-video__speech-indicator--dominant .str-video__speech-indicator__bar,
  .root-theme .str-video__speech-indicator .str-video__speech-indicator__bar {
    background-color: white !important;
    width: 4px !important;
    border-radius: 999px !important;
  }
  ...
}
...
Next, let's create a hook to detect when the user is speaking.
In the hooks directory, create a useSoundDetected.tsx file with the following code:
import {
  createSoundDetector,
  useCallStateHooks,
} from '@stream-io/video-react-sdk';
import { useEffect, useState } from 'react';

const useSoundDetected = () => {
  const [soundDetected, setSoundDetected] = useState(false);
  const { useMicrophoneState } = useCallStateHooks();
  const { status: microphoneStatus, mediaStream } = useMicrophoneState();

  useEffect(() => {
    if (microphoneStatus !== 'enabled' || !mediaStream) return;

    const disposeSoundDetector = createSoundDetector(
      mediaStream,
      ({ isSoundDetected: sd }) => setSoundDetected(sd),
      { detectionFrequencyInMs: 80, destroyStreamOnStop: false }
    );

    return () => {
      disposeSoundDetector().catch(console.error);
    };
  }, [microphoneStatus, mediaStream]);

  return soundDetected;
};

export default useSoundDetected;
The useSoundDetected custom hook utilizes the @stream-io/video-react-sdk to detect sound activity from the user's microphone. Let's break down how it works:
It retrieves the microphone status and media stream using
useMicrophoneStatefrom theuseCallStateHooks.Within a
useEffect, it checks if the microphone is enabled and a media stream exists. If so, it sets up a sound detector usingcreateSoundDetector.The sound detector listens to the media stream and updates the
soundDetectedstate based on whether a sound is detected.
Next, we'll create components to select audio input/output devices and video input devices.
In your components directory, create a DeviceSelector.tsx file with the following code:
import { ReactNode } from 'react';
import { useCallStateHooks } from '@stream-io/video-react-sdk';

import Dropdown from './Dropdown';
import Mic from './icons/Mic';
import Videocam from './icons/Videocam';
import VolumeUp from './icons/VolumeUp';

type DeviceSelectorProps = {
  devices: MediaDeviceInfo[] | undefined;
  selectedDeviceId?: string;
  onSelect: (deviceId: string) => void;
  icon: ReactNode;
  disabled?: boolean;
  className?: string;
  dark?: boolean;
};

type SelectorProps = {
  disabled?: boolean;
  className?: string;
  dark?: boolean;
};

export const DeviceSelector = ({
  devices,
  selectedDeviceId,
  onSelect,
  icon,
  disabled = false,
  className = '',
  dark = false,
}: DeviceSelectorProps) => {
  const label =
    devices?.find((device) => device.deviceId === selectedDeviceId)?.label! ||
    'Default - ...';

  return (
    <Dropdown
      label={disabled ? 'Permission needed': label}
      value={selectedDeviceId}
      icon={icon}
      onChange={(value) => onSelect(value)}
      options={
        devices?.map((device) => ({
          label: device.label,
          value: device.deviceId,
        }))!
      }
      disabled={disabled}
      className={className}
      dark={dark}
    />
  );
};

export const AudioInputDeviceSelector = ({
  disabled = false,
  className = '',
  dark,
}: SelectorProps) => {
  const { useMicrophoneState } = useCallStateHooks();
  const { microphone, devices, selectedDevice } = useMicrophoneState();

  return (
    <DeviceSelector
      devices={devices}
      selectedDeviceId={selectedDevice}
      onSelect={(deviceId) => microphone.select(deviceId)}
      icon={<Mic width={20} height={20} color="var(--meet-black)" />}
      disabled={disabled}
      className={className}
      dark={dark}
    />
  );
};

export const VideoInputDeviceSelector = ({
  disabled = false,
  className = '',
  dark = false,
}: SelectorProps) => {
  const { useCameraState } = useCallStateHooks();
  const { camera, devices, selectedDevice } = useCameraState();

  return (
    <DeviceSelector
      devices={devices}
      selectedDeviceId={selectedDevice}
      onSelect={(deviceId) => camera.select(deviceId)}
      icon={<Videocam width={18} height={18} color="var(--meet-black)" />}
      disabled={disabled}
      className={className}
      dark={dark}
    />
  );
};

export const AudioOutputDeviceSelector = ({
  disabled = false,
  className = '',
  dark = false,
}: SelectorProps) => {
  const { useSpeakerState } = useCallStateHooks();
  const { speaker, devices, selectedDevice, isDeviceSelectionSupported } =
    useSpeakerState();

  if (!isDeviceSelectionSupported) return null;

  return (
    <DeviceSelector
      devices={devices}
      selectedDeviceId={
        selectedDevice
          ? selectedDevice
          : devices
          ? devices[0]?.deviceId
          : 'Default - ...'
      }
      onSelect={(deviceId) => speaker.select(deviceId)}
      icon={<VolumeUp width={20} height={20} color="var(--meet-black)" />}
      disabled={disabled}
      className={className}
      dark={dark}
    />
  );
};
In the code above:
We defined a generic component,
DeviceSelectorthat renders a dropdown for selecting devices.We then utilized the
DeviceSelectorand Stream SDK's call state hooks to manage device states and interactions for specific components:AudioInputDeviceSelector: Allows the user to select a microphone.VideoInputDeviceSelector: Allows the user to select a camera.AudioOutputDeviceSelector: Allows the user to select a speaker if supported.
Finally, let's put everything together in our meeting preview component.
In the components folder, create a MeetingPreview.tsx file with the following code:
import { useEffect, useState } from 'react';
import {
  VideoPreview,
  useCallStateHooks,
  useConnectedUser,
} from '@stream-io/video-react-sdk';

import {
  AudioInputDeviceSelector,
  AudioOutputDeviceSelector,
  VideoInputDeviceSelector,
} from './DeviceSelector';
import IconButton from './IconButton';
import MoreVert from './icons/MoreVert';
import Mic from './icons/Mic';
import MicOff from './icons/MicOff';
import SpeechIndicator from './SpeechIndicator';
import Videocam from './icons/Videocam';
import VideocamOff from './icons/VideocamOff';
import VisualEffects from './icons/VisualEffects';
import useSoundDetected from '../hooks/useSoundDetected';

const MeetingPreview = () => {
  const user = useConnectedUser();
  const soundDetected = useSoundDetected();
  const [videoPreviewText, setVideoPreviewText] = useState('');
  const [displaySelectors, setDisplaySelectors] = useState(false);
  const [devicesEnabled, setDevicesEnabled] = useState(false);
  const { useCameraState, useMicrophoneState } = useCallStateHooks();
  const {
    camera,
    optimisticIsMute: isCameraMute,
    hasBrowserPermission: hasCameraPermission,
  } = useCameraState();
  const {
    microphone,
    optimisticIsMute: isMicrophoneMute,
    hasBrowserPermission: hasMicrophonePermission,
    status: microphoneStatus,
  } = useMicrophoneState();

  useEffect(() => {
    const enableMicAndCam = async () => {
      try {
        await camera.enable();
      } catch (error) {
        console.error(error);
      }
      try {
        await microphone.enable();
      } catch (error) {
        console.error(error);
      }
      setDevicesEnabled(true);
    };

    enableMicAndCam();
  }, [camera, microphone]);

  useEffect(() => {
    if (hasMicrophonePermission === undefined) return;
    if (
      (hasMicrophonePermission && microphoneStatus) ||
      !hasMicrophonePermission
    ) {
      setDisplaySelectors(true);
    }
  }, [microphoneStatus, hasMicrophonePermission]);

  const toggleCamera = async () => {
    try {
      setVideoPreviewText((prev) =>
        prev === '' || prev === 'Camera is off'
          ? 'Camera is starting'
          : 'Camera is off'
      );
      await camera.toggle();
      setVideoPreviewText((prev) =>
        prev === 'Camera is off'? 'Camera is starting ': 'Camera is off'
      );
    } catch (error) {
      console.error(error);
    }
  };

  const toggleMicrophone = async () => {
    try {
      await microphone.toggle();
    } catch (error) {
      console.error(error);
    }
  };

  return (
    <div className="w-full max-w-3xl lg:pr-2 lg:mt-8">
      <div className="relative w-full rounded-lg max-w-185 aspect-video mx-auto shadow-md">
        {/* Background */}
        <div className="absolute z-0 left-0 w-full h-full rounded-lg bg-meet-black" />
        {/* Gradient overlay */}
        <div className="absolute z-2 bg-gradient-overlay left-0 w-full h-full rounded-lg" />
        {/* Video preview */}
        <div className="absolute w-full h-full [&>div]:w-auto [&>div]:h-auto z-1 flex items-center justify-center rounded-lg overflow-hidden [&_video]:-scale-x-100">
          <VideoPreview
            DisabledVideoPreview={() => DisabledVideoPreview(videoPreviewText)}
          />
        </div>
        {devicesEnabled && (
          <div className="z-3 absolute bottom-4 left-1/2 -ml-17 flex items-center gap-6">
            {/* Microphone control */}
            <IconButton
              icon={isMicrophoneMute ? <MicOff /> : <Mic />}
              title={
                isMicrophoneMute ? 'Turn on microphone': 'Turn off microphone'
              }
              onClick={toggleMicrophone}
              active={isMicrophoneMute}
              alert={!hasMicrophonePermission}
              variant= "secondary"
            />
            {/* Camera control */}
            <IconButton
              icon={isCameraMute ? <VideocamOff /> : <Videocam />}
              title={isCameraMute ? 'Turn on camera' : 'Turn off camera'}
              onClick={toggleCamera}
              active={isCameraMute}
              alert={!hasCameraPermission}
              variant="secondary"
            />
          </div>
        )}
        {/* Speech Indicator */}
        {microphoneStatus && microphoneStatus === 'enabled' && (
          <div className="z-2 absolute bottom-3.5 left-3.5 w-6.5 h-6.5 flex items-center justify-center bg-primary rounded-full">
            <SpeechIndicator isSpeaking={soundDetected} />
          </div>
        )}
        {/* User name */}
        {devicesEnabled && hasCameraPermission && (
          <div className="z-3 max-w-94 h-8 absolute left-0 top-3 mt-1.5 mb-1 mx-4 truncate text-white text-sm font-medium leading-5 flex items-center justify-start cursor-default select-none">
            {user?.name}
          </div>
        )}
        {devicesEnabled && (
          <>
            <div className="z-2 absolute top-2.5 right-1 [&>button]:w-12 [&>button]:h-12 [&>button]:border-none [&>button]:transition-none [&>button]:hover:bg-[rgba(255,255,255,.2)] [&>button]:hover:shadow-none">
              <IconButton
                title= "More options"
                icon={<MoreVert />}
                variant= "secondary"
              />
            </div>
            <div className="z-3 absolute bottom-4 right-2.5">
              <IconButton
                icon={<VisualEffects />}
                title= "Apply visual effects"
                variant= "secondary"
              />
            </div>
          </>
        )}
      </div>
      <div className="hidden lg:flex h-17 items-center gap-1 mt-4 ml-2">
        {displaySelectors && (
          <>
            <AudioInputDeviceSelector disabled={!hasMicrophonePermission} />
            <AudioOutputDeviceSelector disabled={!hasMicrophonePermission} />
            <VideoInputDeviceSelector disabled={!hasCameraPermission} />
          </>
        )}
      </div>
    </div>
  );
};

export const DisabledVideoPreview = (videoPreviewText: string) => {
  return (
    <div className="text-2xl font-roboto text-white">{videoPreviewText}</div>
  );
};

export default MeetingPreview;
From the code above:
When the component mounts, we enable the user's mic and cam to begin the preview.
We use Stream's
VideoPreviewcomponent to preview the user's video with a gradient overlay and add a background when no preview is available.The component also displays the
SpeechIndicatorwhen the user is speaking (usinguseSoundDetected), shows the user's name if available, and includes UI controls for additional options like applying visual effects.We use
useCallStateHooksto enable users to toggle their camera and microphone and check for device permissions.We display the device selectors so users can select their input/output devices for the call.
Building the Call Participants UI
To display the participants in a call, we'll update our existing Avatar component to handle more participant types. This change is necessary because participants can come from different sources and have slightly different structures, and we need our component to be flexible enough to display any participant correctly.
Open the Avatar.tsx file in the components directory and update it as follows:
import { useMemo } from 'react';
import {
  CallParticipantResponse,
  StreamVideoParticipant,
} from '@stream-io/video-react-sdk';
import clsx from 'clsx';
import Image from 'next/image';

import useUserColor from '../hooks/useUserColor';

interface AvatarProps {
  width?: number;
  text?: string;
  participant?: StreamVideoParticipant | CallParticipantResponse | {};
}

export const avatarClassName = 'avatar';
const IMAGE_SIZE = 160;

const Avatar = ({ text = '', width, participant = {} }: AvatarProps) => {
  const color = useUserColor();

  const name = useMemo(() => {
    if ((participant as CallParticipantResponse)?.user) {
      return (
        (participant as CallParticipantResponse).user.name ||
        (participant as CallParticipantResponse).user.id
      );
    }
    return (
      (participant as StreamVideoParticipant).name ||
      (participant as StreamVideoParticipant).userId
    );
  }, [participant]);

  const randomColor = useMemo(() => {
    if (text) return color('Anonymous');

    return color(name);
  }, [color, name, text]);

  const image = useMemo(() => {
    if ((participant as CallParticipantResponse)?.user) {
      return (participant as CallParticipantResponse).user?.image;
    }
    return (participant as StreamVideoParticipant)?.image;
  }, [participant]);

  if (image)
    return (
       ...
    );

  return (
    ...
  );
};

export default Avatar;
In the updated Avatar component, we handle multiple participant types by checking the properties of the participant object. We use conditional logic to determine whether the participant has a user property (indicating it's a CallParticipantResponse) or properties like name and image (indicating it's a StreamVideoParticipant).
Next, we'll create the CallParticipants component to display a list of participants in the call using the updated Avatar component.
Create a file named CallParticipants.tsx in the components directory and add the following code:
import { CallParticipantResponse } from '@stream-io/video-react-sdk';

import Avatar from './Avatar';

interface CallParticipantsProps {
  participants: CallParticipantResponse[];
}

const AVATAR_SIZE = 24;

const CallParticipants = ({ participants }: CallParticipantsProps) => {
  const getText = () => {
    if (participants.length === 1) {
      return `${
        participants[0].user.name || participants[0].user.id
      } is in this call`;
    } else {
      // if there are more than 4 then "x, y, z and n - 3 more are in this call"
      // if there are 4 or less then "x ... and y are in this call"
      return (
        participants
          .slice(0, 3)
          .map((p) => p.user.name || p.user.id)
          .join(', ') +
        (participants.length > 4
          ? ` and ${participants.length - 3} more`
          : participants.length === 4
          ? ` and ${participants[3].user.name || participants[3].user.id}`
          : '') +
        'are in this call'
      );
    }
  };

  return (
    <div className="flex flex-col items-center justify-center gap-2">
      <div className="flex items-center justify-center gap-2">
        {participants.slice(0, 3).map((p) => (
          <Avatar participant={p} width={AVATAR_SIZE} key={p.user_session_id} />
        ))}
        {participants.length === 4 && (
          <Avatar participant={participants[3]} width={AVATAR_SIZE} />
        )}
        {participants.length > 4 && (
          <Avatar text={`+${participants.length - 3}`} width={AVATAR_SIZE} />
        )}
      </div>
      <span>{getText()}</span>
    </div>
  );
};

export default CallParticipants;
The CallParticipants component uses the Avatar component to display a list of participants. It formats the participant names and handles cases with many participants by summarizing the additional participants. This feature helps users quickly see who is on the call.
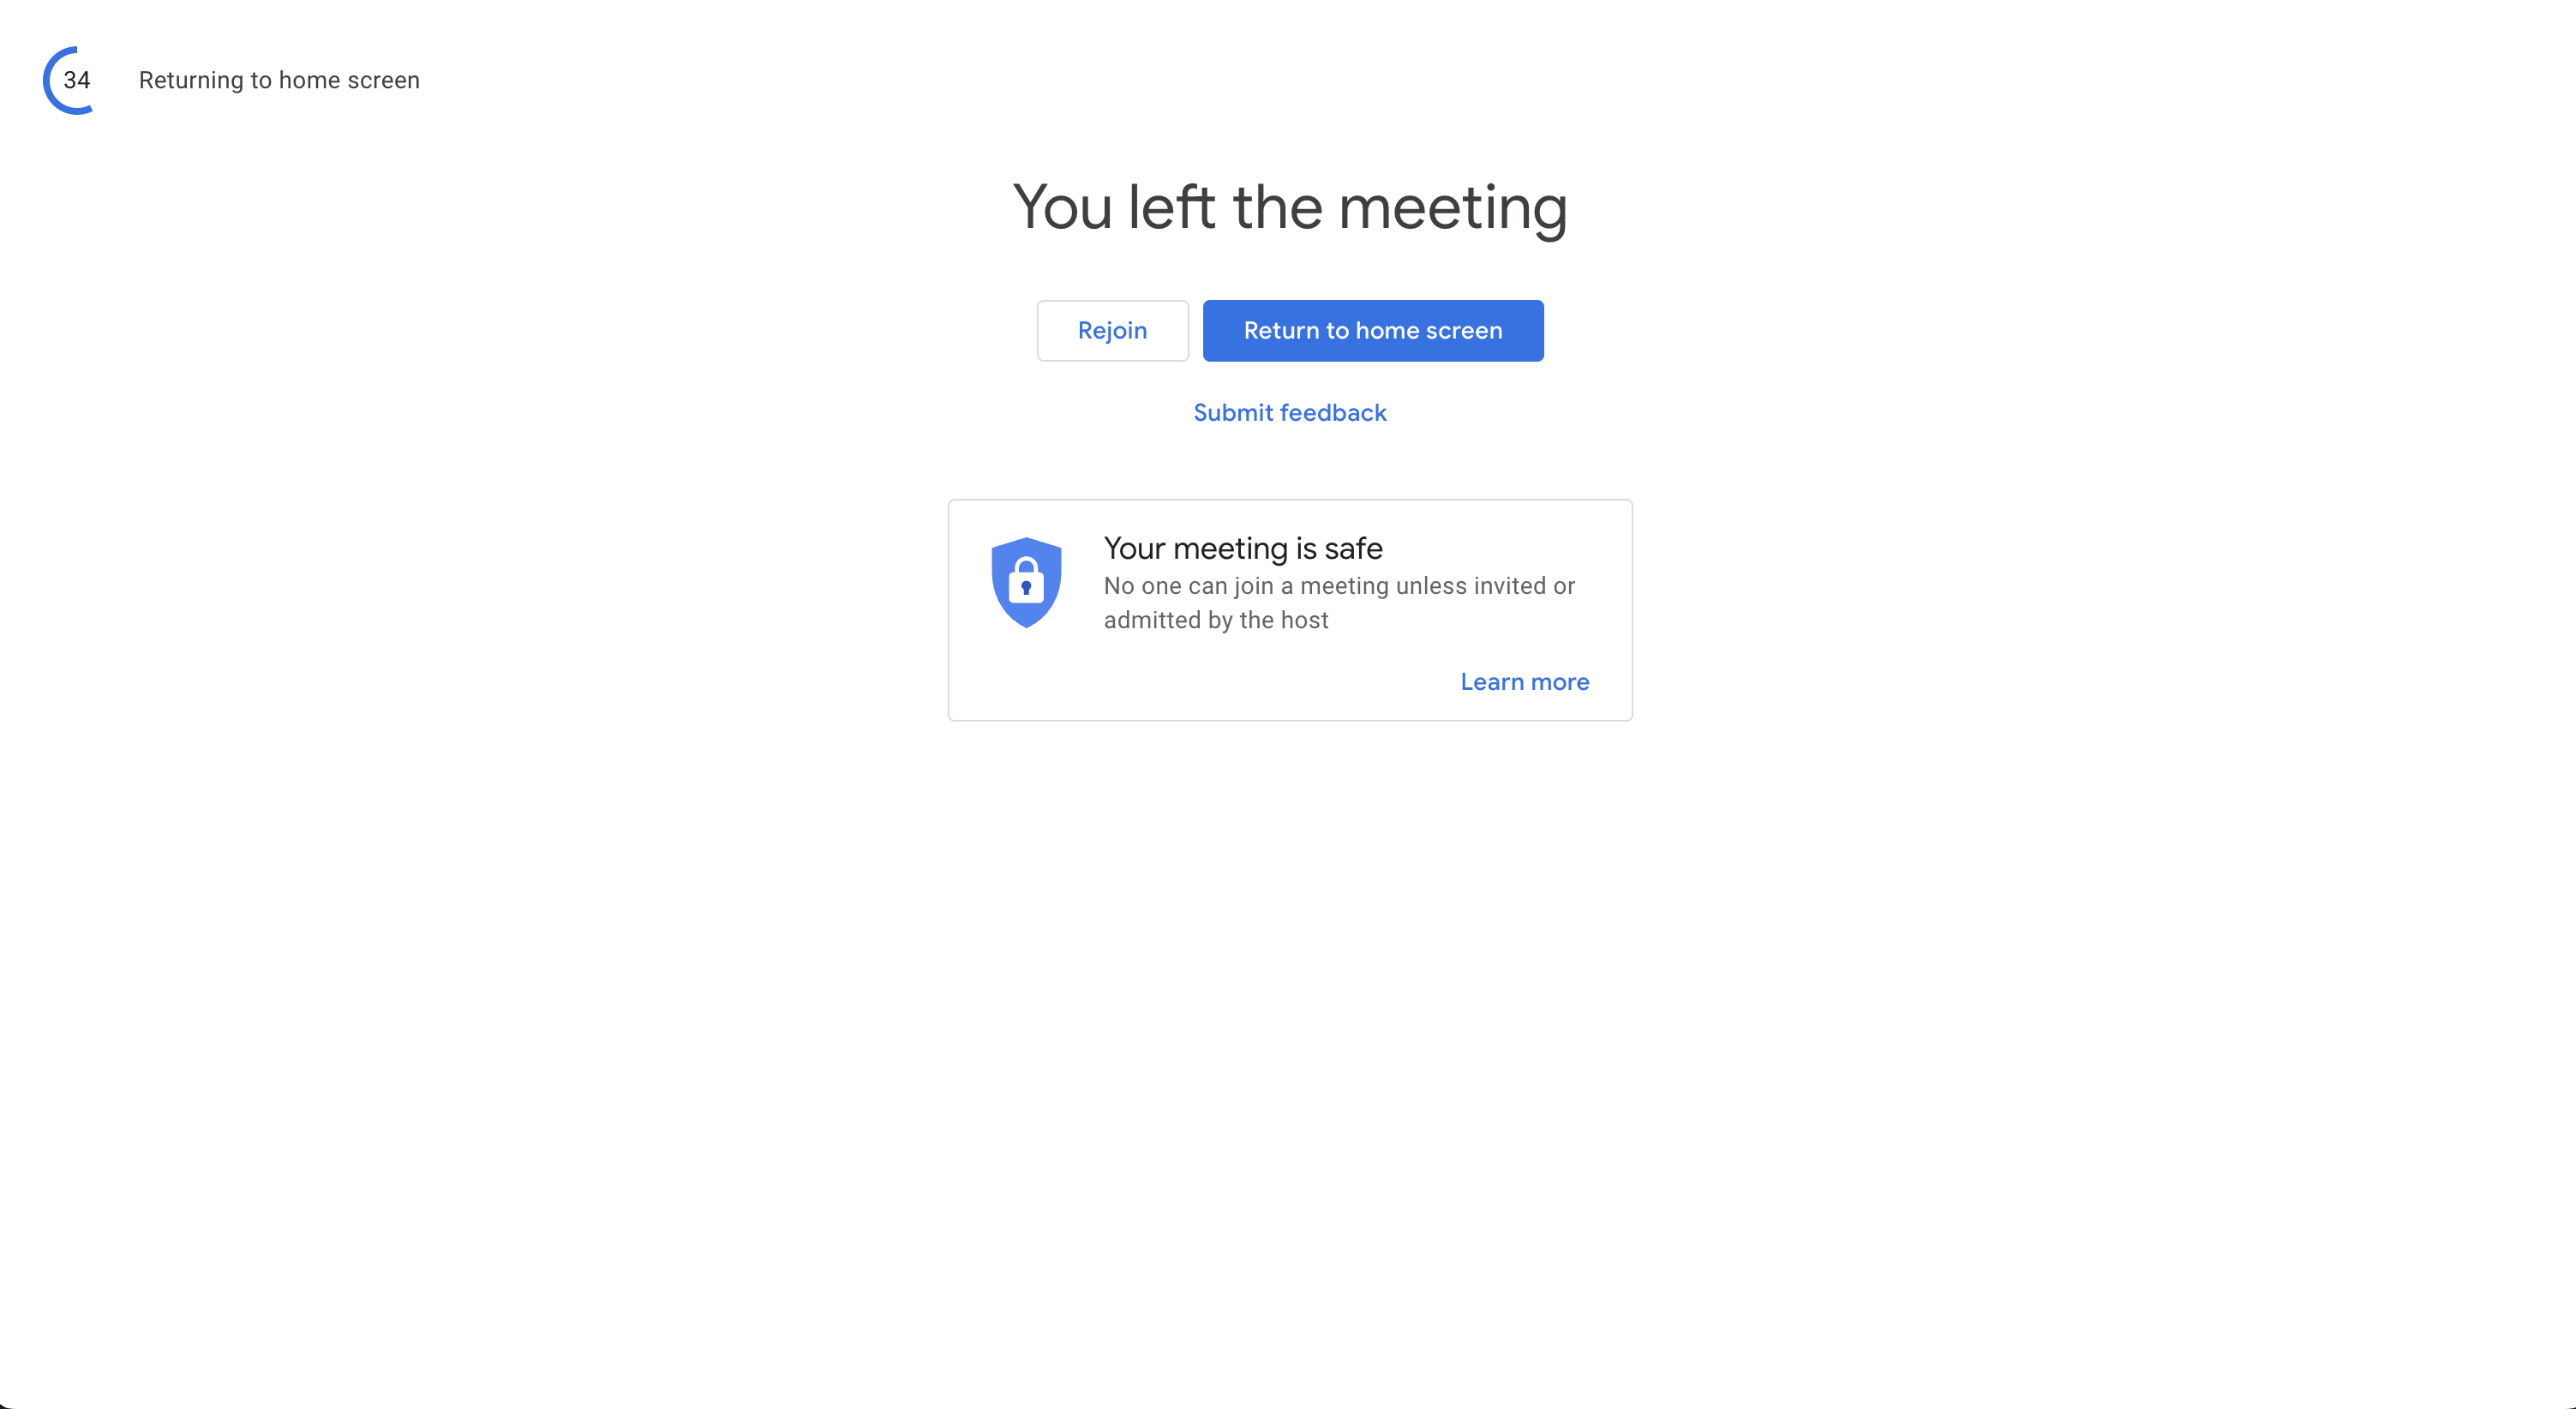
Building the Meeting End Page
We'll also create a meeting end page to inform users when a meeting has ended or if they've entered an invalid meeting ID.
Create a meeting-end folder in the [meetingId] directory and add a page.tsx file with the following code:
'use client';
import { useEffect, useRef, useState } from 'react';
import Image from 'next/image';
import { useRouter } from 'next/navigation';
import { CallingState, useCallStateHooks } from '@stream-io/video-react-sdk';

import Button from '@/components/Button';
import PlainButton from '@/components/PlainButton';

interface MeetingEndProps {
  params: {
    meetingId: string;
  };
  searchParams?: {
    invalid: string;
  };
}

const MeetingEnd = ({ params, searchParams }: MeetingEndProps) => {
  const { meetingId } = params;
  const router = useRouter();
  const { useCallCallingState } = useCallStateHooks();
  const callingState = useCallCallingState();
  const audioRef = useRef<HTMLAudioElement>(null);
  const [countdownNumber, setCountdownNumber] = useState(60);
  const invalidMeeting = searchParams?.invalid === 'true';

  useEffect(() => {
    if (!invalidMeeting && callingState !== CallingState.LEFT) {
      router.push(`/`);
    }
    audioRef.current?.play();
    setCountdownNumber(59);

    const interval = setInterval(() => {
      setCountdownNumber((prev) => (prev ? prev - 1 : 0));
    }, 1000);

    return () => clearInterval(interval);
  }, []);

  useEffect(() => {
    if (countdownNumber === 0) {
      returnHome();
    }
  }, [countdownNumber]);

  const rejoinMeeting = () => {
    router.push(`/${meetingId}`);
  };

  const returnHome = () => {
    router.push('/');
  };

  if (!invalidMeeting && callingState !== CallingState.LEFT) return null;

  return (
    <div className="w-full">
      <div className="m-5 h-14 flex items-center justify-start gap-2">
        <div className="relative w-14 h-14 p-2 flex items-center justify-center text-center">
          <div className="text-meet-black font-normal text-sm font-roboto select-none">
            {countdownNumber}
          </div>
          <svg
            style={{
              transform: 'rotateY(-180deg) rotateZ(-90deg)',
            }}
            className="absolute -top-[32px] -right-[12px] w-[100px] h-[100px]"
          >
            <circle
              r= "18"
              cx= "40"
              cy= "40"
              strokeDasharray={113}
              strokeDashoffset={0}
              strokeWidth={4}
              stroke="var(--primary)"
              fill= "none"
              className="animate-countdown"
            ></circle>
          </svg>
        </div>
        <span className= "font-roboto text-sm tracking-loosest">
          Returning to home screen
        </span>
      </div>
      <div className="mt-6 px-4 flex flex-col items-center gap-8">
        <h1 className="text-4xl leading-[2.75rem] font-normal text-dark-gray tracking-normal">
          {invalidMeeting ? 'Check your meeting code': 'You left the meeting'}
        </h1>
        {invalidMeeting && (
          <div className="font-roboto text-base text-meet-gray text-center">
            <p>
              Make sure you entered the correct meeting code in the URL, for
              example:{' '}
            </p>
            <p>
              https://{window.location.host}/
              <span className="font-extrabold">xxx-yyyy-zzz</span>
              <a href="#" className="ml-2 text-primary">
                Learn more
              </a>
            </p>
          </div>
        )}
        <div className="flex flex-col items-center justify-center gap-3">
          <div className="flex items-center justify-center gap-2">
            {!invalidMeeting && (
              <PlainButton
                size= "sm"
                className="border border-hairline-gray px-[23px] shadow-[border_.28s_cubic-bezier(.4,0,.2,1),box-shadow_.28s_cubic-bezier(.4,0,.2,1)]"
                onClick={rejoinMeeting}
              >
                Rejoin
              </PlainButton>
            )}
            <Button size="sm" onClick={returnHome}>
              Return to home screen
            </Button>
          </div>
          <PlainButton size="sm">Submit feedback</PlainButton>
        </div>
        <div className="max-w-100 flex flex-wrap flex-col rounded items-center pl-4 pr-3 pt-4 pb-1 border border-hairline-gray text-left">
          <div className=" flex items-center">
            <Image
              alt= "Your meeting is safe"
              width={58}
              height={58}
              src="https://www.gstatic.com/meet/security_shield_356739b7c38934eec8fb0c8e93de8543.svg"
            />
            <div className="pl-4">
              <h2 className="text-meet-black text-lg leading-6 tracking-normal font-normal">
                Your meeting is safe
              </h2>
              <div className="font-roboto text-sm text-meet-gray tracking-loosest">
                No one can join a meeting unless invited or admitted by the host
              </div>
            </div>
          </div>
          <div className= "pt-2 w-full flex grow justify-end whitespace-nowrap">
            <PlainButton size="sm">Learn more</PlainButton>
          </div>
        </div>
      </div>
      <audio
        ref={audioRef}
        src="https://www.gstatic.com/meet/sounds/leave_call_bfab46cf473a2e5d474c1b71ccf843a1.ogg"
      />
    </div>
  );
};

export default MeetingEnd;
In this component, we display a message indicating the meeting has ended. It includes a countdown timer that redirects users back to the home page after a certain period.
We also provide buttons to rejoin the meeting or return to the home screen, along with an audio cue to signal that the meeting has ended.
Putting it all Together
Finally, we'll assemble these components on the lobby page.
Create a file named page.tsx inside the app/[meetingId] directory and add the following code:
'use client';
import { useContext, useEffect, useMemo, useState } from 'react';
import { useRouter } from 'next/navigation';
import {
  CallingState,
  CallParticipantResponse,
  ErrorFromResponse,
  GetCallResponse,
  useCall,
  useCallStateHooks,
  useConnectedUser,
} from '@stream-io/video-react-sdk';
import { useChatContext } from 'stream-chat-react';
import { useUser } from '@clerk/nextjs';

import { AppContext, MEETING_ID_REGEX } from '@/contexts/AppProvider';
import { GUEST_ID, tokenProvider } from '@/contexts/MeetProvider';
import Button from '@/components/Button';
import CallParticipants from '@/components/CallParticipants';
import Header from '@/components/Header';
import MeetingPreview from '@/components/MeetingPreview';
import Spinner from '@/components/Spinner';
import TextField from '@/components/TextField';

interface LobbyProps {
  params: {
    meetingId: string;
  };
}

const Lobby = ({ params }: LobbyProps) => {
  const { meetingId } = params;
  const validMeetingId = MEETING_ID_REGEX.test(meetingId);
  const { newMeeting, setNewMeeting } = useContext(AppContext);
  const { client: chatClient } = useChatContext();
  const { isSignedIn } = useUser();
  const router = useRouter();
  const connectedUser = useConnectedUser();
  const call = useCall();
  const { useCallCallingState } = useCallStateHooks();
  const callingState = useCallCallingState();
  const [guestName, setGuestName] = useState('');
  const [errorFetchingMeeting, setErrorFetchingMeeting] = useState(false);
  const [loading, setLoading] = useState(true);
  const [joining, setJoining] = useState(false);
  const [participants, setParticipants] = useState<CallParticipantResponse[]>(
    []
  );
  const isGuest = !isSignedIn;

  useEffect(() => {
    const leavePreviousCall = async () => {
      if (callingState === CallingState.JOINED) {
        await call?.leave();
      }
    };

    const getCurrentCall = async () => {
      try {
        const callData = await call?.get();
        setParticipants(callData?.call?.session?.participants || []);
      } catch (e) {
        const err = e as ErrorFromResponse<GetCallResponse>;
        console.error(err.message);
        setErrorFetchingMeeting(true);
      }
      setLoading(false);
    };

    const createCall = async () => {
      await call?.create({
        data: {
          members: [
            {
              user_id: connectedUser?.id!,
              role: 'host',
            },
          ],
        },
      });
      setLoading(false);
    };

    if (!joining && validMeetingId) {
      leavePreviousCall();
      if (!connectedUser) return;
      if (newMeeting) {
        createCall();
      } else {
        getCurrentCall();
      }
    }
  }, [call, callingState, connectedUser, joining, newMeeting, validMeetingId]);

  useEffect(() => {
    setNewMeeting(newMeeting);

    return () => {
      setNewMeeting(false);
    };
  }, [newMeeting, setNewMeeting]);

  const heading = useMemo(() => {
    if (loading) return 'Getting ready...';
    return isGuest ? "What's your name?": 'Ready to join?';
  }, [loading, isGuest]);

  const participantsUI = useMemo(() => {
    switch (true) {
      case loading:
        return "You'll be able to join in just a moment";
      case joining:
        return "You'll join the call in just a moment";
      case participants.length === 0:
        return 'No one else is here';
      case participants.length > 0:
        return <CallParticipants participants={participants} />;
      default:
        return null;
    }
  }, [loading, joining, participants]);

  const updateGuestName = async () => {
    try {
      await fetch('/api/user', {
        method: 'POST',
        headers: {
          'Content-Type': 'application/json',
        },
        body: JSON.stringify({
          user: { id: connectedUser?.id, name: guestName },
        }),
      });
      await chatClient.disconnectUser();
      await chatClient.connectUser(
        {
          id: GUEST_ID,
          type: 'guest',
          name: guestName,
        },
        tokenProvider
      );
    } catch (error) {
      console.error(error);
    }
  };

  const joinCall = async () => {
    setJoining(true);
    if (isGuest) {
      await updateGuestName();
    }
    if (callingState !== CallingState.JOINED) {
      await call?.join();
    }
    router.push(`/${meetingId}/meeting`);
  };

  if (!validMeetingId)
    return (
      <div>
        <Header />
        <div className="w-full h-full flex flex-col items-center justify-center mt-[6.75rem]">
          <h1 className="text-4xl leading-[2.75rem] font-normal text-dark-gray tracking-normal mb-12">
            Invalid video call name.
          </h1>
          <Button size="sm" onClick={() => router.push('/')}>
            Return to home screen
          </Button>
        </div>
      </div>
    );

  if (errorFetchingMeeting) {
    router.push(`/${meetingId}/meeting-end?invalid=true`);
  }

  return (
    <div>
      <Header navItems={false} />
      <main className="lg:h-[calc(100svh-80px)] p-4 mt-3 flex flex-col lg:flex-row items-center justify-center gap-8 lg:gap-0">
        <MeetingPreview />
        <div className="flex flex-col items-center lg:justify-center gap-4 grow-0 shrink-0 basis-112 h-135 mr-2 lg:mb-13">
          <h2 className="text-black text-3xl text-center truncate">
            {heading}
          </h2>
          {isGuest && !loading && (
            <TextField
              label= "Name"
              name= "name"
              placeholder= "Your name"
              value={guestName}
              onChange={(e) => setGuestName(e.target.value)}
            />
          )}
          <span className="text-meet-black font-medium text-center text-sm cursor-default">
            {participantsUI}
          </span>
          <div>
            {!joining && !loading && (
              <Button
                className="w-60 text-sm"
                onClick={joinCall}
                disabled={isGuest && !guestName}
                rounding= "lg"
              >
                Join now
              </Button>
            )}
            {(joining || loading) && (
              <div className="h-14 pb-2.5">
                <Spinner />
              </div>
            )}
          </div>
        </div>
      </main>
    </div>
  );
};

export default Lobby;
A lot is going on here, so let's break down the essential components:
User Authentication: The code checks whether the user is signed in using Clerk's
useUserhook. If the user is a guest (not signed in), they are prompted to enter their name.State Management: We manage state variables for loading, joining, participant information, and the guest's name.
Meeting Validation: The meeting ID is validated to ensure it's in the correct format before proceeding.
Fetching or Creating Calls: Depending on whether it's a new meeting (using the
newMeetingstate), the code either fetches the existing call data or creates a new call. The code also includes handling participants and setting up the call with the Stream Video SDK.Joining the Call: When the user clicks "Join now", the code handles updating the guest's name (if applicable), joins the call, and navigates the user to the meeting page.
User Interface: The lobby displays the
MeetingPreview, participant information, and provides controls for the user to adjust their settings before joining.
Let's also add the API route for updating the guest's name. Create a new file at app/api/user/route.ts with the following code:
import { StreamClient } from '@stream-io/node-sdk';

const API_KEY = process.env.NEXT_PUBLIC_STREAM_API_KEY!;
const SECRET = process.env.STREAM_API_SECRET!;

export async function POST(request: Request) {
  const client = new StreamClient(API_KEY, SECRET);

  const body = await request.json();

  const user = body?.user;

  if (!user) {
    return Response.error();
  }

  const response = await client.updateUsersPartial({
    users: [
      {
        id: user.id,
        set: {
          name: user.name,
          role: 'user',
        },
      },
    ],
  });

  return Response.json(response);
}
Here, we create a Stream client and use it to update the guest user's name with the updateUsersPartial function.
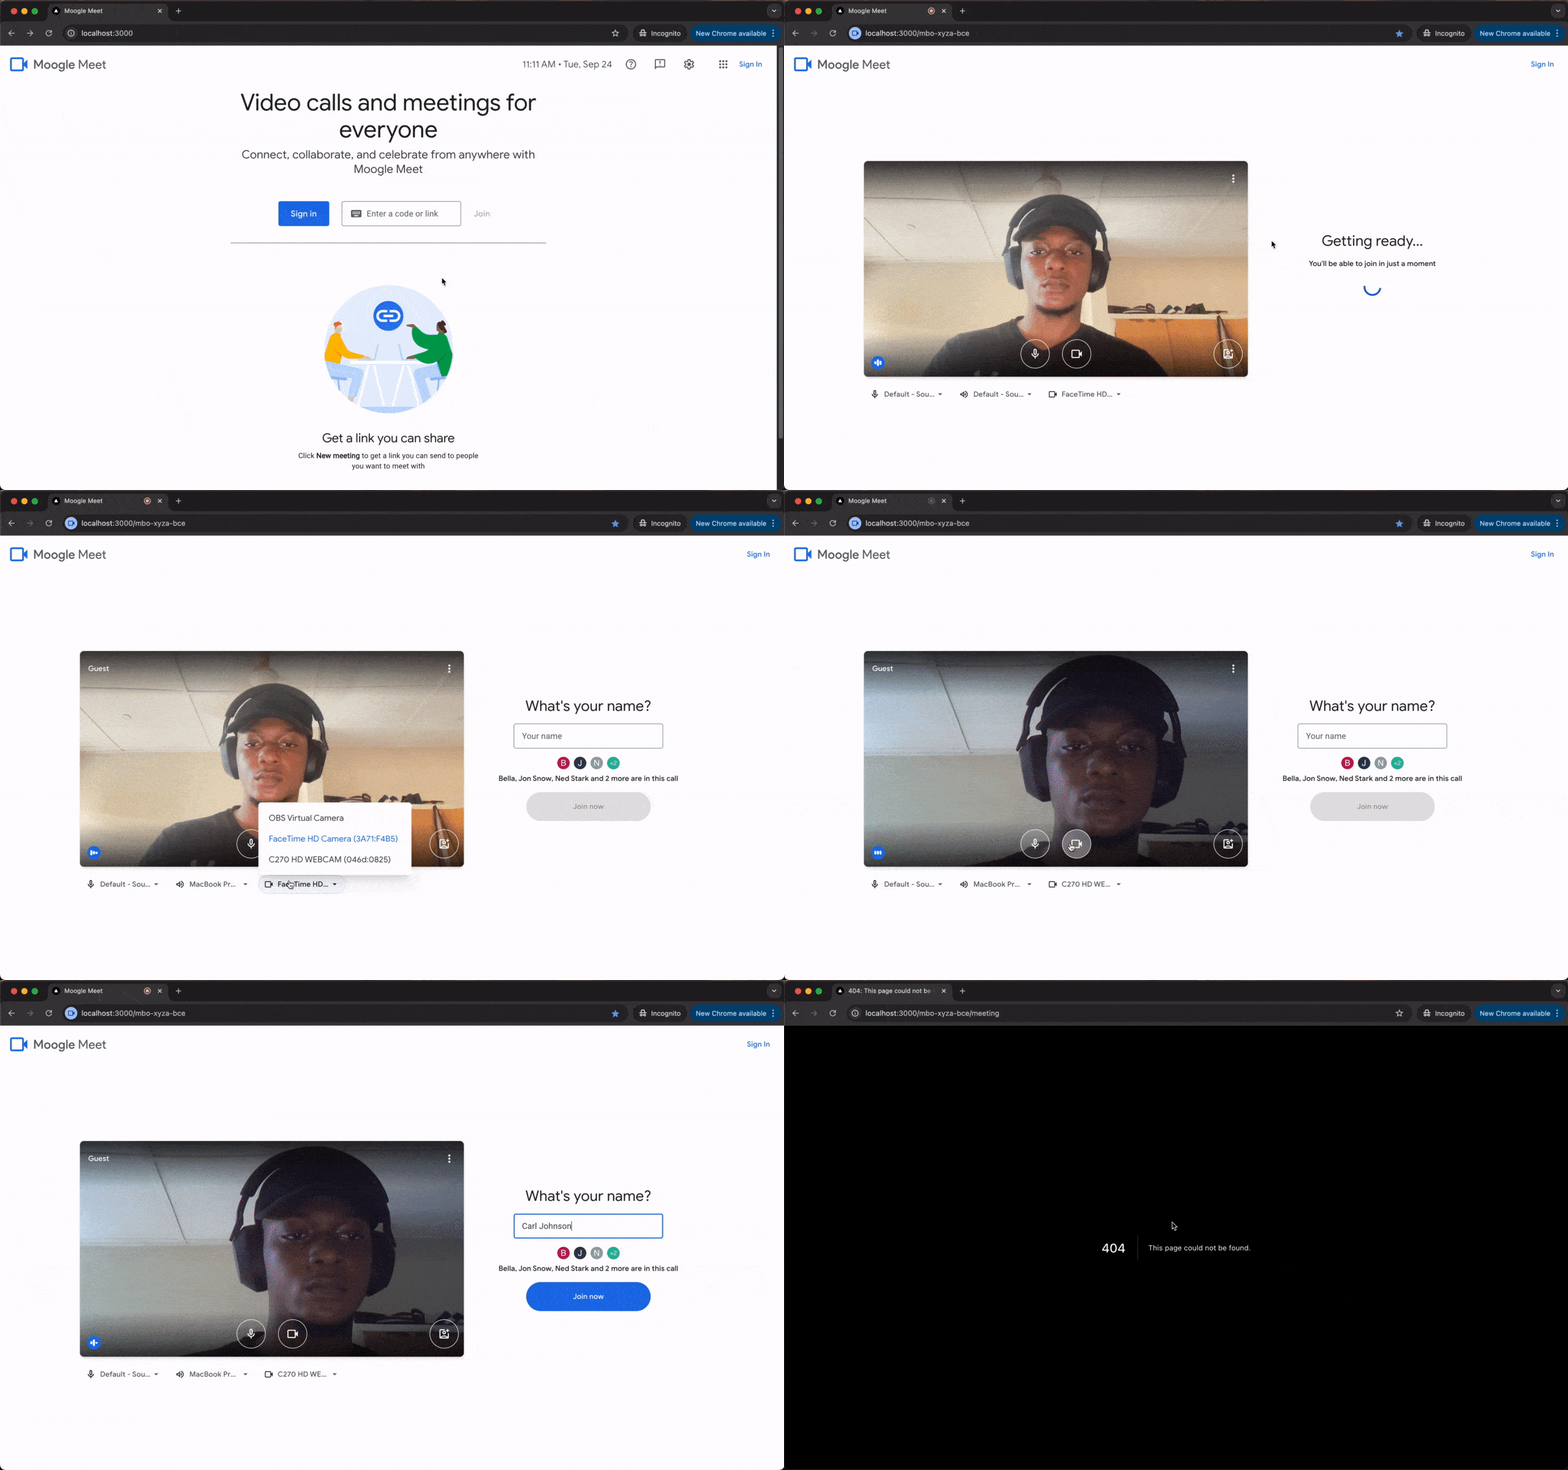
And with that, we've created a fully functional meeting lobby experience!
Note: The meeting route redirects to a 404 page because we haven't created a page for it yet.
Conclusion
In this first part of our series, we have laid the foundation for building a Google Meet clone using Next.js, TailwindCSS, and Stream. We covered the initial setup of the Next.js project, integrated TailwindCSS, and set up authentication with Clerk. We also built the home page and implemented the functionality to create and join meetings.
In the next part, we will build the meeting page and add features like messaging, screen sharing, and recording.
Stay tuned!
Subscribe to my newsletter
Read articles from Oluwabusayo Jacobs directly inside your inbox. Subscribe to the newsletter, and don't miss out.
Written by

Oluwabusayo Jacobs
Oluwabusayo Jacobs
Dev in the Tropics | Software Engineer